TIDRADIO TID TD-9800 User manual

TIDRADIO
TID TD-9800 USER Manual
Version 1.0.01

TERA 3
TID DMR Hand Held Digital
Transceiver
Introduction
The TID DMR Transceiver is a high-performance digital and analog portable unit. Model
TD-9800 VHF provides up to 5 watts of power output on the VHF band (136-174 MHz), and
Model TD-9800 UHF provides up to 4 watts of power output on the UHF band (400-470
MHz). Operating under the DMR (Digital Mobile Radio) protocol and using TDMA (Time
Domain Multiple Access) technology, the TID DMR handheld provides high spectrum
efficiency, along with unparallelled flexibility in configuration for networks using the DMR
TDMA protocol.

• Motorola / Hytera compatibility
• IP67 waterproof
• 1,024 individual channels / 64 Zones
• 800 Talkgroups / frequent individual IDs
• FPP Front Panel Programmable
• MIL-STD810 C / D / E / F / G
• OLED display
• Digital Vocoder AMBE3000+
• Audio output 1.5 watts
• Worldwide Amateur importable receive contact database
• FCC Part 90 certification
To get the most out of your radio, please read this manual before use.
TIDRADIO
Thank you for purchasing TID Model TD-9800 DMR radios. These radios are
built to commercial DMR standards, which ensure worldwide operation and
compatibility.
Some key features include:
TIDRADIO

TERA 5
Radio Antenna Battery Charger
Belt Clip Hand Strap User Manual Adapter
Included In Box
Thank you for choosing the TID DMR radio. Immediately upon receipt of your radio, open the
package and inspect the radio for any signs of shipping damage. Please confirm that all the items
listed below are in the box.
Should there be shipping damage, or if any items are missing, immediately contact the dealer
from whom you purchased the radio to report the issue and get instructions for resolution of the
problem.

The following recommendations will help you understand this radio’s safety requirements.
1.Only qualified TID technicians are allowed to service this two-way radio. Do not
disassemble the radio by yourself as it will void the warranty.
2. Use only the TID brand battery pack and desk charger, so as to not damage the
transceiver.
3. Do not expose this radio to long periods of direct sunlight, or hot or humid areas.
4. Do not put this radio in dusty or dirty locations.
5. Do not use harsh chemicals, cleaning solvents, or strong detergent to clean this radio.
6. Never transmit on this radio without an antenna.
Caution
Safety and operability of this radio can’t be guaranteed unless TID brand accessories or parts
are used.
Safety Matters
TIDRADIO

TERA
Content
Introduction .......................................................... 3
TID Features ........................................................ 4
Included In Box..................................................... 5
Battery Information............................................ 8
Charge Operation................................................. 9
Attaching the Battery......................................... 11
Attaching/Removing the Antenna ................. 12
Installing the Belt Clip & Hand Strap ............. 13
Radio Overview .................................................... 14
Radio Callouts....................................................... 15
Status Indicators.................................................. 16
Turning the Radio ON/OFF................................ 17
Volume Adjustment............................................ 17
Selecting a Channel............................................. 17
Selecting a Zone................................................... 18
Menu Navigation ................................................. 19
Messages............................................................... 20
Contact / Talkgroup ............................................ 22
Receive Group ID ................................................. 24
Scan ......................................................................... 26
Radio Settings ...................................................... 27
Keypad Programming......................................... 28
Editing an Existing Channel.............................. 28
Programming a New Channel ......................... 29
Initial Programming ............................................ 30
Attaching the Programming Cable................. 31
Software Basic Settings .................................... 32
Worldwide Amateur Contact Database........ 33
Software Overview ............................................. 34
Channel Data Entry ............................................. 34
Zone Organization ............................................... 36
Contact Sheet Database Import...................... 37
Programmable Buttons..................................... 41
Monitoring & Screen Saver Function............. 43
Terms of Warranty .............................................. 46
Online Service and Support .............................. 48
General Specifications........................................ 52
7

Battery Information
Please use and charge only a TID approved battery. Attempting to use a different
battery type may result in overheating or explosion of the battery, causing damage to
the radio and the potential for physical injury.
Notes:
1. Do not short-circuit the battery terminals or dispose the battery in fire. Never attempt to
disassemble the battery pack.
2. Charge the battery in 32-105 °F temperature. Otherwise the battery may not fully charge.
3. Turn off the radio before your initial charge. Use of the radio while charging may cause noise
or interfere during reception or transmission.
4. Do not pull/plug the adapter and the battery during charging, to avoid interference with the
charging procedure.
5. NEVER charge the battery or radio with battery if they are wet. Before charging, you should dry
them off with a towel or cloth to avoid danger.
TIDRADIO
TERA 9
Warning:
Conductive metals such as jewelry, keys or decorating lace may result in short circuit
and generate a large quantity of heat when coming in contact with battery electrodes.
Treat any battery carefully especially when placing it into pocket, wallet or other metal
container as it can short out.
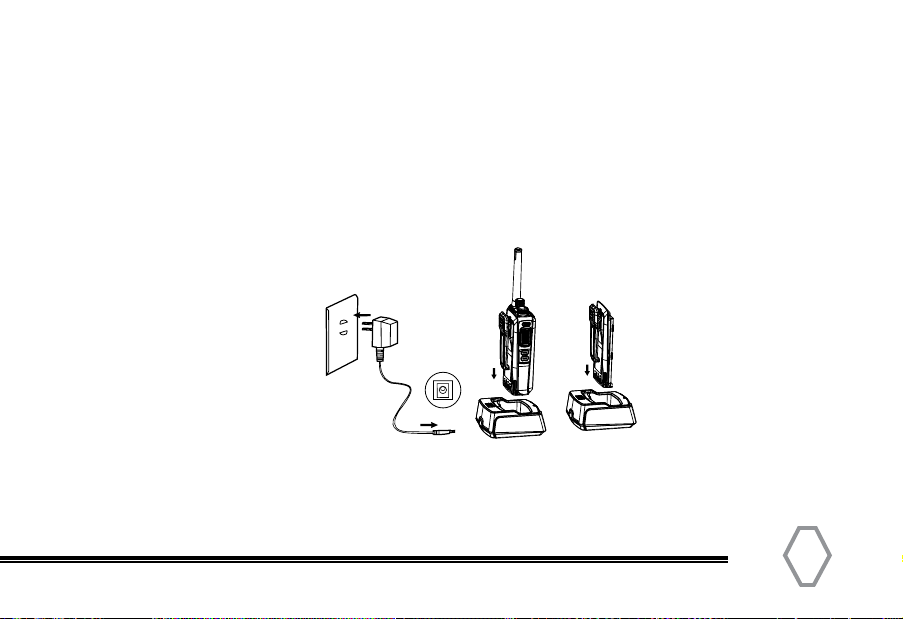
Charge Operation
Please charge as follows:
1. Turn off the radio.
2. Plug the AC connector of adapter into an AC output socket
3. Vertically insert the battery or radio equipped with battery into the charger. Make sure the
charger and battery are well contacted.
4. After the radio and/or battery are inserted into the charger, the LED glows red and that means
the charger is ready for normal charging; if the LED flashes red, it means the remaining battery
power is too low and a trickle charge is in process. After the battery power has reached a
certain amount during trickle charge, the charger automatically turns to normal (fast) charge
mode (solid red colored LED).
5. The battery is fully charged (97%-100%) when LED glows green. The charger stops charging
automatically.
Caution when Charging the Battery
1. The battery is not fully charged from the factory. Please charge the battery before initial use or
after long-period of storage.
2. Repeat charging 2 to 3 times will make the battery reach its best capacity. Please replace or
charge the battery if battery power is low after repeated charges.
Note
Trickle charge is not allowed to exceed 30 minutes. If the LED is still flashing in red after 30
minutes, it means that the charger cannot provide power to the battery. Check if the battery or
charger is damaged.
TIDRADIO
TERA 11
Installation of Accessories
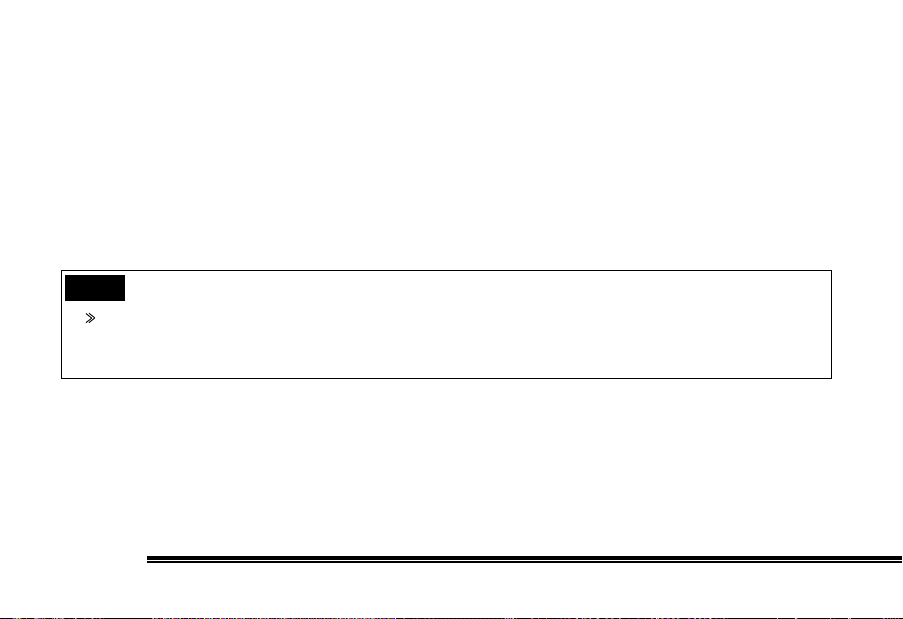
Attaching the Battery
Match the two grooves on the battery with the corresponding grooves on the body of
the radio; be sure that the battery is parallel to the radio body and in full contact with the
aluminum chassis.
Push the battery upward along the guides until it locks.
Push the battery latch toward the “Lock” mark to lock it.
TIP
When storing radio for more then 3 weeks at a time, it is best to remove the TID battery
from radio. This will maintain a full charge in battery so it’s ready for use. Batteries will hold
a charge 6-12 months when removed from radio.
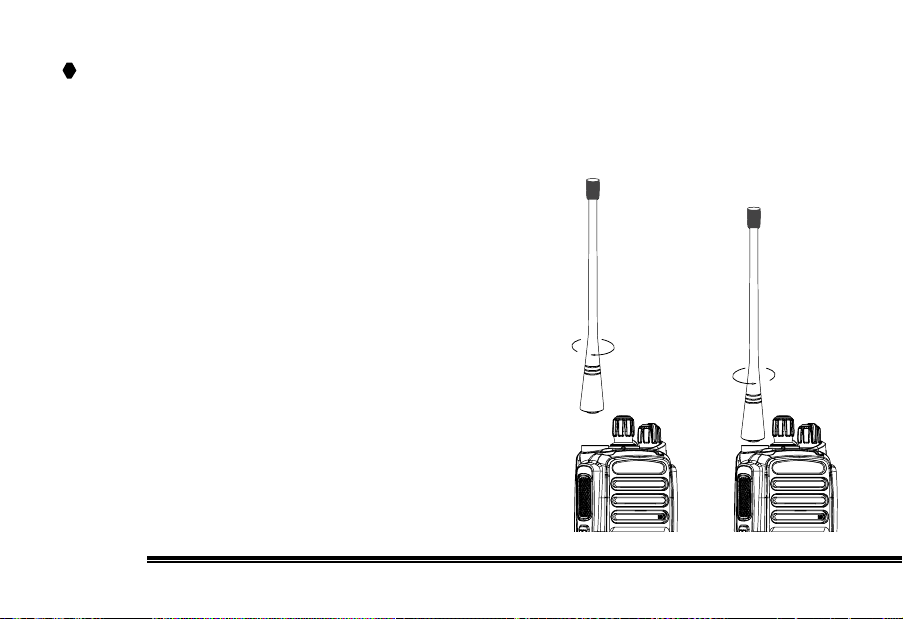
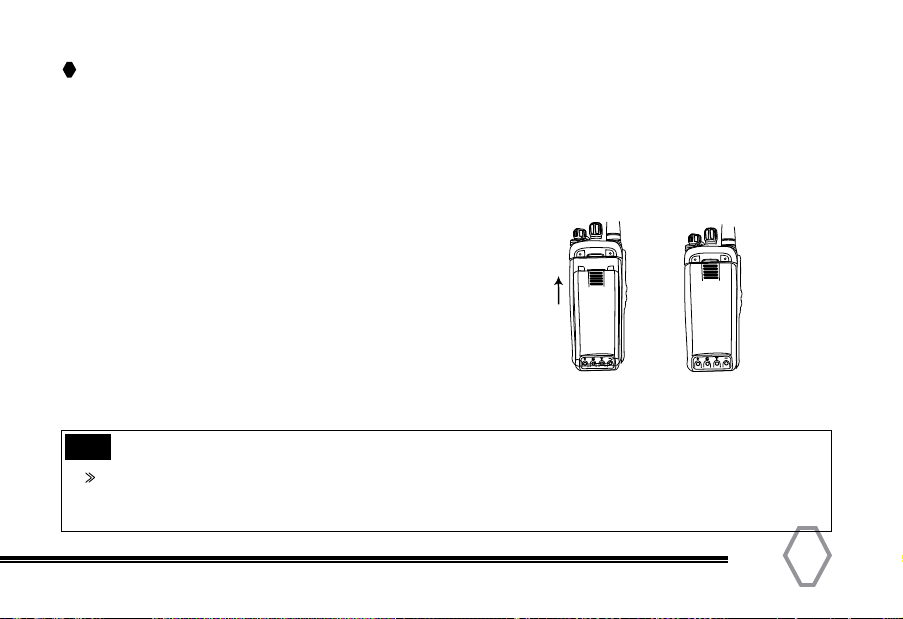
Removing the Antenna
Rotate the antenna counter-clockwise (turning it at its
base) until the antenna is free from the radio.
Attaching/Removing the Antenna
Attaching the Antenna
Insert the antenna into the connector on the radio while holding the antenna at its base.
Rotate the antenna clockwise to secure it to the radio.
T I D T I D
TIDRADIO
TERA 13
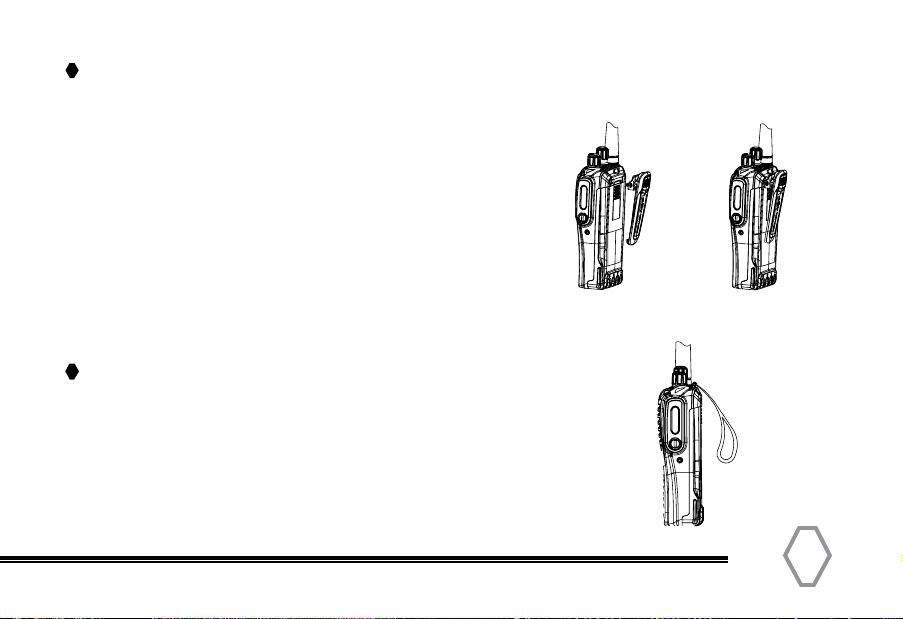
Installing the Hand Strap
Installing the Belt Clip
Installing Belt Clip
Remove screws from rear of radio and align belt clip
over rear holes in case and place belt clip over holes
and replace screws.
Notes:
1. If using a belt clip, please mount the belt clip onto
the back before installing the battery pack.
Thread the strap into the hole at the back of the radio and fasten it.
TERA

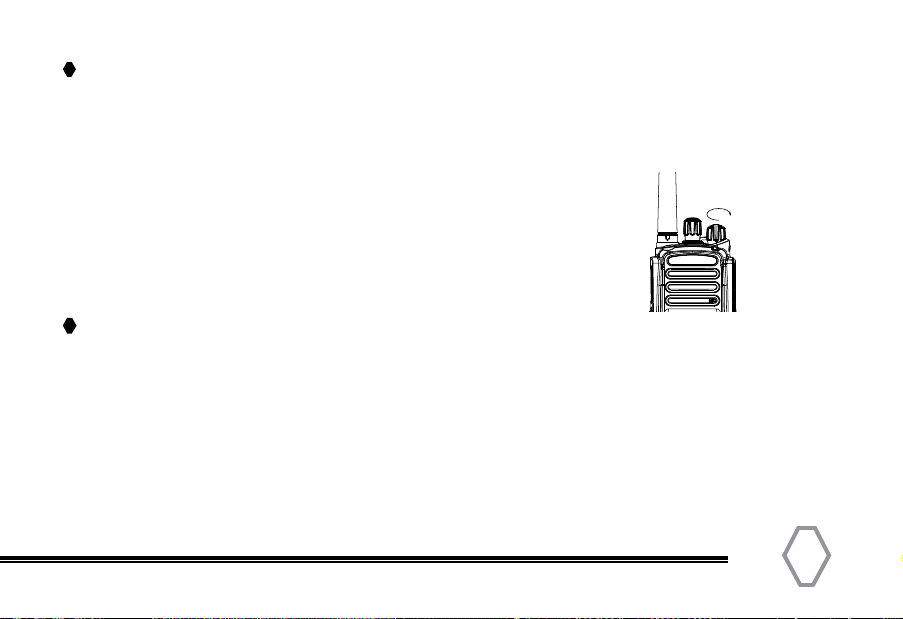
Radio Overview
T I D
TIDRADIO
TIDRADIO

TERA
No. Part Name No. Part Name No. Part Name
1 Top Orange Programmable
Button
7 Speaker 13 Belt Clip
2 Push-To-Talk Button 8 Tricolor LED Indicator 14 Battery
3 Side Key 2 Programmable
Button
9 Antenna 15 OLED display
4 Side Key 1 Programmable
Button
10 Volume Knob 16 Belt Clip Screws
5 Channel Selector Knob 11 Accessory Jack
6 Microphone 12 Battery Latch
15
Radio Callouts
The top LED will help you to identify the current radio status.
LED Indication Status
Flashes Green Powering On
Constant Red Transmitting
Constant Green Receiving
Flashes Orange Scanning
LED Indications
Status Indicators
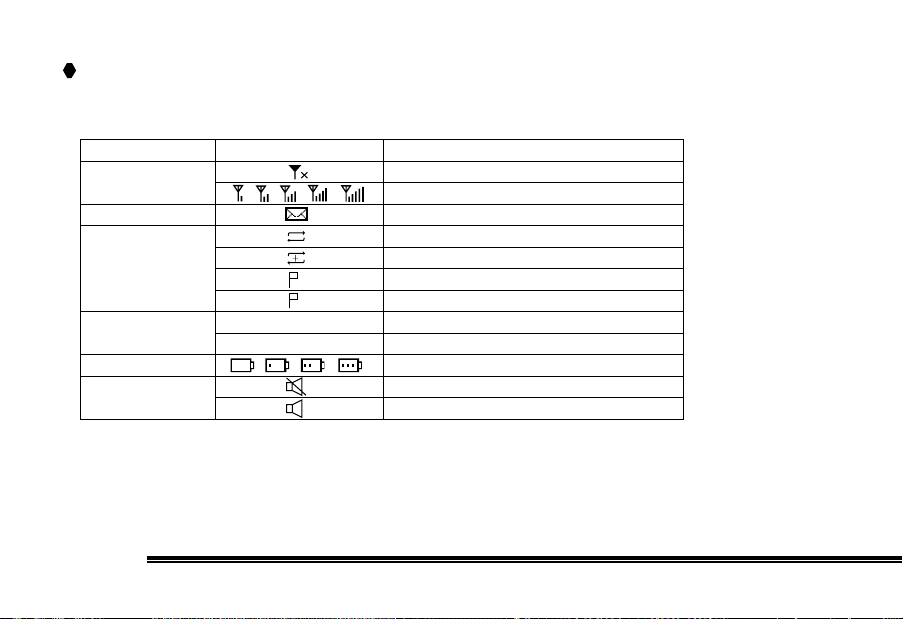
Display Icons
Name Icon Status
RSSI No Signal
More bars indicate a better signal strength
Message Received New / Unread Message
Scan Status Scanning in progress
The scan has paused on a channel (non-priority channel)
The scan has paused on priority channel 1
The scan has paused on priority channel 2
Transmit Power Level Current channel is set to transmit with Low Tx Power
Current channel is set to transmit with High Tx Power
Battery Status More bars indicate more battery power left
Tones Radio Silence Mode is ON
Radio Silence Mode is OFF
1
2
L
H
TIDRADIO
TERA 17
Basic Operations
Turning the Radio ON/OFF
Rotate the radio On-Off/Volume Control knob clockwise to turn ON the radio,
and counter-clockwise to turn OFF.
Volume Adjustment
Rotate the volume control clockwise or counter-clockwise
to adjust the desired volume.
Selecting a Channel
Rotate the “Channel Selector” knob to a desired channel. A channel can either be Analog or Digital.
For the analog channels the Push-To-Talk button is always available, and on the Digital
Channels parameters can be set up by the users / system operators by channel to allow talk
permit. There are three possible settings:
1. Always Allow: The user can transmit all the time.
2. Channel Free: The radio can transmit only if the channel is free.
3. Color Code Free: The radio can transmit only if the channel is free and the color code matches.
T I D

TIDRADIO
Selecting a Zone
A Zone is a group of channels grouped together. The TID DMR radio has 64 Zones. A Zone can
have the maximum of 16 analog and/or digital channels.
Accessing a Zone:
From the Main Menu Screen, scroll up to select Zone, then press OK to enter.
Use the up/down keys to select your desired Zone.
Zone
Settings
Program
Notes
The Top and Side buttons can be programmed via software and they have long and short press
functions.
By default the Top Button is programmed to initiate the Digital Monitor function and the side
buttons are programmed with Zone Up and Zone Down.

TERA 19
Menu Navigation
Contact
Message
Manual
Dial
Call
Logs
Scan
Program
Settings
Zone
Main
Menu
Menu display functions can be
enabled / disabled in software.
H
Local
Santiago

Message
To access this item, press the Menu key in idle mode
and then select “Message,” or press the shortcut key to
get to message directly.
Inbox
Each message function can perform any of these
operations: Reply/Forward/Edit/Delete.
Write
Create a text message up to 150 characters and send
it to an individual user.
Message
Contact
Manual
Dial
Inbox
Write
Outbox
Write
Inbox
Outbox
TIDRADIO

TERA 21
Outbox
The Outbox can save up to 15 sent messages. When
the Outbox is full, the oldest entry will be automatically
deleted. Each message can have these operations:
Resend / Forward / Edit / Delete.
Quick Text
Under this option there are 15 messages that you can
pre-define in software.
Draft Box
The Draft Box can save up to 15 messages. Users can
edit or send the message saved in the Draft Box.
Delete
Can delete messages from Inbox, Outbox, or Draft Box.
Outbox
Inbox
Write
Quick Text
Draft Box
Delete
Draft Box
Quick Text
Delete
Table of contents


