TieJus Bell-J9 User manual
Bell-J9
QUICK START GUIDE
Make your life smarter and safer

Thanks for your shopping and trust.
We have been optimizing our products and improve
our lifetime customer service to offer you a better
shopping experience. If you have any problems,
please feel free to send us an E-mail. We will solve
your problems within 24 hours. In addition, your
advice or suggestions will be much appreciated
and welcomed.
Product Service
Email: [email protected]
Distributor: distributor@tiejus.com
More About Us
Web: www.tiejus.com
Facebook: www.facebook.com/zumimalloffice
Warranty Service

Brand Story
TieJus is a young and fresh security brand that
has attracted millions of technology enthusiasts in
just 6 months of establishment. TieJus is committed
to creating a smarter and easier modern lifestyle
for consumers. Let more consumers enjoy
convenient modern life without worrying about
information security.
At the beginning of 2022, combined with
advanced intelligent AI technology, TieJus launched
the first surveillance camera that combines artificial
intelligence and security system. We believe small
details make a big difference - that's why we
create quality, easy-to-use smart home products.
Choose TieJus - the new security weathervane.

INDEX PAGE
1. What’s in the Box ------------------------P1
2. Meet the Doorbell -----------------------P2
3. Meet the Chime ------------------------P3
4. Download and Install App ----------------P4
5. Account Registration --------------------P5
6. Add Camera to App --------------------P5
6.1 Preparations for Connection ------------P5
6.2 Connect Camera to App --------------P6
7. Charge your doorbell --------------------P8
8. Set up Doorbell -------------------------P9
9. Pair With Your Indoor Chime --------------P10
10. Install Your doorbell ---------------------P12
11. Tamper Alarm -------------------------P14
12. Product Specifications ------------------P15

Doorbell*1 DingDong*1
Quick User Guide*1 USB Cable*1
Screws Set*1 3M Tape*3
AAA Batteries*3 Unlock Pin*1
1. What’s in the Box
NOTE: Micro SD card and power adapter are not included.
1
2
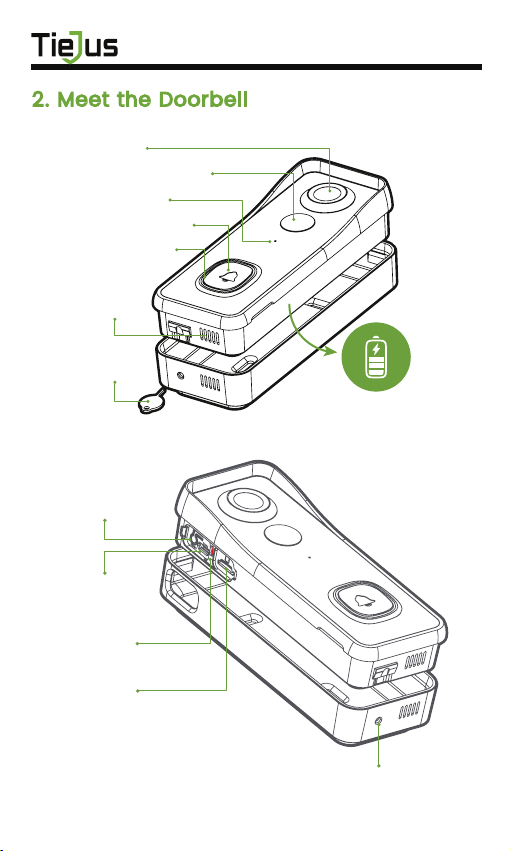
2. Meet the Doorbell
1080P Camera
PIR Motion Sensor
Microphone
Doorbell Button
LED Indicator
Speaker
Unlock Pin
Li-ion Battery
Built-in
Reset Button
Micro USB
Port
Micro-SD
Card Slot
Unlock hole
Charging
Indicator
3
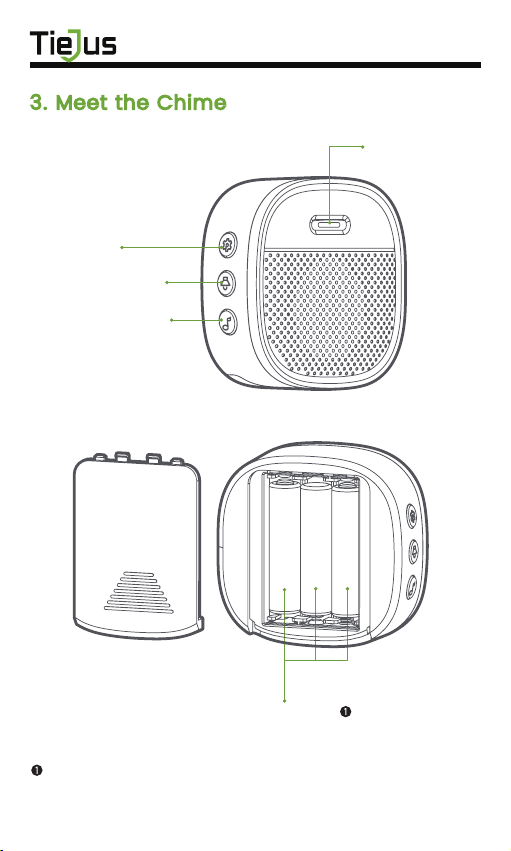
3. Meet the Chime
Please mind the battery polarities when installing.
LED Indicator
Settings
Volume Control
Select Ringtone
AAA Batteries

4
Download ZUMIMALL App from Google Play™ or
App Store™. Or scan the QR codes as below, with your
smart phone.
NOTE: Google Play™ is a trademark of Google Inc.
App Store™ is a service mark of Apple Inc.
NOTE: Please turn on both of the following permissions.
①Allow ZUMIMALL App to access mobile cellular data
and wireless LAN, otherwise it will fail to connect the
camera.
②Allow ZUMIMALL App to receive pushed messages,
otherwise, the phone will not receive alarms when
motion is detected.
4. Download and Install App
ZUMIMALL AndroidiOS
>
>
<
Notifications
ZUMIMALL
ALERTS
Allow Notifications
9:41
Lock Screen
Banner Style
Sounds
Badges
OPTIONS
When Unlocked(Default)
Show Previews
Temporary
>
>
Automatic
Notification Grouping
>
NotificationCenter Banners
5:51
<
ZUMIMALL
Wireless Data
ALLOW”WIRELESS DATA”TO USE DATA
Off
WLAN
WLAN & Cellular Data
5:51
5
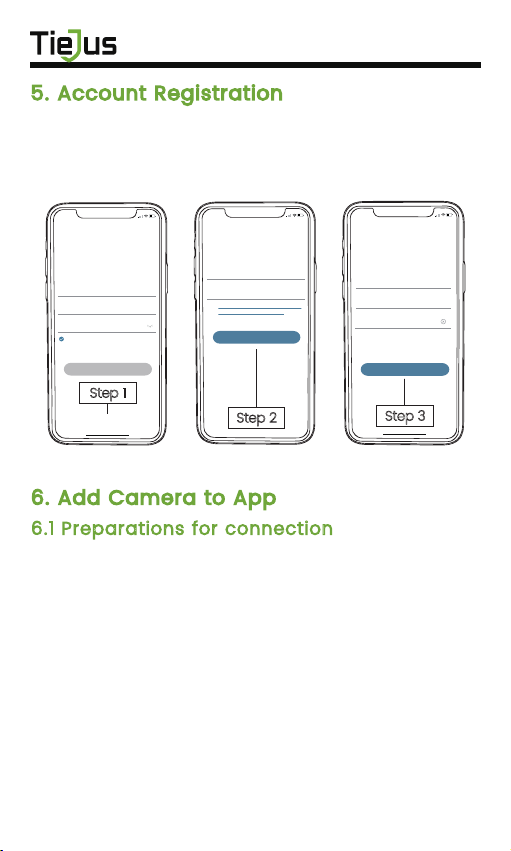
New user needs to sign up ZUMIMALL App with email
address. Click 'Sign up' to create a New Account and
follow the steps to complete registration.
5. Account Registration
6. Add Camera to App
6.1 Preparations for connection
①Insert a Micro SD Card into the camera to save video
clips or you can start the 7-day free cloud service.
Without Micro SD Card or cloud service, no video will
be saved.
②The camera only works with 2.4GHz Wi-Fi,
not support 5GHz.
③When connecting to the network, please take the
camera close to the router
(Recommended within 10-15ft).
Step 1
5:51
Log in
Forgot password?Remember password
Welcome
United States
Account
Passward
No account yet? Sign up now
Step 3
5:51
<
Account
Nickname
Password
Password: 8-16 digits, including two types of
numbers,upper or lower case letters and
characters at least
Sign Up
Done
Step 2
5:51
<
Registration means agreement with the user
agreement and privacy agreement.
Sign Up
United States
Email
Next

6
6.2 Connect Camera to App
Tap 'Add Device'
Reset the Camera Input Wi-Fi Password Prepare the Scanning
Select 'Battery Camera' Turn on the Camera
Home
Homepage Messages Search
5:48
All Devices
Me
Living room Bedroom
Add Device
Quick Guide
5:48
Battery
Camera
Smart
Doorbell
Smart Video Doorbell
Power Plug
Camera
Baby
Camera
Floodlight
Camera
Doorbell
Kits
Select Device
5:49
Add Battery Camera
Press the [battery camera] button to
wake the device if it is asleep.
Hold the device power button to start
the device.
<
Please stay near to your router for the
best signal.
Next
Press the [Bell] button, and tap Next
5:49
Install Doorbell
<
Next
5:50
Wi-Fi Setup
SELECT A 2.4GHZ WIFI NETWORK AND
ENTER Your Password
The Device Does Not Work with 5G Wifi NetWorks
Common Router Setup Methods
Junan
cam2019@
<
Next
Please remove all film from the lens.Tap
Next to show a QR code, and let your
device scan the code. Keep your phone
5-8 inches from the lens.
5:50
Operation Instructions
<
15-25cm
5-8 in
Next
7
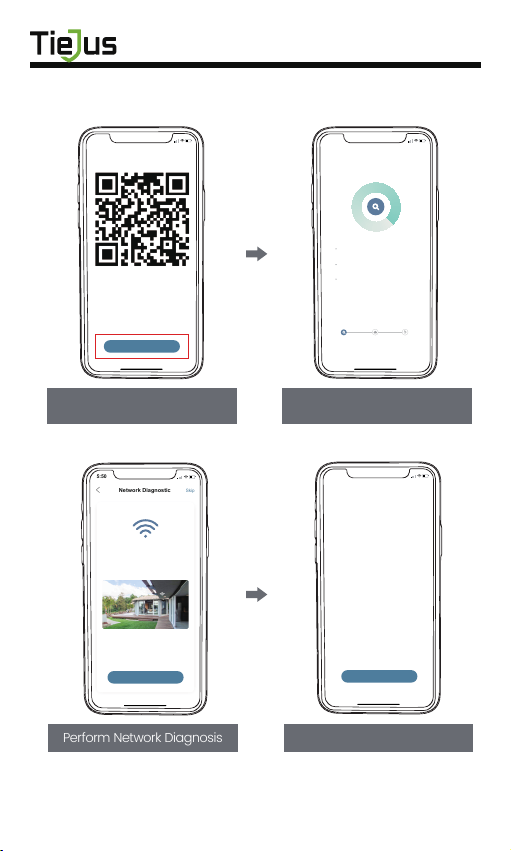
5:50
Scan QR Code
<
Scan the QR code below with the device
at a distance of 5-8 inches. A tone will be
heard when successfully scanned.
Next
Help
Scan QR Code when Indicator
Flashing Slowly in Red Finished Installation
When Reaches 100%
5:50
Connect Network
<
Make sure the device in an
energized state
02:06
Make sure the device is connected to
the router
Make sure the device and the phone are
on the same network
Search device Register to the cloud Device
initialization
Perform Network Diagnosis View Installation Tips
5:50
Network Diagnostic Skip
<
WIFI signal strength
High
Current Place is good, you can install
the camera.
02-15-2022 11:08:17 AM
6KB/s
Next
5:50
How to install camera
Install tips:
<
1.Please use outdoor mounting bracket if you
want to install camera outside.
2.It is recommended to install the camera at a
height of 2-3 meters.
3.Avoid direct sunlight to the camera lens.
4.Avoid placing the camera lens against the
wall and glass at close range.
Done

Prior to the doorbell installation, please charge up your
doorbell for about 8-10 hours till the charging LED turns
BLUE from RED.
USB compatible mobile phone charger (DC 5V 1A~2A).
7. Charge your doorbell
Compatible charger ( not provided ):
8
LED STATUS INDICATION
Battery charging
Fully charged
Solid red
Solid blue

9
Press your doorbell to activate, and you will see the
LED indicator flashes red (once per second). If not,
press and hold reset button for 5 seconds to restore
factory defaults.
· Please operate the setup near your Wi-Fi router.
· Make sure your phone is connecting to a 2.4GHz Wi-Fi.
· Make sure the doorbell is turned on, and its indicator
LED is flashing red. If not, press and hold RESET for 5
seconds.
· Ensure the Wi-Fi signal is good, and the Wi-Fi
password is correct.
Tips
Start setting up your doorbell following the in-app
instructions.
8. Set up Doorbell
Solid red Device is abnormal.
Ready for Wi-Fi configuration.
Connecting to Wi-Fi
Device is online
LiVe-viewing doorbell cam
Firmware upgrading
Flash red (once/sec)
Flash red (twice/sec)
Solid blue
Flash blue (once/sec)
Flash blue (twice/sec)
LED STATUS INDICATION
LED Indicator

10
Click the SETTING button on the chime, and the
chime will be in pairing mode for 20 seconds,
with its red LED flashing.
Press the doorbell button to send a pairing signal,
and your chime will sound to react, together with its
blue LED flashing. Chime pairing succeeds.
9. Pair With Your Indoor Chime
Settings LED indicator
Chime rings &
indicator flashes blue

11
Chime settings.
Ringtone selection.
Click to change ringtone (4 ringtones available).
Volume control button.
Click to control volume:
level 1: 110 dB; level 2: 100 dB
level 3: 90 dB; level 4: 80 dB
Settings.
Click to enter/quit pairing mode;
Press & hold for 5 seconds to restore factory defaults.
12
Select location for your doorbell.
Mount your doorbell.
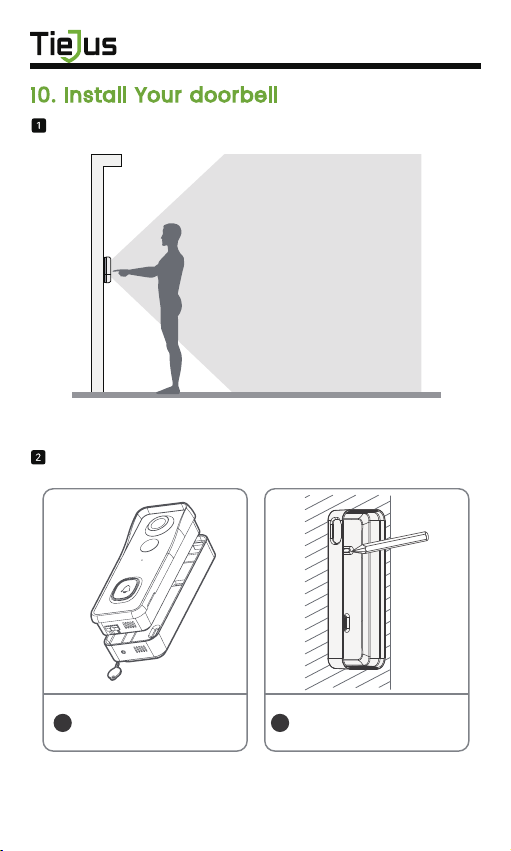
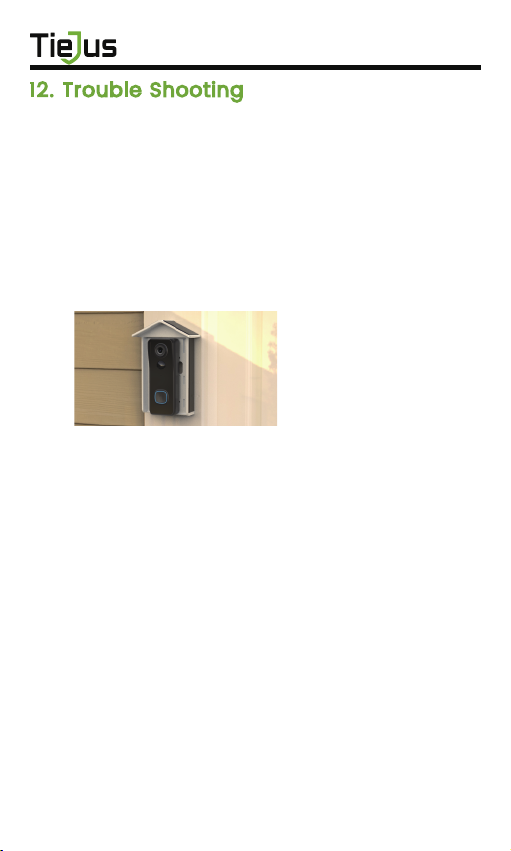
10. Install Your doorbell
It is suggested to mount the
doorbell at least 4 feet (120
cm) above the ground for
optimal angle of view and
best motion detection
performance.
Select a location.
Release the rear mount
using the unlock pin.
A
Mark the screw holes
with the doorbell mount.
B
13
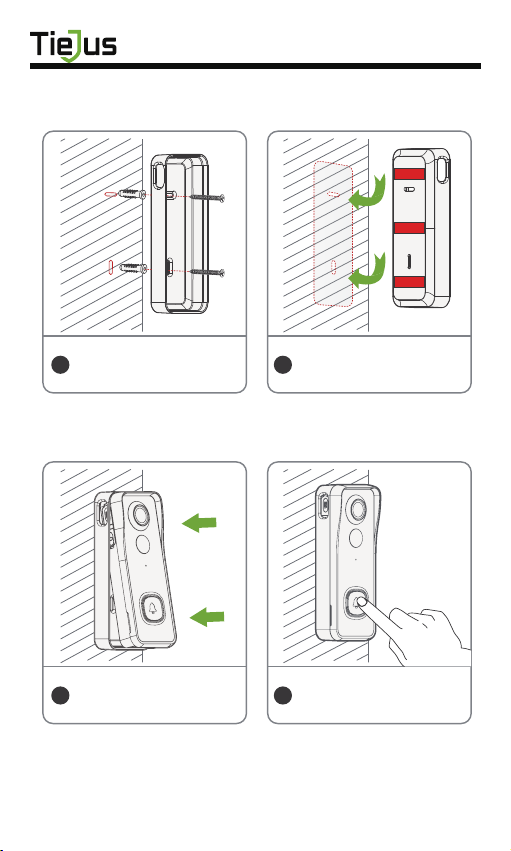
C D
Adhesive tapes are
optional to mount the
doorbell on flat surfaces.
Mount the rear mount to
your wall with screws and
tools.
E F
Attach the doorbell to its
rear mount, and push the
doorbell to lock up.
All set! Press the doorbell
button to run a test.
14
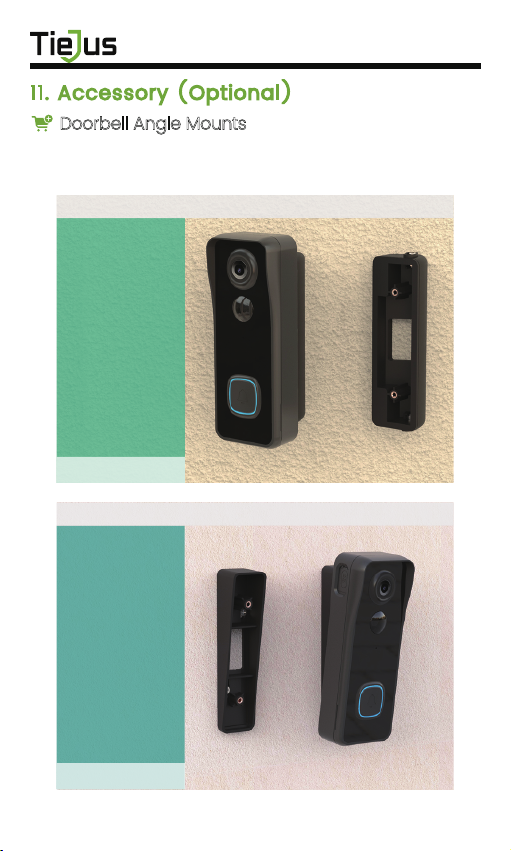
11. Accessory (Optional)
Doorbell Angle Mounts
You can purchase the following angled brackets so as
to point your doorbell to a specific view angle.
Install
with
Wedge
Mount
Install
with
Corner
Mount
Sold separately
Sold separately
Horizontal Angle ∠25° ~ 50° (Adjustable)
Vertical Angle∠8° (Stackable)
Q1: Is the video doorbell powered by battery?
A1: Yes, there is a Li-ion battery built-in. Thanks to the low
power consumption technology, a full charge lasts for more
than 2 to 3 months in our lab test environment (Lab test
condition: 10 events per day, 15 seconds video recording per
event).
Q2: Does it support legacy hardwire power source?
A2: No, it doesn’t. If you need longer battery endurance,
suggest that adding a solar battery charger for your
doorbell, if only there is sunshine in your doorbell location.
You can contact our after-sale service to know where to
buy.
Q3: Does it work with existing mechanical chime?
A3: No. The doorbell comes with a battery powered wireless
chime to notify people when your visitor presses the doorbell
button. And our wireless chime is 100% wireless, you can
place it almost everywhere you like. The transmission
distance in open space is more than 100 meters (328 feet).
Q4: How many wireless chimes can be added to the
doorbell?
A4: You can add several wireless chimes to work with your
video doorbell. And one chime can be paired with upto 8
video doorbells.
Q5: Does it support customized Motion Detection Zones.
A5: Yes it does. You can customize the detection zone in the
doorbell settings.
Q6: Does the doorbell support cloud storage?
A6: Your doorbell support local video storage by TF card .
And you can also activate the cloud storage service in the
App so as to back up video clips into the cloud server. There
is a 7-day-free cloud recording trial service.
12. Trouble Shooting
15

Table of contents
Popular Accessories manuals by other brands


Rice Lake
Rice Lake 1280 Enterprise Series Installation

Dufco
Dufco 48-2025.000 manual

METALTEK
METALTEK PLAYMATE iGENIE owner's manual

M-S Cash Drawer
M-S Cash Drawer EP-125KPC supplementary guide

Panasonic
Panasonic WV-PB5564 instructions

PSI Woodworking Products
PSI Woodworking Products PKFUNSET instructions


