Tiffany HC98 User manual

Hair Clipper
User Manual
Model Number: HC98
READ AND SAVE THESE INSTRUCTIONS
IMPORTANT
Please read and follow the instructions in this user manual even if you feel you are familiar with the product, and
find a place to keep it handy for future reference.
For your convenience, record the complete model number (located on the product identification plate) and the
date you received the product together with your purchase receipt, and attach to the warranty and service
information. Retain in the event that warranty service is required.
NOTE: The rating of this product (as marked on the product identification plate) is based on specific loading tests.
Normal use or the use of other recommended attachments may draw significantly less power.
IMPORTANT SAFEGUARDS
When using any electrically powered product, basic safety precautions should always be followed,
including the following:
PLEASE READALL INSTRUCTIONS CAREFULLY BEFORE USING THIS PRODUCT
WARNING!: - to reduce the risk of fire, electrical shock or injury to persons or property:
•Read all instructions carefully, even if you feel you are quite familiar with the appliance
•Unplug this appliance before cleaning.
•Do not place or store appliance where it can fall or be pulled into a bath or sink.
•Do not use while bathing or in a shower.
•Do not place in, or drop into, water or other liquid.
•Use this appliance only for its intended use as described in this manual. Do not use attachments not
recommended by the manufacturer.
•This appliance should never be left unattended when plugged in.
•Close supervision is necessary when this appliance is used by, on, or near children or invalids.
•Never operate this appliance if it has a damaged cord or plug or if it is not working properly.
•Keep the cord away from heated surfaces.
•Do not pull, twist, or wrap line cord around appliance.
•Never drop or insert any object into any opening on this appliance.
•Do not place appliance on any surface while it is operating.
•Do not use this appliance with a damaged or broken comb nor with teeth missing from the blades as injury
may occur.
•To protect against the risk of electric shock DO NOT IMMERSE any part of this appliance in water or any
other liquid.
•This appliance is not intended for use by persons (including children) with reduced physical, sensory or
mental capabilities, or lack of experience and knowledge, unless they have been given supervision or
instruction concerning use of the appliance by a person responsible for their safety.
•Children should be supervised to ensure that they do not play with the appliance.
•Switch off and remove the plug from the power outlet before cleaning or when not in use. To unplug, grasp
the plug and pull from power outlet. Never pull cord. Never carry the appliance by the cord.
•Do not operate any appliance with a damaged cord or plug after the appliance malfunctions, or is dropped
or damaged in any manner.
•Do not let cord hang over edge of table or counter, or touch hot surfaces. Do not operate or place any part

of this appliance on or near a hot gas or electric burner or in a heated oven.
•Avoid contact with moving parts.
•Before each use make sure the blades are correctly aligned.
•Do not reach for an appliance that has fallen into water. Switch off at the power point and then unplug
immediately.
•The use of attachments or accessories not recommended or sold by the manufacturer may cause fire,
electric shock or injury.
•Do not use any appliance for anything other than its intended use. This product is intended for household
use only.
•Do not use outdoors, or expose to rain or moisture.
•Do not attempt to repair or disassemble the appliance. There are no user serviceable parts.
FEATURES

INSTRUCTIONS
BEFORE COMMENCING HAIR CUT
•Inspect the Hair Clippers and ensure there is no oil between the cutting blade teeth. Turn the unit on to
distribute the oil and to make sure it is running smoothly. Wipe off any excess oil. This step should be
completed after each use. When using the unit, untwist the cord from time to time to avoid tangling.
•Seat the person so their head is approximately at an appropriate level. This allows ease of visibility while
cutting and easy control of the unit.
•Always comb the hair first, so it is tangle free and natural.
•Place a towel around the neck and shoulders of the person having the haircut.
HINTS & TIPS:
•Cut the hair in a relaxed and slow manner. Use short stokes and work gradually over the entire head.
•Always take off a little hair at a time, as you can always trim off additional hair later.
•As you work, comb the hair frequently back into the style to which you are cutting.
•When cutting with these Hair Clippers it is best to leave the hair dry, not wet. Dry hair is much easier to
control/cut.
BEGINNING THE HAIRCUT
Cutting hair requires practice, so it is always best to leave the hair longer for the first few haircuts until you
become confident with each comb attachment.
ATTACHMENT COMBS (see main diagram)
1. Attachments comb #1 leaves 3mm hair length.
2. Attachments comb #2 leaves 6mm hair length.
3. Attachments comb #3 leaves 9mm hair length.
4. Attachments comb #4 leaves 12mm hair length.
Each comb attachment is marked on its outside surface.
•To attach a comb, hold it with its teeth upward and slide it onto the clipper blade, until the front of the comb
firmly sits against the clipper blade.
•To remove the comb, simply pull the comb upward and away from the clipper blade.
•For even cutting, allow the comb attachment to cut its way through the hair. Do not force it through quickly.
Remember to comb the hair frequently to remove trimmed hair and to check for uneven strands.
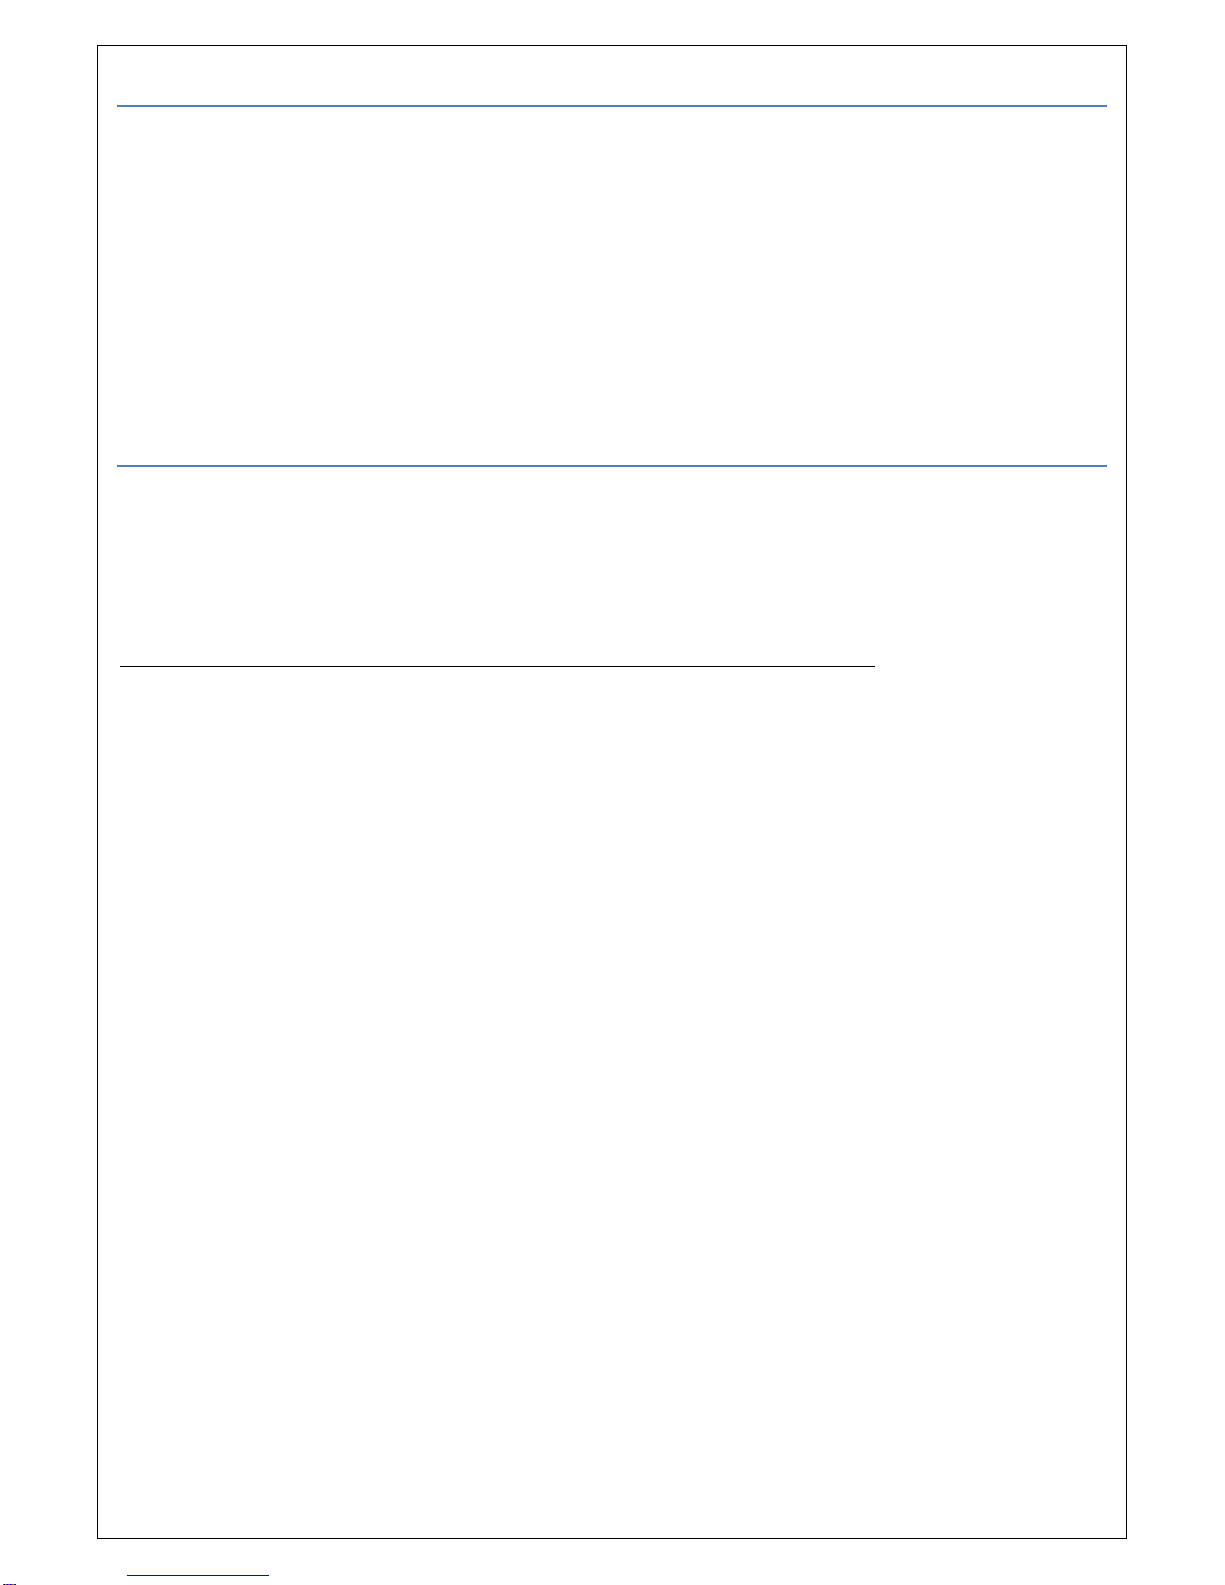
STEP 1 - NAPE OF THE NECK
1. Attach comb attachment 3mm or 6mm (#1 or #2).
2. Hold the clipper cutting edge pointed up and begin the hair cut, starting at the center of the head at the
base of the neck (see Diagram 1).
3. Hold the clipper comfortably in your hand and press lightly against the head with the teeth pointing
upward. Gradually and slowly lift the clipper, working upwards and outwards, through the hair trimming
just a little at a time.
4. As you cut, gradually lift the hair clipper head towards you. Continue to cut the back area from the bottom
of the neck upwards to the top of the ears.
STEP 2 - BACK OF THE HEAD
Attach comb attachment #3 or #4 and cut the hair at the back of the head (see Diagram 2).
STEP 3 - SIDE OF THE HEAD
Change to one of the shorter combs 3mm or 6mm trim sideburns, i.e. the hair directly in front of the ears. Then
change to one of the longer combs, 9mm or 12mm, and continue to cut to the top of the head (see Diagram 3).
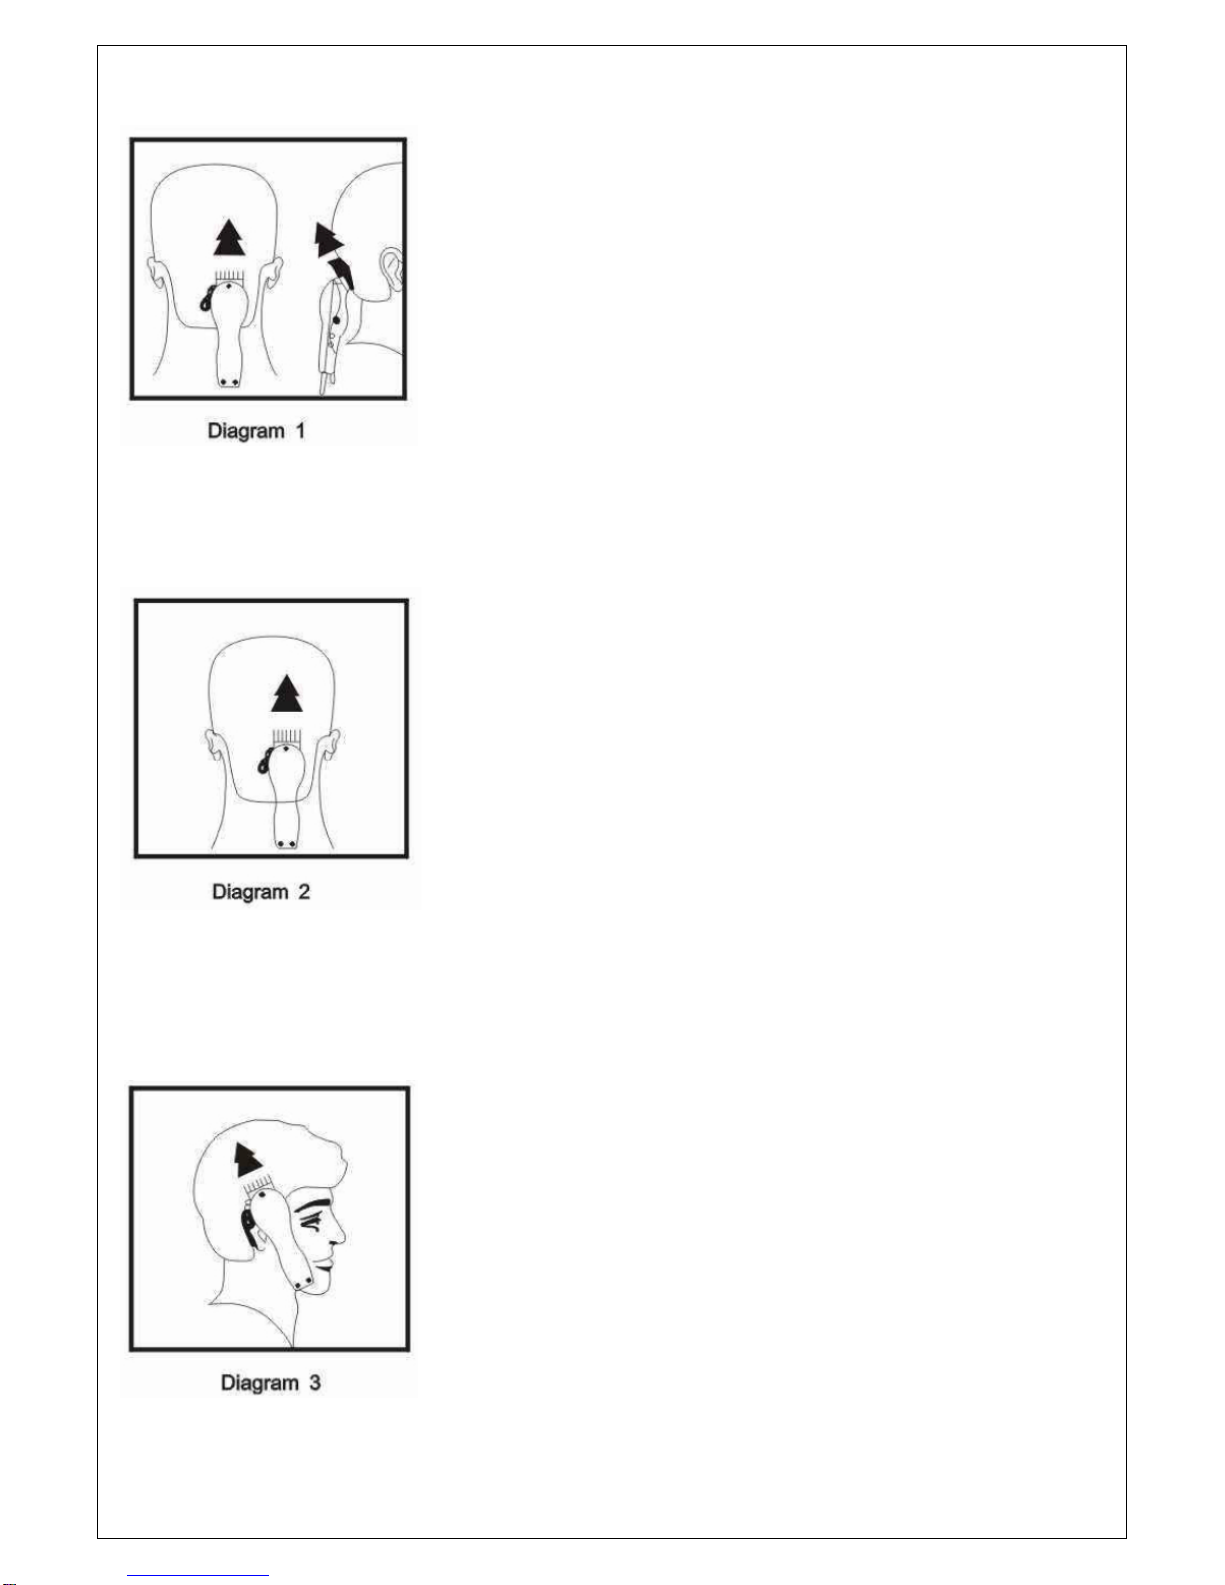
STEP 4 - TOP OF THE HEAD
1. Using comb attachment 9mm or 12mm, cut hair on top of the head from back to front against the direction
in which the hair normally grows (see diagram 4). In some cases, this may require the reverse, or cutting
from front to back.
2. Comb attachments 3mm or 6mm are used to achieve a close crew cut or short cut.
3. For longer hair on top, use the comb provided and lift hair on the top of the head. Cut over the comb, with
the hair lifted or hold the hair between the fingers to lift it and cut it to desired length (see Diagram 5 and
6). Always work from the back of the head. You can cut the hair shorter gradually by reduction the space
between the comb/fingers, and the head. Comb out trimmed hair and check for uneven strands.
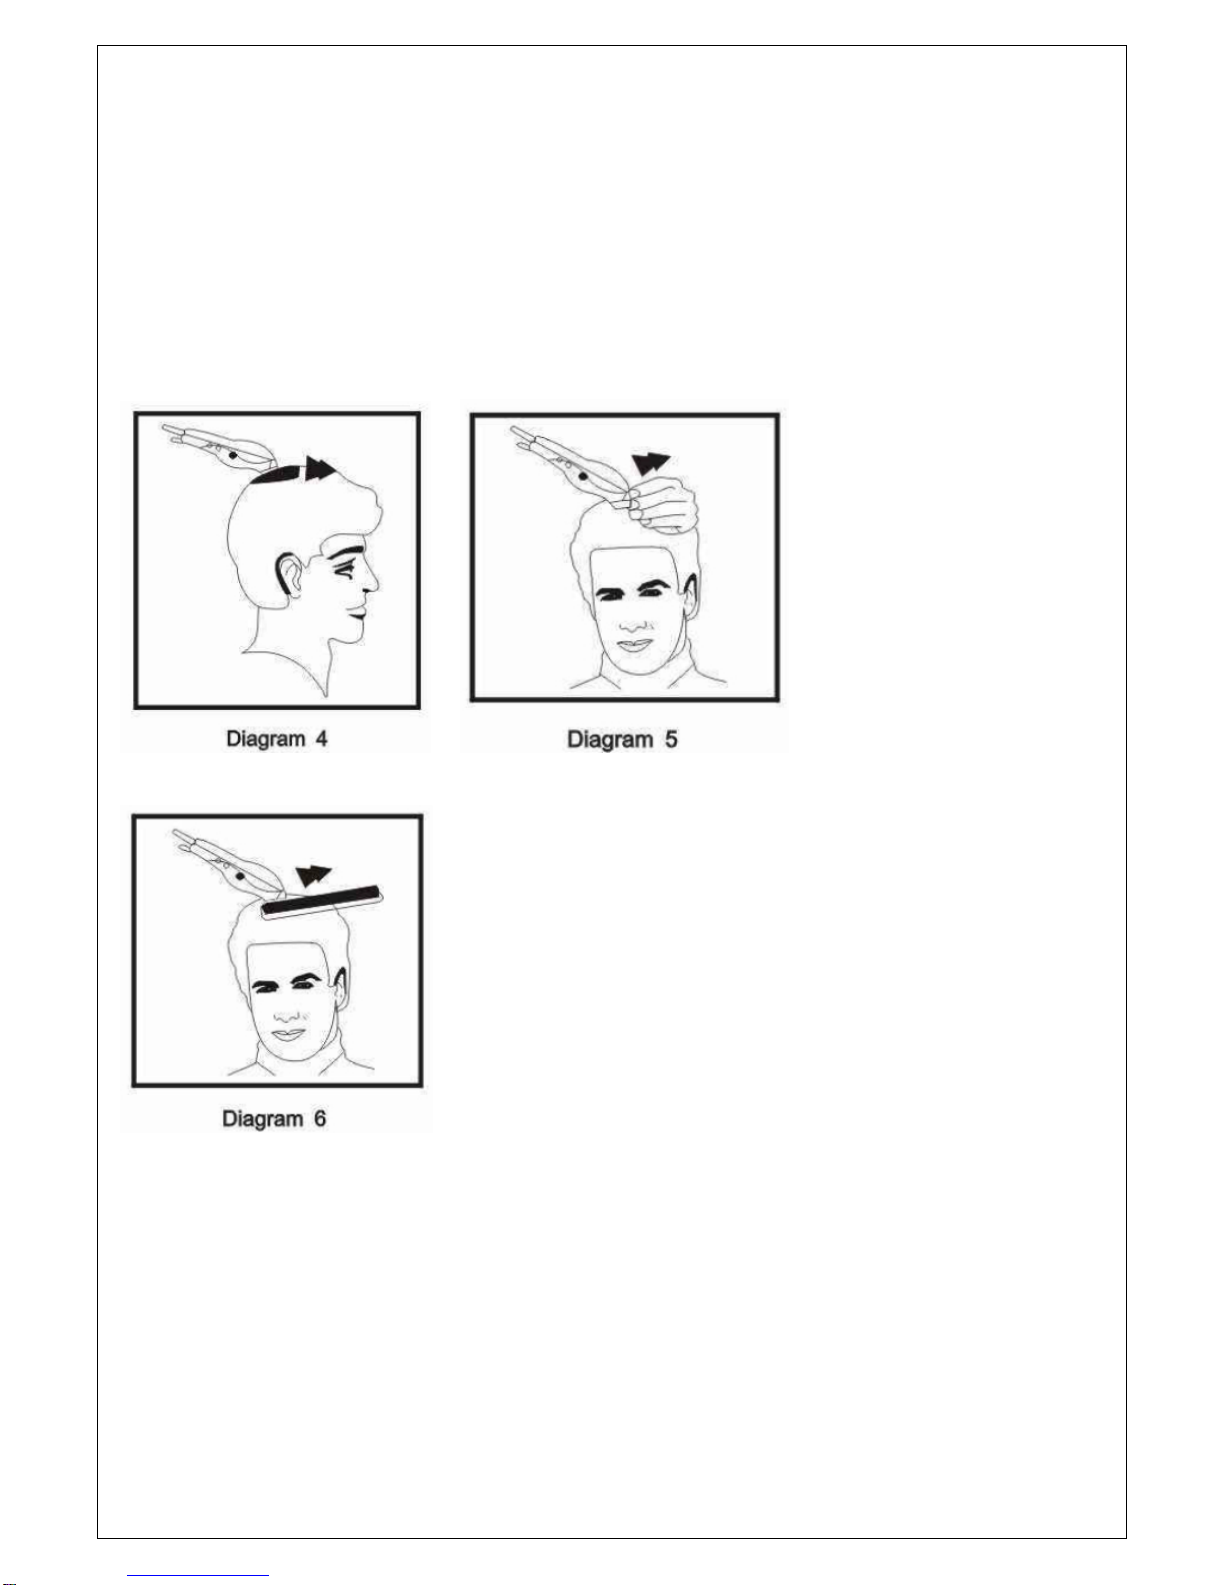
STEP 5 - FINISHING TOUCHES
1. Finally, use the taper lever without an attachment for close trimming around the base of the neck, the
sides of the neck and the ears.
2. To produce a clean straight line at the sideburns, reverse the hair clipper by turning the reverse side
uppermost (see diagram 7).
3. Press the clipper at right angles to the head, tips of the blades lightly touching the skin and work
downwards. This way you will obtain a clean cut as would be given by a razor.
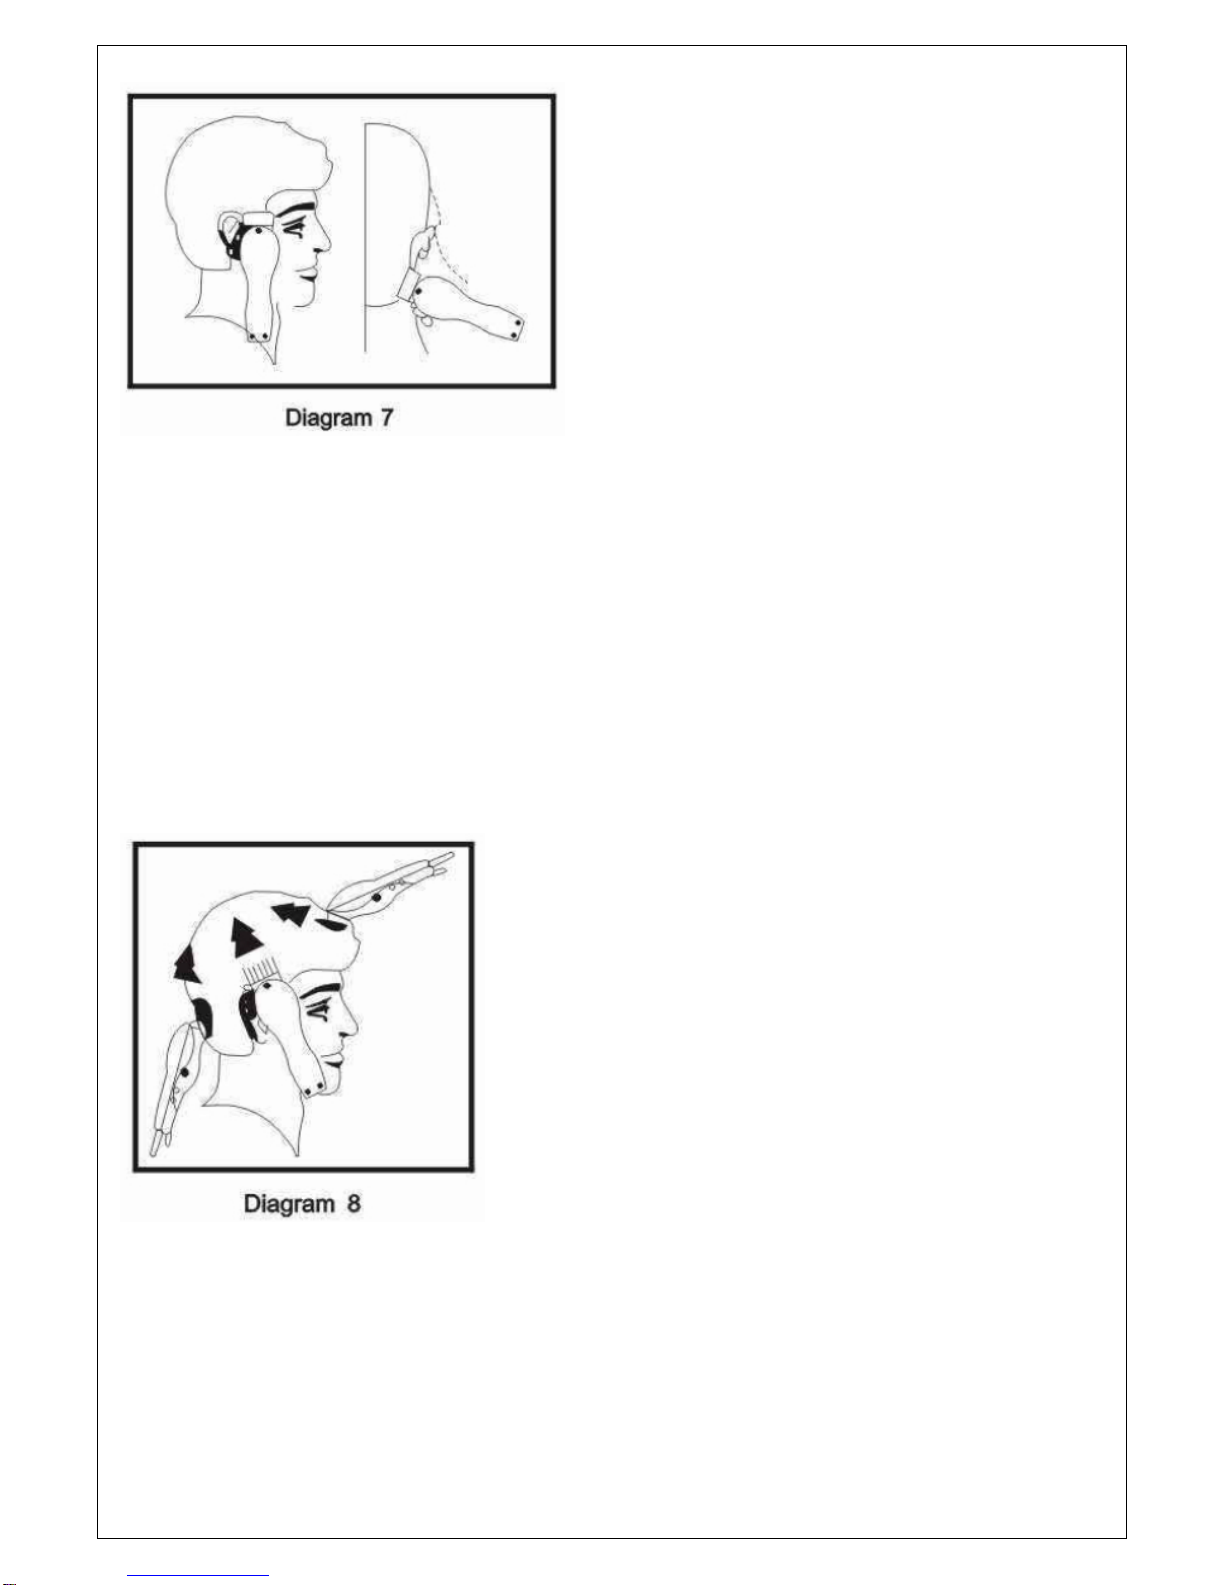
SHORT TAPERED STYLES - “FLAT TOPS” AND SHORT CUTS
1. Starting with the longest attachment comb (12mm), cut from the back of the neck to the crown. Hold the
attachment comb flat against the head and slowly move the clipper through the hair, as shown (see
Diagram 8).
2. Use the same procedure from the lower side to the upper side of the head, as illustrated. Then cut the hair
against the direction in which it grows from the front to the crown and then level the cut with the sides.
3. To give a “flat top” look, the hair on top of the head must be cut over the top of a flat comb rather than by
using the attachment comb.
4. Use closer cutting attachment combs to taper the hair down to the neckline as desired. Comb hair and
check for uneven areas and outlining sideburns and neckline as described previously.

MAINTENANCE
1. Your clippers were carefully examined to ensure that the blades were oiled and aligned before leaving the
factory.
2. Blades must be realigned if they have been removed for cleaning or replacement.
3. To realign the blades, simply match the upper and bottom blades teeth up, point for point. (End fo top
blade teeth should be approximately 1.2mm back from bottom blade. Compare your clipper blades with
the sketch below.
4. If blade alignment is incorrect, add a few drops of oil to the blades, turn clipper on for a few moments, turn
off and unplug. Loosen screws slightly and adjust. Tighten screws after blade is aligned.
OIL
•To keep Hair Clippers in peak condition, the blades should be oiled every few haircuts.
•Do not use hair oil, grease, oil mixed with kerosene or any solvents. Solvents will evaporate and leave the
thick oil which may slow down the blades motion.
POWER SCREW
•The power screw permits you to adjust the power. It has been adjusted before leaving the factory,
however if the voltage in your home is low, you may need to re-adjust it.
•To adjust, use a screwdriver to the turn the power screw in a clockwise direction until the arm strikes the
coil - making noise. Then slowly turn power screw out (counter-clockwise) just until noise stops. This is
maximum power setting.

ADJUSTABLE LEVER
•The lever is conveniently located near your thumb (if you are right-handed), so it can easily be adjusted
while the clipper is in your hand.
•The lever adds versatility to your Hair Clipper by allowing you to gradually change the closeness of your
cut without an attachment comb.
•When the lever is in the uppermost position, the blades will give you the closest cut and leave the hair
very short. Pushing the lever downward gradually increases the cutting length.
•In its lowest position, the lever will leave the hair approximately the same length as a #1 comb.
•The lever will also extend the use of your blades since a different cutting edge is used in each setting.
•In addition, if extremely this hair has jammed the blades, it will help you to remove hair that has become
wedged between the two blades without removing the actual blades.
•While the clipper is running, rapidly move the lever frpm “close cut” to “longer cut” a couple of times.
Doing this each time after you have finished using your Hair Clippers will help to keep the blades clear of
cut hair. If your clipper stops cutting and this does not help, your cutting blades are blunt. Replace them
with new blades.
CUSTOMER SERVICE
Australian Customer Service
GAF Control (Sales) Pty Ltd
P.O Box 19
Altona North Victoria 3025
Phone: 1300 659 489
Hours: 9am-5pm (EST) Mon-Fri
www.gafcontrol.com.au
*This product may vary slightly to the product illustrated due to ongoing product development.

Table of contents


