Flex Apex Assembly 6ft Kit
Page 1 of 2
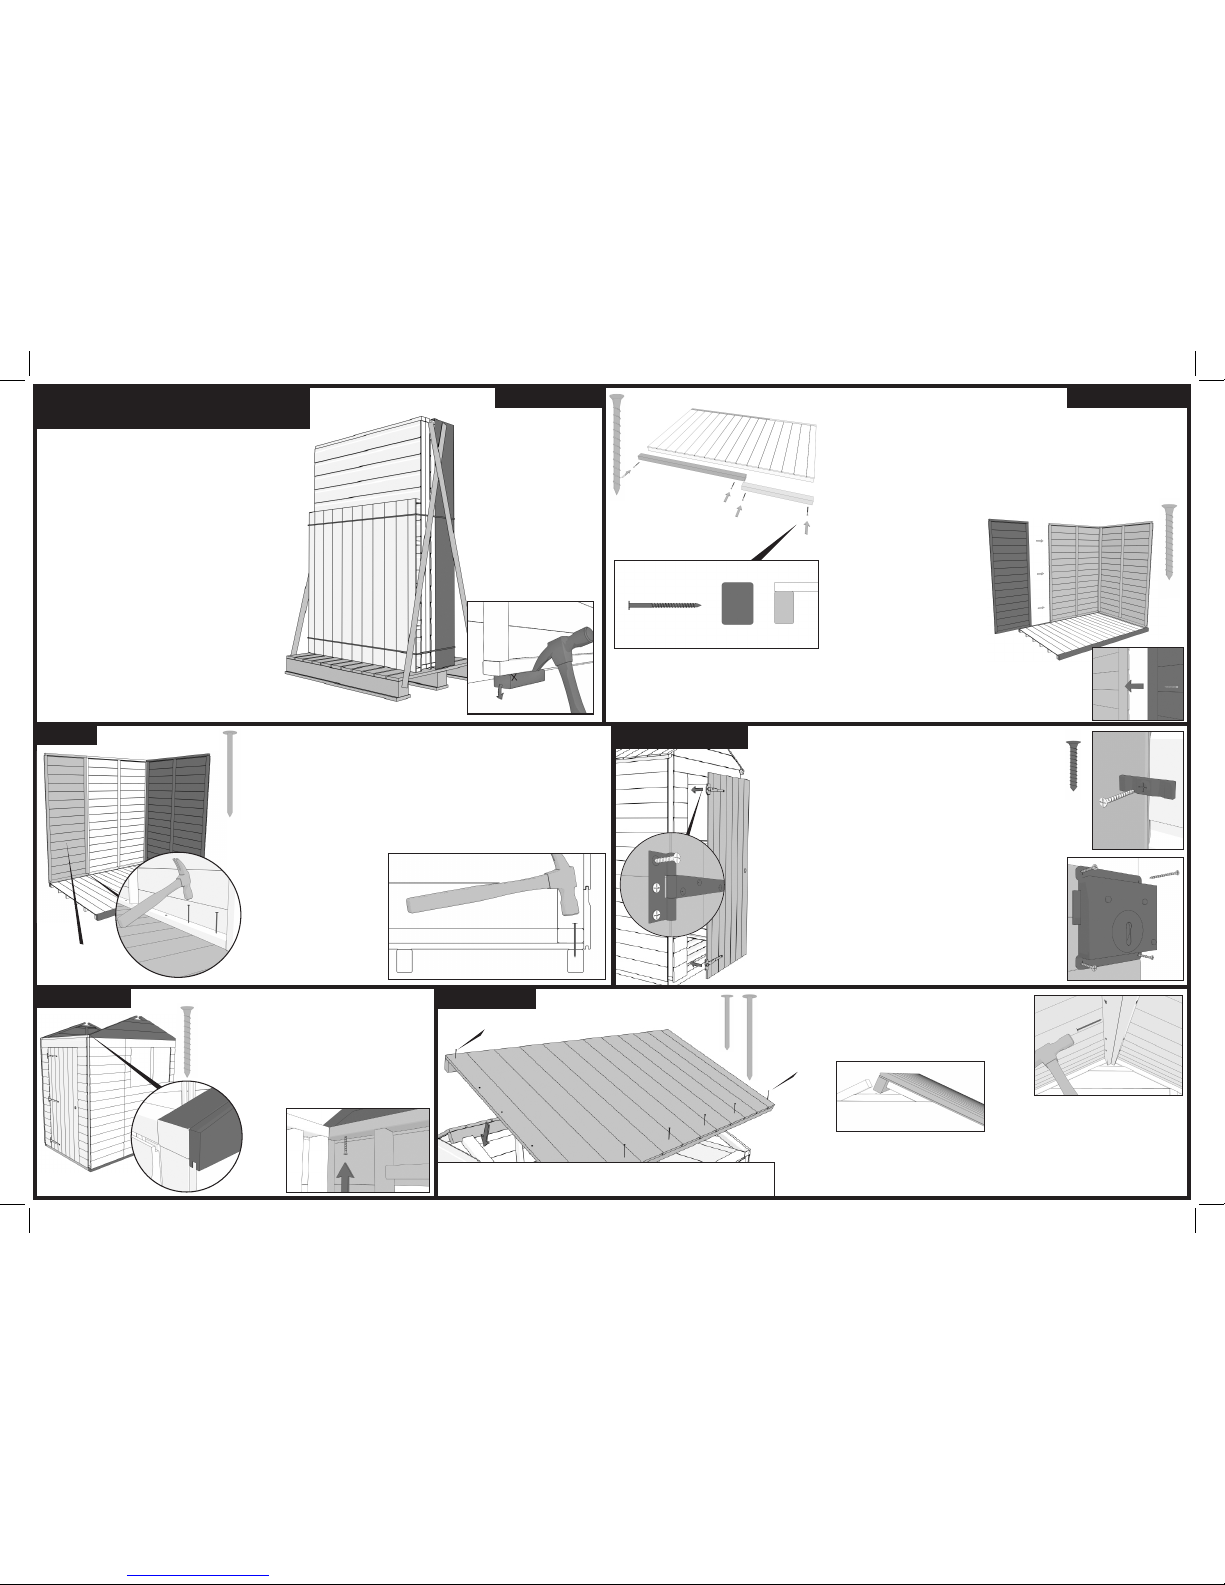
1. Pre Assembly
80mm Screws
Important:
The oor panel must be laid on a rm
and level base.
Note: See back for sizes greater than 4x6
2.b Lay out the completed oor in the desired location and think
about where you want to position the walls. The gables of the
building will sit on top and in line with the heavy duty bearers.
2.a
2. Floor and Walls
2.c Choose a 4ft panel that
will be part of your gable,
position this on top of one of
the heavy duty bearers and
line it up so that it is ush
with the side of the oor.
2.d To make up the 6ft gable
you need to position one of
the smaller panels alongside
the larger one. Secure these
panels together from the in-
side using the 50mm screws
provided.
2.a Lay down the oor and place the heavy
duty bearers running parallel with the bearers along the 6ft edge.
They must sit ush with the oorboards. Screw them in place with
the 80mm screws.
50mm Screws
3. Walls
65mm Nails
3.a Place a 4ft panel at a right angle to the panels positioned on
the gable end. Secure together using the 50mm screws.
3.b Place the remaining panels in position by repeating the last
three steps
3.c When you have secured all of the wall panels to each other.
Attach them to the oor using the 65mm nails.
2.d
3.d Ensure that the nails
are driven through the
side/gable base rails,
through the oor boards
and in a position where
they will nally pene-
trate the oor joists.
3.c
3.d
4. Hanging the Door
4.b
25mm Hinge Screws
4.c
4.d
Important: The door has been manufactured so it can be left or
right hand hinged to suit your needs.
4.a Choose whether you want your door to be right or
left hand hinged and line it up in the framing accordingly.
4.b Secure the hinges in place using the 25mm black
hinge screws provided. Make sure it is level or your door
will stick/not close properly.
4.c Fix the turn button in place. Choose a place close to
the top of the door. Don’t screw in too tightly or it won’t
turn.
4.d Line up the lock with the pre-drilled hole in the door
and x this in place with the screws. Make sure the lock
is on the inside of the shed when you close the door.
5. Gable Tops
Note: See back for sizes greater than 4x6
50mm Screws
5.a Line up the gable tops with the pan-
els on the 6ft side, remembering to place
them above the heavy duty bearers.
5.b Secure with 50mm screws from
the inside, screwing upwards into
the framing.
5.a 5.b
6. Roof Panels
40mm Nails
Note: See back for sizes greater
than 4x6
65mm
Nails
6.a Place roof panels in position and secure these
internally to each other with the 65mm nails provided.
6.b Nail the roof to the gable and side frame with the
40mm and 65mm nails provided.
65mm Nails
40mm Nails
Important: Ensure the overhang of the
roof is equal at each gable end.
Troubleshoot: If at this point the roof panels do not align correctly, the door
does not open/close properly or the building looks twisted at all, then it would
suggest that the base is not correctly level. Therefore, one or more corners of
the building may need adjusting so the base is square/level.
Gable End
6.a
Important: Before securing the roof in place, ensure that the side
walls sit inside the gables. If they are not, the roof will not t.
1.a Unpack all of the components and
check that you have all of the parts
required. Please use the check list on
this page.
1.b Carefully remove the
untreated timber that makes up the pal-
let your building was
delivered on and discard this.
1c. The underside of the oor must be
treated with a quality wood preserver.
1d. Before starting assembly you
may need to remove transport blocks
(marked x) from the bottom of some
panels.
1d.