Timemaster TM-5J User manual

Hi-Performance Wash Systems Car Wash Equipment and Parts Supplier to the Rocky Mountain Region
INTRODUCTION
Thank you for purchasing the TIMEMASTER TM-5J. This product has been designed and manufactured to provide years of trouble-free service. The TIMEMASTER
housing is water resistant but should not be exposed to direct high-pressure spray. TIMEMASTER is not sensitive to normal heat range conditions and is protected
against electromagnetic interference.
While the TIMEMASTER is an extremely rugged device and was designed for adequate protection of its components during normal usage, it is recommended that the
timer be enclosed in a sturdy housing (i.e. coin box or add-on box) to protect it from physical abuse.
Handle the TIMEMASTER as you would an expensive VCR or computer. While the unit has been designed for operation in a rugged environment, rough handling or
accidental abuse could cause damage.
OVERVIEW
This manual describes the following operations:
Mechanical Installation
Electrical Installation
Timer Features and Programming
Remote Control Operation
ONE YEAR LIMITED WARRANTY
Hi-Performance Wash Systems, Inc. warrants the TIMEMASTER car wash timer and remote controller against defects in materials and workmanship for a period of one
(1) year from the date of purchase. This warranty covers normal commercial use and does not cover damage that occurs in shipment or failure that results from alteration,
accident, misuse, abuse, or improper installation. Hi-Performance Wash Systems will, at their option, repair or replace warranted timers. Repairs of any type may be
obtained by sending the timer to Hi-Performance Wash Systems, Inc.
GENERAL OPERATION
The TIMEMASTER will time and control the functions associated with the operation of a single self-service car wash bay. The TIMEMASTER can also be used to time any
electrically powered device through the use of a power relay.
The customer will see the blue-green florescent display of the TIMEMASTER, which will be showing the minimum amount needed to start the car wash.
As coins are deposited, the display will show the balance due in $.25 increments. Once the minimum amount to start is deposited, the display will show the total amount of
time purchased. Additional coins may be deposited at any time to increase the total time.
When the minimum amount to start has been deposited and more that three (3) seconds elapse without the customer depositing additional coins, the timer will begin its
countdown showing minutes and seconds remaining. When one (1) minute remains in the timed cycle, the timer's horn output will activate for the programmed period and
the display will flash its reminder message as it counts down the final minute.
If the CHANGEOVER TIME harness has been wired and the timer programmed, the timer will stop timing for the programmed CHANGEOVER TIME period when that
selection is made. CHANGEOVER TIME can be connected to up to four (4) wash selections.
If the BONUS TIME program has been modified, customers will receive additional time for each coin they deposit after the minimum price to start has been deposited.
If the GRACE TIME program has been activated, customers may deposit one coin to restart the timer after the time has elapsed.
FEATURES
http://www.hpws.com/tech/tmman.htm (1 of 15)3/29/2007 12:19:49 PM

Hi-Performance Wash Systems Car Wash Equipment and Parts Supplier to the Rocky Mountain Region
- Digital display of price to start car wash
- Digital display of balance due as coins are deposited
- Digital display of time purchased once minimum price has been deposited
- One minute remaining alert horn output combined with flashing time display
- Changeover Time for up to four selections
- Bonus Time for all additional coins deposited after minimum
- Grace Time to restart timer
- Test Time to check operation and/or wash down bay
- Coin counter with reset feature
- Test Time counter with no reset feature
- Wireless remote control of programming and Test Time feature
- EEPROM memory requires no batteries
FEATURES - DETAILED
PRICE TO START MESSAGE
PRICE TO START is displayed with a flashing message. This message prompts the customer to deposit the minimum PRICE TO START until they have deposited
sufficient counts to start the timer. As coins are deposited, the remaining balance to start is displayed. Various machines can be controlled with the TIMEMASTER
therefore the PRICE TO START MESSAGE is selectable from the following choices: WASH, VAC, RUN, USE. Once selected the timer will flash through its message
continuously; i.e. $2.00...TO...WASH...$2.00...TO...WASH. To further prompt the customer who deposits too few coins, the display will continuously flash the balance due
until the amount has been deposited.
PURCHASED TIME
Once the PRICE TO START has been deposited the timer displays the time purchased. Additional coins deposited after the PRICE TO START amount has been
deposited will be displayed as additional time. The timer WILL NOT begin its timing function until 2 seconds after the last coin is deposited. This prevents customers from
losing time while they deposit more than the minimum PRICE TO START.
ONE-MINUTE ALERT
When the remaining time reaches one minute, the timer will activate its last minute alert. If the last minute alert horn has been installed, the customer will hear the
beeping. The display will alternate between its last minute message and the final minute countdown. The last minute message flashes "ADD...COINS...FOR...MORE...
TIME." This message is followed by 5 seconds of countdown display. The message and countdown will alternate throughout the final minute of operation.
CHANGEOVER TIME
CHANGEOVER TIME is provided for the car wash operator who wishes to pause the timer's countdown during the wash cycle. Examples of the CHANGEOVER TIME
uses are as follows:
Example 1 - Low-pressure products such as PRESOAK, TIRE CLEANER, and FOAM BRUSH frequently require up to 30 seconds to appear at the wand. With the TM-5J,
you can program the timer to stop its countdown for up to 60 seconds. The selector switch must remain in position for 2 seconds before the CHANGEOVER TIME is
activated. The CHANGEOVER TIME delay will only be activated one time for each product selected during the total time purchased.
Example 2 - TIRE CLEANER and PRE-SOAK are expensive products to dispense. Connecting the TM-5J to WASH, RINSE, WAX and SPOT FREE RINSE and
programming the timer to delay for 20 seconds will effectively give you a TWO-TIERED pricing structure for you car wash. For example, your car wash pricing is $2.00 for
4 minutes (30 seconds per coin). Customers using PRE-SOAK and TIRE CLEANER will receive 30 seconds per coin. However, when they select SOAP, RINSE, WAX
and SPOT FREE RINSE, the timer pauses 20 seconds for each selection, giving your customers an extra 20 seconds per selection for those low cost selections.
GRACE TIME
GRACE TIME is a programmable time period after the purchased time expires. When programmed, this feature will allow your customers to restart the timer with one coin
within the programmed GRACE TIME. To assist customers with this feature, the timer will flash the following message during the programmed GRACE TIME: $.25...FOR...
MORE...TIME. The alert horn will also beep each time the message is displayed.
BONUS TIME
BONUS TIME is a programmable feature that allows you to increase the time per coin of each coin deposited after the starting price has been reached. For example, you
car wash is priced at $2.00 for 4 minutes (30 seconds per coin). You set the bonus time program at 45 seconds per coin. Your customers deposit $2.00 to activate the
wash cycle and receive 4 minutes of time. Each additional coin they deposit will then increase the time by 45 seconds instead of the usual 30 seconds.
INSTALLATION
HARDWARE INSTALLATION
As described in the introduction, the recommended mounting arrangement for the TIMEMASTER encases the timer in a water resistant and shock resistant housing that
reduces the possibility of physical abuse to the timer.
The TIMEMASTER is designed to mount on a shelf or bracket inside the service panel of a stainless steel coin box. The principle behind this design is to reduce the
http://www.hpws.com/tech/tmman.htm (2 of 15)3/29/2007 12:19:49 PM

Hi-Performance Wash Systems Car Wash Equipment and Parts Supplier to the Rocky Mountain Region
possibility of damage. When properly installed, the TIMEMASTER will (in most cases) simply slide backwards off the shelf if the customer strikes the coin box. A mounting
bracket for the timer can be manufactured from metal and welded or bolted to the inside of the coin box faceplate. (Hi-Performance Wash Systems has several designs of
TIMEMASTER mounting shelves available for purchase.)
Once the mounting bracket has been installed on the coin box faceplate, secure the timer using the supplied wing nut as shown in figure 1. Only slightly tighten the wing
nut, as this will allow the timer to recoil to the real if the coin box is struck.
ELECTRICAL INSTALLATION
Provided with the TIMEMASTER are two (2) pre-wired connectors. These wires are to be connected to the site wiring as instructed on the following page. Improper
connections could damage the timer or prevent function from operating correctly. Please read and understand all connection requirements before proceeding with the
installation. TIMERS DAMAGED BY INCORRECT CONNECTION ARE NOT COVERED BY THE TIME MASTER WARRANTY.
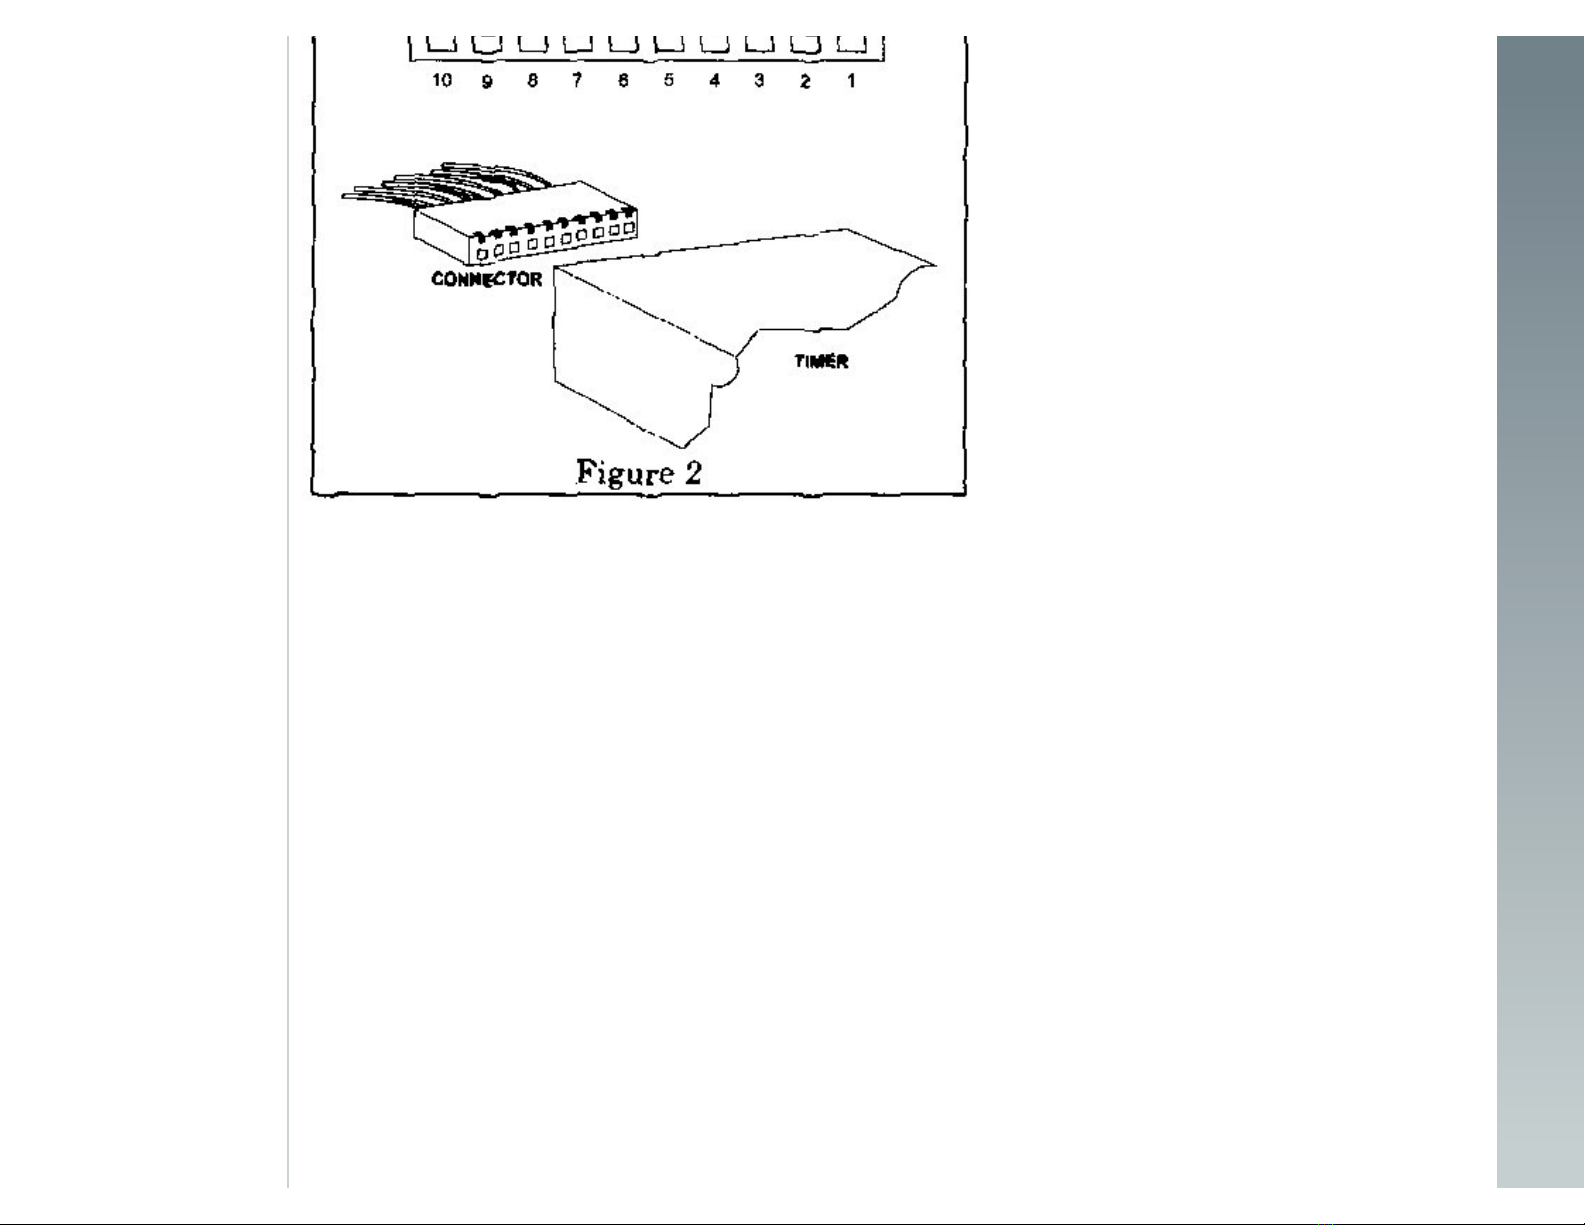
Determine the proper polarity of the connectors before connecting the attached wiring. While it is difficult to connect the plugs upside-down, the will fit! Refer to Figure 2
for pin numbering and polarity. The pin numbers are also indicated on the timer's rear label.
http://www.hpws.com/tech/tmman.htm (3 of 15)3/29/2007 12:19:49 PM
Hi-Performance Wash Systems Car Wash Equipment and Parts Supplier to the Rocky Mountain Region
CONNECTOR INSTALLATION
Carefully inspect the completed wiring before connecting the TIMEMASTER.
WIRE
COLOR PIN# USED FOR
purple 1 24 volt pulse to mechanical coin counter
orange/black 2 coin pulse from coin acceptor
green/black 3 last minute horn (24 volts DC ground)
red/black 4 last minute horn (24 volts DC hot)
light green 5 safety ground
blue/black 6 timed output
yellow 7 jumpered (DO NOT USE)
yellow 8 jumpered(DO NOT USE)
green 9 TIMEMASTER power (24 volts AC
neutral)
orange 10 TIMEMASTER power (24 volts AC hot)
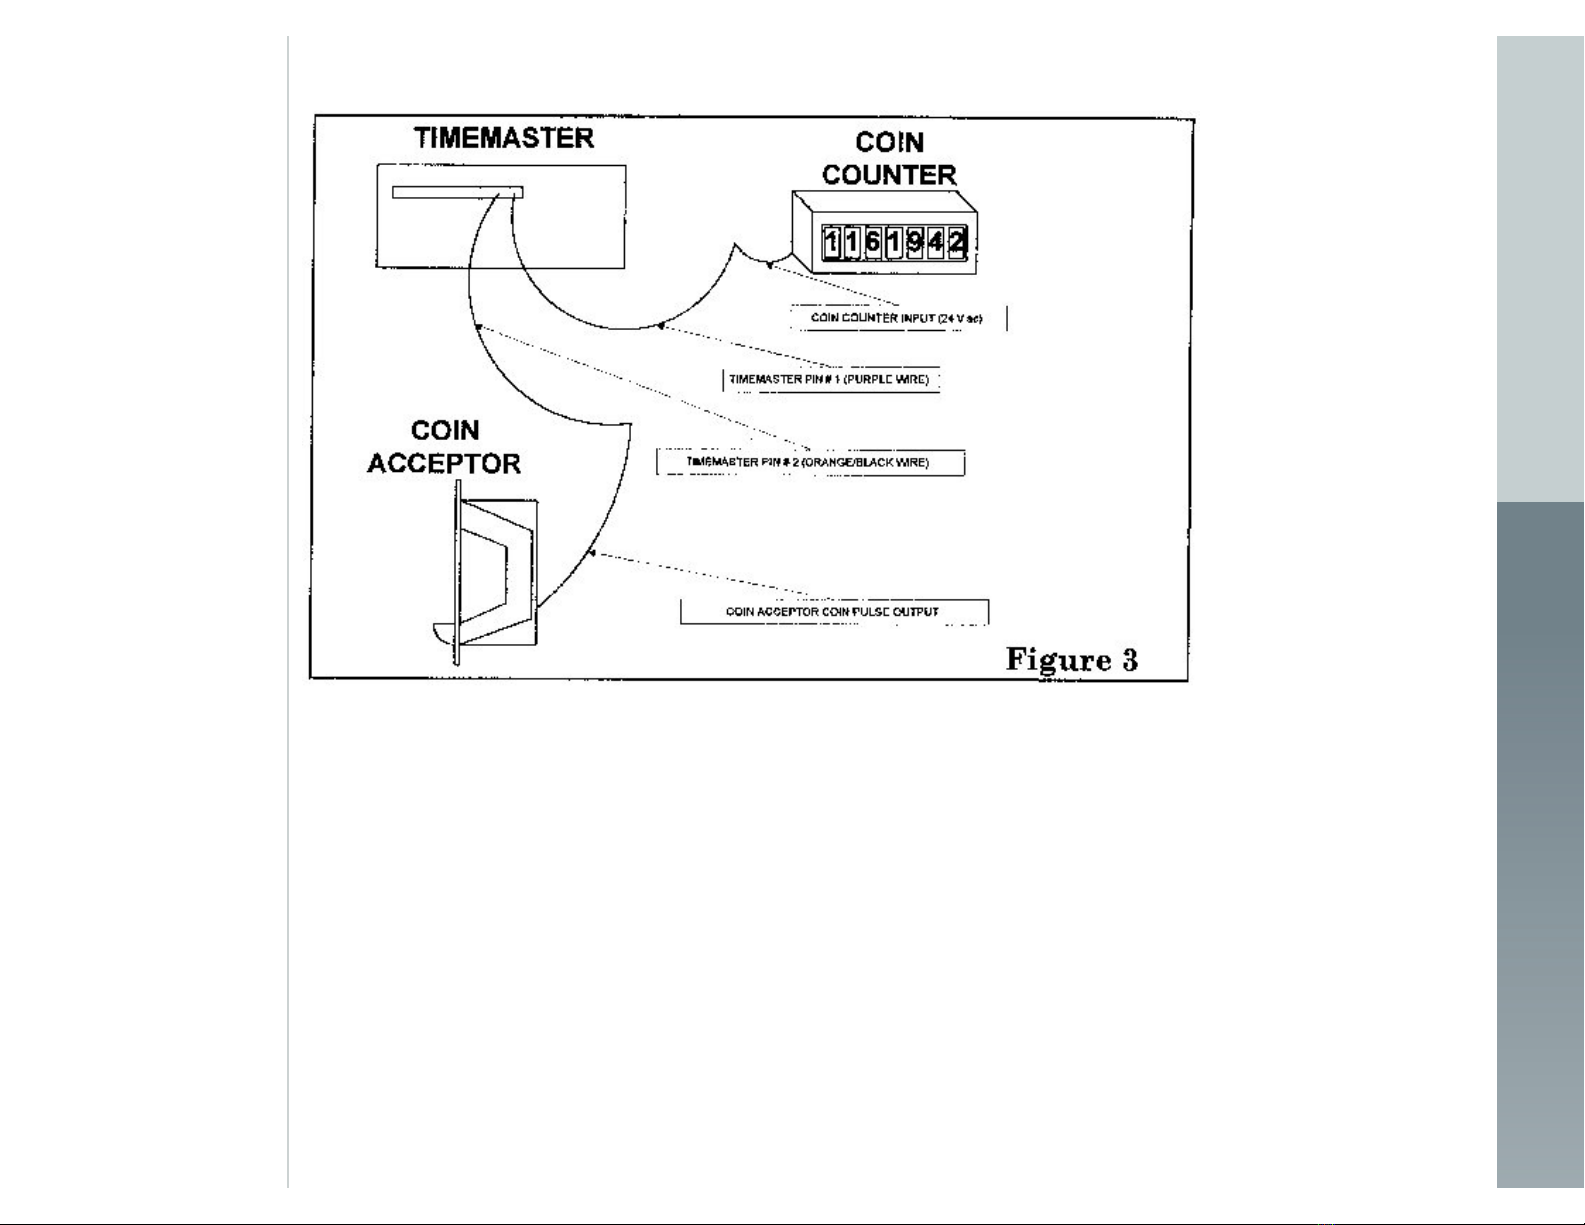
Pin #1
COIN COUNTER PULSE (output) See Figure 3.
A 24 volt AC pulse is output on pin 1 in response to an input from pin 2 each time a coin is deposited. Normally, this pin is connected to one terminal of a mechanical coin
counter in the equipment room for accounting purposes.
Pin #2
COINT ACCEPTOR PULSE (input) See Figure 3.
http://www.hpws.com/tech/tmman.htm (4 of 15)3/29/2007 12:19:49 PM
Hi-Performance Wash Systems Car Wash Equipment and Parts Supplier to the Rocky Mountain Region
Applying the output from a coin acceptor to this pin indicates to the timer that a coin has been deposited. Maximum ratings for this input pulse are:
AC voltage: 32 VAC
DC voltage: 30 VDC
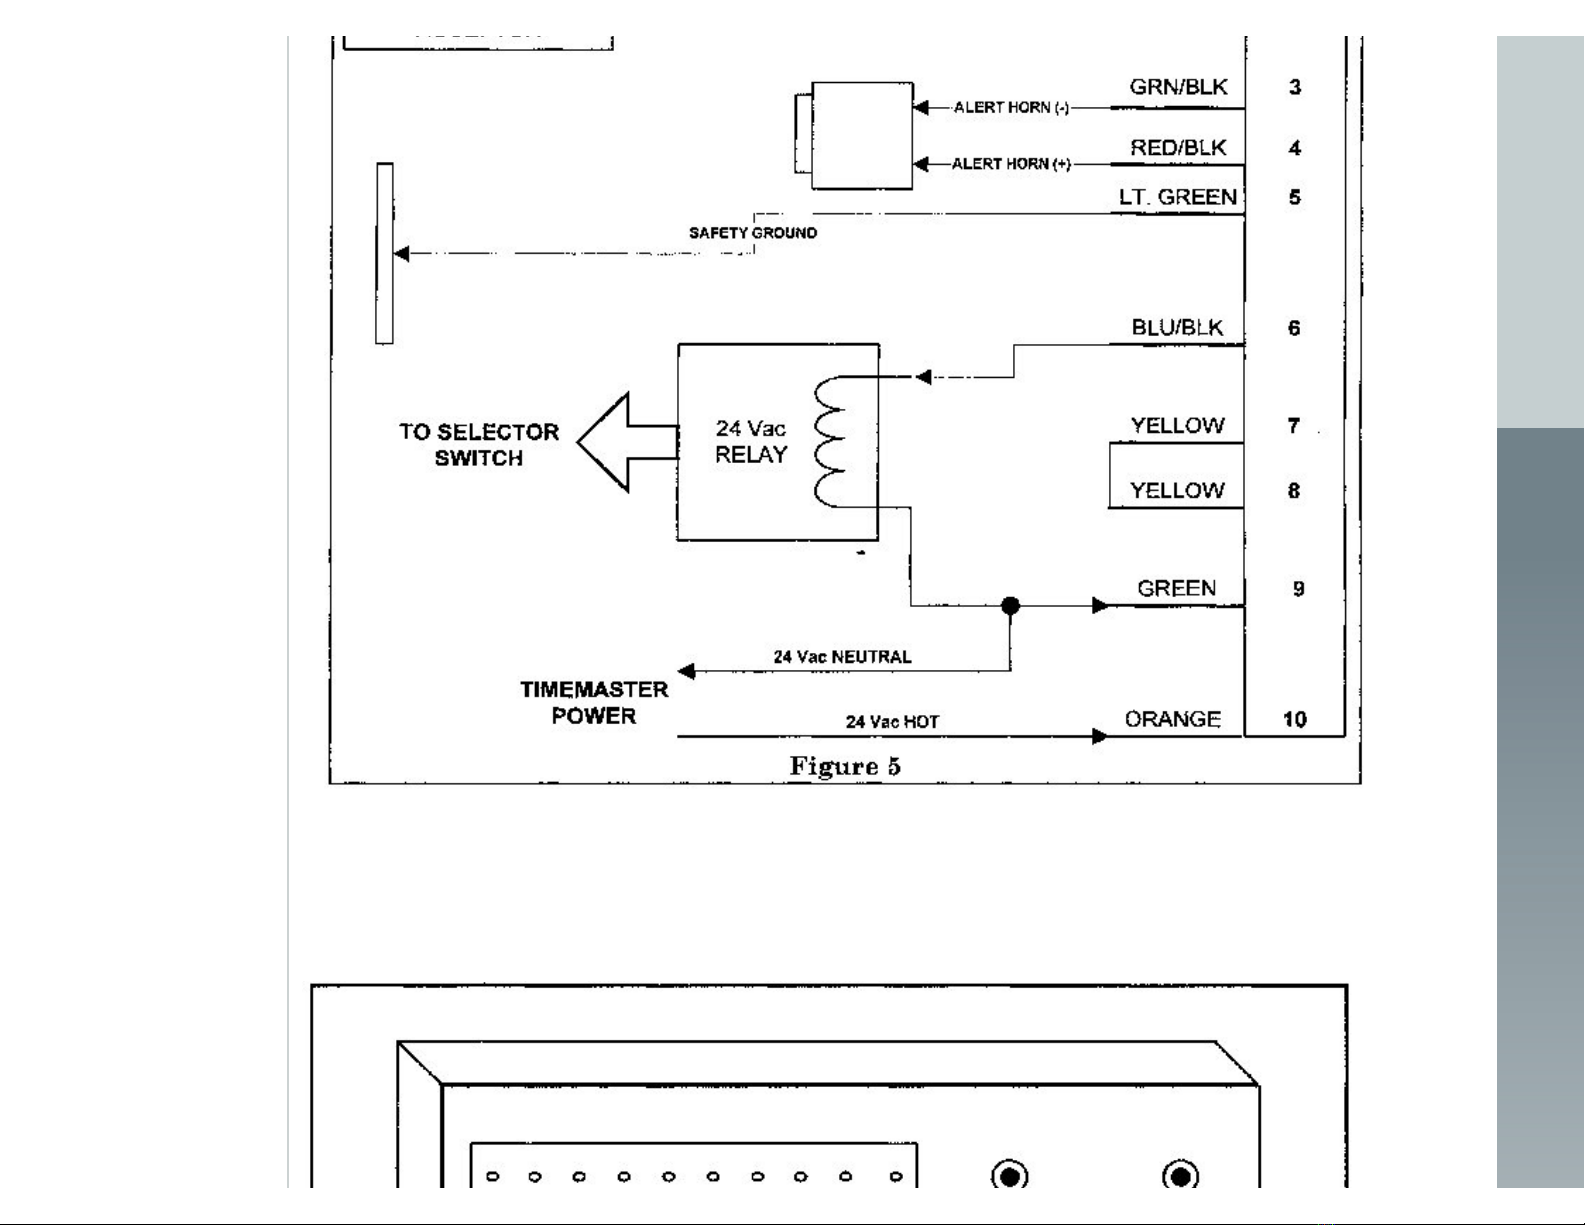
Pin #3
ALERT HORN (-)
An output voltage is applied by the timer when one (1) minute of time remains during a timer cycle. The maximum rating for the horn is:
DC voltage: 12 VDC
DC current: 30 mA
Connect the horn's negative (-) terminal to this pin.
Pin #4
ALERT HORN (+)
Connect the horn's positive (+) terminal to this pin.
(Note: Hi-Performance Wash Systems provides a 12Vdc, 105dB, water resistant alert horn for use with the TIMEMASTER timer. Use only this horn or its equivalent)
Pin #5
SAFETY GROUND
In addition to ensuring safety in the event of an electrical short-circuit, the safety ground also prevents timer problems caused by electrical power line noise. THIS PIN
MUST BE CONNECTED TO SFAETY GROUND! The safety ground is the facility ground or earth ground. Commonly, a green wire is connected to a cold water pipe to
provide the safety or earth ground. This ground must be solid and electrically conductive. Remove any paint or coating that could prevent conductivity.
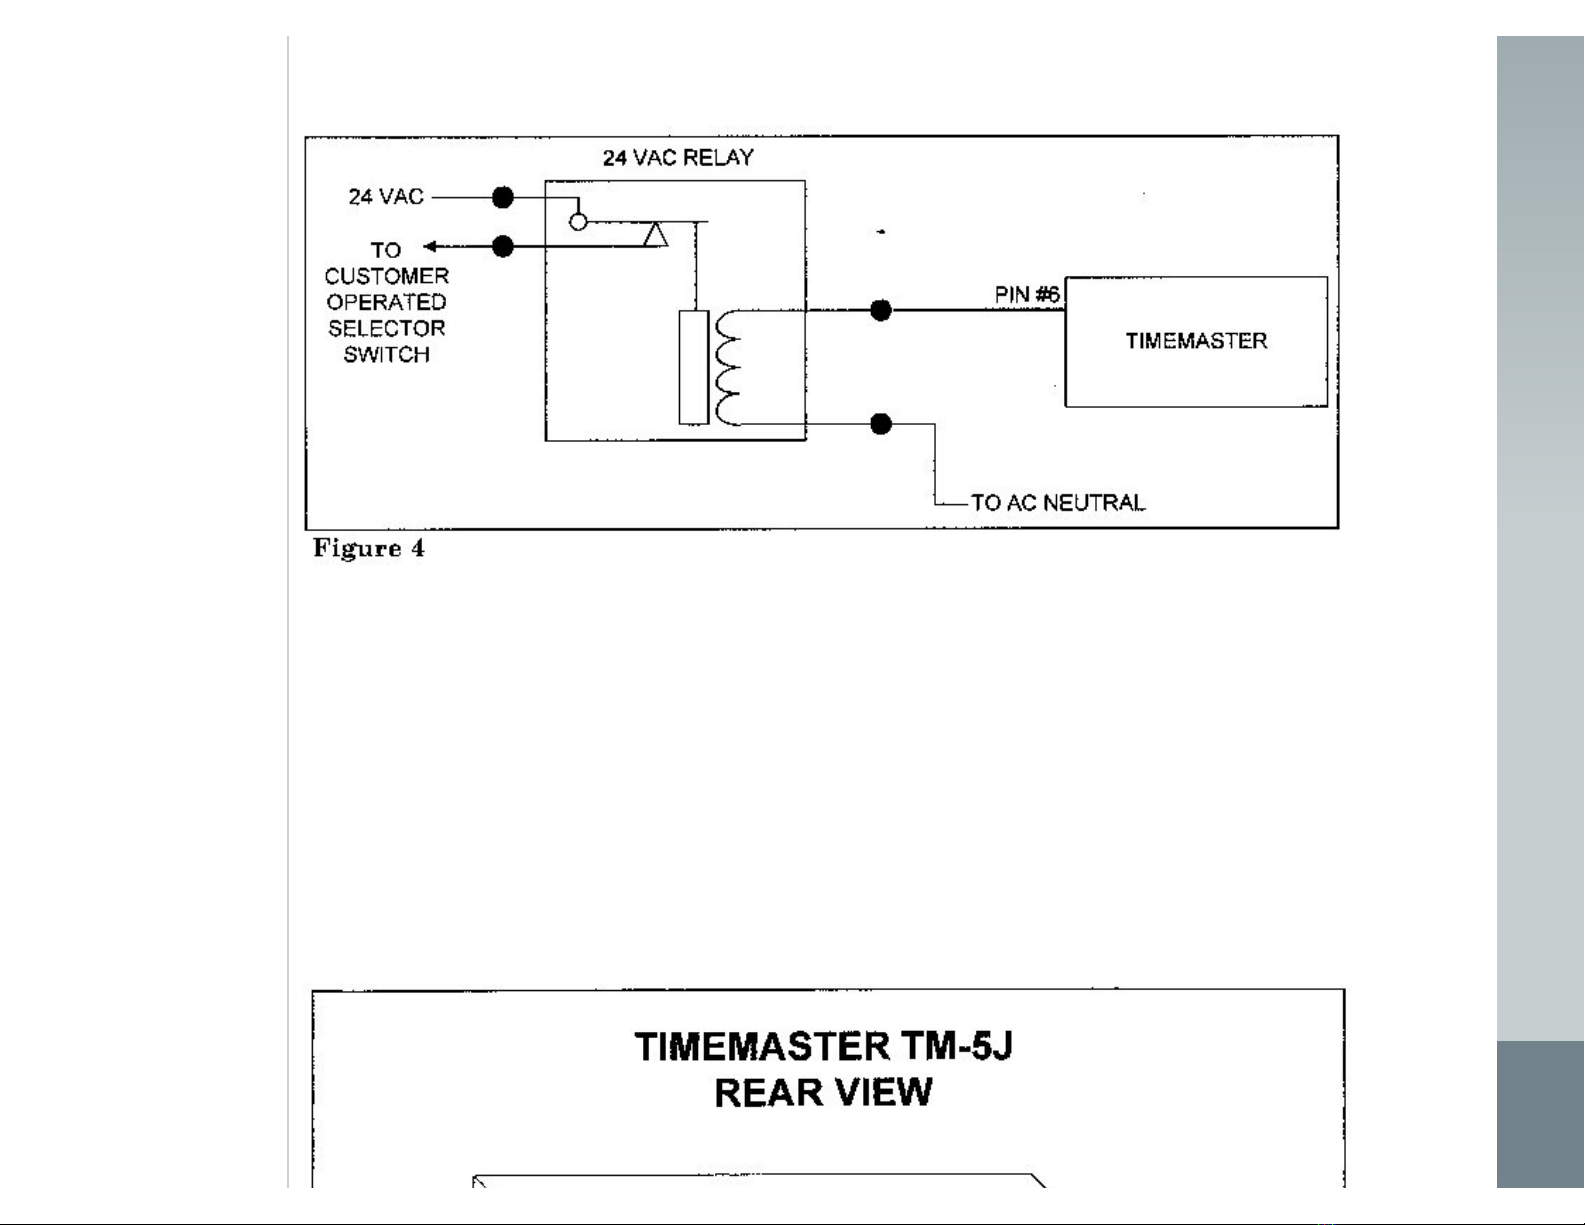
Pin #6
TIMED OUTPUT
http://www.hpws.com/tech/tmman.htm (5 of 15)3/29/2007 12:19:49 PM
Hi-Performance Wash Systems Car Wash Equipment and Parts Supplier to the Rocky Mountain Region
This is the power output for controlling the car wash bay. With the timer running, this pin provides 24 V AC to operate the car wash equipment. While TIMEMASTER is
capable of driving most car wash motor starter relays, it is recommended that pin 6 be wired to an isolation relay. Because of differences in car wash equipment, various
current requirements and short circuit protection are afforded the TIMEMASETER by proper isolation relay installation. Figure 4 illustrates the recommended isolation
relay installation.
Pins #7 & #8
No customer connections
Pin #9
24 V AC Neutral
AC voltage to power the TIMEMASTER is applied to pins 9 and 10. Pin 9 will be referred to as "AC neutral" and pin 10 referred to as "AC hot".
Voltage ratings applied to these pins are: AC voltage 20 to 30 V
Pin #10
24 V AC hot. See pin #9.
CHANGEOVER TIME ELECTRICAL INSTALLATION
The TIMEMASTER TM-5J requires additional electrical installation for the CHANGEOVER TIME feature to function.
Provided with the TIMEMASTER TM-5J is an additional pre-wired connector. This connector plugs into the smaller secondary socket located on the back of the timer. The
socket is numbered 1 through 8 right to left. The red wire on the wiring harness is the corresponding #1 wire. CAREFULLY insert the plug into the socket insuring that the
#1 wire is connected to the #1 pin. (See figure)
http://www.hpws.com/tech/tmman.htm (6 of 15)3/29/2007 12:19:49 PM

Hi-Performance Wash Systems Car Wash Equipment and Parts Supplier to the Rocky Mountain Region
Connect the red, orange, yellow and green wires to the appropriate rotary switch terminals for the products you wish to activate the CHANGEOVER TIME. Note that each
selection connected to CHANGEOVER TIME is individually programmable. (See PROGRAMMING for instructions). The remaining 4 wires on the connector are not used
and should be secured with tape or wire ties.
GRACE TIME ELECTIRCAL INSTALLATION
The TIMERMASTER TM-5J requires no additional electrical installation for the GRACE TIME feature to function. (See PROGRAMMING for instructions).
BONUS TIME ELECTRICAL INSTALLATION
The TIMEMASTER TM-5J requires no additional electrical installation for the BONUS TIME feature to function. (See PROGRAMMING for instructions).
http://www.hpws.com/tech/tmman.htm (7 of 15)3/29/2007 12:19:49 PM
Hi-Performance Wash Systems Car Wash Equipment and Parts Supplier to the Rocky Mountain Region
PROGRAMMING
MODE AND SET SWITCHES
The TIMEMASTER is programmed through the use of its MODE and SET switches. The switches are push button switches located on the back of the timer case. The
switches should only be depressed with light finger pressure. NO TOOLS SHOULD BE USED TO DEPRESS THE SWITCHES! The MODE and SET switches are labeled
for easy identification. (See figure 6)
http://www.hpws.com/tech/tmman.htm (8 of 15)3/29/2007 12:19:49 PM

Hi-Performance Wash Systems Car Wash Equipment and Parts Supplier to the Rocky Mountain Region
INITIAL SETUP
These instructions are for programming the TIMEMASTER when it is first installed. You may reprogram the timer using these same steps however, the display number will
reflect the current program instead of what is indicated by the chart. You may also reprogram the TIMEMASTER with the optional infrared remote control. See REMOTE
CONTROL PROGRAMMING for details.
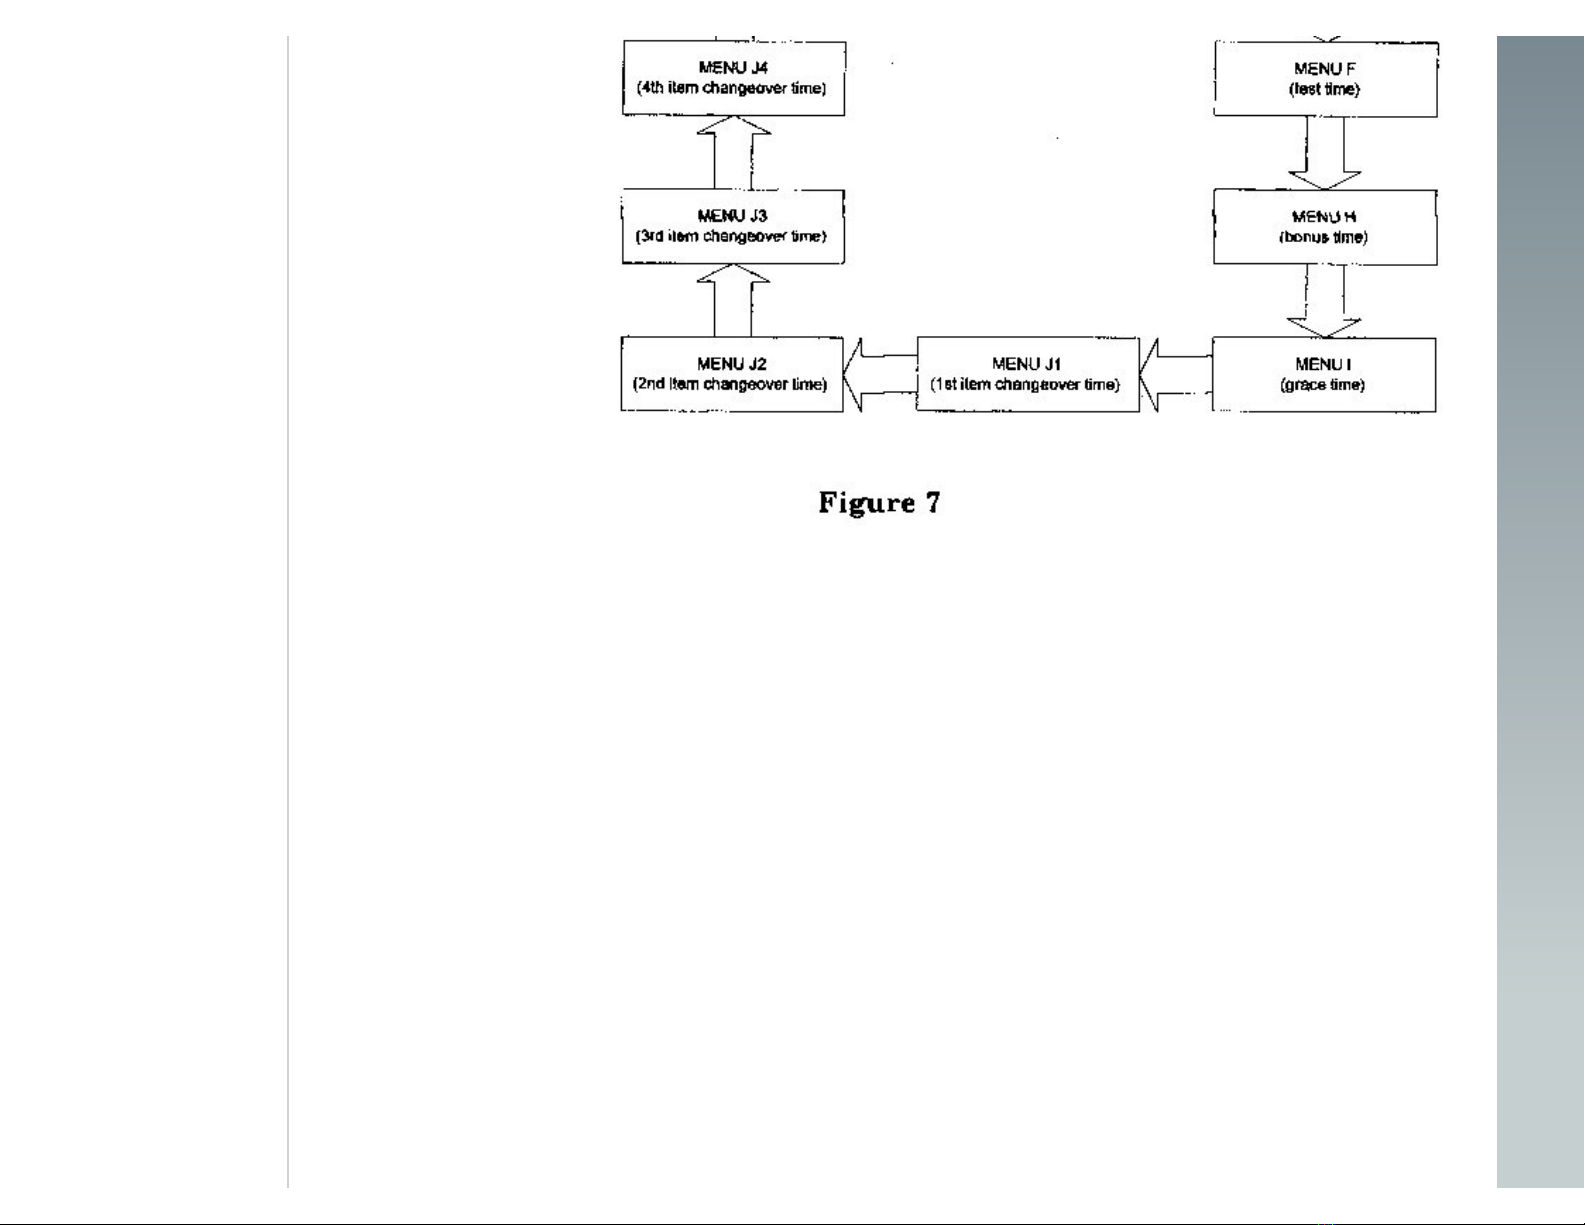
The MODE switch cycles the timer through its 12 steps of programmable steps. These steps are shown in the following flow chart (figure 7)
After the MODE switch moves to the option step, the SET switch causes the number displayed to increase by one unit value. Holding the switch depressed for more that 2
seconds will increase the count rapidly. If you pass the desired number, continue to depress the SET switch until the display counts to its maximum value and starts over.
Once the timer has been programmed, the built-in memory will maintain the program even if the timer is unplugged.
WARNING! The timer's memory includes its timed output. If power is removed from the timer during a timing operation, the unit will activate its controlled device when the
power is restored.
http://www.hpws.com/tech/tmman.htm (9 of 15)3/29/2007 12:19:49 PM
Hi-Performance Wash Systems Car Wash Equipment and Parts Supplier to the Rocky Mountain Region
INITIAL SETUP - PROGRAMMING
When the wiring has been properly connected, and the plug has been installed into the timer, turn on the power to the device. The timer's display will flash:
"$.50...TO...WASH".
The timer's default programming is set to $.50 for 1 minute. To change the program, depress and hold the MODE button until the display reads "MENU". Press and
release the MODE button again and the display will read:
A:02
MENU A (Price to start)
This menu sets the number of coins required to start the equipment. If you wish to set the timer to start on $1.00, this number will be set to 4, (4 quarters = $1.00). A $2.00
starting price is therefore 8, (8 quarters = $2.00). To change the PRICE TO START, depress and release the SET button once for each number increase you desire. Once
the correct number is displayed, depress and release the MODE button. This display will now read:
b:00
MENU B (Seconds)
This menu sets the seconds your equipment will operate once the minimum amount to start has been deposited. Most car wash equipment operates on a 4-minute cycle.
However, some facilities are set to run at 3:30 per cycle. To set an even minute cycle leave this number at :00.
To change this number, depress and release the SET button until the desired number of seconds is displayed.
Once the correct number is displayed, depress and release the MODE button. The display will now read:
C 1:00
MENU C (Minutes)
This menu sets the minutes your equipment will operate once the minimum amount to start has been deposited. Most car wash equipment operates on a 4-minute cycle.
However, some facilities are set to run at 3:30 per cycle.
To set the minute cycle, depress and release the SET button until the desired number of minutes is displayed.
Once the correct number is displayed, depress and release the MODE button. The display will now read:
http://www.hpws.com/tech/tmman.htm (10 of 15)3/29/2007 12:19:49 PM

Hi-Performance Wash Systems Car Wash Equipment and Parts Supplier to the Rocky Mountain Region
d:00
MENU D (Last minute alert)
This menu sets the number of seconds the alert horn will sound when one minute remains on the cycle. This feature can be set from 0 to 59 seconds. Most operators find
that 5 seconds is sufficient warning time (in fact, more the 5 seconds can become quite annoying.)
To set the last minute alert, depress and release the SET button until the desired number of seconds is displayed.
Once the correct number is displayed, depress and release the MODE button. The display will now read:
0E:EE
MENU E (Security Code)
This menu sets the security code for the timer's remote control functions. If you intend to use the optional remote control to access your timers, it is recommended that you
change the default code (0000) to a number more secure.
To set the security code, depress and release the SET button until the desired number is displayed.
Once the correct number is displayed, depress and release the MODE button. The display will now read:
#0:EE (# = the number you just entered)
Continue setting the security code, depress and release the SET button until the 2nd desired number is displayed.
Once the correct number is displayed, depress and release the MODE button. This display will now read:
##:0E (# = the number you just entered)
Repeat these steps two more times to complete the 4-digit code.
MENU F (Test Time)
This menu set s the test time for the timer's remote control functions. With the optional remote control you can access your timers to operate the equipment for testing
purposes.
To set the test time, depress and release the SET button until the desired number of minutes is displayed. Experience has shown that 4 to 5 minutes is sufficient to test
the equipment and wash down the bay floor of a self-service car wash.
Once the correct number is displayed, depress and release the MODE button. The display will now read:
h:## (## indicates the number of seconds each quarter is worth based upon the values you entered for menus A, B, and C).
MENU H (Bonus Time)
This menu sets the bonus time for additional coins. With this feature you may give your customers more value for the quarters that are deposited after the initial start price.
To illustrate this feature we will assume the car wash is priced at $2.00 for 4 minutes. Each quarter is therefore worth 30 seconds of time. The timer automatically
calculates the time per coin and displays it on the 'h' menu. You can change the value of each coin deposited after the initial $2.00 to give your customers a bonus for
spending more money. If you change the time shown on the 'h' menu from 30 seconds to 45 seconds your customers will receive 4 minutes of time for their first $2.00 and
45 seconds for each quarter deposited thereafter.
To set the bonus time, depress and release the SET button until the desired seconds is displayed.
If you do no want to offer bonus time simply depress and release the MODE button. The display will now read:
I:00
MENU J1 (Changeover time 1)
This menu sets the CHANGEOVER TIME for item 1. If you have connected the "J" wiring harness (see electrical connections) setting the CHANGEOVER TIME is
accomplished with this menu.
To set the CHANGEOVER TIME for item 1, depress and release the SET button until the desired seconds are displayed.
http://www.hpws.com/tech/tmman.htm (11 of 15)3/29/2007 12:19:49 PM

Hi-Performance Wash Systems Car Wash Equipment and Parts Supplier to the Rocky Mountain Region
Once the correct number is displayed, depress and release the MODE button. The display will now read:
J2:## (## indicates the numbers you set for the J1 program)
MENU J2 (Changeover time 2)
This menu sets the CHANGEOVER TIME for item 2. If you have connected the "J" wiring harness (see electrical connections) setting the CHANGEOVER TIME is
accomplished with this menu. Note that the CHANGEOVER TIME 2 is set to the same value that you set for CHANGEOVER TIME 1.
To set the CHANGEOVER TIME for item 2, depress and release the SET button until the desired seconds are displayed.
Once the correct number is displayed, depress and release the MODE button. If you want the CHANGEOVER TIME 2 to be the same as CHANGEOVER TIME 1, simply
depress and release the MODE BUTTON. The display will now read:
J3:## (## indicates the numbers you set for the J2 program)
MENU J3 (Changeover time 3)
This menu sets the CHANGEOVER TIME for item 3. If you have connected the "J" wiring harness (see electrical connections) setting the CHANGEOVER TIME is
accomplished with this menu. Note that the CHANGEOVER TIME 3 is set to the same value that you set for CHANGEOVER TIME 1.
To set the CHANGEOVER TIME for item 3, depress and release the SET button until the desired seconds are displayed.
Once the correct number is displayed, depress and release the MODE button. If you want the CHANGEOVER TIME 3 to be the same as CHANGEOVER TIME 1, simply
depress and release the MODE BUTTON. The display will now read:
J4:## (## indicates the numbers you set for the J3 program)
MENU J4 (Changeover time 4)
This menu sets the CHANGEOVER TIME for item 4. If you have connected the "J" wiring harness (see electrical connections) setting the CHANGEOVER TIME is
accomplished with this menu. Note that the CHANGEOVER TIME 4 is set to the same value that you set for CHANGEOVER TIME 1.
To set the CHANGEOVER TIME for item 4, depress and release the SET button until the desired seconds are displayed.
Once the correct number is displayed, depress and release the MODE button. If you want the CHANGEOVER TIME 4 to be the same as CHANGEOVER TIME 1, simply
depress and release the MODE BUTTON. The display will now read:
WASH
MESSAGE MENU
This menu sets the GREETING MESSAGE. The greeting can be selected from the following choices:
"WASH" "VAC" "RUN" "USE" "DRY" "PLAY"
Once selected and in operation, the timer's display will flash your selection along with PRICE TO START and the word "TO". To illustrate, we will assume the timer is
installed in a car wash coin box and the car wash is priced at $2.00 for 4 minutes. An approaching customer will see the timer flash:
$2.00...to..WASH
Once the selected greeting message word has been displayed, depress and release the MODE button. The timer is now programmed and ready for operation.
REPROGRAMMING
Reprogramming the timer from its initial setup is easy. Simply follow the initial programming instructions. The existing program values will be displayed allowing you to
make changes more rapidly. For example, assume the timer is programmed at $1.25 for 4 minutes and you wish to raise you price to $1.50 for 4 minutes. Follow the
programming instructions to access the timer's menu. When the display read "A:05" depress and release the SET button once. The display will now read "A:06" indicating
6 coins are needed to start the equipment. Now press and release the MODE button 15 times. Except for the BONUS TIME, no other menu items will have been affected
by this simple price increase. If you are using the BONUS TIME feature, you will have to reprogram the "H" menu to reflect the correct time. Otherwise the BONUS TIME
automatically calculates to the standard timer per coin.
To cancel all programming you may perform a "POWER-ON RESTART". This procedure will return the timer to its default program as it came from the factory (2 coins to
start, 1 minute of time). Simply unplug the main power plug from the timer. Depress and hold the MODE button while reinstalling the plug. The timer is now at its default
program. The display will read "MENU".
http://www.hpws.com/tech/tmman.htm (12 of 15)3/29/2007 12:19:49 PM

Hi-Performance Wash Systems Car Wash Equipment and Parts Supplier to the Rocky Mountain Region
Notice: You must program the timer's features beyond the factory default for the timer to fully function. For example, if you simply plug in the timer to operate at $.50 for
one minute, the timer will not recognize additional coins. This is because the "H" menu is defaulted to 0 seconds. However, once you change the timer's program, the "H"
menu automatically calculates the standard time per coin.
REMOTE CONTROL
The TIMEMASTER TM-5J is capable of remote control with the optional RC-1 infrared remote controller. One remote will access as many timers as you won. Simply use
the same security code for every timer. It is recommended that your security code be unique as opposed to 1111 or 1234.
REMOTE CONTROL FUNCTIONS
The RC-1 permits you or your employees to perform the following functions:
TEST
Enter your four-digit security code and depress the TEST button. The display will count down the test time that you programmed into the timer during Step 6 of the Initial
Setup procedure. If you wish to turn off the TEST time prior to it elapsing, simply depress the button labeled "CNCL", to cancel the time.
COIN COUNT
Enter your four-digit security code, depress the button labeled "COIN". The timer's display will show the number of coins deposited since the counter was last reset. To
reset the coin count, simply depress the "0" button followed by the "CNCL" button.
TEST COUNT
Enter your four-digit security code, depress the button labeled "TEST CYCLES". The timer's display will show the number of TEST CYCLES that have been used. To turn
of the test cycle display, press any other button on the remote control. The test counter will not reset unless you perform a POWER ON RESTART.
CANCEL
Enter your four-digit security code, depress and release the button labeled "CNCL". You may cancel the remaining time (except during the last minute) on a timer that is
left running by a customer, after you have deposited coins to test your equipment, or to cancel the TEST time after washing down the car wash bay.
See figure 8 for RC-1 button description.
http://www.hpws.com/tech/tmman.htm (13 of 15)3/29/2007 12:19:49 PM

Hi-Performance Wash Systems Car Wash Equipment and Parts Supplier to the Rocky Mountain Region
REMOTE CONTROL OPERATION
The remote control works best from close proximity - usually within three feet of the timer. Simply aim the remote at the TIMEMASTER and depress the appropriate
buttons. After the security code has been properly entered, the timer's horn will beep once. This signal tells you that you have accessed the timer. You must press a
function button within 7 seconds or access will automatically cancel. If you enter your security code and no beep is heard, depress "CNCL" and reenter your code.
REMOTE CONTROL REPROGRAMMING OF THE TIMERMASTER
The TIMEMASTER TM-5J can be reprogrammed with the RC-1 remote controller. All functions except the timer's security code can be changed with the remote controller.
This makes the RC-1 a valuable tool in that the coin box need not be opened to modify your timer program.
Reprogramming with the remote controller follows the same flow chart as initial programming. The only difference is the use of the remotes buttons versus the MODE and
SET buttons on the back of the timer.
To access the timer enter your 4 digit security code. Listen for the horn to beep. Once the horn beeps, depress and release the MODE button (See Figure 8).
Note: When entering function commands or your security code number on the remote control, press each button completely and release it completely before depressing
the next button. The infrared communications system is designed to prevent improper use. Therefore, sending signals too quickly can cause the system to reject the
signal. If you do not get a beep response from the timer after you have entered your security code, depress and release the "CNCL" button and reenter your security code
slowly. Remember to keep the remote pointed toward the timer's display when entering your code or function commands
Follow the programming flow charts described previously in this manual to change the desired program on your timer.
Once you have selected the desired MODE, use the INCREASE button to advance to a higher number or the DECREASE button to return to a lower number. Note that
http://www.hpws.com/tech/tmman.htm (14 of 15)3/29/2007 12:19:49 PM

Hi-Performance Wash Systems Car Wash Equipment and Parts Supplier to the Rocky Mountain Region
depressing and holding the buttons will advance or decrease the numbers rapidly.
If you wish to keep a menu function unchanged, simply bypass the menu function by pressing the MODE button again.
http://www.hpws.com/tech/tmman.htm (15 of 15)3/29/2007 12:19:49 PM
Table of contents
Other Timemaster Clock manuals

Popular Clock manuals by other brands


Explore Scientific
Explore Scientific BCC1001 instruction manual

SANTEK
SANTEK SACO700 manual

La Crosse Technology
La Crosse Technology WT-3161BK quick start guide

Meinberg
Meinberg GPS167SV operating instructions

Clas Ohlson
Clas Ohlson 18-5042/31-1193 quick start guide

La Crosse Technology
La Crosse Technology WT-3181 instruction manual

Enviro
Enviro MRP2 manual

La Crosse Technology
La Crosse Technology Radio Controlled Analog Clock WT-3181bz instruction manual

Oregon Scientific
Oregon Scientific CIR100 quick start guide

SkyScan
SkyScan 86722 instruction manual

Oregon Scientific
Oregon Scientific BAR332ES user manual

Koolatron
Koolatron Hummer AC51 owner's manual