Tineco FLOOR ONE S3 Series User manual
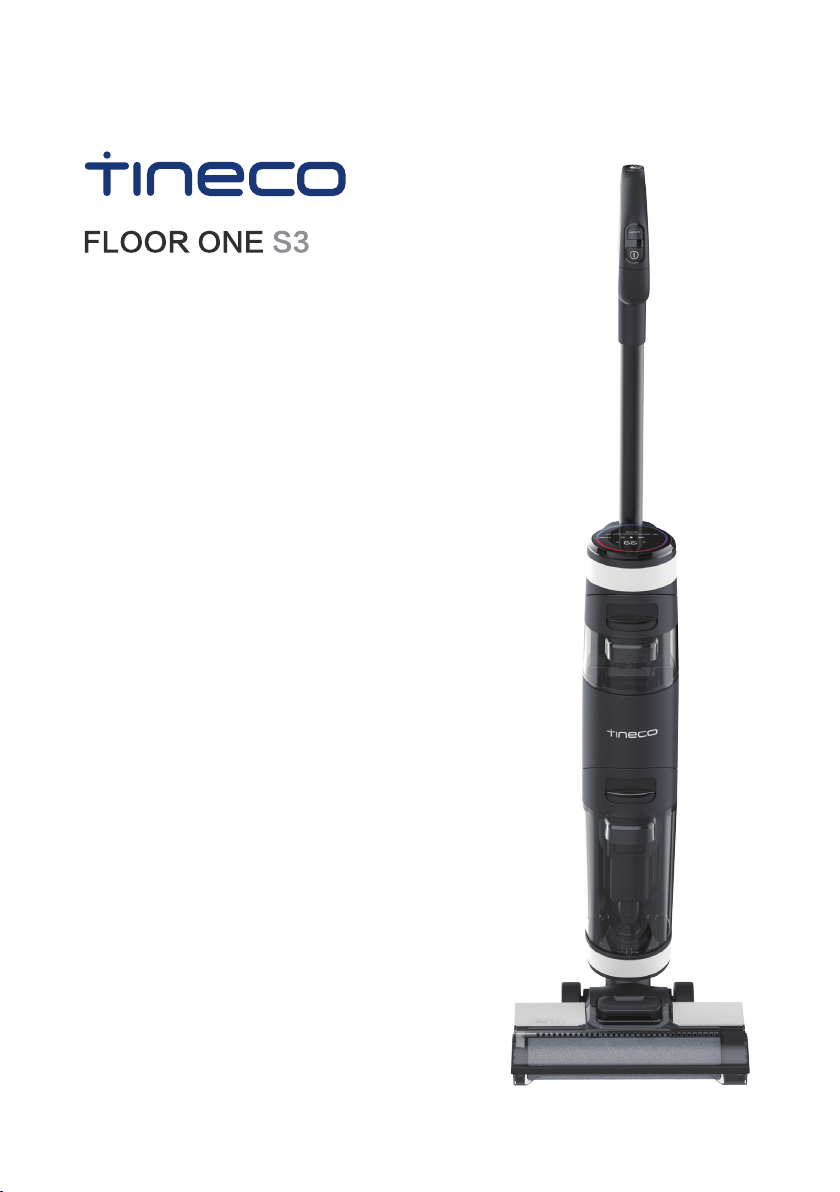
SERIES
Smart Cordless Vacuum & Washer
Instruction Manual
*Actual product may differ from illustration.


1
CONTENTS
Important Safety Instructions...............................................................3
Overview................................................................................................6
Accessories............................................................................................8
Assembly ...............................................................................................9
Operation............................................................................................10
Maintenance .......................................................................................16
Specications ......................................................................................20
Troubleshooting..................................................................................21
Warranty ..............................................................................................22
2
1. Do not operate the hard oor washer too close to heaters,
radiators or other hot surfaces.
2. Before inserting the charger into the wall, make sure your
hands are dry.
3. Before turning on the hard oor washer, safely remove any
large objects from the oor or cleaning surface in order to
prevent damage to the lter.
4. When you want to remove the charger from the power
socket, do not use the power cable, gently pull the plug
from the power socket.
Do not use this hard oor washer if the housing and/or the charger
housing is damaged.
Precautionary measures:

3
IMPORTANT! Always switch off the hard oor washer before
cleaning, when not in use or attempting any maintenance task.
The charger must only be connected to an AC power supply at the
voltage shown on the rating label. This hard oor washer should
only be used for its intended purpose as described in this instruction
manual. Never operate the washer without lters.
When using your hard oor washer, basic
precautions should always be observed,
including the following;
1. This appliance is not intended for use
by persons (including children) with
reduced physical, sensory, mental
capabilities or lack of experience
and knowledge, unless they have
been given supervision or instruction
concerning use of the appliance by a
person responsible for their safety.
2. Children should be supervised to
ensure that they do not play with the
appliance.
3. To prevent electrical shock, do not
immerse the appliance, battery or
power plug into water or other liquids.
4. To prevent electrical shock, do not use
the hard oor washer outdoors or on
wet surfaces.
5. Always check the power cord before
use, the power cord and the power
adapter should be in a good condition
and must not be damaged. If the
power cord or the charger adaptor
is damaged or defective, it must be
replaced.
6. The appliance and charger are intended
for domestic indoors use only.
7. Do not unplug the charger by pulling
on the power cord. To unplug, grasp
the power adapter, not the power cord
and gently pull the power adapter from
the power socket.
8. Do not handle or operate the appliance
with wet hands. Follow electrical safety
precautions at all times.
9. Do not attempt to change the
attachments while the appliance is
switched on. Use only manufacturer’s
recommended accessories.
10. Do not operate the hard oor washer
too close to heaters, radiators and
other hot surfaces.
11. Do not use the appliance to pick up
ammable items or combustible liquids
(i.e. gasoline, hot ashes, cigarettes,
matches, explosive materials or
anything burning) or use in areas where
such substances and items may be
present.
12. Do not use the appliance to pick up
toxic materials (i.e. chlorine, bleach,
ammonia).
13. Never operate or use the appliance
without the lters in place.
Important Safety Instructions

4
14. Before using the hard oor washer,
remove any large or sharp objects from
the oor or cleaning surface in order to
prevent damage to the lter.
15. If the air inlet or oor head is blocked,
switch off the washer straight away.
Clear the blocked object before
attempting to start the hard oor
washer again.
16. Before carrying out any maintenance or
cleaning the lters, always switch off the
hard oor washer.
17. Keep openings away from your face
and body.
18. Do not use the hard oor washer if it
is damaged or broken. If connection
cables are damaged, have them
replaced immediately.
19. Never clean the hard oor washer or
any of the electrical parts, especially
the electrical connections with water or
liquid cleaners.
20. Never attempt to make any
modications to the hard oor washer
and charger.
21. Always store the appliance and charger
indoors in a cool and dry place.
22. This washer is for dry household use
only.
23. Never run over the power cable with
the power head, as this may cause
damage to the power cable.
24. Keep your hands away from the roller
brush while the hard oor washer is
switched on.
25. To prevent unnecessary wear on the
roller brush, keep it moving while in
operation.
26. Damage caused by improper use or by
not observing the instructions in this
manual will void the warranty.

5
Battery use and care
1. The appliance is only to be used with the charger provided with the appliance.
2. Only charge the battery inside the washer or the charging dock. Only use the
specically designated charger to charge the product.
3. When the appliance is not in use, keep it away from other metal objects, like paper
clips, coins, keys, nails, screws or other small metal objects that can make a connection
from one terminal to another. Shorting the appliance terminals together may cause
burns or a re.
4. Under abusive conditions, liquid may be ejected from the battery; avoid contact. If
contact occurs, ush with water immediately. If liquid comes into contact with your eyes,
seek medical help immediately.
5. Do not charge or store the appliance outdoors or inside the car. Only charge or store
the battery in a dry indoor area where the temperature is more than 4 deg C but less
than 40 deg C. The charger is for indoor use only.
6. Never attempt to open the battery for any reason. If the plastic housing of the battery
casing breaks or cracks, immediately discontinue use and do not recharge.
7. The charger is not a serviceable part.
8. Before disposal of your battery, fully discharge your battery by running the product until
it stops.
9. The washer contains a Lithium battery. Do not dispose the appliance with your local
garbage. Contact your local council for instructions on how to safely dispose of the
battery.
10. Do not use the charger to charge a non-chargeable battery.
6
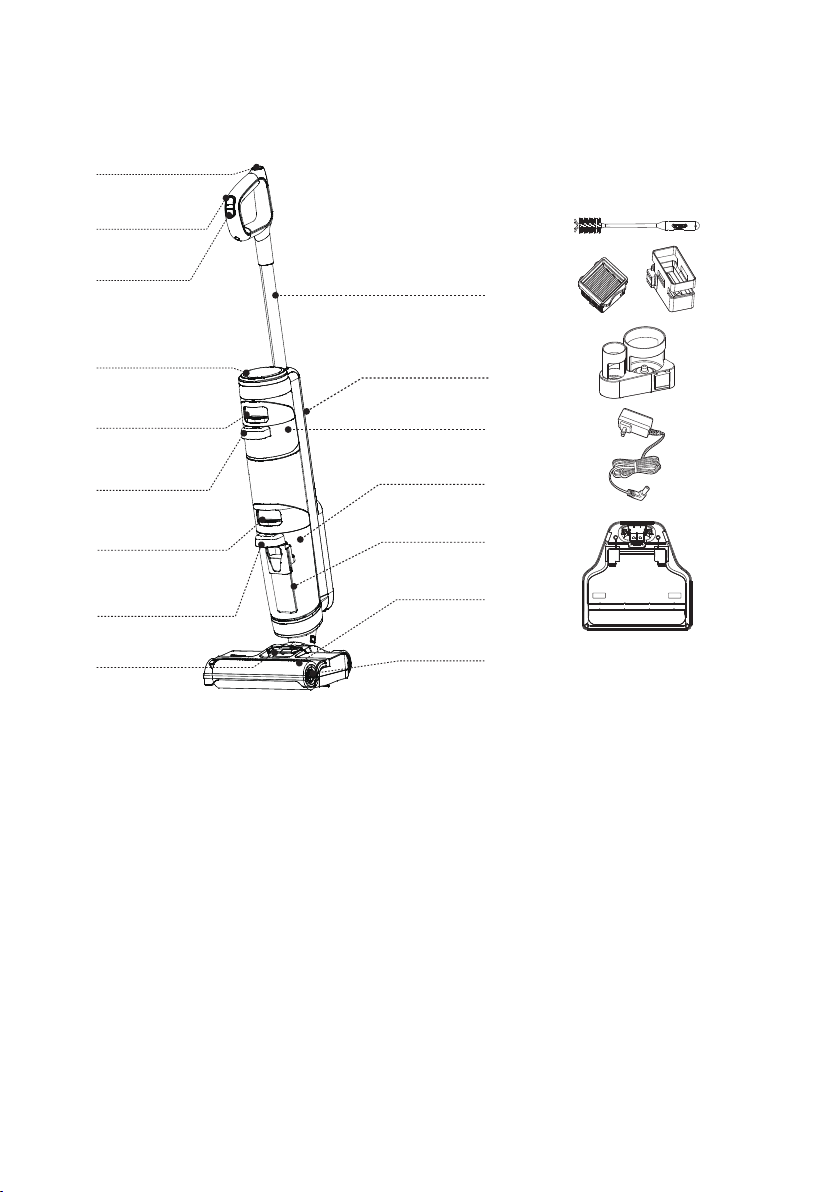
A. Self-cleaning Button
B. AUTO/MAX
C. Power On/Off
D. Digital Display
E. Clean Water Tank Release
F. Clean Water Tank Handle
G. Dirty Water Tank Release
H. Dirty Water Tank Handle
I. Brush Roller Cover Release
J. Tube
K. WiFi/Mute Button
L. Clean Water Tank (CWT)
M.Dirty Water Tank (DWT)
N. Floater
O. Brush Roller Cover
P. Brush Roller
Q. 3-in-1 Cleaning Tool
R. HEPA Filter & HEPA Holder
S. Accessory Holder
T. Adaptor
U. Charging Base
A
Q
B
R
J
M
C
S
K
N
D
T
L
O
E
U
F
G
H
IP
Overview

7
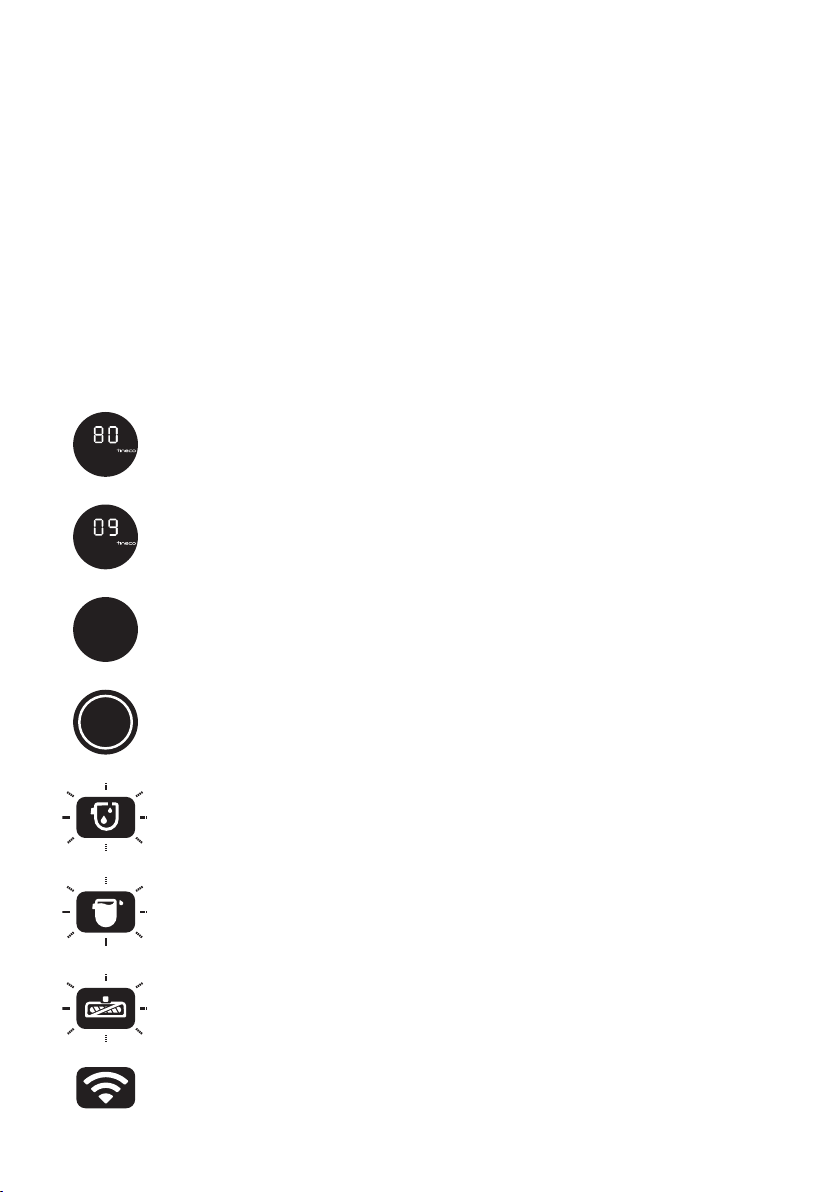
Digital Display
A. Self-cleaning Icon
B. Brush Roller Tangled Indicator
C. Dirt Monitoring Loop
(Blue to red according to the dirt
amount)
D. AUTO Mode
E. DWT Full or Blocked
F. CWT Empty
G.Power Indicator
H. Tineco Logo
I. WiFi Indicator
J. Battery Level Indicator
A B C D E F G H JI
8
Accessories
Note:
Accessories may vary between markets. If you would like to purchase accessories or consumables,
please contact Customer Service on AUS: 1800 815 270, NZ: 0800 282 288.
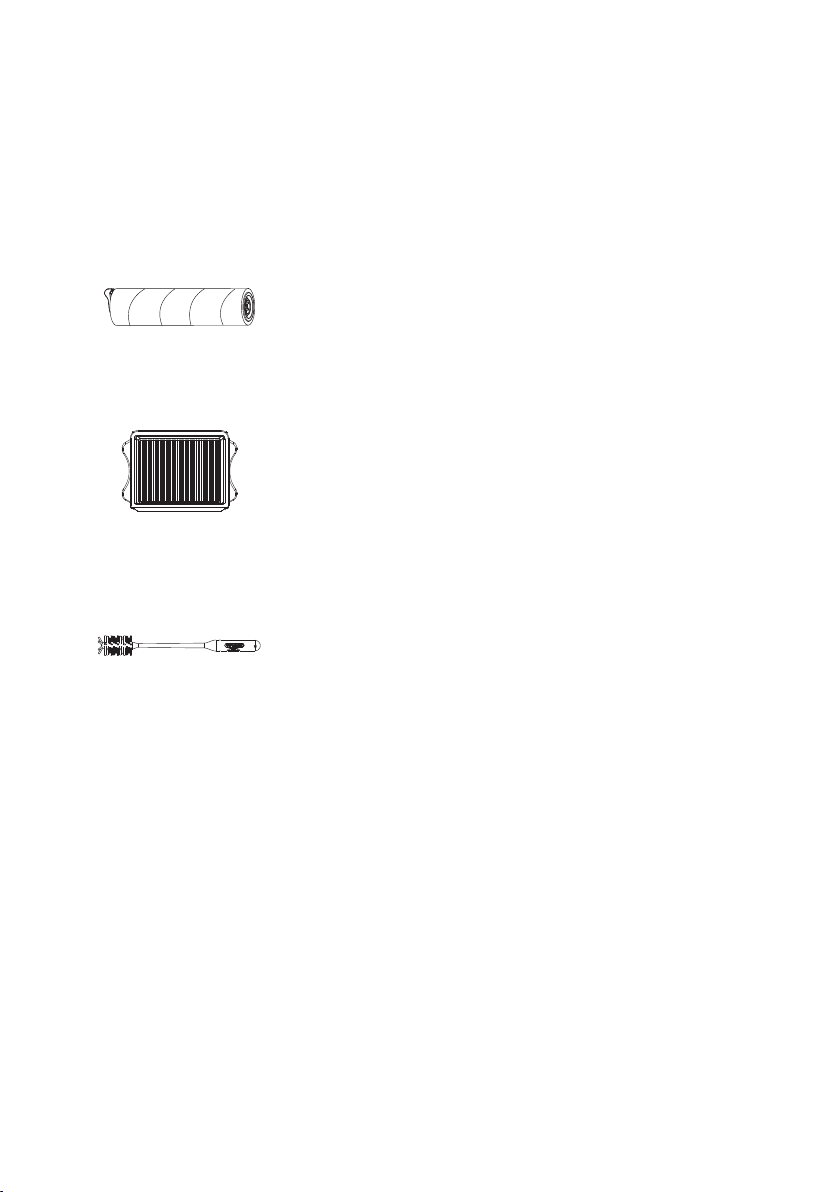
Brush Roller
Soft roller head with bristles can be used to vacuum and wash
at the same time. It can be easily cleaned with the self-cleaning
function.
HEPA Filter
HEPA and lter net can block large particles and debris, ensure
the appliance’s durability.
* Please install the HEAP before use, or it may lead to weak
suction.
3-in-1 Cleaning Tool
A full brush to clean the DWT, brush chamber and opening.
The tool also has a bristled end to remove dirt and mud on the
roller and DWT. The tool has a bladed end to remove hair and
debris that is wrapped around the roller.
9
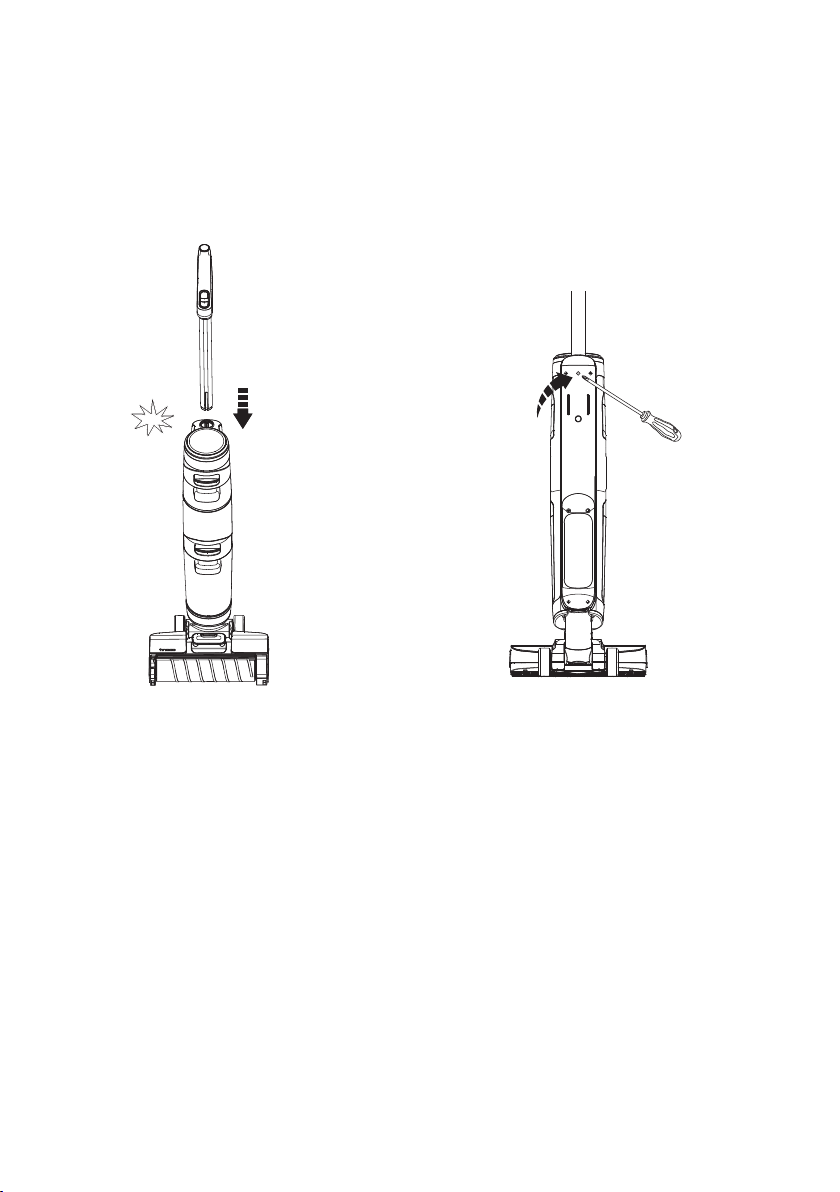
Assembly
How to Assemble/Disassemble
Note:
For water tank and brush assembly, please refer to “Operation” and “Maintenance”.
click
To assemble the handle, insert it into the
appliance until you hear a click.
In the event that the product must be returned,
please disassemble the handle. Press the
spring to release the handle with a tool (like a
screwdriver) and lift the released handle from the
appliance.

10
Operation
Preparing for Use
Before rst use, please charge the appliance for 4±0.5 hours (refer to “Charging Instructions” for details).
* Based on results from Tineco lab tests. Lab temperature 39.2°F (4°C) ~ 104°F (40°C).
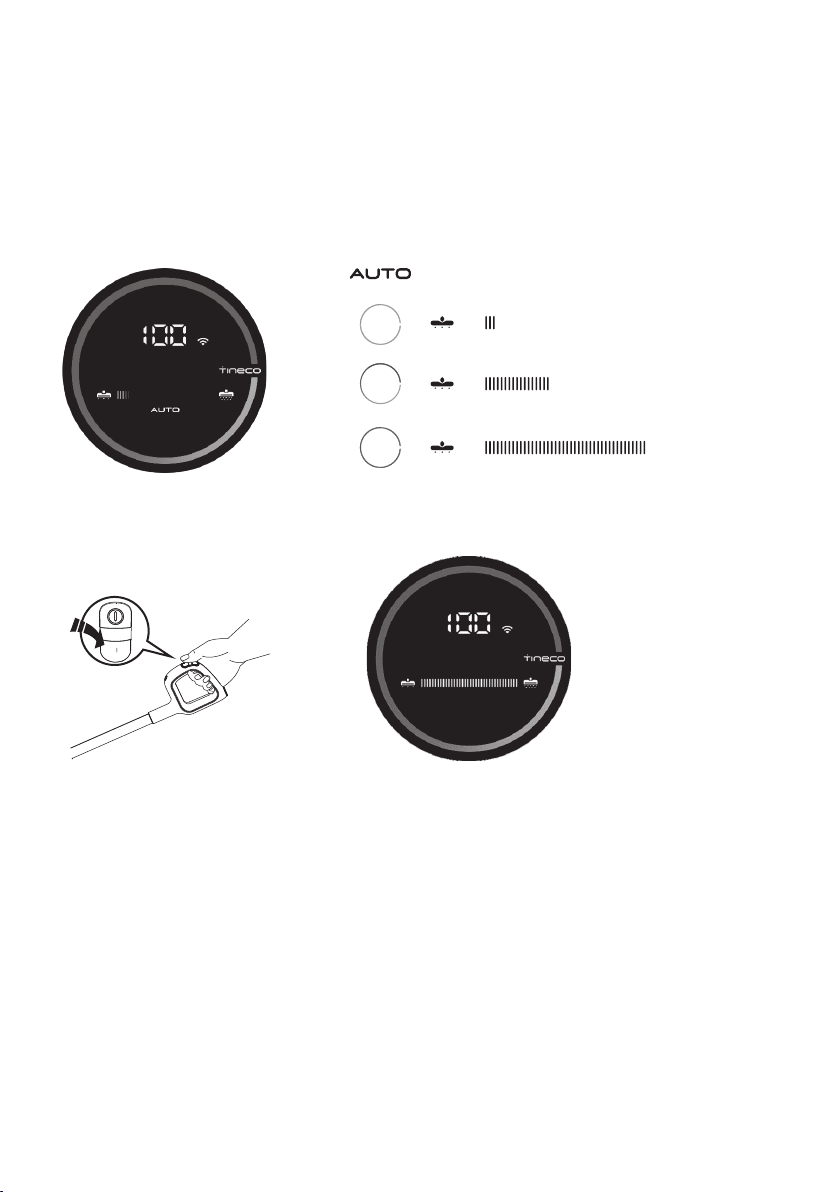
AUTO MAX
Tips:
• Water mode/Solution mode:
Appliance starts with Water mode by default.
Power on while the appliance is upright, long-
press
AUTO MAX
for 3s to switch between the
two modes.
• Switch to Solution mode:
LED Loop: Blue →Red (use cleaning solution)
• Switch to Water mode:
LED Loop: Red →Blue (use water only)
Press the button and the appliance will start
in AUTO mode by default. Press it again to turn
off the appliance. Switch between AUTO and
MAX mode by pressing the
AUTO MAX
button.
<142°
The appliance will stop working when put uprightly
and start running again when you recline.
* Do not recline more than 142° to protect
against water leakage.
Place the appliance on the charging base
vertically after use for recharge and storage.
Note:
• Selecting the appropriate mode depending on the CWT contents is vital for maximum dirt detection
effectiveness.
• Do not vacuum foamed liquid.
• To vacuum water left on the surface, the appliance will switch off in 3 seconds after power off.
Stop Working Start Again

11
Filling Clean Water Tank
MAX
Press the Clean Water Tank release button to
remove it from the appliance.
Open the tank cap, and ll with tap water to
the Max line.
②
①
click
Note:
Only use water under 140F°/60C°.
DO NOT USE HOT WATER.
Place the tank back into the appliance. You
should hear a “Click” if done correctly.
Charging Instructions
To charge the appliance, place the appliance on the charging
base and plug the adaptor into a power outlet.
1. To charge the appliance, connect the external charging cord
to the charging base and plug it into the wall outlet.
2. To avoid tripping hazards, please place the appliance on the
charging base near a wall during charging.
Warning:
• Only charge the appliance with the adaptor supplied by Tineco.
• During long periods of not being used, the appliance must be charged once every 3 months for
optimal performance. It may take 4±0.5 hours for a full charge.
• Store indoors in a dry place. Do not expose the appliance to sunlight or freezing temperatures.
Recommended temperature range: 39.2°F (4°C) ~ 104°F (40°C).
12
Cleaning Mode Selection
AUTO Mode
• In AUTO mode, the iLoop™ sensor automatically detects how dirty the oor is and applies the
appropriate amount of detergent and suction power.
• A red dirt monitoring loop indicates more dirt is detected, and a blue loop indicates less dirt is
detected. This mode automatically provides the best cleaning solution.
Clean: on Min
Power
Vary depending
on dirt amount
Heavy dirt: on
Max Power
MAX Mode
AUTO MAX
• In AUTO mode, press the AUTO/MAX button to enter MAX mode. The AUTO indicator on the
display will turn off.
• In Max mode, the appliance will apply max suction power and will spray water/solution for deeper
cleaning.
Note:
Keep sharp objects away from the digital display screen to avoid scratches and scrapes.
13
Runtime
• When in AUTO mode, the runtime is approximately 35 minutes. When MAX power is used, the
runtime is approximately 25 minutes.
• Estimated runtime data was obtained by a Tineco Laboratory.
Charging Time
• A full charge takes approximately 4±0.5 hours.
• Estimated data was obtained by a Tineco Laboratory using ambient temperatures between
39.2°F (4°C) to 104°F (40°C).
Indicator
When in Use
Battery level ≥ 10%: battery indicator will be illuminated.
Battery level < 10%: battery indicator will be blinking.
Off: no power detected or possible battery malfunction.
Blinking red: dirt sensor malfunction or blocked.
Indicator blinking: CWT is empty.
Indicator blinking: DWT is full or channel has a blockage.
Indicator blinking: brush roller is not installed or has a blockage.
Illuminated: WiFi has successfully connected.

14
Blinking: WiFi is connecting.
Off: WiFi is not connected, please connect to the network.
Indicator blinking: appliance is in need of self-cleaning.
During Charging
Tineco indicator: blinking.
Fully Charged
In 5 minutes: Tineco indicator illuminated.
After 5 minutes: all indicator lights turn off.
App
All the functions can be performed using the Tineco app. Download the Tineco app from the App
Store, Google Play and Tineco Ofcial Site.
TinecoTineco
www.tineco.com
Support
App Downloads
GET IT ON
Google Play
iOS 9.0 or later
Android 5.0 or later
Download on the
App Store
App
Downloads
Note:
The default setting for voice prompt is English, you can set other languages via App (German, French,
Italian, Spain, etc.).

15
Voice Prompts (May vary depending on software version)
Status Reminder
Battery level: 10~20% Low battery
Battery level: 0~10% Low battery, please charge
WiFi network connected Network connected
Clean Water Tank is empty Clean Water Tank empty, please rell water and
cleaning solution
Dirty Water Tank full or channel blocked Clean the Dirty Water Tank or the debris channel
Dirty Water Tank is full during self cleaning Dirty Water Tank full, please empty
Dirty sensor Please begin self-cleaning cycle
Dirty HEPA lter Please clean the lter in Dirty Water Tank
Brush roller is tangled Please clean the brush roller
Brush roller not installed Please install the brush roller correctly
Too much wear of brush roller Please replace the brush roller
Shutting down (takes 3s to shut down) Shutting down
Power is off Power off
Start charging Charging has commenced. Auto-detecting
whether to run self-cleaning cycle
Need self cleaning Please begin self-cleaning cycle
Appliance not on the charging base Please place appliance on the charging base
Battery insufcient for self-cleaning Low battery, start charging
Sufcient battery to start self cleaning Start self cleaning
Cleaning brush roller Cleaning brush roller
Cleaning debris channel Cleaning debris channel
Auto detecting Auto detecting
Deep cleaning Deep cleaning
Self-cleaning completed Self-cleaning cycle complete. Please clean Dirty
Water Tank
Self-cleaning stopped Self-cleaning cycle stopped. Please clean Dirty
Water Tank
Clean with cleaning solution by default Clean with cleaning solution
Clean with water only Clean with water only
Auto mode by default Auto Mode
Switch to Max mode Max Mode
Voice prompts on Voice prompts on
Voice prompts disabled Voice prompts disabled

16
Maintenance
Note:
• For optimal performance and to prevent odors, always clean and dry DWT, oater, lters, brush
roller, brush roller cover completely after each use.
• Please make sure each part is installed correctly or the appliance may not work properly.
• After maintenance, place the appliance on the charging base vertically. Do not expose the appliance
to direct sunlight, and store it indoors in a dry place.
Main Body
AUTO MAX
To reduce the risk of injury, switch off before
performing maintenance.
Use a cloth to clean the surface with a neutral
detergent. The cloth should be dry to prevent
water from entering the appliance.
Blinking red
When LED loop blinking red, remove Dirty Water
Tank, clean the dirt sensor with a damp cloth or
3-in-1 cleaning tool.

17
Dirty Water Tank
• When dirty water reaches the Max line, the appliance will stop working and show a reminder on the
display and play a voice prompt.
• Pull up the tank lid to empty the DWT. Use the 3-in-1 cleaning tool to remove remaining debris.
Rinse the inside of the DWT and place back into the appliance.
Filter & Floater
If the lter and the oater have been blocked, rinse with water.
Remove the lter from the tank lid, remove the oater, and rinse both parts with water.
HEPA Filter
Grasp recessed area on each side of the HEPA and pull upward. Rinse under running water and must
be completely dry before recombining with the lid of the DWT.
*A spare HEPA is provided with your appliance for convenient replacement.

18
Brush Roller Self-cleaning
AUTO MAX
1. Place the appliance on the charging base after use, the
sensor will auto-detect the level of dirt.
2. When you hear the voice prompt “please begin self-
cleaning cycle,” press the self-cleaning button and
begin the process.
3. Once complete, you will hear the voice prompt “self-
cleaning completed, please clean the Dirty Water
Tank.” At this point, the appliance will begin charging.
Note:
• Ensure the charging base is plugged in.
• Before self-cleaning cycle, please clean the DWT and
ensure the water level in the CWT exceeds 40%.
Brush Roller Cover
Grab the front handle while pressing the button
and pull upward to remove.
Rinse with water.
②
①
When replacing, always latch the brush cover into
place to avoid leakage.
click
Other manuals for FLOOR ONE S3 Series
2
Table of contents
Other Tineco Washer manuals


Popular Washer manuals by other brands


Siemens
Siemens WH34A2X0HK Instruction manual and installation instructions

Hercules
Hercules G415 owner's manual

Zanussi
Zanussi ZWF825B4PW user manual

Bosch
Bosch WAS24460UC - 24" Front-Load Washer installation instructions

Electrolux Professional
Electrolux Professional Wascator FOM71 CLS user manual

SOGEDIS
SOGEDIS D4 Series Service manual


