Tisira TDW12AX User manual

www.tisira.com
SERVICE MANUAL
12 PLACE // DISHWASHER
TDW12AX
DISCLAIMER // THE INFORMATION CONTAINED IN THIS SERVICE MANUAL IS INTENDED
FOR LICENSED PERSONNEL ONLY. PLEASE CONTACT ARISIT FOR FUTHER INFORMATION
[AUST] 1300 762 219 [NEW ZEALAND] 09 306 1020
Version 1.1

tisira | TDW12AX pg 1/18
CAUTION
DISCONNECT POWER BEFORE SERVICING
Rated voltage / frequency 220-240V AC / 50Hz
Current Max 10A
Installation Freestanding
Place setting 12
Product dimensions (W x D x H) 600 x 600 x 845mm
Product weight: 39.5kg
Door nish Stainless Steel, White
Control Electronic
Rated power 1760 - 2100W
Hot water connection Max 60°C
Water pressure 0.04 - 1.00MPa
Operating time (Normal) 171 mins
Water consumption (Normal) 10.2L

Exploded View
tisira | TDW12AX pg 2/18
110
102b
102a
201
202
204
205
208
211
204
210
209

Exploded View
tisira | TDW12AX pg 3/18
320
303
316
317-a
317
318
315
316
304
302
314
314
313
313
321
301

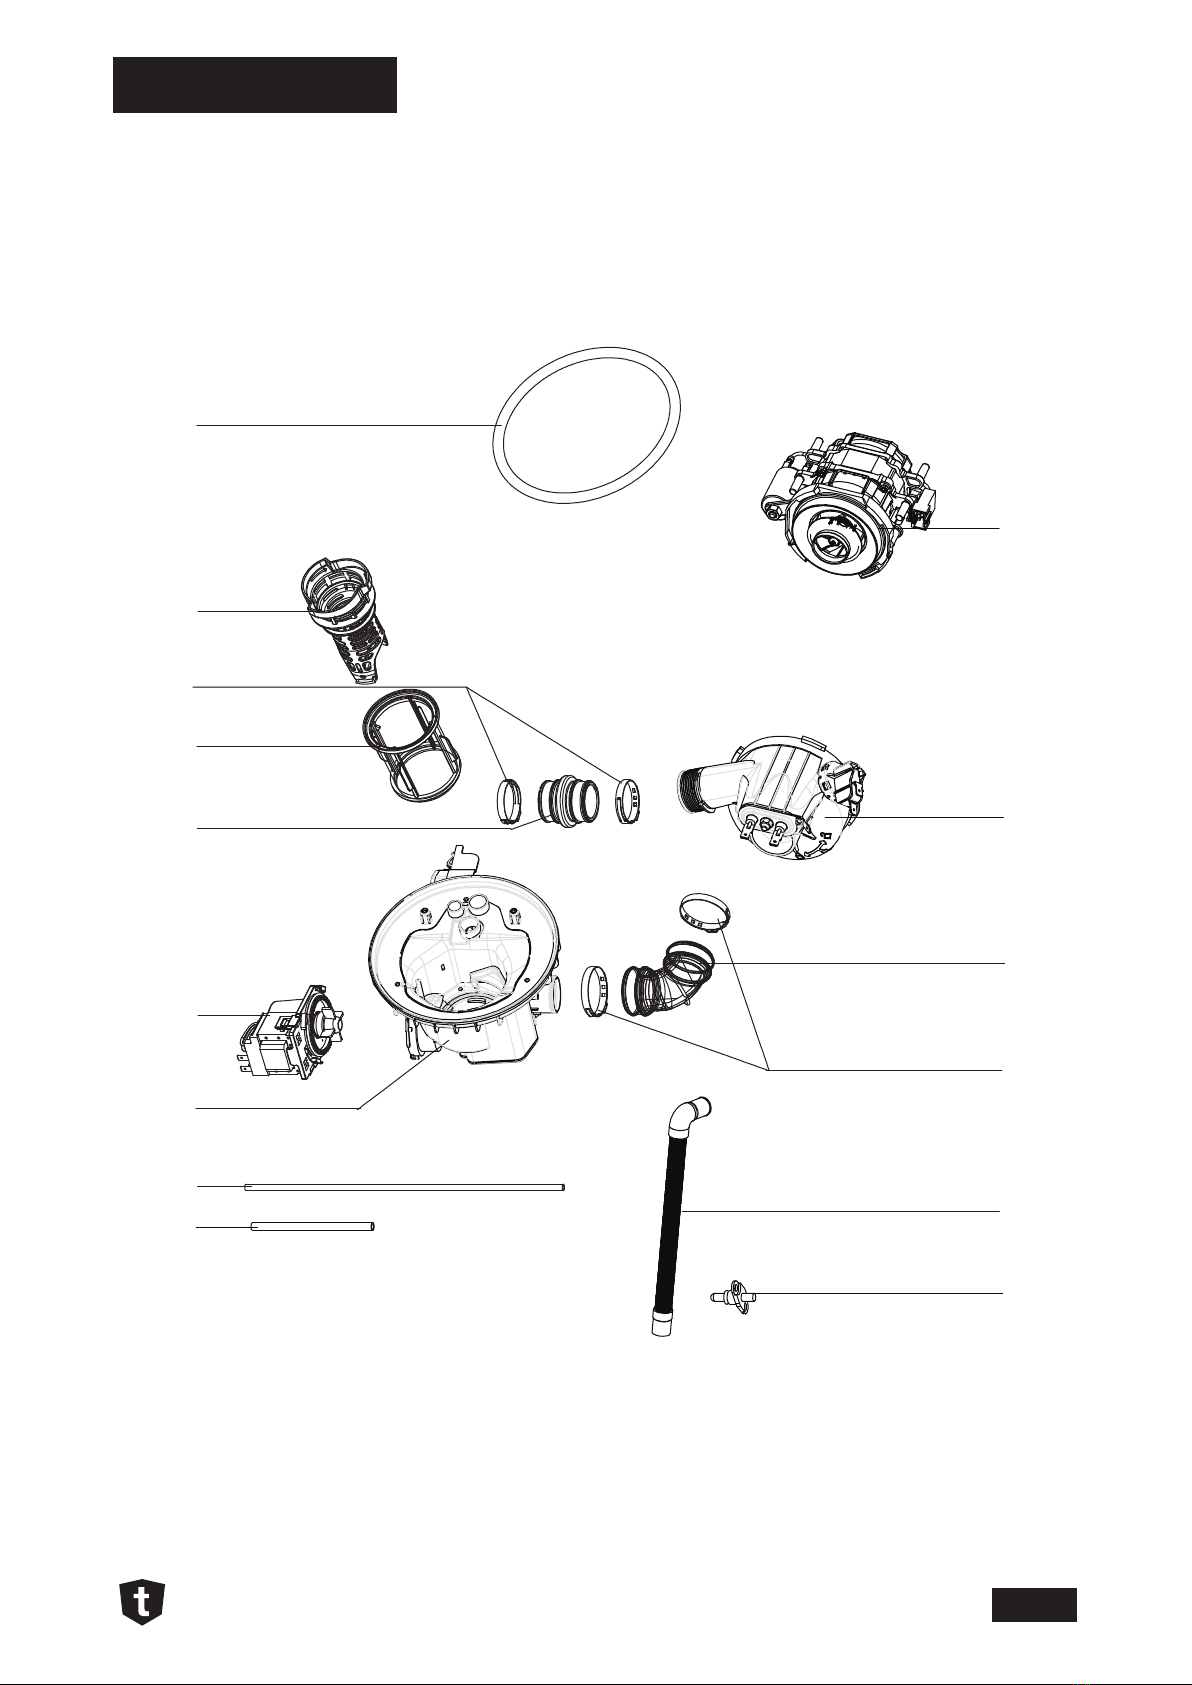
Exploded View
tisira | TDW12AX pg 4/18
4 01
4 08
4 11
4 12
4 13
4 14
4 15
4 16
4 17
4 18
4 19
4 20
4 24
4 26
4 27
4 08
4 1
1
4 12
4 2
8
4 29
4 30
4 04
4 06
421
423
4 07
4 07
4 0
7
4 0
7

Exploded View
tisira | TDW12AX pg 5/18
510
511
513
501
703
702
701
710
711
712
704
705
Exploded View
tisira | TDW12AX pg 6/18
601
604
605
606
607
610
611
612
624
625
628
618
614
613
629

Parts List
tisira | TDW12AX pg 7/18
ID PART NUMBER DESCRIPTION
101 2406402 Control Panel - Tisira
102a 2499498 Light cover for power and extra dry indicators
102b 2499499 Light cover for programs and status indicators
103 2498400 Plastic handle
104 2499209 Button spring
105 2401428 Button
106 2401429 Power button
101 - 106 2406404 Control Panel Assembly - Tisira
107 2499114 Finish door panel
108 2498401 Baseboard
110 2499527 Control boards
201 2499924 Door lock assembly
202 2499115 Inner door
204 2499202 Hinge clamp
205 2499914 Left hinge assembly
208 2499116 Dispenser bracket
209 2499925 Detergent dispenser
210 2499915 Right hinge assembly
211 2499117 Hinge crossbar
301 2498402 Top panel
302 2499118 Left side panel
303 2499119 right side panel
304 2498403 Upper back crosspiece
313 2499469 Wheel - upper basket track
314 2499470 Washer for wheels of upper basket track
315 2499926 Noise insulation top board
316 2499471 Stopper cap - upper basket track
317 2499206 wheel track - upper basket (left)
317-a 2499207 wheel track - upper basket (right)
318 2499472 Cavity seal - U shape
320 2499210 Door lock hook
321 2499927 Back cover
401 2499518 Flexible supply cord and plug (AUS - 10A)
404 2498404 Clamp for exible supply cord
406 2499928 Counterweight
407 2498405 Adjustable foot
408 2499929 Hinge line
411 2499211 Door spring assembly
412 2499208 Adjusting screw of hinge spring

Parts List
tisira | TDW12AX pg 8/18
ID PART NUMBER DESCRIPTION
413 2498406 Bottom structure
414 2498407 Overow tray
415 2499701 Drain hose assembly
416 2499917 Air breather assembly
417 2499473 Ring seal - air breaker nut
418 2499474 Air breaker nut
419 2499519 Pressure switch
420 2499212 Motor bracket assembly
421 2499708 Inlet hose of air breather
423 2499528 Inlet valve
424 2499520 Overow microswitch
426 2498409 Overow oat casing
427 2499930 Overow oat
428 2499529 Main PCB
429 2498410 PCB Box
430 2498411 Lid of PCB Box
501 2498408 Inner pipe
510 2499476 Lower sprayer assembly
511 2499477 Lower sprayer support
513 2499478 Flat lter
601 2499479 Ring seal - sump assembly
604 2499480 Coarse lter
605 2499903 Hose clamp (OTK396)
606 2499481 Micro lter
607 2499702 Inlet pipe - heating element
610 2499522 Draining pump
611 2499931 Sump assembly
612 2499703 PVC pipe - pressure switch
613 2499704 Connect hose
614 2499523 Washing pump
618 2499524 Heating element
624 2499705 Inlet pipe - washing pump
625 2499934 Hose clamp (OTK460)
628 2499706 Inner drain pipe
629 2499525 Thermostat
701 2498412 cutlery basket
702 2499932 basket assembly
703 2499933 lower basket assembly
704 2499482 Middle sprayer assembly
705 2498413 Cup rack

Parts List
tisira | TDW12AX pg 9/18
ID PART NUMBER DESCRIPTION
710 2499709 Inlet hose assembly
712 2499530 Wiring harness
- 2406004.905 Hose Clamp (OTK286)
- 2499000.915 Hose Clamp (OTK175)
tisira | TDW12AX pg 10/18
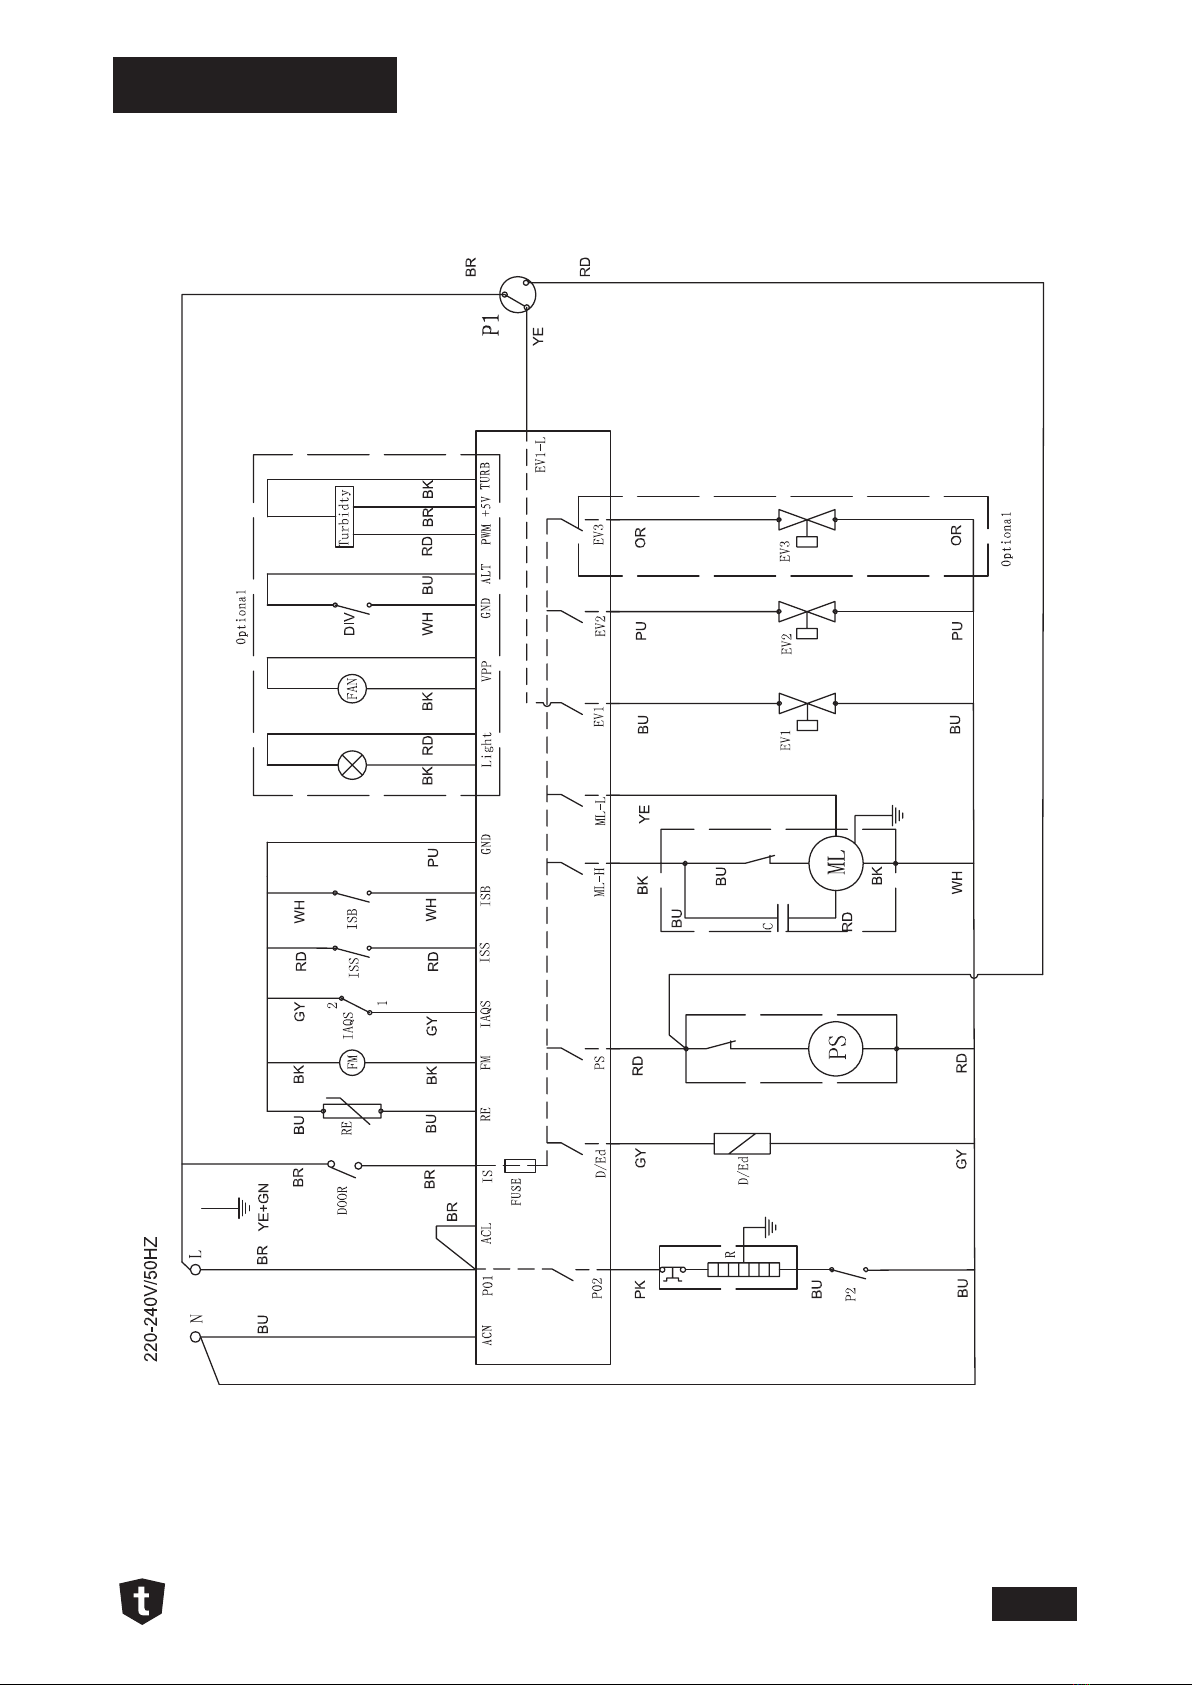
Wiring Diagram

tisira | TDW12AX pg 11/18
Trouble Shooting
Codes
(LEDs) Description Possible causes
Rapid
(E1) Water malfunction
• The faucets are not opened
• The water intake is restricted
• The water pressure is too low
90 mins
+ Rapid
(E3)
The required temperature is not
being reached
• Temperature sensor malfunction
• Heating element malfunction
ECO
(E4) An overow has occurred • Leakage in the dishwasher element
90 mins +
ECO
(E6)
Thermistor Failure • Open-circuit failure of thermistor
Rapid
+ 90 mins
+ ECO
(E7)
Thermistor Failure • Short-circuit failure of thermistor
Error Codes
When a malfunction occurs, the appliance displays error codes to alert you.
WARNING // If overow occurs, turn off the main water supply before calling for service. If there
is water in the base pan because of an overll or small leak, the water should be removed before
restarting the dishwasher.

tisira | TDW12AX pg 12/18
Trouble Shooting
Test Program
Test Program Steps Table
A Test Program has been designed to facilitate the technician diagnosis of the dishwasher. The normal operation of
several components can be tested using this program. Follow the steps below to activate the Test Program.
1. Turn the switch on the power point OFF if it is ON.
2. Open the dishwasher door and turn the power point switch ON.
3. Within 60s from turning the power point ON, with the dishwasher door open and while holding down the Start/
Pause Button, press the Power Button until the dishwasher enter the Test Program (All LEDs will be ashing).
4. The appliance should now be on stand by.
5. Close the door to start the Test Program. The two vertical rows of LEDs (Prgrams and Progress LEDs) will be
ashing in pairs rolling from the top to bottom during the Test Program Cycle
NOTE // Steps of the Test Program can be skipped by pressing the Start/Pause button.
NOTE // An Error Codes Table can be found on page 12 of this manual.
Step Testing Description
0 Initialization Stand by mode
1 Inlet Valve Inlet valve is openned to allow the tub to be lled with 3.6L of water. If the
model is equipped with turbidity sensor, the tubidity level is displayed.
2High-speed Washing Pump
& Heating Element
The washing pump runs for 10 seconds followed by the heating element
operating until the water reaches 57ºC. Once this temperature is reached, the
program will pause.
Press the Start/Pause to continue to the next step.
3Low-speed Washing Pump
& Dispenser
The washing pump runs in low speed for 8s, then dispenser will be
activated for 45s.
4 Regenaration Valve The regeneration valve is open for 30s.
5 Drain Pump The drain pump runs for 30s.
6 Finish Unit will be in stand by mode.

tisira | TDW12AX pg 13/18
PCB
ID Label Function
1 ML-H High-speed washing pump
2 PS Darin pump
3 EV1 Inlet valve
4 P01/P02 Heating element
5 EV2 Regeneration valve of softener
6 EV3 Diverter valve
7 ML-L Low-speed washing pump
8 D/Ed Dispenser
9FAN Fan
10 BUZ1 Buzzer
11 LIGHT Top light
12 RE Thermister
13 IS Door
14 IA QS Overow sensor
15 IS S Sallt sensor
16 IS B Rinse sensor
17 FM Flowmeter
18 TURB Turbidity sensor
Model: 7601
NOTE// The position of the connectors can vary slightly depending on the dishwasher model or generation.
However, the labels used for the connectors are kept the same.

tisira | TDW12AX pg 14/18
Electrical Components - Testing
Component Unplug con-
nectors [PCB]
Multimeter
probes between
Expected
Reading
Inlet Valve CON1 & CON3
WITH THE DISHWASHER DOOR CLOSED
BLue wire CON3 (EV1)
&
Blue wire CON1 (ACN)
4.4 - 4.8 kΩ
Drain Pump CON1 & CON3
Red wire CON3 (PS)
&
Blue wire CON1 (ACN)
220 - 250 Ω
Heating Element - Refer to Image A 27 - 30 Ω
Washing Pump CON1 & CON2
Black wire CON2 (ML-H)
&
Blue wire CON1 (ACN)
100 - 130 Ω
Washing Pump CON1 & CON2
Black wire CON2 (ML-H)
&
Yellow wire CON2 (ML-L)
35 - 45 Ω
NTC Thermistor CN4
Blue wire CN4 (RE)
&
Purple wire CN4 (GND)
Refer to Table 1
Flowmeter CN4
Black wire CN4 (FM)
&
Purple wire CN4 (GND)
Continuity Test while water is
going through the owmeter
Temperature Expected Reading
15ºC 17.48 kΩ
20ºC 12.12 kΩ
25ºC 10.00 kΩ
30ºC 8.299 kΩ
40ºC 5.807 kΩ
50ºC 4.144 kΩ
60ºC 3.011 kΩ
70ºC 2.224 kΩ
80ºC 1.667 kΩ
85ºC 1.451 kΩ
IMAGE A // Heating element test - Multimeter probes position. TABLE 1 // NTC Thermistor readings.
tisira | TDW12AX pg 15/18
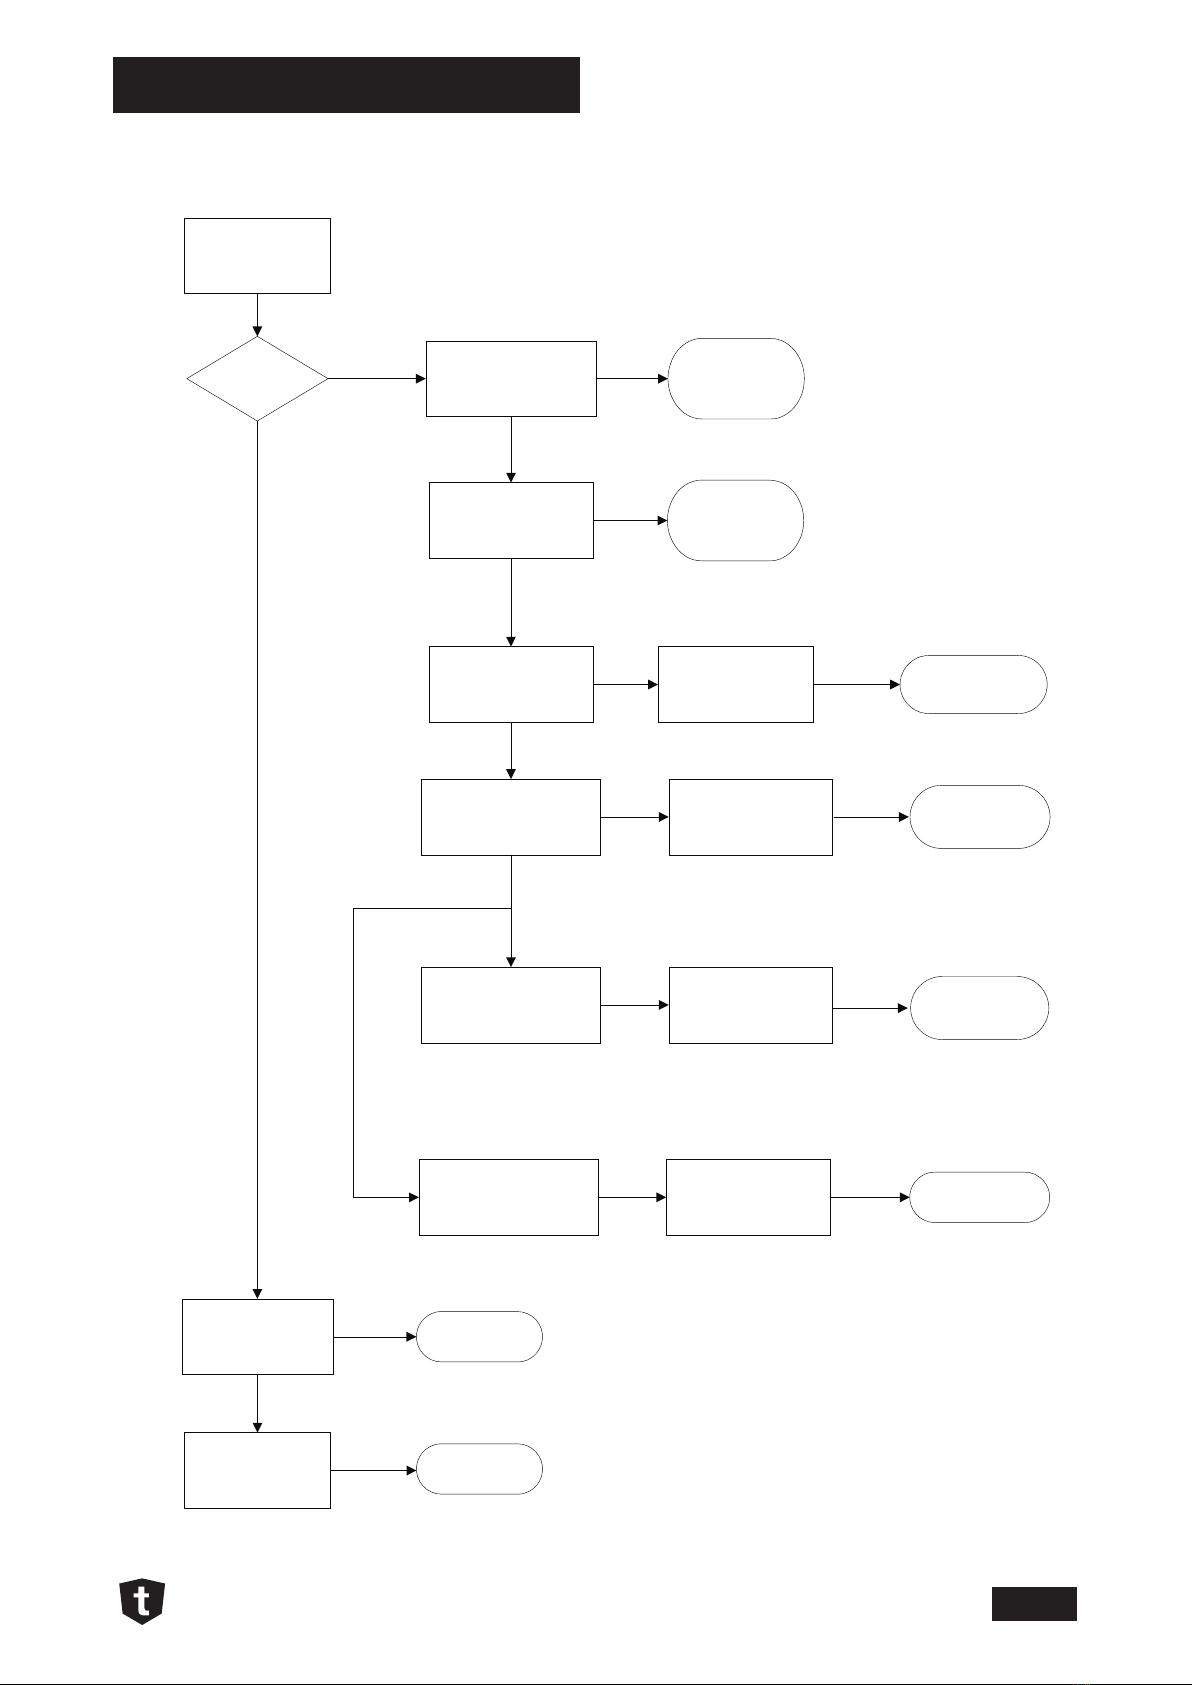
Trouble Shooting - Flowcharts
Water Inlet Malfunction
E1 treeInspection->
E1 code
Water Inlet
No water
Not open Open it to solve the
problem
Opened
Check whether the Inlet
Valve circuit is correct
No
Correct
Check the
water pressure.
(0.04-1.0MPa )
Little water
Inform the
consumer
Lower
Check the
Drain Hose
Installation
OK
Is thereany
water in the Tub?
Reconnect the wire of
Inlet Valve circuit and
check again
Failure
Replace the
Inlet Valve
Check whether the
Pressure Switch(83/63)
circuit is correct .
Check the Inlet Hose Smoothen the kinks
Inlet Hose is blocked or
kinked
OK
eruliaFeruliaF
Reconnect the wire of
Pressure Switch circuit
and check again
No Replace the
Pressure switch
Check the AquaStop Inlet
hose
(only for the dishwasher
with AQUASTOP device)
Replace the
Failure
Hang correctly to
solve the problem
Wrong
Check whether the
Flowmeter circuit is correct
or not.
Reconnect the wire of
Flowmeter circuit and
check again
No Replace the
Flowmeter
Model with Pressure
Switch(83/63)
Model with Flowmwter
Check if the tap is open
AquaStop
Failure
Failure

tisira | TDW12AX pg 16/18
Trouble Shooting - Flowcharts
Heating Element Malfunction
E3 treeInspection->
E3 code
Heating Element
Check water
temperature in the tub
Low
Check whether the
NTC circuit is correct.
High
No
Check the over
heating Microswitch. Replace Switch
Failure
OK
Check Heating Element.
Failure Reconnect the wire of
Heater circuit and check
again
Replace the Inlet
Valve
Check whether the
Washing Pump circuit is
correct
Reconnect the wire of
Washing Pump circuit
and check again
No Replace the
Washing Pump
OK
Reconnect the wire of
NTC circuit and check
again
Failure Replace the NTC
Check if the filters
are clean Clean or replace filter
Blocked
OK
Failure
Failure

tisira | TDW12AX pg 17/18
Trouble Shooting - Flowcharts
Overow/leakage Malfunction
E4 treeInspection
->
E4
Overflow/Leakage
Is thereany water on
thebottomtray?
Check the
Float Microswitch
(normally closed)
Reconnect the wire of
Flooding Switch circuit
and check again
Failure
Repair or Replace it
to solve problem
No water
Check whether Flooding
Switch is blocked or not
Blocked
Failure
Check the
Drain Hose
Some
water
Drain Hose is kinked
or blocked
eruliaFeruliaF
OK
Check whether the
Pressure Switch(83/63)
circuit is correc.
Reconnect the wire of
Pressure Switch circuit
and check again
No Failure Replace the
Pressure Switch
Ensure that the consumer
used the proper detergent
and rinse aid
OK
Maybe there is a real
leakage
Correct
Do as follows:
Remove both sidepanels
Drain the waterfromthebottomtray
Restart the dishwasher and select a strong or standard wash program as leakages are more likely to occur at higher temperatures and
afteralong period of running time.
Observe the bottom tray every twenty minutes.
If any water appears, you will found out which areas, such as motor, drain pump, sump, softener, and hoses between them, and also clips at the
end of each hose, besides the weld seam at the bottom of the tub.
If hours passed, but no water comes out, you should stop the dishwasher with sufficient water in the inner tub, and observe it again after leaving
it aloneforone to two hours.
Check whether the
Flowmeter circuit is correct
Reconnect the wire of
Flowmeter circuit and
check again
No Failure Replace the
Flowmeter
Model with
Flowmeter
Model with Pressure
Switch(83/63)
Smoothen the kinks
tisira | TDW12AX pg 18/18
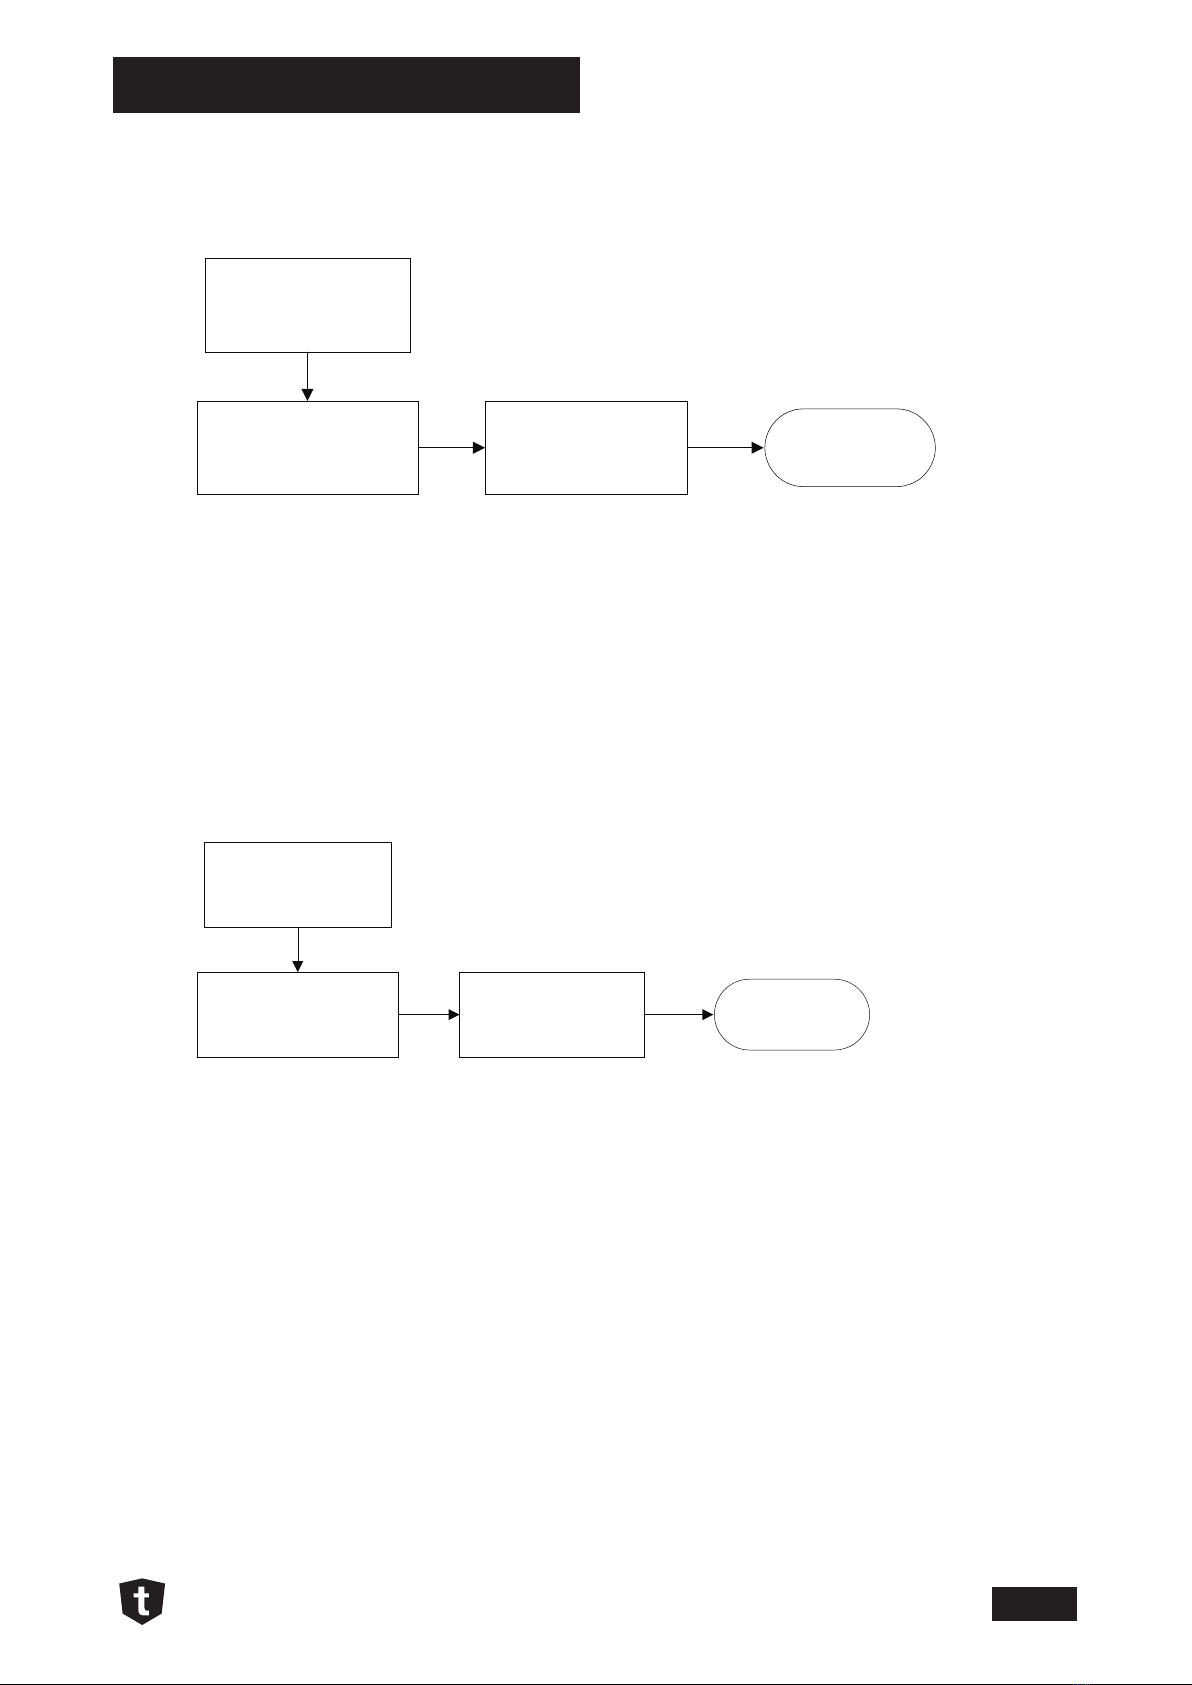
Trouble Shooting - Flowcharts
Water Inlet Malfunction
E6&E7 treeInspection->
E6 / E7
Open or short-circuit
thermistor failure
Check whether the NTC
circuit is correct .
Reconnect the wire of
Flowmeter circuit and
check again
No Failure
Replace the NTC
-33 -
E8
Diverter valve failure
Check whether the
Diverter Valve circuit is
correct
Reconnect the wire of
Diverter Valve and
check again
No Failure
Replace the NTC
Diverter Valve Malfunction (Not all models)
E6&E7 treeInspection->
E6 / E7
Open or short-circuit
thermistor failure
Check whether the NTC
circuit is correct .
Reconnect the wire of
Flowmeter circuit and
check again
No Failure
Replace the NTC
-33 -
E8
Diverter valve failure
Check whether the
Diverter Valve circuit is
correct
Reconnect the wire of
Diverter Valve and
check again
No Failure
Replace the NTC
NOTE // If the problem has not been solved by follow these flowcharts. Try replacing the PCB.

CONTACT DETAILS
AUSTRALIA
ARISIT PTY LIMITED
40-44 Mark Anthony Drive,
Dandenong South, VIC 3175,
Australia
P // 1300 762 219
F // 03 9768 0838
NEW ZEALAND
ARISIT PTY LIMITED
PO Box 68-140
Newton, Auckland 1145,
New Zealand
P // 09 306 1020
F // 09 302 0077
Tisira is committed to ongoing research
and development. Every effort has been
made to ensure all information in this
service manual is correct at time of going
to print. Dimensions should be used as
a reference only and actual dimensions
should be taken from the physical product
only.
Manufacturer reserves the right to change
specifications without notice.
www.tisira.com
Table of contents
Other Tisira Dishwasher manuals


