Tivax MiniVu7C User manual

Tivax MiniVu7C Portable TV
User Manual
Getting
Started
10
PICTURE
Menu
12
AUDIO
Menu
12
TIMER
Menu
13
SETUP
Menu
13
V-CHIP
Menu
14
CHANNEL
Menu
18
20
20

S
a
fe
ty
P
re
c
a
u
ti
o
n
s
In
tr
o
d
u
c
ti
o
n
WARNING
:
This symbol indicates thathigh
voltage is present inside. It is
dangerous to make anykind of
contact with any internalpart of
this product.
This symbol alerts youthat
important literature concerning
operation and maintenance
has been included withthis
product.
WAR
NING
:
THE
M
AIN
P
LUG/A
PPLIAN
CE
CO
UPLER
IS
US
ED
AS
TH
E
DIS
CONNE
CT
DE
VICE,
THE
DISCON
NECT
DEVICE
SHALL
REMA
IN
RE
ADIL
Y
OPE
RABLE
.
ALW
AYS
REMEMBER
TO
R
EMOVE
THE
PLUG
FROM
THE
MAIN
SOCKE
T
BEF
ORE
DISCON
NECTIN
G
TH
E
POW
ER
FR
OM
T
HE
UNIT
.
THE
APP
ARA
TUS
S
HALL
NOT
BE
E
XPOSE
D
TO
D
RIPPIN
G
OR
SPLAS
HING
AND
THA
T
NO
OBJEC
TS
FI
LLED
WITH
LIQUID
S,
SU
CH
A
S
VA
SES, SHALL
BE
P
LACED
THE
APPA
RAT
US
N
O
OP
EN
FLAME
SOUR
CES
S
UCH
AS
LI
GHTED
CANDL
ES
SHOUL
D
BE
PLACE
D
ON
THE
APPA
RAT
US.
WAR
NING
:
PA
Y
A
TTENTIO
N
TO
BATT
ERY
D
ISPOSA
L.
DANGER
OF
EXPL
OSION
OF
B
ATTE
RY
IF
INCOR
RECTL
Y
REP
LACED.
REPLAC
E
ONL
Y
WIT
H
TH
E
SAM
E
OR
EQUIV
ALENT
TYPE
OF
BA
TTERY
.
TO
P
RE
VE
NT
FI
RE
O
R
E
LE
CT
RI
C
S
HO
CK
,
D
O
NO
T
E
XP
OS
E
T
HE
U
NI
T
T
O
R
AI
N
O
R
M
OI
ST
UR
E.
NE
VE
R
A
TT
EM
PT
TO
O
PE
N
T
HE
C
AB
IN
ET,
HI
GH
V
OL
T
AG
ES
S
OU
RC
E
I
N
T
HE
U
NI
T.
RE
FE
R
S
ER
VI
CING
TO
Q
UA
LIF
IE
D
SE
RV
IC
E
P
ER
SO
NN
EL
.
CAUTION:
TO
P
RE
VE
NT
E
LE
CT
RI
C
SH
OC
K,
M
AT
CH
W
ID
E-
BL
AD
E
P
LU
G
W
IT
H
W
ID
E
S
LO
T
A
ND
FU
LLY
IN
SE
RT.
TH
E
A
PP
AR
AT
US
S
HA
LL
N
OT
B
E
E
XP
OS
ED TO
W
AT
ER
A
ND
N
O
O
BJ
EC
TS
FI
LL
ED
W
IT
H
LI
QU
ID
S
UC
H
A
S
V
AS
ES
S
HA
LL
B
E
P
LA
CE
D
ON
T
HE
A
PP
AR
AT
US
.
WAR
NING
:
FC
C
RE
GU
LAT
ION
S
STA
TE
TH
AT
ANY
C
HA
NG
E
OR
M
OD
IFI
CA
TIO
N
TO
T
HE
E
QU
IPM
EN
T,
N
OT EX
PR
ES
SLY
AP
PR
OV
ED
B
Y
MA
KE
R
OR
IT
S
AU
TH
OR
IZE
D
PA
RT
IES
,
C
OU
LD
V
OID
U
SE
R'S
AU
TH
OR
ITY
TO
O
PE
RAT
E
THIS
E
QU
IPM
EN
T.
2
Im
p
or
ta
n
t
S
a
fe
ty
I
n
st
ru
ct
io
n
s
In
tro
du
ct
io
n
1.
Rea
d,
follo
w
and
k
eep
the
se
inst
ruction
s
All
Safe
ty
and
o
perating
instru
ctions
i
n
this
m
anual
s
hould
be
read
and
fo
llowed
before
the
pro
duct
is
operated.
Plea
se
retain
in
struct
ions
for
future
referen
ce.
2.
Clea
ning
Unplug
this
pr
oduct
f
rom
the
wall
outlet
befo
re
clean
ing. Do
not
use
liqu
id
clean
ers
or
a
erosol
c
leaners
.
Use
a
damp
c
loth
for
cleaning.
3.
Attac
hments
Do
not
use
atta
chment
s
not
recomme
nded
by
the produc
t
manufacture
r
as
the
y
may
c
ause
ha
zards.
4.
Wate
r
and
M
oisture
Do
not
use
this
produc
t
near
w
ater
fo
r
examp
le,
near
a
bathtu
b,
wash
bowl,
k
itchen
s
ink,
or
laundr
y
tub;
in
a
wet
bas
ement;
or
near
a
swim
ming
p
ool;
and
the
like
.
5.
Ventilation
Slots
and
openings
in
the
cabinet
are
provided
for
ventilation
and
to
ensure
reliable
operation
of
the
product
and
to
protect
it
from
overheating,
and
these
openings
must
not
be
blocked
or
covered.
The
openings
should
never
be
blocked
by
placing
the product
on
a
bed,
sofa,
rug,
or
other
similar
surface.
This
product
should
not
be
placed
in
a
built-in installation
such
as
a
bookcase
or
rack
unless
proper
ventilation
is
provided
or
the
manufacturer's
instructions
have
been
adhered
to.
6
.
Power
Sources
This
product
should
be
operated
only
from
the
type
of
power
source
indicated
on
the
marking
label.
If
you
are
not
sure
of
the
type
of
power
supply
to
your
home,
consult
your
product
dealer
or
local
power
company.
For
products
intended
to
operate
from
battery
power
or
other
sources,
refer
to
the
operating
instructions.
7.
Grou
nding
o
r
Polari
zation
This
pr
oduct
m
ay
be
e
quipped
with
a
polarize
d
alterna
ting
cur
rent
line
plug
(a
plug
ha
ving
on
e
blade
wider
th
an
the
o
ther).
T
his
plug
will
fit
into
the
power
outlet
o
nly
one
way.
This
is
a
sa
fety
fea
ture.
If
you
are unable
to
inser
t
the
plu
g
fully
i
nto
the
outlet,
try
reversin
g
the
p
lug.
If
t
he
plug
should
still
fai
l
to
fit,
contact
your
e
lectrician
to
rep
lace
yo
ur
obso
lete
out
let.
Do
not
defeat
t
he
safe
ty
purp
ose
of
t
he
pola
rized
plug.
8.
Powe
r
Cord
Protect
ion
Power
s
upply
c
ords
sh
ould
be
routed
so
that
they
ar
e
not
like
ly
to
be
walked
on
or
p
inched
by
item
s
place
d
upon
o
r
agains
t
them,
paying
part
icular
a
ttention
to
cords
a
t
plugs,
conven
ience
re
ceptacl
es,
and
the
po
int
where
t
hey
exi
t
from
t
he
prod
uct.
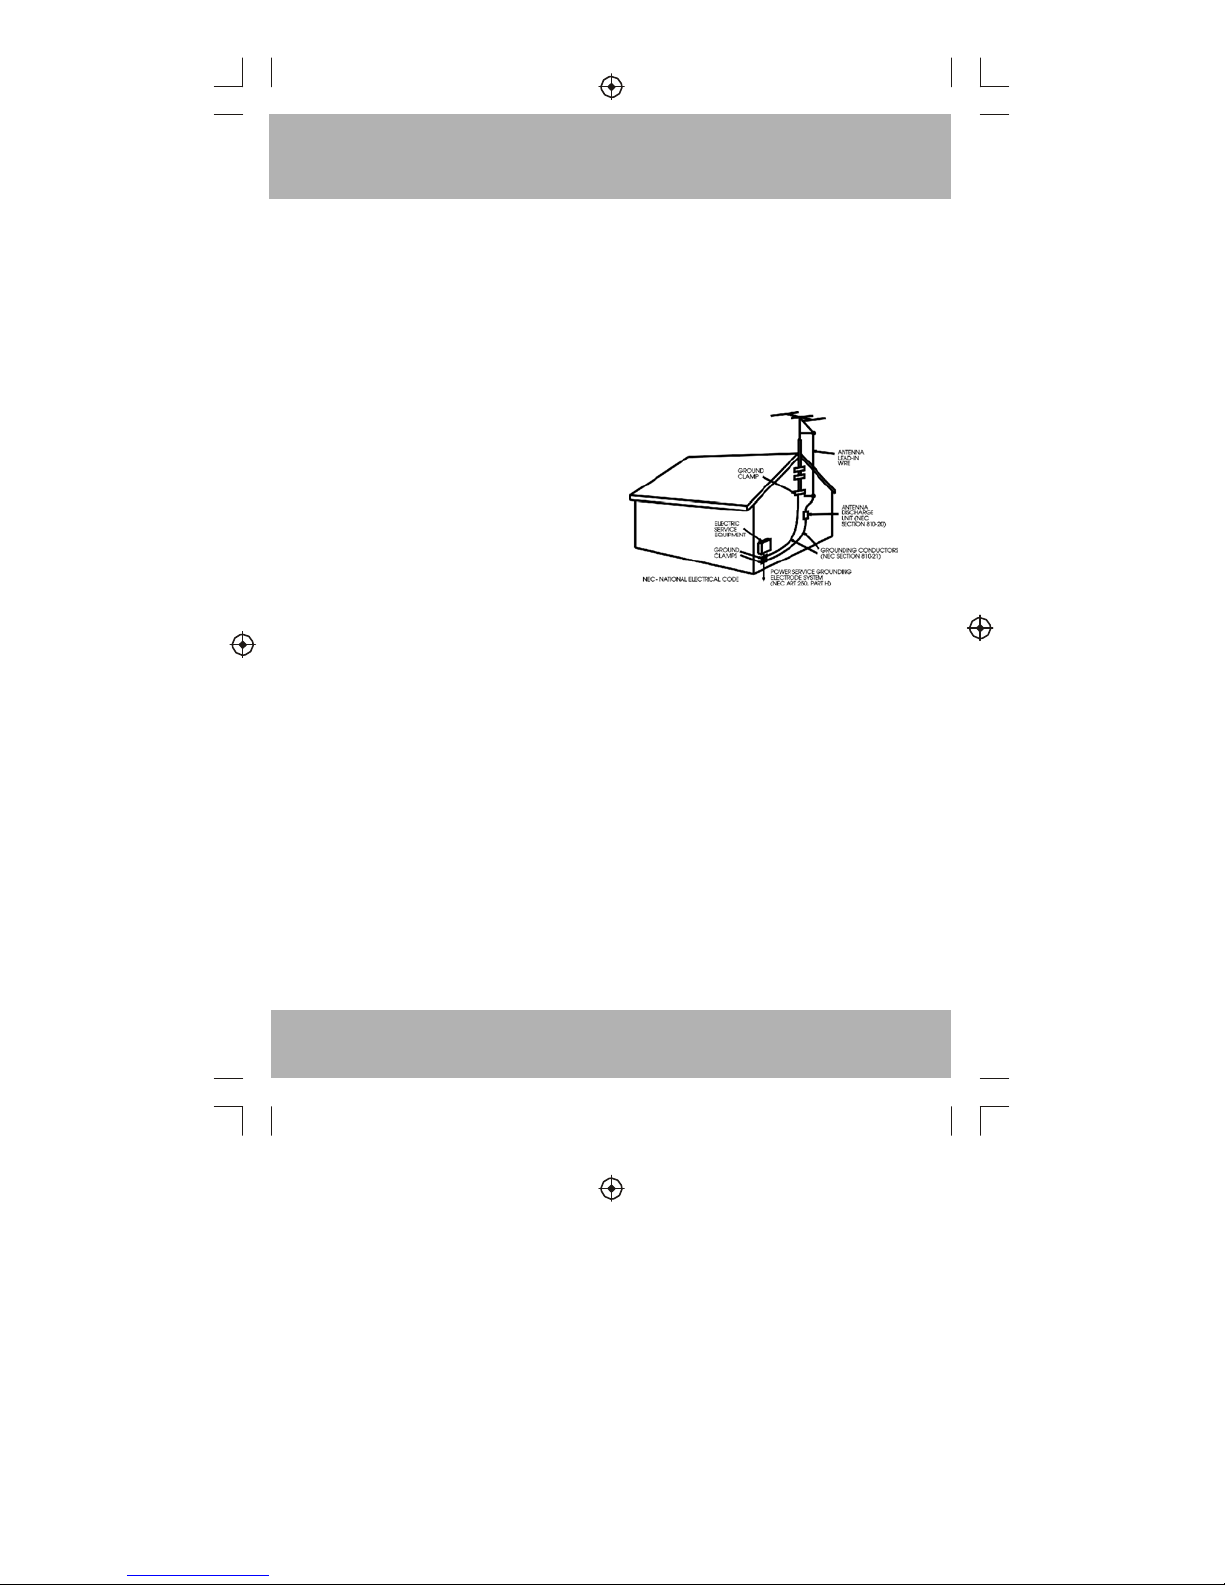
9.
Outd
oor
Ant
enna
G
roundin
g
If
an
ou
tside
an
tenna
o
r
cable
system
is
conn
ected
to the
prod
uct,
be
sure
the
antenn
a
or
cab
le
syste
m
is
grounde
d
so
as
to
prov
ide
som
e
protec
tion
aga
inst
voltage
surges
and
bui
lt-up
sta
tic
char
ges.
Ar
ticle
810
of
the
N
ational
E
lectrical
Code,
A
NSI/NFPA
70,
provide
s
inform
ation
w
ith
rega
rd
to
pr
oper
gro
unding
of
the
mas
t
and
su
ppor
ting
str
ucture,
groundi
ng
of
th
e
lead-in
wire
to
an
antenna
dis
charge
unit,
siz
e
of
groundi
ng
cond
uctors,
location
of
ante
nnadisc
harge
unit,
co
nnection
to
gro
unding
electrod
es,
and
requirem
ents
for
the
gro
unding
electrod
e.
See
f
igure below.
10.
Ligh
tning
For
adde
d
protec
tion
for
this
pro
duct
du
ring
a
li
ghtning
storm,
or
when
it
is
lef
t
unatte
nded
an
d
unuse
d
for
lon
g
periods
of
time
,
unplug
it
from
the
wall
outlet
a
nd
disconn
ect
the
antenna
or
cabl
e
system
.
This
will
prevent
damag
e
to
the
produc
t
due
to
lightnin
g
and
power
l
ines
sur
ges.
11.
Power
Line
s
An
outs
ide
ante
nna
sys
tem
sho
uld
not
be
locat
ed
in
the
vicin
ity
of
ov
erhead
power
lines
or
other
e
lectric light
or
power
c
ircuits,
or
wher
e
it
can
fall
into
such
power
l
ines
or
circuits
.
When
installin
g
an
ou
tside
antenna
system
,
extrem
e
care
s
hould
b
e
taken
to
keep
from
to
uching
such
po
wer
line
s
or
circ
uits
as
c
ontact
with
the
m
migh
t
be
fata
l.
12.
Ove
rloadin
g
Do
not
overloa
d
wall
o
utlets,
e
xtension
cords,
or
integral
conven
ience
re
ceptacl
es,
as
t
his
can
result
i
n
a
risk
of
f
ire
or
el
ectric
s
hock.
13.
Object
and
Liquid
Entry
Never
p
ush
obj
ects
of
any
kind
into
thi
s
product
through
openin
gs
as
th
ey
may
connec
t
with
h
igh
voltage
parts
that
co
uld
resu
lts
in
a
fire
or
e
lectric
shock
.
Never
s
pill
liqui
d
of
any
kind
on
the
pro
duct.
3

Im
p
o
rt
a
n
t
S
a
fe
ty
I
n
st
ru
ct
io
n
s
14.
Ser
vicing
Do
not
attempt
to
ser
vice
this
produc
t
yourse
lf
as
opening
or
removing
c
overs
m
ay
expo
se
you
to
dangero
us
volta
ge
or
other
haz
ards.
Re
fer
all
s
ervicin
g
to
quali
fied
ser
vice
per
sonnel.
15.
Dam
age
Requiring
Servic
e
Unplug
this
pro
duct
fro
m
the
w
all
outle
t
and
re
fer
servic
ing
to
q
ualified
servic
e
perso
nnel
un
der
the
followin
g
condi
tions:
A)When
the
pow
er-supply
cord
or
plug
is
damaged,
B)If
liqu
id
has
b
een
spil
led,
or
o
bjects
h
ave
falle
n
into
the
produc
t,
C)If
the
produc
t
has
be
en
expo
sed
to
r
ain
or
w
ater,
D)If
the
produc
t
does
not
opera
te
norm
ally
by
followin
g
the
op
erating
instructions.
A
djust
on
ly
those
c
ontrols
that
are
covere
d
by
the
operati
ng
instructions
as
an
improper
ad
justmen
t
of
othe
r
controls
may
re
sult
in
d
amage
and
will
often
require
extensiv
e
work
by
a
qu
alified
te
chnician
to
resto
re
the
p
roduct
t
o
its
normal
op
eration,
E)If
the
product
has
be
en
drop
ped
or
d
amaged
in
any
wa
y.
F)When
the
pro
duct
ex
hibits
a
distinc
t
chang
e
in
performance
this
ind
icates
a
need
fo
r
servi
ce.
16.
Re
placem
ent
Par
ts
When
r
eplacem
ent
par
ts
are
re
quired,
be
sure
the
servic
e
technician
ha
s
used
replace
ment
pa
rts
specifie
d
by
the
manufa
cturer
o
r
have
t
he
sam
e
charact
eristics
as
the
original
part
.
Unauth
orized
substitu
tions
m
ay
resu
lt
in
fire,
electri
c
shock,
or
other hazards
.
17.
Saf
ety
Che
ck
Upon
c
ompletion
of
an
y
serv
ice
or
re
pairs
to
this
product
,
ask
th
e
serv
ice
technician
t
o
per
form
s
afety
checks
to
deter
mine
th
at
the
p
roduct
i
s
in
pro
per
operatin
g
condi
tion.
18.
Hea
t
The
pro
duct
sh
ould
be
placed
away
from
he
at
sources
such
a
s
radiat
ors,
hea
t
registe
rs,
stov
es,
or
other
products
(includi
ng
amp
lifiers)
t
hat
prod
uce
hea
t.
In
tr
o
d
u
c
ti
o
n
4

I
n
t
r
o
d
u
c
t
i
o
n
Safety
Information
T
h
a
n
k
y
o
u
f
o
r
p
urch
a
s
in
g
t
h
is
p
ro
d
u
c
t
w
h
ic
h
h
a
s
b
ee
n
de
s
ig
n
ed
a
n
d
m
a
n
u
fac
tu
re
d
to
g
iv
e
y
o
u
m
a
n
y
y
e
a
rs
o
f
t
ro
u
b
le
-
fr
ee
s
e
rv
ic
e
.
A
b
o
u
t
T
h
is
U
s
e
r
G
uid
e
T
h
is
u
s
e
r
g
u
id
e
c
o
n
ta
in
s
a
ll
t
h
e
i
n
fo
rm
a
ti
o
n
y
o
u
n
eed
t
o
k
n
o
w
a
b
o
u
t
h
o
w
t
o
s
e
tu
p
a
n
d
w
a
tc
h
f
re
e
o
ff
t
h
e
a
ir
c
h
a
nn
e
ls
u
s
in
g
y
o
u
r
P
o
rt
a
b
le
A
T
S
C
T
V
.
A
cc
e
ss
o
r
ie
s
I
n
t
h
e
B
o
x
R
e
m
o
v
e
y
o
u
r
P
o
rt
a
b
le
A
T
S
C
T
V
c
a
re
fu
ll
y
f
ro
m
t
h
e
b
o
x
,
a
n
d
r
e
m
o
v
e
t
h
e p
a
c
k
a
g
in
g
f
ro
m
e
a
c
h
p
a
rt
.
Y
o
u
w
ill
f
in
d
t
h
e
f
o
ll
o
w
in
g
i
te
m
s
:
P
o
rt
a
b
le
A
T
S
C
T
V
R
e
m
o
te
C
o
n
tr
o
l
(
C
R
2025
b
a
tt
e
ry
i
n
c
lu
ded
)
U
s
e
r
M
a
n
u
a
l
M
a
g
n
e
ti
c
b
a
s
e
a
n
te
nn
a
P
o
w
e
r
a
d
a
p
to
r
L
oo
k
o
u
t
f
o
r
t
h
is
s
ym
b
o
l.
I
t
i
n
d
ic
a
te
s
u
s
e
fu
l
a
n
d
i
m
p
o
rt
a
n
t
t
ip
s
.
If
t
h
e
A
C
/D
C
a
d
a
p
te
r
i
s
c
o
nn
e
c
te
d
w
h
il
e
t
h
e
T
V
i
s
p
o
w
e
re
d
o
n
,
i
t
w
il
l
s
u
pp
ly
t
h
e
un
it
w
it
h
p
o
w
e
r
.
N
o
te
:
t
h
e
b
a
tt
e
ry
w
il
l
a
lw
a
y
s
b
e
r
e
c
h
a
rg
e
d
w
h
il
e
t
h
e
A
C
/D
C
a
d
a
p
te
r
i
s
c
o
nn
e
c
te
d
.
Warning:
Change
or
modifications
to
this
unit
not
expressly
by
the
part
responsible
for
compliance
could
void
the
user
's
authority
to
operate
the
Equipment.
NOTE:
This
equipment
has
been
tested
and
found
to
comply
with
the
limits
for
a
Class
B
digital
device,
pursuant
to
Part
15
of
the
FCC
Rules.
These
limits
are
designed
to
provide
reasonable
protection
against
harmful
interference
in
a
residential
installation.
This
equipment
generates,
uses,
and
can
radiate
radio
frequency energy
and,
if
not
installed
and
used
in
accordance
with
the
instructions,
may
cause
interference.
If
this
equipment
does
cause
interference
to
radio
or
televisionreception,
which
can
be
determined
by
turning
the equipment
off
and
on,
the
user
is
encouraged
to
try
to
correct
the
interference
by
one
or
more
of
the
following
measures:
-
Reorient
or
relocate
the
receiving
antenna.
-
Increase
the
separation
between
the
equipment
and
receiver.
-
Connect
the
equipment
into
an
outlet
on
a
circuit
different
from
that
to
which
the
receiver
is
connected
.
-Consult
the
dealer
or
an
experienced
radio
TV
technician
or
help.
Shield
cables
must
be
used
with
this
unit
to
ensure
compliance
with
the
Class
B
FCC
limits.
5

Safety
Information
Do
not
exp
ose
the
Po
rtable
A
TSC
TV
do
drip
ping
or
spla
shin
g
a
nd
not
not
plac
e
a
roun
d
a
ny
obje
cts
fille
d
w
ith
liqui
ds,
suc
h
a
s
vases.
The
mai
n
p
lug
is
used
as
the
disc
onne
ct
d
evic
e.
Alwa
ys
reme
mbe
r
to
rem
ove
the
plug
from
the
mai
n
s
ocke
t
be
fore
disc
onne
cting the
power
l
ead
from
the
bac
k
o
f
th
e
u
nit.
Safe
ty
is
Im
porta
nt
To
ens
ure
you
r
s
afety
and
the
safe
ty
o
f
o
thers
,
please
ens
ure
you
read
the
Sa
fety
Ins
tructi
ons
befo
re
y
ou
oper
ate
this
prod
uct.
K
eep
this
informat
ion
in
a
s
afe
plac
e
fo
r
fu
ture
referenc
e.
Pl
ease
read
all
the
safe
ty
i
nform
ation
befo
re
u
se.
Safe
ty
C
onsi
dera
tions
Pos
ition
the
cab
les
so
that
they
can
not
be
wal
ked
on
or
pinc
hed
by
item
s
p
lace
d
on
or
agai
nst
them
.
Do
not
use
the
Po
rtable
A
TSC
TV
in
hum
id
o
r
d
amp
con
ditio
ns.
Do
not
allo
w
t
he
Porta
ble
A
TSC
TV
to
get
wet
.
Do
not
exp
ose
the
Po
rtable
A
TSC
TV
to
dripp
ing
or
spla
shin
g.
Do
not
plac
e
w
ater
fille
d
o
bjec
ts,
such
as
vas
es
arou
nd
the
Po
rtable
A
TSC
TV
.
Do
not
hav
e
o
pen
flam
e
s
ourc
es,
suc
h
a
s
candl
es
arou
nd
the
Po
rtable
A
TSC
TV
.
Clea
ning
AL
WA
YS
unplug
the
Po
rtable
A
TSC
TV
befo
re
y
ou
clea
n
it
.
Do
not
use
liqu
id
o
r
ae
roso
l
cl
eane
rs.
Clea
n
th
e
P
ortable
A
TSC
TV
with
a
s
oft,
dam
p
(
not
wet
)
c
loth.
Ven
tilat
ion
The
slot
s
a
nd
open
ings
on
the
Po
rtable
A
TSC
TV
are
for
ven
tilati
on.
Do
not
cov
er
o
r
b
lock
them
as
it
m
ay
caus
e
overhe
ating
.
NEV
ER
let
chil
dren
pus
h
a
nyth
ing
into
the
hole
s
o
r
sl
ots
on
the
cas
e.
Serv
icing
Ther
e
a
re
n
o
u
ser
servi
ceab
le
p
arts
i
n
th
is
P
ortable
A
TSC
TV
.
Whe
n
s
ervici
ng,
refe
r
to
qua
lified
servi
ce
pers
onne
l.
Cons
ult
your
dea
ler
if
y
ou
are
eve
r
in
doubt
a
bout
the
inst
allat
ion,
ope
ration
o
r
safe
ty
o
f
th
is
u
nit.
Batt
ery
Disp
osal
Plea
se
ensu
re
b
atter
ies
are
disp
osed
of
safe
ly.
Neve
r
d
ispo
se
of
batte
ries
in
the
fire
or
with
hou
seho
ld
w
aste
.
Chec
k
w
ith
your
loca
l
au
thor
ity
for
disposal
regulatio
ns.
6

Remote
Control
Remote
Key
Function:
1)
POWER:
Powers
TV
on
or
sets
standby
mode.
2)
P
.M.:
Switches
picture
mode.
3)
NUMBER
KEYS:
Numeric
keys
to
select
desired
channel.
4)
RECALL:
Recalls
last
channel.
5)
VOL+:
Increases
volume.
6)
MENU:
Displays
TV
menu
or
returns
to
previous
menu.
7)
EPG:
Displays/Removes
all
program
information
.
8)
TV
DISPL
A
Y:
Displays/Removes
program
information.
9)
FAV:
Used
to
access
your
favorite
program.
10)
MUTE:
Disables
or
enables
sound.
11)
S.M.:
Switches
sound
mode.
12)
SLEEP:
Timer
to
turn
off
TV.
13)
ASPECT:
Adjusts
aspect
mode.
14)
AUDIO:
Switches
TV/audio
mode.
15)
SOURCE:
Displays
or
exits
TV
input
source
menu.
16)
CH+:
Changes
to
next
channel
up.
17)
VOL-:
Decreases
volume.
18)
OK:
Confirms
selection.
19)
EXIT:
Exits
menu.
20)
CH-:
Changes
to
next
channel
down.
21)
CC:
Enables/Disables
CC
function.
22)
CH.LIST:
Displays
channel
list.
7

U
si
n
g
t
h
e
R
e
m
o
t
e
C
o
n
t
r
o
l
P
o
in
t
t
h
e
r
e
m
o
t
e
c
o
n
t
r
o
l
a
t
t
h
e
r
e
m
o
t
e
s
e
n
s
o
r
in
o
r
de
r
f
o
r
t
h
e
p
la
y
e
r
t
o
f
u
n
c
t
io
n
c
o
rr
e
c
tly
.
T
h
e
r
e
m
o
t
e
will
f
u
n
c
t
io
n
t
o
a
pp
r
o
x
im
a
t
e
ly
21
'
f
r
o
m
t
h
e
r
e
m
o
t
e
s
e
n
s
o
r
a
t
a
n
a
n
g
le
o
f
a
pp
r
o
x
im
a
t
e
ly
30
O
in
e
a
c
h
d
ir
e
c
t
io
n
.
N
o
t
e
:
D
ir
e
c
t
in
g
t
h
e
r
e
m
o
t
e
s
e
n
s
o
r
t
o
w
a
r
d
a
n
y
li
g
h
t
s
o
u
r
c
e
,
s
u
c
h
a
s
d
ir
e
c
t
s
u
n
li
g
h
t
,
m
a
y
c
a
u
s
e
t
h
e
u
n
it
t
o
m
a
lf
u
n
c
t
io
n
.
D
o
n
o
t
s
p
ill
w
a
t
e
r
o
r
p
u
t
w
e
t
it
e
m
s
o
n
t
h
e
r
e
m
o
t
e
c
o
n
t
r
o
l.
N
e
v
e
r
d
is
a
ss
e
m
b
le
t
h
e
r
e
m
o
t
e
c
o
n
t
r
o
l.
H
O
W
T
O
R
E
P
L
A
C
E
T
H
E
B
A
TT
E
RY
S
T
E
P
1:
PU
S
H
T
H
E
B
U
TT
O
N
T
O
W
A
R
D
S
T
H
E
L
E
F
T
;
S
T
E
P
2:
PU
LL
T
H
E
B
A
TT
E
RY
L
O
A
D
E
R
O
U
T
.
C
a
u
t
i
o
n
:
I
n
c
o
rr
e
c
t
u
s
e
o
f
t
h
e
b
a
tt
e
r
y
m
a
y
c
a
u
s
e
le
a
k
s
,
c
o
rr
o
s
io
n
,
o
r
e
x
p
lo
s
io
n
s
.
B
e
s
u
r
e
t
o
p
la
c
e
t
h
e
b
a
tt
e
r
ie
s
in
t
h
e
c
o
rr
e
c
t
d
ir
e
c
t
io
n
.
I
t
is
d
a
n
ge
r
o
u
s
t
o
c
h
a
r
ge
/
h
e
a
t
/
o
pe
n
o
r
s
h
o
rt
-
c
ir
c
u
it
t
h
e
b
a
tt
e
r
y. D
o
n
o
t
le
a
v
e
de
a
d
o
r
e
x
p
ir
ed
b
a
tt
e
r
y
in
s
id
e
t
h
e
r
e
m
o
t
e
.
R
e
m
o
v
e
t
h
e
b
a
tt
e
r
y
w
h
e
n
n
o
t
u
s
in
g
t
h
e
r
e
m
o
t
e
c
o
n
t
r
o
l
f
o
r
a
lo
n
g
pe
r
io
d
o
f
t
im
e
.
W
h
e
n
t
h
e
o
pe
r
a
t
in
g
r
a
n
ge
is
r
ed
u
c
ed
,
r
ep
la
c
e
t
h
e
b
a
tt
e
r
y
w
it
h
n
e
w
,
f
r
e
s
h
o
n
e
s
.
I
f
le
a
k
a
ge
f
r
o
m
t
h
e
b
a
tt
e
r
y
o
cc
u
r
s
,
w
ip
e
t
h
e
b
a
tt
e
r
y
li
q
u
id
f
r
o
m
t
h
e
b
a
tt
e
r
y
c
o
m
p
a
rt
m
e
n
t
,
t
h
e
n
r
ep
la
c
e
.
Built-in
Rechargeable
Battery
Management
The
capacity
of
built-in
rechargeable
Lithium
Polymer
battery
is
1800mAh,
which
can
provide
about
1.5
hours
of
operation
depending
on
the
usage
conditions.
This
portable
TV
uses
a
smart
battery
management
system
inside
which
can
support
low
battery
detection.
1.
If
the
battery
voltage
falls
below
a
specific
value,
the
unit
will
enter
the
low
battery mode,
displaying
a
flashing
low
battery
icon
in
the
OSD,
indicating
the
user
needs
to
recharge
the
TV
immediately.
2.
If
the
AC/DC
adapter
is
connected
while
the
TV
is
powered
on,
it
will
supply
the
unit
with
power.
Note:
the
battery
will
always
be
recharged
while
the
AC/DC
adapter
is
connected.
3.
If
the
TV
is
kept
running
on
low
battery
without
using
AC/DC
adapte
r
,
the
TV
will
shut
down
after
a
short
time
to
protect
the
battery
from
depletion.
BATTERYCAUTION
Do
not
store
or
use
this
portable
TV
in
extremely
hot
or
cold
environments.
This
product
works
best
in
a
temperature
range
from
32
F
to
95
F.
Storage
or
operation
outside
this
temperature
range,
especially
above
95
F
cansignificantly
and
irreparably
degrade
the performance
of
the
lithium
polymer
battery.
Do
not
store
this
device
in
the
sun
or
in
a
hot
car,
such
as
the
glove
box.
8
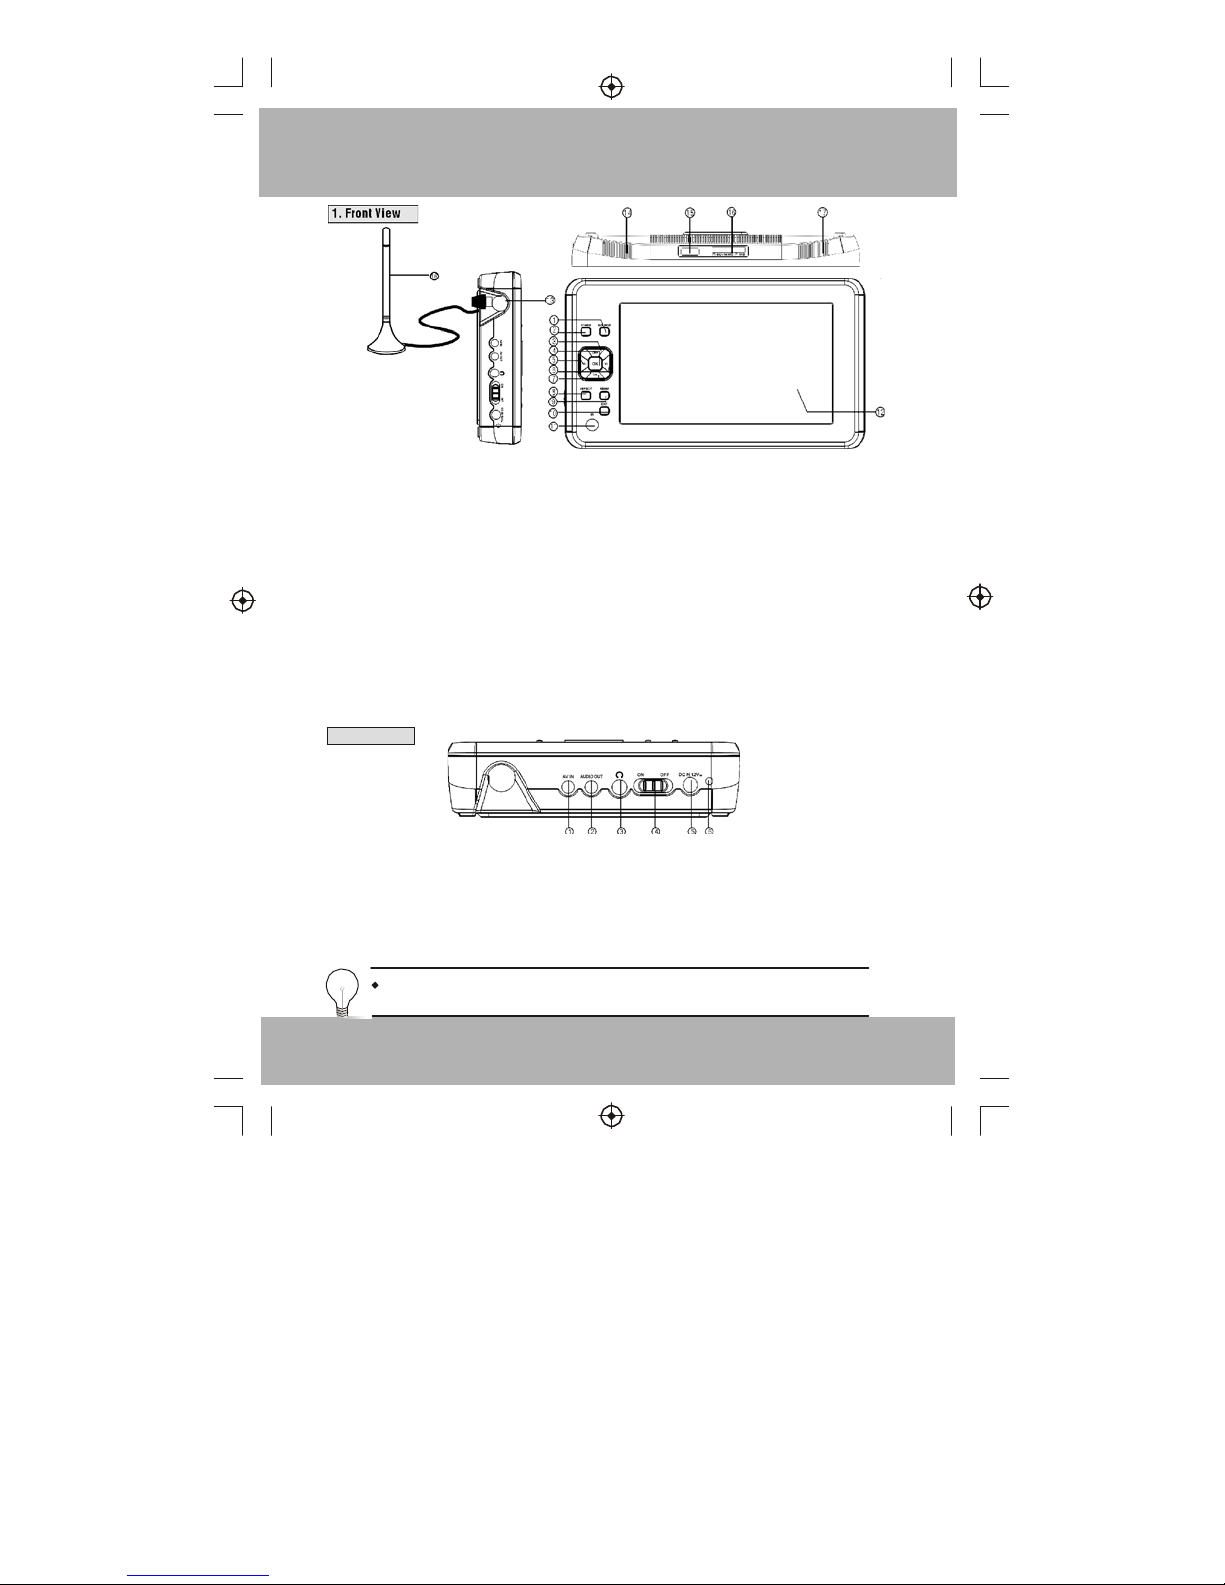
Front
P
anel
1)
SOURCE:
Selects
the
input
source.
2)
POWER:
Powers
TV
on
or
sets
standby
mode.
3)
CH+:
Navigates
the
menu
screens
or
selects
the
channels
in
non-menu
state.
4)
OK:
Confirms
a
selection
within
a
menu.
5)
VOL-:
Navigates
the
menu
screens
or
adjusts
the
volume
in
non-menu
state.
6)
VOL+:
Navigates
the
menu
screens
or
adjusts
the
volume
in
non-menu
state
.
7)
CH-:
Navigates
the
menu
screens
or
selects
the
channels
in
non-menu
state
.
8)
ASPECT:
Changes
display
mode
19:9
or
4:3.
9)
MENU:
Opens
the
main
menu
window.
10)
EXIT:
Exits
menu.
11)
REMOTE
CONTROL
SENSOR:
Receives
the
signal
from
the
remote
control
12)
TFT
screen:
Displays
the
TFT
widescreen
display.
13)
Antenna
input:
Connects
to
an
external
RF
signal.
14)
Speaker
Left:
The
left
speaker.
15)
USB
card
slot
16)
Memory
Card
slot
17)
Speaker
Right
2.
Left
View
1)
AV
IN
JACK:
For
connection
to
an
external
CVBS
video
and
analog
audio
input.
2)
AUDIO
OUT
JACK:
Out
puts
analog
audio
L/R
and
coaxial
digital
Audio
signal.
3
)
EARPHONE
JACK:
Outputs
analog
audio
L/R
signal
to
earphone.
4
)
POWER
SWITCH:
System
on/off.
5
)
DC
IN
JACK:
AC-DC
adaptor
input,
the
voltage
range
is
12
V
.
6
)
CHARGE
INDICATOR:
The
system
is
charging
when
the
red
LED
is
lit,
Will
turn
green
when
fully
charged.
The
AUDIO
IN
and
VIDEO
IN
inputs
should
be
used
at
the
same
time.
AUDIO
IN
cannot
be
used
for
audio-only
without
an
associated
video
connection
9

Getting
Started
Switching
on
the
first
time
Swi
tch
t
he
b
utto
n
to
O
N
po
sitio
n
to
pow
er
on
the
syst
em
1.Connect
the
antenna
to
the
antenna
jack
on
the
left
side
of
the
unit.
2.Connect
the
power
adaptor
to
the
“DC
IN
12V”
jack
on
the
right
side
of
the
unit
3.Switch
on
the
portable
LCD
TV
using
the
power
key
on
the
right
side
of
the
unit.
4.Press
the
MENU
key
and
select
the
rightmost
icon-channel
menu.
5.Use
the
navigation
key
to
select
the
TV
source
and
then
select
Air
or
C
A
TV.
6.Select
the
Auto
Scan
item
and
press
the
Right
key
to
start
auto
search
(It
will
search
for
all
available
channels
in
your
area).
7.
After
completing
the
Auto
Scan,
use
the
channel+/-
key
or
numeric
keys
(remote
control
only)
to
select
the
TV
programs.
10

Getting
Started
For
good
reception,
place
the
antenna
as
close
as
possible
to
the
window
of
your
house,
and
as
far
away
as
possible
from
the
portable
TV.
Don't
place
the
antenna
near
other
machine/appliances
(such
as
motors,
computers,
switching
power,
TVs,
power
amplifiers,
speakers...
etc),
since
these
machines/
appliances
can
cause
interferences
to
the
antenna.
To
conserve
power
while
the
TV
is
not
in
use,
the
power
switch
key
on
the
right
side
should
be
turned
to
the
OFF
position.
How
to
use
the
USB
interface
1.Insert
a
USB
device
into
the
USB
interface
2.
Press
the
source
key
and
select
External
Storage
item.
3.
Select
the
USB
icon.
4.
Select
the
JPG/MUSIC/MOVIE
icons
to
play
the
JPG/MP3/MOVIE
file
.
H
o
w
t
o
u
s
e
3
I
n
1
C
a
r
d
R
e
ad
e
r
1.
I
n
s
e
rt
a
n
S
D
/
M
S
/
MM
C
c
a
rd
i
n
to
t
h
e
C
a
rd
R
e
a
de
r
i
n
te
rf
a
c
e
.
2.
P
re
ss
t
h
e
s
o
u
rc
e
k
e
y
a
n
d
s
e
lec
t
t
h
e
E
x
te
rn
a
l
S
to
ra
ge
i
te
m
.
3.
S
e
lec
t
t
h
e
S
D
/M
S
/M
M
C
i
c
o
n
.
4.
S
e
lec
t
t
h
e
J
P
G
/M
U
S
IC
/M
O
V
IE
i
c
o
n
s
to
p
la
y
t
h
e
J
P
G
/M
P
3
/M
O
V
IE
f
il
e
.
P
le
a
s
e
r
e
fe
r
t
o
p
a
ge
19
f
o
r
de
ta
il
s
o
f
t
h
e
U
S
B
a
n
d
c
a
rd
r
e
a
de
r
u
s
e
.
11
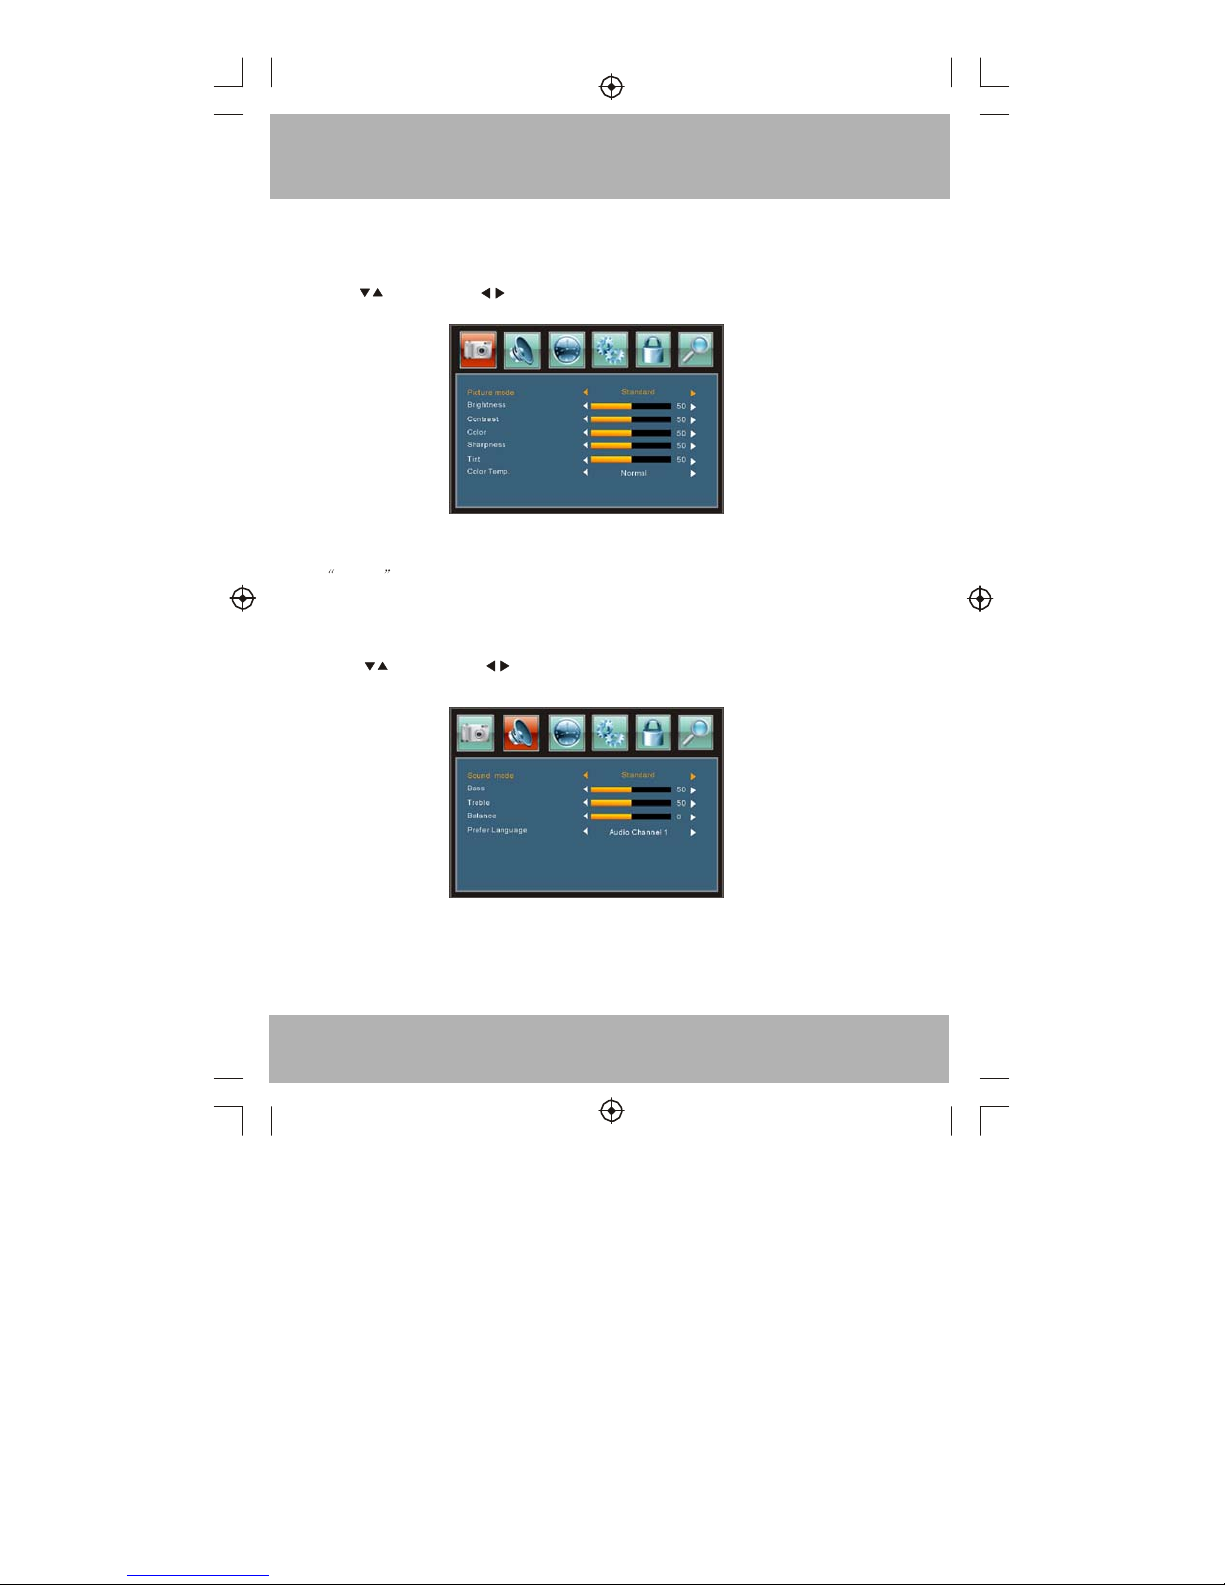
1
.
PICTURE
MODE
The
first
item
of
the
Main
MENU
is
the
PICTURE
MODE.
You
can
adjust
the
contrast,
brightness,
etc.
Press
to
select,
press
to
adjust,
press
MENU
to
exit.
Note:
If
you
want
to
adjust
contrast,
brightness,
color
and
sharpness
,
the
picture
mode
must
return
to personal
status.
2.AUDIO
MODE
The
second
item
of
the
Main
MENU
is
the
SOUND
MODE.
Press
to
select,
press
to
adjust,
press
MENU
to
exit.
12

3.TIMER
MENU
The
third
item
of
the
Main
MENU
is
the
TIMER
MENU.
Press
to
select,
press
to
adjust,
press
MENU
to
exit.
1).SLEEP
TIMER:
adjust
this
item
,
you
can
set
the
sleep
timer
.
4.
SETUP
MENU
1).The
forth
item
of
the
Main
MENU
is
the
SETUP
MENU
for
system
setup.
Press
to
select,
press
to
adjust,
press
MENU
to
exit.
Note:
Restore
Default:
Reset
all
the
settings
to
default
value.
Software
Upgrade:
Only
use
for
system
software
upgrade
by
USB
.
13

2).
Closed
Caption:
Toggles
on/off
.
Press
button
to
select
Closed
Caption
,Press
button,
the
screen
will
display:
5.
V-CHIP
MENU
The
fifth
item
of
the
MENU
is
the
V-CHIP
MENU
for
setting
up
Parental
Control.
Press
to
select,
press
to
adjust,
press
MENU
to
exit.
Parental
control:
input
the
password,
it
will
go
into
the
Parental
Control
menu.
Factory
default
password
is
6666.
5.1
.
Input
the
correct
password
,the
screen
will
display:
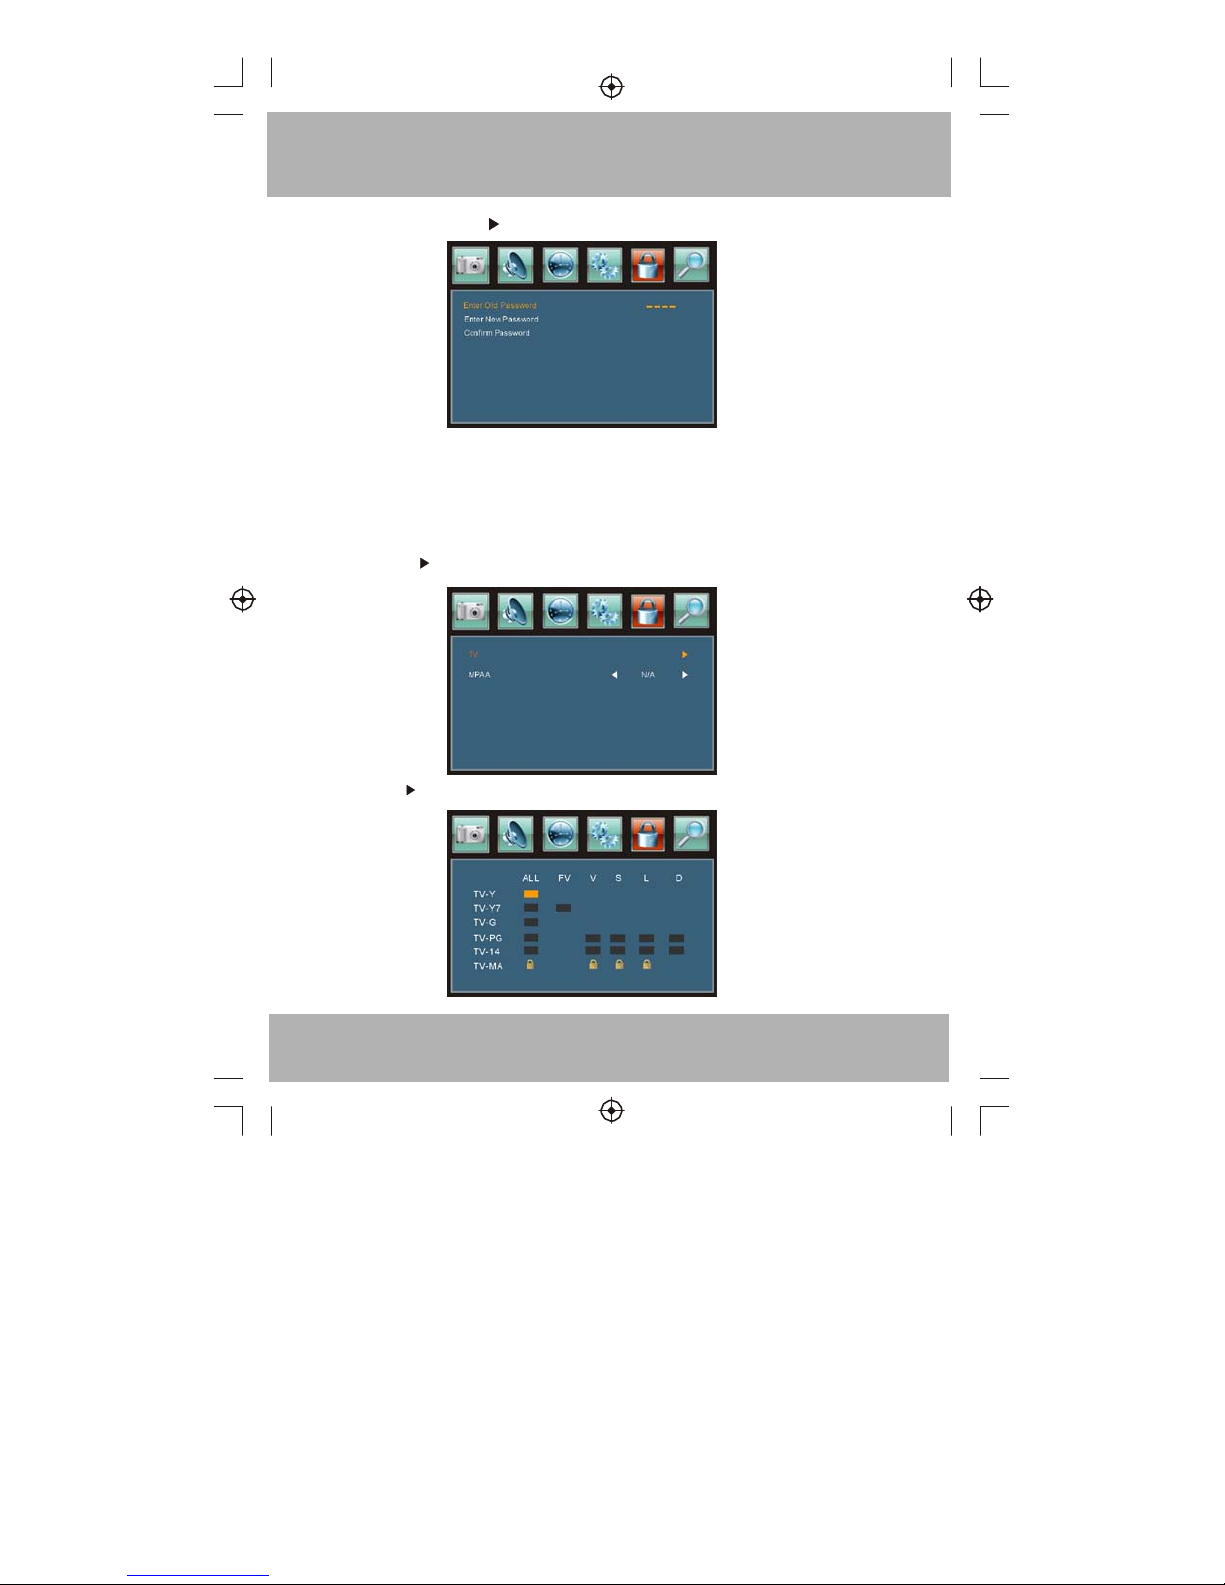
1).
Change
Password:
Press
button,
the
screen
will
display:
1).Enter
Old
Password:
Input
the
old
password.
2).Enter
New
password:
Input
the
new
password.
3).Confirm
password:
Input
the
new
password
again.
5.2
V-CHIP
switch:
When
the
System
Lock
is
ON,
the
options
below
can
be
adjusted.
5.3
US:
Press
button,
the
screen
will
display:
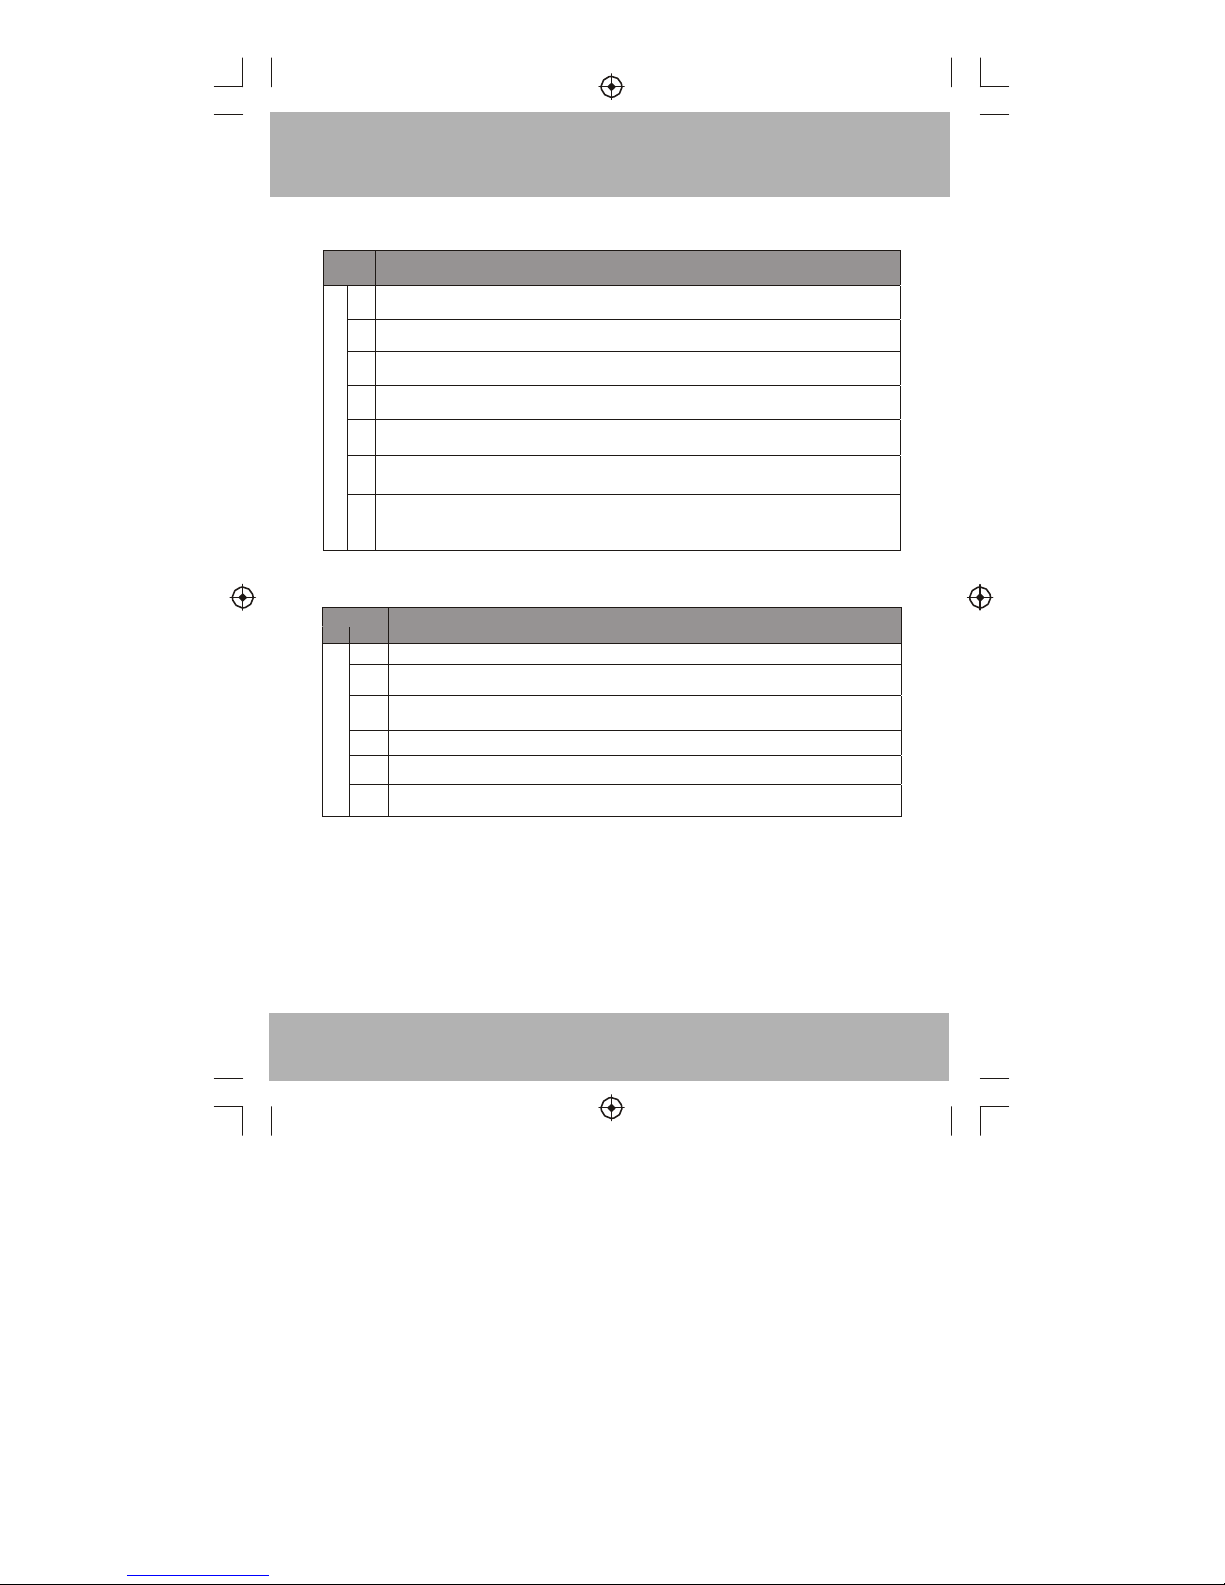
1):TV:
Press
button,
the
screen
will
display
as
follow:
15

And
use
the
OK
key
to
switch
lock/
unlock
the
Parental
Control
feature.
2).MPAA:switch
the
movie-rating
control
level;
N/A,
G,PG,
PG-13,R,NC-17,X.
5.4
Canada:
Press
button,
the
screen
will
display:
16
1):
Canadian
English:
switch
the
english
rating
control
level:E,C,C8+,G,PG,14+,18+.
Rating
Description
Age
E
Exempt:
Includes
news,
sports,
documents
and
other
information
programming:
talk
shows,
music
videos,
and
variety programming.
C
Children:
Intended
for
youngerchildren
under
the
age
of
8.
Pays
careful
attentionto
themes
that
could
threaten
t
heir
sense
of
security
and
well-being.
C8+
Children
over
8
years
old:
Contains
no
portrayal
of
violence
as
the
preferred,
acceptable,
or
only
way
to
resolve
conflict;
no
r
encourag
e
childre
n
t
o
imitat
e
dangerou
s
acts
whic
h
the
y
ma
y
se
e
onth
e
scree
n
G
General:
Considered
acceptable
for
all
age
groups,
Appropriate
viewing
for
the
entire
famil
y,
contains
very
little
violence,
physical,
verbal
or
emotional.
PG
Parental
Guidance:
Intended
for
a
general
audience,
butmay
not
be
suitable
for
younger
children
(under
the
age
of
8)
because
it
could
contain
controversialthemes
or
issues.
14+
Over
14
Y
ears:
Could
contain
themes
where
violence
is
one
of
the
dominant
elements
of
the
storyline
But
it
must
be
integral to
the
development
of
plo
t
or
character.Language
usage
could
be
profane
and
nudity
present
with
in
the
contex
t
o
f
theme
18+
Adults:
Intended
for
viewers
18
years
and
older
and
might
contain
depictions
of
violence,
which
while
related
to
the
development
of
plot,
character
or
themes,
are
intended
for
adult
viewing.
Could
contain
graphic
language
and
portrayals of
nudity.
2).Canadian
French:
switch
the
French-rating
control
level:
E,
G,8ANS+,13
ANS+,16ANS+,
18ANS+.
Rating
Description
Age
E
Exempt
programming
G
General
:All
ages
and
children,
contains
minimal
directviolence,
but
may
be
integrated
into
the
plot
in
a
humorousor
unrealistic
manner
.
8ans+
General
but
unadvisable
for
young
children
:May
be
viewed
by
a
wide
public
audience,
but
could
contain
scen
e
disturbing
to
children
under
8
who
cannot
distinguish
between
imaginary
and
real
situations.
Recommended
f
o
viewin
g
wit
h
parents
13ans+
Over
13
years:
Could
contain
scenes
of
frequent
violence
and
tense
violence.
16ans+
Over
16
years:
Could
contain
frequent
violence
scenes
and
violence.
18ans+
Over
18
years:
Only
for
adult
viewing.
Could
contain
frequent
violent
scenes
and
extreme
violence.
17

6.
Channel
MENU
The
right
most
icon
is
Channel
MENU
for
adjusting
the
TV
Channels.
Press
to
move,
press
to
adjust
here.
1).
TV
Source:
select
Air
TV
signal
or
cable
TV
signal.
2).
Auto
Scan:
press
the
button
to
confirm,
you
will
see
below
menu
:
3).
Favorite:
Press
button
to
choose/delete
the
favorite
channel
.
4).
Show/Hide:
Press
button
to
display
or
hide
current
channel.
5).
Channel
NO
.
:Display
the
currentl
channel
numbe
r
.
6).
Channel
lable:
Press
button
to
edit
current
channel
name.
7).
DTV
signal:
Display
DTV
signal
strength.
Cannot
be
selected
or
adjusted.
18

External
Storage
MENU
Please
use
the
CURSOR
key
and
OK
key
to
operate.
Play
Control
Bar:
Fast
backward
Previous
/
Play/Pause
Fast
Forward
Next
Normal
p
lay
Volume
level
Repeat
all
Repeat
one
Six
window
navigation
(only
for
JPG
file)
T
JPG
play
interval
time
Stop
Shuffle
play
ZOOM(only
for
JPG
file)
To
use
the
button
on
front
panel
to
adjust
volume,please
select
the
Play
Control
Bar
and
select
icon
and
press
OK
ke
y,
then
press
V+/V-
key
for
volume
control.
19
Table of contents
Other Tivax Portable TV manuals


