Tivoli Audio Music System Plus User manual

OWNER’S MANUAL
DAB/DAB+/DMB/FM/CD HI-FI SYSTEM
®

DAB/DAB+/DMB/FM/CD HI-FI SYSTEM
English........................................................................................03
Dansk .........................................................................................17
Deutsch ......................................................................................31
Français......................................................................................46
Italiano........................................................................................62
Nederlands .................................................................................78
Norsk..........................................................................................94
4 – ENGLISH
Important Safety Instructions
1. Read these instructions.
2. Keep these instructions.
3. Heed all warnings.
4. Follow all instructions.
5. CAUTION – Danger of explosion if battery is incorrectly replaced. Replace only with the same
or equivalent type.
6. Warning: Batteries shall not be exposed to excessive heat such as sunshine, fire, or the like.
7. WARNING: DO NOT INGEST BATTERY, CHEMICAL BURN HAZARD. The remote control sup-
plied with this product contains a coin/button cell battery. If the coin/button cell battery is
swallowed, it can cause severe internal burns in just 2 hours and can lead to death. Keep new
and used batteries away from children. If the battery compartment does not close securely,
stop using the product and keep it away from children. If you think batteries might have been
swallowed or placed inside any part of the body, seek immediate medical attention.
8. WARNING – To reduce the risk of fire or electric shock, do not expose this apparatus to rain
or moisture.
9. Clean only with a dry cloth.
10.
Do not block any ventilation openings. Install in accordance with the manufacturer’s
instructions.
11.
Do not install near any heat sources such as radiators, heat registers, stoves, or other apparatus
(including amplifiers) that produce heat.
12.
Do not defeat the safety purpose of the polarized or grounding-type plug. A polarized plug has
two blades with one wider than the other. A grounding type plug has two blades and a third
grounding prong. The wide blade or the third prong are provided for your safety. If the provided
plug does not fit into your outlet, consult an electrician for replacement of the obsolete outlet.
13. Protect the power cord from being walked on or pinched particularly at plugs, convenience
receptacles, and the point where they exit from the apparatus.
14. Only use attachments/accessories specified by the manufacturer.
15. Use only with the cart, stand, tripod, bracket, or table specified by the manufac-
turer, or sold with the apparatus. When a cart is used, use caution when moving
the cart/apparatus combination to avoid injury from tip-over.
5 – ENGLISH
16.
Operate this product only from the type of power source indicated on the rear panel. For
products using an external power supply, use an exact replacement if lost or damaged. For
products operating from battery power, refer to the user manual.
17. For added protection for this product during a lightning storm, or when it is left unattended
and unused for long periods of time, unplug it from the wall outlet. This will prevent damage
to the product to lightning and power-line surges.
18. This product utilizes a laser. Use of controls or adjustments or performance of procedures
other than those specified herein may result in hazardous radiation exposure. Do not remove
the panels and do not repair yourself. Refer service to qualified personnel only.
19.
Unplug this product from the wall outlet and refer servicing to qualified service personnel under
the following conditions:
a. When the power supply cord or plug is damaged.
b. If liquid has been spilled or objects have fallen into the product.
c. If the product has been exposed to water or rain.
d. If the product does not operate normally by following the operating instructions.
e. If the product has been dropped or damaged in any way.
f. When the product exhibits a distinctive change in performance.
20. When replacement parts are required, be sure your service technician has used replacement
parts specified by the manufacturer or have the same characteristics as the original part.
Unauthorized substitutions may result in fire, electric shock, or other hazards.
21.
Upon completion of any service, ask the service technician to perform safety checks to confirm
the product is in proper operating condition.
22. If the LCD becomes cracked and damaged, do not touch the liquid.
23. Keep this product a safe distance away from naked flame, such as a lit candle.
24.
Apparatus shall not be exposed to dripping or splashing and no objects filled with liquids, such
as vases, shall be placed on the apparatus.
25. The recommended operating temperature range is 5˚ C to 40˚ C (41˚ F to 104˚ F).
26.
WARNING – The mains are not disconnected in the off position, but the circuits are
de-powered.
27. Complies with the Canadian ICES-003 & RSS-210.
28. The power cord plug serves as the disconnect device and should remain readily accessible.
This product can be recycled. Products bearing this symbol must NOT be
thrown away with normal household waste. At the end of the product’s life, take it
to a collection point designated for recycling of electrical and electronic devices.
Find out more about return and collection points through your local authority.
The European Waste Electrical and Electronic Equipment (WEEE) Directive was
implemented to dramatically reduce the amount of waste going to landfills,
there by reducing the environmental impact on the planet and on human health.
Please act responsibly by recycling used products. If this product is still usable,
consider giving it away or selling it.

6 – ENGLISH
Music System+Instructions
Congratulations on your purchase of the Tivoli Audio Music System+. We believe this to be one
of the finest-sounding stereo DAB Hi-Fi Systems on the market today. With Bluetooth®wireless
technology on board, you can stream music to your Music System+.
In order to take full advantage of what your new radio is capable of, please take a moment to read
this Owner’s Manual and Safety Instructions. If you have any quetions, please do not hesitate to
contact your dealer or Tivoli Audio.
Please save the carton and original packing should you ever need to ship your radio, as
shipping damage is not covered by the factory warranty.
On behalf of all of us, thank you for choosing Tivoli Audio and enjoy your new Music System+!
About Tivoli Audio
Tivoli Audio was founded by Tom DeVesto with the mission of bringing simple to use, elegantly desi-
gned, high quality audio products to consumers. As CEO and head of research and development
at his former company, Cambridge SoundWorks*, Tom was responsible for the development of
many of the best selling home entertainment and multi-media products on the market. He also held
senior management positions in product development at both Advent and Kloss Video.
*Cambridge SoundWorks is a registered trademark of Creative Labs, Singapore.
Packed with your Music System+ you should find:
• 1 (2.7 m) Power Cord
• 1 Remote Control (Battery installed)
• 1 Cleaning Cloth
• 2 “AA” Batteries
Please contact your dealer/distributor or Tivoli Audio if any of these items are missing.
Getting Started
Before operating the Music System+, wait until it has reached room temperature. Otherwise, con-
densation may form inside the CD player and it may not operate correctly. The display can also
be affected by hot or cold temperatures.
• Insert the two “AA” back-up batteries before inserting the power cord.
• Connect the power cord to the input in the rear of the Music System+ and then plug the cord
into an outlet.
• Press the Red Power Button on the front panel to turn the Music System+ on.
• Fully extend the rear telescoping antenna and be sure the rear antenna switch is in “External”
position.
• When powered on for the first time in DAB mode, the MSY+ will initiate an auto scan. When
complete, the display will indicate how many stations were received. Be sure the rear antenna
is fully extended during the auto scan and the antenna switch is in the “External” position.
• Adjust the volume to the desired level using the front rotary knob.

7 – ENGLISH
Guide To Features (Front Panel)
1. POWER: Push to power the Music System+ On or Off (Standby).
2. VOLUME/MENU/TREBLE: Rotate clockwise to increase the volume or counter-clockwise to
decrease the volume. The volume level is represented in numbers from 0 (no output) to 30
(maximum output). If the volume ever sounds distorted, reduce the level immediately. In DAB
and FM modes, push and hold the knob to access the menu. See the sections marked “DAB
Menu” and “FM Menu”. Push briefly and rotate counter-clockwise to reduce the treble or
clockwise to increase the treble. Press the volume knob in to set or the setting will store auto-
matically and the display will return to its previous state. This knob is also used to adjust and
enter selections (by pushing the knob in) when setting the Clock and Alarms. Adjusting the
volume during Snooze will cancel the Snooze mode.
3. ALARM 1/ALARM 2: Briefly press and hold Alarm 1 or 2. A beep will confirm you are in the alarm
set-up mode and the corresponding green LED will illuminate. Rotate and press the Volume knob
in to adjust and set the hour (Figure 1) and minutes (Figure 2) and press in to set and move to the
next setting. Note, adjusting the hour does not affect the minutes and vise-versa. Set the alarm
source (Figure 3 and 4) and alarm volume (Figure 5) in the same manner. Setting the alarm source
to “AUX” will cause the alarm to wake to a tone. You will not be able to set the alarm source to CD
if a CD isn’t loaded inside. Bluetoothcannot be selected as an alarm source. When the alarm LED
is off, press the Alarm button once to set the alarm. The display will show the time the alarm is set
to wake. When the alarm LED is on, press the Alarm button briefly to turn it off. If the alarm is set
and power is lost, the alarm will still sound (the tone will sound in place of radio or CD) at the des-
ignated time provided fresh batteries are correctly installed in the rear battery compartment. When
the alarm activates (Alarm LED flashes) you may either turn the unit off and keep the alarm set for
the next day, press the Snooze button to temporarily mute the alarm for 7 minutes, or briefly press
the Alarm button to cancel activation, turning the unit off, and keeping the alarm set to wake the
next day. Adjusting the volume during Snooze will cancel Snooze mode. CLOCK: Press and hold
to set. A beep will confirm you are in the clock set mode. Use the volume knob to select the
hour (Figure 6) and then press the volume knob in to set and cycle to the minutes (Figure 7).
Adjusting the hour does not affect the minutes and vise-versa. Repeat this process to set the
year, month and the day (Figure 8, 9 and 10). Once set, press the Clock button briefly to recall
the date and time whenever DAB, RDS or CD Text is displayed. When the date is shown, only
the month and day will show (not the year).

8 – ENGLISH
4. CLOCK: Press and hold to set. A beep will confirm you are in the clock set mode. Use the
volume knob to select the hour (Figure 6) and then press the volume knob in to set and cycle
to the minutes (Figure 7). Adjusting the hour does not affect the minutes and vise-versa. Repeat
this process to set the year, month and the day (Figure 8, 9 and 10). Once set, press the Clock
button briefly to recall the date and time whenever DAB, RDS or CD Text is displayed. When
the date is shown, only the month and day will show (not the year).
5. PRESETS 1–6: Press and hold to memorize the tuned station to that particular preset. A beep
will sound confirming the station has been successfully stored. Press briefly to recall the sta-
tion associated with that preset. There are 6 DAB presets and 6 FM presets. If a Preset button
is pressed but no station has been set, the display will show “Preset Empty” for 2 seconds.
These buttons will also act as limited direct track access during CD playback. The same sta-
tion cannot be saved to more than 1 preset.
6. SOURCE/BT: Briefly press to cycle through the sources: DAB, FM, CD, Bluetooth/Auxiliary. The
source can’t be changed while the alarm is sounding. If the source is changed during CD play-
back and the source is changed back to CD again, the CD will start playback from the first track.
7. SLEEP: With the Music System+ playing DAB, FM, CD, Bluetooth or an auxiliary device, briefly
press to begin the 20 minute Sleep timer. The corresponding green LED will illuminate while the
Sleep timer is active and the display will countdown the remaining Sleep time. The Music
System+ will power off automatically at the end of the Sleep cycle. Sleep cannot be activated
in CD mode unless a CD is loaded. Note DAB, RDS and CD Text will not be displayed in Sleep
mode.
8. / TUNE +/– : In DAB mode, press to access and navigate the DAB Station List. The
volume knob may also be used to navigate when in the Station List. Press the volume knob in
to tune a DAB station or press the “Enter” button on the remote. The Music System+ will return
to the last-tuned station if no action is taken in the Station List after 3 seconds. Note the volume
knob will not control the volume level when in the DAB Station List.
FM: Press the Tune +/- buttons briefly to Auto Scan to the next station detected. See “Scan
Setting” under “FM Menu” on how to disable Auto Scan and tune stations manually.
CD: Briefly press to advance to the next track on a disc or back to a previous track if the track
has been playing for under 10 seconds. If the track has been playing for more than 10 seconds,
Fig 1, 2, 3, 4, 5
Fig 6, 7, 8, 9, 10

9 – ENGLISH
pressing the button will re-start the currently playing track. Using these buttons during
shuffle play may cause tracks to repeat.
9. STOP: Press to stop CD playback and return to the first track.
10.
PLAY/PAUSE: With a CD loaded, briefly press to initiate disc playback. Press during playback
to Pause playback and press again to resume playback. If the CD is paused for more than 5
consecutive minutes it will revert to Stop.
11. :Briefly press to fast forward or fast reverse in approximately 10 second intervals. Press
again to resume normal playback or press Play. These functions are not on the remote control.
Due to the nature of MP3 CDs, using the fast reverse will cause the CD to stop playback once it
reaches the start of the track. Also note fast forward and fast reverse will not operate during CD
Intro mode. Pressing the fast scan buttons ( ) during shuffle play may cause tracks to repeat.
12. EJECT: Press to Eject a CD. The display will show “Ejecting”. This button is to eject only and
should NOT be used to load a CD. Always remove the disc in a straight position with-out bending
the disc. In the unlikely event you experience an error or a disc remains stuck inside, discon-
nect the power cord for 60 seconds and reconnect firmly.
13.
AUDIO: Push briefly to cycle through Stereo, SpacePhase™ Wide mode, or Mono audio settings.
The SpacePhase™Wide mode setting is designed to create a more expansive soundstage,
while the Mono setting reduces multiplex noise on weak FM stations, making otherwise unlis-
tenable stations listenable. Regardless of the previous audio setting, the SpacePhase™ Wide
mode will automatically engage each time the Music System+ is turned on.
EQ: To temporarily turn the EQ off, press and hold the Audio button. The display will show “EQ
Off” and a confirmation beep will sound. The EQ will engage again automatically the next time
the Music System+ is turned on. To keep the EQ off, press and hold the Audio button and the
display will show “EQ Always Off” and a confirmation beep will sound. The EQ will remain off
until “EQ On” is selected. The EQ differs from Audio in that it enhances lower frequencies
primarily at lower volume levels. We suggest the rear Bass level be set to the center detent
position. Should the bass ever sound distorted, immediately lower the bass level and/or volume.
14. INFO: When in DAB mode, briefly press repeatedly to view audio, signal strength, frequency,
signal error, and bit rate. In FM mode, view audio, signal strength, PTY (Program Type, if any)
and frequency.
15. SNOOZE/MUTE (Top of Cabinet): When the Alarm activates, press this button to silence the
alarm for 7 minutes. The display will count down the remaining Snooze time. Adjusting the
volume level will cancel the Snooze mode. During normal operation, press this button to mute
the audio. The display will show “Muted”. Press again to restore the audio output or adjust the
volume level.
16.
HEADPHONE OUT: Connect a set of headphones (not included) to this variable stereo output
for private listening. Plugging in the headphones will mute the primary speakers. The head-
phone’s volume is adjusted using the front panel volume knob. This stereo output accepts
a 3.5 mm stereo male mini connector. Avoid using headphones at high volume levels to prevent
possible hearing damage.
17.
OPTICAL SENSOR: Automatically adjusts the display brightness based on ambient lighting
conditions. The display will dim in darker environments and brighten in brighter conditions. Do
not obstruct this sensor.
18. IR SENSOR: Receives signals from the included remote control. Do not obstruct this sensor.
19. SLOT-LOAD: Insert a disc (with printing side facing up) until it is drawn inside. The display will
say “Loading”. Disc functions will not work while the disc is loading. Playback will begin auto-
matically once the table of contents is read. The display will show “No Disc” when the unit is
set to CD mode and there is no CD inside. When ejecting a CD the display will show “Ejecting”.
For more, see “Important Notes About the CD Player.”

10 – ENGLISH
Guide To Features (Rear Panel)
1. ANTENNA SWITCH: Switch between the internal and the external DAB/FM antenna.
2. EXTERNAL ANTENNA: An external telescoping antenna is affixed to this input. Adjust for
best reception. For more, see the section marked “Digital Radio/FM Reception”.
3. AUX IN: To hear audio from another device such as a TV or MP3 player, connect said device’s
audio output to this stereo input and set the Source button to AUX. Switching to the Auxiliary
position does not turn on the connected device. This stereo input accepts a 3.5 mm stereo male
mini connector. Note you may need to adjust the volume level differently for an auxiliary device
than the level used for radio or CD listening.
4.
MIX IN: Connect your computer’s (or other device’s) audio output to this input to hear its audio
mixed in with the tuner, CD, or auxiliary device if one is connected. The volume level of this
input must be adjusted at the source. This input accepts a 3.5mm male stereo mini
connector.
5. REC OUT: You can record from the Music System+ by connecting a cassette deck’s audio
input (or other recording device) to this fixed level stereo output. The primary speakers will
not be muted when using this output. This jack accepts a 3.5 mm stereo male mini
connector.
6. BASS LEVEL: Turn this control knob to the right to increase the bass volume level or to the
left to decrease the bass volume level. The subwoofer is designed to subtly augment the lower
bass frequencies, not overpower the sound. Tivoli Audio recommends setting this knob to the
center detent position. If the bass should ever sound distorted, immediately lower the bass
level control and/or the front volume control.
7. POWER INPUT: Connect the supplied power cord to this input and plug the cord into a wall
outlet not controlled by a switch. If the power cord is removed from the unit or unplugged from
the wall outlet, please wait 60 seconds before plugging the cord back into the Music System+.
When power is restored the unit will auto eject a CD if one is inside.
8.
BATTERY COMPARTMENT: Properly install the included “AA” batteries to maintain the clock
and alarm settings during a power outage. Check the batteries annually. The display will show
“No Batteries” if there are no batteries installed or the batteries have no or low power. Dispose
of spent batteries according to your state/country’s regulations. When operating on the battery
back-up power, the Music System+’s display and LEDs will not illuminate in order to conserve
power, but if set, the alarm will still sound at the designated time. In such a case, the tone will
sound instead of the radio or CD to further conserve battery power.
+
ANTE NNA DAB /FM ANT E NNA
1 236 78 4 5
11 – ENGLISH
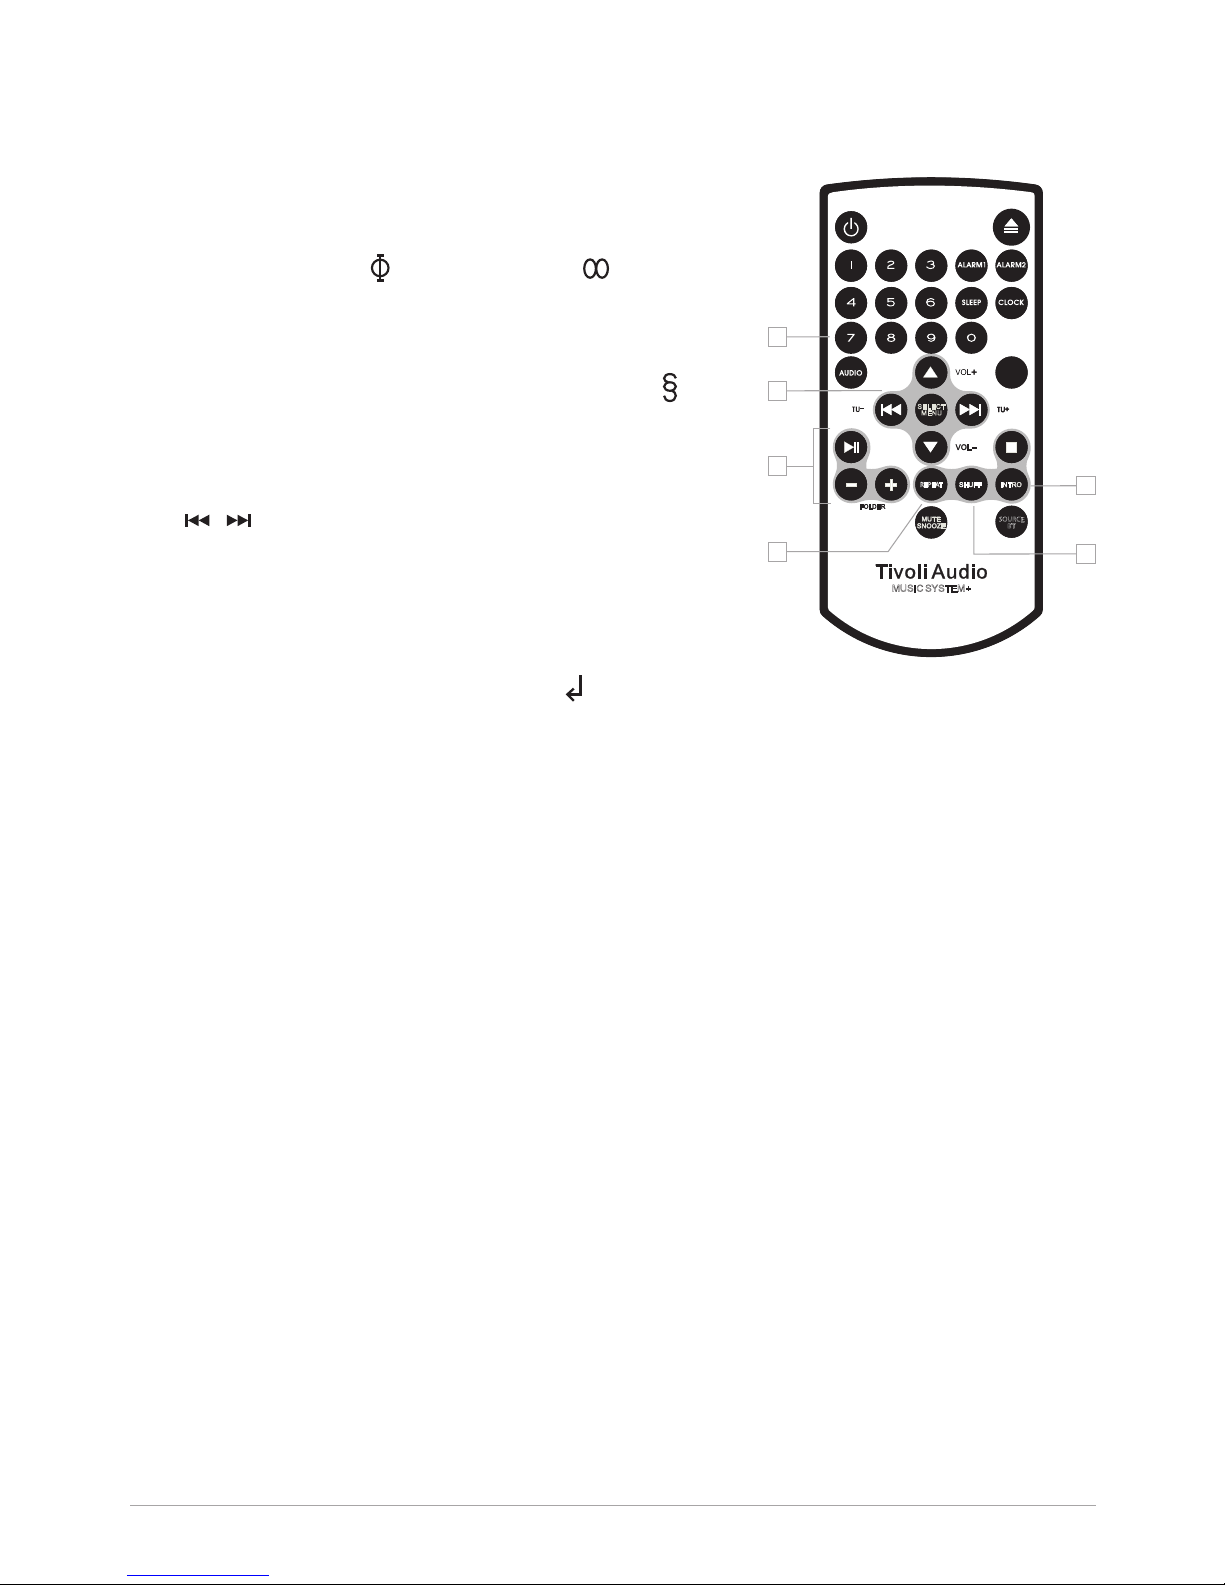
Remote Control (Remove clear tab over battery before use)
In addition to duplicating most of the front panel controls, the remote control adds the following
functions:
1. REPEAT: With a CD playing, press once to repeat the
track being played; Press twice to repeat the entire disc;
Press again to cancel the Repeat mode or press stop.
The Repeat Once ( ) and Repeat All ( ) icons will
show on the Music System+’s display when active.
Repeat 1 cannot be used in conjunction with Shuffle.
2. SHUFF (SHUFFLE): With a CD playing, briefly press to
play the tracks in random order. The Shuffle icon ( ) will
show on the Music System+’s display when active. Press
the Shuffle button a second time to cancel shuffle play
or press Stop. Otherwise, CD playback will stop once all
tracks have been played. Pressing the track up or down
() on the remote and on the Music System+
during shuffle play may cause tracks to repeat. Note that
MP3 CDs with many tracks may repeat some songs in
Shuffle mode. Shuffle cannot be used in conjunction with
Repeat 1, Repeat All, or Intro.
3. INTRO: With a CD playing, briefly press to audition 10
seconds of each track. The Intro icon ( ) will show on
the Music System+’s display when active. Press a second time to cancel Intro play or press
Stop. Otherwise, CD playback will stop once all tracks have played.
Note: The above functions cannot be activated while the disc is loading. If two of the above
functions are used at the same time, both icons will alternate on the display until
finished.
4. FOLDER +/– : Advance or go back to a previous MP3 folder.
5. MENU/SELECT: Same function as pressing the Volume Control in on the Music System+ to
set selections or adjust the treble.
6. 7, 8, 9, 0: Use these buttons in addition to the 1-6 buttons to access a CD track directly. A two
second window is provided to enter another digit after the first digit is entered.
Saved favorite station presets can be recalled using the 1 through 6 buttons on the remote
control.
Controlling volume via the remote is performed using the up/down arrow buttons, while DAB
and FM tuning is controlled using the Left and Right arrow (CD track) buttons.
When operating the remote control at close distances the display might pulse. This is normal
and is a direct result of the remote’s ability to operate at greater distances.
When it comes time to replace the remote control’s battery, use a 3V Lithium Cell #CR2025,
installed with the positive side facing the bottom side of the remote.
DAB/DAB+/DMB Menu
In DAB Mode, press and hold the volume knob on the Music System+, or press and hold the Menu
button on the remote control, to enter the main menu. Rotate the knob and press in to change the
items within the menu or use the Remote pq buttons and Select button.
1. AUTO SCAN: Searches the entire frequency range. If you move the Music System+ to another
location, you must perform a new scan so the radio will find stations in the new location.
INFO
SOURCE
BT
REPEAT
SSEE LLEE CCTT
MMEE NNUU
MUSIC SYSTEM+
1
5
6
2
3
4

12 – ENGLISH
2. SCROLLING TEXT: Press the Select button and use the up/down arrow and Select buttons to
choose between DAB scrolling text On, Off, or Static (text will be displayed but will not scroll).
3. DRC: Dynamic Range Control allows you change the sound level of stations to make quiet pas-
sages louder to compensate for a noisy environment, or when listening at a low volume level.
4.
AUTO UPDATE: Choose between “Any”, “DAB” (also DMB) or “RDS”. For any of the auto
updates to work, you must have consistent reception of DAB or FM RDS with a time/date signal
provided. It could take up to a minute or more for the clock to update. Tivoli Audio is not
responsible for inaccurate time/date information provided by the auto update signal. To set
the clock manually select “Off” and set the time and date using the “Clock” button.
5. FACTORY RESET: Press Select and use the Remote pq and Select buttons to confirm (Yes)
or reject (No) the factory reset. A factory reset will restore factory defaults and cancel all your
personal settings, such as presets.
DAB Display Messages
Secondary Services: Secondary stations will be indicated by a >> symbol next to the station
name. Secondary services may not be available in your area.
“?”: If this symbol appears next to the station name, it means the station is invalid or inactive.
“Not Available”: Shown when tuning a DAB station with an insufficient signal.
FM Menu
In FM mode, press and hold the volume knob on the Music System+, or press and hold the Menu
button on the remote control, to enter the main menu. Rotate the knob and press in to change the
items within the menu, or use the remote’s pq buttons and Select button.
1.
SCAN SETTING: Press the Select button and use the +/- and Select buttons to choose
between “Strong Stations only” or “All Stations” when performing an auto scan, or select “Off”.
Selecting “All stations” increases the sensitivity of the scan, possibly resulting in the auto scan
stopping on noise. Selecting “Off” allows manual tuning of stations using the Tune
+/- buttons.
2. SCROLLING TEXT: Press the Select button and use the up/down arrow and Select buttons
to choose between FM RDS scrolling text On, Off, or Static (text will be displayed but will not
scroll). Not all FM stations utilize RDS text. For more about RDS, see “Reception/RDS”.
3. RDS: Select On or Off to turn RDS on or off.
4.
AUTO UPDATE: Choose between “Any”, “DAB” (also DMB) or “RDS”. For any of the auto
updates to work, you must have consistent reception of DAB or FM RDS with a time/date signal
provided. It could take up to a minute or more for the clock to update. Tivoli Audio is not
responsible for inaccurate time/date information provided by the auto update signal. To set
the clock manually select “Off” and set the time and date using the “Clock” button.
5. FACTORY RESET: Press Select and use the Remote pq and Select buttons to confirm (Yes)
or reject (No) the factory reset. A factory reset will restore factory defaults and cancel all your
personal settings, such as presets.

13 – ENGLISH
CD Menu
In CD mode, press and hold the volume knob on the Music System+, or press and hold the Menu
button on the remote control, to enter the main menu. Rotate the knob and press in to change the
items within the menu, or use the remote’s pq buttons and Select button.
1. SCROLLING TEXT: Press the Select button and use the up/down arrow and Select buttons
to choose between CD scrolling text On, Off, or Static (text will be displayed but will not scroll).
Not all CD’s show CD text.
Bluetooth Operation
Prior to pairing, verify your device supports Bluetooth 2.1+EDR A2DP and your device is not con-
nected to any other Bluetooth product. Devices may pair differently. Below is a general guide.
1. Turn on the Music System+ to the Auxiliary position. This will power on the Bluetooth. Turn the
volume up about ¼ to start. Also turn up the volume on the source device (the device you are
streaming from).
2. Turn on the Bluetooth wireless technology on your enabled device.
3.
Select “Tivoli Bluetooth (Not Paired)” when it appears on your device’s screen to initiate search-
ing. Some devices may prompt you for a PIN. If so, enter “0000”. “Tivoli Bluetooth” will change
from “Not Paired” to “Connected”.
4. You will hear a ring tone from the Music System+ confirming connection and you can begin
playing your music files wirelessly. Adjust the volume level on your device. You should not have
to pair your device again. Depending on your device, you may need to make multiple
attempts at Pairing and/or Connecting to the Music System+, but please give your device
adequate time to Pair or Connect before repeating the process.
Pairing A Bluetooth Wireless Technology Enabled
iPhone/iPod touch/iPad
1. Turn on the Music System+ to the Auxiliary position. This will power on the Bluetooth. Turn the
volume up about ¼ to start. Also turn up the volume on the source device (the device you are
streaming from).
2. Select “Settings”. (Depending on software version)
3. Select “General”.
4. Select “Bluetooth”.
5. Switch Bluetooth “On” to initiate searching.
6. Select “Tivoli Bluetooth (Not Paired)” when it appears on the display. If you are prompted to
enter a PIN, enter “0000”. “Tivoli Bluetooth will change from “Not Paired” to “Connected”.
7. You will hear a ring tone from the Music System+ and you can begin playing your music files wire-
lessly. Adjust the volume level on your device. You should not have to pair your iPhone/iPod/iPad
again.
The volume output level of music files varies. If you prefer an even higher output level, check the settings
in your iPhone/iPod touch/iPad: Set the EQ Off, the SoundCheck Off, and the Volume limit Off.
If you encounter a problem Pairing, press the small arrow to the right of “Tivoli Bluetooth” on your
iPhone/iPod touch/iPad display and select “Forget this Device”, then repeat the Pairing process.
Depending on your device, you may need to make multiple attempts at Pairing and/or Con-
necting to the Music System+, but please give your device adequate time to Pair or Connect
before repeating the process.

14 – ENGLISH
When streaming music, you can press the blue arrow to the right of the next track button >>| on
the iPhone/iPod touch/iPad display to alternate between the iPhone/iPod/iPad and Bluetooth.
NOTE:
• The Music System+ will remember pairing information for up to 8 devices. Additional devices
can be paired, but the least-recently used device will be replaced by the newly paired device.
• If the audio drops out or stops during playback, move your device closer to the Music System+,
or check to be sure another wireless device is not interfering with the signal.
• When switching from Bluetooth to DAB or FM, you may need to re-adjust (lower) the radio’s volume
level.
Important Notes About the CD Player
• Do not try to insert a disc in the slot if one is already inside the unit.
• The display does not show the total disc time for MP3/WMA CDs due to their often very lengthy
table of contents. Total time will be shown for commercial music CDs but if either track +/- but-
tons are pressed, the total time will disappear since the initial mode was changed.
• You may experience a delay in playback when inserting MP3 or WMA discs while the player
reads the directory. Playback will be delayed slightly while the table of contents is read.
• Disc functions will not work while the disc is loading.
• Do not use the Eject button to load a CD.
• Changing sources while a CD is playing causes the CD to stop playback. Playback will resume
when the source is set to CD again.
• The sound quality of MP3, CD-R/CD-RW, and even commercially recorded discs can vary greatly.
The same holds true for the sound quality of portable MP3 players.
• Do NOT use any CD lens cleaning discs since these are not designed for slot-load machines.
• Avoid bending the disc when loading or ejecting.
• Do not move the unit while a disc is playing and do not ship the unit with a CD inside.
• Do not insert specially shaped discs or 3” CD “single” discs.
• Paper labels stuck to CD-R/CD-RWs may become loose and possibly damage the player.
• CDs with severe scratches may not play properly.
• Do not insert anything except a CD inside the loading slot.
• In the rare event you experience an error, unplug the power cord for 60 seconds and then plug
it back in firmly.
Getting the most from your Music System+
1.
Treat the Music System+ as you would a home stereo system. Although the audio from a
computer or laptop can be connected to the Music System+, it’s not intended for near-field
(close-up) listening like “computer speakers”. As with a home stereo system, listening at a
distance will yield the best results.
2.
The SpacePhase™ Wide mode and EQ settings allow you to tailor the Music System+’s sound
to your liking depending on the program material, room size and volume level. We’ve spent
countless hours of critical listening using a variety of material with different settings and at
different volume levels. In general we recommend the treble control be kept in the “0” position.
At high volume levels, for the most accurate reproduction, we recommend keeping the EQ off
and the Audio setting in Stereo or Mono (not SpacePhase™ Wide) mode.

15 – ENGLISH
3. Should you ever experience a problem, remove the batteries and the power cord for 60 sec-
onds, then reinstall the batteries and re-attach the cord. This should restore normal
operation.
Reception/RDS
The internal DAB/FM antenna will provide good reception. The supplied external DAB/FM antenna
will usually provide improved reception. Fully extend the antenna. If a noisy FM station is received,
setting the Audio button to “Mono” may help to clear up some of the multiplex noise.
The Radio Data System (RDS) transmits text information along with audio broadcasts. Program
Service data will be shown in the upper right corner when available. Not all FM stations utilize
RDS, thus text data may not be present with some stations. For stations using RDS, text may not
appear or may appear scrambled if the signal is too weak. Experimenting with the FM antenna
position may improve RDS reception. RDS content is determined by each individual FM station,
therefore if any data is shown incorrectly, this is not a fault of the unit. There are also limitations in
terms of the kinds of characters that can be displayed. Therefore it is not unusual to see a different
character or blank space in cases where the precise character can’t be reproduced. Note RDS
text will not be displayed in Sleep mode.
Buildings made with concrete, steel, or aluminum siding will hinder reception. Household appliances,
electric blankets, computers, and other electronic devices can also adversely affect reception or
inject noise. If you experience this, move the Music System+ further from the offending device or
plug it into an electrical outlet not shared by another device.
Placement
Place the Music System+ on a solid, flat, stable surface strong enough to support its weight.
Placement in a bookcase, cabinet, or close to walls or corners may inflate the bass, creating an
unnatural sound. Do not obstruct the vents on the rear panel, as these are for sound as well as
internal heat ventilation.
The CD player built-into the Music System+ has excellent shock protection, but it is not shock
proof. We therefore recommend the Music System+ be placed on a flat, level surface that is not
subject to vibration.
The Music System+ is shielded and may be placed near or below a TV or computer monitor.
Cleaning
For your own safety, be sure the Music System+ is disconnected from the power outlet during
cleaning. Never use any harsh cleansers or solvents on your radio. Fingerprints may be removed
from the cabinet using the included cloth. The face may be cleaned with a slightly damp cloth
only if necessary.
An important note about the wood cabinet: The variation in color and grain are characteristics
of real wood and contribute to the cabinet’s natural beauty. The veneer for each cabinet is
unique. As a result, the cabinet’s finish may not match other Tivoli Audio products.
Depending on the veneer, you might also notice the wood darken over time with exposure to
light. This is normal.
It is also possible dyed veneers such as blue, red, etc., could fade from exposure to sunlight.
This is not covered under the warranty.

16 – ENGLISH
Limited Warranty
Tivoli Audio manufactures its products to very high standards and we are confident our products
will perform well. Accordingly, we provide a limited warranty on this product against manufactu-
ring defects in material and workmanship to the original owner. This warranty is non-transferable.
Products purchased in the European Union and Norway have a minimum warranty term of two
years. For countries where minimum warranty terms are determined by statute, the warranty term
is the statutory period required. In all other locations, the warranty term is one year.
This Limited Warranty covers the functionality of the product for its normal, intended use as
specified in this Owner’s Manual. It does not cover a malfunction or damage that has resulted
from improper or unreasonable use or installation, using the charger to charge alkaline batteries,
faulty ancillary equipment, modifications, unauthorized repair, shipping damage or loss, abuse,
accidents, use on improper voltage/current, power surges, lightning or other acts of God, excess
moisture, normal wear and tear, commercial use, or purchase from unauthorized dealers. Proof
of purchase as evidence the unit was purchased from an authorized dealer may be required for
warranty service. Please contact the dealer of purchase or local distributor for warranty
service or repair.
Please refrain from opening this product or taking it apart as doing so will void this Limited War-
ranty. There are no user serviceable parts inside. Tivoli Audio will not pay for costs incurred due
to correction of reception problems, elimination of externally generated static/noise, loss of time,
inconvenience, loss of use of product, or damage caused by improper use of this product.
In the event the product is returned during the warranty term and is eligible for service under this
Limited Warranty, we will repair or replace any defective parts within a reasonable period of time
and free of charge.
THIS LIMITED WARRANTY GIVES YOU SPECIFIC LEGAL RIGHTS SUBJECT TO SPECIFIED CON-
DITIONS. YOU MAY ALSO HAVE OTHER LEGAL RIGHTS WHICH APPLY TO THE PRODUCT YOU
HAVE ACQUIRED. THESE LEGAL RIGHTS VARY FROM COUNTRY TO COUNTRY. SOME PLACES
DO NOT ALLOW THE EXCLUSION, RESTRICTION, OR MODIFICATION OF CERTAIN IMPLIED
RIGHTS OR THEIR EFFECT. IN THOSE SITUATIONS THIS LIMITED WARRANTY WILL ONLY APPLY
TO THE EXTENT THAT THE APPLICABLE LAW ALLOWS.
The laws of your country may provide you with legal claims against the seller or manufacturer of
this product. This Limited Warranty does not affect those rights.
The provisions of the Limited Warranty are in lieu of any other warranties or conditions, except
those provided by law. This Limited Warranty does not affect any legal rights provided to you by
law and does not preclude any remedy you may have under law.
In countries where liability limits are not precluded by statute, the maximum liability of Tivoli Audio
shall not exceed the purchase price paid by you for the product. In countries where limitations of
liability are precluded by law, Tivoli Audio shall be liable for no more than the direct damages for
bodily injury, and/or real or personal property arising from the negligence of Tivoli Audio.
Where not prohibited by law, Tivoli Audio shall not be liable for special, incidental, consequential,
or indirect damages. Some places do not allow limitations on the exclusion or limitation of relief,
special, incidental, consequential or indirect damages, or the limitation of liability to specified
amounts, so the above limitations or exclusions may not apply to you.
This Limited Warranty is void if the label bearing the serial number has been removed or defaced.
If you purchased an extended service contract from your dealer and service is required after the
term of this Limited Warranty has expired, please contact your extended service contract provider
to obtain service.
17 – ENGLISH
For your convenience, you may register your product for warranty service online at our website,
www.tivoliaudio.com. There is no legal obligation for you to provide personal information. Howe-
ver, such information allows us to maintain a record of the Tivoli Audio products acquired by you
and better understand the purchasers of our products. The information collected will be used for
marketing purposes by Tivoli Audio and, where permitted, to contact you in relation to the products
you have acquired or other products which might be of interest to you from Tivoli Audio or other
companies. The information that you provide may be processed in another country.
For service, please contact your dealer or local distributor.
Specifications
Model: Tivoli Audio™Music System™+
Type: DAB/DAB+/DMB/FM/CD Hi-Fi System with Bluetooth wireless technology
Drivers: 2 x 7.62 cm (2 x 3") full-range, video shielded
1 x 13.34 cm (1 x 5.25") down-firing woofer, video shielded
Dimensions: 35.88 cm W x 13.34 cm H x 24.13 cm D
(14.125" W x 5.25" H x 9.5" D)
Weight: 5.90 kg (13.0 lbs.)
Specifications subject to change without notice. Tivoli Audio reserves the right to make product changes without
notice. Tivoli Audio, the Tivoli Audio logo, Tivoli Audio Music System and Space Phase are trademarks of Tivoli
Audio, LLC. The Bluetooth word mark and logos are registered trademarks owned by Bluetooth SIG, Inc. and any
use of such marks by Tivoli Audio is under license. iPod, iPod touch, iPhone, and iPad are trademarks of Apple Inc.,
registered in the U.S. and other countries.
18 – DANSK
Vigtige sikkerhedsinstrukser
1. Læs disse instrukser.
2. Gem disse instrukser.
3. Lyt til alle advarsler.
4. Følg alle instrukser.
5. FORSIGTIG – Der er eksplosionsfare, hvis batteriet udskiftes forkert. Udskift kun et batteri med
et andet af samme eller tilsvarende type.
6. Advarsel: Undlad at udsætte batterier for stærk varme som f.eks. direkte sol, ild eller lignende.
7. ADVARSEL: SLUG IKKE BATTERIET – FARE FOR KEMISKE FORBRÆNDINGER. Fjernbetjenin-
gen, der følger med dette produkt, indeholder et mønt-/knapcellebatteri. Hvis mønt-/
knapcellebatteriet sluges, kan det forårsage alvorlige indre forbrændinger på blot 2 timer, hvilket
kan være livsfarligt. Opbevar nye og brugte batterier utilgængeligt for børn. Hvis batterirummet
ikke lukker ordentligt, skal du ophøre med at bruge produktet og opbevare det utilgængeligt for
børn. Hvis du har mistanke om, at batteriet kan være blevet slugt eller er kommet ind et andet
sted i kroppen, skal du straks søge læge.
8. ADVARSEL – For at nedsætte risikoen for brand eller elektrisk chok, må dette apparat ikke
udsættes for regn eller fugt.
9. Rengøres kun med en tør klud.
10. Bloker ikke ventilationsåbninger. Installer i overensstemmelse med fabrikantens instrukser.
11.
Må ikke installeres nær andre varmekilder så som radiatorer, varmeriste, ovne eller andre
apparater (inklusive forstærkere) som producerer varme.
12. Omgå ikke sikkerhedsformålet med et polariseret eller jordforbindelsesstik. Et polariseret stik
har to blade og det ene blad er bredere end det andet. Et jordforbindelsesstik har to blade og
et tredje jordforbindelsesben. Det brede blad på det tredje ben er der for din sikkerhedsskyld.
Hvis det medførende stik ikke passer ind i din stikkontakt, bedes du kontakte en elektriker for
at udskifte den forældede stikkontakt.
13. Beskyt strømkablet så man ikke kan træde på det eller klemme det især ved stik, stikdåser og
der hvor de er tilsluttet apparatet.
14. Brug kun de vedhæftelser/tilbehør som fabrikanten har specificeret.

19 – DANSK
15. Må kun bruges sammen med det rullebord, den stand, det stativ, det beslag
eller bord som fabrikanten har specificeret, eller som blev solgt sammen med
apparatet. Når man bruger et rullebord skal man være forsigtig, når man flytter
apparatet på rullebordet, så man undgår skade hvis det tipper.
16.
Brug kun dette produkt fra den type strømkilde, som er indikeret på bagpanelet.
For produkter som bruger en ekstern strømforsyning skal man erstatte den med
en identisk strømforsyning, hvis den forsvinder eller beskadiges. For produkter som bruger
batteristrøm henvises til brugermanualen.
17. For ekstra beskyttelse skal du trække stikket ud på dette produkt i tordenvejr eller hvis det
efterlades eller ikke bruges i længere tid. Det vil forhindre skade på produktet ved lynnedslag
og overspænding.
18.
Dette produkt anvender en laser. Anden anvendelse, justering eller betjening end den heri
foreskrevne kan resultere i skadelig stråling. Åben ikke produktet og forsøg ikke selv at
reparere produktet. Service og reparation må kun udføres af kvalificeret personale.
19.
Træk produktet ud af stikkontakten og kontakt en kvalificeret servicetekniker for service i
følgende tilfælde:
a. Hvis strømkablet eller stikket er beskadiget.
b. Hvis der er spildt væske eller hvis der er kommet noget i produktet.
c. Hvis produktet er blevet udsat for vand eller regn.
d. Hvis produktet ikke fungerer normalt, når man følger brugsanvisningerne.
e. Hvis man har tabt produktet, eller det på nogen måde er blevet beskadiget.
f. Når produktets performance ændrer sig i betydelig grad.
20. Når det er nødvendigt at bruge reservedele, skal du sørge for at serviceteknikeren bruger de
reservedele, som fabrikanten specificerer eller at de har samme karakteristika som den origi-
nale del. Uautoriserede erstatninger kan forårsage brand, elektrisk chok eller andre farer.
21. Når der er blevet udført service, skal du bede serviceteknikeren om at udføre sikkerhedstjek
for at bekræfte at produktet fungerer korrekt.
22. Hvis LCD displayet revner eller bliver beskadiget, må væsken ikke berøres.
23. Hold sikker afstand mellem dette produkt og åben ild så som et tændt stearinlys.
24. Apparatet må ikke udsættes for dryp eller stænk og ting der er fyldt med væske, så som en
vase, må ikke stilles på apparatet.
25. Den anbefalede temperatur for brug er mellem 5 ºC og 40 ºC (41ºF - 104ºF).
26. ADVARSEL – Forsyningsnettet er ikke frasluttet, når det står på “off”, men der er ingen strøm
i kredsløbene.
27. Canada overholder RSS210, ICES-003.
28.
Stikket på strømkablet fungerer som en fraslutningsanordning og skal altid være let
tilgængelig.
Dette produkt kan genbruges. Produkter med dette symbol må IKKE smides
væk sammen med almindeligt husholdningsaffald. Når du vil smide produktet
ud, bedes du tage det til et indsamlingssted for genbrug af elektriske og elektro-
niske anordninger. Få mere information om steder for returnering og indsamling
hos din lokale myndighed.
Det europæiske direktiv om affald af elektrisk og elektronisk udstyr (WEEE)
blev implementeret for at stærkt nedsætte mængden af affald som ender på i
lodsepladsen og derved nedsætte den miljømæssige påvirkning på jorden og
på menneskers helbred. Udvis venligst ansvarlighed ved at genbruge brugte
produkter. Hvis dette produkt stadigt kan bruges, bedes du overveje at forære
det væk eller sælge det.

20 – DANSK
Music System+Instruktioner
Tillykke med dit køb af Tivoli Audio Music System+. Vi anser dette for at være et af de mest velspil-
lende stereo DAB Hi-Fi systemer på markedet i dag. Med Bluetooth®trådløs teknologi indbygget,
kan du streame musik til dit Music System+.
For at få fuldt udbytte af dit nye systems muligheder, anbefaler vi at du bruger lidt tid på at
læse denne brugervejledning. Hvis du har nogen spørgsmål, er du velkommen til at kontakte din
forhandlere eller Tivoli Audio.
Venligst gem den originale emballage, i tilfælde af, at du skulle få brug for at sende dit system,
da skader opstået under forsendelse ikke er omfattet af garantien.
Vi takker dig for at vælge Tivoli Audio og ønsker dig god fornøjelse med dit nye Music System+!
Om Tivoli Audio
Tivoli Audio blev startet af Tom DeVesto som havde en mission om at bringe brugervenlige og
elegant designede audioprodukter af høj kvalitet til forbrugerne. Som administrerende direktør
og chef for forskning og udvikling på hans tidligere arbejdsplads, Cambridge SoundWorks*, var
Tom ansvarlig for at udvikle mange af de home entertainment og multimedie produkter, der sælger
bedst på markedet. Han arbejdede også i topledelsesstillinger indenfor produktudvikling hos både
Advent and Kloss Video.
*Cambridge SoundWorks is a registered trademark of Creative Labs, Singapore.
I pakken med dit Music System+ finder du:
• 1 stk. 2,7m lysnet ledning
• 1 stk. Fjernbetjening (Batterier er isat)
• 1 stk. Pudseklud
• 2 stk. Batterier (AA)
Hvis nogle af disse dele mangler, bedes du kontakte din forhandler eller Tivoli Audio.
Kom Godt I Gang
Før du tager Music System+ ibrug, bedes du sikre at systemet har stuetemperatur. Ellers kan
kondens opstå inden i CD afspilleren og denne vil så muligvis ikke virke korrekt. Displayet kan
ligeledes blive påvirket af for varme eller kolde temperaturer.
• Isæt de to “AA” batterier, før lysnet-ledningen tilsluttes.
• Tilslut lysnetledningen på bagsiden af Music System+ og tilslut derefter ledningen til en stik-
kontakt.
• Tryk på den røde tænd/sluk knap for forsiden af Music System+ for at tænde systemet.
• Træk teleskopantennen på bagsiden ud i fuld længde og sørg for at antenne kontakten på bag-
siden står på “External”-positionen.
• Første gang systemet tændes i DAB-mode, vil systemet starte en automatisk scanning. Når den
er gennemført vil displayet vise hvor mange stationer det har fundet. Vær sikker på at anten-
nen er udtrukkekt i fuld længde under scanningen og at antenne kontakten på bagsiden står i
“External”-positionen.
• Tilpas lydstyrken til det ønskede niveau med drejeknappen på forsiden.
Table of contents
Languages:
Other Tivoli Audio Stereo System manuals

Tivoli Audio
Tivoli Audio MUSIC SYSTEM User manual

Tivoli Audio
Tivoli Audio Model Two User manual

Tivoli Audio
Tivoli Audio MUSIC SYSTEM User manual

Tivoli Audio
Tivoli Audio MUSIC SYSTEM User manual

Tivoli Audio
Tivoli Audio ONE BT User manual

Tivoli Audio
Tivoli Audio Revive User manual

Tivoli Audio
Tivoli Audio Model Two User manual

Tivoli Audio
Tivoli Audio ART MUSIC SYSTEM HOME User manual

Tivoli Audio
Tivoli Audio MUSIC SYSTEM User manual

Tivoli Audio
Tivoli Audio Music System Home Generation 2 User manual


