TMT 4x4 Skyline User manual

INSTALLATION MANUAL
SKYLINE ROOF RACK
Toyota Land Cruiser 80 Series

CONTACT US
@ TMT4X4
GET CONNECTED!
SKYLINE ROOF RACK
Toyota Land Cruiser 80 Series
Installation Time = 1 Hour
Difficulty = Intermediate
1

SKYLINE ROOF RACK
Toyota Land Cruiser 80 Series
03
WARNING!
READ ALL SAFETY MESSAGES AND UNDERSTAND
ALL INSTRUCTIONS AND PROCEDURE NOTICES BEFORE
ATTEMPTING TO INSTALL OR USE THIS PRODUCT!
11111
-Ideal accessory for the Toyota Land Cruiser 80 Series.
-The installation of this product may require the use of specialized tools and techniques.
It is recommended that only be installed by trained personnel.
-All products built and designed by TMT are intended for off-road use and should be
assembled, installed, and used according to TMT’s recommendations.
-All attachment points should be checked when you first install your rack. You should also
inspect it periodically and each time they are reinstalled.

SKYLINE ROOF RACK
Toyota Land Cruiser 80 Series
04
CARRYING LOADS
Maximum Load Capacity:
Please refer to your vehicle manufacturer’s handbook for maximum roof load
capacity.
Handling Change:
Don’t overload your vehicle’s hood to the point of difficult maneuverability. Be
especially careful in off-road conditions and when transporting wind-resistant loads.
Location of Loads:
Please ensure that all loads are evenly distributed and the center of gravity is kept as
low as possible.
Securing Long Loads:
Long loads must be securely tied down to both the front and rear of the vehicle, in
addition to the rack. Use only non-stretch fastening ropes or straps.
CAUTION!
TMT products should be used safely. The user must understand the precautions.
Be smart, use good judgement. Failure to do so can result in ruined car, material
damage, personal injury or even death.
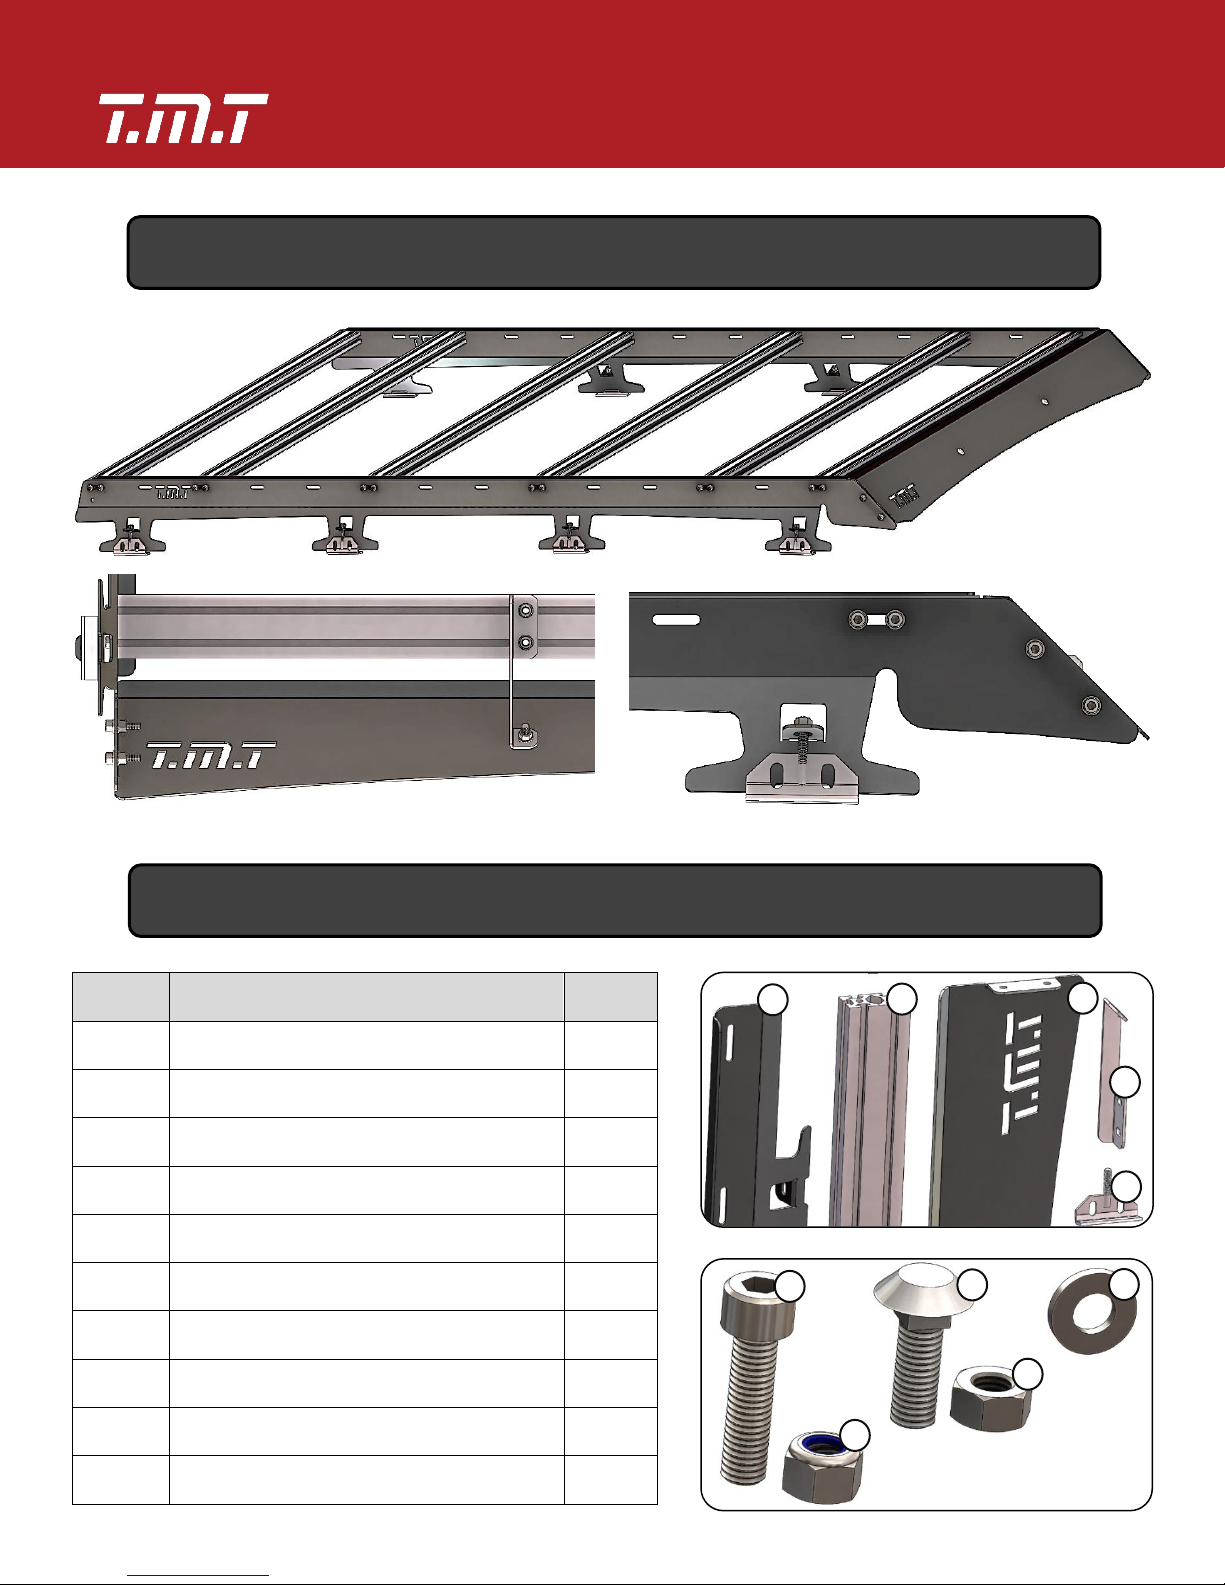
ITEM
DESCRIPTION
QTY.
1
Side Beam
2
2
Crossbar
6
3
Wind Deflector
1
4
Deflector Support
2
5
Clamp
8
6
Allen Bolt (M8)
28
7
Lock Nut (M8)
12
8
Carriage Bolt (5/16”)
6
9
Hex Nut (5/16”)
6
10
Plain Washer (5/16” & M8)
46
SKYLINE ROOF RACK
Toyota Land Cruiser 80 Series
05
ASSEMBLED VIEW
PACKING LIST
5
6
7
8
9
10
2
3
4
1
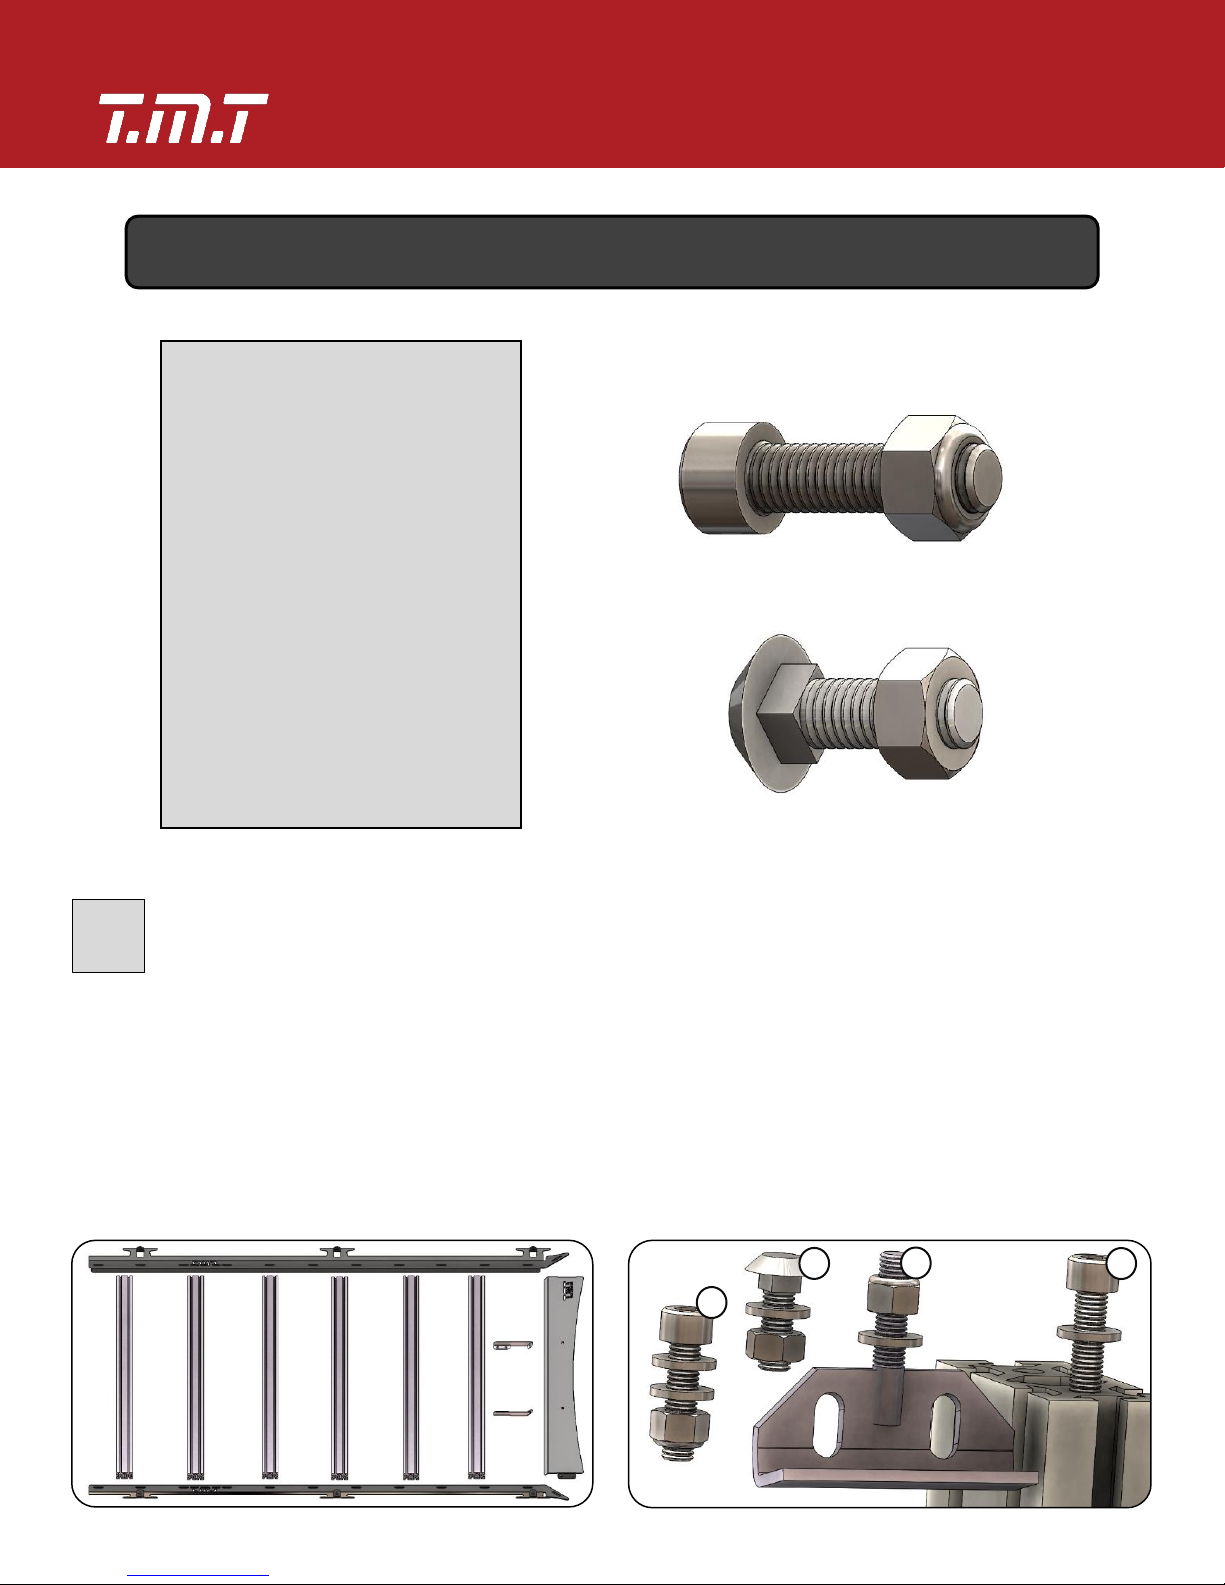
Check contents of kit and required tools.
Assembly the rack completely on a level surface.
Put in order the fasteners as shown in the picture.
SKYLINE ROOF RACK
Toyota Land Cruiser 80 Series
06
INSTRUCTIONS
REQUIRED TOOLS
M13 Wrench
M6 Allen Key
(Don’t Included in Kit)
IMPORTANT TO OBSERVE!
Lock Nuts are for the Allen Bolts
01
Standard Nuts are for the Carriage Bolts
x4
x6
x8
x24

SKYLINE ROOF RACK
Toyota Land Cruiser 80 Series
07
02
03
Note that this is the frontal Crossbar. Use Standard Nuts.
Insert the heads of 4 Carriage Bolts through one Crossbar inferior rails.
Couple the Deflector Supports as shown in the picture.
Don’t tighten up yet! Allows Supports to move sideways.
Connect the Crossbars to the Side Beams.
Place them in the desired positions.
Should be separated from each other as much as possible.
Then tighten them in even increments.
F
R
O
N
T
A
L
Apply a Max Torque of 30 lbf*ft to avoid damaging the thread.

SKYLINE ROOF RACK
Toyota Land Cruiser 80 Series
08
Place the Wind Deflector in position.
Verify that it is centered and level.
Screw it to the Side Beams.
Use Lock Nuts.
04
Move the Deflector Supports sideways to align them with their frontal holes.
Insert the Carriage Bolts through the Deflector holes with their nuts.
Tighten all the nuts (Crossbar to Supports and Supports to Deflector).
Observe that the Deflector has two small square holes. Use Standard Nuts.
05

SKYLINE ROOF RACK
Toyota Land Cruiser 80 Series
09
06
Place the rack on the vehicle roof carefully, resting up the
Side Beams on the rain gutters.
Attach the Rack to the rain gutters tightening the Clamps.
Tighten slightly for avoid rain gutters deformations.
Don’t rest up the Deflector on the roof. Use Lock Nuts.
-Firstly, take a short ride to
test your rack in safe
conditions.
-Pay attention for unusual
noises or vibrations
generated by the Rack.
-Check again the fastenings. If
anything is loose, RE-
TIGHTEN!
TEST IT IN A SHORT JOURNEY!
BEFORE FIRST RIDE!
Make sure your rack is securely
fastened to all mounting points.
Verify that the Rack is centered,
level and in desired position.
If necessary, correct the clearance
between Wind Deflector and roof.

SKYLINE ROOF RACK
Toyota Land Cruiser 80 Series
10
PAINTING MAINTENANCE RECOMENDATIONS
With the objective of guaranteeing the best quality and durability of your painting, the products from
TMT4x4 Accessories go through a rigorous quality control process.
Among the processes that each of our products go through you find: chemical treatment, sand blasting
and 4 layers of powder coating.
Since we want you to have the best off-road experience with our products, we provide some
recommendations for keeping them in the best possible way:
-Maintain your vehicle clean, wash it with water and soap immediately after exposing to salty
environments. The salt and magnesium chloride used on icy roads to prevent freezing is also
there at the beach and in locations near the ocean, these are highly corrosive elements that will
deteriorate your painting in time.
-Avoid any drilling, cutting or modifications to your products because you will be creating spots
where the oxidation process may begin. Remember that TMT4x4 have a wide range of
accessories that adapt to your needs.
If you find any damage in your painting or oxide spots, retouch it and make it as good as new:
1. Clean the area properly, remove all the oxide and damaged painting.
2. Sand the borders between the original painting and the metal until achieving a smooth
transition.
3. Slowly apply several thin layers of Rust-Oleum spray painting of a similar color and texture to
the original in your product until achieving the same thickness of the original painting.
4. If you use too much painting you can create ripples. Use sandpaper to reduce them and
smoothen the surface.
Once you see the repaired area is fairly similar to the original painting and that there are no abrupt
changes, you have finished the job.

SKYLINE ROOF RACK
Toyota Land Cruiser 80 Series
11
WARRANTY POLICY
1. Once you receive your TMT4x4 Accessories you have a 1-month warranty, due to defect or for
replacing any of its components.
2. To make use of your warranty you must have your purchase order receipt that will arrive with your
product; there you will find the order number that you can use to contact us directly through any
of the following ways:
Phone: +01 786 210 5352
Website: www.TMT4x4.com
3. At TMT4x4 we offer a material fatigue warranty on all of our accessories.
4. If you have any complaint due to change or defect in any product or one of its parts, it is required
that you send the product back to us for replacement. The shipping cost for sending the product
to the company will be paid by the client.
5. If you are not satisfied with the product, TMT4x4 Accessories will take returns, once we receive
the product you will receive the amount for the original pricing.
6. TMT4x4 Accessories is not responsible for custom expenses for shipping to any destination, the
client is responsible for this payment.
7. TMT4x4 Accessories is not responsible for any defects on the painting caused by scratches, impacts
and/or bumps during shipping. We use third parties for our shipping and they are not responsible
for any damages caused. We protect your purchase from any inconvenient and work hard to have
your product delivered in the best possible conditions.
8. Warranty is lost on any of the following cases:
-Damage caused by poor execution when installing on your vehicle.
-Installation on non-compatible vehicles.
-Overloading beyond the recommended capacity.
-Damage caused by improper maintenance.
-Improper use or damage received in competitions or races.
-Ignoring the recommendations provided by the company.
TMT4X4 ACCESSORIES IS NOT RESPONSIBLE FOR ANY PERSONAL OR MATERIAL
AND/OR COMMERCIAL DAMAGE THAT MAY COME FROM USING THE ACCESSORIES
Table of contents
Popular Automobile Accessories manuals by other brands

Axxess
Axxess AX-MLINK-HD installation guide

Figure Engineering
Figure Engineering 04 CHEVY COLORADO GRILLE SET installation manual

AMP Research
AMP Research BedStep 75307-01A installation instructions

BGS technic
BGS technic 3050 manual

Prorack
Prorack K661 Fitting Instructions for Basic Carrier

BrandMotion
BrandMotion 1009-6503 installation instructions


