TMT Automation ChowBELL Pro User manual
User Manual
for video doorbell
www.tmt-automation.com
CARD
EN
ChowBELL PRO

Index
Introduction of the ChowBELL Pro
Product Overview
Kit contents
Specifications
Hardware installation_Wi-fi
Hardware installation_LAN cable
Pairing indoor chime with ChowBELL Pro
Apply for a new Chow account
Connect ChowBELL to Chow! App
Owner shares the ChowBELL Pro to other users
Connect your ChowBELL Pro with a gate opener
FAQ
P2
P2
P3
P3
P4
P5
P6
P7
P8
P10
P12
P13
1

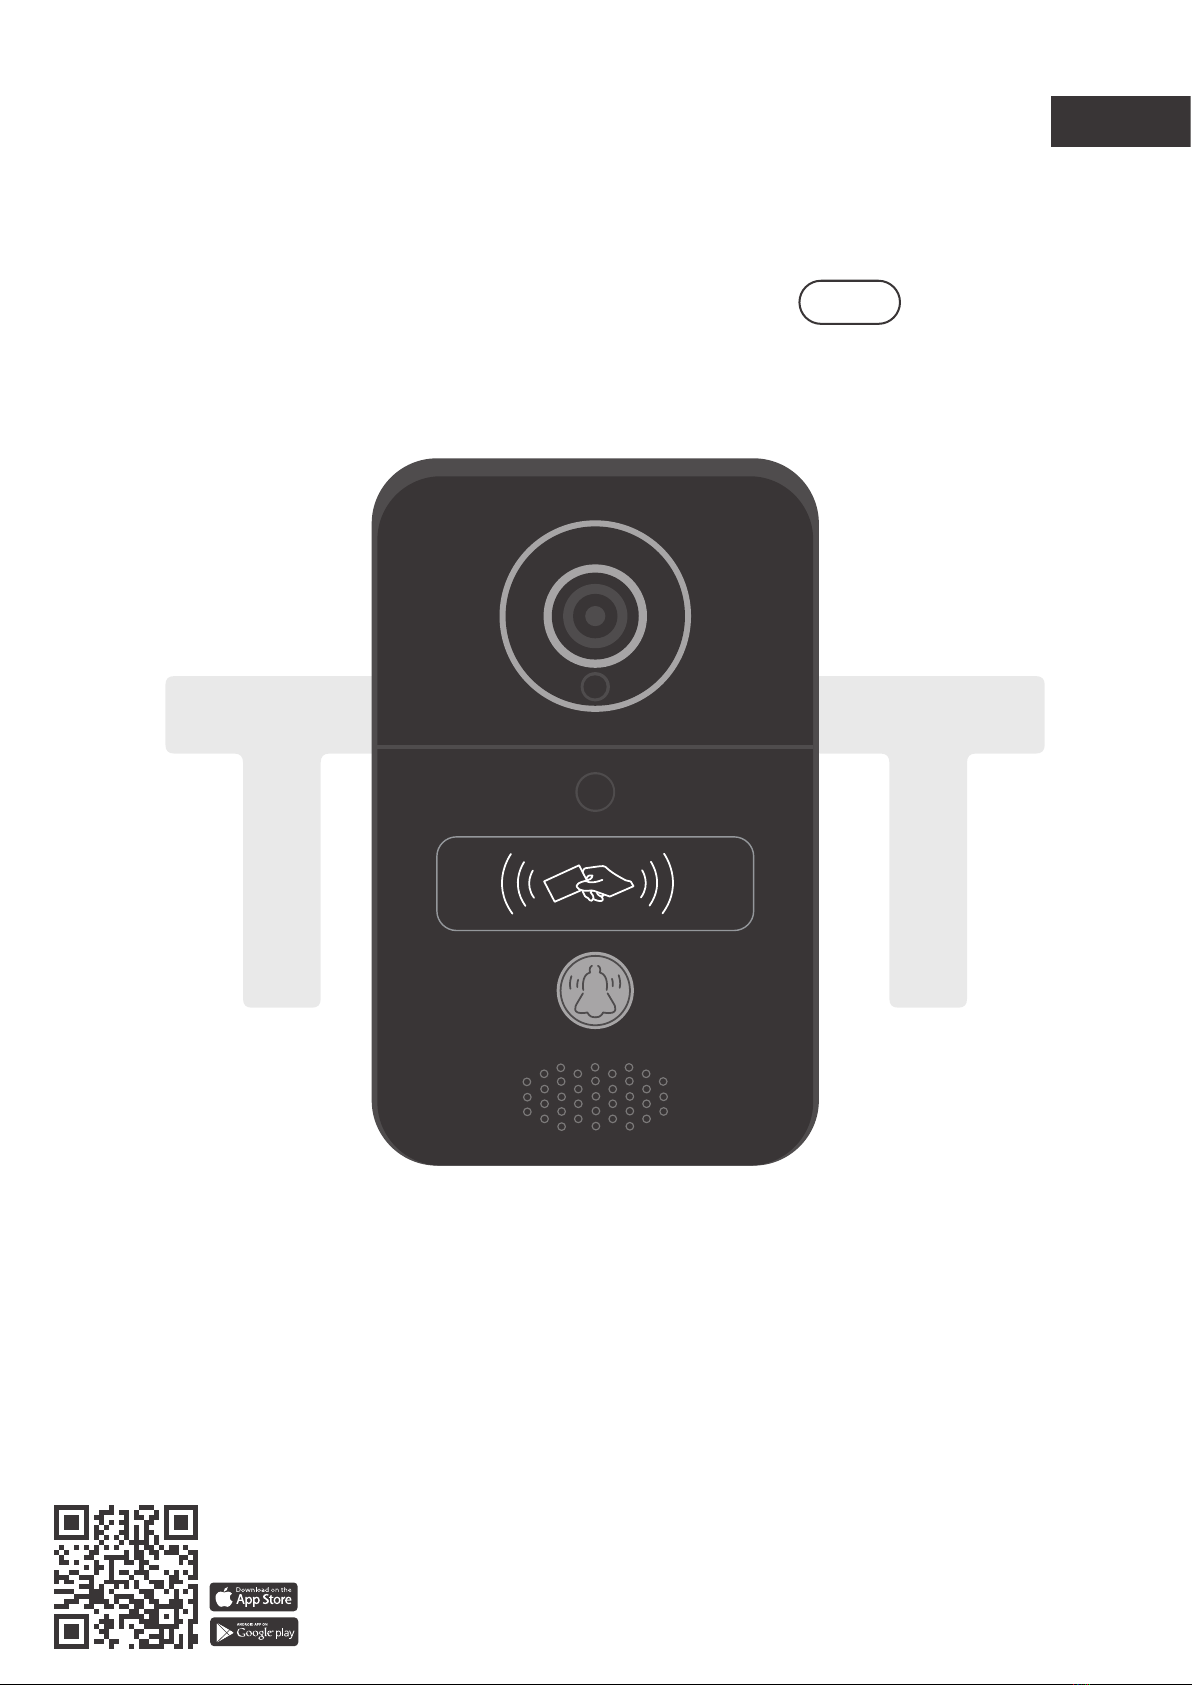
Introduction of the ChowBELL Pro
Product Overview
This user manual is designed to provide indications of the ChowBELL Pro
and its features and functions.
ChowBELL Pro is a device which can connect to App! and provide two-way audio
communication.
ChowBELL Pro can be intergrated with other Wi-Fi gate openers on the Chow! App.
Video Doorbell
2
CARD
Lens Micro SD card slot
Power AC/8-12V ; DC/12-36V
Volume
NC/COM/NO
Ring tone
EXIT
Unlock delay time
Reset button
RFID scan area
Call button
Speaker

Kit contents
Specifications
3
Video
Communication
Power
Security
Image Sensor
Audio
Display Resolution
Viewing Angle
Image Compression
Image Frame Rate
Record Mode
Audio
Wireless Standard
Wire
Infrared Light
SD Card
Motion Detection
Power Supply
Alarm
1920 x 1080
150°
H.264
25 fps
Motion detection
Two-way Audio
IEEE 802.11b/g/n
10/100Mbps
Built-in IR LED, Night visibility up to 5 meters
256GB MAX
Support
DC 12 ~ 36V, AC 8 ~ 24V
Push notification, Tamper alarm
ChowBELL Pro
CARD
1
1Wall mount bracket
2RFID cards
3Indoor chime
4POE cable
5
DC cable
6Parts package
7Power wire
812V Power
9
23
4
56
78
9

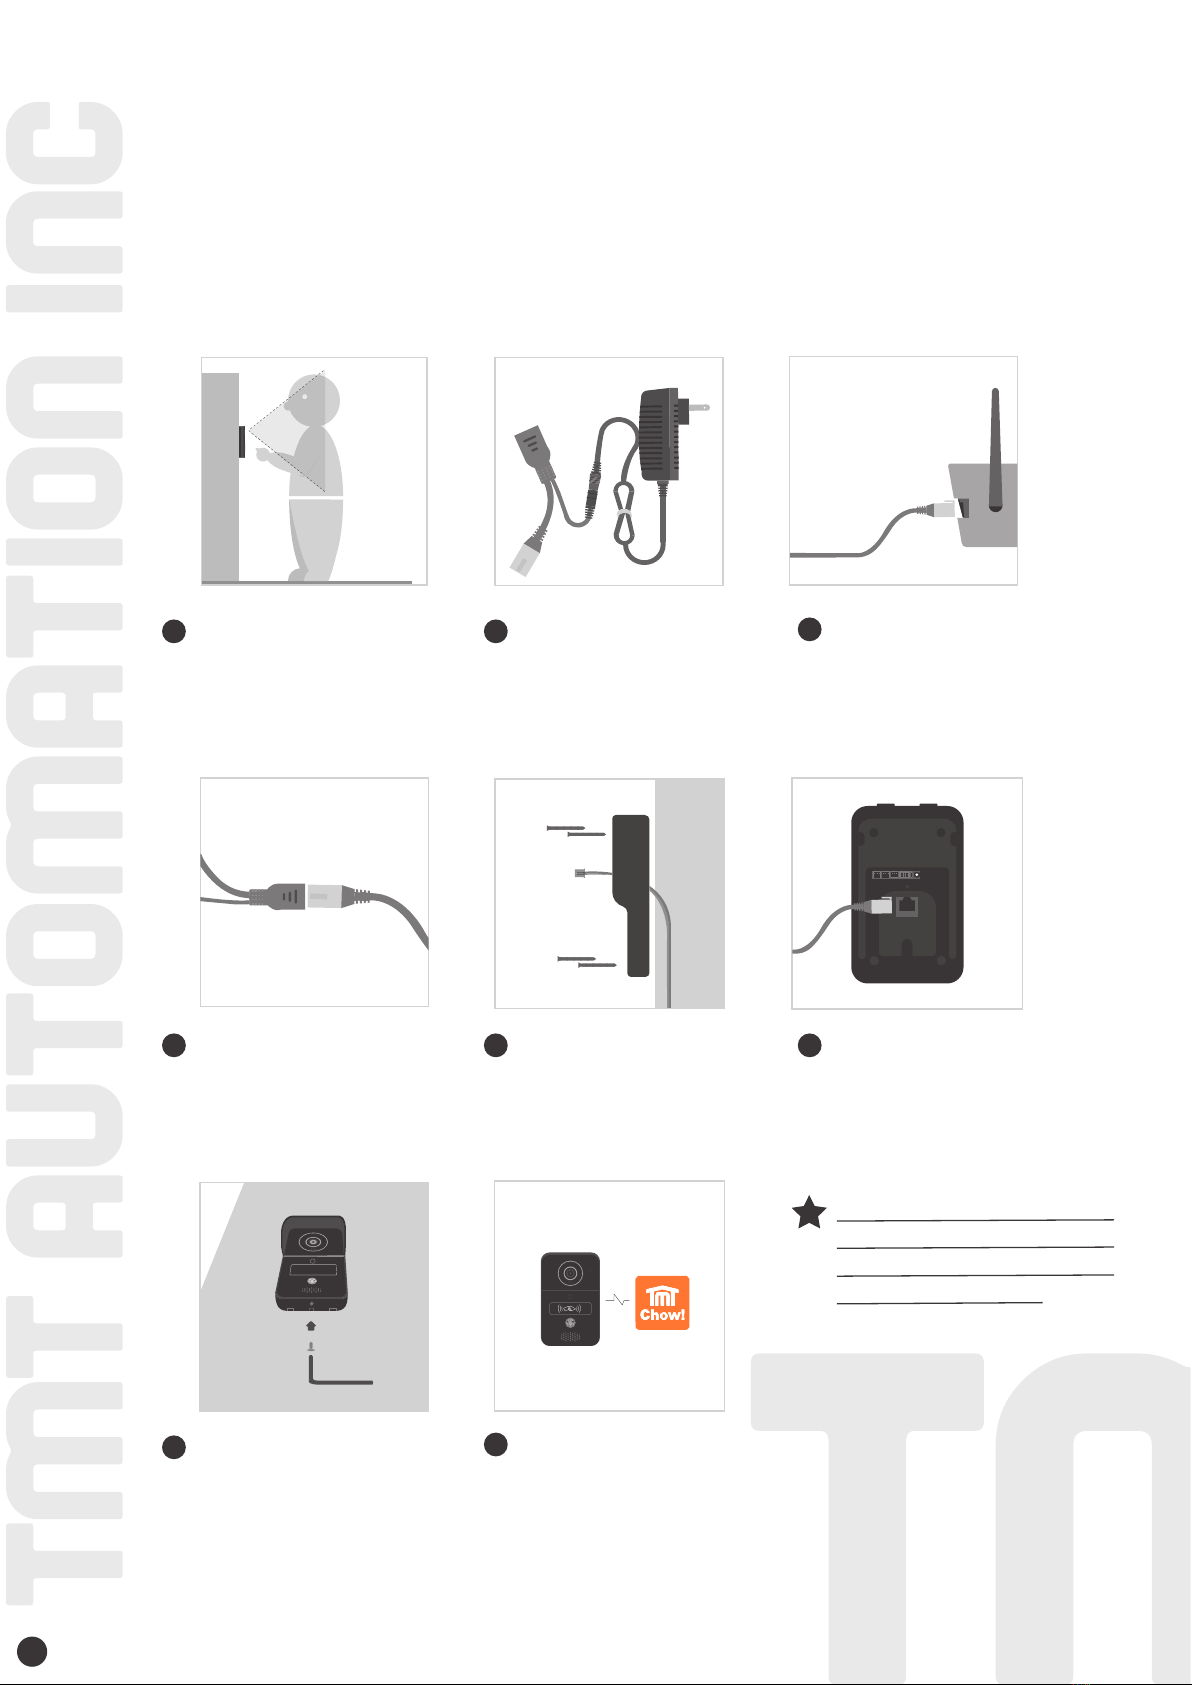
Hardware installation -connect to Wi-fi
4
Connect the ChowBELL Pro via 2.4GHz Wi-Fi. Please make sure your Wi-Fi
signal is strong and stable.
Connect to your home Wi-Fi
Hardware installation
1.
12
Choose a proper location for the
Chow BELL Pro, be sure to consider
the average height of visitors.
Connect the 12V power plug to the
DC cable.
3Align the DC cable and wall mount
bracket with the hole on wall;
fasten the wall mount bracket.
4Connect the DC cable to the
ChowBELL Pro 12V terminal
5Fasten the ChowBELL Pro on the
wall mount bracket with an allen
key and a screw from parts pack-
6Refer to page 10 connect Chow-
BELL Pro to Eyeopen App to finish
the Wi-Fi connection.
CARD
Hardware installation - connect to LAN cable
5
Please connect your ChowBELL Pro to the Wi-Fi network before connect to the LAN cable.
ChowBELL Pro has a RJ45 port which is used for connecting to the router with a LAN cable.
Connect to LAN cable
Hardware installation
1.
2.
***Please make sure the Wi-Fi
you connected and
the LAN cable are going to connect
is shared the same SSID***
1Choose a proper location
for the ChowBELL Pro, be
sure to consider the aver-
age height of visitors.
4Connect a LAN cable (cable
not provided) to the POE
wire.
5Align the LAN cable and wall
mount bracket with the
hole on wall; fasten the wall
mount bracket.
7Fasten the ChowBELL Pro
on the wall mount bracket
with an allen key and a
screw from parts package.
6Connect the LAN cable
(cable not supported) to the
back of the ChowBELL Pro.
Connect the POE wire to
your router.
23
Connect the 12V power
plug to the POE wire.
6
8Refer to page 7 Connect
ChowBELL Pro to Eyeopen
App to finish the Wi-Fi
connection.
CARD

Pairing indoor chime with ChowBELL Pro
6
Connect the indoor chime to the power via the USB port / USB adaptor, please
also ensure ChowBELL Pro is powered.
NOTE
Step1 Press and hold the indoor chime rings twice and LED blinks once.
Step2 Press the indoor LED blinks once and chime rings once.
Blue LED OFF
Step3 Press the indoor LED blinks 5 times and the pairing is done
Operation - Press the and the indoor chime rings and LED blinks at the same time.
Press
3 seconds
Blue LED blink
CARD
Blue LED blink
CARD
Blue LED blink
Blue LED blink

1. Please scan the QR code and download the Chow! App
2. Press Sign Up icon and press the agree icon to continue
3. Pleases type the following information for registration :
4. The system will send a link to your email when the registration succeeds
5. Please go to your email , and click the link to activate your Chow account
6. Log in to your personal TMT Chow account by key in the Account name and Password when Sing Up
a. Account (a-z, A-Z, 0-9 only)
b. Email (enter twice for verification)
c. Password (enter twice for verification)
d. The password should have at least 1 English character and at least 8 characters in total
7
Apply for a new Chow account
34
2 2

8
Step 1 Connect to ChowBELL’s AP (1st User - Owner)
Step 2 Add a new ChowBELL Pro
Connect ChowBELL Pro to Chow! App
Make sure the ChowBELL is perfectly installed and powered.
Switch to your smartphone’s Wi-Fi setting page to connect to
“GW_AP_XXXXXXXX”(XXXXXXXX is the UID of the device)
Tap (+) icon to add a new device.
New Device -> Accessories -> ChowBELL Pro
*** Hint may be vary from different phone system.***
***Please refer to the FAQ if GW_AP of
the ChowBELL Pro cannot be found***
***Please wait for 20 seconds after
connecting the GW_AP device internet***
***Please press the decline button when
the connection hint shows up ***
IF With above hint show up, press“ALLOW”for TMT Chow to access your device’s location
to get the corresponds Wi-Fi source
Wi-fi 1
Wi-fi 2
Wi-fi 3
Wi-fi 4
Wi-fi 5
Wi-fi 6
The Wi-Fi network“GW-AP_18482834”
is not connected to the internet.
Allow Wi-Fi Assistant to switch you to
a better Wi-Fi network.
Decline Allow

9
1
1
2
2
When you are adding a new ChowBELL Pro, the App shows ”please connect to
2.4Ghz Wi-Fi,“ but you have already connect to ChowBELL Pro’s AP
When doing the connection, the App shows“ the ChowBELL Pro’s Wi-Fi is not
connected to the internet. ”
Step 3 Indications of connection
***The system takes time to connect to ChowBELL Pro’s Ap.
Please wait till you smart phone shows the Wi-Fi icon on the top of your smart phone screen.
It takes about 20-30 seconds.***
***A ChowBELL Pro’s AP is closed network which is only used for
connecting to your home Wi-Fi system.
Please tap the “ Keep Trying Wi-Fi to finish the connection. ”***
10
***Please refer to the FAQ_Question1 if you forgot the password***
***Please make sure to enter the correct password with the right characters***
Set the security PIN code. This PIN code is used for device sharing and function setting.
Select your home Wi-Fi name (Only 2.4G ) and enter the correct password.
Tap“SET” button to connect to your home Wi-FI
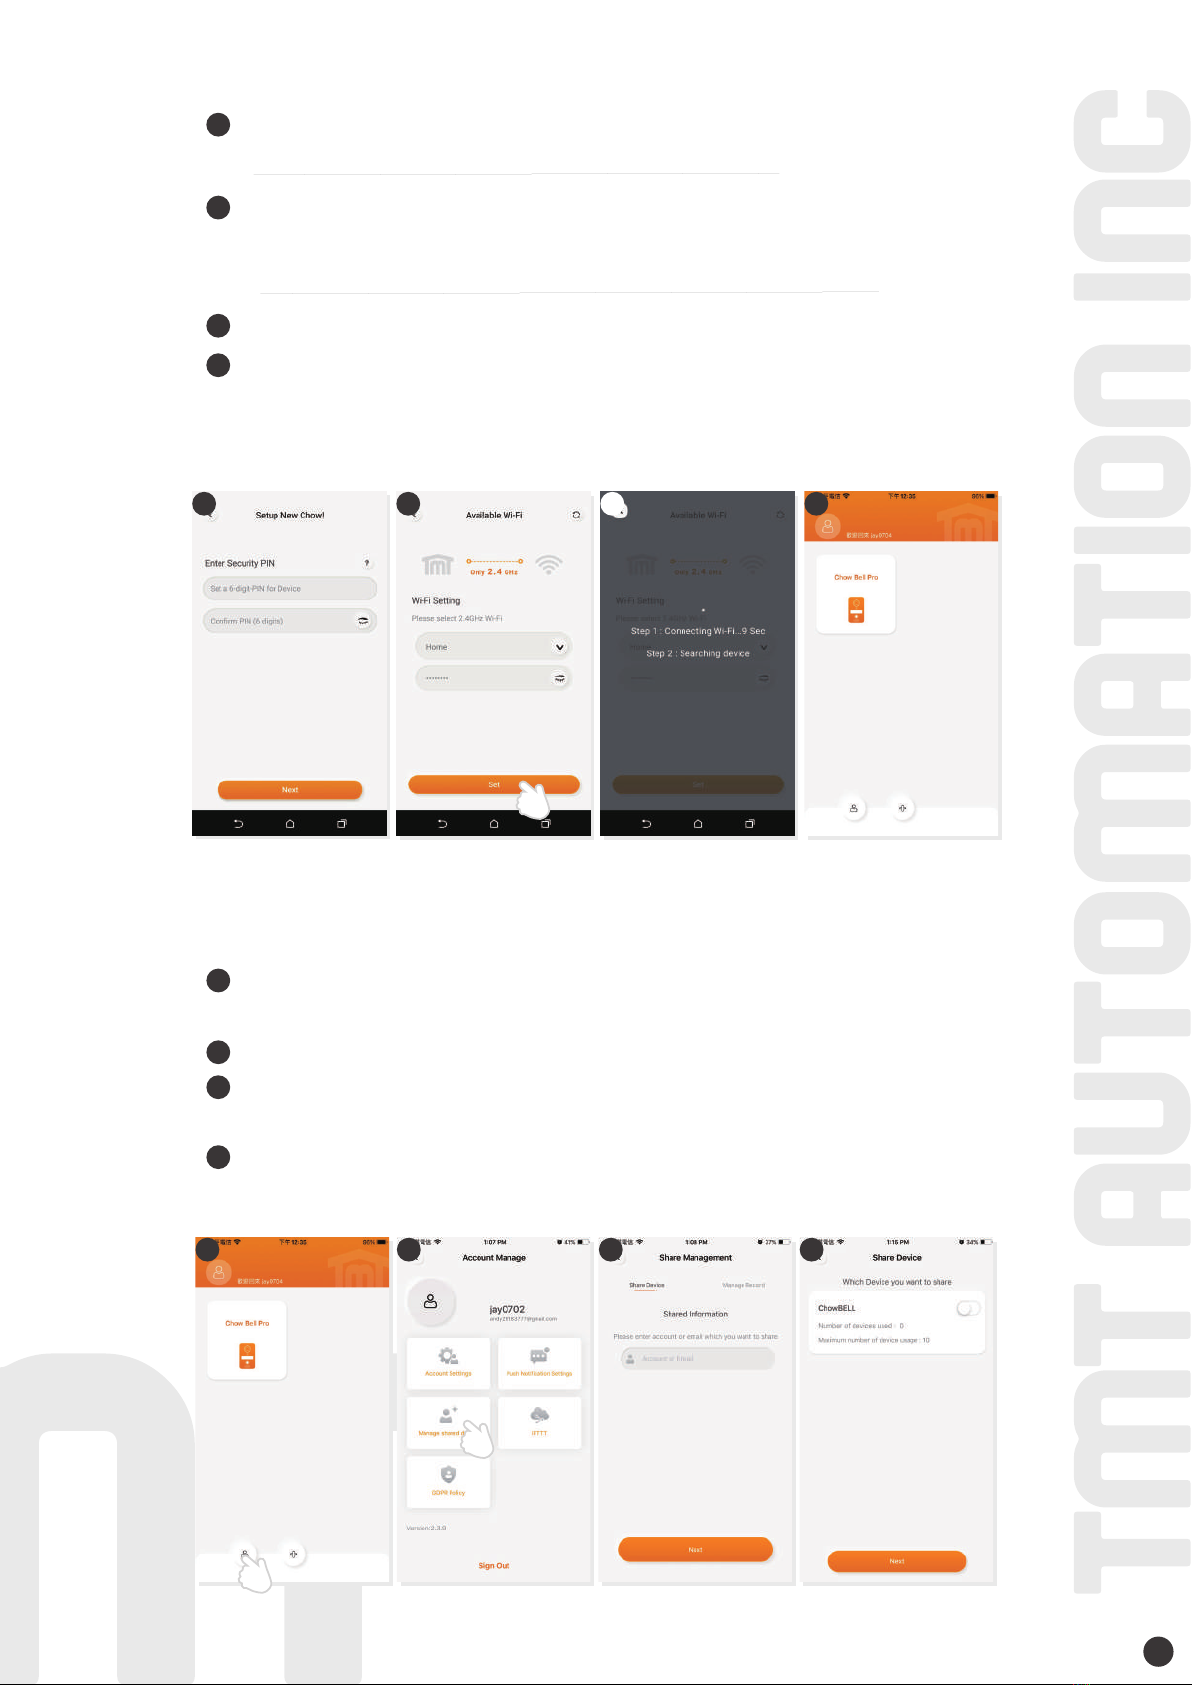
Owner shares the ChowBELL Pro to other users
After the countdown, ChowBELL Pro will appear on the main page.
Tap the ChowBELL Pro to enter the operation page.
The ChowBELL Pro will send a push notification when below events occur:
visitor calls / alarms / motion detection is triggered.
The device owner can share the ChowBELL Pro up to 4 users through Chow! APP
Tap the icon to enter the account manage page
Tap the Mange shared device icon
Enter the account name to share with
(People need to be shared require Sing Up their personal account)
Select the device which you like to share with
1
1
12
2
4
3
3
4
2
3
4
5
Step 4 Set the PIN code and connect to your home Wi-Fi
12 3 4
11
1
2
3
4
2020-08-07 12:40:30
1
2 3 4
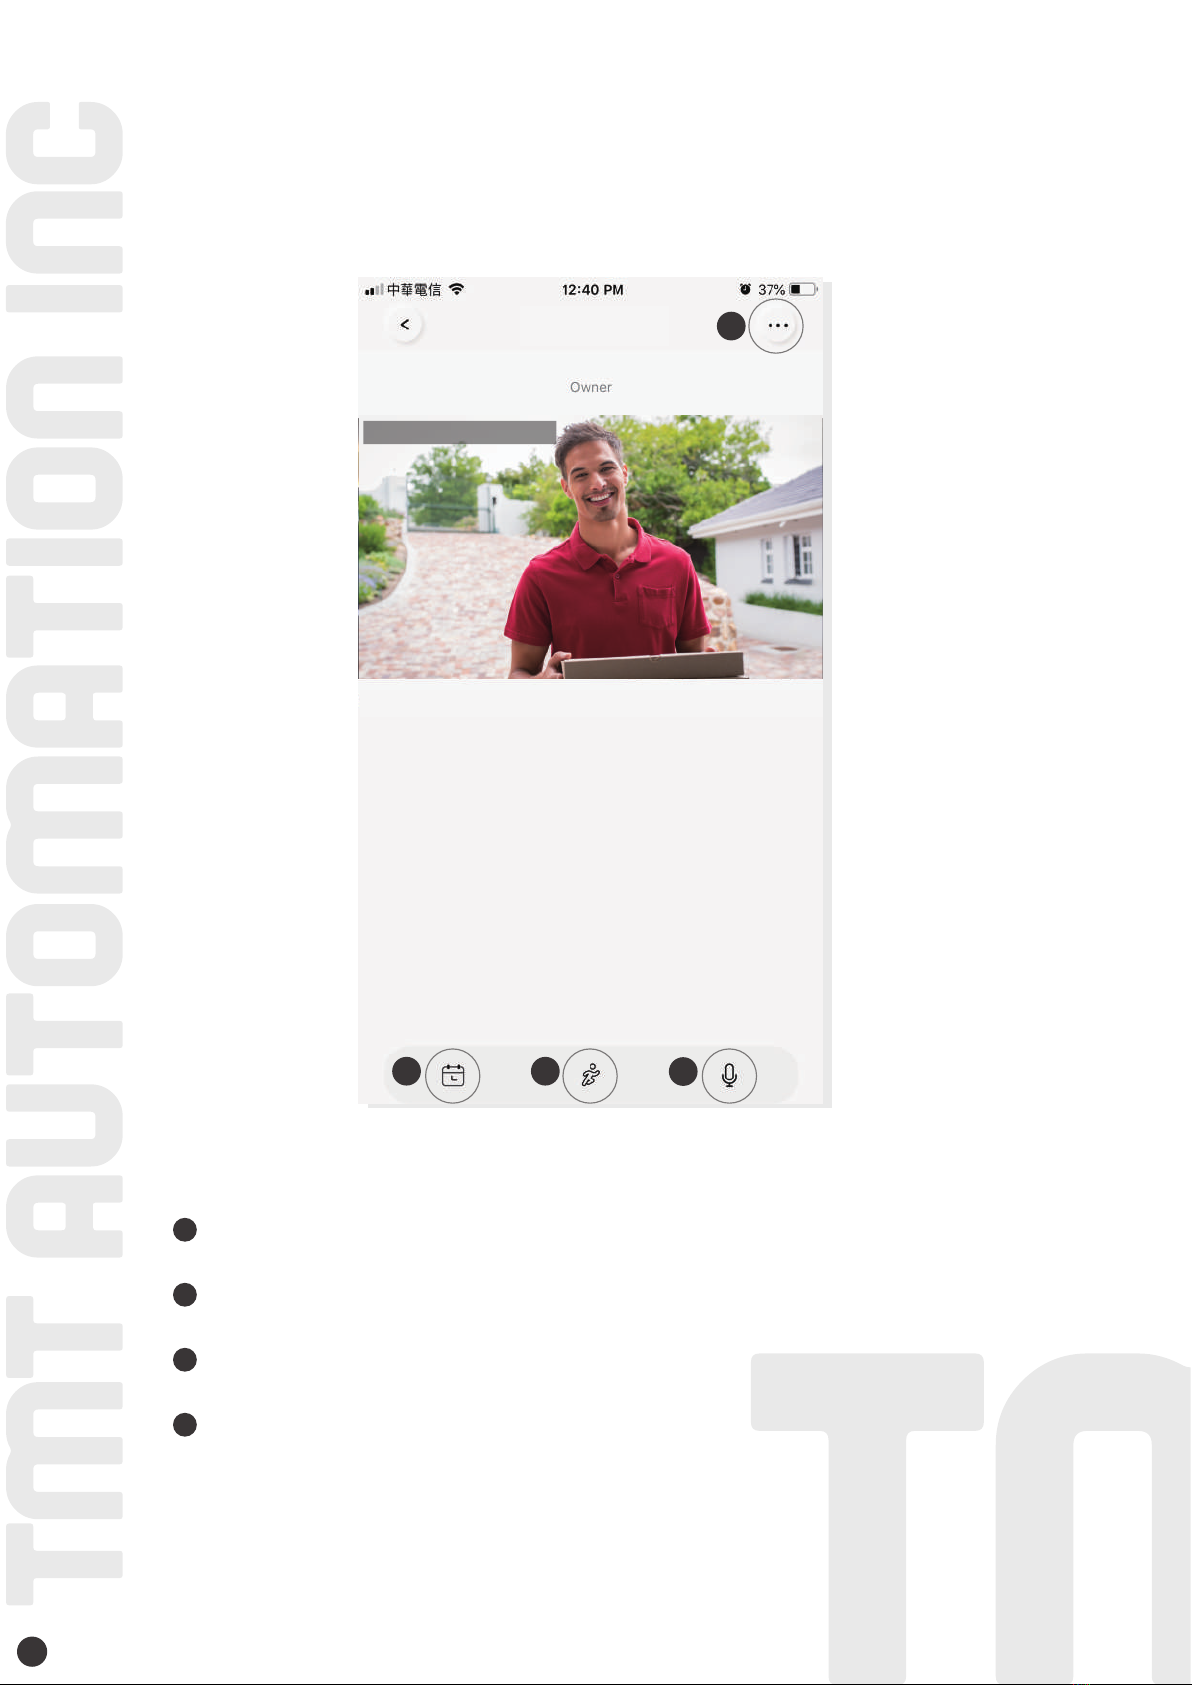
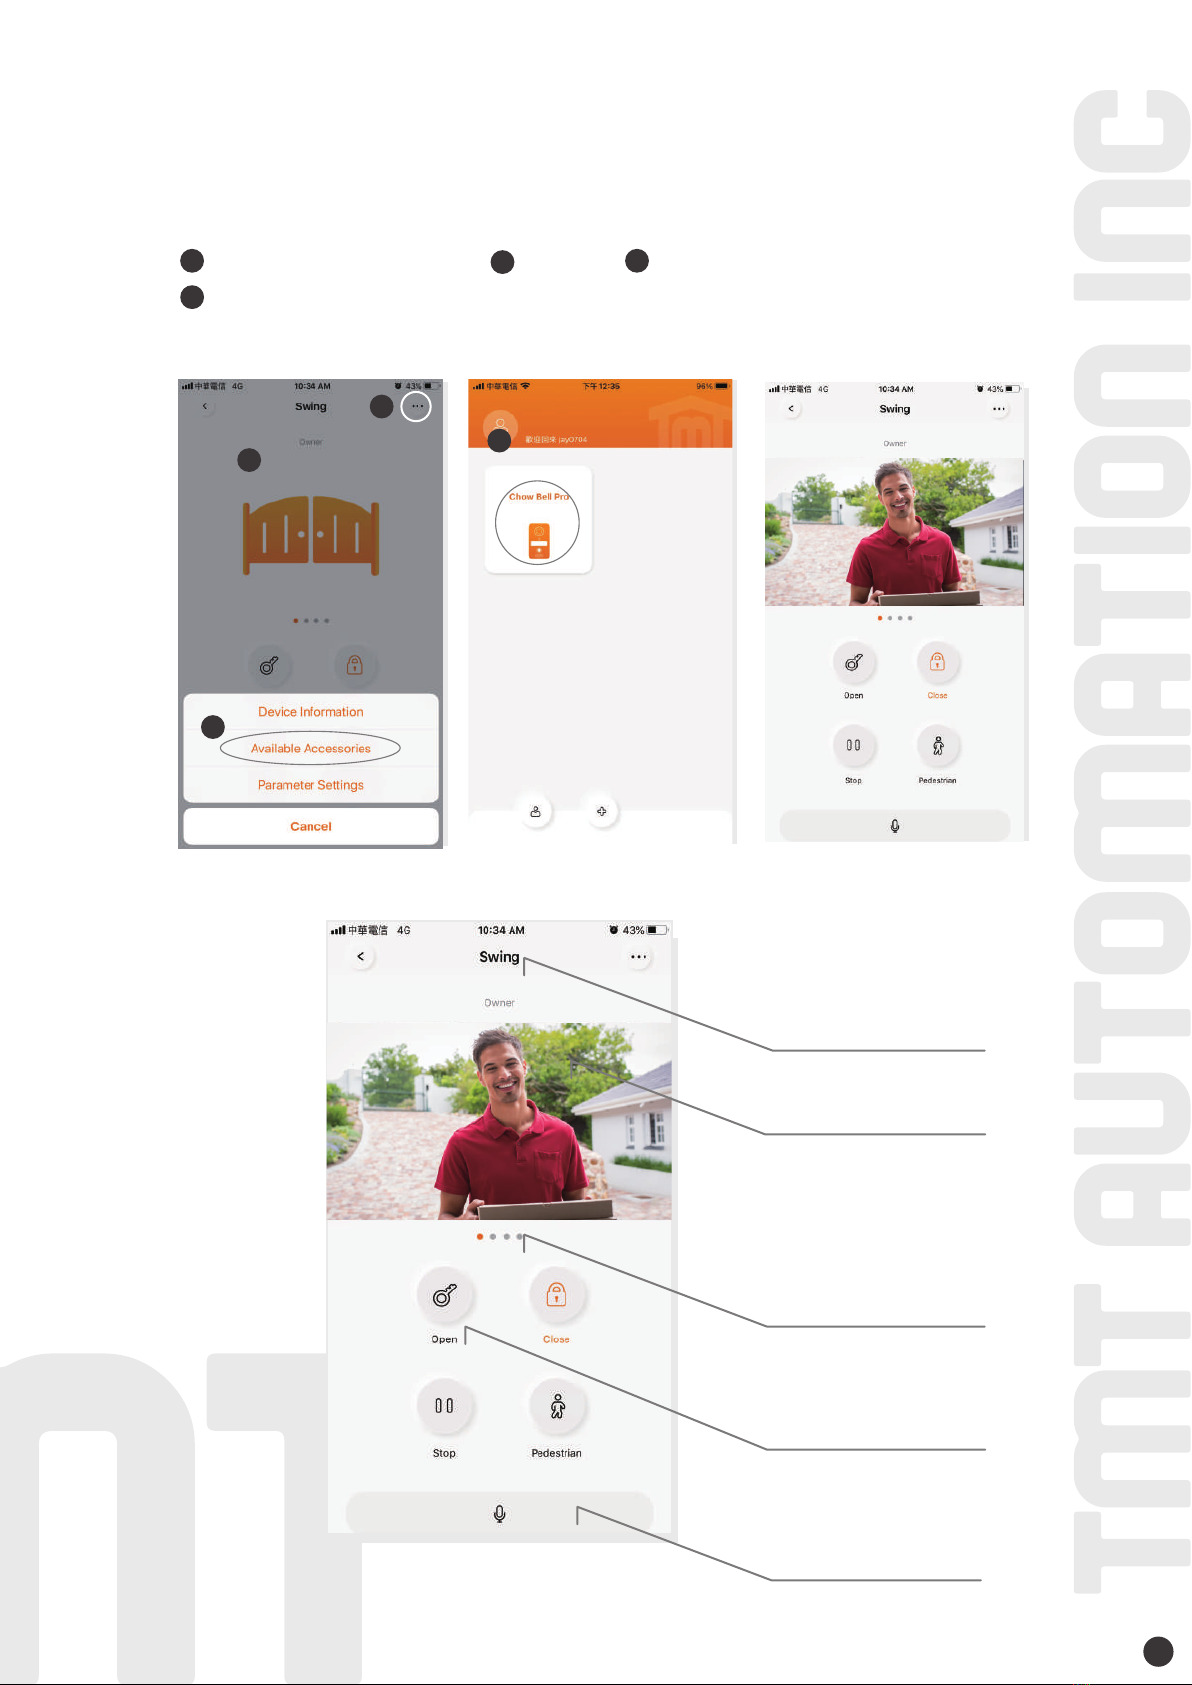
Operation page of ChowBELL Pro
Setting
With an extra micro SD card, the recorded videos will be listed in the calendar
Switch of the Motion detection. You will get notifications when you turn it ON.
Switch of the two-way audio. Turn ON to start the audio function
ChowBELL Pro
12
Connect your ChowBELL Pro with a gate opener
To connect your ChowBELL Pro to the gate opener, please go the operation page
of a gate opener.
Gate opener operation page Settings Available Accessories
Select ChowBELL Pro from the list.
2
2
1
b
3
3
4
4
Device name
Live view screen
Switch devices
Talk button
Gate operation button
1
13
Add RFID cards to trigger the NC/COM/NO output terminal
on ChowBELL Pro (like electric latch control)
Terminals of the ChowBELL Pro
Delaytime for electric latch
12V NC COM EXIT
NO Reset button
Press 3 seconds to reset
-
DC 12-36V
AC 8-12V
Delay 1S
Delay 4S
Delay 8S
Delay 16S
CARD
RFID scan area
Blue(User) RFID card
Red(Delete) RFID cardYellow(Add) RFID card
Function of each terminal
NO
Electric
latch
NC
Electric
latch
34100-211-A 14
1. Please scan the YELLOW (Add) RFID card.
The scan area shows BLUE light ON with a beep which activates the system for adding the
BLUE (User) RFID card.
2. Scan a BLUE (User) RFID card and the BLUE LED shows ON with a beep which indicates
adding user card successfully.
3. Scan the YELLOW (Add) RFID card AGAIN and the BLUE light goes OFF which deactivates the
pairing mode.
After scanning the yellow (Add) RFID card, the system shows red light with 3 beeps which
indicates activation fail. Please scan the yellow RFID card again.
1. Please scan the RED(Delete) RFID card.
The scan area shows RED light ON with a beep which activates the system for deleting the
BLUE (User) RFID card.
2. Scan a PAIRED BLUE (User) RFID card and the RED LED shows ON with a beep which indicates
deleting user card successfully.
3. Scan the RED (Delete) RFID card AGAIN and the RED light goes OFF which deactivates the
delete mode.
After scanning the red (Delete) RFID card, the system shows red light with 3 beeps which
indicates activation fail. Please scan the red (Delete) RFID card again.
Add RFID cards
Delete RFID cards
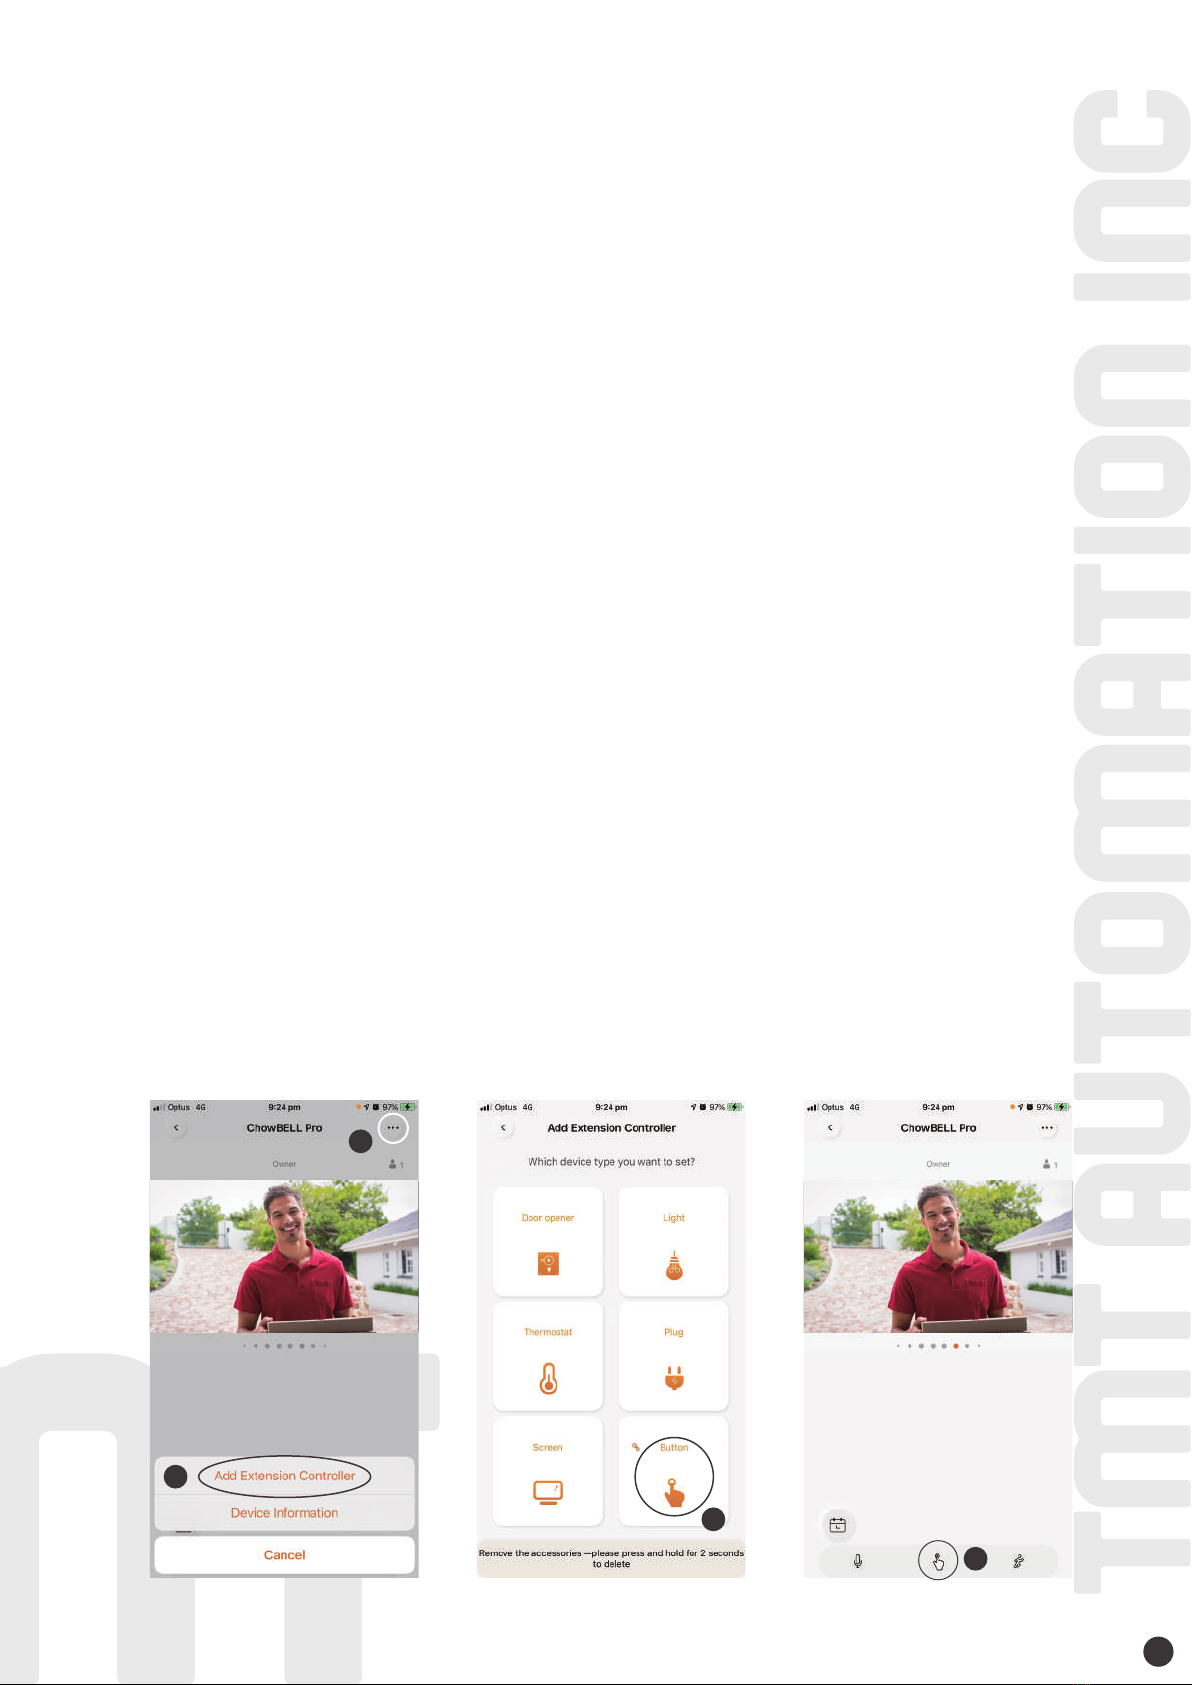
1. Press the … icon on the top right
2. Add Extension Controller
3. Select the device icon to match with your control device
4. The output icon show up at your operation page at the bottom part
* Connect the EXIT to the push button terminal of your device to be control through the APP
Exit trigger
1
2
3
4

FAQ
Question 1
Answer 1
How to Reset ChowBELL Pro to default setting?
Delete the ChowBELL Pro on the Chow! App by long pressing the ChowBELL Pro icon and confirm it.
Press Reset button at the back of the ChowBELL Pro for 5 seconds to reset
ChowBELL Pro to default setting.
Please refer to Page7 Connect ChowBELL Pro to Chow! App to reconnect the ChowBELL Pro.
Question 2
Answer 2
GW-AP of the ChowBELL Pro can’t be found.
Make sure the Wi-Fi setting on the smartphone has been turned on.
Make sure ChowBELL Pro has been set to default setting.
If ChowBELL Pro is connected to the LAN wire, the AP mode will be turned off automatically.
Question 3
Answer 3
Change ChowBELL Pro’s Wi-Fi network
ChowBELL Pro control page → Settings → Device Information → Wi-Fi Setting
→ choose available Wi-Fi SSID → Entering Wi-Fi security password → Set
Question 4
Answer 4
Unable to receive notification from my ChowBELL Pro
Go the setting page of the Chow! App
Turn on the switch of notification to receive the notifications
1.
2.
3.
13

34100-211-A 14

www.tmt-automation.com
ChowBELL PRO
CARD
巧家可視門鈴
安裝手冊
專業版
CH
產品介紹
產品概觀
包裝內容
產品規格
將設備連結到您家中的Wi-Fi網路
將設備連結到您家中的有線網路
配對室內門鈴
申請Chow帳號
連線到無線網路
連線到有線網路
分享使用權限
控制頁功能介紹
新增/刪除RFID卡
開門鈕新增步驟
配對門控機
設備接點與按鍵說明
常見問題
P2
P2
P3
P3
P4
P5
P6
P7
P8
P10
P11
P12
P13
P14
P15
P16
P17
1
索引
Other TMT Automation Accessories manuals


