Tom's Tumbler TTT 2200 User manual
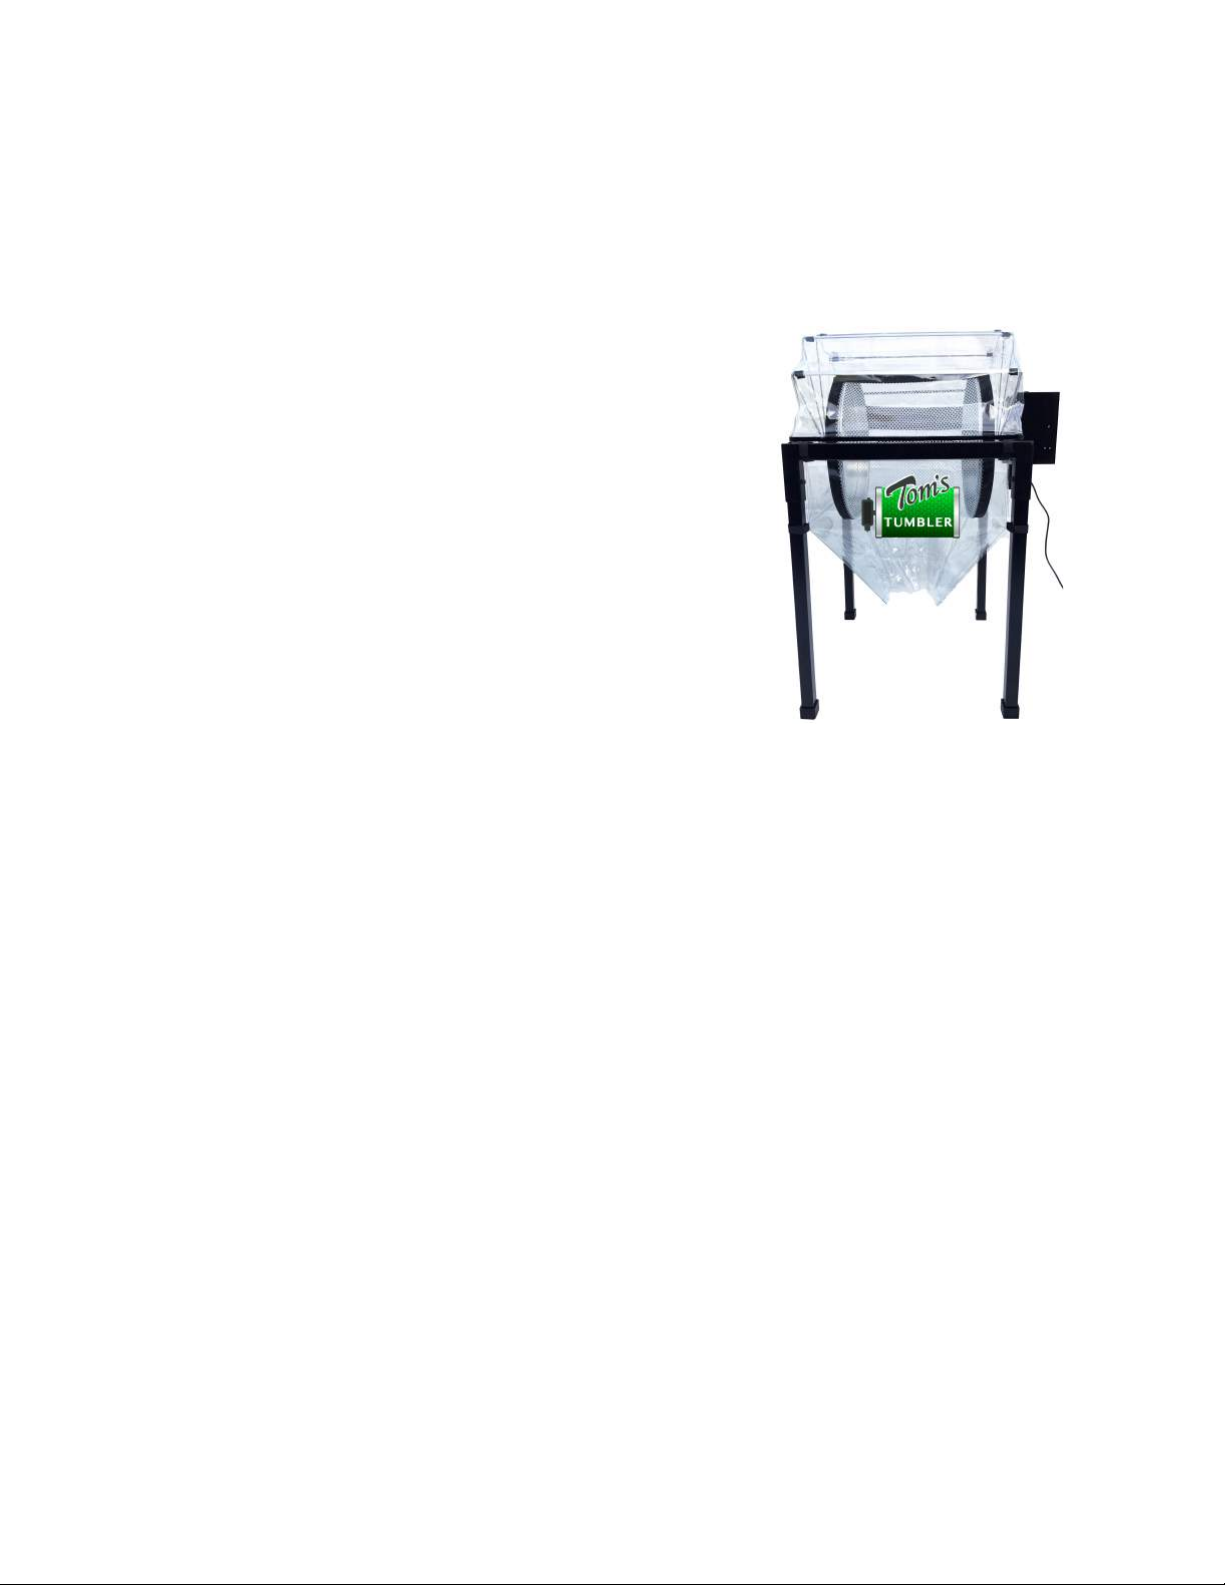
Assembly(Instructions(for(the((
TTT(2200(and(the(TTT(2600(Commercial(Tumbler(Systems((
Parts List
Steel Frame with coupler and bushing attached
4 Steel Legs
4 Rubber caps for legs (or optional wheels)
Motor with power cord with Motor shaft alignment brackets and motor
bolt (attached)
2 Mesh nets ½”and 3/8” meshnet
1 Funnel flow bag
2 Aluminum drums
Aluminum axle
Dust Cover (with screws)
Kief Net
Tools Needed:
Phillips head screw driver
Adjustable wrench or vice grips
Allen wrenches for leg and motor
!
Assembly((
!
"#$%&!'!()*%#!#+!,--%./01!)-!,0-#!,(,)0,/0%!#2!3#454/%!,$!6$$7-&881#4$49/%8-:;6<=>1?"@9!
!
Frame(Assembly!!
!
A4$!$6%!+B,.%!$#7!47-)*%!*#C2!#2!$6%!+0##B!C)$6!0%;!D#22%D$#B-!479!!E2-%B$!0%;!)2!%,D6!D#22%D$#B9!!5);6$%2!'00%2!
?DB%C-!C6)D6!,B%!%./%**%*!#2!$6%!+B,.%9!!54B2!$6%!+B,.%!B);6$!-)*%!479!!56%!5B)..%B!+B,.%!C)00!/%!(%B1!
-$,/0%9!!!!
!
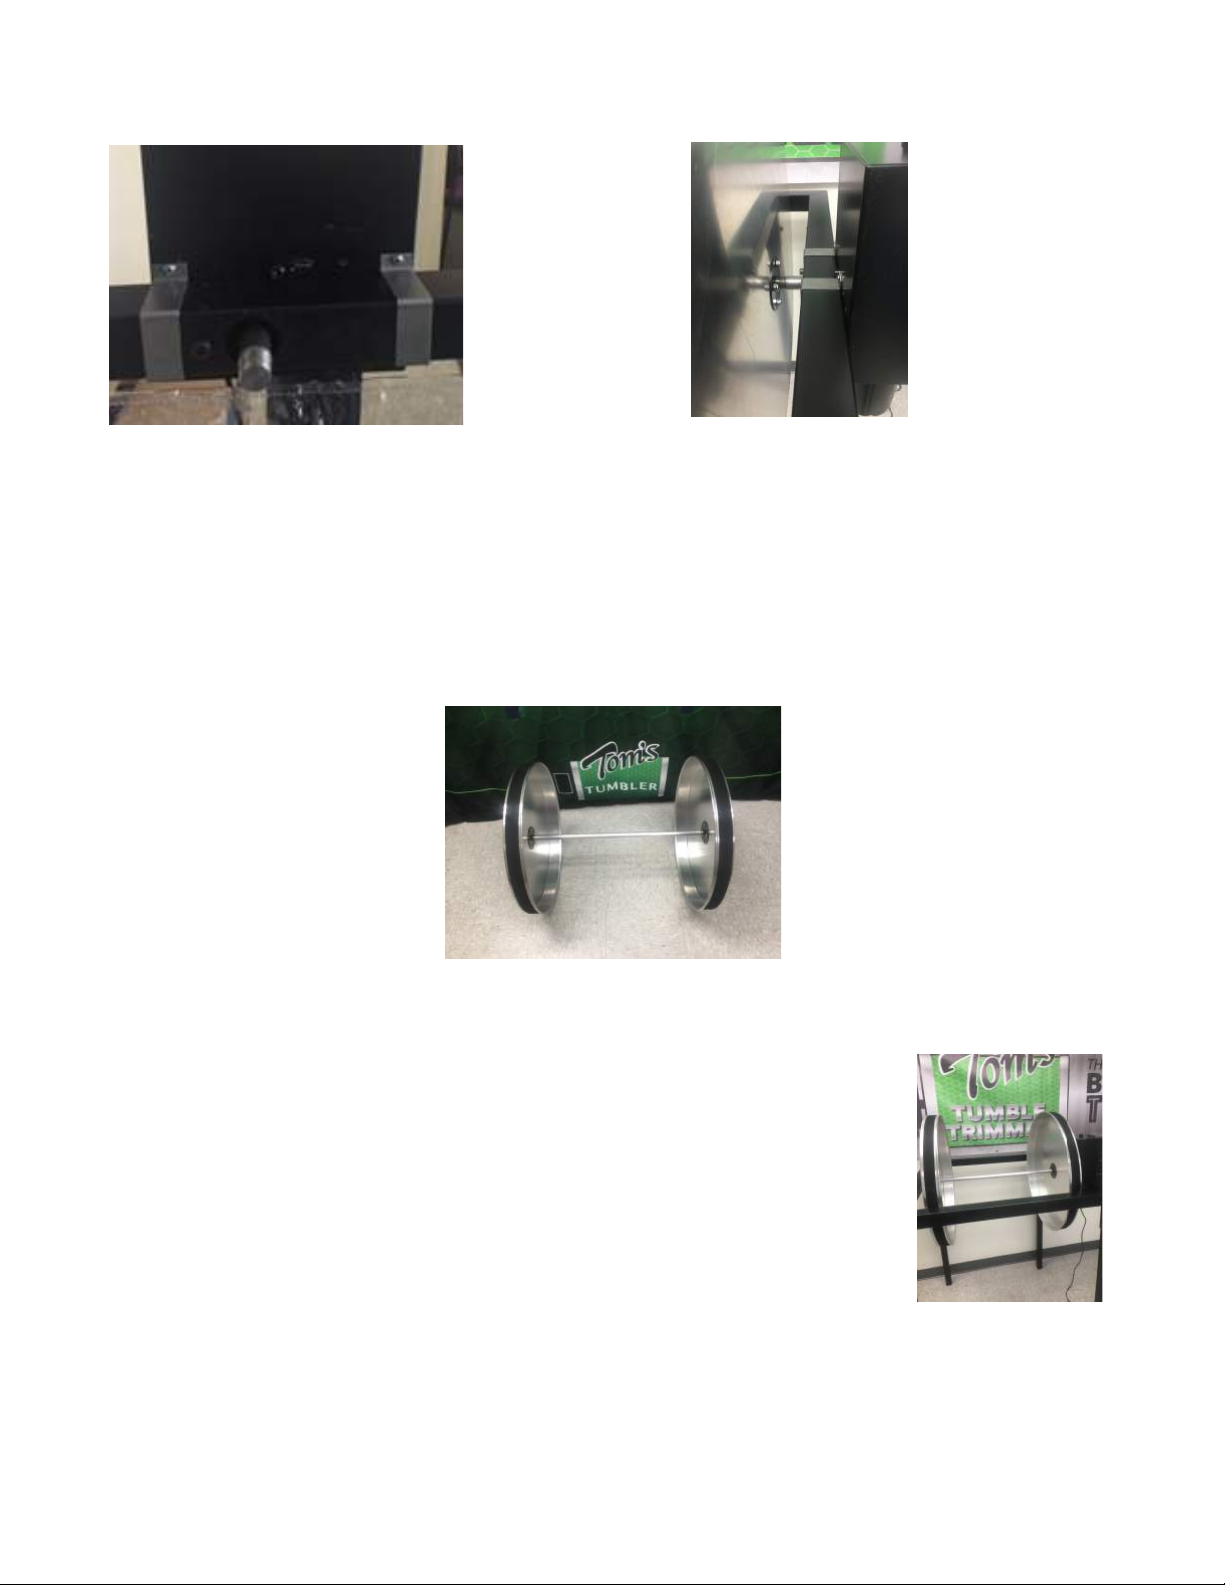
Attach(Motor(to(frame!
!
F2-DB%C!$6%!0#2;!.#$#B!/#0$!,2*!G#$#B!?6,+$!'0);2.%2$!/B,D@%$-!+B#.!$6%!.#$#B9!!E2-%B$!.#$#B!-6,+$!$6B#4;6!
0,B;%!6#0%!2%H$!$#!-.,00!6#0%!#2!#4$-)*%!#+!+B,.%!#2!#77#-)$%!-)*%!#+!+B,.%!#+!/%,B)2;-9!!E2-%B$!.#$#B!/#0$!
$6B#4;6!-.,00!6#0%!)2!+B,.%!,2*!,2*!$6B%,*!)2$#!.#$#B9!!56)-!.#$#B!/#0$!I,00%2!6%,*J!)-!)2-%B$%*!+B#.!$6%!)2-)*%!
#+!$6%!+B,.%!$6B#4;6!$#!$6%!.#$#B9!K,2*!$);6$%2!#2019!I$6)-!)-!,2!,0);2.%2$!/#0$!#201J9!!"%H$!70,D%!$6%!/B,D@%$-!
#(%B!$6%!)2-)*%!#+!+B,.%!,2*!-DB%C!$6%.!#2$#!$6%!.#$#B!4-)2;!$6%!+#4B!-DB%C-!7B#()*%*9!!56%-%!6#0*!$6%!.#$#B!
)2!70,D%!,2*!,--4B%!7%B+%D$!,0);2.%2$!#+!.#$#B!-6,+$9!!F-%!76)00)7-!6%,*!-DB%C!*B)(%B!,2*!$);6$%2!$6%-%!-.,00!
/B,D@%$!-DB%C-9!I*#!2#$!#(%B!$);6$%2J
!
Attach(Pans(to(Axle!
!
56B%,*!$6%!,H0%!)2$#!$6%!)2-)*%!#+!#2%!#+!$6%!*B4.-9!G,@%!-4B%!$6B%,*-!,0);2!7%B+%D$01!,2*!*#!2#$!DB#--!
$6B%,*9!K,2*!$);6$%29!56%2!$6B%,*!$6%!#$6%B!-)*%!#+!,H0%!)2$#!$6%!)2-)*%!#+!#$6%B!*B4.9!!!56%!*B4.-!-6#40*!
/%!+,D)2;!%,D6!#$6%B!C)$6!$6%!D47!#+!%,D6!7,2!+,D)2;!)2C,B*9!!';,)2!/%!D,B%+40!$#!$6B%,*!7B#7%B019!56B%,*)2;!
-6#40*!/%!%,-1!,2*!-.##$6!+#B!,!+%C!$4B2-9!!"#C!$6,$!/#$6!*B4.-!,B%!$6B%,*%*!#2!D#BB%D$01L!6#0*!#2%!*B4.!
/%$C%%2!+%%$!,2*!$C)-$!#$6%B!*B4.!#2!42$)0!$);6$9!!M%(%B-%!7#-)$)#2!#+!*B4.-!,2*!*#!$6%!-,.%!$#!$6%!#$6%B!
*B4.9!
!
!!
Attach(Drums(to(Frame(
!
A4$!$6%!,--%./0%*!*B4.-!,2*!,H0%!/%$C%%2!$6%!.#$#B!,2*!$6B%,*!#2!$6%!D#470%BN
/4-6)2;!#2!2#2N.#$#B!-)*%!+)B-$L!-DB%C)2;!D0#D@C)-%!42$)0!$6%!/4-6)2;!)-!$6B%,*%*!)2$#!
$6%!+0,2;%!/#0$%*!$#!*B4.9!I4-%!,*O4-$,/0%!CB%2D6!$#!$);6$%2!D#470%BN/4-6)2;!)2$#!
+0,2;%J9!!56%2!$6B%,*!$6%!#$6%B!+0,2;%!/#0$%*!$#!#$6%B!*B4.!#2$#!$6%!.#$#B!D#470%B9!
';,)2L!.,@%!-4B%!7,B$-!,B%!$6B%,*)2;!$B4%!,2*!2#$!DB#--!$6B%,*%*9!I*#!2#$!#(%B!$);6$%2J9!
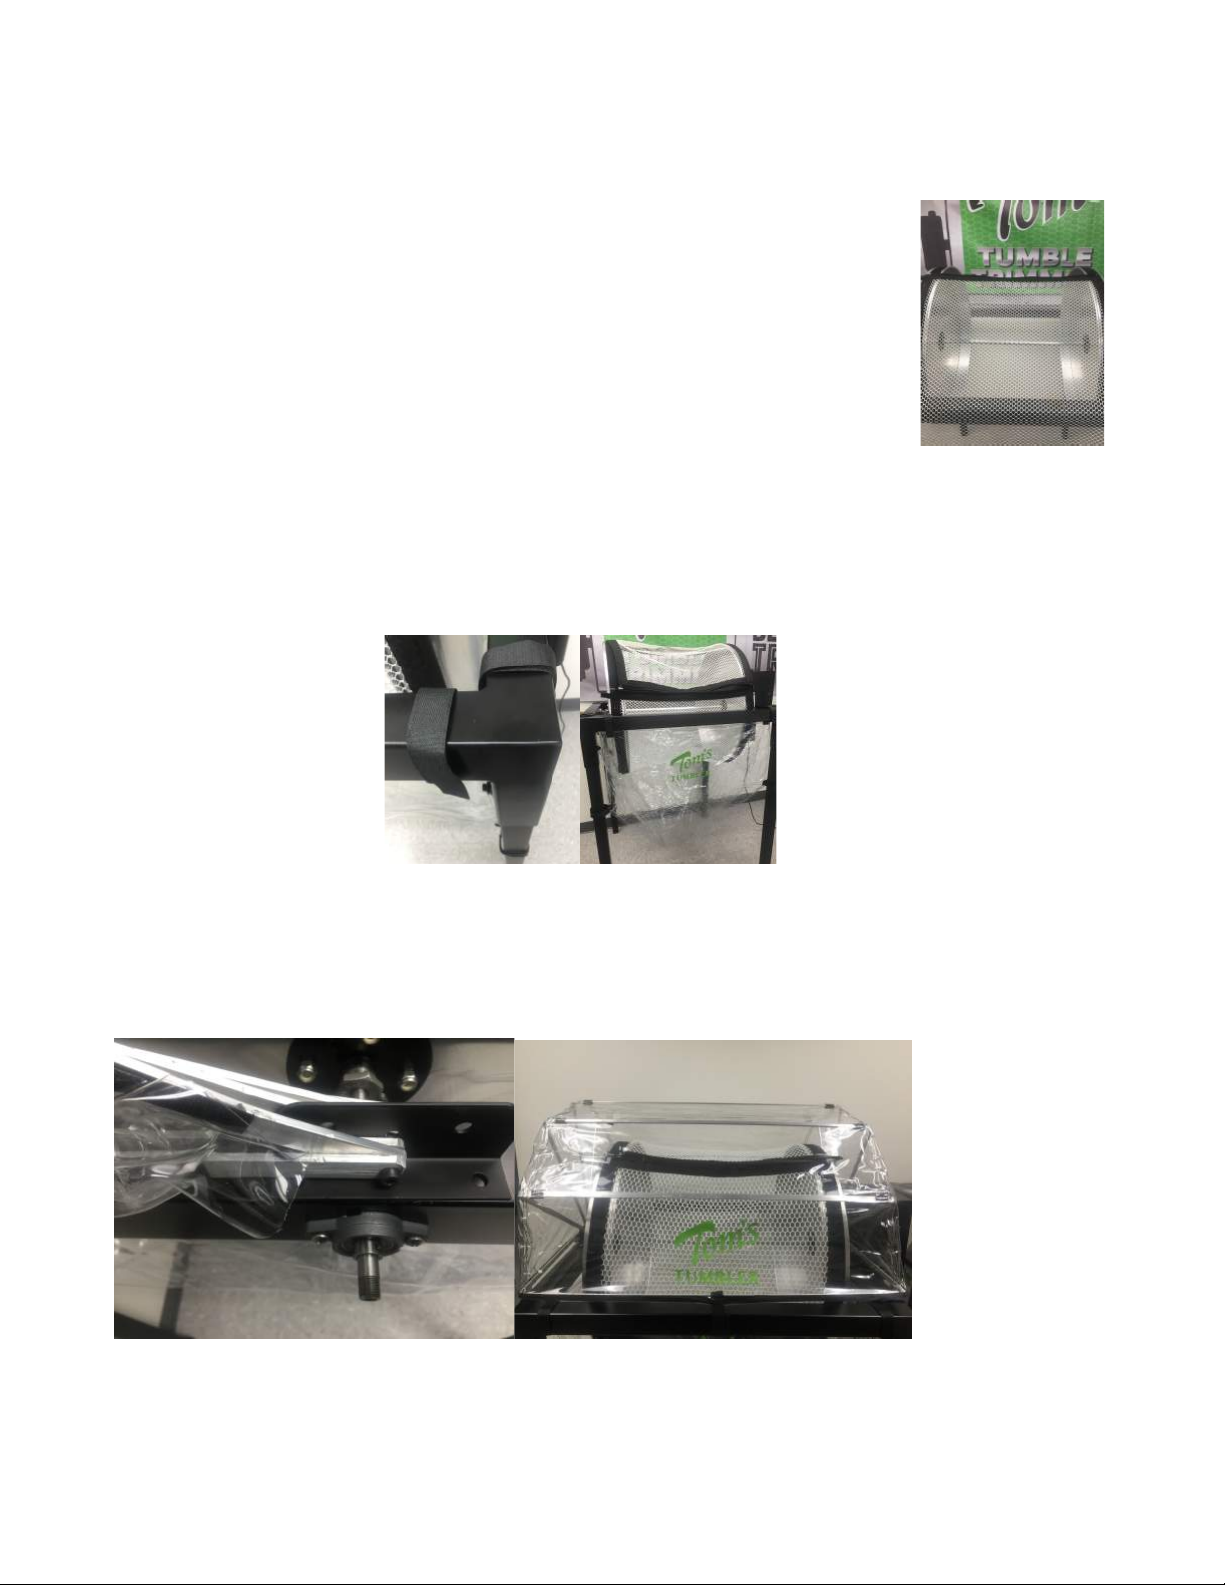
Attaching(Nets(
!
A0,D%!$6%!PQ!6#0%!.%-6!2%$!%(%201!,DB#--!$6%!*B4.-!C)$6!$6%!(%0DB#!*#C29!!?0#C01!$4B2!
-7%%*!D#2$B#0!-#!$6%!*B4.-!$4B2!(%B1!-0#C01!,2*!B#0%!R%0DB#!#2!2%$!!#2$#!R%0DB#!#2!
*B4.-9!I*#!2#$!C#BB1!)+!2%$!)-!2#$!$,4$L!$6)-!)-!-477#-%!$#!/%!0##-%!+#B!;%2$0%!
$4./0)2;J!!56%!2%$!-6#40*!/%!-$B,);6$!,-!$6%!*B4.!$4B2-!,2*!!2%$!R%0DB#!B#0%-!#2$#!
R%0DB#!#2!*B4.-9!!';,)2L!$6%B%!C)00!/%!-#.%!;)(%!)2!$6%!.%-6!2%$9!!S6%2!$6%!2%$!)-!
,B#42*!$6%!*B4.-L!T)77%B!D0#-%*L!DB%,$)2;!,!2%$!/,BB%09!!"#$%!$6,$!#2%!#+!$6%!T)77%B-!C)00!
"<5!#7%2!,00!$6%!C,19!!56%B%!)-!2#!2%%*!$#!42T)7!!%)$6%B!T)77%B!D#.70%$%01!420%--!1#4!
C,2$!$#!*%$,D6!.%-6!,2*!B%70,D%!C)$6!#$6%B!-)T%!.%-6%-9!!F2T)7!%,D6!T)77%B!:UV!!$#!
,00#C!+0,7!$#!/%!7400%*!/,D@!$#!7#4B!7B#*4D$!)2$#!.%-6!/,BB%09!(
!!
Attach(the(Funnel(Flow(Bag(
!
<7%2!$6%!+422%0!+0#C!/,;!,2*!,00!(%0DB#!7)%D%-9!!F-%!(%0DB#!$#!,$$,D6!$6%!+422%0!+0#C!/,;!,$!,00!D#B2%B-!,2*!#2!$6%!
0%;-9!!!56%!/,;!)-!*%-);2%*!$#!-$,1!#2!$6%!$B)..%B!C)$6!1#4B!D,$D6!/#H!/%0#C!$#!D,$D6!1#4B!$B).!#B!@)%+!
!!
Attach(the(Dust(Cover(
!
56%!W4-$!X#(%B!D#.%-!C)$6!Y!-DB%C-!,2*!7B%N*B)00%*!6#0%-!)2!$6%!+B,.%9!!A0,D%!$6%!*4-$!D#(%B!#2!$6%!+B,.%9!
X%2$%B!$6%!*4-$!D#(%B!+%%$!)2!$6%!.)**0%!#+!$6%!+B,.%!0%2;$6C)-%!/4$!70,D%!$6%!+%%$!,0#2;!$6%!#4$-)*%!%*;%!#+!$6%!
+B,.%9!!F-)2;!,!*B)00L!-DB%C!$6%!-DB%C-!)2!42$)0!$);6$9!!
!
(
3#4!,B%!M%,*1!$#!$4./0%Z!!
(

((
Using(the(Trimmer!
!
Make sure your product is completely dry on the outside (brittle to the touch while 5% to 10% moisture on the
inside of the bud is good). See our website for suggestions on how to dry your product at
TomsTumbleTrimmer.com
Take the large leaves and stems off. (called bucking down)
A04;!$6%!.#$#B!)29!!56%!@2#/!#2!$#7!#+!$6%!.#$#B!,00#C-!1#4!$#!D#2$B#0!$6%!-7%%*!#+!$6%!.#$#B9!!56%!6);6%-$!
-7%%*!)-!#7$).,0!+#B!+,-$!,2*!;%2$0%!$B)..)2;L!/4$!-0);6$01!0#C%B!-7%%*-!C)00!C#B@!/%$$%B!#2!-#.%!-$B,)2-9!!F2T)7!
$6%!2%$!,2*!,**!1#4B!*B)%*!7B#*4D$9!!
!
Put the larger hole (1/2”) mesh net on the trimmer and put the RIGHT AMOUNT of product in the net. The ideal
amount is to fill the barrel to about 3” under the axle. Over filling or under filling are not recommended.
The Table below specifies the approximate capacity for each model. Following these guidelines is critical to
the effectiveness of the trimmer. Ideally, your bud should have a nice curling wave just under or over the axle.
Capacity Guidelines per 3-5 minute cycle.
MODEL
MINIMUM
MAXIMUM
TTT 2600
3 pounds
6 pounds
TTT 2200
2 pounds
4 pounds
Put a clean catch bin under the trimmer. Turn on the motor to the desired speed, and watch the trim fall through
the net into your catch bin. Adjust the speed based on your product strain, dryness and capacity. WATCH the
trimming closely. DO NOT OVER PROCESS. Most strains will be trimmed in 3 to 5 minutes and some strains
may take a minute or two longer, but do not over do it! When trim slows down coming out the bottom and kief
begins to be seen coming out the bottom, STOP! You are done. The idea is to preserve your trichomes and
crystals and maintain a hand trimmed look. You can stop the trimmer at any time to see how your buds look.
There should be 10 to15% hand manicuring touch up left but our machine should alleviate 80 to 85% of manual
labor.
Step2: SEPARATING: when done with the trimming take off the ½” mesh net and put the ¼” hole net on the
trimmer with the velcro. Note that only one of the zippers will open completely; the other is sewn at the end to
keep the nets together. Tumble the TRIM through until popcorn size flowers are isolate in the chamber. In just a
few minutes you will isolate any small nuggets that fell through the larger hole net.
Step 3: ISOLATING POLLEN: If you have a pollen net, put this on the drums as you did with the mesh nets. We
recommend that you freezing your pollen first. You can also throw in chips of dry ice in with the trim to speed up
the process. A plastic bag or liner can be placed in your funnel flow bag to catch all of your pollen. Use a small
brush to brush the kief from the dust cover and funnel flow bag into your catch bin.
Call us with any questions 818-835-3282. All parts are covered by our 1 year warranty.
Thank you again for your purchase!
Tom
Tom Bruggemann
Inventor and President
(
This manual suits for next models
1
Table of contents
Other Tom's Tumbler Trimmer manuals


 Handling instructions")


