Tom's Tumbler TTT 1600 User manual

USING YOUR TUMBLER (CONTINUED)
The Three-Step Process
1. TRIM
Put the larger hole (1/2") mesh net on the trimmer and place the CORRECT AMOUNT of product in the net. The ideal
amount will fill the barrel to about 1" under the axle. Over filling or under filling are not recommended.
2. SEPARATE
When finished trimming, remove the 1/2" mesh net and put the 3/8" hole net on the tumbler. Place the TRIM in the net
and turn the motor on for just a few minutes. This will isolate and catch any small nuggets that fell through the larger
hole net, and the trim will be clean and separated.
3. EXTRACT POLLEN
If you have a pollen net (sold with the System or available separately), put the net on the drums as was done with the
mesh nets. We recommend that you freeze your trim first, or use a few nuggets of dry ice in the barrel the your trim to
speed up the process. A plastic bag or liner can be placed in the funnel flow bag to catch all of the pollen. In just a few
minutes you will have a pile of pollen under the trimmer, as well as on the funnel flow bag and dust cover. Use a small
brush to brush the kief from the dust cover and funnel flow bag into the catch bin.
Care and Cleaning
We recommend cleaning the funnel flow bag and dust cover after each use with a damp rag and Weed Wipes or other
organic cleaner. The mesh nets can be washed in a washing machine with cold water and detergent. Line dry.
Clean the pollen net by wiping with a damp cloth or by dipping in alcohol for two minutes. Keep the zippers clean and
lubricated with organic vegetable oil spray or Weed Wipes.
TTT 1600 and TTT 1900
Assembly Instructions
Call us with any questions at 818-835-3282.Thank you again for your purchase!
PARTS LIST
Bottom Frame (6 openings for legs)
Middle Frame (6 openings for legs with bearings)
6 PVC legs (15" for TTT 1600 and 30" for TTT 1900)
2 aluminum pans with flanges and velcro
Motor with power cord
Parts Bag: 2 couplers, 2 clamps, 4 screws, long screw
1 axle
1 funnel flow bag
2 nets (1/2" mesh for trimming and 3/8" for separating)
Included with Systems
Dust Cover top (4 openings for dust cover legs)
1 Dust Cover with 4 legs
1 Pollen Net (151 Micron)
Tools Required
Rubber mallet (or PVC leg will work)
Phillips head screwdriver
Wrench or Vice grip
ASSEMBLY
Assemble Frame
1. Lay the bottom frame on the ground with open corners up.
2. Insert the six legs into the bottom frame.
3. Place the middle frame (with bearing) on the legs, then tap down with rubber mallet.
4. If assembling a System, put the 11.5" legs on top of the frame and add the dust cover top. Tap to tighten.
YOUR TUMBLER IS NOW READY TO USE!
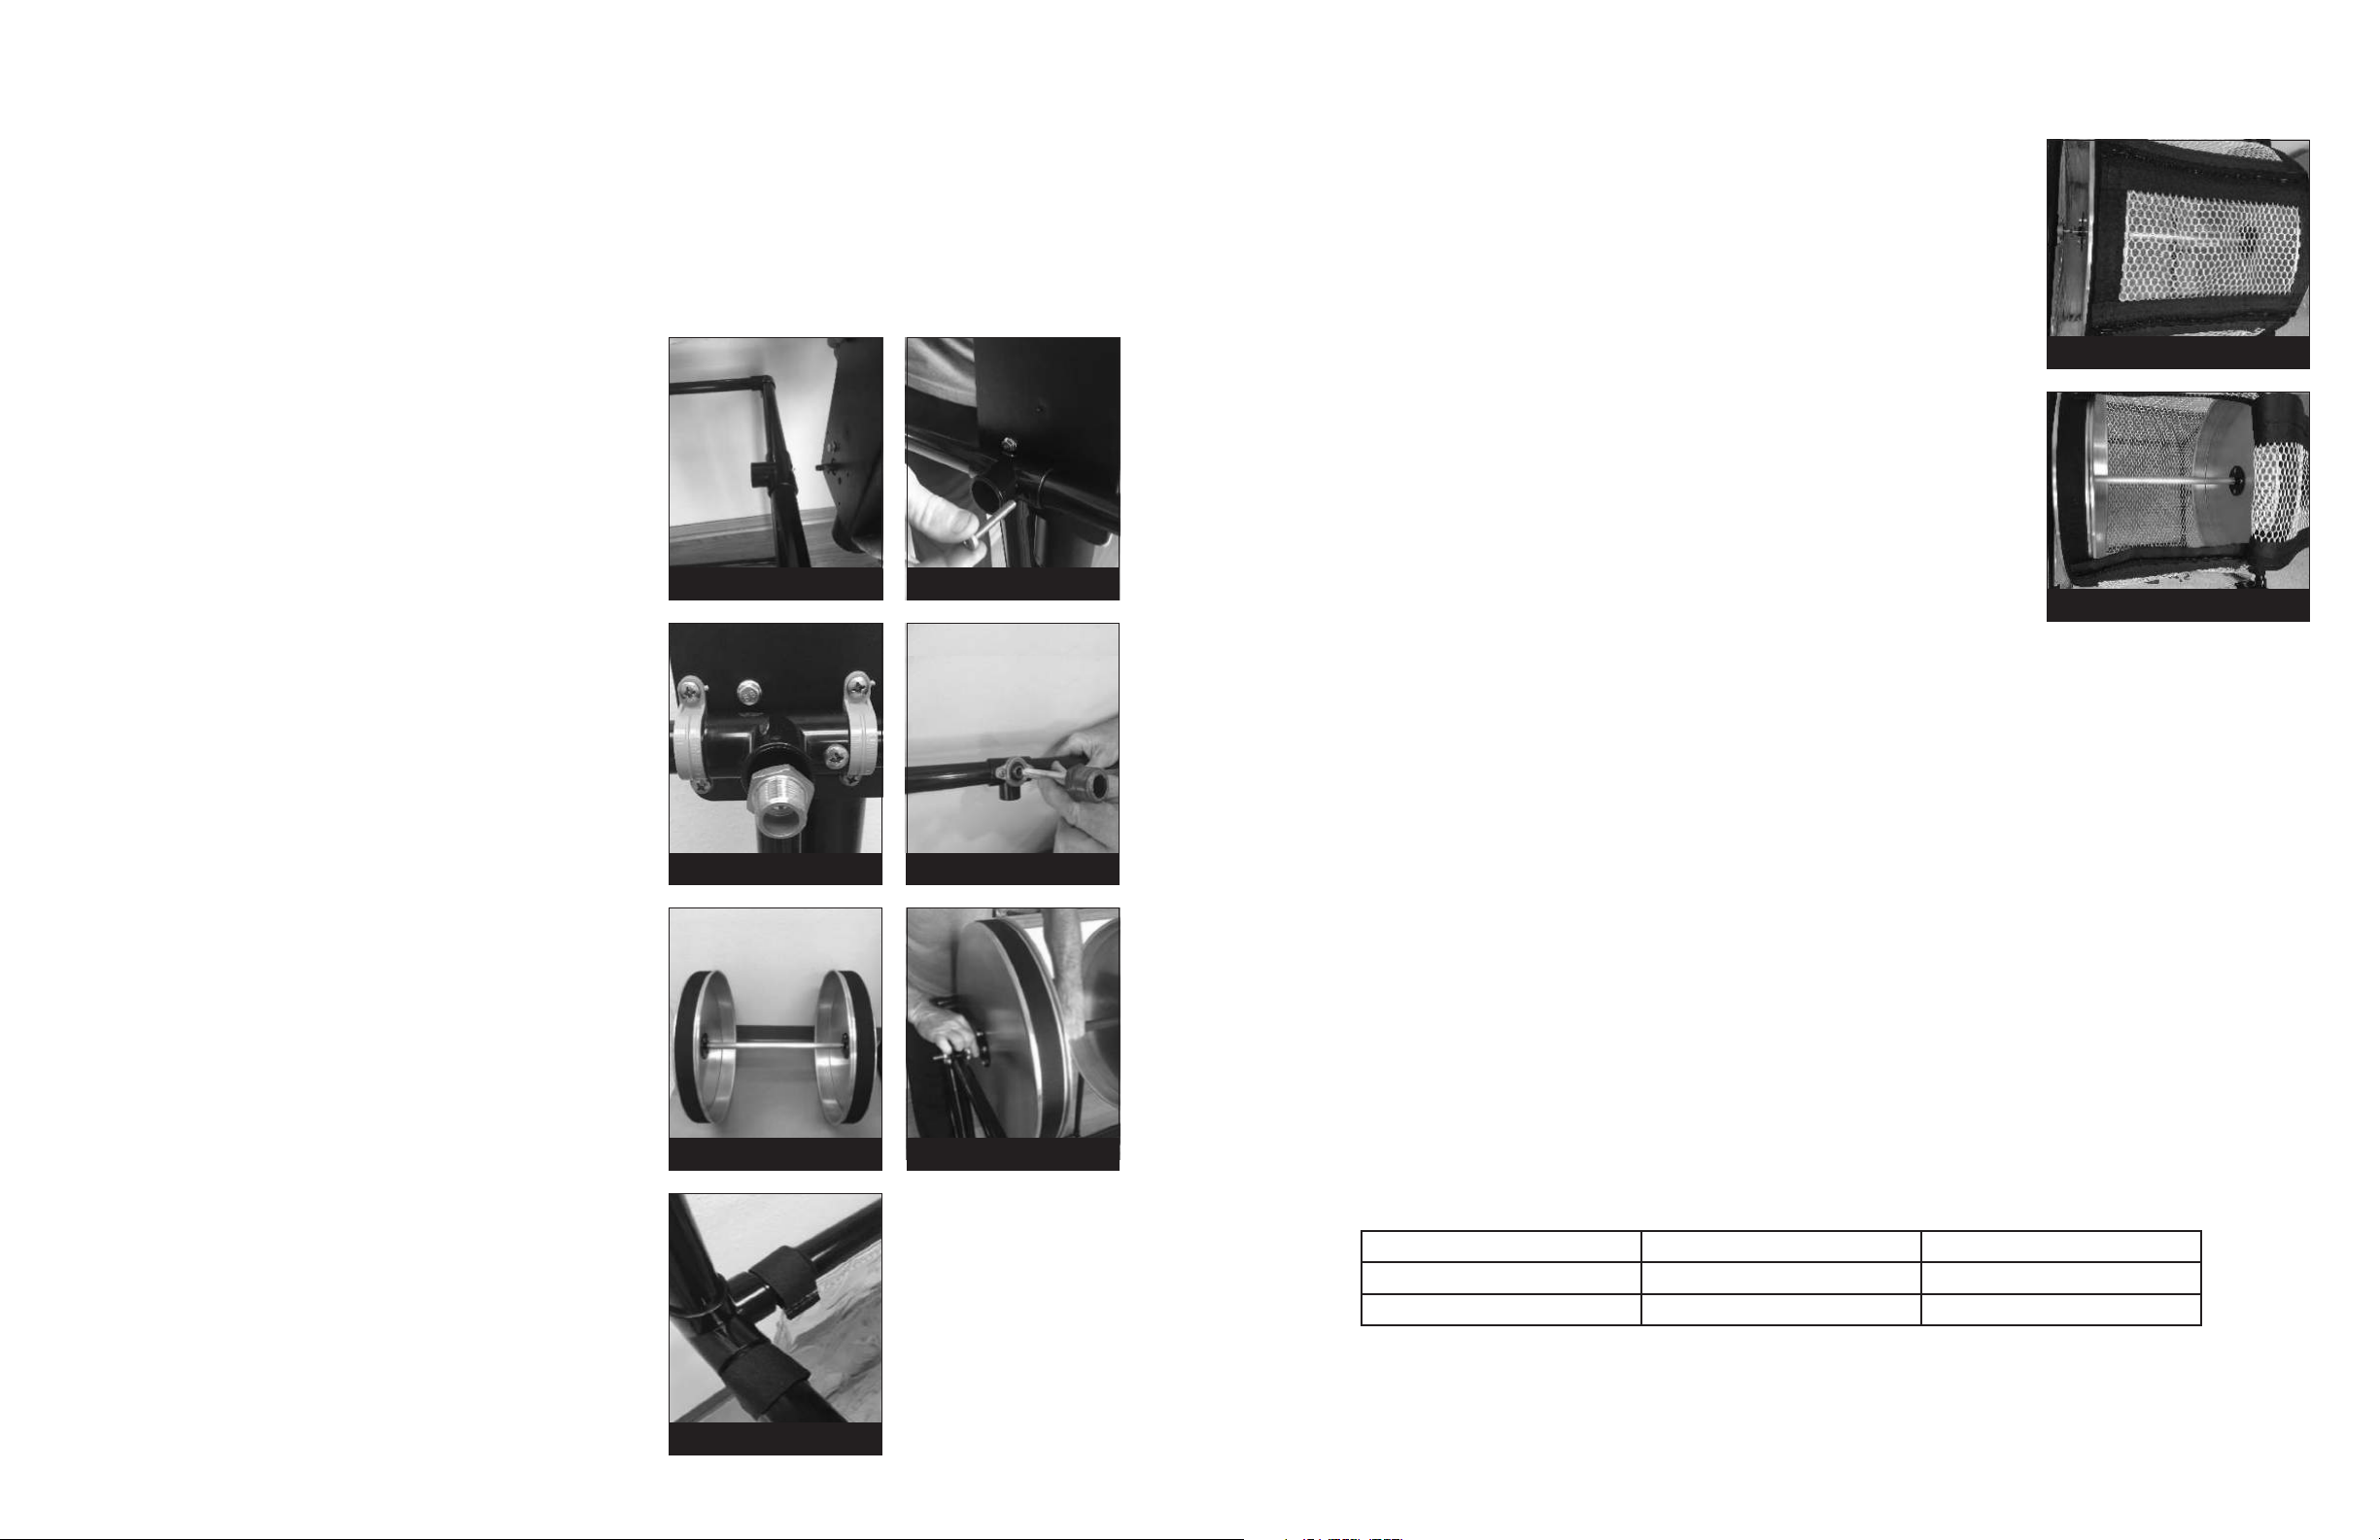
Attach Motor
1. Place the motor box on the outside of the frame, on the side
opposite the bearing (FIGURE A).
2. Insert the motor shaft into the large hole in the PVC.
3. Insert the 1-3/4" Phillips head screw through the small hole in
the frame, and thread into motor box (FIGURE B). Do not over
tighten. This is an alignment screw only.
4. Insert the shorter shaft coupler (with bushing) into the frame
hole and through to the motor, and thread on clockwise.
5. Attach the two plastic brackets around the frame and attached
to the motor box with the four small screws to secure motor to
frame (FIGURE C). Do not over tighten.
Attach Coupler Bushing
1. On the opposite side of the frame top, insert the longer coupler
(with bushing) into the bearing, with the bushing on the inside
of the frame (FIGURE D).
Assemble Tumbler Barrel
1. Carefully thread the axle onto the flanges on the pans, with
edges of the pans facing in (FIGURE E). Take care when
threading the axle into the pans to prevent cross-threading.
Tighten the pans to the axle.
Attach Tumbler Barrel to Frame
1. Place the axle and drums between the frame top. Hold the axle
with one hand to keep it parallel to the floor. Thread the drum
end onto the coupler bushing opposite the motor (FIGURE F).
Hand tighten with wrench.
2. Thread the other drum onto the motor bushing. Hand tighten the
drum flanges onto the bushing.
Attach Funnel Flow Bag to Frame
1. Attach the clear funnel flow bag or 1600 catch bag to the frame
using the velcro connectors (FIGURE G). The funnel flow bag
should hang down like a funnel.
2. Place a catch box of your choice under the funnel to catch the
trim, product and pollen.
ASSEMBLY (CONTINUED)
Attach Net to Drums
1. Plug the motor cord into the motor and to an outlet.
2. Put the end of the net on the drums, velcro side down. Operate the motor slowly,
attaching the net to the drums as it turns (FIGURE H).
3. When the barrel has turned one full rotation, zipper the ends of the net together
(FIGURE I).
Note that the middle zipper does not unzip completely to keep the netting together as
one piece. The net should be tight across the drums but will have some give in the middle,
which is desired for tumbling.
Install Dust Cover on Dust Cover Frame
(included with Systems)
1. Place the plastic dust cover over the top of the dust cover frame. This lifts off easily for
filling and emptying the tumbler.
We recommend brushing the dist cover with a small brush to capture pollen collected, and
wiping the dust cover with a damp cloth after use to avoid build up.
FIGURE A FIGURE B
FIGURE C FIGURE D
FIGURE E FIGURE F
FIGURE G
FIGURE H
FIGURE I
Using YOUR TUMBLER
Place the catch box underneath the opening of the funnel flow bag. The trim will fall through the mesh and slide through
the clear funnel bag into the box.
When you are finished tumbling, remove the trim box and put a clean catch box underneath. Unzip both zippers to release
the flap on the net. Turn the motor on slowly to turn the drum and empty the trimmed product into the container.
If desired, put the 1/4" mesh net on the drums, pour in the trim, then tumble again briefly to separate the popcorn-sized
nuggets.
Recommendations
Make sure your product is completely dry on the outside. 5% to 10% moisture on the inside of the bud is recommended.
Visit our website at TomsTumbleTrimmer.com for suggestions on how to properly dry your product.
Remove any large leaves and stems. Break very large buds into smaller buds, if necessary.
Capacity Guidelines: The Table below specifies the capacity for each model. Following these guidelines is
critical
to
the effectiveness of the trimmer. Your product should have a nice rolling wave under the axle. If your product is tumbling
over the axle, reduce the amount of product in the basket.
Turn on the motor, then slowly to the highest speed (the highest speed is optimal). Watch the trim fall through the net into
the catch bin. Adjust the motor speed based on your product strain, dryness and capacity. WATCH the trimming closely.
DO NOT OVER PROCESS. Some strains will be trimmed in as little as three minutes, while others may take a few minutes
longer. You can stop the trimmer at any time to see how the buds look. You want to leave about 15% of trim left for hand
touch up and to preserve the crystals.
MODEL
TTT 1600
TTT 1900
MINIMUM
3/4 pound
1 pound
MAXIMUM
1 pound
2 pounds
This manual suits for next models
1
Other Tom's Tumbler Trimmer manuals


