Tomate TOM 1151 User manual

INSTALLATION ANDUSER’S MANUAL
ALL MODELS:
TOM 1151, TOM 1201, TOM 1201B
TOM 3150, TOM 3155, TOM 3159,
TOM 3020, TOM 3375
TOM 4200, TOM 4203

2
CONTENT
INTRODUCTION.......................................................................3
SAFETYPRECAUTION..........................................................3-4
WALL MOUNTING INSTALLATION........................................5-11
PREPARE FOR INSTALLATION.............................................5
INSTALLATION(VENTOUTSIDE).........................................6-10
INSTALLATION(VENTINSIDE).............................................11
ISLAND MODEL INSTALLATION...........................................12-15
SLIM MODEL..........................................................................16-20
OPERATION...........................................................................20-33
MAINTENANCE......................................................................33-34
TROUBLESHOOTING...............................................................35E
NVIRONMENTALPROTECTION............................................35

3
INTRODUCTION
Thank you for choosing this cooker hood.
This instruction manual is designed to provide you with all required
instructions related to the installation, use and maintenance of the
appliance.
In order to operate the unit correctlyand safety, please read this instruction
manual carefully before installation and usage.
The cooker hood use high quality materials, and is made with a
streamlined design. Equipped with large power electricmotor and
centrifugal fan, it also provides strong suction power, low noiseoperation,
non-stick grease filter and easy assembly installation.
SAFETY PRECAUTION
Never let the children operate the machine.
The cooker hood is for home use only,not
suitable for barbecue, roast shop and other
commercial purpose.
The cooker hood and its filter should be
clean regularly in order to keep in good
working condition.
Clean the cooker hood according to the
instruction manual and keep the unit from
danger of burning. There is a fire risk if
cleaning is not carried out in accordance
with the instructions.
Forbid the direct baking from the gas
cooker.
Please keep the kitchen room a good
convection.
If the supply cord is damaged, it must be
replaced by the manufacturer, its service
agentor similarly qualified persons in order
to avoid a hazard.
There shall be adequate ventilation of the
room when the range hoodis used at the
same time as appliances burning gas or

4
other fuels;
Τhe air must not be discharged into a flue
that is used for exhausting fumes from
appliances burning gas or other fuels;
Regulations concerning the discharge of air
have to be fulfilled.
This appliance can be used by children
aged from 8 years and above and persons
with reduced physical, sensory or mental
capabilities or lack of experience and
knowledge if they have been given
supervision or instruction concerning use of
the appliance in a safe way and understand
the hazards involved.
Children should be supervised to ensure
that they do not play with the appliance.
Cleaning and user maintenance shall not
be made by children without supervision.
Do not flame under the range hood.
CAUTION: Accessible parts may become
hot when used with cooking appliance.
The warning shall be in the same part of the
instructions that include details of how to
mount the equipment.
Electrical ShockHazard
Only plug this unit into a properly earthed outlet. If
in doubt seek advice from a suitably qualified
engineer.
Failure to follow these instructions can result in
death, fire, or electrical shock.

5
WALL MOUNTINGINSTALLATION
1. Prepare for installation:
a. If you have an outlet to the outside,your cooker hood can be connected
asbelow picture by means of an extraction duct (enamel, aluminum,
flexible pipe or inflammable material with an interior diameter of 150mm)
b. Before installation, turn the unit off and unplug it from the outlet.
c. The cooker hood should be placed at a distance of 65~75cm above the
cooking plane for best effect.

6
2. Installation (Vent outside):
Attention! Observe the warning in the instruction sheet concerning the
operation of the appliance when air is discharged from the room.
When the range hood and appliance supplied with energy other than
electricity are simultaneously in operation, the negative pressure in the
room must be not exceed 4 Pa (4×10⁻⁵ Bar)
Drill 3 x 8mm holes to accommodate the bracket. Screw and tighten the
bracket onto the wall with the screws & screw plugs provided.
For inclined panel Model, need to drill 4 x8mm extra holes & fixing
screws & screw plugs before installation.
Screw plug
Wall bracket
Screw
(4mm x30mm)
Holes on wall

7
Leave up the cooker hood and hang onto the wall bracket hook.
Fix the one-way-valve to the air outlet of the cooker hood. Then,
attached the exhaust pipe onto the one-way-valve as shown below.
Chimney installation.
For Glass model and T shape model
By Put the upper chimney into lower chimney .Then pulling out the
upper chimneyupwards. Adjustto reach the height required.
Wall bracket
Cooker hood
Exhaust pipe
Cooker hood

8
Sliding the chimney to adjust the chimney height. When the height you
required is reached, then hang the fixing hole to the fixing screws as
showed in below pictures.
Drill 2×8mm holes to accommodate the plate II. Screw and tighten the
plate II onto the wall with 2 screws provided.Assembly the chimney
onto the unit and fix it with 2 screws.
Warning: Failure to install the screws or fixing device in accordance with these
instructions may result in electrical hazards.
Upper chimney
Lower chimney
Plate II
Rawl plug
Screw (4mmx8mm)
Screw (4mmx30mm)

9
For Tower model
By Put the inner chimney into upper chimney .Then pulling out the
upper chimneyupwards. Adjust to reach the height required.
Fix the lower chimney with 2 pcs of 4x8mm screws.
Sliding the chimney to adjust the chimney height. When the height you
required is reached, then fix 2 pcs of 4x8mm screws onto the hole fixing
with plate I as showed in below pictures.

10
Drill 2 x 8mm holes to accommodate the plate II. Screw and tighten the
plate II onto the wall with 2 screws provided.
Assembly the chimney onto the unit and fix it with 2 screws.

11
Installation (Vent inside)
If you do not have an outlet to the outside, exhaust pipe is not required andthe
installation is similar to the one show in section “Installation (Vent outside)”.
Activated carbon filter can be used to trap odors.
In order to install the activated carbon filter, the grease filter should be
detached first. Press the lock and pull it downward.
Plug the activated carbon filter into the unit and turn it in clockwise direction.
Repeat the same on the other side.
NOTE:
o Make sure the filter is securelylocked. Otherwise, it would
loosen and cause dangerous.
o When activated carbon filter attached, the suction power will
be lower.

12
ISLAND MODEL INSTALLATION
1)Position the hanging plate on
theceiling and then mark the position of
the screw holes.The hanging plate
should be securely fixed to the ceiling,
11 x ST6 (40 mm)screws for
wooden ceiling
8 x expansion bolts for cement
ceiling
2) Fix the angle bars to the hanging
plate, using the 8 x M5 screws.
3) Extend the angle bars to the
required height and then fix them in
position using the 16 x M5 screws and
nuts with metal washers.
IMPORTANT: The angle bars
must have an overlap of AT LEAST
100 mm.
4) If your cooker hood is going to be
used inextraction mode, then you
should connect the ducting hose to the
ceiling adaptor at this point.
Fix the upper chimney section to the
hangingplate, using the 4 x self tapping
screws.
Slide the lower chimney section onto
the angle bars and raise it until it sits
just below the upper chimney section.

13
5) If the glass canopy has not been
pre-assembled by the factory, then it
should be fixed to the top of the main
body of the cooker hood at this stage.
6) Lift the main body of the cooker
hood onto the angle bar and then fix it
into position using the 16 x M5 screws.
IMPORTANT: This stage of the
installation process MUST
becompleted by two people.
IMPORTANT: The 16 x M5 screws
MUST be securely tightened.
7) If you are going to be using the hood
in
extraction mode, you should fix the
ducting
hose to the ceiling.
The electrical connection must correspond to the electrical requirement
noted on the rating plate, which is placed inside the cooker hood. The
appliance should now be connected to the electrical supply.
Check that the appliance is operating correctly by selecting each speed and
switching the light bulbs on and off.
Remove the hanging hook and then slide the lower chimney section
downwards, until it rests against the main body of the cooker hood.
Use a stainless steel cleaner and polish on the stainless steel sections of the
appliance.
If you are using the appliance in recirculation mode, then you should now fit
the carbon filter. See the “fitting the carbon filter" section on page9.

14
LAMP HOOD MODEL INSTALLATION
1) Position the hanging plate on the
ceiling and then mark the position of
the screw holes. The hanging plate
should be securely fixed to the ceiling,
4 x ST6 (40 mm)screws for
wooden ceiling
4 x M6 (60 mm)expansion bolts
for cement ceiling
2) Make the fixing wire & Power cable
pass through to the hole of hanging
plate cover.
3) Fix the fixing wire in the special crew
of the hanging plate & connect Power
cable in the right way
IMPORTANT: This stage of the
installation process MUST be
completed by two people.
IMPORTANT: make the same
length of the fixing wire to let the
hood in balance level

15
4) Push the hanging plate cover up to
the ceiling &
5) Fix hanging plate cover with 4 x ST4
(8 mm)screws
IMPORTANT: The 4 x ST4 screws
MUST be securely tightened.
The electrical connection must correspond to the electrical requirement
noted on the rating plate, which is placed inside the cooker hood. The
appliance should now be connected to the electrical supply.
Check that the appliance is operating correctly by selecting each speed and
switching the light bulbs on and off.
Use a stainless steel cleaner and polish on the stainless steel sections of the
appliance.
If you are using the appliance in recirculation mode, then you should now fit
the carbon filter. See the “fitting the carbon filter" section on page 9.

16
SLIM MODEL INSTALLATION
Way one:
To install onto the wall drill 2 holes of Ø8mm on a suitable place
according with the centre distance of hole in the back of the cooker
hood.
Insert the nut into the holes.
Insert the screws into the nuts and tight. Put the cooker hood onto the
tighten screws.
Fix the cooker hood with safety screw. The two safety vents are
positioned on the back casing, with diameter of 6mm.
Put the one way valve onto the cooker hood.
Way two:
Drill 4 holes of 6mm diameter at the bottom of the hanging cupboard
Put the one way valve on the cooker hood, then install the cooker hood
on the bottom of the hanging cupboard, tighten the hood with enclosed
4 screws.

17
Note:
1.The extensible pipe are optional accessory, not supplied.
2.Take off protection film before installation.
3.There are 2 methods for ventilation , including ' horizontal ventilation' and '
vertical ventilation'. Please pay attention to the ventilation method when
installation.
Vertical ventilation: See Pic A, please use tool take out the round cover before
using, and the air can be vented from top
horizontal ventilation: See Pic B, please use tool take out the rectangular
cover before using, and the air can be vented from back.
The rectangular air outlet for horizontal ventilation is not supplied.

18
Air ventilation setting
Outdoor exhausting: Turn the adjuster to outdoor position, install the
outlet, turn on the cooker hood, then the air will be vented from the
outside outlet.
Recycling: the recycling mode with carbon filter ,Turn the adjuster to
indoor position, install the outlet cover, turn on the cooker hood, then
the air can be vented from the inside outlet.
Note: The charcoal filter is mounted on the back of the grill and must be
changed once three month.
Warning: the charcoal cannot be washed or recycled. It should be
changed at most after 120 hours using. The carbon filter shouldn’t be
exposed to heat.

19
TELESCOPIC MODELMODEL INSTALLATION
Way one:
To install onto the wall drill 2 holes of Ø8mm on a suitable place
according with the centre distance of hole in the back of the cooker
hood.
Insert the nut into the holes.
Insert the screws into the nuts and tight. Put the cooker hood onto the
tighten screws.
Fix the cooker hood with safety screw. The two safety vents are
positioned on the back casing, with diameter of 6mm.
Put the one way valve onto the cooker hood.

20
Way two:
Drill 4 holes of 6mm diameter at the bottom of the hanging cupboard
Put the one way valve on the cooker hood, then install the cooker hood
on the bottom of the hanging cupboard, tighten the hood with enclosed
4 screws.
Note:
1.The extensible pipe are optional accessory, not supplied.
2.Take off protection film before installation.
OPERATION
Mechanical Rocker button
It just appear in TELESCOPIC MODEL.
Light button On the left side of hood.
Speed buttonOn the right side of hood.
“=”: high speed level.
“-”: Low speed level.
“o”: Off
This manual suits for next models
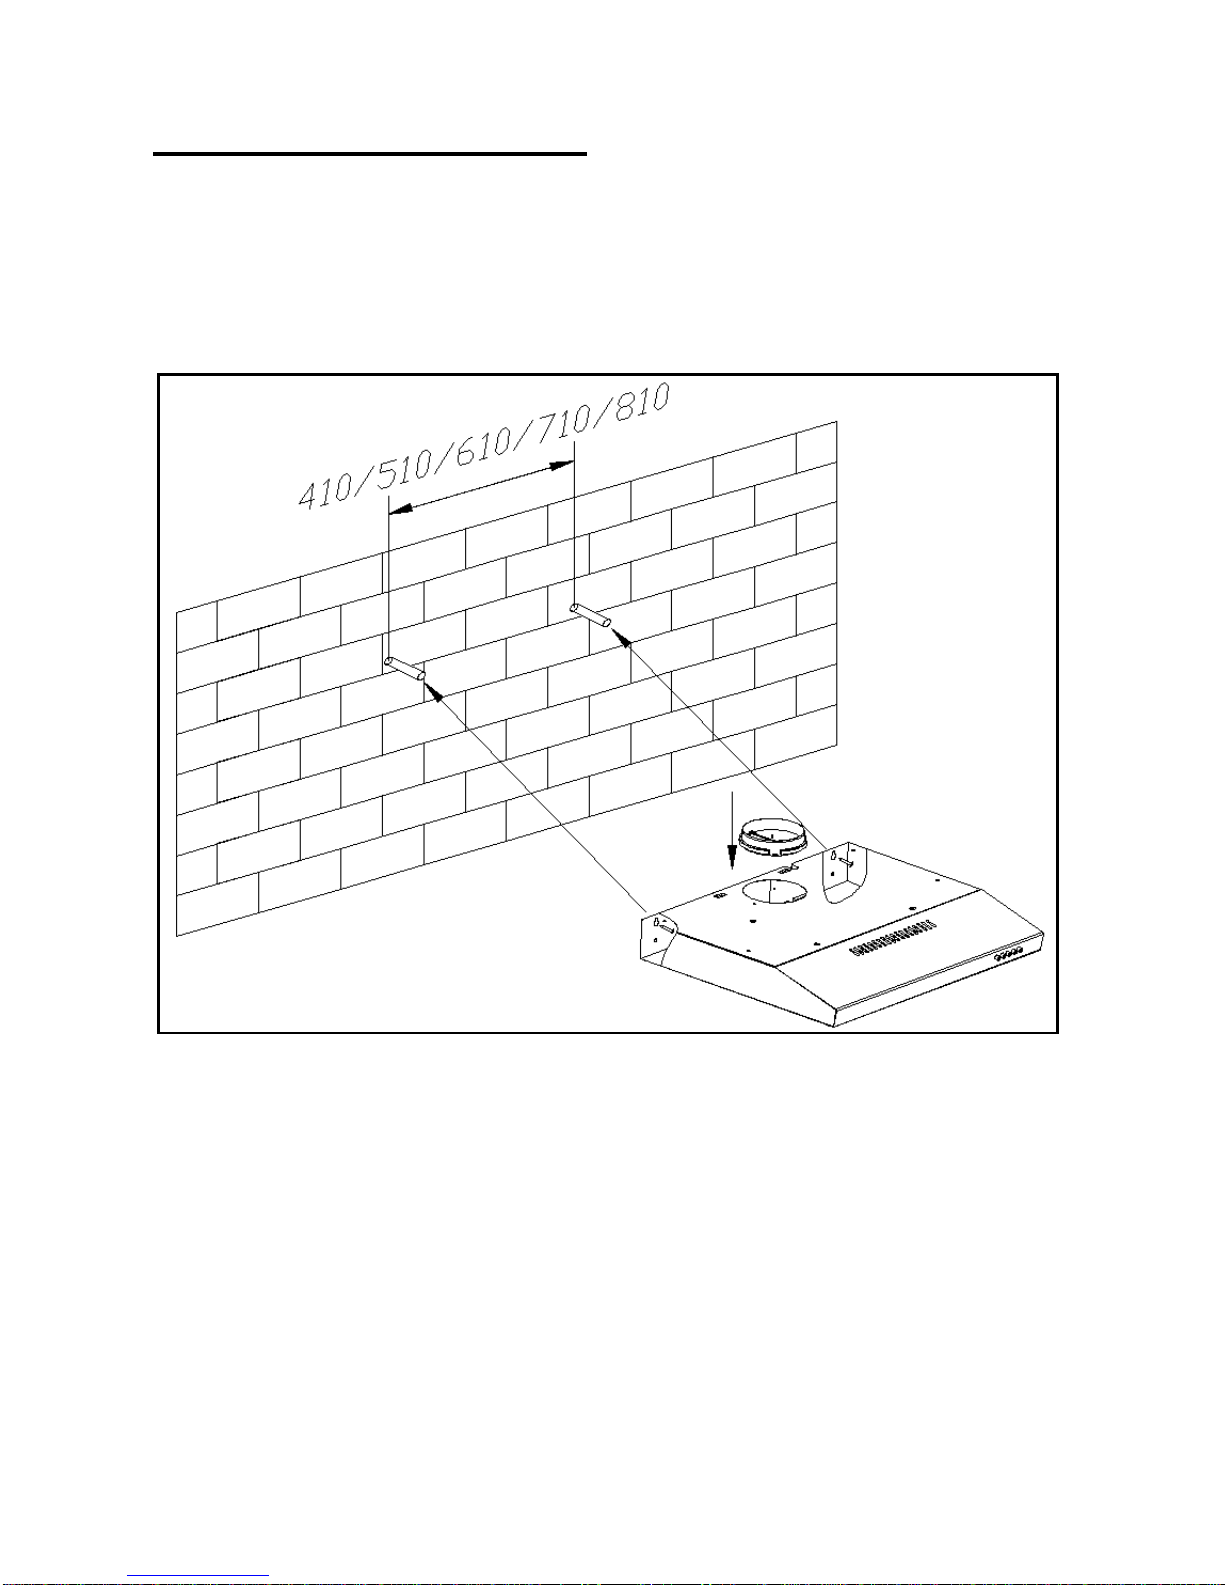
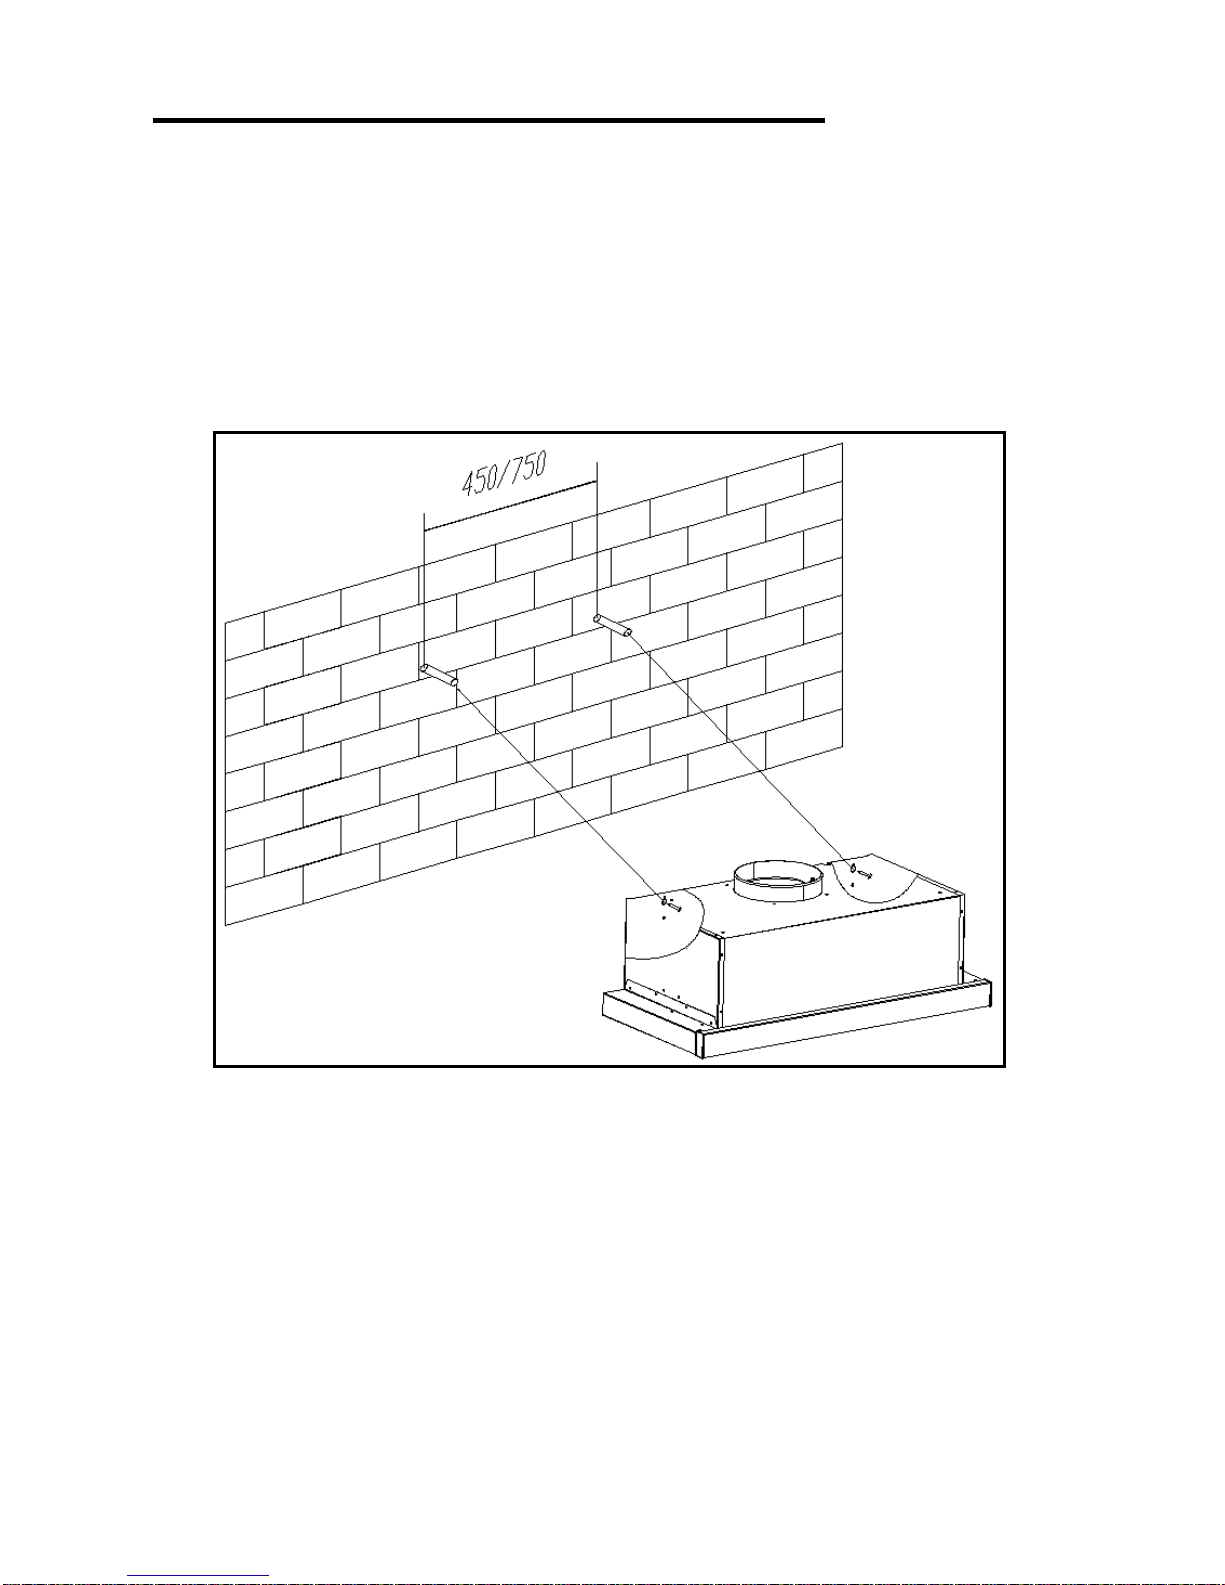
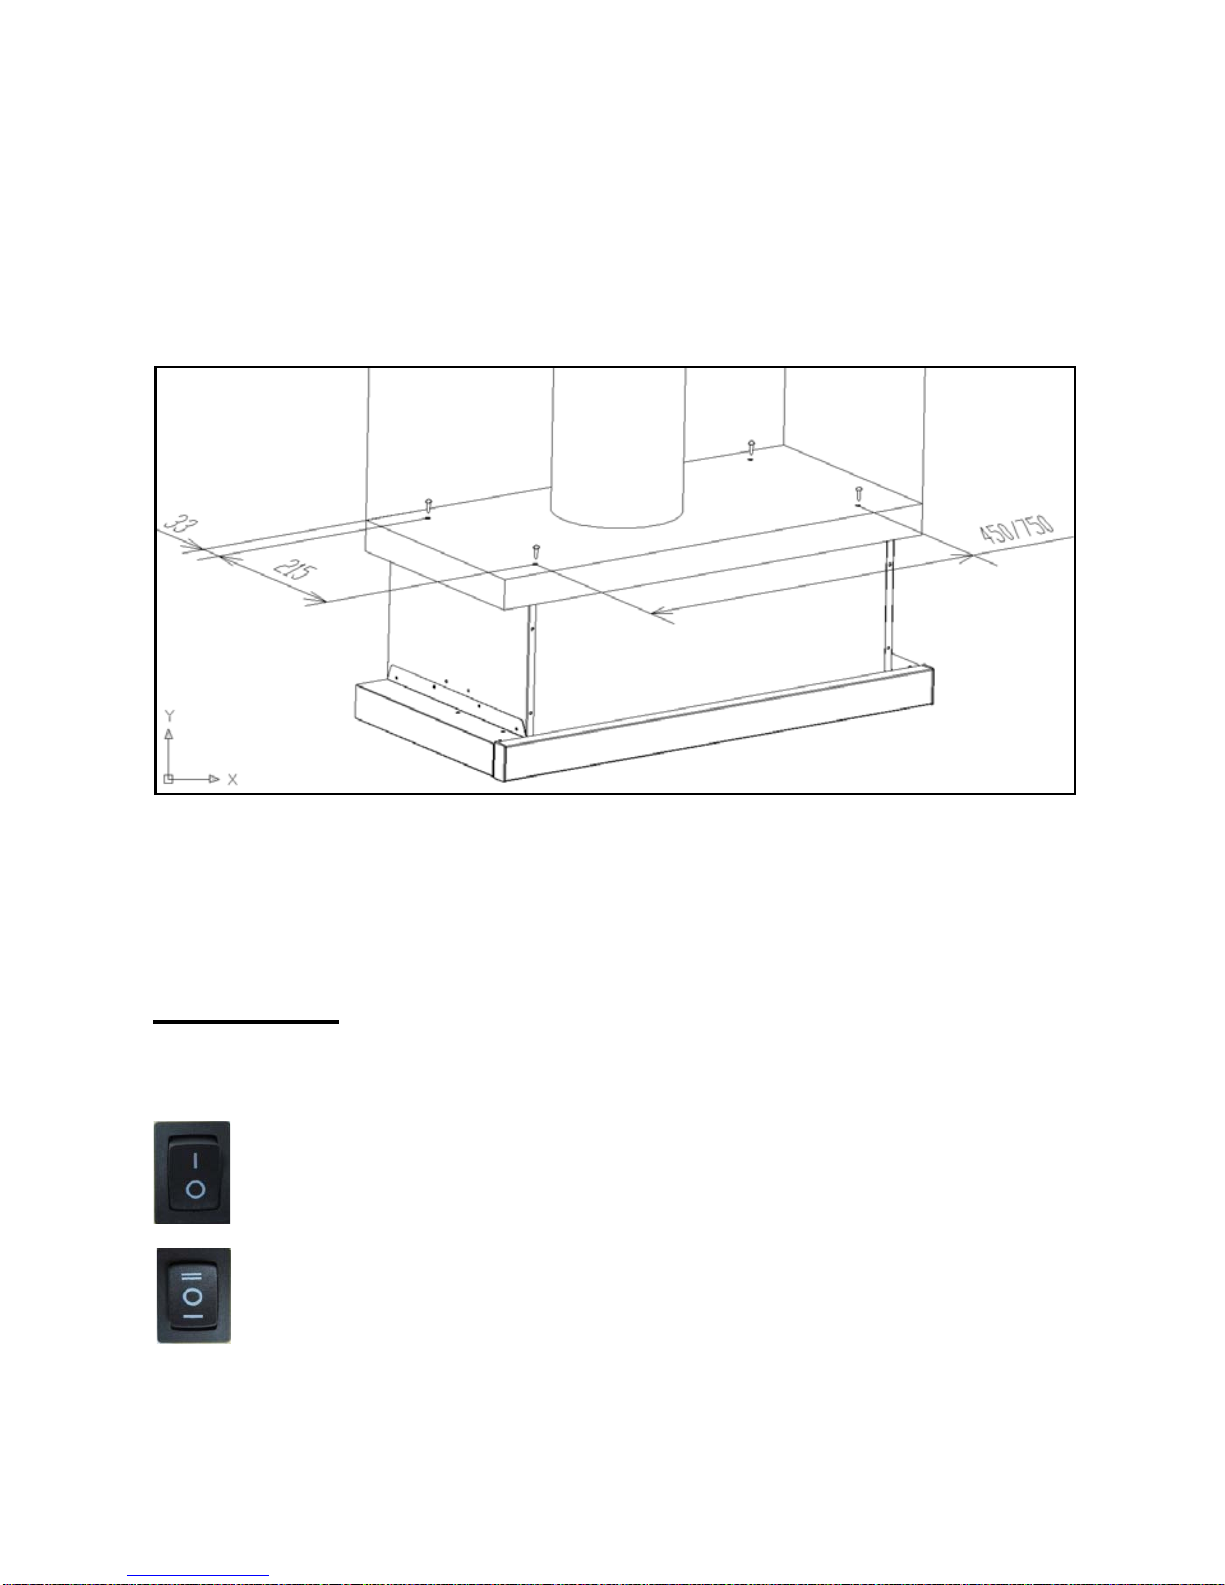
9
Table of contents
Popular Ventilation Hood manuals by other brands

ELICA
ELICA Tamaya Series Instruction on mounting and use

Zanussi
Zanussi TH 6033 Instructions for use and care

Zephyr
Zephyr CACHE CCA-E30ASX Use Use, care and installation guide

Küppersbusch
Küppersbusch LB 6500 OPERATING AND INSTALLATION Manual

ILVE
ILVE CU-79 Specifications

AEG
AEG 511 D Instructions for installation and use

CONSTRUCTA
CONSTRUCTA CD70130 Operating and installation instructions

Teka
Teka GF-T Mounting instructions and maintenance recommendations

Fisher & Paykel
Fisher & Paykel HC24PHTX1 installation instructions

NEFF
NEFF D99L20N0 instruction manual

Haier
Haier HIH-T60HM-V INSTALLATION GUIDE/USER GUIDE

Goobay
Goobay 58967 user manual