Tone King Tone King "Sky King" User manual

Tone King
“Sky King”
User’s Manual
Tone King Amplifiers
www.toneking.com
mail@toneking.com

Note from the Builder
Thank you for choosing Tone King’s “Sky King” guitar amplifier. It was inspired by the
desire to dig deeper into the realm of genuine vintage guitar tones. Whether you’re
chasing the tone of Steve Cropper, Joe Maphis, Roy Buchannan, or any player that
defines an iconic vintage American guitar sound, the Sky King will get you there. In
spite of its’ rich set of features, the Sky King is quite simple to operate, and full of great
tones - you won’t need to do a lot of knob twiddling to get a great tone.
The Sky King is hand built by the fine team of builders at Boutique Amps Distribution
located in Huntington Park, CA. This crew works to the highest standards of quality,
and every phase of construction is subject to strict scrutiny and verification to ensure
that every Tone King amplifier is built exactly the way.
We've composed this User’s Manual as a means of describing the features and operation
of the Sky King. If you have any questions which are not covered here, please feel free
to contact us mail@toneking.com
Best Regards,
Tone King Amplifiers

Safety Instructions
Please keep this instruction manual for future reference and for the duration of owning
this Tone King Amplifier. Please carefully read and understand the instructions inside
this user’s manual before attempting to operate your new amp. This instruction manual
includes essential safety information regarding the use and maintenance of the
amplifier. Take special care to heed all warning symbols and signs inside this manual
and those printed on the amplifier itself.
WARNING!
TO PREVENT FIRE OR SHOCK HAZARD, DO NOT EXPOSE THE AMPLIFIER TO
WATER OR MOISTURE. DO NOT OPERATE NEAR ANY WATER SOURCE
WHAT’S THE MEANING OF THIS?
The lightning flash with an arrow triangular symbol is intended to alert the user to the
presence of non-insulated “dangerous voltage” within the products enclosure, and may
be of sufficient magnitude to constitute a risk of electric shock
WHAT’S THE MEANING OF THIS?
The exclamation point triangular symbol is intended to alert the user to the presence of
important operating and maintenance (servicing) instructions in the user manual
accompanying this amplifier!
1. Read Instructions – All the safety and operating instructions should be read before
this product is operated.
2. Retain Instructions – The safety and operating instructions should be retained for
future reference.
3. Heed Warnings – All warnings on the amplifier and in the operating instructions
should be adhered to.
4. Follow Instructions – All operating and use instructions should be followed.
5. Water and Moisture – The amplifier should not be used near water – for example, a
bathtub, washbowl, kitchen sink, laundry tub, wet basement, or near a swimming pool,
and the like.
6. Carts and Stands – The amplifier should be used only with a cart or stand that is
recommended by the manufacturer.
An amplifier and cart combination should be moved with care. Quick stops, excessive
force, and uneven surfaces may cause the amplifier and cart combination to overturn.
7. Wall or Ceiling Mounting
– The product should never be mounted to a wall or ceiling.
8. Heat – Amplifier should be situated away from heat sources such as radiators, heat
registers, stoves, or other amplifier (including amplifiers) that produce heat.
9. Power Sources – This product should be operated only from the type of power source
indicated on the rating label.
If you are not sure of the type of power supply to your home, consult your product
dealer or local power company.
10. Grounding or Polarization
– This product may be equipped with a polarized alternation-current line plug (a plug
having one blade wider than the other). This plug will fit into the power outlet only one
way. This is a safety feature. If you are unable to insert the plug fully into the outlet, try

reversing the plug. If the plug should still fail to fit, contact your electrician to replace
your obsolete outlet. Do not defeat the safety purpose of the polarized plug.
11. Power-Cord Protection
– Power-supply cords should be routed so that they are not likely to be walked on or
pinched by items placed upon or against them, paying particular attention to the cord
in correspondence of plugs, convenience receptacles, and the point where they exit from
the amplifier.
12. Cleaning – The amplifier should be cleaned only as recommended by the
manufacturer. Clean by wiping with a cloth slightly damp with water. Avoid getting
water inside the amplifier.
14. Non-use Periods – The power cord of the amplifier should be unplugged from the
outlet when left unused for a long period of time.
15. Object and Liquid Entry
– Care should be taken so that objects do not fall and liquids are not spilled into the
enclosure through openings.
16. Damage Requiring Service
– The amplifier should be serviced by qualified service personnel when:
A. The power-supply cord or the plug has been damaged; or
B. Objects have fallen, or liquid has been spilled into the amplifier; or
C. The amplifier has been exposed to rain; or
D. The amplifier does not appear to operate normally or exhibits a marked change in
performance; or
E. The amplifier has been dropped, or the enclosure damaged.
F. The amplifier needs tube replacement or biasing
17. Servicing – The user should not attempt any service to the amplifier beyond that
described in the operating instructions.
All other servicing should be referred to qualified service personnel.
18. Ventilation – Slots and openings in the cabinet are provided for ventilation and to
ensure reliable operation of the product and to protect it from overheating, and these
openings must not be blocked or covered. The openings should never be blocked by
placing the product on a bed, sofa, rug, or other similar surface. This product should
not be placed in a built- in installation such as a bookcase or rack.
19. Attachments – do not use attachments not recommended by the product
manufacturer as they may cause hazards.
20. Accessories – Do not place this product on an unstable cart, stand, tripod, bracket,
or table. The product may fall, causing serious injury to a child or adult, and serious
damage to the product. Use only with a cart, stand, tripod, bracket, or table
recommended by the manufacturer, or sold with the product.
21. Lightning – For added protection for this product before a lightning storm, or when
it is left unattended and unused for long periods of time, unplug it from the wall outlet.
This will prevent damage to the product due to lightning and power line surges.
22. Replacement Parts – When replacement parts are required, be sure the service
technician has used replacement parts specified by the manufacturer or have the same
characteristics as the original part. Unauthorized substitutions may result in fire,
electric shock, or other hazards.
23. Safety Check – Upon completion of any service or repairs to this product, ask the
service technician to perform safety checks to determine that the product is in proper
operating condition.
24. FUSES – Always use the correct rating and type of fuse as indicated on the rear
panel. Note the proper rating fuse is determined by the AC line voltage in the country
this unit is being operated.
25. AC SELECT SWITCH: If the unit is equipped with an AC select switch, the switch
must be set to match the AC line voltage in the country this unit is being operated.
To change the setting, loosen (do not remove) the two screws above and below the slide
switch. Temporarily move the protective cover strip and slide the actuator to match the
voltage in your country. Place the protective cover strip back over the switch and
tighten the two screws.

Contents
1. Front Panel Controls
3
Two Channels – Lead and Rhythm
3
Rhythm Channel
3
Lead Channel
4
Reverb
5
Tremolo (Rate & Depth)
5
2. Back Panel Controls
6
AC Power
6
Fuse
6
Power Switch, Standby Switch
6
Footswitch
6
Speaker Jacks, Impedance Switch
7
Output Mode
7
Attenuation Controls
8
Notes on Using the Attenuator
8
3. Tube Installation and Replacement
9
Choice of Tube Types and Brands
9
12AX7 Tubes
9
6L6 Tubes
10
5U4 Tubes
10
Installing Tubes
10
Replacing Output Tubes
10
Tube Quality
11
4. Warranty
12

1. Front Panel Controls
Two Preamp Channels – Lead and Rhythm
The Sky King has two separate preamplifier channels, each with its own unique voicing.
You can switch between the channels with either the “Lead/Rhythm” switch (on the
front panel) or with the “Channel” switch on the footswitch. When using the footswitch,
you should set the front panel switch to the “Rhythm” position. You’ll notice that the
LED on the footswitch indicates the channel selected. When the LED is lit, the Lead
channel is selected. When the LED is not lit, the Rhythm channel is selected.
Rhythm Channel
The Rhythm channel includes controls for Volume, Treble, and Bass. This channel is
designed to deliver a “vintage 1960’s clean tone” – the type of tone you might associate
with a well-known brand of amplifier made in California during that period. This tone
is characterized by a crisp, present top end, a slightly “scooped” midrange, and a full
bottom end. As will be noted later, this general type of tone can take on two distinct
flavors, depending on the setting of the “Mode” switch on the back panel. Pentode mode
will give you a sound and response that you would expect from a genuine vintage amp
of this type, with a crisp and present top end, and fast attack, and lots of clarity and
transparency. Ultralinear mode recalls a sound from an earlier period of vintage amps.
In this mode, you will get a sound with a softer attack and increased depth and
dimension, and a nice compliant “feel”. The top end will become rounder, smoother,
and silkier. In Ultralinear mode, the overall gain of the amplifier is reduced significantly.
You will need to compensate by adjusting the Volume control.
The Bass and Treble controls act much like they would on a genuine vintage amp of
this type. The Sky King is a bit unique in that you’ll find a wide range of usable tones
at just about any setting of the Bass and Treble controls, but here are a few sample
settings to get you started:
1960s Clean Tone
Volume
Treble
Bass
Mode (back panel)
3
4
6
Pentode
Old-School Clean Tone
Volume
Treble
Bass
Mode (back panel)
5
5
6
Ultralinear

Lead Channel
The Lead channel starts out with a Tweed style preamp, which drives a proprietary
tone-shaping circuit built around the Mid-Bite control, a unique Tone King feature.
This proprietary circuit transforms the basic tweed tone to more of a crunchy rock tone
as you turn up the mid-bite control. This is accomplished by simultaneously tightening
up the bass, rolling off the very high frequencies, increasing the gain, and developing a
pronounced upper midrange peak. The Mid-Bite control is the key to dialing in your
own particular sound on the lead channel, so you may want to experiment and observe
its effect as you rotate it from 1 to 9.
The setting of the “Mode” switch, on the back panel, will have a big effect on the tone
and feel of the amp in the Lead channel. In Pentode mode, the amp will be brighter and
edgier, with a tighter, more percussive response. In Ultralinear mode, the overdrive will
be thick and syrupy, with more of an elastic feel. Just as on the Rhythm channel, when
in Ultralinear mode, the overall gain of the amplifier is reduced significantly. You will
need to compensate by adjusting the Volume control.
When you are using the attenuator to reduce the volume of the lead channel, you’ll
notice that the speaker acts differently at low volume than it does at high volume. At
low volume, you don’t get the benefit of speaker breakup and compression to smooth
and round out the distortion tone. A good way to compensate for this is to use
Ultralinear mode when attenuating to very low volume.
Here are a few sample settings which demonstrate just a few of the tones available with
the Lead channel:
Old Style Tweed Clean
Mode
Volume
Tone
Mid-Bite
Ultralinear
4
5
1
Cranked Tweed
Mode
Volume
Tone
Mid-Bite
Pentode
5
4
1.5
Rock Grind
Mode
Volume
Tone
Mid-Bite
Pentode
7
5
6
Thick, Chunky Mids
Mode
Volume
Tone
Mid-Bite
Ultralinear
7
5
9

Reverb
The Sky King includes a built in 2-spring, tube-driven reverb circuit. Reverb is applied
to both the Rhythm and Lead channels. In order to compensate for the higher gain of
the Lead channel, the reverb drive is reduced slightly on the Lead channel. The added
reduction helps to match the reverb level when switching between preamp channels.
This is useful for when the Lead channel is being driven hard, and the Rhythm channel
is set for a clean tone.
The Reverb level is controlled by the front panel Reverb control, which adjusts the
amount of the reverb signal which is mixed into the signal path.
Tremolo (Rate & Depth)
The Sky King’s tremolo circuit is a modified form of the old-fashioned “bias modulation”
tremolo circuit. This circuit achieves the tremolo effect by varying the bias of the
output tubes. This type of tremolo was used in all Tone King amplifiers dating back to
1993; however, the Sky King uses a modified form of this circuit which virtually
eliminates the “thumping” and other sonic effects that are typically heard.
This type of tremolo circuit gives you a nicely rounded effect, but it is quite subtle when
compared to an opto-coupler tremolo.
The “Depth” control varies the intensity of the modulation effect, and the “Rate” knob
controls the speed of the effect.
If the footswitch is not being used, then the tremolo circuit is active all the time. To
mute the effect, turn the “Depth” knob all the way down.
When the footswitch is plugged in, you can turn the tremolo on and off with the
footswitch. An LED on the footswitch shows the status of the effect (LED on = tremolo
on)

2. Back Panel Controls
AC Power
Always use a grounded AC cord, and make sure that a proper ground connection is
supplied to the amp. Never attempt to lift or defeat the ground connection to the amp.
Fuse
A standard 3A slo-blo fuse (style 3AG) should be used.
Power Switch, Standby Switch
When powering up the amp, you should start with both the Power and Standby
switches in the "off" position.
First, turn on the Power switch. This will apply voltage only to the tube filaments and
the low-voltage circuitry.
After turning on the Power switch, allow the tubes to warm up for about 1 minute, then
turn on the Standby switch.
The power-down sequence is not as important as the power-up sequence. When
turning the amp off, you may turn Power off before Standby, or turn Standby off before
Power, or turn them both off at the same time.
Footswitch
Connect the footswitch to the amp with the supplied cable, or with any standard ¼”
TRS (Stereo) -to- ¼” TRS (Stereo) cable.
The footwitch allows you to control both the preamp channel selection and the tremolo
on/off. LEDs indicate the current switching status, as follows:
Channel switch: LED on = Lead channel
Tremolo switch: LED on = Tremolo on
When using the footswitch, make sure to set the front panel Channel switch to the
Rhythm position.

Speaker Jacks, Impedance Switch
When only one speaker is being used (e.g. the internal speaker), it must be plugged into
the “Main” speaker jack, and the Impedance switch should be set to match the
impedance of that speaker.
If you are using an extension speaker, but NOT using the internal speaker, then you
should plug the extension speaker into the Main speaker jack, and set the Impedance
switch to match the impedance of the external speaker.
The Extension speaker jack may only be used if there is also a speaker plugged into the
Main speaker jack. Inside the amp, the Extension speaker jack is wired in parallel with
the Main speaker jack. When using an extension speaker in addition to the internal
16-ohm speaker, it is best to use a 16-ohm external speaker. Since the external
speaker is wired in parallel with the internal speaker, the total combined impedance will
be 8 ohms, so you would set the Impedance switch to the 8-ohm position.
If desired or necessary, you may safely mismatch the impedance by as much as
doubling or halving the selected impedance. Mismatching beyond this is not
recommended. For example, if the Impedance switch is set to 8 ohms, you may use a
combined speaker load as low as 4 ohms or as high as 16 ohms.
Output Mode
This switch selects the operating mode of the output tubes. As described in the
previous sections for the Rhythm and Lead channels, the two modes give you distinctly
different feel and tone. It is important to understand and appreciate the qualities of
each operating mode, and it is the key to the Sky King’s tonal versatility. Here’s a brief
description of each mode:
Pentode Mode: Most tube amplifiers built today, and in the past, have their
output tubes wired in pentode mode. In this mode, the screen grid is supplied
with a filtered supply voltage which is around the same than the plate voltage.
The sound and feel of tubes operated in this mode should be quite familiar. In
general, this mode will give you a sound that is crisp and present, with a fast
attack and a percussive response.
Ultralinear Mode: Only a handful of popular guitar amplifiers have been built
with their output tubes wired in Ultralinear mode. In this mode, the screen
grids are connected to taps on the primary of the output transformer. Tubes
wired this way can generate about the same level of power as Pentode mode, but
will create a unique sound and response, which is similar to what you would get
if they were wired in Triode mode (though in Triode mode, the output power
would be reduced). It is a sound that is richer in lower order even harmonics.
This is a more old-school kind of sound, with a thicker midrange and a sweeter,
rounder top end. You’ll also notice that it gives the amp a softer, more elastic
feel that makes it a joy to play.
A secondary effect you will notice in Ultralinear mode is that the gain of the
amplifier is reduced significantly. When switching between modes, you will need
to adjust the preamp volume controls to compensate.
When you switch between modes, you will hear a loud pop from the speaker. It is
perfectly safe to do this, but if you prefer to avoid hearing the loud pop, you may want
to switch to standby mode before changing the Mode setting.

Attenuation Controls
The Sky King contains a built-in Ironman precision attenuator with dual attenuation
controls. This allows you to reduce the volume level of the amplifier while allowing its
output tubes to operate at full output power, for natural power tube overdrive and
distortion. The attenuator uses transformer coupling and a precision tuned reactive
load to best preserve the natural tone and feel of the amp, even at very low volume.
This is the same general approach used in the highly regarded Ironman standalone
attenuator.
There are many different approaches that can be used to generate overdriven and
distorted tones as a low volume. Master volume circuits and power reduction schemes,
such as London Power Scaling, have both been used successfully on various amp
models of other brands. However, for the more vintage sounding tones that the Sky
King is designed to achieve, a good quality attenuator such as the built-in Ironman is
the best way to preserve tone and feel at very low volume.
The attenuation controls determine the level of the signal sent to the speaker, but do
not affect the operation of the output stage of the amplifier itself (strictly speaking that's
not true). The attenuator absorbs and dissipates any excess power generated by the
output tubes that is not sent to the speaker.
The attenuator circuit is between the amplifier output and the speaker jack – the same
way an external attenuator would be connected.
This particular variation of the Ironman is designed with two separate attenuation
controls, so you can set the output level for the Rhythm and Lead channels
independently.
Notes on using the attenuator
Although the Ironman attenuator does the best possible job of reducing output power
without changing the tone of the amp’s circuitry, there are other variables in play at
lower volume which do result in some apparent tone change. Here are a few factors
that you should be aware of -
Speaker breakup and compression is a big part of the tone and feel of the amp when
played at high volume. At low power settings, the speaker responds differently, and
does not break up and compress as it does at high power.
The ear’s natural response curve varies at different volume levels, which changes the
way you perceive sounds at different volume levels. Quieter sounds tend to give the
impression of having less bass content.
At lower volume, there is a tendency to hit the guitar strings harder and play more
aggressively than you would if the amp were tuned up very loud. It may take some time
to get used to maintaining your playing style at reduced volume.
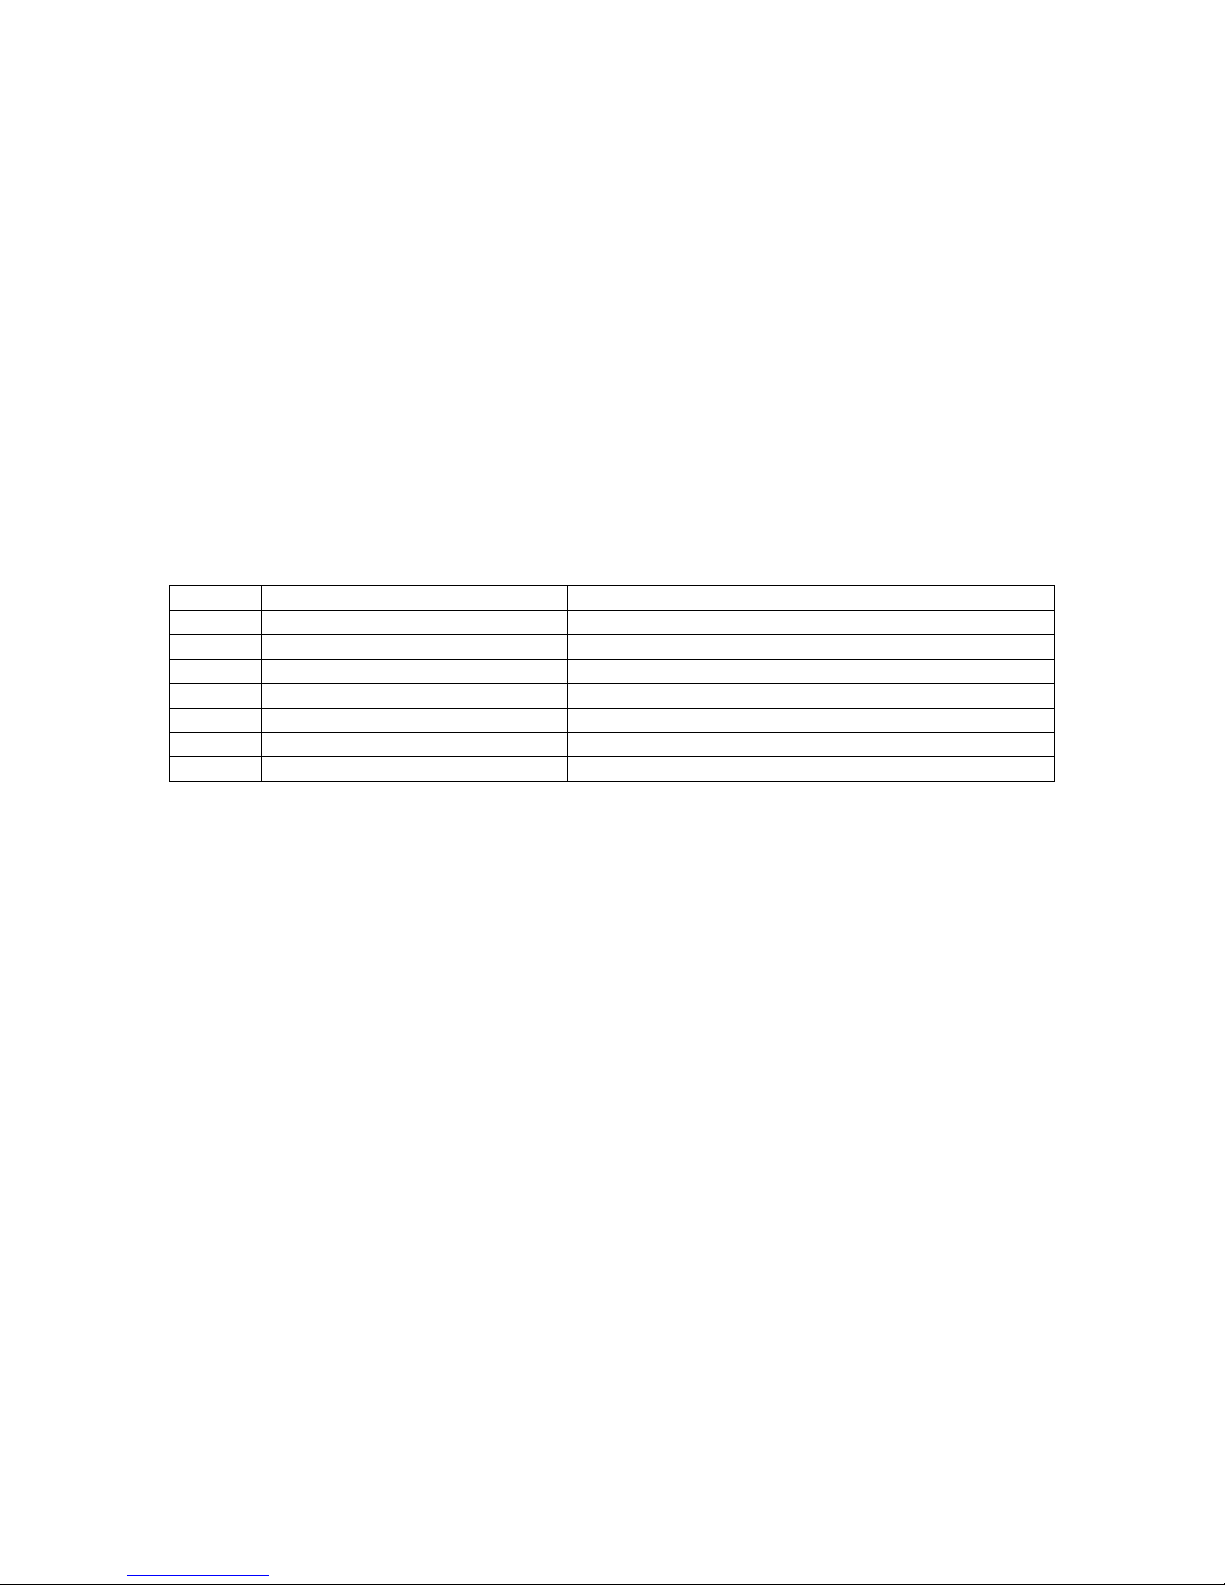
3. Tube Installation and Replacement
No.
Type
Function
V1
12AX7/ECC83
Stage 1 (Rhythm+Lead), Stage 2 (Lead)
V2
12AX7/ECC83
Stage 2 (Rhythm), Stage 3 (Lead)
V3
12AT7
Reverb Driver
V4
12AX7/ECC83
Reverb Receiver
V5
12AX7/ECC83
Phase Inverter
V6-V7
TAD 6L6GC STR
Output Tubes
V8
TAD GZ34-STR
Rectifier
Installing Tubes
When installing tubes, you may find it helpful to lay the amp on its face (speaker
pointing toward the ground), on a table, and shine a light directly into the back of the
amp, to aid in locating the position of each tube. Tubes must be installed in the correct
orientation. The smaller, all-glass tubes have a blank space in the ring of pins which
must line up with the blank space in the ring of tube pins in the tube socket, located on
the chassis. The larger, bakelite-base tubes have a small cylinder with an indexing key
in the center of the ring of tube pins, and this indexing key must match up with the
corresponding slot in the socket on the chassis.
Replacing Output Tubes
The output stage of the Sky King is fully cathode biased, and no bias adjustment is
necessary when changing output tubes. The design of the Sky King’s output stage
allows a fair amount of margin for variation in tube characteristics, so any known
brand of 6L6 can be installed, and will work properly and be appropriately self-biased.

TONE KING LIMITED LIFETIME WARRANTY
Thank you for choosing Tone King. Tone King manufactures some of the world’s most
reliable hand-wired, all-tube amplifiers and speaker cabinets. Tone King takes great
pride in an extremely thorough testing procedure which is implemented on each
product prior to shipment. In the unlikely event that you have a problem with you
amplifier, please refer to warranty below. Tone King stands behind our products like no
other and we’re here to help you!
AMPLIFIERS: Tone King offers a limited lifetime warranty to the original purchaser that
a Tone King amplifier will be free from defects in material and workmanship. A dated
sales receipt will establish coverage under this warranty, PLEASE KEEP YOUR PROOF
OF PURCHASE TO USE YOUR WARRANTY. This warranty does not cover service or
parts to repair damage caused by accident, neglect, abuse, normal & wear, disaster,
misuse, abuse, over-powering, negligence, inadequate packing or shipping procedures
and service, repair or any modifications to the product which have not been authorized
or approved by Tone King in writing. ANY MODIFICATION TO THE AMPLIFIER WILL
VOID YOUR WARRANTY. If this product is defective in materials or workmanship as
warranted above, your sole remedy shall be repair or replacement by Tone King as
provided below.
CAUTION: Do NOT attempt to repair, modify or service your amplifier by
yourself!!! Please read the instruction manual for all safety notifications,
warnings and instructions. Tone King, like all tube amplifiers, have extremely high
voltages that can cause serious injury or death. Do not remove the chassis from the
amplifier. All repair and service work must be performed by Tone King or an authorized
service center of Tone King. ANY UNAUTHORIZED REPAIRS WILL VOID YOUR
WARRANTY.
TUBES: Tone King warrants the original purchaser that the specific tubes used in Tone
King will be free from defects in material and workmanship for a period of 90 days from
the original date of purchase. A dated sales receipt will establish coverage under this
warranty. This tube warranty will automatically terminate 90 days after the original
retail sales date. This tube warranty is in lieu of all other expressed warranties. If tubes
fail within the 90 day warranty period your sole remedy shall be replacement of tubes
as provided below.
SPEAKERS: Tone King warrants the original purchaser that the speaker used in Tone
King will be free from defects in material and workmanship for a period of 90 days from
the original date of purchase. A dated sales receipt will establish coverage under this
warranty. This speaker warranty will automatically terminate 90 days after the original
retail sales date. This speaker warranty is in lieu of all other expressed warranties. If
speaker fails within the 90 day warranty period your sole remedy shall be replacement
of the speaker as provided below.
RETURN PROCEDURES: In the unlikely event that a defect occurs please call us at
323-277-4100. In most cases we can help you diagnose the problem over the phone. If
a product must be sent to us, please follow the procedure outlined below.
•Defective products must be shipped, together with proof of purchase, freight pre-
paid and insured to the Authorized Tone King Service Center or directly to Tone
King.

•If a product must be returned to Tone King for warranty replacement/repair, a
Return Authorization Number must be obtained from our Customer Service
Department prior to shipping the product.
•Please contact Tone King Customer Service Department for the Authorized Tone
King Service Center nearest you.
•Products must be shipped in their original packaging or its equivalent; in any
case, the risk of loss or damage in transit is to be borne by the purchaser.
•The Return Authorization Number must appear in large print directly below the
shipping address.
•Always include a brief description of the defect, along with your correct return
address and telephone number.
•When calling to inquire about a returned product, always refer to the Return
Authorization Number.
If Tone King determines that the unit was defective in materials or workmanship at any
time during the warranty period, Tone King has the option of repairing or replacing the
product at no additional charge, except as set forth below.
•All replaced parts become a property of Tone King. Products replaced or repaired
under this warranty will be returned via ground shipping within the United
States or Canada - freight prepaid.
•Tone King is not responsible for costs associated with expedited shipping, either
to Tone King or the return of the product to the customer.
All warranty repairs outside the United States and Canada must be directed to the
dealer or distributor from which you purchased the product.
INCIDENTAL OR CONSEQUENTIAL DAMAGE: In no event will Tone King be liable for
any incidental or consequential damages arising out of the use or inability to use of any
Tone King product, even if a Tone King dealer has been advised of the possibility of
such damages, or any other claim by any other party. Some states do not allow the
exclusion or limitation of consequential damages, so the above limitation and exclusion
may not apply to you. This warranty gives you specific legal rights and you may also
have other rights which may vary from state to state.
FOR YOUR PROTECTION: Please complete the warranty registration online at
www.toneking.com within (10) ten days of the date of purchase so that we may contact
you directly in the event a safety notification issued in accordance with the 1972
Consumer Product Safety Act.
CUSTOMER SUPPORT: Our dedicated and friendly staff is ready to help you with any
warranty or product questions you may have. Please call us at 323-277-4100 – Monday
– Friday 9AM-4PM (Pacific Standard Time)
Thank you again for choosing Tone King and we look forward to a long relationship!


CE Declaration
Other manuals for Tone King "Sky King"
2
Table of contents
Other Tone King Amplifier manuals

Tone King
Tone King Tone King "Sky King" User manual

Tone King
Tone King Falcon Grande User manual

Tone King
Tone King Imperial MK II User manual

Tone King
Tone King Metropolitan User manual

Tone King
Tone King Royalist MK III User manual

Tone King
Tone King FALCON User manual

Tone King
Tone King Falcon Grande User manual

Tone King
Tone King Ironman II Mini User manual

Tone King
Tone King Ironman II User manual


