TOOL WAREHOUSE MAG-8150X User manual

MIG/MAG WELDING
MACHINE
MAG-8150X

This document contains general information about the topics discussed herein.This document
is not an application manual and does not contain a complete statement of all factors
pertaining to those topics.
This installation,operation,and maintenance of arc welding equipment and the employment of
procedures described in this document should be conducted only by qualified persons in
accordance with applicable codes,safe practices,and manufacturer’s instructions.
Always be certain that work areas are clean and safe and that proper ventilation is
used.Misuse of equipment,and failure to observe applicable codes and safe practices,can
result in serious personal injury and property damage.
SECTION 1—SAFETY PRECAUTIONS-READ BEFORE USING
1-1. Symbol Usage
1-2. Arc Welding Hazards
1-3. Additional Symbols For Installation,Operation,And Maintenance
1-4. EMF Information
SECTION 2—PRINCIPLES OF METAL INERT/ACTIVE GAS SHIELDED ARC
WELDING ( MIG/MAG)
SECTION 3—INSTALLATIONAND CONNECTION INSTRUCTIONS
3-1. GENERAL DESCRIPTION
3-2. EXPLANATION OF THE TECHNICAL SPECIFICATIONS LISTED ON THE NAMEPLATE
3-3. INSTALLATION
3-4. OPERATING INSTRUCTIONS
3-5. MAINTENANCE
SECTION 4 —METAL INERT/ACTIVE GAS SHIELDED ARC WELDING
( MIG/MAG) PROCEDURE
4-1. Typical FLUX MIG and MIG/MAG Welding Machines
4-2. Typical MIG/MAG Welding Process Control Settings
4-3. HoldingAnd Positioning Welding Gun
4-4. Conditions That Affect Weld Bead Shape
4-5. Gun Movement During Welding
4-6. Poor Weld Bead Characteristics
4-7. Good Weld Bead Characteristics
4-8. Practice of welding
4-9. Common Metals
SECTION 5—WELDINGTROUBLESHOOTING
5-1. Excessive Spatter
5-2. Porosity

5-3. Incomplete Fusion
5-4. Excessive Penetration
5-5. Lack Of Penetration
5-6. Burn-Through
5-7. Waviness Of Bead
5-8. Distortion
5-9. Common Shielding Gas
SECTION 1 - SAFETY PRECAUTIONS - READ BEFORE USING
1-1. Symbol Usage
Means Warning! There are possible hazards with this procedure! The possible
hazards are shown in the adjoining symbols.
▲Marks a special safety message.
Means "Note"; not safety related.
This group of symbols means Warning! Possible ELECTRIC SHOCK, MOVING
PARTS, and HOT PARTS hazards. Consult symbols and related instructions below for
necessary actions to avoid the hazards.
1-2. Arc Welding Hazards
▲The symbols shown below are used throughout this manual to call attention to and identify
possible hazards. When you see the symbol, watch out, and follow the related instructions to avoid
the hazard. The safety information given below is only a summary of the more complete safety
information found in the Safety Standards listed in Section 1-5. Read and follow all Safety
Standards.
▲Only qualified persons should install, operate, maintain, and repair this unit.
▲During operation, keep everybody, especially children, away.
ELECTRIC SHOCK can kill.
Touching live electrical parts can cause fatal shocks or severe burns. The electrode and work circuit
is electrically live whenever the output is on. The input power circuit and machine internal circuits
are also live when power is on. In semiautomatic or automatic wire welding, the wire, wire reel, drive

roll housing, and all metal parts touching the welding wire are electrically live. Incorrectly installed
or improperly grounded equipment is a hazard.
●Do not touch live electrical parts.
●Wear dry, hole-free insulating gloves and body protection.
●Insulate yourself from work and ground using dry insulating mats or covers big enough to prevent any
physical contact with the work or ground.
●Do not use AC output in damp areas, if movement is confined, or if there is a danger of falling.
●Use AC output ONLY if required for the welding process.
●If AC output is required, use remote output control if present on unit.
●Disconnect input power or stop engine before installing or servicing this equipment. Lockout/tagout
input power according to OSHA 29 CFR 1910.147 (see Safety Standards).
●Properly install and ground this equipment according to its Owner's Manual and national, state, and local
codes.
●Always verify the supply ground-check and be sure that input power cord ground wire is properly
connected to ground terminal in disconnect box or that cord plug is connected to a properly grounded
receptacle outlet. When making input connections, attach proper grounding conductor first-
double-check connections.
●Frequently inspect input power cord for damage or bare wiring-replace cord immediately if damaged -
bare wiring can kill.
●Turn off all equipment when not in use.
●Do not use worn, damaged, undersized, or poorly spliced cables.
●Do not drape cables over your body.
●If earth grounding of the workpiece is required, ground it directly with a separate cable.
●Do not touch electrode if you are in contact with the work, ground, or another electrode from a different
machine.
●Use only well-maintained equipment. Repair or replace damaged parts at once. Maintain unit according
to manual.
●Wear a safety harness if working above floor level.
●Keep all panels and covers securely in place.
●Clamp work cable with good metal-to-metal contact to workpiece or worktable as near the weld as
practical.
●Insulate work clamp when not connected to workpiece to prevent contact with any metal object.
●Do not connect more than one electrode or work cable to any single weld output terminal.
SIGNIFICANT DC VOLTAGE exists after removal of input power on inverters.
●Turn Off inverter, disconnect input power, and discharge input capacitors according to instructions in
Maintenance Section before touching any parts.
FUMES AND GASES can be hazardous.
Welding produces fumes and gases. Breathing these fumes and gases can be hazardous to your
health.
●Keep your head out of the fumes. Do not breathe the fumes.
●If inside, ventilate the area and/or use exhaust at the arc to remove welding fumes and gases.
●If ventilation is poor, use an approved air-supplied respirator.
●Read the Material Safety Data Sheets (MSDSs) and the manufacturer's instructions for metals,

consumables, coatings, cleaners, and degreasers.
●Work in a confined space only if it is well ventilated, or while wearing an air-supplied respirator. Always
have a trained watchperson nearby. Welding fumes and gases can displace air and lower the oxygen level
causing injury or death. Be sure the breathing air is safe.
●Do not weld in locations near degreasing, cleaning, or spraying operations. The heat and rays of the arc
can react with vapors to form highly toxic and irritating gases.
●Do not weld on coated metals,such as galvanized, lead, or cadmium plated steel, unless the coating is
removed from the weld area, the area is well ventilated, and if necessary, while wearing an air-supplied
respirator. The coatings and any metals containing these elements can give off toxic fumes if welded.
ARC RAYS can burn eyes and skin.
Arc rays from the welding process produce intense visible and invisible (ultraviolet and infrared)
rays that can burn eyes and skin. Sparks fly off from the weld.
●Wear a welding helmet fitted with a proper shade of filter to protect your face and eyes when welding or
watching (see ANSI Z49.1 and Z87.1 listed in Safety Standards).
●Wear approved safety glasses with side shields under your helmet.
●Use protective screens or barriers to protect others from flash and glare; warn others not to watch the arc.
●Wear protective clothing made from durable, flame-resistant material (leather and wool) and foot
protection.
WELDING can cause fire or explosion.
Welding on closed containers, such as tanks, drums, or pipes, can cause them to blow up. Sparks can
fly off from the welding arc. The flying sparks, hot workpiece, and hot equipment can cause fires and
burns. Accidental contact of electrode to metal objects can cause sparks, explosion, overheating, or
fire. Check and be sure the area is safe before doing any welding.
●Protect yourself and others from flying sparks and hot metal.
●Do not weld where flying sparks can strike flammable material.
●Remove all flammables within 35 ft (10.7 m) of the welding arc. If this is not possible, tightly cover them
with approved covers.
●Be alert that welding sparks and hot materials from welding can easily go through small cracks and
openings to adjacent areas.
●Watch for fire, and keep a fire extinguisher nearby.
●Be aware that welding on a ceiling, floor,bulkhead,or partition can cause fire on the hidden side.
●Do not weld on closed containers such as tanks, drums,or pipes,unless they are properly prepared
according to AWS F4.1 (see Safety Standards).
●Connect work cable to the work as close to the welding area as practical to prevent welding current from
traveling long, possibly unknown paths and causing electric shock and fire hazards. Do not use welder to
thaw frozen pipes.
●Remove stick electrode from holder or cut off welding wire at contact tip when not in use.
●Wear oil-free protective garments such as leather gloves, heavy shirt, cuffless trousers, high shoes, and a
cap.

●Remove any combustibles, such as a butane lighter or matches, from your person before doing any
welding.
FLYING METAL can injure eyes.
●Welding, chipping, wire brushing, and grinding cause sparks and flying metal. As welds cool, they can
throw off slag.
●Wear approved safety glasses with side shields even under your welding helmet.
BUILDUP OF GAS can injure or kill.
●Shut off shielding gas supply when not in use.
●Always ventilate confined spaces or use approved air-supplied respirator.
HOT PARTS can cause severe burns.
●Do not touch hot parts bare handed.
●Allow cooling period before working on gun or torch.
MAGNETIC FIELDS can affect pacemakers.
●Pacemaker wearers keep away.
●Wearers should consult their doctor before going near arc welding, gouging, or spot welding operations.
NOISE can damage hearing.
●Noise from some processes or equipment can damage hearing.
●Wear approved ear protection if noise level is high.
CYLINDERS can explode if damaged.
Shielding gas cylinders contain gas under high pressure.If damaged,a cylinder can explode.Since
gas cylinders are normally part of the welding process, be sure to treat them carefully.
●Protect compressed gas cylinders from excessive heat, mechancal shocks, slag, open flames, sparks, and
arcs.
●Install cylinders in an upright position by securing to a stationary support or cylinder rack to prevent
falling or tipping.
●Keep cylinders away from any welding or other electrical circuits.

●Never drape a welding torch over a gas cylinder.
●Never allow a welding electrode to touch any cylinder.
●Never weld on a pressurized cylinder-explosion will result.
●Use only correct shielding gas cylinders, regulators, hoses,and fittings designed for the specific
application; maintain them and associated parts in good condition.
●Turn face away from valve outlet when opening cylinder valve.
●Keep protective cap in place over valve except when cylinder is in use or connected for use.
●Read and follow instructions on compressed gas cylinders, associated equipment, and CGA publication
P-1 listed in Safety Standards.
1-3. Additional Symbols For Installation, Operation, And Maintenance
FIRE OR EXPLOSION hazard.
●Do not install or place unit on, over, or near combustible surfaces.
●Do not install unit near flammables.
●Do not overload building wiring - be sure power supply system is properly sized, rated, and protected to
handle this unit.
FALLING UNIT can cause injury.
●Use lifting eye to lift unit only, NOT running gear, gas cylinders, or any other accessories.
●Use equipment of adequate capacity to lift and support unit.
●If using lift forks to move unit, be sure forks are long enough to extend beyond opposite side of unit.
OVERUSE can cause OVERHEATING.
●Allow cooling period; follow rated duty cycle.
●Reduce current or reduce duty cycle before starting to weld again.
●Do not block or filter airflow to unit.

STATIC (ESD) can damage PC boards.
●Put on grounded wrist strap BEFORE handling boards or parts.
●Use proper static-proof bags and boxes to store, move, or ship PC boards.
MOVING PARTS can cause injury.
●Keep away from moving parts.
●Keep away from pinch points such as drive rolls.
WELDING WIRE can cause injury.
●Do not press gun trigger until instructed to do so.
●Do not point gun toward any part of the body, other people, or any metal when threading welding wire.
MOVING PARTS can cause injury.
●Keep away from moving parts such as fans.
●Keep all doors, panels, covers, and guards closed and securely in place.
H.F. RADIATION can cause interference.
●High-frequency(H.F.) can interfere with radio navigation,safety services,computers,and
communicationsequipment.
●Have only qualified persons familiar with electronic equipment perform this installation.
●The user is responsible for having a qualified electrician promply correct any interference problem
resulting from the installation.
●If notified by the FCC about interference, stop using the equipment at once.
●Have the installation regularly checked and maintained.
●Keep high-frequency source doors and panels tightly shut,keep spark gaps at correct setting, and use
grounding and shielding to minimize the possibility of interference.
ARC WELDING can cause interference.
●Electromagnetic energy can interfere with sensitive electronic equipment such as computers and
computer-driven equipment such as robots.

●Be sure all equipment in the welding area is electromagneticallycompatible.
●To reduce possible interference, keep weld cables as short as possible, close together, and down low, such
as on the floor.
●Locate welding operation 100 meters from any sensitive electronic equipment.
●Be sure this welding machine is installed and grounded according to this manual.
●If interference still occurs, the user must take extra measures such as moving the welding machine, using
shielded cables, using line filters, or shielding the work area.
1-4. EMF Information
Considerations About Welding And The Effects Of Low Frequency Electric And Magnetic Fields Welding
current, as it flows through welding cables, will cause electromagnetic fields. There has been and still is
some concern about such fields. However, after examining more than 500 studies spanning 17 years of
research, a special blue ribbon committee of the National Research Council concluded that: "The body of
evidence, in the committee's judgment, has not demonstrated that exposure to power-frequency electric and
magnetic fields is a human-health hazard." However, studies are still going forth and evidence continues to
be examined. Until the final conclusions of the research are reached, you may wish to minimize your
exposure to electromagnetic fields when welding or cutting.
To reduce magnetic fields in the workplace, use the following procedures:
1. Keep cables close together by twisting or taping them.
2. Arrange cables to one side and away from the operator.
3. Do not coil or drape cables around your body.
4. Keep welding power source and cables as far away from operator as practical.
5. Connect work clamp to workpiece as close to the weld as possible.
About Pacemakers:
Pacemaker wearers consult your doctor first. If cleared by your doctor, then following the above
procedures is recommended.

SECTION 2 –PRINCIPLES OF MIG/MAG OR NO GAS
FLUX CORED WIRES ARC WELDING
Metal Inert/Active Gas-shielded arc welding ( MIG/MAG ) or Gas Metal Arc Welding ( GMAW ) methods
are some processes which melt and join metals by heating them with an arc between a small diameter metal
wire electrode and the workpiece.
With the MIG welding the small diamete metal wire electrodes may be low alloy steel welding
wires,stainless steel welding wires,flux cored welding wires,etc. Gases or inert gases are commonly
argon,helium and a mixture of argon and helium.
With the MAG welding the small diamete metal wire electrodes may be low alloy steel welding wires,flux
cored welding wires,etc. The most common active gases are a mixture of argon and C02, rather than just
C02.
It is necessary to use shielded gas for some flux cored welding wires. But,it is not necessary to
use outer shielded gas for some flux cored welding wires, these flux cored wires are commonly
referred to as ‘self-protecting’flux cored welding wires. The welding method using flux cored welding
wires,but the outer shielded gas is not used,is too referred to as ‘No Gas’flux cored wire arc welding by
some people.
With the help of the MIG/MAG, GMAW or ‘No Gas’flux cored wire arc welding, you can weld thin or
thick steel plates,pipes and other materials in any position.
For MIG/MAG, GMAW or ‘No Gas’flux cored wire arc welding, ‘semi-automatic’ welding operation
method, meaning the arc is ‘self-adjusting’, is commonly used.Any variation in the arc length produces
a change in the ‘burn-off’ rate allowing rapid re-establishment of the original arc length. Even in
the hands of an inexperienced welder it would be possible to produce acceptable looking
welds in a very short period of time.
In this semi-automatic welding process, the arc is burning between a thin metal wire electrode and the
workpiece. The arc and weld zone are enveloped in a protective gas shield. The wire is fed
automatically from a spool, through a welding torch, which is usually connected to the positive terminal
and is moved by hand. But the ‘semi-automatic’ principle of operation doesn’t mean these processes is
semi-skilled; it refers to the control of welding parameters that would have to be controlled by the
operator.that is,the welding voltage will be changed by adjusting the position of voltage selection
switch;The welding current will be changed by adjusting the wire feed speed. The faster the speed the
higher the amperage draw;The welding speed is controlled by the operator.
Because these welding methods are easy to use and good quality weld bead can be obtained,
they have all but replaced Manual Metal Arc ( MMA ) welding. Why can these welding methods replace
MMA welding? Because the output characteristics of the MIG/MAG welding power source is
completely different from that of the MMA welding power source.
For MMA/TIG welding,the welding power source characteristic curve is a typical ‘drooping’

characteristic, or constant-current output characteristic. With the drooping
_____________________________________________________________________
characteristic , a small change in arc voltage will produce a much smaller change in arc current, depending
upon the open circuit voltage (OCV) of the welding machine. This means the wire ‘burn-off’ rate is much
slower for MMA welding, or put another way, for any given change in arc length the welding current
change is small. This allows manual welding to take place, as even in the hands of a skilled welder, arc
length will vary as welding is progressed, but under these circumstances the current changes will only be
small.
For MIG/MAG, GMAW and ‘No Gas’flux cored wire arc welding, the welding power source
characteristic curve is a typical ‘flat’ characteristic, or constant-voltage output characteristic. With the
‘flat’ characteristic , a large change in current will produce a small change in voltage. This means
the wire ‘burn-off’ rate is much quicker, or put another way, for any given change in arc length the
welding voltage change is small. Therefore, in all semi-automatic welding the arc-length and the wire
‘burn-off’ rate are controlled by the welding machine. The welding current increases as the
arc-length decreases so as to rapidly compensate for the increase in wire ‘burn-off’ rate. This
response rate needs to be extremely rapid. Of course the welder needs to try and maintain a consistent
wire ‘stick-out’ length. The wire ‘stick-out’ length may best be described as the distance from the contact
tip of welding gun to the workpiece.
If the same person were asked to make a weld using MMA, in the same training period, it would be most
unlikely they would succeed. This is because the only variable parameter is output current of the MMA
welding power source. Get that wrong and the results will be poor. Whereas MIG/MAG
welding or ‘No Gas’flux cored wire arc welding, being semi-automatic, controls voltage and wire feed
speed automatically, thereby, it is easy to mastery in a shorter period of time. This means training courses
don’t need to be lengthy affairs.
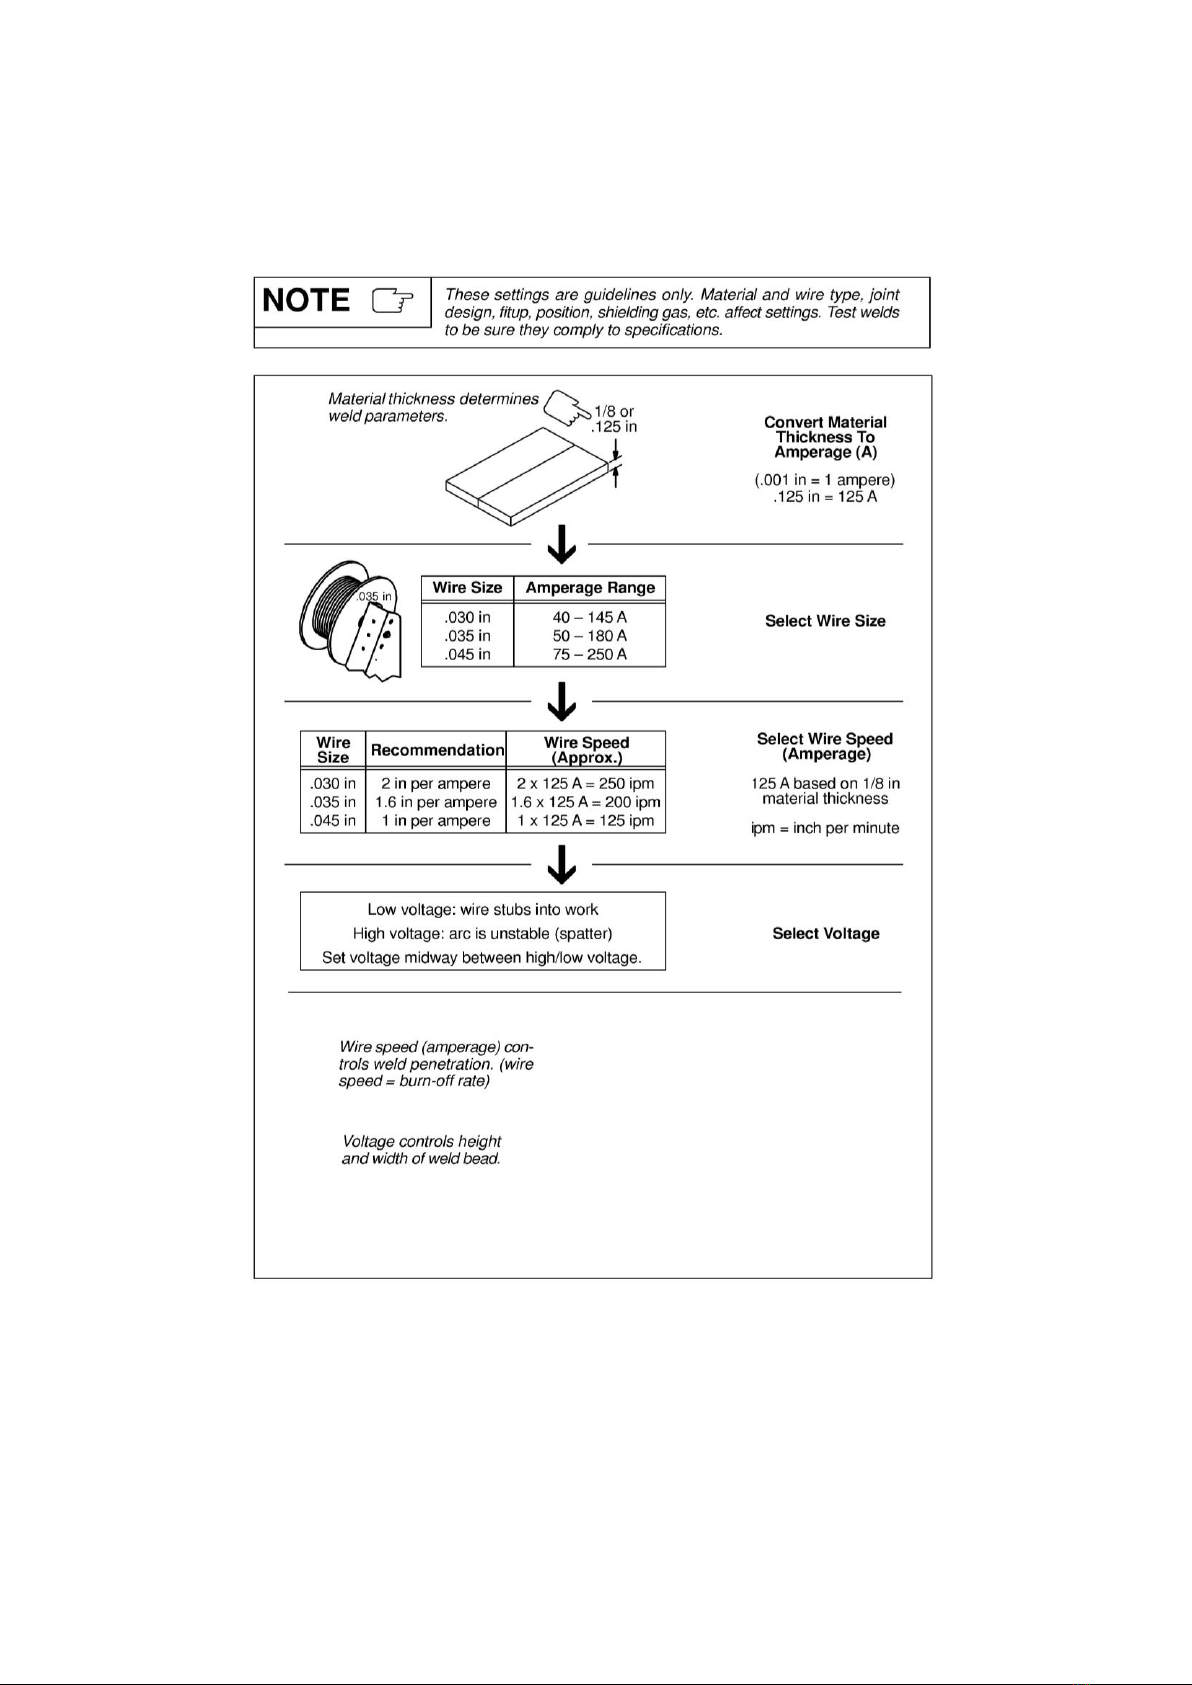
In the MIG/MAG, GMAW and ‘No Gas’flux cored wire arc welding processes, methods of molten
globules transfer are mainly “dip” or “globular” transfer.The “dip” transfer, also known as
short-circuiting transfer, is carried out using currents below 200 amps and voltages below 24 volts. Under
these conditions the arc is so short that the molten globules at the electrode tip ‘short-circuit’ to the
workpiece at rapid, regular intervals. The welding current during short-circuiting melts off the electrode
tip and allows re-establishment of the arc. This is ideal for welding on thin materials and out of position
working and/or root runs for butt welds.The “globular” transfer, that is a kind of transfer without
short-circuiting, is carried out using currents over 200 amps and voltages over 24 volts. Under these
conditions the arc is so long that the molten globules at the electrode tip ‘not short-circuit’ to the workpiece.
This is ideal for welding on thick materials.So,in setting up the machine, you must a suited welding voltage,
which needs to be in keeping with the wire feed speed or the welding current . If the wire feed speed and
welding voltage to be set are not suited, incorrect arc condition may be produced.
In the MIG/MAG arc welding processes,Gas flow rates will depend on the worksite conditions and the
workpiece to be welded. If you use a mixture of argon and C02,
_____________________________________________________________________

you should set a flow rate of between 12-18 ltrs/min. If Gas flow rates are too high or low,the porosity of
weld bead will occur.
The contact tip is another important consideration. This does get damaged easily and is essential to good
electrical contact, as it transfers current to the wire. Therefore, a worn tip will present all sorts of electrical
contact problems.
The feed roll pressure is another important factor.often overlooked as not being particularly, as is the drum
break. If pressure is too high it will deform the wire and cause poor current pick-up, too little pressure and
the wire will misfeed.
How is the wire feed speed and voltage selected ?
What are the settings on the front panel of the welding machine controlling?
Do you always get high levels of spatter when welding?
What gas flow rate should be selected?
What is the importance of the contact tip and weld quality?
How do you need to set the feed roller pressure?
These are just a few basic questions. If you cannot answer these or are not familiar with the terms, some
weld defects or poor weld bead will be inevitable.
If you would like to improve your welding skills, productivity and quality of weld bead.,Please get practice
and learn to knowledge on the welding, or visit some website to learn to knowledge on the welding.

SECTION 3- INSTALLATION AND CONNECTION
INSTRUCTIONS
3-1. GENERAL DESCRIPTION
MAG-8100/8120/8130/8150X welding machines are designed for those who have an occasional need
for a welder,and suitable for light fabrication and repair welding . These welding machines are developed
specifically for the nonprofessional welder.The welding machine is compact to allow portability and easy
storage on a shelf or under a workbench.
These welding machines are designed in accordance with the EN60974-1 safety standards, with
single-phase input voltage and DC output current. The machine is mainly used in the welding of metallic
materials such as low-carbon steel, low-alloy steel, stainless steel, etc. The welding machine features low
cost, high production efficiency, high anti-rust performance, welding slag free and so on. The machine can
be widely applied and welding operations can be done at any position.
MIG/MAG-8100/8120/8130/8150X welding machines are three types of metal arc welding machines. The
technical specifications or parameters of the product are showed on its nameplate.
CAUTION: For different type welding machine,the technical specifications or parameters is different.
3-2. EXPLANATION OF THE TECHNICAL SPECIFICATIONS LISTED ON THE
NAMEPLATE
Single-phase transformer,Rectifier,DC output.
Application standards: EN60974-1:2005 or IEC 60974-1:2005.
U1:Rated AC input voltage of the welding power source (tolerance: ±10% )
I1max:Max. input current
I1eff:Max. effective input current
X: duty cycle
It is the ratio between the load duration time and the full cycle time.
Note1: This ratio is between 0~100%.
Note2: For this standard, one full cycle time is 10min.For example, if the rate is 10%, the loaded time shall be 1
minutes and rest time shall be 9 minutes.
Duty cycle is based on a ten minute period.This means that the arc may be drawn for two minutes out of
each ten minute period without any danger of overheating .If it is used more than two minutes during
several successive ten minutes peiods, it may overheat.
U0:Non-load voltage
It is the open-circuit output voltage of the welding power source.
I2:output current
U2:Output load voltage
The rated loaded output voltage U2=14+0.05I2
Vmax: max. wire feeding speed
D: wire diameter
A / V—A / V:The adjustable range of current and its corresponding load voltage.
IP:Protection grade . For example, IP21,approving the welding machine as suitable for use indoors; IP23,.
approving the welding machine as suitable for use outdoors in the rain.
Suitable for hazardous environments.
S

Please read the User’s Manual carefully before use.
Symbol of single-phase AC power supply and rated frequency (e.g.50HZor 60 HZ).
:Beyond rain.
H:Class of Insulation.
Environmental conditions:
3-3. INSTALLATION
WARNING: Only qualified personnel should install,use,or service the welding machines.
Machine Installation Location - Place the welding machine to there where is free circulation of air.
●The machine should be installed, operated and maintained by the professionals or people with
the relevant experience.
●The welding operation should be done by the people who are familiar with the related safety
operation technology.
●The machine should not be used for the purpose other than welding.
●The input voltage should be in conformity with the rated voltage described on the nameplate.
●The welding machine should be placed on the plane surface. If placed on tilted surface,
measures should be taken to prevent it from falling.

Welding Machine Assembly
For MIG/MAG-8100/8120/8130/8150X welding machines , the input power cable should be
connected to power supply.For the No gas flux cored welding wire, The shielded gas is needless. The
shielded gas is necessary when the solid or some flux welding wire is used. The shielded gas may be CO2
or 80%Ar+20% CO2or Ar etc.
1-MIG/MAG gun 2-Earth clamp to workpiece 3-Welding voltage selection
switch
4-Wire speed or Welding current adjustment 5-Power and Over-heat indicator 6-welding
cable Figure 1 Typical MAG-8100/8120/8130/8150X Welding Machines
Figure 3-2 Thefrontpanel of the MAG-8150X Welding Machines
Input Power and Grounding Connections
Only qualified persons should install,use or service these equipments. Protect yourself and others
Knob of the welding
current
Knob of the welding
voltage
Power and Over-heat
indicator
Welding Gun

from possible serious injury or death.
WARNING: Do not operate with covers removed. Disconnect input power before servicing.
Do not touch electically live parts.
●Before starting the installation,check with the power company to be sure your power supply is
adequate for the voltage,amperes,phase,and frequency specified on the welding machine nameplate,Also
be sure the planned installation will meet all local and national code requirements.Some welding
machines may be operated from a single phase line or from one phase of a two or three phase line.
●Before connecting the input cable to the power supply,check that the power(on-off) switch operates in
the position corresponding to the input voltage that the machine will be connected to.
CAUTION :If the power switch setting does not match the input power voltage,you may burn up
the welding machine!
●If it is necessary, connect the “PE” or green/yellow grounding wire in the input cord to a system
ground per the applicable national and local codes.
Connect The Machine To Power Supply
●The connectiontothemainlinesis made by the end user. It has to be performed by qualified electricians or
by the people trained in thisarea.
●Power supply cable to the machine must be connected to the main power supply switch.Themain power
supply has been labeled inthe nameplate of the machine,for example,1~,50 or 60Hz,220 or 230VAC etc.
●If the user want to increase the length of power supply cable the3x2.5 or 4mm²lines should be used.
●Before turning on the main power supply switch user must check carefully these connections of the power
supply cable and earth cable (Yellow/Green) to the machine.
Be sure that connections are fastened tightly. Loose or incorrect fastening may cause
the connection to overheat or burn. Unexpected results may occur if a mistake is
made
in the network connection. Pay attention that the connection of the “PE” or
green/yellow grounding wire of the input cord to a system ground.
Connect The Gas Cylinder
●Afterplacingthegascylinder,fasten it with the chain. To operate safely and get best resultsuseapprovedgas
regulator.
●Connect the pressure regulator to the shielding gascylinder.
●Connect the gas tube to the gas supply system outlet.
●Screw the gas hose pressure regulator andopen the shieldinggascylinder.
●Open the torch gas valve,and Setting of the gas flow with the adjustment valve. Usually,the gas flow is
about 6~12L/min.
Gas hose
The gascylinder
Open the gas cylinder
valve
Setting of gas flow
with the adjustment
valve
Show gas flow
rate
Gas hose

Figure 3-3 Connection of gas hose and thegascylinder Figure 3-4 Open the gas valve and Setting of gas
flow
3-4. OPERATING INSTRUCTIONS
●The welding machine should be put in the place with good ventilation. The ambient environment
should not have dust, humidity and vapor.
●The machine should be kept away from the sunlight and rain. It should not be used in the rain.
CAUTION :Duty cycle is based on a ten minute period.This means that the arc may be drawn for two
minutes out of each ten minute period without any danger of overheating .If it is used more than two
minutes during several successive ten minutes peiods, it may overheat.
Control Functions
The desired welding curent is set by turning the wire speed knob (In Figure 1, 4-Wire speed or Welding
current adjustment).Clockwise rotation raises the wire feed speed or the welding current, counterclockwise
rotation reduces the wire feed speed or the welding current.
The desired welding voltage is set by turning the voltage selection switch (In Figure 1, 3-Welding
voltage selection switch).Clockwise rotation raises the welding voltage, counterclockwise rotation reduces
the welding voltage.
Use and protection of the gas cylinder
●Before using the machine the operator should check the gas cylinder and other devices to see if
the gas pressure gauge works normally, if the gas valve control device has gas leaking and if all
the gas pressure devices are within the effective period and in conformity with the safety
requirements.
●The gas cylinder used for the machine should be tied firmly with the belt or the chain and should
be placed on the floor.
●The gas valve should be turned off after the welding work is finished. The gas cylinder should be
isolated from the heat source and no hazardous articles like the inflammable substances should
be placed near the gas cylinder.
●Using a hose connect the outlet of the gas cylinder to the gas inlet of the machine. Then turn on
the gas valve and adjust the gas flow to 6-12L/min.
Use and protection of the wire feeder
●Place the welding wire in the notch corresponding to the wire feeding wheel through the wire
feeding tube and insert it into the welding gun directly.Then press the pressing shaft of the wire
feeding wheel down on the welding wire. Finally turn on the switch of the welding gun and wait
until the welding wire extends out for 10-15mm. After the above operations are finished, the
welding operation can begin.
●The weight of the welding wire equipped with the feeding drive system is 0.5-5kg. Welding wire
more than 5Kg shall not be used. Otherwise, the wire feeder may be damaged or the feeding
speed may be excessively low.
●The diameter of the welding wire should be 0.6-0.8mm.

Caution: Please don’t use the gun mouth to face any part of the human body during wire
feeding!
Other precautions
●When the thermal protection device is working, it will shut off the output of the welding machine
and the yellow indicator lamp will be on.When the thermal protection device is automatically
reset, the yellow indicator lamp will be off.
●If the output welding cable is excessively long, it will result in the unstable welding process.
●The input voltage of the power should be kept stable.The larger fluctuation of the voltage will
affect the performance of the welding machine.
3-5. MAINTENANCE
WARNING: ELECTRIC SHOCK can kill.
Do not touch electrically live parts such as output terminals or internal wiring.
MOVING PARTS can injure.
Routine preventative maintenance is not required.
If either output welding cable requires replacement for other reasons, it should be replaced with the
appropriate part -and only by qualified personnel .
●Any incorrect or improper operation may cause failure and damage of the machine.
●Before maintenance and repair of the machine, the main power must be shut off.
●In case of the failure occurs or some consumptive parts need to be replaced, the related work of
repair or maintenance should be done by professionals.

SECTION 4 —METAL INERT/ACTIVE GAS SHIELDED ARC WELDING
( MIG/MAG) PROCEDURE
4-1. Typical Welding Process Control Settings
Figure 2 Typical GMAW Process Control Settings
Three simple manipulations are of prime importance. Without complete mastery of
these four, further welding is futile .With compete mastery of the four, welding will be
easy.
1)The Correct Welding Position
2)The CorrectArc Length
3)The Correct Welding Speed

▁▁▁▁▁▁▁▁▁▁▁▁▁▁▁▁▁▁▁▁▁▁▁▁▁▁▁▁▁▁▁▁▁▁▁▁▁▁▁▁▁▁
▁▁▁
4-2. HoldingAnd Positioning Welding Gun
Figure 3 HoldingAnd Positioning Welding Gun
Figure 3 illustrates the correct welding position for left -handed people (For right - handed it is
opposite):
a. Hold the gun in your left hand
b. Touch right hand to under side of left hand.
c. The welding gun trigger is controlled by the left hand .
Weld with two the hand whenever possible .
Whenever possible, weld from left to right (if right-hand).This enables you to see clearly what you are
doing.
Hold the gun at a slight angle as Figure 3 shown .
Table of contents
Other TOOL WAREHOUSE Welding System manuals