Top Chef HGM408 User manual

Welcome
Important Safeguards
Product Overview
How to Use
Multifunctional Food Processor
Model: HGM408
Getting Started Guide
220-240V~ 50/60Hz 820-1100W

English
Deutsch
Español
Français
Italiano
01~14
15~29
30~44
45~59
60~74
Contents

Welcome to the world of TopChef cooking.

Important Safeguards
Read this user manual carefully before you use the appliance and keep it for future reference.
Danger
- Never immerse the motor unit in water or any other liquid, nor rinse it under the tap.
Warning
- Check if the voltage indicated on the appliance corresponds to the local mains voltage before you connect the appliance.
- Never connect this appliance to a timer switch in order to avoid a hazardous situation.
- Do not use the appliance if the mains cord, the plug or other parts are damaged.
- If the mains cord is damaged, it must be replaced by the supplier, a service center authorized by Supplier in order to avoid a
hazard.
- This appliance is not intended for use by persons (including children) with reduced physical, sensory or mental capabilities, or
lack of experience and knowledge, unless they have been given supervision or instruction concerning the use of the appliance
by a responsible person for their safety.
- Children should be supervised to ensure that they do not play with the appliance.
- Never let the appliance run unattended.
- Never use your ngers or an object (e.g. a spatula) to push ingredients down the feeding tube while the appliance is running.
Only use the pusher for this purpose.
- Be very careful when you handle the discs, blenderblade unit or food processor blade unit. Be especially careful when you
remove them from the food proces-sor bowl or blender jar, when you empty the bowl or jar and when you clean them. Their
cutting edges are very sharp.
Caution
- Never switch o the appliance by turning the blender jar, the food processor bowl or the juicer bowl. Always switch o the
appliance by turning the speed control knob to OFF.
- Switch o the appliance before you detach any accessories.
- Unplug the appliance immediately after each use.
1

Product Overview
1. Main Body
5. Drive Shaft
9. Citrus Juicer Filter
13. Chopping Blade
17. Grinder Lid
21. Blender Jar Base
2. Power Switch
6. Bowl Lid
10.
Thick/Coarse Shredding Disc
14. Dough Hook
18. Measuring Cup
22. Whisk Body
3. Safety Switch
7. Double Pusher
11. Adjustable Slicing Disc
15. Spatula
19. Blender Jar Lid
23. Whisk stick
4. Bowl
8. Citrus Juicer
12. French Fryer Disc
16. Grinder
20. Blender Jar
- Always unplug the appliance before you reach into the blender jar with your ngers or an object (e.g. aspatula).
- Wait until moving parts stop running before you remove the lid of the bowl or jar.
- Never use any accessories or parts from other manufacturers or that Supplier does not specically recommend. If you use
such accessories or parts, your guarantee becomes invalid.
- Do not exceed the maximum content indicated onthe food processor bowl or the blender jar.-Do not use the juicer if the
sieve is damaged.
- Consult the tables in this user manual for the correct quantities and processing times.
- Thoroughly clean the parts that come into contact with food before you use the appliance for the rst time.
- Let hot ingredients cool down before you processthem (max. temperature 80°C/175°F)
2

HOW TO USE
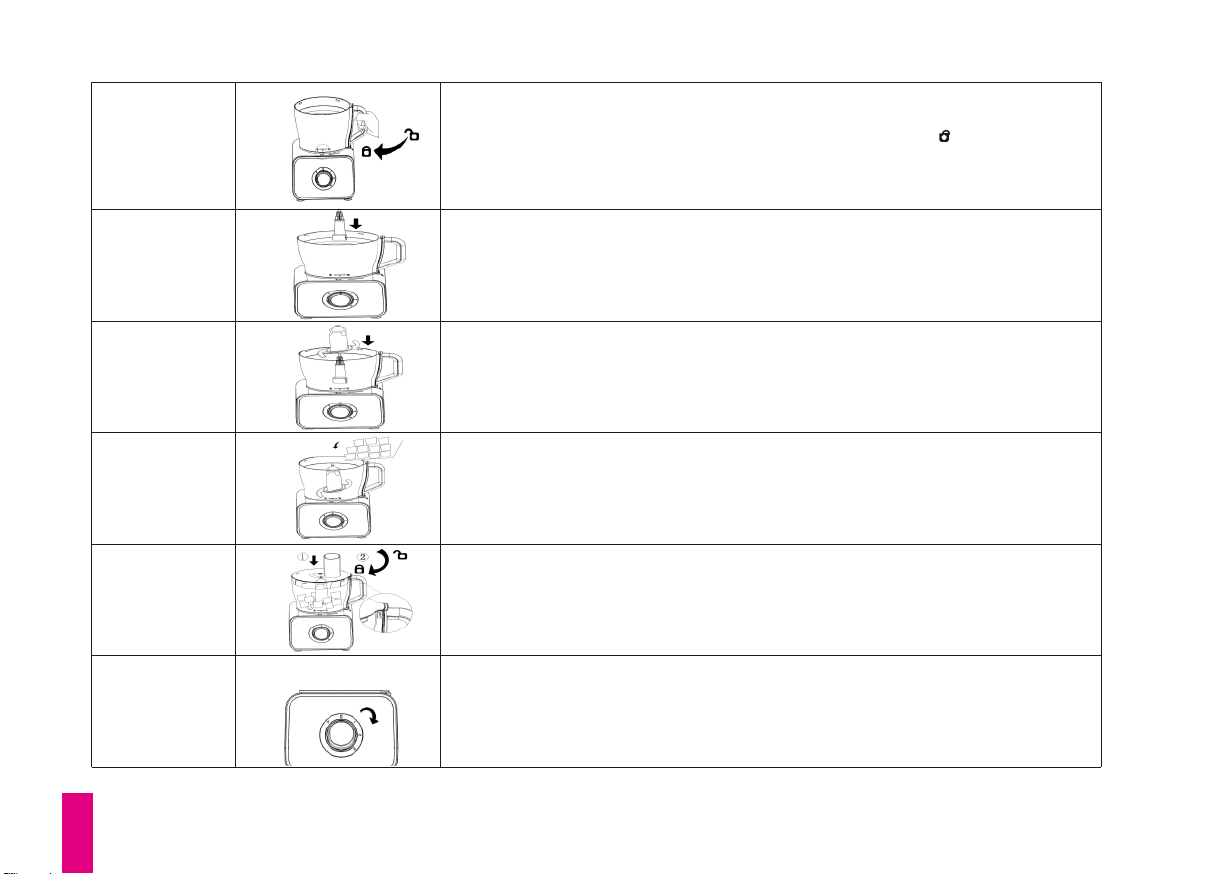
1
- Please wash thoroughly those components which may contact the food before using the product.
- This product has a dual safety system. It will work only after all parts are properly installed.
Place the Bowl on the Main Body, the angle between the handle and the
main body safety switch is about 55 degrees (before placing, make sure
that the Main Body is on a at desktop and it is not shaking)
3
Chopping Meat
2
3
4
5
6
7
Hold the handle of the Bowl and turn it clockwise into the Main Body.
When the "▼" on the Bowl is opposite to the Main Body “ ” or a "click" is
heard, it indicates that the Bowl has been rotated in the right position.The
product does not work if the Bowl is not in the right position.
Put the meat into the Bowl. Food that needs to be processed should not
exceed 500g
Insert the power cord into the power supply, and rotate the switch to 1 or 2
shift and start working. Each working time should be less than 30 seconds.
①Cover the Blow with the Bowl Lid.
②Rotate the Bowl Lid clockwise into the Bowl.
When the "click" is heard, it means that the Bowl Lid has been rotated in the right
position, The product does not work if the Bowl Lid is not in the right position.
Put the Drive Shaft into the Bowl.
Put the Chopping Blade on the Drive Shaft.
4

Kneading Dough
1)Make sure that the Chopping Blade is placed rst when putting the ingredients in the Bowl, so as to avoid the diculty
to assemble Chopping Blade.
2)The Bowl Lid should be in the right postion to avoid not working.
3)Do not process hard food materials, such as coee beans, ice cubes, etc. to avoid cracking Bowl and deformation blunt of
Chopping Blade;
4)Ingredient should not exceed the maximum calibration line of the Bowl, otherwise the crushing eect and life of the
product will be aected.
5)When there is ingredient sticking to the Chopping Blade and Bowl, please be sure to turn o the power, then take out
the food.
1
2
3
Place the Bowl on the Main Body, the angle between the handle and the
main body safety switch is about 55 degrees (before placing, make
sure that the Main Body is on a at desktop and it is not shaking)
Hold the handle of the Bowl and turn it clockwise into the Main Body.
When the "▼" on the Bowl is opposite to the Main Body “ ” or a "click" is
heard, it indicates that the Bowl has been rotated in the right position.The
product does not work if the Bowl is not in the right position
Put the Drive Shaft into the Bowl.
CAUTION
5
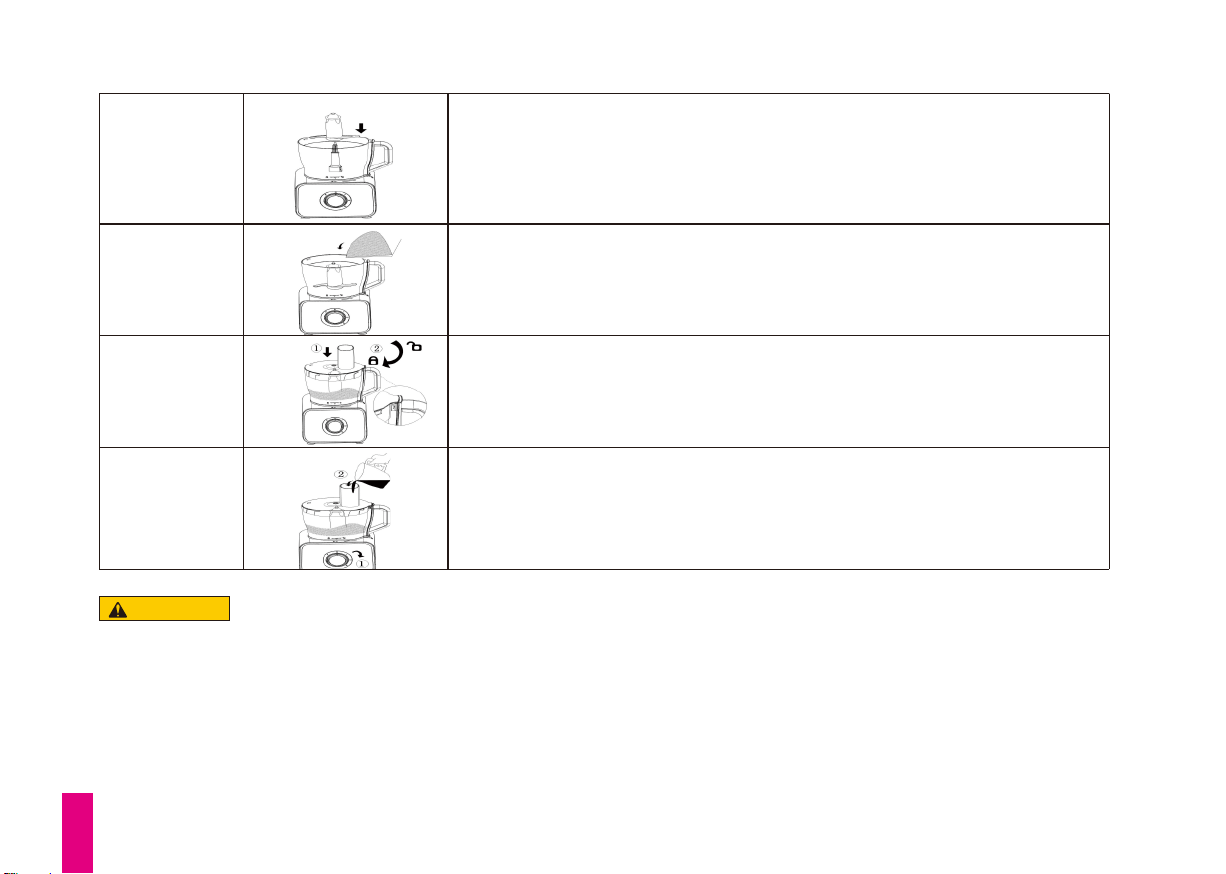
4
5
6
7
Put the Drive Shaft into the Bow
Put the our into the Bowl. The our should not exceed 500g
①Insert the power cord into the power supply, and rotate the switch to 1
shift and start working. Each working time should be less than 3 minutes.
②Pour slowly water into the Bowl through chute on the Bowl Lid when
the product start working. Don't pour the water too fast.
①Cover the Blow with the Bowl Lid.
②Rotate the Bowl Lid clockwise into the Bowl.
When the "click" is heard, it means that the Bowl Lid has been rotated in the right
position, The product does not work if the Bowl Lid is not in the right position
1)Make sure that the Dough Hook is placed rst when pouring the our inot the Bowl, so as to avoid the diculty to assemble the Dough
Hook.
2)Do not process hard food materials, such as coee beans, ice cubes, etc. to avoid cracking Bowl and deformation blunt of Dough Hook.
3)Ingredient should not exceed the maximum calibration line of the Bowl, otherwise the crushing eect and life of the product will be
aected.
4)When there is ingredient sticking to the Dough Hook and Bowl, please be sure to turn o the power, then take out the food.
CAUTION
6
Slicing & Shredding
1
2
3
4
Place the Bowl on the Main Body, the angle between the handle and the
main body safety switch is about 55 degrees (before placing, make
sure that the Main Body is on a at desktop and it is not shaking)
Hold the handle of the Bowl and turn it clockwise into the Main Body. When the
"▼" on the Bowl is opposite to the Main Body “ ” or a "click" is heard, it indicates
that the Bowl has been rotated in the
right position.The product does not work if the Bowl is not in the right position
Place the Adjustable Slicing Disc on the Drive Shaft. (Three types of Disc can be
selected according to the processing requirements)
Put the Drive Shaft into the Bowl
5)Please put in the appropriate proportion of our rst, then start the machine to ensure that the Dough Hook works rst, then evenly
and slowly pour into the appropriate proportion of water, do not pour water
too fast, so that water can not form paste with the our
7

1)Before processing, please make sure that the size of food materials can be fully put into the chute.
2)When you put the food into the chute, don't push hard by the Double Pusher to avoid aecting the processing eect and
stuck.
3)Do not put hand or other objects (such as knives, forks, spoons, chopsticks, etc.) into the chute, only use the Double
Pusher.
4)Ingredient should not exceed the maximum calibration line of the Bowl, otherwise the crushing eect and life of the
product will be
aected.When the food stuck on the Disc, please turn o the power rst, and then take out the food.
CAUTION
1
2
3
①Cover the Blow with the Bowl Lid.
②Rotate the Bowl Lid clockwise into the Bowl. When the "click" is heard, it
means that the Bowl Lid has been rotated in the right position, The
product does not work if the Bowl Lid is not in the right position
Insert the power cord into the power supply, and rotate the switch to 1 or 2
shift and start working. Each working time should be less than 30 seconds
①Put slowly food material to the Bowl through the chute on the Bowl Lid.
②Gently use the Double Pusher to push the ingredients through the chute
8

Whisk
1
2
3
4
5
6
Place the Bowl on the Main Body, the angle between the handle and the
main body safety switch is about 55 degrees (before placing, make
sure that the Main Body is on a at desktop and it is not shaking)
Hold the handle of the Bowl and turn it clockwise into the Main Body.
When the "▼" on the Bowl is opposite to the Main Body “ ” or a "click" is
heard, it indicates that the Bowl has been rotated in the right position.The
product does not work if the Bowl is not in the right position.
Whisk the egg into the Bowl. If you make a cake, please take out the yolk.
Eggs should not be less than 2
①Cover the Blow with the Bowl Lid.
②Rotate the Bowl Lid clockwise into the Bowl.
When the "click" is heard, it means that the Bowl Lid has been rotated in the right
position, The product does not work if the Bowl Lid is not in the right position.
Put the Whisk Body on the Drive Shaft
Put the Drive Shaft into the Bowl
9

Citrus Press
7Insert the power cord into the power supply, and rotate the switch to 1 or
2 shift and start working. Each working time should be less than 30
seconds.
1)When processing egg white, please make sure that the inside of the Bowl is dry and there is no water or oil inside of the
Bowl.
2)Do not use Whisk Body to knead dough.
3)Ingredient should not exceed the maximum calibration line of the Bowl, otherwise the crushing eect and life of the
product will be aected.
4)Clean up the Whisk Stick after each use.
CAUTION
1
2
Place the Bowl on the Main Body, the angle between the handle and the
main body safety switch is about 55 degrees (before placing, make sure
that the Main Body is on a at desktop and it is not shaking).
Hold the handle of the Bowl and turn it clockwise into the Main Body. When
the "▼" on the Bowl is opposite to the Main Body “ ” or a "click" is heard, it
indicates that the Bowl has been rotated in the right position.The product
does not work if the Bowl is not in the right position.
10

3
4
5
6
7
Put the Drive Shaft into the Bowl.
1、Choose low speed when working.
2、Do not use hand directly to press the Citrus Juicer.
3、The Citrus Juicer Filter should be completely stuck in the Bowl, and the Citrus Juicer should be put in place before the
power is turned on.
CAUTION
Put the Citrus Juicer on the Citrus
Juicer Filter.
①Put the Citrus Juicer Filter on the Drive Shaft.
②Rotate the Citrus Juicer Filter clockwise into the Bowl. When the "click" is heard,
it means that the Citrus Juicer Filter has been rotated in the right position, The
product does not work if the it is not in the right position.
Insert the power cord into the power supply, and rotate the switch to 1
shift and start working. Each working time should be less than 1 minute.
①Cut one orange in half before.
②Hold the orange peel, push it to the Citrus Juicer when the product
working.
11
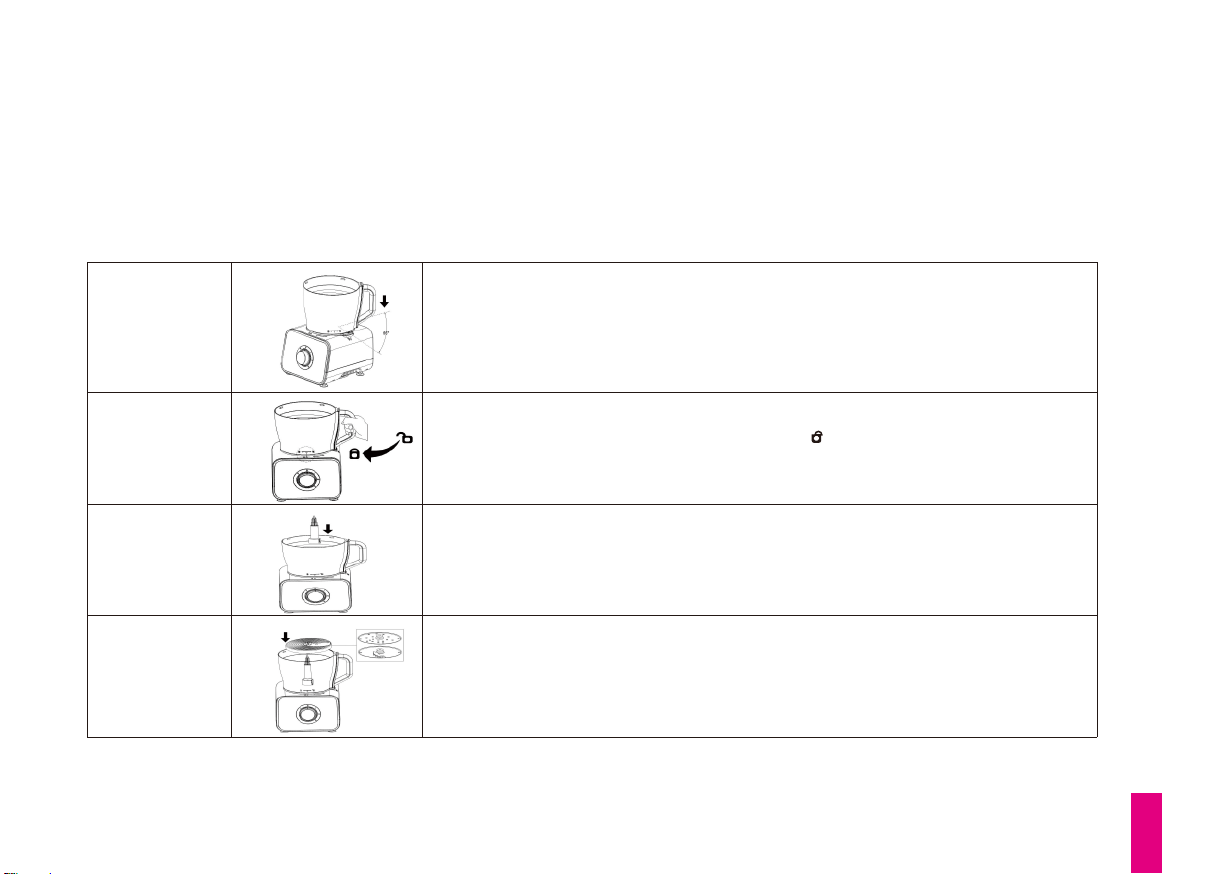
1
2
3
4
5
Blender
①Put the Blender Jar Lid on the Blender Jar.
②Rotate the Blender Jar Lid clockwise into the Blender Jar.
Pour the food materials and some water into the Blender Jar.
Place the Measuring Cup in the Blender Jar Lid.
①Check whether the sealing ring is installed in the Blender Jar Base.
②Rotate the Blender Jar Base clockwise into the Blender Jar. It needs to be
tightened. Untightened will lead to leakage.
①Place the Blender Jar on the Main Body, the angle between the handle and
the main body safety switch is about 55 degrees (before placing, make sure
that the Main Body is on a at desktop and it is not shaking).
②Rotate the Blender Jar clockwise into the Main Body. When the "click" is
heard, it means that the Blender Jar has been rotated in the right position, The
product does not work if the it is not in the right position.
12

1
2
6
1)Do not put food above 80℃into the Blender Jar.
2)Ingredient should not exceed the maximum calibration line of the Bowl, otherwise the crushing eect and life of the product will
be aected.
3)When the product is in operation, food materials can be put into the Blender Jar through the chute on the Blender Jar Lid.
4)Solid food is better cut into small pieces before processing.
5)When the product is working, don't put your nger in the Blender Jar.
6)It is forbidden to start operation without covering the Blender Jar Lid.
7)If you do not achieve the desired eect within 1 minute, please turn o the product and wait for 2 minutes before re-processing.
This method is benecial to prolong the life of products.
CAUTION
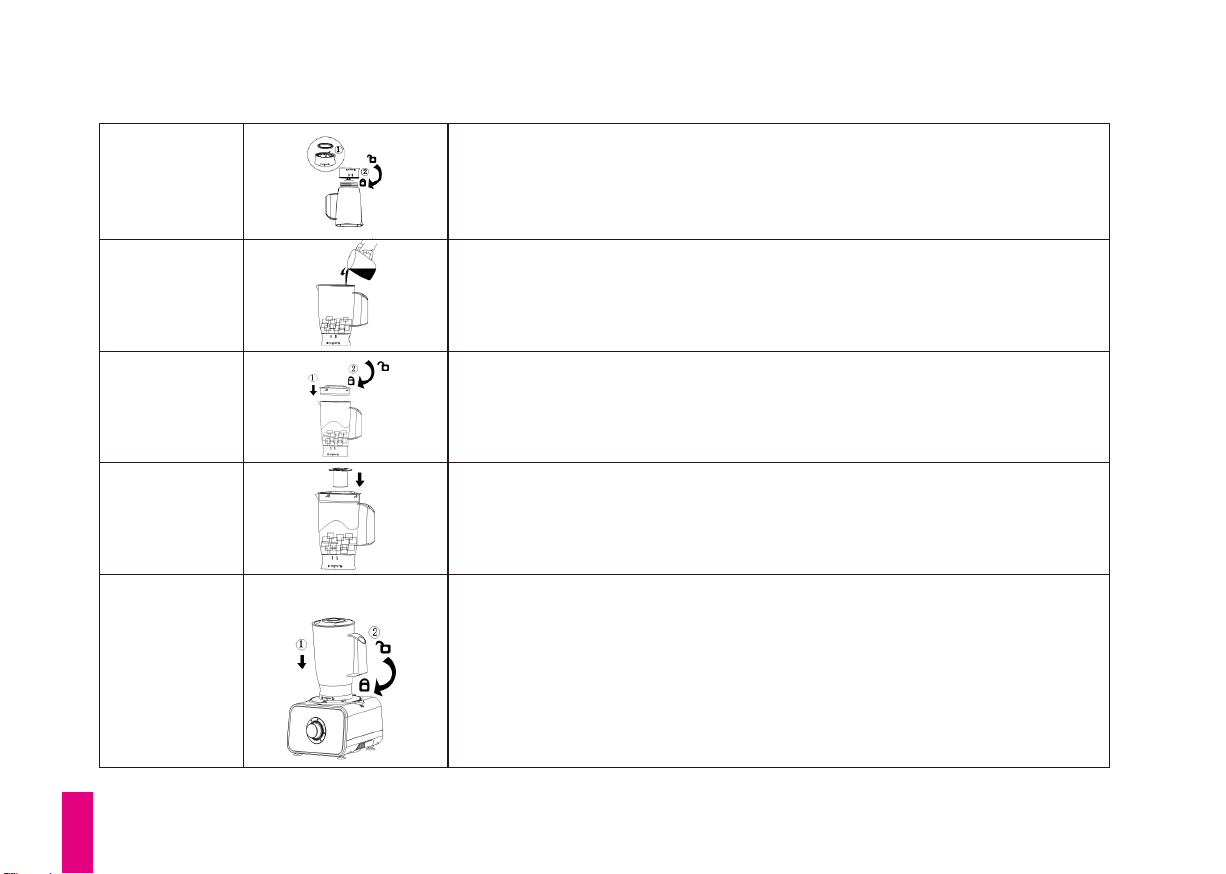
Insert the power cord into the power supply, and rotate the switch to 1 shift
and start working. Each working time should be less than 1 minute.
Grinder
Put the ingredients in a dry grinder. (Food materials are suitable for dried
soybeans, chili peppers, rice, etc. Some food materials can not be processed, such
as ice, turmeric, maka.)
①Check whether the sealing ring is installed in the Grinder Base.
②Rotate the Blender Jar Base clockwise into the Grinder. It needs to be
tightened. Untightened will lead to leakage.
13

3
4
CAUTION
1)It is forbidden to install the Grinder Base without the Grinder on the Main Body;
2)Ingredient should not exceed the maximum calibration line of the Grinder, otherwise the crushing eect and life of the product
will be aected.
3)Do not unscrew the Grinder when it is working.
4)You can put the Grinder Lid on the Girnder to store the processed food materials.
5)If you do not achieve the desired eect within 30 seconds, please turn o the product and wait for 1 minutes before re-processing.
This method is benecial to prolong the life of products.
Insert the power cord into the power supply, and rotate the switch to 3 shift and
start working. Each working time should be less than 30 seconds.
①Place the Grinder on the Main Body. (before placing, make sure that the Main Body
is on a at desktop and it is not shaking)
②Rotate the Grinder clockwise into the Main Body. When the "click" is heard, it
means that the Blender Jar has been rotated in the right position, The product does
not work if the it is not in the right position.
14

Lesen Sie bitte vor Inbetriebnahme die Bedienungslei tung aufmerksam durch. Bewahren Sie die Bedienung sanleitung für
zukünftige Referenz.
Achtung
- Tauchen Sie die Motoreinheit niemals ins Wasser oder andere Flüssigkeiten und spülen Sie sie nicht unter ießendem Wasser
ab
Warnung
- Prüfen Sie, ob die auf dem Gerät angegebene Span nung mit der örtlichen Netzspannung übereinstimmt, bevor Sie das Gerät
anschließen.
- Um gefährliche Situation zu vermeiden, schließen Sie dieses Gerät niemals an einen Zeitschalter an.
- Benutzen Sie das Gerät nicht, wenn das Netzkabel, der Stecker oder andere Teile beschädigt sind.
- Wenn das Netzkabel beschädigt ist, muss es vom Lieferanten, dem vom Lieferanten autorisierten Service center, ausgetauscht
werden, um Gefahren zu ver meiden.
- Geräte können von Personen mit reduzierten phy sischen, sensorischen oder mentalen Fähigkeiten oder Mangel an Erfahrung
und/oder Wissen benutzt werden, wenn sie beaufsichtigt oder bezüglich des sicheren Gebrauchs des Gerätes unterwiesen
wurden und die daraus resultierenden Gefahren verstanden haben.
- Kinder müssen überwacht werden, damit sie nicht mit dem Gerät spielen
- Lassen Sie das Gerät niemals unbeaufsichtigt laufen.
- Verwenden Sie niemals Ihre Finger oder einen Gegen stand (z. B. einen Spatel), um die Lebensmittel in das Füllrohr des
Deckels zu schieben, während das Gerät in Betrieb ist. Verwenden Sie nur den Schieber für diesen Zweck.
- Seien Sie sehr vorsichtig, wenn Sie mit den Scheiben, der Mixermesser oder der Küchenmaschinemesser umgehen. Seien Sie
besonders vorsichtig, wenn Sie sie aus der Küchenmaschine oder dem Mixeraufsatz nehmen, wenn Sie die Schüssel oder den
Aufsatz leeren und reinigen. Ihre Schneidkanten sind sehr scharf
Vorsicht
- Schalten Sie das Gerät niemals aus, indem Sie den Mixbecher, die Küchenmaschine Schüssel oder Entsafter Schüssel drehen.
Schalten Sie das Gerät immer aus, indem Sie den Geschwindigkeitsregler auf OFF stellen.
- Schalten Sie das Gerät aus, bevor Sie Zubehöre ab nehmen.
15

Eingebautes Sicherheitsschalter
Das Gerät verfügt über Sicherheitsschalter, die das Einschalten des Gerätes erst ermöglichen, wenn der
Mixeraufsatz mit dem Messer, die Arbeitsschüssel, die Entsafter Schüssel mit Kupplungseinheit oder die Zitrus
presse korrekt aufgesetzt und eingerastet sind, d.h. wenn sie so weit wie möglich in Richtung des "locked"
Markierung gedreht wurde ("Klick”), wird das einge baute Sicherheitsschalter entriegelt.
- Ziehen Sie das Gerät sofort nach jedem Gebrauch ab.
- Immer den Netzstecker ausziehen, bevor Sie mit den Fingern oder einem Gegenstand (z. B. einem Spatel) in den Mixaufsatz
gelangen.
- Önen Sie die Schüssel oder den Mixeraufsatz erst, wenn der Motor vollends zum Stillstand gekommen ist.
- Verwenden Sie niemals Zubehöre oder Teile von anderen Herstellern, oder die der Lieferant nicht be sonders empehlt.
Wenn Sie solche Zubehöre oder Teile verwenden, verliert Ihre Garantie die Gültigkeit.
- Überschreiten Sie nicht die maximale Menge, der auf der Schüssel der Küchenmaschine oder dem Mixauf satz angegeben ist.
- Verwenden Sie den Entsafter nicht, wenn das Sieb beschädigt ist.
- Beraten Sie sich mit der Tabelle in dieser Bedienung sanleitung für die richtigen Mengen und Verarbeit ungszeiten.
- Reinigen Sie die mit Lebensmitteln in Berührung kom mende Teile, gründlich vor dem ersten Gebrauch.
- Lassen Sie heiße Zutaten abkühlen, bevor Sie sie verar beiten (max. Temperatur 80 ° C / 175 ° F)
16
Teilname:
1. Hauptkörper
5. Antriebswelle
9. Zitruspresse-Filter
2. Netzschalter
6. Schüsseldeckel
10.
Dicke / Grobe Zerkleinerungsscheibe
3. Sicherheitsschalter
7. Doppelschieber
11. Einstellbare Trennscheibe
4. Schüssel
8. Zitruspresse
12. Französische Bratpfanne-Scheibe

17
13. Hackklinge
17. Mahlwerkdeckel
21. Mixerbecher-Basis
14. Knethaken
18. Messbecher
22. Schneebesen Körper
15. Spatel
19. Mixbecher Deckel
23. Schneebesen Stock
16. Mahlwerk
20. Mixerbecher
Table of contents
Languages:
Popular Food Processor manuals by other brands


Silvercrest
Silvercrest SMZ 260 H1 operating instructions

Silvercrest
Silvercrest KM 250 B1 operating instructions

Silvercrest
Silvercrest SKV 1200 A1 operating instructions

Silvercrest
Silvercrest MONSIEUR CUISINE SKMH 1100 A1 operating instructions

TriStar
TriStar MX-4837 user manual

Silvercrest
Silvercrest SMZ 260 F1 operating instructions

German pool
German pool PRO-9 user manual

German pool
German pool Anti-Oxidation Vacuum Food Processing Plus... user manual

Silvercrest
Silvercrest SMZ 260 H1 User manual and service information

Silvercrest
Silvercrest SMZ400A1 manual

BLACK DECKER
BLACK DECKER FP4150 use and care manual

Silvercrest
Silvercrest SMZCD 400 A1 operating instructions