TOP DC FC 125 User manual

www.topacdc.com Amazon Store Facebook
MODEL: FC 125
MIG WELDER
OPERATOR'S MANUAL

CONTENTS
Please save these instructions. This manual contains important safety and operating
instructions. Read all instructions and follow them with each use of this product.
1-4
SPECIFICATIONS 4
4-5
OPERATING INSTRUCTIONS 5-7
…………...……………………………….…………….…………….
………...……………………………….……………….……………….
……...……………………………….………….……
MAINTENANCE AND SERVICE 7-9
…………………………….…………….…………….
9
TROUBLE SHOOTING .……………………………….……………….……………….
…………...……………………………….………….……
SAFETY INFORMATIONVITAL
1. General Safety Rules
2. Specific Safety Rules
SET-UPINITIAL
1. Work Piece And Work Area Setting Up
2. General Operating Instructions
1. Cleaning, Maintenance and Lubrication
2. Parts List and Assembly Diagram

1
VITAL SAFETY INFORMATION
1. General Safety Rules
1) Work Area Safety
a. Take a suitable work area, must be clean and well bright. Cluttered or dark areas
could cause accidents.
b. Do not operate machines in explosive atmospheres, such as the presence of
flammable liquids, gases or dust. Welding sparks may ignite the dust or fumes.
c. Keep children and bystanders away while operating a machine. Distractions can
make you lose all the control.
2) Electrical Safety
a. Avoid body contact with grounded surfaces such as pipes, radiators, ranges and
refrigerators. There is an increased risk of electric shock if your body is grounded.
b. Do not expose machines to rain or wet conditions. Water entering a machine will
increase the risk of electric shock.
c. Do not abuse the Power Cord. Never use the Cord for pulling or unplugging the
machine. Keep Cord away from heat, oil, sharp edges or moving parts. Damaged or
entangled Cords increase the risk of electric shock.
d. When operating a machine outdoors, use an extension cord suitable for outdoor use.
Use of a cord suitable for outdoor use reduces the risk of electric shock.
3) Personal Safety
a. Stay alert, watch what you are doing and use common sense when operating a
machine. Do not use a machine while you are tired or under the influence of drugs,
alcohol or medication. A moment of inattention while operating machines may result in
serious personal injury.
b. Use safety equipment. Always wear eye protection. Safety equipment such as arc
shaded, impact safety full face shield, dust mask or respirator, heavy-duty work gloves,
non-skid safety shoes, or hearing protection used for appropriate conditions will reduce
personal injuries. Do not wear loose fitting things, like rings, scarves, etc., which is high
risk of being trapped or burnt.
c. Avoid accidental starting. Ensure the Power Switch is in the off-position before
plugging in. Plugging in machines that have the Switch on invites accidents.
d. Do not overreach. Keep proper footing and balance at all time. This enables better
control of the machine in unexpected situations.
4) Machine Use and Care
a. Use the correct machine for your application. The correct machine will do the job
better and safer at the rate for which it was designed.
b. Do not use the machine if the Power Switch does not turn it on and off. Any
machine that cannot be controlled with the Switch is dangerous and must be repaired.
c. Disconnect the Power Cord from the power source before making any adjustments,
changing accessories, or storing machines. Such preventive safety measures reduce
the risk of starting the machine accidentally.
d. Store idle machines out of the reach of children and do not allow persons unfamiliar
with the machine or these instructions to operate the machine. Machines are
dangerous in the hands of untrained users.
e. Maintain machines. Check for misalignment or binding of moving parts, breakage of
parts and any other condition that may affect the machine’s operation. If damaged,
have the machine repaired before use. Many accidents are caused by poorly
maintained machines.

2
f. Use the machine and accessories in accordance with these instructions and in the
manner intended for the particular type of machine, taking into account the working
conditions and the work to be performed. Use of the machine for operations different
from those intended could result in a hazardous situation.
5) Service
Have your machine serviced by a qualified repair person using only identical
replacement parts. This will ensure that the safety of the machine is maintained.
2. Specific Safety Rules
1) Maintain labels and nameplates on the Inverter Machine. These carry important
safety information.
2) Avoid electric shock. Do not permit electrically live parts, cables, or electrodes to
contact skin, clothing, or gloves. Wear protective clothing. This unit draws enough
current to cause serious injury or death. Do not use the Machine unless you are
insulated from the ground and the work piece.
3) Avoid body damage. Arc rays and infrared radiation can injure eyes and burn skin.
Wear eye and body protection. Do not allow viewing by visitors without proper eye
and body protection. Use a Face Shield with arc shaded filter plate.
4) Move flammable and explosive materail at least 10 meters from the welding arc to
prevent sparks or molten metal from starting a fire. Keep a type ABC fire
extinguisher within easy reach. Thoroughly clean the object being welded of any
paint, grease, or other foreign material.
5) Avoid unintentional starting. Prepare to begin work before turning on the Inverter
Machine.
6) Do not leave the Machine unattended when it is plugged into an electrical outlet.
Turn off the machine, and unplug it from its electrical outlet before leaving.
7) Use clamps or other practical ways to secure and support the work piece to a stable
platform. Holding the work by hand or against your body is unstable and may lead to
loss of control.
8) This product is not a toy. Keep it out of reach of children.
9) People with pacemakers should consult their physician(s) before using.
Electromagnetic fields in close proximity to heart pacemaker could cause
pacemaker interference or pacemaker failure. In addition, people with pacemakers
should:
• Avoid operating alone.
• Do not use with Power Switch locked on.
• Properly maintain and inspect to avoid electrical shock.
• Any Power Cord must be properly grounded. Ground Fault Circuit Interrupter (GFCI)
should also be implemented – it prevents sustained electrical shock.
10) Prevent eye injury and burns. Wearing and using personal safet y clothing and safety
devices reduce the risk for injury.
• Wear safety impact eye goggles underneath welding eye protection featuring at least
a Number 10 shade lens rating.
• Leather leggings, fire resistant shoes or boots should be worn when using this
product. Do not wear pants with cuffs, shirts with open pockets, or any clothing that can
catch and hold molten metal or sparks.

• Keep clothing free of grease, oil, solvents, or any flammable substances. Wear dry,
insulating gloves and protective clothing.
• Wear an approved head covering to protect the head and neck. Use aprons,
cape, sleeves, shoulder covers, and bibs designed and approved for welding and
welding procedures.
• When welding overhead or in confined spaces, wear flame resistant ear plugs or ear
muffs to keep sparks out of ears.
11) Prevent accidental fires. Remove any combustible material from the work area.
•When possible, move the work to a location well away from combustible materials. If
relocation is not possible, protect the combustibles with a cover made of fire resistant
material.
• Remove or make safe all combustible materials for a radius of 10 meters around the
work area. Use a fire resistant material to cover or block all open doorways, windows,
cracks, and other openings.
• Enclose the work area with portable fire resistant screens. Protect combustible walls,
ceilings, floors, etc., from sparks and heat with fire resistant covers.
•If working on a metal wall, ceiling, etc., prevent ignition of combustibles on the other
side by moving the combustibles to a safe location. If relocation of combustibles is not
possible, designate someone to serve as a fire watch, equipped with a fire
extinguisher, during the welding process and for at least one half hour after the welding
is completed.
• Do not weld or cut on materials having a combustible coating or combustible internal
structure, as in walls or ceilings, without an approved method for eliminating the
hazard.
• Do not dispose of hot slag in containers holding combustible materials. Keep a fire
extinguisher nearby and know how to use it.
• After welding, make a thorough examination for evidence of fire. Be aware that
easily-visible smoke or flame may not be present for some time after the fire has
started. Do not weld or cut in atmospheres containing dangerously reactive or
flammable gases, vapors, liquids, and dust. Provide adequate ventilation in work areas
to prevent accumulation of flammable gases, vapors, and dust. Do not apply heat to a
container that has held an unknown substance or a combustible material whose
contents, when heated, can produce flammable or explosive vapors. Clean and purge
containers before applying heat. Vent closed containers, including castings, before
preheating, or welding.
12) Do not touch live electrical parts. Wear dry, insulating gloves. Do not touch
electrode or conductor tong with bare hand. Do not wear wet or damaged gloves.
13) Protect yourself from electric shock. Do not use outdoors. Insulate yourself from the
work piece and ground. Use nonflammable, dry insulating material if possible, or
use dry rubber mats, dry wood or plywood, or other dry insulating material big
enough to cover your full area of contact with the work or ground.
14) Ensure that the unit is placed on a stable location before use. If this unit falls while
plugged in, severe injury, electric shock, or fire may result.
15) Never remove the grounding prong or modify the Power Cord Plug in any way. Do
not use adapter plugs with this product.
3

16) Avoid overexposure to fumes and gases. Always keep your head out of the fumes.
Do not breathe the fumes. Use enough ventilation or exhaust, or both, to keep
fumes and gases from your breathing zone and general area.
17) Live torch when Trigger is pressed. Keep Torch away from people and flammables
before touching Trigger.
18) Turn off, unplug, and discharge electrode to ground before perform-ing any
inspection, maintenance, or cleaning.
19) Use only compressed air at between 0.4 and 0.5 MPA. Never use oxygen, carbon
dioxide, combustible gases or any bottled gas as an air source for the Machine.
Such gases are capable of explosion and serious injury to people.
20) The warnings, precautions, and instructions discussed in this instruction manual
cannot cover all possible conditions and situations that may occur. It must be
understood by the operator that common sense and caution are factors which
cannot be built into this product, but must be supplied by the operator.
SPECIFICATIONS
INITIAL SETTING UP INSTRUCTION
4
Input Voltage 120VAC / 60HZ
Current Input 23.5A
Output Range 30-125A
Rated Duty Cycle 30%@90A
Maximum OCV 45.5 V
Wire Speed 0-120 IPM
Welding Wire Capacity 0.030/ 0.035” Flux Cored
Wire Spool Capacity 2 LB Spool
Read the entire Important Safety Information section at the beginning of this manual
including all text under subheadings therein before set up or use of this product.
To prevent serious injury from accidental operation:
Turn the Power Switch of the machine to its “OFF” position and unplug it from its electrical
outlet before assembling or making any adjustments to the machine.
Note: For additional information regarding the parts listed in the following pages,
refer to the Assembly Diagram near the end of this manual.
1. Assembly
1) Unpack and make sure all the items in good condition. When you receive the
parcel, check it carefully from the packing list to make sure no damage due to
shipping. If there is any damage happened, inform the carrier immediately to
claim before installing. Complete the information and damage details in the
order’s returns and refund of the Amazon order in that case. Care the safety to
avoid damaging the machine when using bars, hammers, etc.

OPERATING INSTRUCTIONS
2) Make sure the machine is transported securely. If the machine must be moved,
always disconnect the power cable from the electrical outlet. And do not touch
live electrical parts.
CONTROLS & INDICATORS
Power indicator
Voltage knob
Wire speed knob
Overload Indicator
1. Power Indicator turns on when Power Switch is ON.
2. Overload Indicator turns on when the machine working time exceeds rated duty cycle.
3. Voltage Knob and Scale: Turn the knob to adjust output voltage.
4. Wire Feed Speed Knob and Scale: Turn the knob to adjust wire feed speed.
5
Read the entire Important Safety Information section at the beginning of this manual
including all text under subheadings therein before set up or use of this product.
To prevent serious injury from accidental operation:
Turn the Power Switch to “OFF” or “0” position before performing any inspection,
maintenance, or cleaning procedures.
1 Work Piece and Work Area Setting Up
Prevent eye injury and burns. Wearing personal protective
equipment to reduce the risk of injury.
1) Designate a work area that is clean and well-lit. The work area must not allow
access by children or pets to prevent injury and distraction.
2) Route the Power Cord along a safe route to reach the work area without creating a
tripping hazard or exposing the Power Cord to possible damage. The Power Cord must
reach the work area with enough extra length to allow free movement while working.
3) There must not be hazardous objects, such as utility lines or foreign objects, nearby
that will present a hazard while working.
4) A barrier, such as a welding curtain or welding shroud should be put up to protect
others in the work area and limit the spray of sparks.

6
2 General Operating Instructions
Protective gear must be worn when using the machine.
Arc shaded, eye protection, a full face shield, heavy-duty work gloves, a welding
apron, respirator, and heavy -duty work clothes without pockets should be worn
when using this product. Do not look at the ignited arc without eye protection.
Light from the arc can cause permanent damage to the eyes. Light from the arc
can burn the skin. Do not breathe arc fumes.
1) BEFORE EACH USE, inspect the general condition of the Machine. Check for
•loose hardware,
•damaged cord/electrical wiring,
•cooling fan operation,
•cracked or broken parts
•any other condition that may affect the safe operation.
IMPORTANT: The duty cycle defines the number of minutes, within a 10 minute period,
during which a given Machine can safely produce a particular current.
• This Machine is equipped with an internal thermal protection system to help prevent
damage to the unit. When the unit overheats; it automatically shuts down, then returns
to service when it cools down.
2) Clean the weld surfaces thoroughly with a wire brush or angle grinder; there must
be no rust, paint, oil, or other materials on the weld surfaces, only bare metal.
3) Use clamps (not included) to hold the workpieces in position so that you can
concentrate on proper welding technique. The distance (if any) between the two
workpieces must be controlled properly to allow the weld to hold both sides securely
while allowing the weld to penetrate fully into the joint. The edges of thicker
workpieces may need to be chamfered (or beveled) to allow proper weld
penetration.
4) Clamp Ground Cable to bare metal on the workpiece near the weld area, or to metal
work bench where the workpiece is clamped.
5) Turn the Power Switch to the OFF position, then plug the Power Cord into a
properly grounded, GFCI protected 120 VAC receptacle that matches the plug.
6) Turn on the machine.
7) Settings - Refer to Setting chart attached on the machine.
8) Trigger the torch and start to weld. The end of the MIG Gun should be tilted so that
wire is angled anywhere in-between straight on and 15° in the direction you are
welding.
WARNING! TO PREVENT SERIOUS INJURY, point torch away from your body
when triggering the torch.
Note: If the Machine working time reaches to the maximum working time according to
the duty cycle, the thermal protector will activate and the “Overload Indicator” will
illuminate. The Machine will automatically shut down until it cools, then you may resume
welding again.

9) When welding is complete, set the MIG Gun down on a heat-proof, electrically
nonconductive surface.
10) A weld from flux-cored wire will be covered by slag. Use a chipping hammer to
knock this off. Be careful not to damage the weld or base material.
11) Turn the Power Switch OFF after fan stops rotating. Allow Welder to cool down,
then unplug the Power Cord.
12) Remove Ground Clamp from workpiece or table.
13) Respool wire by clipping wire, removing gas nozzle/contact tip on MIG gun,
releasing Idler Arm on Wire Feed mechanism, and rotating the Wire Spool
counterclockwise. Be sure to securely hold wire as it is being respooled because the
end of wire has a tendency to quickly unravel once it clears the wire feeder.
14) Clean the machine and then store the unit indoors out of children’s reach.
MAINTENANCE AND SERVICE
Procedures not specifically explained in this manual must be performed only
by a qualified technician.
To prevent serious injury from accidental operation:
Turn the Power Switch of the Machine to its “OFF” position and unplug the machine
from its electrical outlet before performing any inspection, maintenance, or cleaning
procedures.
To prevent serious injury from machine failure
Do not use damaged equipment. If abnormal noise or vibration occurs, have the
problem corrected before further use.
1 Cleaning, Maintenance, and Lubrication
1) BEFORE EACH USE, inspect the general condition of the Machine. Check for
loose screws, cracked or broken parts, damaged electrical wiring, and any other
condition that may affect its safe operation.
2) After Use, clean external surfaces of the machine with clean cloth.
3) Periodically, using compressed air, blow out all dust and debris from the interior.
4) If the unit repeatedly shuts down from thermal overload, stop all use.
Have the Machine inspected and repaired by a qualified service technician.
5) Store the Machine and accessories in a clean and dry location out of reach of
children.
WARNING! If any part of this Machine is damaged, it must be replaced only
by a qualified service technician.
A Parts list and assembly diagram are provided as following just for
reference. Contact the distributer or the seller to get the spare parts for
maintenance and have the damaged parts be replaced by a qualified
technician only.
7
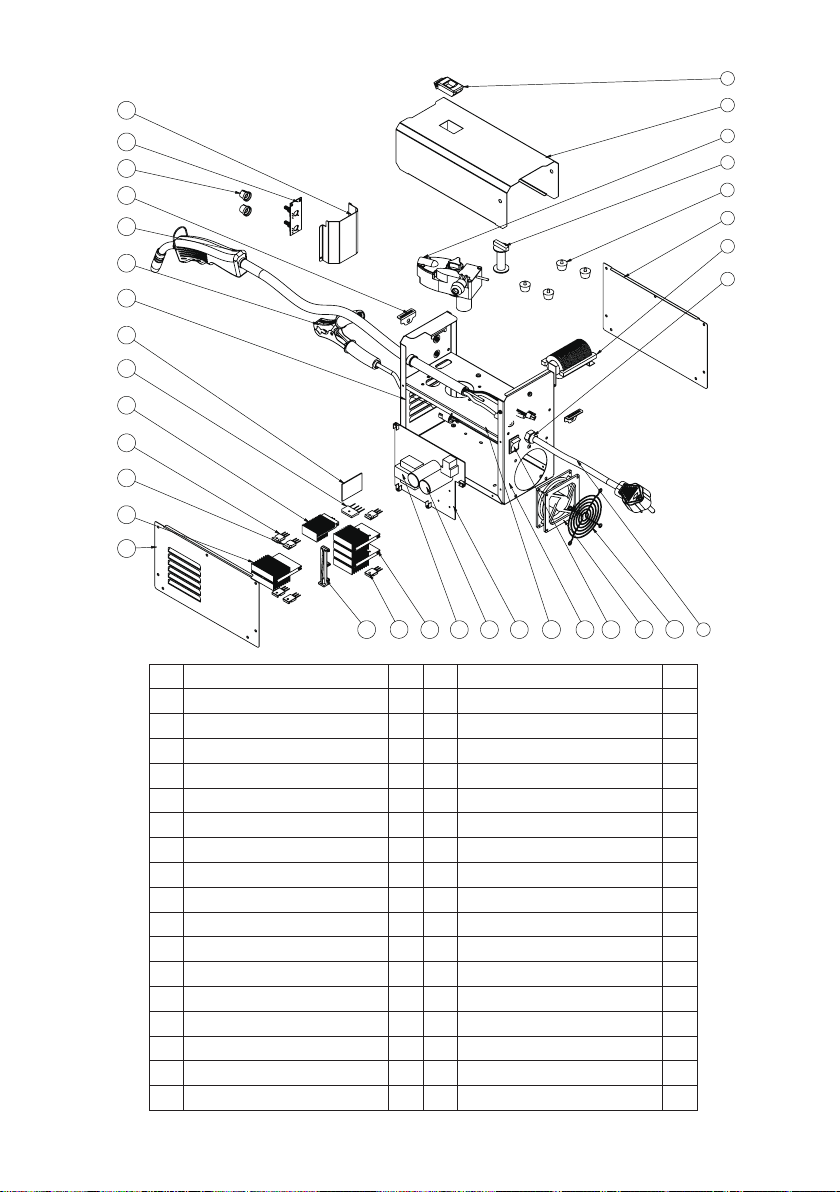
Parts List and Assembly Diagram
1 Lock catch 1
NO. Part Name QTY
2 Top Cover 1
3 Wire feeder 1
4 Axis 1
5 Foot pad 4
6 Left cover 1
7 Output choke 1
8 Line card 1
9 Power cable 1
10 Fan cover 1
11 DC fan 1
12 Switch 1
13 Bottom cover 1
14 Bracket 1
15 Main PCB 1
NO. Part Name QTY
16 Capacitance 2
17 Transformer 1
31 Braces ring 2
32 Knob 2
33 Panel PCB 1
34 Panel shield 1
18 IGBT heat sink 2
19 IGBT 2
20 Support 1
21 Right cover 1
22 Rectifier heat sink 1
23 Fast recovery diode 3
24 Triode 1
25 Rectifiers heat sink 1
26 Bridge rectifiers 1
27 Control PCB 1
28 Front panel 1
29 Ground clamp assembly 1
30 Welding torch 1
8
1
2
4
6
7
3
8
9
11 10
32
33
30
29
31
27
26
24
25
23
22
21
20 18
19 151617 12
34
1314
28
5

Service
Thank you for purchasing our mig welder. Your purchase includes our free 1-year
limited warranty. If you have any questions or issues about your product, Welcome to
contact us at
topacdc01@gmail.com
Please have your order number available when asking for support.
TROUBLE SHOOTING
Be certain to shut off the welder, disconnect if from power, and discharge the flux gun to
ground before adjusting, cleaning, or repairing the unit
Possible Cause Likely Solutions
When switched
on, power indicator
lights but welder
does not function
1) Tripped thermal protection
device
2) Faulty or improperly
connected trigger.
3) Machine is in low- or over -
voltage protection
1) If the alarm indicator is illuminated without an error
code, welder has overheated and shut down. Stop
and wait with the power switch ON for the welder to
cool. Reduce duty cycle to help reduce wear on the
welder.
2) Ensure the gun connection is properly seated on the
machine.
3) If the alarm light is illuminated, check input voltage
and ensure it falls within the specified range. If input
voltage is correct, turn the welder off and back on.
Power ON indicator
does not light when
switched on
1) Unit is not connected to outlet
properly
2) Outlet is unpowered
3) Circuit supplies insufficient
input voltage or amperage
4) Plug does not have correct
rating.
5) Input power cord is not seated
properly
1) Verify the voltage at the outlet and the connection to
the outlet.
2) Check circuit breaker, if any is tripped, determine and
remedy cause before resetting.
3) Verify that the circuit is designed to supply the
required input voltage and amperage as detailed.
4) Make sure installed plug is correct rating.
5) Ensure the input power cord is fully secured.
Wire feeds,
but arc does
not ignite
1) Improper ground connection
2) Improperly sized contact tip
3) Excessively worn contact tip
4) Dirty contact tip.
1) Make sure that the workpiece is contacted properly by
the ground clamp and that the workpiece is properly
cleaned near the ground clamp and the welding
location.
2) Verify that contact tip is the proper size of the welding
wire. If needed, replace contact tip with proper size
and type.
3) Check that the hole in the tip is not deformed or
enlarged. If needed, replace contact tip with proper
size and type
4) Properly clean contact tip.
Porosity in
the weld metal
1) Dirty workpiece
2) Gun is being used too far
away from workpiece
3) Dirty welding wire is
introducing contamination
into the weld
1) Clean workpiece down to bare metal.
2) Check contact tip to work distance for the proper
procedure.
3) Make sure that welding wire is clean and free of rust
and residues.
Problem
9
Table of contents


