INSTRUCTION MANUAL: READ THIS FIRST
LAYOUT NAVIGATOR
LN-100
Please read the following before using the instrument.
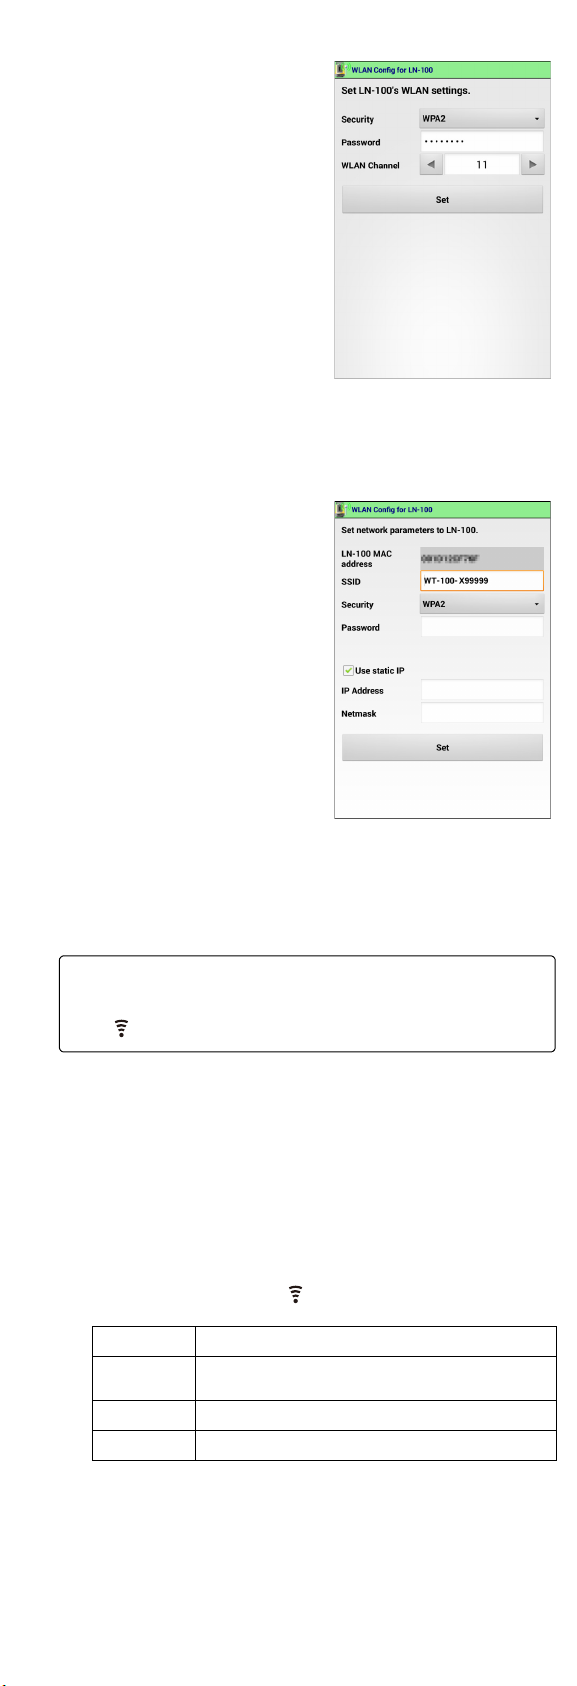
• Procedures for WLAN config between the LN-100 and a
controller are included in the back side of this manual.
• The manual is an electronic manual provided in a CD in PDF
format. It is recommended that the manual files are backed
up by transferring to your PC etc.
Adobe Reader is necessary in order to view these
documents. The latest version of Acrobat Reader can be
the Adobe homepage.
• All company and product names featured in this manual are
trademarks or registered trademarks of each respective
organization.
For the safe use of the product and prevention of injury to
operators and other persons as well as prevention of property
damage, items which should be observed are indicated herein
by an exclamation point within a triangle used with WARNING
and CAUTION statements in this manual.
The definitions of the indications are listed below. Be sure you
understand them before reading the manual’s main text.
Definition of Indication
General
Power Supply
Tripod
PRECAUTIONS FOR SAFE OPERATION
CWARNING
Ignoring this display and making an
operation error could possibly result in
death or serious injury to the operator.
CCAUTION
Ignoring this display and making an
operation error could possibly result in
minor injury or property damage.
JThis symbol indicates items for which caution (hazard
warnings exclusive) is urged. Specific details are printed in
or near the symbol.
DThis symbol indicates items which are prohibited. Specific
details are printed in or near the symbol.
IThis symbol indicates items which must always be
performed. Specific details are printed in or near the
symbol.
CWarning
DDo not use the unit in areas exposed to high amounts of
dust or ash, in areas where there is inadequate ventilation,
or near combustible materials. An explosion could occur.
GDo not perform disassembly or rebuilding. Fire, electric
shock, burns or hazardous radiation exposure could
result.
E
When securing the instrument in the carrying case make
sure that all catches, including the side catches, are
closed. Failure to do so could result in the instrument
falling out while being carried, causing injury.
CCaution
DDo not use the carrying case as a footstool. The case is
slippery and unstable so a person could slip and fall off it.
DDo not place the instrument in a case with a damaged
case or belt. The case or instrument could be dropped and
cause injury.
DThis instrument automatically operates when the power is
turned ON or OFF. Do not touch the instrument during
operation. Doing so may cause injury.
CWarning
DDo not use batteries other than those designated. An
explosion could occur, or abnormal heat generated,
leading to fire.
ETo prevent shorting of the battery in storage, apply
insulating tape or equivalent to the terminals. Otherwise
shorting could occur, resulting in fire or burns.
DDo not place articles such as clothing on the battery
charger while charging batteries. Sparks could be
induced, leading to fire.
DDo not use damaged power cords, plugs or loose outlets.
Fire or electric shock could result.
DDo not use power cords other than those designated. Fire
could result.
E
Use only the specified battery charger to recharge
batteries. Other chargers may be of different voltage rating
or polarity, causing sparking which could lead to fire or
burns.
DDo not connect or disconnect power supply plugs with wet
hands. Electric shock could result.
DDo not short circuit. Heat or ignition could result.
DDo not use voltage other than the specified power supply
voltage. Fire or electrical shock could result.
DDo not use the battery or charger for any other equipment
or purpose. Fire or burns caused by ignition could result.
HDo not heat or throw batteries or chargers into fire. An
explosion could occur, resulting in injury.
DDo not use batteries or the battery charger if wet.
Resultant shorting could lead to fire or burns.
CCaution
FDo not touch liquid leaking from batteries. Harmful
chemicals could cause burns or blisters.
CWarning
E
When mounting the instrument to the tripod, tighten the
centering screw securely. Failure to tighten the screw
properly could result in the instrument falling off the tripod,
causing injury.
ETighten securely the leg fixing screws of the tripod on
which the instrument is mounted. Failure to tighten the
screws could result in the tripod collapsing, causing injury.
Wireless LAN
Laser Safety
Refer to "LASER SAFETY INFORMATION" in your manual
(PDF).
Upon opening, make sure that all the following are included.
1 Main unit . . . . . . . . . . . . . . . . . . . . . . . . . . . . . . . . . . .1
2 Battery (BDC70) . . . . . . . . . . . . . . . . . . . . . . . . . . . . .2
3 Battery charger (CDC68A) . . . . . . . . . . . . . . . . . . . . .1
4 Power cable
(EDC113A/113B/113C) . . . . . . . . . . . . . . . . . . . . . . . .1
5 Wiping cloth . . . . . . . . . . . . . . . . . . . . . . . . . . . . . . . .1
6 CD (PDF Manual) . . . . . . . . . . . . . . . . . . . . . . . . . . . .1
7
INSTRUCTION MANUAL: READ THIS FIRST (This sheet)
. .1
8 Laser caution sign-board . . . . . . . . . . . . . . . . . . . . . .1
9 Carrying case . . . . . . . . . . . . . . . . . . . . . . . . . . . . . . .1
10 Carrying strap . . . . . . . . . . . . . . . . . . . . . . . . . . . . . . .2
11 Export restrictions card (Be sure to read) . . . . . . . . . .1
$
• A dedicated power cable for the country or the area where
the instrument is purchased is attached.
DDo not carry the tripod with the tripod shoes pointed at
other persons. A person could be injured if struck by the
tripod shoes.
EKeep hands and feet away from the tripod shoes when
fixing the tripod in the ground. A hand or foot stab wound
could result.
ETighten the leg fixing screws securely before carrying the
tripod. Failure to tighten the screws could lead to the tripod
legs extending, causing injury.
CWarning
DDo not use within the vicinity of hospitals. Malfunction of
medical equipment could result.
E
Use the instrument at a distance of at least 22 cm from
anyone with a cardiac pacemaker. Otherwise, the
pacemaker may be adversely affected by the
electromagnetic waves produced and cease to operate as
normal.
DDo not use onboard aircraft. The aircraft instrumentation
may malfunction as a result.
D
Do not use within the vicinity of automatic doors, fire
alarms and other devices with automatic controls as the
electromagnetic waves produced may adversely affect
operation resulting in an accident.
STANDARD PACKAGE COMPONENTS
21313 91120
©2013 TOPCON CORPORATION
ALL RIGHTS RESERVED
Be sure to read the back side of this manual as well.