Toro Recycler 20958 User manual

FormNo.3400-886RevA
55cmRecycler®LawnMower
20958
Recycler®Rasenmäher(55cm)
20958
TondeuseRecycler®55cm
20958
55cmRecycler®gazonmaaier
20958
www.T oro.com.*3400-886*A


CV
FormNo.3400-880RevA
55cmRecycler®LawnMower
ModelNo.20958—SerialNo.316000001andUp
Operator'sManual
ReplacementpartsareavailablefromanAuthorizedServiceDealeroratwww.shoptoro.com.
Introduction
Thisrotary-blade,walk-behindlawnmowerisintendedto
beusedbyresidentialhomeowners.Itisdesignedprimarily
forcuttinggrassonwell-maintainedlawnsonresidential
properties.Itisnotdesignedforcuttingbrushorfor
agriculturaluses.
Readthisinformationcarefullytolearnhowtooperateand
maintainyourproductproperlyandtoavoidinjuryand
productdamage.Youareresponsibleforoperatingthe
productproperlyandsafely.
YoumaycontactTorodirectlyatwww .Toro.comforproduct
andaccessoryinformation,helpndingadealer,ortoregister
yourproduct.
Wheneveryouneedservice,genuineToroparts,oradditional
information,contactanAuthorizedServiceDealerorToro
CustomerServiceandhavethemodelandserialnumbersof
yourproductready.Figure1identiesthelocationofthe
modelandserialnumbersontheproduct.
g036584
Figure1
1.Modelandserialnumberplate
Writetheproductmodelandserialnumbersinthespace
below:
ModelNo.
SerialNo.
Thismanualidentiespotentialhazardsandhassafety
messagesidentiedbythesafety-alertsymbol(Figure2),
whichsignalsahazardthatmaycauseseriousinjuryordeath
ifyoudonotfollowtherecommendedprecautions.
g000502
Figure2
1.Safety-alertsymbol
Thismanualuses2wordstohighlightinformation.
Importantcallsattentiontospecialmechanicalinformation
andNoteemphasizesgeneralinformationworthyofspecial
attention.
Important:Ifyouareusingthismachineabove1500m
(5,000ft)foracontinuousperiod,ensurethattheHigh
AltitudeKithasbeeninstalledsothattheenginemeets
CARB/EPAemissionregulations.TheHighAltitude
Kitincreasesengineperformancewhilepreventing
spark-plugfouling,hardstarting,andincreased
emissions.Onceyouhaveinstalledthekit,attach
thehigh-altitudelabelnexttotheserialdecalonthe
machine.ContactanyAuthorizedToroServiceDealer
toobtaintheproperHighAltitudeKitandhigh-altitude
labelforyourmachine.Tolocateadealerconvenientto
you,accessourwebsiteatwww.Toro.comorcontactour
ToroCustomerCareDepartmentatthenumber(s)listed
inyourEmissionControlWarrantyStatement.
Removethekitfromtheengineandrestoretheengine
toitsoriginalfactorycongurationwhenrunningthe
engineunder1500m(5,000ft).Donotoperateanengine
thathasbeenconvertedforhigh-altitudeuseatlower
altitudes;otherwise,youcouldoverheatanddamage
theengine.
Ifyouareunsurewhetherornotyourmachinehasbeen
convertedforhigh-altitudeuse,lookforthefollowing
label(Figure3).
©2016—TheToro®Company
8111LyndaleAvenueSouth
Bloomington,MN55420
Registeratwww.T oro.com.OriginalInstructions(EN)
PrintedintheUSA
AllRightsReserved*3400-880*A

decal127-9363
Figure3
Contents
Introduction..................................................................1
Safety...........................................................................2
GeneralSafety.........................................................2
SafetyandInstructionalDecals.................................2
Setup............................................................................4
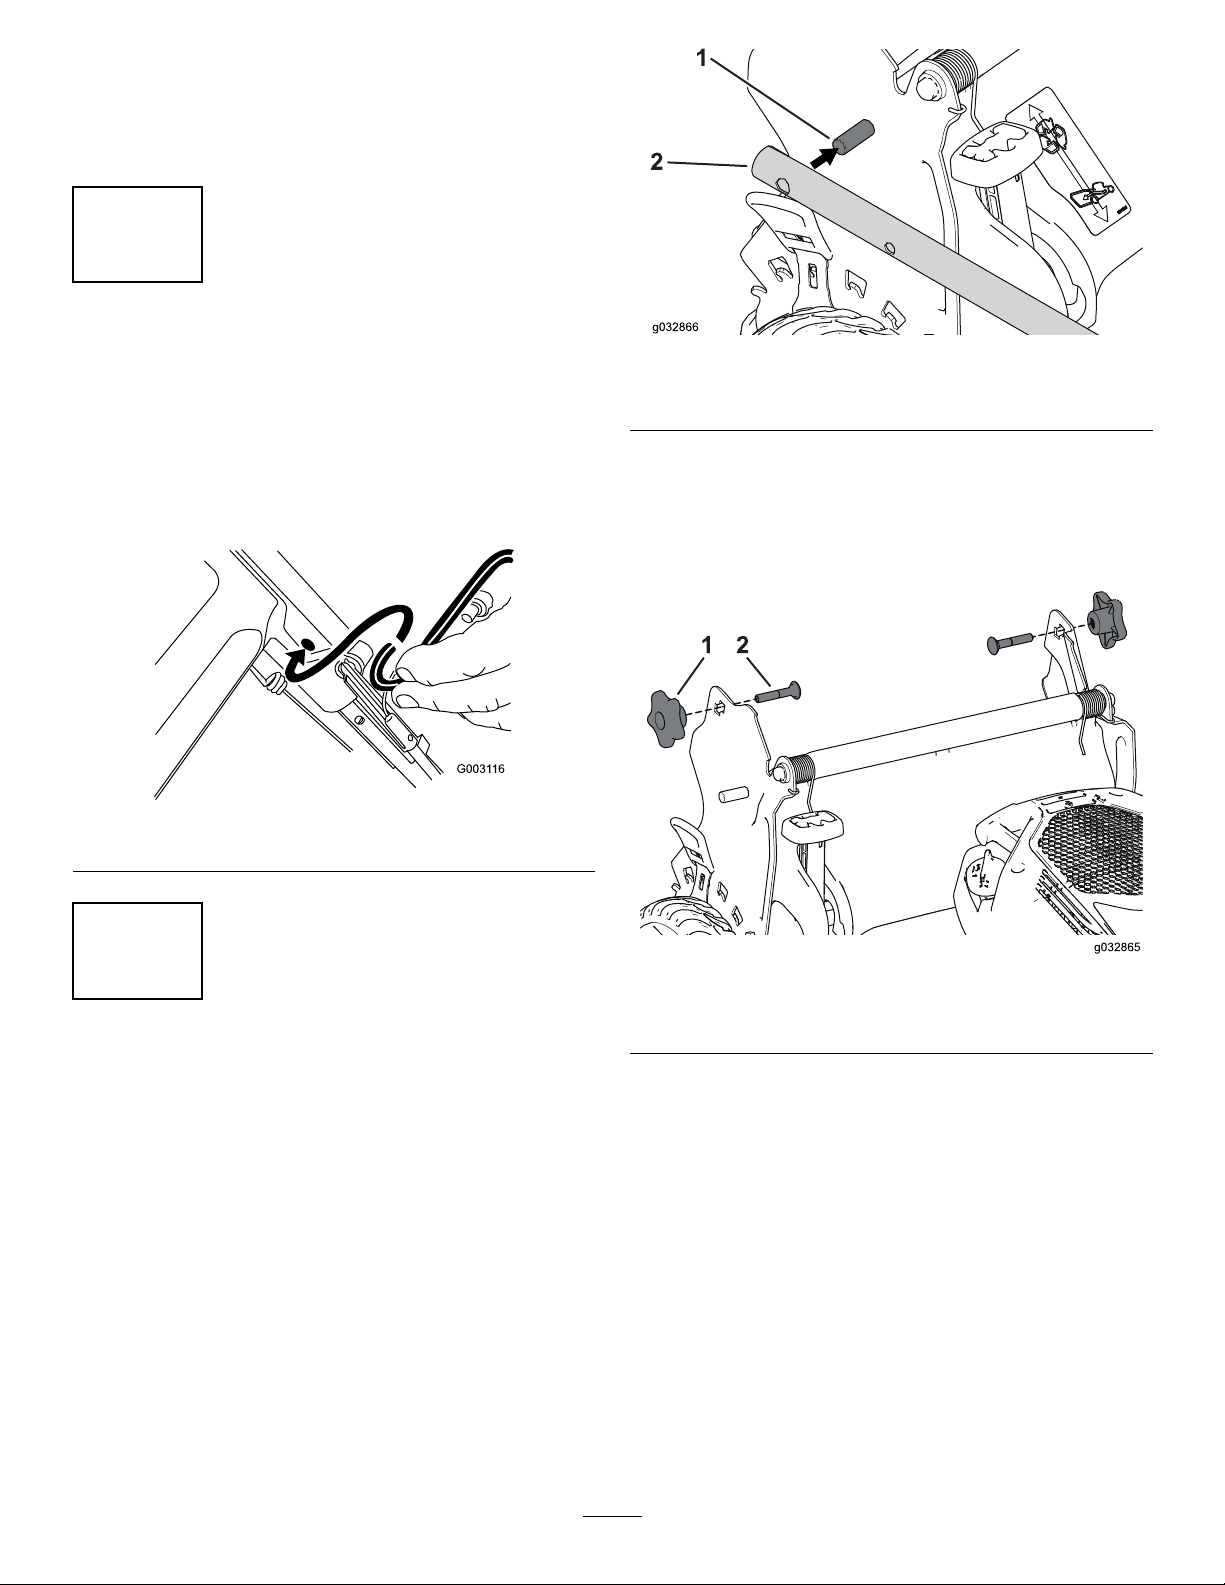
1InstallingtheBlade-ControlBar..............................4
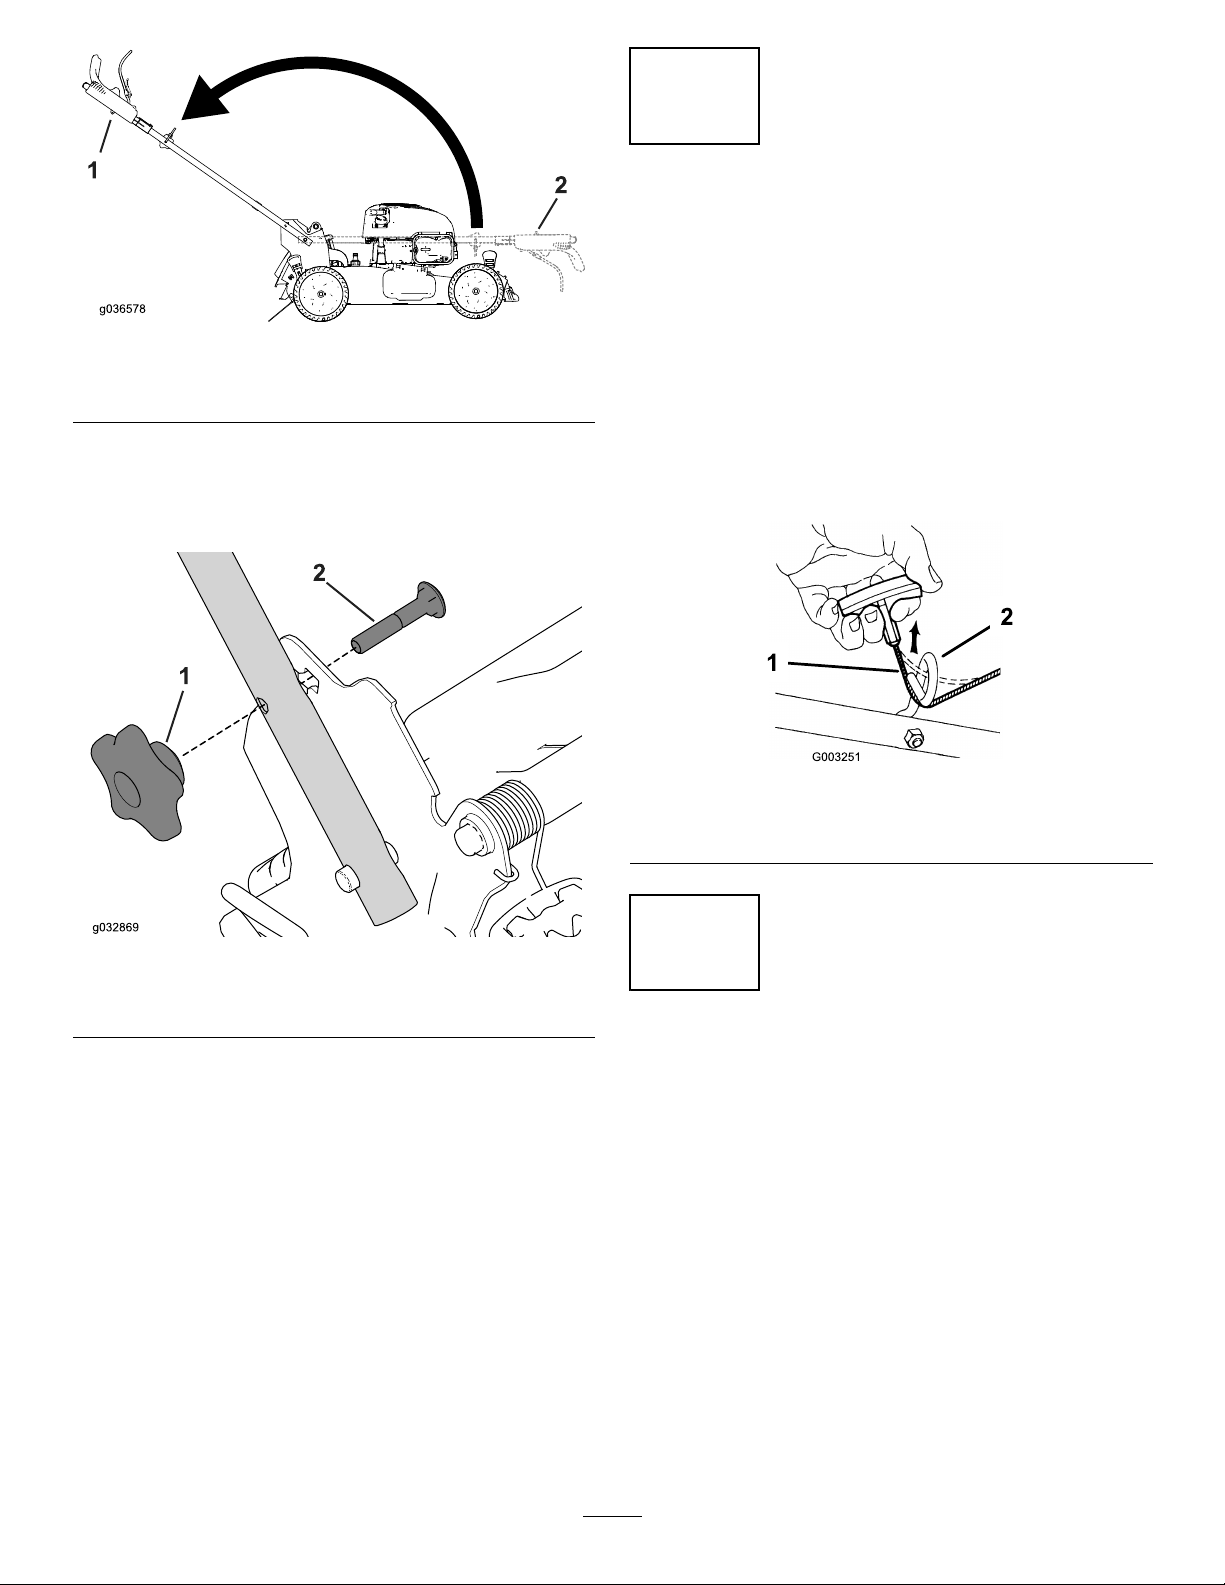
2AssemblingandUnfoldingtheHandle.....................4
3InstallingtheRecoil-StarterRopeintheRope
Guide.................................................................5
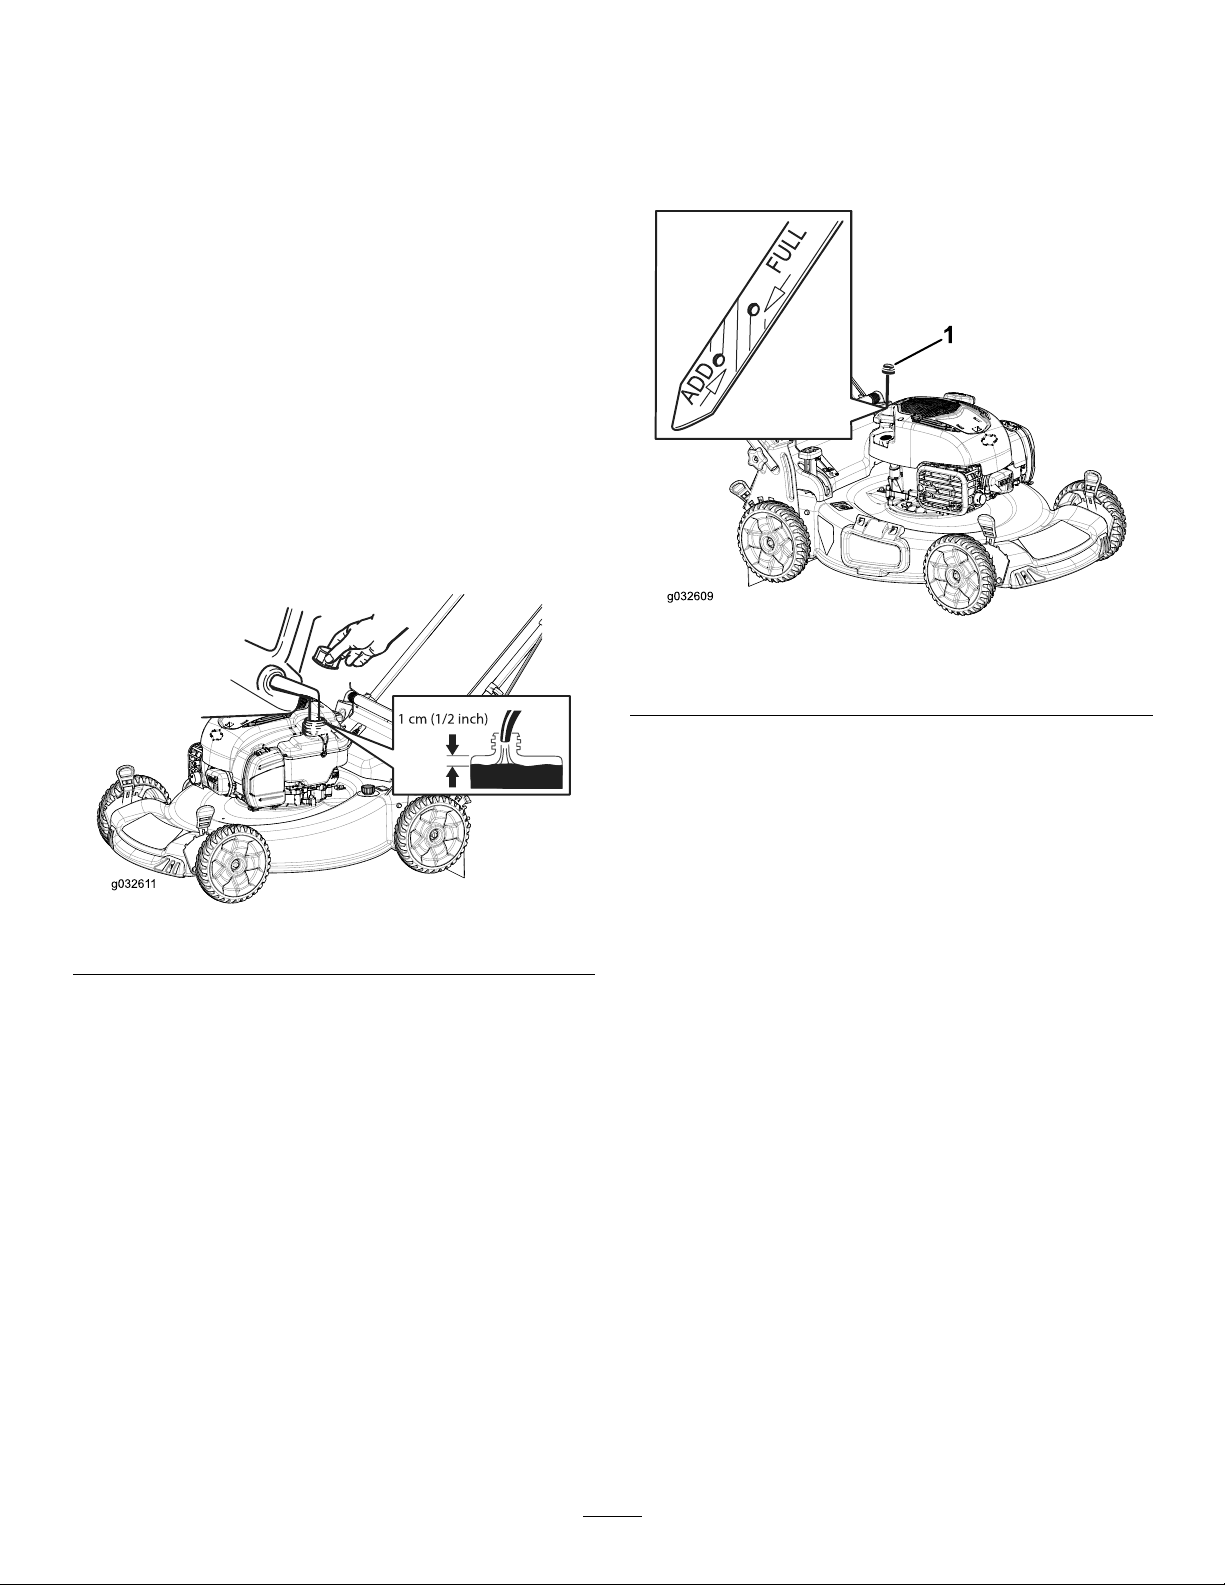
4FillingtheEnginewithOil......................................5
5AssemblingtheGrassBag......................................6
ProductOverview..........................................................7
Operation.....................................................................7
BeforeOperation.......................................................7
BeforeOperationSafety...........................................7
FillingtheFuelTank................................................8
CheckingtheEngine-OilLevel..................................8
AdjustingtheHandleHeight.....................................9
AdjustingtheCuttingHeight....................................9
DuringOperation......................................................9
DuringOperatingSafety...........................................9
StartingtheEngine.................................................10
UsingtheSelf-PropelDrive.....................................10
ShuttingOfftheEngine..........................................10
EngagingtheBlade.................................................11
DisengagingtheBlade.............................................11
CheckingtheBlade-Brake-ClutchOperation..............11
RecyclingtheClippings...........................................12
BaggingtheClippings.............................................12
Side-DischargingtheClippings.................................13
OperatingTips......................................................13
AfterOperation........................................................14
AfterOperatingSafety............................................14
FoldingtheHandle.................................................14
Maintenance.................................................................16
RecommendedMaintenanceSchedule(s)......................16
MaintenanceSafety.................................................16
PreparingforMaintenance.......................................16
ServicingtheAirFilter............................................17
ChangingtheEngineOil.........................................17
ReplacingtheBlade................................................18
CleaningtheBlade-Brake-ClutchShield.....................18
AdjustingtheSelf-PropelDrive................................19
CleaningundertheMachine.....................................19
Storage........................................................................20
PreparingtheMachineforStorage............................20
RemovetheMachinefromStorage............................20
Safety
ThismachinehasbeendesignedinaccordancewithENISO
5395:2013andANSIB71.1-2012.
GeneralSafety
Thisproductiscapableofamputatinghandsandfeetand
ofthrowingobjects.Alwaysfollowallsafetyinstructionsto
avoidseriouspersonalinjury.
Usingthisproductforpurposesotherthanitsintendeduse
couldprovedangeroustoyouandbystanders.
•ReadandunderstandthecontentsofthisOperator’sManual
beforeyoustarttheengine.Ensurethateveryoneusing
thisproductknowshowtouseitandunderstandsthe
warnings.
•Donotputyourhandsorfeetnearmovingcomponents
ofthemachine.
•Donotoperatethemachinewithoutallguardsandother
safetyprotectivedevicesinplaceandworkingonthe
machine.
•Keepclearofanydischargeopening.Keepbystandersa
safedistancefromthemachine.
•Keepchildrenoutoftheoperatingarea.Neverallow
childrentooperatethemachine.
•Stopthemachineandshutofftheenginebeforeservicing,
fueling,oruncloggingthemachine.
Improperlyusingormaintainingthismachinecanresult
ininjury.Toreducethepotentialforinjury,complywith
thesesafetyinstructionsandalwayspayattentiontothe
safety-alertsymbol,whichmeansCaution,Warning,or
Danger—personalsafetyinstruction.Failuretocomplywith
theseinstructionsmayresultinpersonalinjuryordeath.
Youcanndadditionalitemsofsafetyinformationintheir
respectivesectionsthroughoutthismanual.
SafetyandInstructional
Decals
Important:Safetyandinstructiondecalsarelocated
nearareasofpotentialdanger.Replacedamageddecals.
2

decaloemmarkt
Manufacturer'sMark
1.Indicatesthatthebladeisidentiedasapartfromthe
originalmachinemanufacturer
decal94-8072
94-8072
decal108-8117
108-8117
decal112-8867
112-8867
1.Lock2.Unlock
decal117-2718
117-2718
decal131-0894
131-0894
TractionAdjustment
1.Attention;readtheOperator'sManual—1)Loosenthe
knobbyturningitcounterclockwise;2)Pullthecable(s)
awayfromtheenginetodecreasethetraction,orpush
thecable(s)towardtheenginetoincreasethetraction;3)
Tightentheknobbyturningitclockwise.
decal131-4514b
131-4514
1.Warning—readtheOperator'sManual.
2.Cutting/dismembermenthazardofhandorfoot,mower
blade—stayawayfrommovingparts;keepallguardsand
shieldsinplace.
3.Cutting/dismembermenthazardofhandorfoot,mower
blade—disconnectthespark-plugwireandreadthe
instructionsbeforeservicingorperformingmaintenance.
4.Thrownobjecthazard—keepbystandersasafedistance
fromthemachine;shutofftheenginebeforeleavingthe
operatingposition;pickupanydebrisbeforemowing.
5.Cutting/dismembermenthazardofhandorfoot,mower
blade—donotoperateupanddownslopes;operatesideto
sideonslopes;lookbehindyouwhenbackingup.
3

Setup
Important:Removeanddiscardtheprotectiveplastic
sheetthatcoverstheengine.
1
InstallingtheBlade-Control
Bar
NoPartsRequired
Procedure
Installtheblade-controlbarintotheupperhandle(Figure4).
g003116
Figure4
2
AssemblingandUnfoldingthe
Handle
NoPartsRequired
Procedure
1.Installthehandleendsontothemowerhousingsothat
thepinattachedtoeachhandlebracketisinthelower
holeofitsrelatedhandleend(Figure5).
g032866
Figure5
1.Pin2.Handleend
Note:Thepinsdonotshowthroughtheholesinthe
handleendswhenthehandleisinthefoldedposition.
2.Removeandsavethe2handleknobsand2carriage
boltsfromthehandlebrackets(Figure6).
g032865
Figure6
1.Handleknob2.Carriagebolt
3.Unfoldthehandletotheoperatingpositionbyrotating
itrearward(Figure7).
4

g036578
Figure7
1.Foldedposition2.Operatingposition
4.Insertthecarriagebolt(withtheboltheadtoward
theinside)throughtheupperorlowersquareholein
handlebracketandtheupperholeinthehandleend
(Figure8).
g032869
Figure8
1.Handleknob2.Carriagebolt
5.Looselyinstallthehandleknobsontothecarriagebolts.
6.Refertosteps3through5ofAdjustingtheHandle
Height(page9).
3
InstallingtheRecoil-Starter
RopeintheRopeGuide
NoPartsRequired
Procedure
Important:Tostarttheenginesafelyandeasily
wheneveryouusethemachine,installtherecoil-starter
ropeintheropeguide.
Pulltherecoil-starterropethroughtheropeguideonthe
handle(Figure9).
g003251
Figure9
1.Recoil-starterrope2.Ropeguide
4
FillingtheEnginewithOil
NoPartsRequired
Procedure
Note:Yourmachinedoesnotcomewithoilintheengine,
butitdoescomewithabottleofoil.
Max.ll:0.53L(18oz),type:SAE30detergentoilwithan
APIserviceclassicationofSF,SG,SH,SJ,SL,orhigher.
1.Removethedipstick(Figure10).
5

g032609
Figure10
1.Dipstick
2.Slowlypouroilintotheoillltubeuntiltheoillevel
reachestheFulllineonthedipstick(Figure10).Do
notoverll.
3.Installthedipsticksecurely.
5
AssemblingtheGrassBag
NoPartsRequired
Procedure
1.SlipthegrassbagovertheframeasshowninFigure11.
Note:Donotslipthebagoverthehandle(Figure11).
2.Hookthebottomchannelofthebagontothebottom
oftheframe(Figure12).
3.Hookthetopandsidechannelsofthebagontothetop
andsidesoftheframe,respectively(Figure12).
g027257
1
23
g027257
Figure11
1.Handle3.Grassbag
2.Frame
g027258
g027258
Figure12
6

ProductOverview
g036579
Figure13
1.Handle8.Sparkplug
2.Blade-controlbar9.Side-dischargedeector
3.Adjustmentknobforthe
self-propeldrive
10.Oilll/dipstick
4.Engine-shutoffswitch11.Bag-on-demandlever
5.Fuel-tankcap12.Handleknob(2)
6.Airlter13.Recoil-starthandle
7.Cutting-heightlever(4)14.Control-barlock
g009527
Figure14
1.Grassbag2.Side-dischargechute
Operation
BeforeOperation
BeforeOperationSafety
GeneralSafety
•Becomefamiliarwiththesafeoperationoftheequipment,
operatorcontrols,andsafetysigns.
•Checkthatallguardsandsafetydevices,suchasdeectors
and/orgrasscatcher,areinplaceandworkingproperly.
•Alwaysinspectthemachinetoensurethattheblades,
bladebolts,andcuttingassemblyarenotwornor
damaged.
•Inspecttheareawhereyouwillusethemachineand
removeallobjectsthatthemachinecouldthrow .
•Adjustingthecuttingheightmaybringyouintocontact
withthemovingblade,causingseriousinjury.
–Shutofftheengineandwaitforallmovingpartsto
stop.
–Donotputyourngersunderthehousingwhen
adjustingthecuttingheight.
FuelSafety
DANGER
Fuelisextremelyammableandhighlyexplosive.
Areorexplosionfromfuelcanburnyouand
othersandcandamageproperty.
•Topreventastaticchargefromignitingthefuel,
placethecontainerand/ormachinedirectlyon
thegroundbeforelling,notinavehicleoron
anobject.
•Fillthefueltankoutdoors,inanopenarea,when
theengineiscold.Wipeupanyfuelthatspills.
•Donothandlefuelwhensmokingoraroundan
openameorsparks.
•Storefuelinanapprovedcontainerandkeepit
outofthereachofchildren.
WARNING
Fuelisharmfulorfatalifswallowed.Long-term
exposuretovaporscancauseseriousinjuryand
illness.
•Avoidprolongedbreathingofvapors.
•Keepyourhandsandfaceawayfromthenozzle
andthefuel-tankopening.
•Keepfuelawayfromyoureyesandskin.
7

FillingtheFuelTank
•Forbestresults,useonlyclean,fresh,unleadedgasoline
withanoctaneratingof87orhigher((R+M)/2rating
method).
•Oxygenatedfuelwithupto10%ethanolor15%MTBE
byvolumeisacceptable.
•Donotuseethanolblendsofgasoline,suchasE15
orE85,withmorethan10%ethanolbyvolume.
Performanceproblemsand/orenginedamagemayresult,
whichmaynotbecoveredunderwarranty.
•Donotusegasolinecontainingmethanol.
•Donotstorefueleitherinthefueltankorinfuel
containersoverthewinterunlessfuelstabilizerhasbeen
addedtothefuel.
•Donotaddoiltogasoline.
Important:Toreducestartingproblems,addfuel
stabilizertothefuelallseason,mixingitwithgasoline
lessthan30daysold.
g032611
Figure15
CheckingtheEngine-OilLevel
ServiceInterval:Beforeeachuseordaily
1.Movethemachinetoalevelsurface.
2.Removethedipstick(Figure16).
g032609
Figure16
1.Dipstick
3.Wipethedipstickcleanwithacleancloth.
4.Insertthedipstickfullyintotheoil-lltube,then
removethedipstick.
5.Readtheoillevelonthedipstick(Figure16).
•IftheoillevelisbelowtheAddmarkonthe
dipstick,slowlypourasmallamountofoilinto
theoil-lltube,wait3minutes,andrepeatsteps3
through5untiltheoillevelisattheFullmarkon
thedipstick(Figure16).
•IftheoillevelisabovetheFullmarkonthe
dipstick,draintheexcessoiluntiltheoillevelon
thedipstickisattheFullmark.RefertoChanging
theEngineOil(page17).
Important:Iftheoillevelinthecrankcaseis
toolowortoohighandyouruntheengine,
youmaydamagetheengine.
6.Installthedipsticksecurely.
8

AdjustingtheHandleHeight
Youcanraiseorlowerthehandlein1of2positionsthatis
morecomfortableforyou(Figure17).
g032867
Figure17
1.Loosenbothhandleknobsuntilyoucanpushthe
squareedgesofthecarriageboltsoutofthesquare
holesinthehandlebrackets.
2.Pushtheknobsuntiltheyareloose.
3.Movethehandletotheupperorlowerheightposition.
4.Pulltheknobsuntilthesquareedgesofeachcarriage
bolttsintoitsrelatedsquarehole.
5.Tightenthehandleknobsastightasyoucan.
AdjustingtheCuttingHeight
Adjustthecuttingheightasdesired.Setthefrontwheelsto
thesameheightastherearwheels(Figure18).
Note:Toraisethemachine,movethefrontcutting-height
leversrearwardandtherearcutting-heightleversforward.
Tolowerthemachine,movethefrontcutting-heightlevers
forwardandtherearcutting-heightleversrearward.
g032612
Figure18
1.Raisethemachine2.Lowerthemachine
Note:Thecutting-heightsettingsare25mm(1inch);35
mm(1-3/8inches);44mm(1-3/4inches);54mm(2-1/8
inches);64mm(2-1/2inches);73mm(2-7/8inches);83mm
(3-1/4inches);92mm(3-5/8inches);and102mm(4inches).
DuringOperation
DuringOperatingSafety
GeneralSafety
•Wearappropriateclothing,includingeyeprotection;
slip-resistant,substantialfootwear;andhearing
protection.Tiebacklonghair,securelooseclothing,and
donotwearjewelry.
•Donotoperatethemachinewhileill,tired,orunderthe
inuenceofalcoholordrugs.
•Thebladeissharp;contactingthebladecanresultin
seriouspersonalinjury.Shutofftheengineandwaitfor
allmovingpartstostopbeforeleavingtheoperating
position.
•Whenyoureleasetheblade-controlbar,theengineshould
shutoffandthebladeshouldstopwithin3seconds.If
not,stopusingyourmachineimmediatelyandcontactan
AuthorizedServiceDealer.
•Operatethemachineonlyingoodvisibilityand
appropriateweatherconditions.Donotoperatethe
machinewhenthereistheriskoflightning.
•Wetgrassorleavescancauseseriousinjuryifyouslipand
contacttheblade.Avoidmowinginwetconditions.
•Useextremecarewhenapproachingblindcorners,
shrubs,trees,orotherobjectsthatmayblockyourview .
9

•Watchforholes,ruts,bumps,rocks,orotherhidden
objects.Uneventerraincouldcauseaslip-and-fall
accident.
•Stopthemachineandinspectthebladesafterstrikingan
objectorifthereisanabnormalvibrationinthemachine.
Makeallnecessaryrepairsbeforeresumingoperation.
•Beforeleavingtheoperatingposition,shutofftheengine,
andwaitforallmovingpartstostop.
•Iftheenginehasbeenrunningthemuferwillbehotand
canseverelyburnyou.Keepawayfromthehotmufer.
•Checkthegrasscatchercomponentsandthedischarge
guardfrequentlyandreplacethemwiththemanufacturer’s
recommendedpartswhennecessary.
•UseaccessoriesandattachmentsapprovedbytheThe
Toro®Companyonly.
SlopeSafety
•Mowacrossthefaceofslopes;neverupanddown.Use
extremecautionwhenchangingdirectiononslopes.
•Donotmowonexcessivelysteepslopes.Poorfooting
couldcauseaslip-and-fallaccident.
•Mowwithcautionneardrop-offs,ditches,or
embankments.
StartingtheEngine
Note:Youcanstarttheengineeitherfromtheoperating
position(Figure19)orattheengine(withtherecoil-start
handleoutoftheropeguide).
g009557
Figure19
Pulltherecoil-starterhandlelightlyuntilyoufeelresistance,
thenpullitsharply.Allowtheropetoreturntothehandle
slowly.
Note:Ifthemachinedoesnotstartafterseveralattempts,
contactanAuthorizedServiceDealer.
UsingtheSelf-PropelDrive
Tooperatetheself-propeldrive,simplywalkwithyourhands
ontheupperhandleandyourelbowsatyoursides,andthe
machinewillautomaticallykeeppacewithyou(Figure20).
g009549
Figure20
Note:Ifthemachinedoesnotfreelyrollbackwardafter
self-propelling,stopwalking,holdyourhandsinplace,and
allowthemachinetorollacoupleofcentimeters(inches)
forwardtodisengagethewheeldrive.Youcanalsotry
reachingjustundertheupperhandletothemetalhandleand
pushthemachineforwardacoupleofcentimeters(inches).
Ifthemachinestilldoesnotrollbackwardeasily,contactan
AuthorizedServiceDealer.
ShuttingOfftheEngine
Toshutofftheengine,pressandholdtheignitionswitch
(Figure13)untiltheengineshutsoff.
Important:Whenyoureleasetheblade-controlbar,
thebladeshouldstopwithin3seconds.Ifitdoesnot
stopproperly,stopusingyourmachineimmediatelyand
contactanAuthorizedServiceDealer.
10

EngagingtheBlade
Whenyoustartyourengine,thebladedoesnotturn.You
mustengagethebladetomow.
1.Pullthecontrol-barlockback(Figure21).
g003123
Figure21
2.Pulltheblade-controlbartothehandle(Figure22).
g003124
Figure22
3.Holdtheblade-controlbaragainstthehandle(Figure
23).
g003125
Figure23
DisengagingtheBlade
Releasetheblade-controlbar(Figure24).
g003126
Figure24
Important:Whenyoureleasetheblade-controlbar,
thebladeshouldstopwithin3seconds.Ifitdoesnot
stopproperly,stopusingyourmachineimmediatelyand
contactanAuthorizedServiceDealer.
Checkingthe
Blade-Brake-ClutchOperation
Checkthecontrolbarbeforeeachusetoensurethatthe
blade-brake-clutchsystemisoperatingproperly.
UsingtheGrassBag
ServiceInterval:Beforeeachuseordaily
Youcanusethegrassbagtoperformanadditionaltestto
checktheblade-brakeclutch.
1.Installtheemptygrassbagonthemachine.
2.Starttheengine.
3.Engagetheblade.
Note:Thebagshouldbegintoinate,indicatingthat
thebladeisengagedandrotating.
4.Releasetheblade-controlbar.
Note:Ifthebagdoesnotimmediatelydeate,the
bladeisstillrotating.Theblade-brakeclutchmaybe
deterioratingand,ifignored,couldresultinanunsafe
operatingcondition.Havethemachineinspectedand
servicedbyanAuthorizedServiceDealer.
5.Shutofftheengineandwaitforallmovingpartsto
stop.
NotUsingtheGrassBag
1.Movethemachineontoapavedsurfaceinanon-windy
area.
2.Setall4wheelstothe83mm(3-1/4inch)cutsetting.
3.Takeahalfsheetofnewspaperandcrumpleitintoa
ballsmallenoughtogounderthemachinehousing
(about76mmor3inchesindiameter).
11

4.Placethenewspaperballabout13cm(5inches)in
frontofthemachine.
5.Starttheengine.
6.Engagetheblade.
7.Releasetheblade-controlbar.
8.Immediatelypushthemachineoverthenewspaperball.
9.Shutofftheengineandwaitforallmovingpartsto
stop.
10.Gotothefrontofthemachineandcheckthe
newspaperball.
Note:Ifthenewspaperballdidnotgounderthe
machine,repeatsteps4through10.
11.Ifthenewspaperisunravelledorshredded,theblade
didnotstopproperly,whichcouldresultinanunsafe
operatingcondition.ContactanAuthorizedService
Dealer.
RecyclingtheClippings
Yourmachinecomesfromthefactoryreadytorecyclethe
grassandleafclippingsbackintothelawn.
Ifthegrassbagisonthemachineandthebag-on-demand
leverisintheBaggingposition,movethelevertothe
Recyclingpositionbeforerecyclingtheclippings;referto
OperatingtheBag-on-DemandLever(page12).Ifthe
side-dischargechuteisonthemachine,removeitbefore
recyclingtheclippings;refertoRemovingtheSide-Discharge
Chute(page13).
BaggingtheClippings
Usethegrassbagwhenyouwanttocollectgrassandleaf
clippingsfromthelawn.
Iftheside-dischargechuteisonthemachine,removeitbefore
baggingtheclippings;refertoRemovingtheSide-Discharge
Chute(page13).Ifthebag-on-demandleverisinthe
Recyclingposition,moveittotheBaggingposition;referto
OperatingtheBag-on-DemandLever(page12).
InstallingtheGrassBag
1.Raiseandholdupthereardeector(Figure25).
g036580
Figure25
1.Notches3.Grass-bagpin(2)
2.Reardeector
2.Installthegrassbag,ensuringthatthepinsonthebag
restinthenotchesonthehandle(Figure25).
3.Lowerthereardeector.
RemovingtheGrassBag
Toremovethebag,reversethestepsinInstallingtheGrass
Bag(page12).
OperatingtheBag-on-DemandLever
Thebag-on-demandfeatureallowsyoutoeithercollector
recyclegrassandleafclippingswhilethegrassbagisattached
tothemachine.
•Forbaggingthegrassandleafclippings,pressthebutton
onthebag-on-demandleverandmovetheleverforward
untilthebuttonontheleverpopsup(Figure26).
12

g033491
Figure26
1.Bag-on-demandlever(inbaggingposition)
•Forrecyclingthegrassandleafclippings,pressthebutton
ontheleverandmovetheleverrearwarduntilthebutton
ontheleverpopsup.
Important:Forproperoperation,removeanygrass
clippingsanddebrisfromthebag-on-demanddoorand
thesurroundingopening(Figure27)beforeyoumove
thebag-on-demandleverfrom1positiontoanother.
g036581
Figure27
1.Cleanhere
Side-Dischargingthe
Clippings
Usethesidedischargeforcuttingverytallgrass.
Ifthegrassbagisonthemachineandthebag-on-demand
leverisintheBaggingposition,movethelevertothe
Recyclingposition;refertoOperatingtheBag-on-Demand
Lever(page12).
InstallingtheSide-DischargeChute
Liftupthesidedeectorandinstalltheside-dischargechute
(Figure28).
g033496
Figure28
RemovingtheSide-DischargeChute
Toremovethesidedischargechute,liftupthesidedeector,
removetheside-dischargechute,andlowertheside-discharge
deector.
OperatingTips
GeneralMowingTips
•Cleartheareaofsticks,stones,wire,branches,andother
debristhatthebladecouldhit.
•Avoidstrikingsolidobjectswiththeblade.Never
deliberatelymowoveranyobject.
•Ifthemachinestrikesanobjectorstartstovibrate,
immediatelyshutofftheengine,disconnectthewirefrom
thesparkplug,andexaminethemachinefordamage.
•Forbestperformance,installanewbladebeforethe
cuttingseasonbegins.
•ReplacethebladewhennecessarywithaToro
replacementblade.
13

CuttingGrass
•Cutonlyaboutathirdofthegrassbladeatatime.Donot
cutbelowthe54mm(2-1/8-inch)settingunlessthegrass
issparseoritislatefallwhengrassgrowthbeginstoslow
down.RefertoAdjustingtheCuttingHeight(page9).
•Whencuttinggrassover15cm(6inches)tall,mowatthe
highestcutting-heightsettingandwalkslower;thenmow
againatalowersettingforthebestlawnappearance.If
thegrassistoolong,themachinemayplugandcause
theenginetostall.
•Mowonlydrygrassorleaves.Wetgrassandleavestend
toclumpontheyardandcancausethemachinetoplug
ortheenginetostall.
•Beawareofapotentialrehazardinverydryconditions,
followalllocalrewarnings,andkeepthemachinefree
ofdrygrassandleafdebris.
•Alternatethemowingdirection.Thishelpsdispersethe
clippingsoverthelawnforevenfertilization.
•Ifthenishedlawnappearanceisunsatisfactory,try1
ormoreofthefollowing:
–Replacethebladeorhaveitsharpened.
–Walkataslowerpacewhilemowing.
–Raisethecuttingheightonyourmachine.
–Cutthegrassmorefrequently.
–Overlapcuttingswathsinsteadofcuttingafullswath
witheachpass.
–Setthecuttingheightonthefrontwheelsanotch
lowerthantherearwheels.Forexample,setthefront
wheelsat54mm(2-1/8-inches)andtherearwheels
at64mm(2-1/2inches).
CuttingLeaves
•Aftercuttingthelawn,ensurethathalfofthelawnshows
throughthecutleafcover.Youmayneedtomakemore
thanasinglepassovertheleaves.
•Iftherearemorethan13cm(5inches)ofleavesonthe
lawn,setthefrontcuttingheight1or2notcheshigher
thantherearcuttingheight.
•Slowdownyourmowingspeedifthemachinedoesnot
cuttheleavesnelyenough.
AfterOperation
AfterOperatingSafety
GeneralSafety
•Cleangrassanddebrisfromthemachinetohelpprevent
res.Cleanupoilorfuelspills.
•Allowtheenginetocoolbeforestoringthemachinein
anyenclosure.
•Neverstorethemachineorfuelcontainerwherethereis
anopename,spark,orpilotlight,suchasonawater
heateroronotherappliances.
HaulingSafety
•Usecarewhenloadingorunloadingthemachine.
•Securethemachinefromrolling.
FoldingtheHandle
WARNING
Foldingorunfoldingthehandleimproperlycan
damagethecables,causinganunsafeoperating
condition.
•Donotdamagethecableswhenfoldingor
unfoldingthehandle.
•Ifacableisdamaged,contactanAuthorized
ServiceDealer.
1.Removeandsavethe2handleknobsand2carriage
boltsfromthehandlebrackets(Figure29).
Important:Routethecablestotheoutsideofthe
handleknobsasyoufoldthehandle.
g032869
Figure29
1.Handleknob2.Carriagebolt
14

2.Foldthehandlebyrotatingitforward(Figure30).
g036582
Figure30
1.Operatingposition2.Foldedposition
3.Insertthecarriagebolt(withtheboltheadtowardthe
inside)throughthehandlebracketandtheupperhole
inthehandleend.Ensurethatthesquareedgesofeach
carriagebolttsintotheupperorlowersquareholein
itsrelatedhandlebracket(Figure31).
g032865
Figure31
1.Handleknob2.Carriagebolt
4.Looselyinstallthehandleknobsandcarriageboltson
thehandlebrackets.
5.Tounfoldthehandle,referto2Assemblingand
UnfoldingtheHandle(page4).
15

Maintenance
Note:Determinetheleftandrightsidesofthemachinefromthenormaloperatingposition.
RecommendedMaintenanceSchedule(s)
MaintenanceService
IntervalMaintenanceProcedure
Beforeeachuseordaily
•Checktheengine-oillevel.
•Checktheblade-brake-clutchoperation.
•Cleangrassclippingsanddirtfromunderthemachine.
Every25hours•Replacetheairlter;replaceitmorefrequentlyindustyoperatingconditions.
•Cleantheblade-brake-clutchshield.
Yearly
•Replacethebladeorhaveitsharpened(morefrequentlyiftheedgedullsquickly).
•Cleantheair-coolingsystem;cleanitmorefrequentlyindustyoperatingconditions.
Refertoyourengineowner’smanual.
•Refertoyourengineowner’smanualforanyadditionalyearlymaintenance
procedures.
Yearlyorbeforestorage•Emptythefueltankbeforerepairsasdirectedandbeforeyearlystorage.
Important:Refertoyourengineowner’smanualforadditionalmaintenanceprocedures.
Note:ReplacementpartsareavailablefromanAuthorizedServiceDealer(gotowww.toro.comtondthenearestdealer)
oratwww.shoptoro.com.
MaintenanceSafety
•Disconnectthespark-plugwirefromthesparkplug
beforeperforminganymaintenanceprocedure.
•Wearglovesandeyeprotectionwhenservicingthe
machine.
•Thebladeissharp;contactingthebladecanresultin
seriouspersonalinjury.Weargloveswhenservicingthe
blade.
•Nevertamperwithsafetydevices.Checktheirproper
operationregularly.
•Tippingthemachinemaycausethefueltoleak.Fuelis
ammableandexplosive,andcancausepersonalinjury.
Runtheenginedrytoremovethefuelwithahandpump;
neversiphonthefuel.
PreparingforMaintenance
1.Shutofftheengineandwaitforallmovingpartsto
stop.
2.Disconnectthespark-plugwirefromthesparkplug
(Figure32).
g032617
Figure32
1.Spark-plugwire
3.Afterperformingthemaintenanceprocedure(s),
connectthespark-plugwiretothesparkplug.
Important:Beforetippingthemachinetochange
theoilorreplacetheblade,allowthefueltankto
rundrythroughnormalusage.Ifyoumusttip
themachinepriortorunningoutoffuel,usea
handfuelpumptoremovethefuel.Alwaystipthe
machineontoitsside,withthedipstickdown.
16

ServicingtheAirFilter
ServiceInterval:Every25hours
1.Upclipthetopoftheair-ltercover(Figure33).
g033493
Figure33
1.Clip3.Airlter
2.Air-ltercover
2.Removetheairlter(Figure33).
3.Inspecttheairlter.
Note:Iftheairlterisexcessivelydirty,replaceitwith
anewlter.Otherwise,gentlytaptheairlterona
hardsurfacetoloosendebris.
4.Installtheairlter.
5.Usethecliptoinstalltheair-ltercover.
ChangingtheEngineOil
Changingtheengineoilisnotrequired,butifyoudesire
tochangetheoil,usethefollowingprocedure.
Note:Runtheengineafewminutesbeforechangingthe
oiltowarmit.Warmoilowsbetterandcarriesmore
contaminants.
Max.ll:0.53L(18oz),type:SAE30detergentoilwithan
APIserviceclassicationofSF,SG,SH,SJ,SL,orhigher.
1.Movethemachinetoalevelsurface.
2.RefertoPreparingforMaintenance(page16).
3.Removethedipstick(Figure34).
g032609
Figure34
1.Dipstick
4.Tipthemachineontoitssidewiththeairlterupto
draintheusedoiloutthroughtheoil-lltube(Figure
35).
g037003
Figure35
5.Returnthemachinetotheoperatingposition.
6.Slowlypourabout3/4ofthecrankcasecapacityofoil
intotheoil-lltube.
7.Waitabout3minutesfortheoiltosettleinthe
crankcase.
8.Wipethedipstickcleanwithacleancloth.
9.Insertthedipstickfullyintotheoil-lltube,then
removethedipstick.
10.Readtheoillevelonthedipstick(Figure34).
•IftheoillevelisbelowtheAddmarkonthe
dipstick,slowlypourasmallamountofoilintothe
17

oil-lltubeandrepeatsteps8through10untilthe
oillevelisattheFullmarkonthedipstick.
•IftheoillevelisabovetheFullmarkonthe
dipstick,draintheexcessoiluntiltheoillevelon
thedipstickisattheFullmark.
Important:Iftheoillevelinthecrankcaseis
toolowortoohighandyouruntheengine,
youmaydamagetheengine.
11.Installthedipsticksecurely.
12.Recycletheusedoilproperly.
ReplacingtheBlade
ServiceInterval:Yearly
Important:Youwillneedatorquewrenchtoinstallthe
bladeproperly.Ifyoudonothaveatorquewrenchorare
uncomfortableperformingthisprocedure,contactan
AuthorizedServiceDealer.
Examinethebladewheneveryourunoutofgasoline.Ifthe
bladeisdamagedorcracked,replaceitimmediately.Ifthe
bladeedgeisdullornicked,haveitsharpenedandbalanced,
orreplaceit.
Weargloveswhenservicingtheblade.
1.Disconnectthespark-plugwirefromthesparkplug.
RefertoPreparingforMaintenance(page16).
2.Tipthemachineontoitssidewiththedipstickdown.
3.Removethe2bladenutsandthestiffener(Figure36).
g003134
Figure36
1.Bladenuts2.Stiffener
4.Removetheblade(Figure36).
5.Installthenewblade(Figure36).
6.Installthestiffenerthatyoupreviouslyremoved.
7.Installthebladenutsandtorquethemto20to37N-m
(15to27ft-lb).
Cleaningthe
Blade-Brake-ClutchShield
ServiceInterval:Every25hours
Cleantheblade-brake-clutchshieldyearlytopreventtheblade
fromstallingwhileyoumow.
1.Disconnectthespark-plugwirefromthesparkplug.
RefertoPreparingforMaintenance(page16).
2.Tipthemachineontoitssidewiththedipstickdown.
3.Removethe2bladenutsandthestiffener(Figure37).
g003133
Figure37
1.Bladenuts4.Bladedriver
2.Stiffener5.Disk
3.Blade6.Blade-brake-clutchshield
4.Removetheblade(Figure37).
5.Removethebladedriveranddisk(Figure37).
6.Removethebladebrake-clutchshield(Figure37).
7.Brushorblowoutdebrisfromtheinsideoftheshield
andaroundalltheparts.
8.Installtheblade-brake-clutchshieldthatyoupreviously
removed.
9.Installthebladedriveranddiskthatyoupreviously
removed.
10.Installthebladeandthestiffenerthatyoupreviously
removed(Figure37).
11.Installthebladenutsandtorquethemto20to37N-m
(15to27ft-lb).
18
Other manuals for Recycler 20958
5
Table of contents
Languages:
Other Toro Lawn Mower manuals

Toro
Toro 30853 User manual

Toro
Toro 31914 User manual

Toro
Toro Recyler 20333 User manual

Toro
Toro 22276 User manual

Toro
Toro Greensmaster Fixed Head Walk Behind Series User manual

Toro
Toro 3678 User manual

Toro
Toro Z Master 74925TE User manual

Toro
Toro 72211 User manual

Toro
Toro Super Recycler 21681 User manual

Toro
Toro 30716TE User manual

Toro
Toro 13AX91RS848 User manual

Toro
Toro Z Master G3 Manual

Toro
Toro TimeCutter MX 5075 User manual

Toro
Toro 74635 User manual

Toro
Toro TITAN ZX 4800 User manual

Toro
Toro LT3340 User manual

Toro
Toro TimeCutter Z5040 User manual

Toro
Toro TITAN ZX 4800 User manual

Toro
Toro GrandStand 74504 User manual

Toro
Toro 74570 User manual