Toro Recycler 20958 User manual

FormNo.3381-259RevA
55cmRecycler®LawnMower
ModelNo.20958—SerialNo.314000001andUp
Operator'sManual
Introduction
Thisrotary-blade,walk-behindlawnmowerisintended
tobeusedbyresidentialhomeowners.Itisdesigned
primarilyforcuttinggrassonwell-maintainedlawns
onresidentialproperties.Itisnotdesignedforcutting
brushorforagriculturaluses.
Readthisinformationcarefullytolearnhowtooperateand
maintainyourproductproperlyandtoavoidinjuryand
productdamage.Youareresponsibleforoperatingthe
productproperlyandsafely.
YoumaycontactTorodirectlyatwww .Toro.comforproduct
andaccessoryinformation,helpndingadealer,ortoregister
yourproduct.
Wheneveryouneedservice,genuineToroparts,oradditional
information,contactanAuthorizedServiceDealerorToro
CustomerServiceandhavethemodelandserialnumbersof
yourproductready.Figure1identiesthelocationofthe
modelandserialnumbersontheproduct.
Figure1
1.Modelandserialnumberplate
Writetheproductmodelandserialnumbersinthespace
below:
ModelNo.
SerialNo.
Thismanualidentiespotentialhazardsandhassafety
messagesidentiedbythesafetyalertsymbol(Figure2),
whichsignalsahazardthatmaycauseseriousinjuryordeath
ifyoudonotfollowtherecommendedprecautions.
Figure2
1.Safetyalertsymbol
Thismanualuses2wordstohighlightinformation.
Importantcallsattentiontospecialmechanicalinformation
andNoteemphasizesgeneralinformationworthyofspecial
attention.
ThisproductcomplieswithallrelevantEuropeandirectives.
Fordetails,seetheseparateproduct-specicDeclarationof
Conformity(DOC)sheet.
Formodelswithstatedenginehorsepower,thegross
horsepoweroftheenginewaslaboratoryratedbytheengine
manufacturerinaccordancewithSAEJ1940.Ascongured
tomeetsafety,emission,andoperatingrequirements,the
actualenginehorsepoweronthisclassoflawnmowerwill
besignicantlylower.
Donottamperwiththeenginecontrolsoralterthegovernor
speed;doingsomaycreateanunsafeconditionresultingin
personalinjury.
Contents
Introduction..................................................................1
GeneralLawnMowerSafety.....................................2
SoundPressure......................................................3
SoundPower..........................................................3
Hand/ArmVibration..............................................3
SafetyandInstructionalDecals.................................4
Setup............................................................................5
1InstallingtheBladeControlBar..............................5
2InstallingtheHandle.............................................5
3InstallingtheRecoil-starterRopeintheRope
Guide.................................................................5
4FillingtheEnginewithOil......................................6
ProductOverview..........................................................7
Specications.........................................................7
Operation.....................................................................7
FillingtheFuelTank................................................7
CheckingtheEngineOilLevel..................................8
AdjustingtheCuttingHeight....................................8
StartingtheEngine..................................................9
UsingtheSelf-propelDrive.......................................9
StoppingtheEngine................................................9
EngagingtheBlade.................................................10
©2014—TheToro®Company
8111LyndaleAvenueSouth
Bloomington,MN55420
Registeratwww.T oro.com.OriginalInstructions(EN)
PrintedintheUSA
AllRightsReserved*3381-259*A

DisengagingtheBlade.............................................10
CheckingtheBlade-brakeClutchOperation...............10
RecyclingtheClippings...........................................11
BaggingtheClippings.............................................11
Side-dischargingtheClippings..................................12
OperatingTips......................................................13
Maintenance.................................................................14
RecommendedMaintenanceSchedule(s)......................14
PreparingforMaintenance.......................................14
ReplacingtheAirFilter............................................15
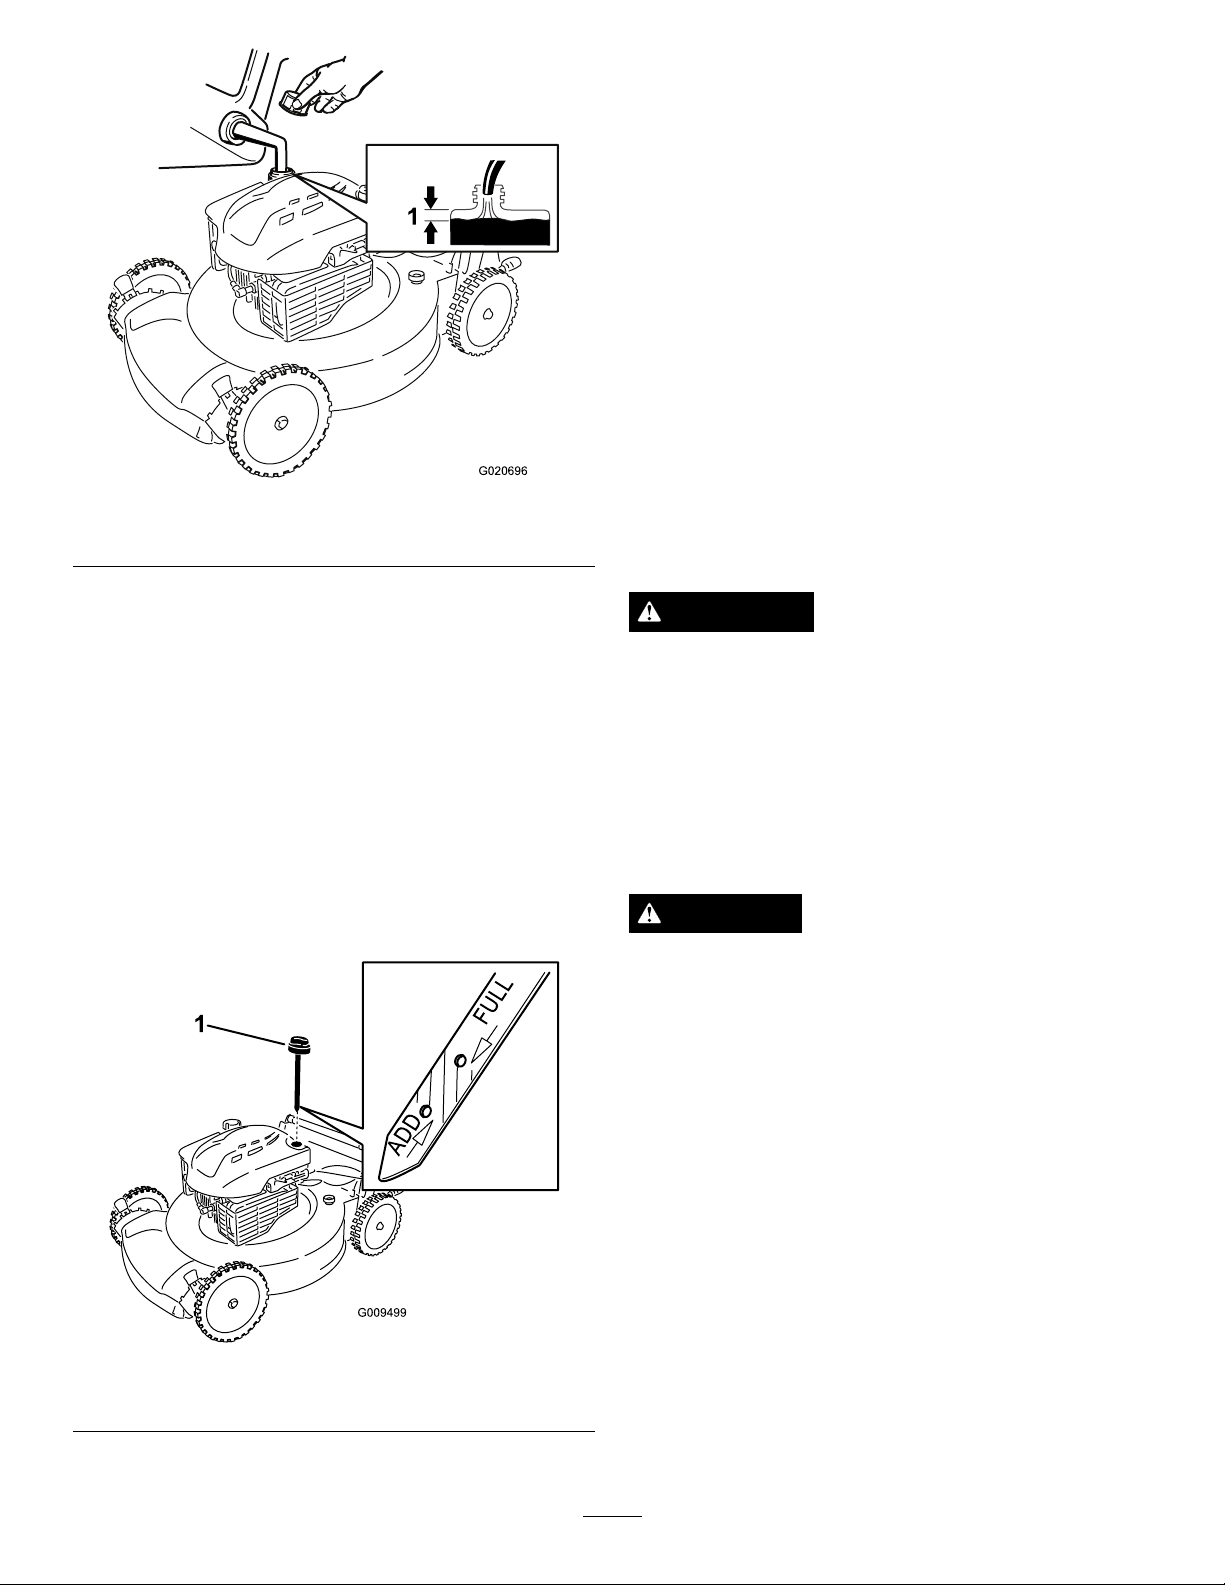
ChangingtheEngineOil.........................................15
ReplacingtheBlade................................................16
CleaningtheBlade-brake-clutchShield......................16
AdjustingtheSelf-propelDriveCable........................17
CleaningundertheMachineHousing........................17
Storage........................................................................18
PreparingtheMachineforStorage............................18
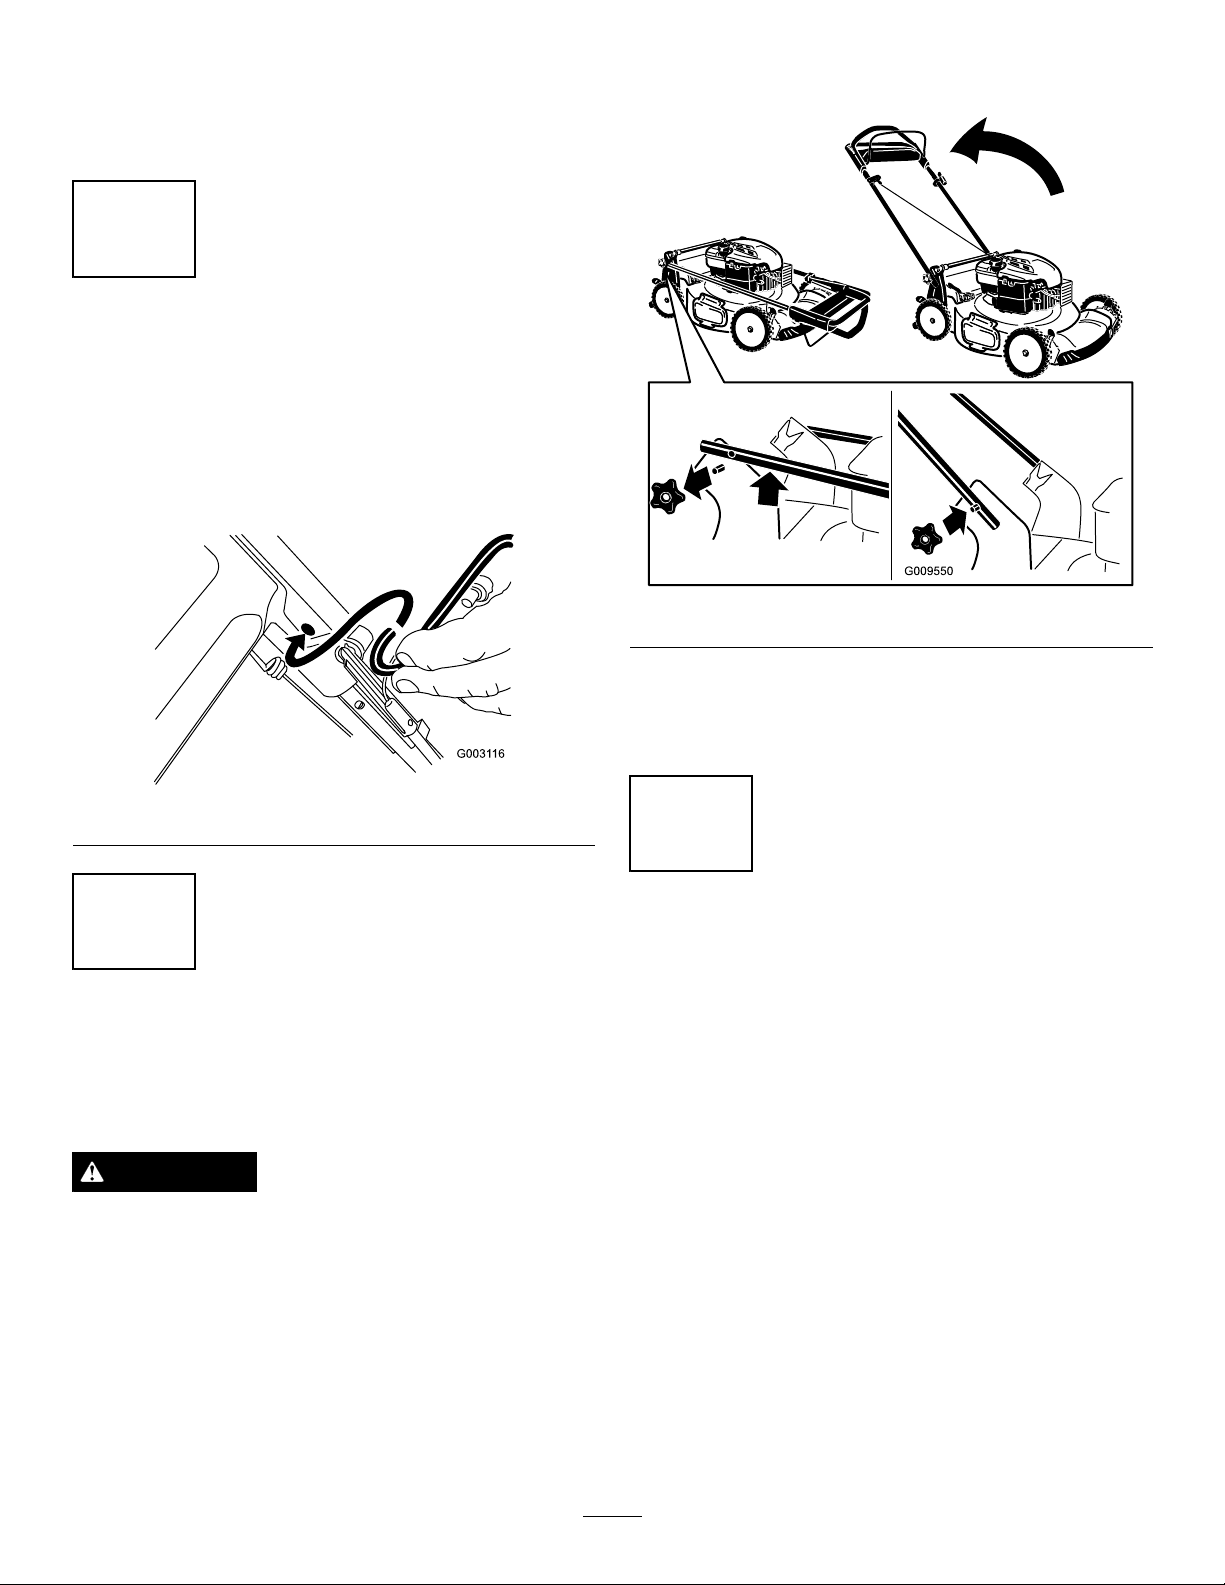
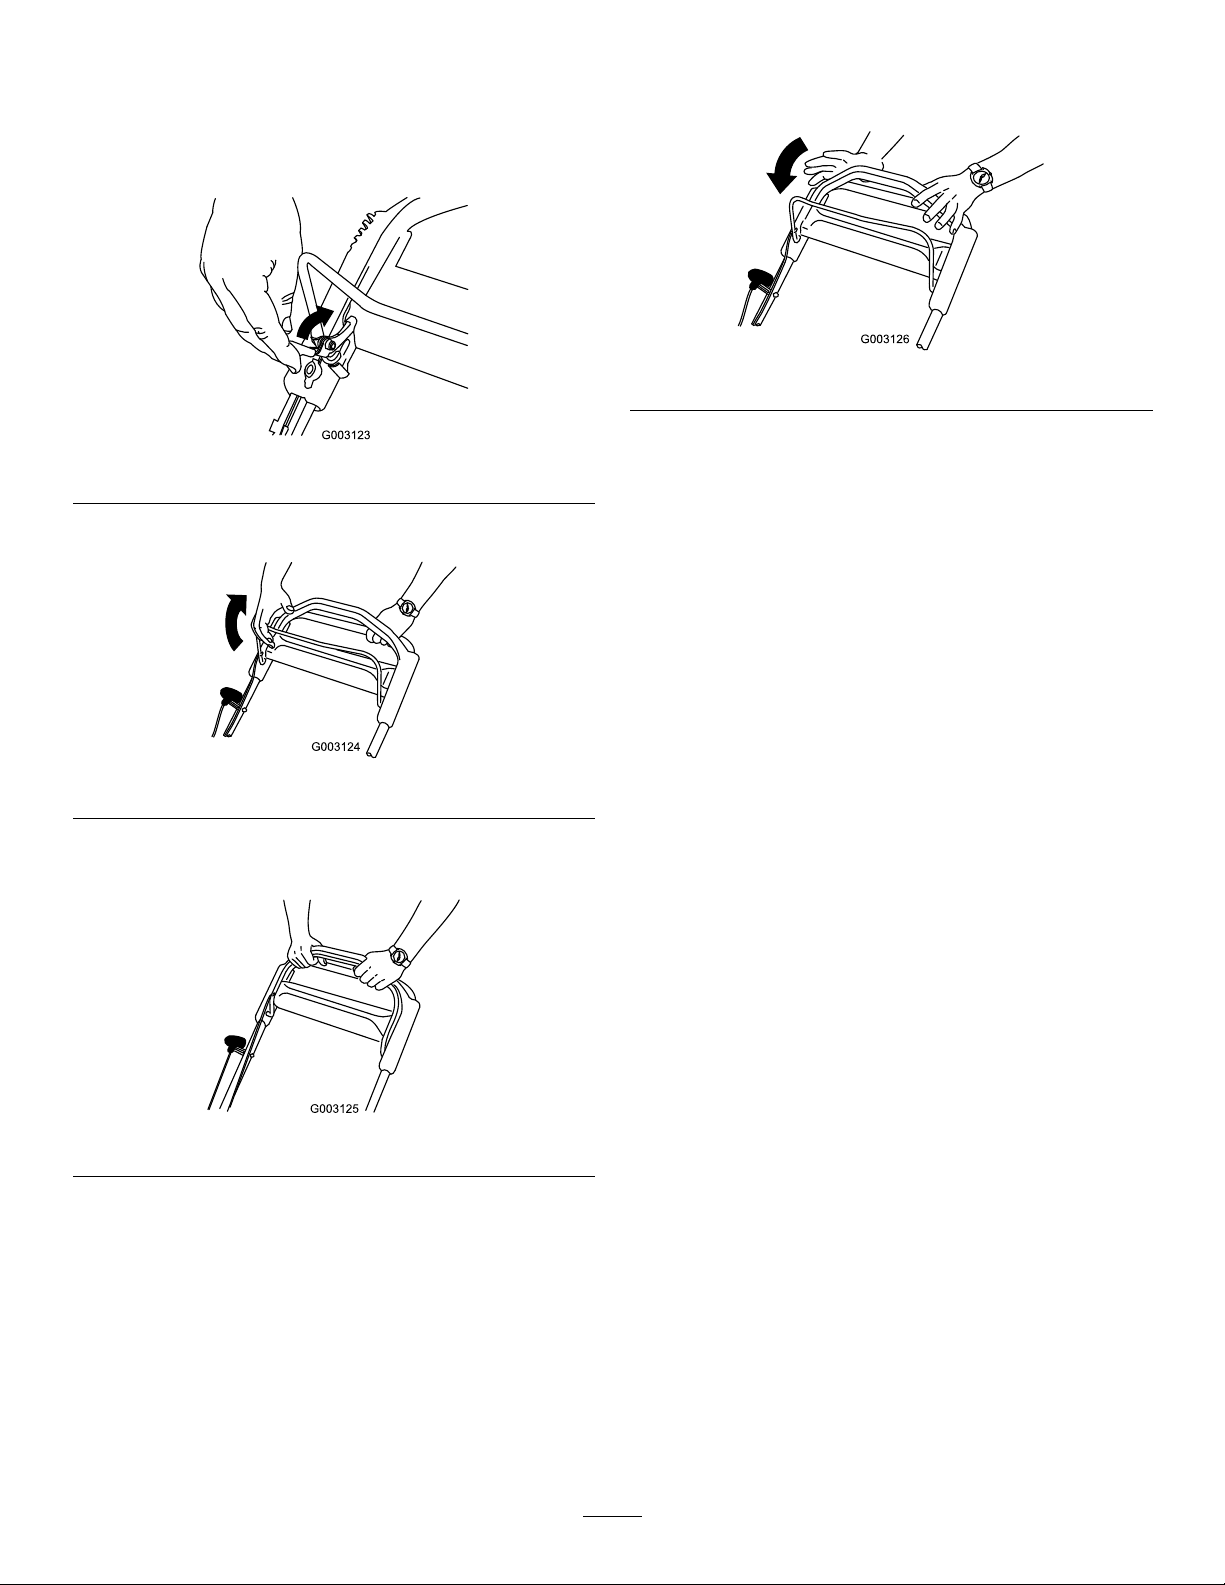
FoldingtheHandle.................................................18
RemovingtheMachinefromStorage.........................18
Safety
Improperlyusingormaintainingthismowercanresult
ininjury.Toreducethepotentialforinjury,complywith
thesesafetyinstructions.
Torodesignedandtestedthismachineforreasonablysafe
service;however,failuretocomplywiththefollowing
instructionsmayresultinpersonalinjury.
Toensuremaximumsafetyandbestperformance,
andtogainknowledgeoftheproduct,itisessential
thatyouandanyotheroperatorofthemowerread
andunderstandthecontentsofthismanualbeforethe
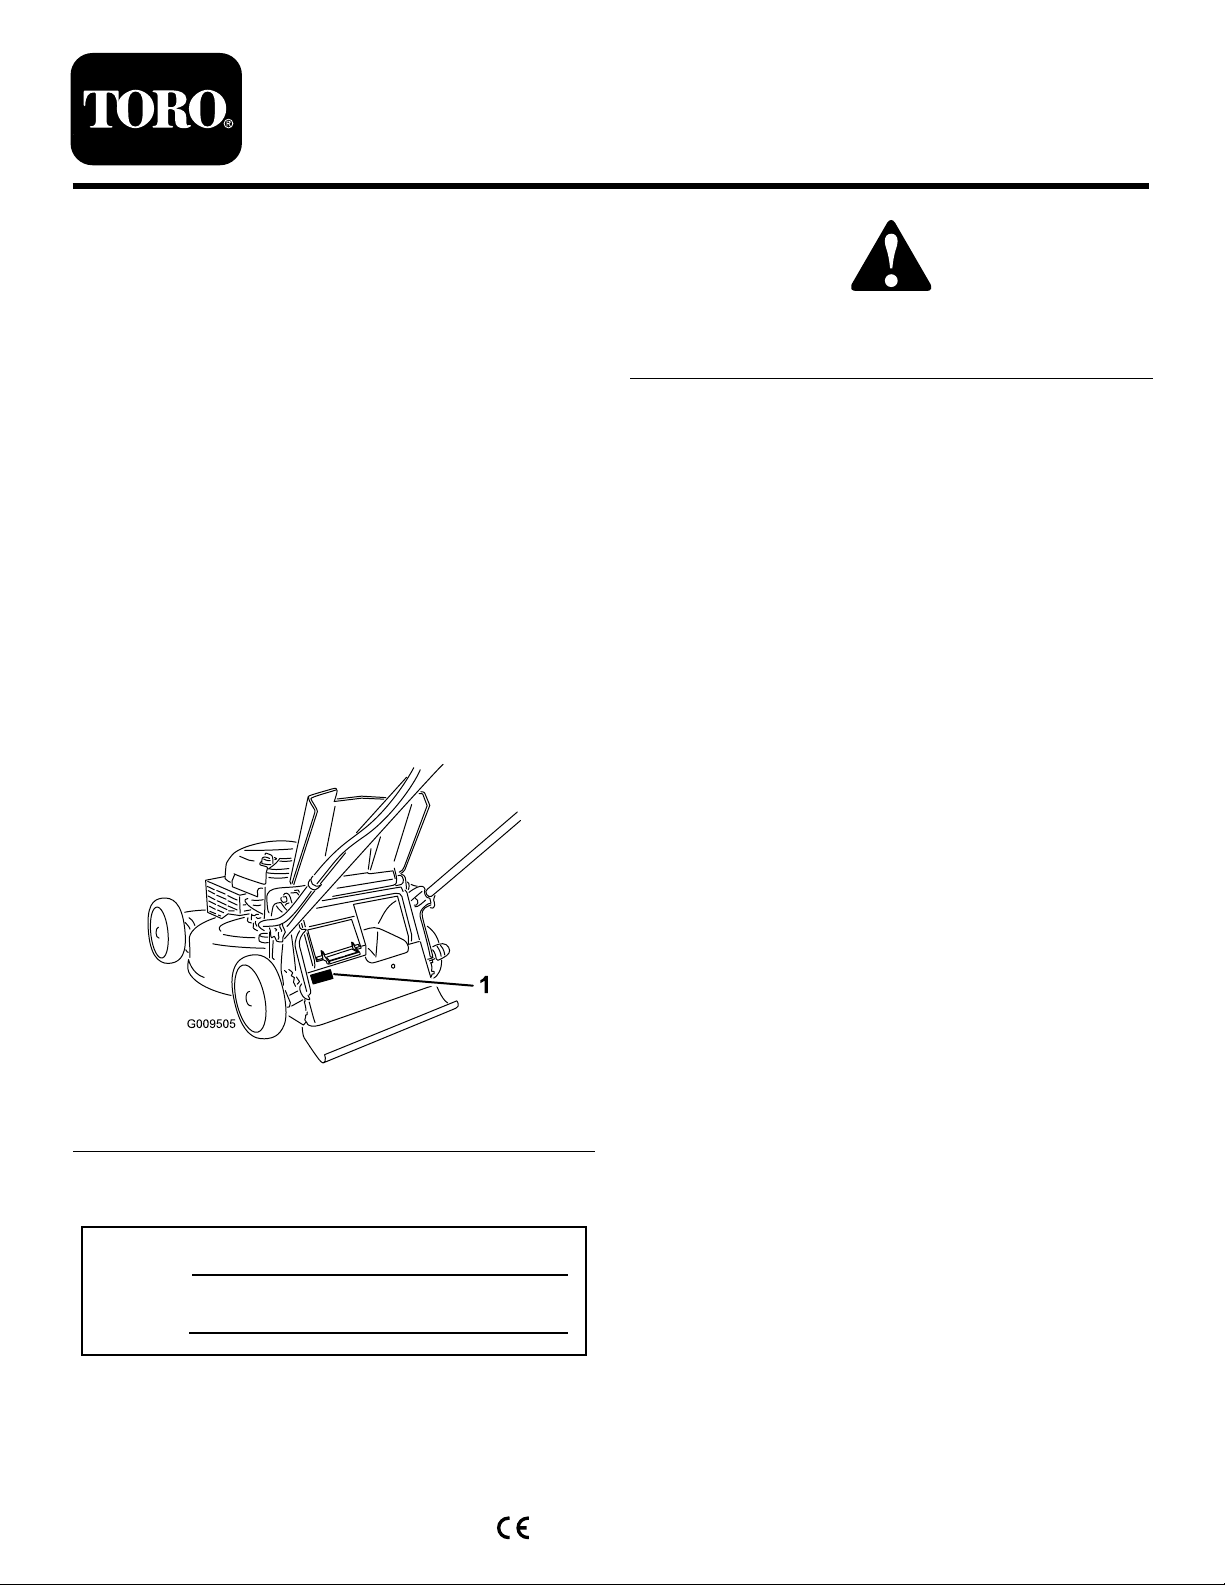
engineiseverstarted.Payparticularattentiontothe
safetyalertsymbol(Figure2),whichmeansCaution,
Warning,orDanger—“personalsafetyinstruction.”
Readandunderstandtheinstructionbecauseithasto
dowithsafety.Failuretocomplywiththeinstruction
mayresultinpersonalinjury.
GeneralLawnMowerSafety
ThefollowinginstructionshavebeenadaptedfromEN836.
Thiscuttingmachineiscapableofamputatinghandsandfeet
andofthrowingobjects.Failuretoobservethefollowing
safetyinstructionscouldresultinseriousinjuryordeath.
Training
•Readtheinstructionscarefully.Befamiliarwiththe
controlsandtheproperuseoftheequipment.
•Neverallowchildrenorpeopleunfamiliarwiththese
instructionstousethemower.Localregulationscan
restricttheageoftheoperator.
•Keepinmindthattheoperatororuserisresponsiblefor
accidentsorhazardsoccurringtootherpeopleortheir
property.
•Understandexplanationsforallpictogramsusedonthe
mowerorintheinstructions.
Gasoline
WARNING
Gasolineishighlyammable.Takethefollowing
precautions.
•Storefuelincontainersspecicallydesignedfor
thispurpose.
•Refueloutdoorsonlyanddonotsmokewhile
refueling.
•Addfuelbeforestartingtheengine.Never
removethecapofthefueltankoraddgasoline
whiletheengineisrunningorwhentheengine
ishot.
•Ifgasolineisspilled,donotattempttostartthe
enginebutmovethemachineawayfromthe
areaofspillageandavoidcreatinganysourceof
ignitionuntilgasolinevaporshavedissipated.
•Replaceallfueltankandcontainercapssecurely.
Preparation
•Whilemowing,alwayswearsubstantialfootwearandlong
trousers.Donotoperatetheequipmentwhenbarefoot
orwearingopensandals.
•Thoroughlyinspecttheareawheretheequipmentisto
beusedandremoveallstones,sticks,wires,bonesand
otherforeignobjects.
•Beforeusing,alwaysvisuallyinspecttoseethatguards,
andsafetydevices,suchasdeectorsand/orgrass
catchers,areinplaceandworkingcorrectly.
•Beforeusing,alwaysvisuallyinspecttoseethattheblades,
bladeboltsandcutterassemblyarenotwornordamaged.
Replacewornordamagedbladesandboltsinsetsto
preservebalance.
Starting
Starttheenginecarefullyaccordingtoinstructionsandwith
feetwellawayfromtheblade(s)andnotinfrontofthe
dischargechute.
Operation
•Nevermowwhilepeople,especiallychildren,orpetsare
nearby.
•Mowonlyindaylightoringoodarticiallight.
•Stayalertforholesintheterrain,andotherhidden
hazards.
2

•Donotputhandsorfeetnearorunderrotatingparts.
Keepclearofthedischargeopeningatalltimes.
•Neverpickuporcarryalawnmowerwhiletheengineis
running.
•Useextremecautionwhenreversingorpullinga
pedestriancontrolledlawnmowertowardsyou.
•Walk,neverrun.
•Slopes:
–Donotmowexcessivelysteepslopes.
–Exerciseextremecautionwhenonslopes.
–Mowacrossthefaceofslopes,neverupanddown,
andexerciseextremecautionwhenchangingdirection
onslopes.
–Alwaysbesureofyourfootingonslopes.
•Reducespeedonslopesandinsharpturnstoprevent
overturningorlossofcontrol.
•Stopthebladeifthelawnmowerhastobetiltedfor
transportationwhencrossingsurfacesotherthangrass
andwhentransportingthelawnmowertoandfromthe
areatobemowed.
•Donotoperatetheengineinaconnedspacewhere
dangerouscarbonmonoxidefumescancollect.
•Stoptheengine
–wheneveryouleavethelawnmower.
–beforerefueling.
–beforeremovingthegrasscatcher.
–beforemakingheightadjustmentunlessadjustment
canbemadefromtheoperator'sposition.
•Stoptheengineanddisconnectthespark-plugwire.
–beforeclearingblockagesoruncloggingchute.
–beforechecking,cleaningorworkingonthelawn
mower.
–afterstrikingaforeignobject,inspectthelawnmower
fordamageandmakerepairsbeforerestartingand
operatingthelawnmower.
–iflawnmowerstartstovibrateabnormally(check
immediately).
•Lightningcancausesevereinjuryordeath.Ifyousee
lightningorhearthunderinthearea,donotoperatethe
machine;seekshelter.
•Watchoutfortrafcwhencrossingornearroadways.
MaintenanceandStorage
•Keepallnuts,bolts,andscrewstighttobesurethe
equipmentisinsafeworkingcondition.
•Donotusepressure-cleaningequipmentonmachine.
•Neverstoretheequipmentwithgasolineinthetankand
insideabuildingwherefumescanreachanopename
orspark.
•Allowtheenginetocoolbeforestoringinanyenclosure.
•Toreducetherehazard,keeptheengine,silencer,
batterycompartment,andgasolinestorageareafreeof
grass,leaves,orexcessivegrease.
•Checkthegrasscatchercomponentsandthedischarge
guardfrequentlyandreplacewithmanufacturer's
recommendedparts,whennecessary.
•Replacewornordamagedpartsforsafety.
•Replacefaultysilencers.
•Ifthefueltankhastobedrained,dothisoutdoors.
•Donotchangetheenginegovernorsettingsoroverspeed
theengine.Operatinganengineatexcessivespeedcan
increasethehazardofpersonalinjury.
•Becarefulduringadjustmentofthelawnmowerto
prevententrapmentofthengersbetweenmovingblades
andxedpartsofthelawnmower.
•Toensurethebestperformanceandsafety,
purchaseonlygenuineTororeplacementpartsand
accessories.Donotuse
will t
partsandaccessories;
theymaycauseasafetyhazard.
SoundPressure
Thisunithasasoundpressurelevelattheoperator’searof88
dBA,whichincludesanUncertaintyValue(K)of1dBA.
Thesoundpressurelevelwasdeterminedaccordingtothe
proceduresoutlinedinEN836.
SoundPower
Thisunithasaguaranteedsoundpowerlevelof98dBA,
whichincludesanUncertaintyValue(K)of1dBA.
Thesoundpowerlevelwasdeterminedaccordingtothe
proceduresoutlinedinISO11094.
Hand/ArmVibration
Measuredvibrationlevelforrighthand=4.7m/s2
Measuredvibrationlevelforlefthand=5.1m/s2
UncertaintyValue(K)=2.0m/s2
Measuredvaluesweredeterminedaccordingtotheprocedures
outlinedinEN836.
3

SafetyandInstructionalDecals
Important:Safetyandinstructiondecalsarelocatednearareasofpotentialdanger.Replacedamageddecals.
Manufacturer'sMark
1.Indicatesthebladeisidentiedasapartfromtheoriginal
machinemanufacturer.
112-8760
1.Thrownobjecthazard—keepbystandersasafedistance
fromthemachine.
2.Cutting/dismembermentofhandorfoot—stayawayfrom
movingparts.
112-8867
1.Lock2.Unlock
114-7982
1.Warning—readtheOperator'sManual.
2.Thrownobjecthazard—keepbystandersasafedistance
fromthemachine.
3.Cutting/dismembermenthazardofhandorfoot,mower
blade—disconnectthesparkplugwireandreadthe
instructionsbeforeservicingorperformingmaintenance.
4.Cutting/dismembermenthazardofhandorfoot,mower
blade—stayawayfrommovingparts.
5.Cutting/dismembermenthazardofhandorfoot,mower
blade—donotoperateupanddownslopes;operatesideto
sideonslopes;stoptheenginebeforeleavingtheoperating
position;andlookbehindyouwhenbackingup.
4

Setup
Important:Removeanddiscardtheprotectiveplastic
sheetthatcoverstheengine.
1
InstallingtheBladeControl
Bar
NoPartsRequired
Procedure
Installtheblade-controlbarintotheupperhandle(Figure3).
Figure3
2
InstallingtheHandle
NoPartsRequired
Procedure
WARNING
Foldingorunfoldingthehandleimproperlycan
damagethecables,causinganunsafeoperating
condition.
•Donotdamagethecableswhenfoldingor
unfoldingthehandle.
•Ifacableisdamaged,contactanAuthorized
ServiceDealer.
1.Removethehandleknobsfromthemachinehousing
(Figure4).
Important:Routethecablestotheoutsideofthe
handleknobsasyouinstallthehandle.
Figure4
2.Movethehandletotheoperatingposition.
3.Installandtightenthehandleknobsthatyouremoved
instep1.
3
InstallingtheRecoil-starter
RopeintheRopeGuide
NoPartsRequired
Procedure
Important:Tostarttheenginesafelyandeasily
wheneveryouusethemachine,installtherecoil-starter
ropeintheropeguide.
Pulltherecoil-starterropethroughtheropeguideonthe
handle(Figure5).
5

Figure5
1.Recoil-starterrope2.Ropeguide
4
FillingtheEnginewithOil
NoPartsRequired
Procedure
Important:Yourmachinedoesnotcomewithoilin
theengine.Beforestartingtheengine,lltheengine
crankcasewithoil.
1.Movethemachinetoalevelsurface.
2.Removethedipstick(Figure6)andpourabout3/4of
thecrankcasecapacityofoilintotheoil-lltube.
Note:Maxll:0.59L(20oz),type:SAE30
detergentoilwithanAPIserviceclassicationofSF,
SG,SH,SJ,SL,orhigher.
Figure6
1.Dipstick
3.Wipethedipstickcleanwithacleancloth.
4.Insertthedipstickfullyintotheoil-lltube.
5.Removethedipstickandreadtheoillevelonthe
dipstick;refertoFigure6.
•IftheoilisbelowtheAddmarkonthedipstick,
slowlypourasmallamountofoilintotheoil-ll
tube,wait3minutes,andthenrepeatsteps3
through5untiltheoillevelisattheFullmarkon
thedipstick.
•IftheoilisabovetheFullmarkonthedipstick,
draintheexcessoiluntiltheoillevelisattheFull
markonthedipstick.Todraintheexcessoil,refer
toChangingtheEngineOil(page15).
Important:Iftheoillevelinthecrankcaseistoo
lowortoohighandyouruntheengine,youmay
damagetheengine.
6.Installthedipstickintotheoil-lltubesecurely.
Important:
Change the engine oil after the r st 5
operating hour s
;changeityearlythereafter.Refer
toChangingtheEngineOil(page15).
6

ProductOverview
Figure7
1.Handle8.Cutting-heightlever(4)
2.Blade-controlbar9.Airlter
3.Ignitionswitch10.Side-dischargechute
4.Fuel-tankcap11.Bag-on-demandlever
5.Oilll/dipstick12.Handleknob(2)
6.Washoutport(notshown)13.Recoil-starthandle
7.Sparkplug14.Control-barlock
G020551
2
1
Figure8
1.Grassbag2.Side-dischargechute
Specications
ModelWeightLengthWidthHeight
2095841kg
(90lb)
150cm
(59inches)
58cm
(23inches)
107cm
(42inches)
Operation
FillingtheFuelTank
RecommendedFuel:
•Forbestresults,useonlyclean,fresh(lessthan30days
old),unleadedgasolinewithanoctaneratingof87or
higher((R+M)/2ratingmethod).
•Ethanol:Gasolinewithupto10%ethanol(gasohol)
or15%MTBE(methyltertiarybutylether)byvolume
isacceptable.EthanolandMTBEarenotthesame.
Gasolinewith15%ethanol(E15)byvolumeisnot
approvedforuse.Neverusegasolinethatcontains
morethan10%ethanolbyvolume,suchasE15
(contains15%ethanol),E20(contains20%ethanol),or
E85(containsupto85%ethanol).Usingunapproved
gasolinemaycauseperformanceproblemsand/orengine
damagewhichmaynotbecoveredunderwarranty.
•Donotusegasolinecontainingmethanol.
•Donotstorefueleitherinthefueltankorfuelcontainers
overthewinterunlessafuelstabilizerisused.
•Donotaddoiltogasoline.
Important:Toreducestartingproblems,addfuel
stabilizertothefuelallseason,mixingitwithgasoline
lessthan30daysold;runthemachinedrybeforestoring
itformorethan30days.
Donotusefueladditivesotherthanafuel
stabilizer/conditioner.Donotusefuelstabilizers
withanalcoholbasesuchasethanol,methanol,or
isopropanol.
DANGER
Gasolineisextremelyammableandexplosive.A
reorexplosionfromgasolinecanburnyouand
others.
•Topreventastaticchargefromignitingthe
gasoline,placethecontainerand/ormachine
directlyonthegroundbeforelling,notina
vehicleoronanobject.
•Fillthetankoutdoorswhentheengineiscold.
Wipeupspills.
•Donothandlegasolinewhensmokingoraround
anopenameorsparks.
•Storegasolineinanapprovedfuelcontainer,out
ofthereachofchildren.
1.Cleanaroundthefuel-tankcap,andremovethecap
fromthetank(Figure9).
7

G020696
1
Figure9
1.6mm(1/4inch)
2.Fillthefueltank,leavingatleast6mm(1/4inch)from
thebottomoftheneckemptytoallowthegasoline
roomtoexpand.
3.Installthefueltankcapandtightenitsecurelybyhand.
CheckingtheEngineOilLevel
ServiceInterval:Beforeeachuseordaily
Note:Maxll:0.59L(20oz),type:SAE30detergent
oilwithanAPIserviceclassicationofSF,SG,SH,SJ,SL,
orhigher.
1.Movethemachinetoalevelsurface.
2.Removethedipstick(Figure10).
Figure10
1.Dipstick
3.Wipethedipstickcleanwithacleancloth.
4.Insertthedipstickfullyintotheoil-lltube.
5.Removethedipstickandreadtheoillevelonthe
dipstick;refertoFigure10.
•IftheoilisbelowtheAddmarkonthedipstick,
slowlypourasmallamountofoilintotheoil-ll
tube,wait3minutes,andthenrepeatsteps3
through5untiltheoillevelisattheFullmarkon
thedipstick.
•IftheoilisabovetheFullmarkonthedipstick,
draintheexcessoiluntiltheoillevelisattheFull
markonthedipstick.Todraintheexcessoil,refer
toChangingtheEngineOil(page15).
Important:Iftheoillevelinthecrankcaseistoo
lowortoohighandyouruntheengine,youmay
damagetheengine.
6.Installthedipstickintotheoil-lltubesecurely.
AdjustingtheCuttingHeight
WARNING
Adjustingthecuttingheightmaybringyouinto
contactwiththemovingblade,causingserious
injury.
•Stoptheengineandwaitforallmovingparts
tostop.
•Donotputyourngersunderthehousingwhen
adjustingthecuttingheight.
CAUTION
Iftheenginehasbeenrunning,themuferwillbe
hotandcanseverelyburnyou.Keepawayfromthe
hotmufer.
Adjustthecuttingheightasdesired.Setthefrontwheelsto
thesameheightastherearwheels(Figure11).
Note:Toraisethemachine,movethefrontcutting-height
leversrearwardandtherearcutting-heightleversforward.
Tolowerthemachine,movethefrontcutting-heightlevers
forwardandtherearcutting-heightleversrearward.
8

Figure11
1.Raisethemachine2.Lowerthemachine
Note:Thecutting-heightsettingsare25mm(1inch);35
mm(1-3/8inch);44mm(1-3/4inch);54mm(2-1/8inches);
64mm(2-1/2inches);73mm(2-7/8inches);83mm(3-1/4
inches);92mm(3-5/8inches);and102mm(4inches).
StartingtheEngine
Pulltherecoil-starthandlelightlyuntilyoufeelresistance,
thenpullitsharply(Figure12).Allowtheropetoreturnto
thehandleslowly.
Figure12
Note:Ifthemachinedoesnotstartafterseveralattempts,
contactanAuthorizedServiceDealer.
UsingtheSelf-propelDrive
Tooperatetheself-propeldrive,simplywalkwithyourhands
ontheupperhandleandyourelbowsatyoursides,andthe
machinewillautomaticallykeeppacewithyou(Figure13).
Figure13
Note:Ifthemachinedoesnotfreelyrollbackwardafter
self-propelling,stopwalking,holdyourhandsinplace,and
allowthemachinetorollacoupleofcentimeters(inches)
forwardtodisengagethewheeldrive.Youcanalsotry
reachingjustundertheupperhandletothemetalhandleand
pushthemachineforwardacoupleofcentimeters(inches).
Ifthemachinestilldoesnotrollbackwardeasily,contactan
AuthorizedServiceDealer.
StoppingtheEngine
Holddowntheignitionswitchinthe“Stop”positionuntil
theenginestops(Figure14).
Figure14
1.Ignitionswitch
9

EngagingtheBlade
Whenyoustartyourengine,thebladedoesnotturn.You
mustengagethebladetomow.
1.Pullthecontrol-barlockback(Figure15).
Figure15
2.Pulltheblade-controlbartothehandle(Figure16).
Figure16
3.Holdtheblade-controlbaragainstthehandle(Figure
17).
Figure17
DisengagingtheBlade
Releasetheblade-controlbar(Figure18).
Figure18
Important:Whenyoureleasetheblade-controlbar,
thebladeshouldstopwithin3seconds.Ifitdoesnot
stopproperly,stopusingyourmachineimmediatelyand
contactanAuthorizedServiceDealer.
CheckingtheBlade-brake
ClutchOperation
Checktheblade-controlbarbeforeeachusetoensurethat
theblade-brakeclutchsystemisoperatingproperly.
UsingtheGrassBag
ServiceInterval:Beforeeachuseordaily
Youcanusethegrassbagtoperformanadditionaltestto
checktheblade-brakeclutch.
1.Installtheemptygrassbagonthemachine.
2.Starttheengine.
3.Engagetheblade.
Note:Thebagshouldbegintoinate,indicatingthat
thebladeisengagedandrotating.
4.Releasetheblade-controlbar.
Note:Ifthebagdoesnotimmediatelydeate,the
bladeisstillrotating.Theblade-brakeclutchmaybe
deterioratingand,ifignored,couldresultinanunsafe
operatingcondition.Havethemachineinspectedand
servicedbyanAuthorizedServiceDealer.
5.Stoptheengineandwaitforallmovingpartstostop.
NotUsingtheGrassBag
1.Movethemachineontoapavedsurfaceinanon-windy
area.
2.Setall4wheelstothe83mm(3-1/4inches)
cutting-heightsetting.
3.Takeahalfsheetofnewspaperandcrumpleitintoa
ballsmallenoughtogounderthemachinehousing
(about76mmor3inchesindiameter).
10

4.Placethenewspaperballabout13cm(5inches)in
frontofthemachine.
5.Starttheengine.
6.Engagetheblade.
7.Releasetheblade-controlbar.
8.Immediatelypushthemachineoverthenewspaperball.
9.Stoptheengineandwaitforallmovingpartstostop.
10.Gotothefrontofthemachineandcheckthe
newspaperball.
Note:Ifthenewspaperballdidnotgounderthe
machine,repeatsteps4through10.
11.Ifthenewspaperisunravelledorshredded,theblade
didnotstopproperly,whichcouldresultinanunsafe
operatingcondition.ContactanAuthorizedService
Dealer.
RecyclingtheClippings
Yourmachinecomesfromthefactoryreadytorecyclethe
grassandleafclippingsbackintothelawn.
Ifthegrassbagisonthemachineandthebag-on-demand
leverisinthebaggingposition,movethelevertotherecycling
position;refertoOperatingtheBag-on-DemandLever(page
12)beforerecyclingtheclippings.Iftheside-discharge
chuteisonthemachine,removeit;refertoRemovingthe
Side-dischargeChute(page13)beforerecyclingtheclippings.
BaggingtheClippings
Usethegrassbagwhenyouwanttocollectgrassandleaf
clippingsfromthelawn.
WARNING
Aworngrassbagcouldallowsmallstonesandother
similardebristobethrowntowardtheoperatoror
abystander,andresultinseriouspersonalinjury
ordeath.
Checkthegrassbagfrequently.Ifitisdamaged,
installanewTororeplacementbag.
Iftheside-dischargechuteisonthemachine,removeit;
refertoRemovingtheSide-dischargeChute(page13)before
baggingtheclippings.Ifthebag-on-demandleverisinthe
recyclingposition,moveittothebaggingposition;referto
OperatingtheBag-on-DemandLever(page12).
WARNING
Thebladeissharp;contactingthebladecanresult
inseriouspersonalinjury.
Stoptheengineandwaitforallmovingpartstostop
beforeleavingtheoperatingposition.
InstallingtheGrassBag
1.Raiseandholdupthereardeector(Figure19).
Figure19
1.Notches3.Grassbagpin(2)
2.Reardeector
2.Installthegrassbag,ensuringthatthepinsonthebag
restinthenotchesonthehandle(Figure19).
3.Lowerthereardeector.
RemovingtheGrassBag
Toremovethebag,reversethestepsabove.
11

OperatingtheBag-on-DemandLever
Thebag-on-demandfeatureallowsyoutoeithercollector
recyclegrassandleafclippingswhilethegrassbagisattached
tothemachine.
•Forbaggingthegrassandleafclippings,pressthebutton
onthebag-on-demandlever,andmovetheleverforward
untilthebuttonontheleverpopsup(Figure20).
Figure20
1.Bag-on-demandlever(inbaggingposition)
•Forrecyclingthegrassandleafclippings,pressthebutton
ontheleverandmovetheleverrearwarduntilthebutton
ontheleverpopsup.
Important:Forproperoperation,removeanygrass
clippingsanddebrisfromthebag-on-demanddoor
andthesurroundingopening(Figure21)beforeyou
movethebag-on-demandleverfromoneposition
toanother.
WARNING
Thebladeissharp;contactingthebladecan
resultinseriouspersonalinjury.Also,anopen
reardischargeareacouldallowsmallstonesand
othersimilardebristobethrowntowardthe
operatororabystander,andresultinserious
personalinjuryordeath.
Stoptheengineandwaitforallmovingpartsto
stopbeforecleaningthebag-on-demanddoor
andthesurroundingopening.
Figure21
1.Cleanhere
Side-dischargingtheClippings
Usethesidedischargeforcuttingverytallgrass.
Ifthegrassbagisonthemachineandthebag-on-demand
leverisinthebaggingposition,movethelevertotherecycling
position;refertoOperatingtheBag-on-DemandLever(page
12).
WARNING
Thebladeissharp;contactingthebladecanresult
inseriouspersonalinjury.
Stoptheengineandwaitforallmovingpartstostop
beforeleavingtheoperatingposition.
InstallingtheSide-dischargeChute
Liftupthesidedeectorandinstalltheside-dischargechute
(Figure22).
12

Figure22
RemovingtheSide-dischargeChute
Toremovetheside-dischargechute,liftupthesidedeector,
removetheside-dischargechute,andlowerthesidedeector.
OperatingTips
GeneralMowingTips
•Cleartheareaofsticks,stones,wire,branches,andother
debristhatthebladecouldhit.
•Avoidstrikingsolidobjectswiththeblade.Never
deliberatelymowoveranyobject.
•Ifthemachinestrikesanobjectorstartstovibrate,
immediatelystoptheengine,disconnectthewirefrom
thesparkplug,andexaminethemachinefordamage.
•Forbestperformance,installanewbladebeforethe
cuttingseasonbegins.
•ReplacethebladewhennecessarywithaToro
replacementblade.
CuttingGrass
•Cutonlyaboutathirdofthegrassbladeatatime.Do
notcutbelowthe54mm(2-1/8inches)settingunlessthe
grassissparseoritislatefallwhengrassgrowthbegins
toslowdown.RefertoAdjustingtheCuttingHeight
(page8).
•Whencuttinggrassover15cm(6inches)tall,mowatthe
highestcuttingheightsettingandwalkslower;thenmow
againatalowersettingforthebestlawnappearance.If
thegrassistoolong,themachinemayplugandcause
theenginetostall.
•Mowonlydrygrassorleaves.Wetgrassandleavestend
toclumpontheyardandcancausethemachinetoplug
ortheenginetostall.
WARNING
Wetgrassorleavescancauseseriousinjuryif
youslipandcontacttheblade.Mowonlyindry
conditions.
•Beawareofapotentialrehazardinverydryconditions,
followalllocalrewarnings,andkeepthemachinefree
ofdrygrassandleafdebris.
•Alternatethemowingdirection.Thishelpsdispersethe
clippingsoverthelawnforevenfertilization.
•Ifthenishedlawnappearanceisunsatisfactory,tryone
ormoreofthefollowing:
–Replacethebladeorhaveitsharpened.
–Walkataslowerpacewhilemowing.
–Raisethecuttingheightonyourmachine.
–Cutthegrassmorefrequently.
–Overlapcuttingswathsinsteadofcuttingafullswath
witheachpass.
–Setthecuttingheightonthefrontwheelsonenotch
lowerthantherearwheels.Forexample,setthefront
wheelsat54mm(2-1/8inches)andtherearwheels
at64mm(2-1/2inches).
13

CuttingLeaves
•Aftercuttingthelawn,ensurethathalfofthelawnshows
throughthecutleafcover.Youmayneedtomakemore
thanonepassovertheleaves.
•Iftherearemorethan13cm(5inches)ofleavesonthe
lawn,setthefrontcuttingheightoneortwonotches
higherthantherearcuttingheight.
•Slowdownyourmowingspeedifthemachinedoesnot
cuttheleavesnelyenough.
Maintenance
Note:Determinetheleftandrightsidesofthemachinefromthenormaloperatingposition.
RecommendedMaintenanceSchedule(s)
MaintenanceService
IntervalMaintenanceProcedure
Aftertherst5hours•Changetheengineoil.
Beforeeachuseordaily
•Checktheengineoillevel.
•Checktheblade-brakeclutchoperation.
•Cleangrassclippingsanddirtfromunderthemachinehousing.
Every25hours•Replacetheairlter;replaceitmorefrequentlyindustyoperatingconditions.
•Cleantheblade-brake-clutchshield.
Beforestorage•Emptythefueltankbeforerepairsasdirectedandbeforeannualstorage.
Yearly
•Changetheengineoil.
•Replacethebladeorhaveitsharpened(morefrequentlyiftheedgedullsquickly).
•Cleantheair-coolingsystem;cleanitmorefrequentlyindustyoperatingconditions.
Refertoyourengineoperator'smanual.
•Refertoyourengineoperator'smanualforanyadditionalyearlymaintenance
procedures.
Important:Refertoyourengineoperator'smanualforadditionalmaintenanceprocedures.
Note:ReplacementpartsareavailablefromanAuthorizedServiceDealer(gotowww.Toro.comtondthenearestdealer)
oratwww.shoptoro.com.
PreparingforMaintenance
1.Stoptheengineandwaitforallmovingpartstostop.
2.Disconnectthespark-plugwirefromthesparkplug
(Figure23)beforeperforminganymaintenance
procedure.
Figure23
3.Afterperformingthemaintenanceprocedure(s),
connectthespark-plugwiretothesparkplug.
Important:Beforetippingthemachinetochange
theoilorreplacetheblade,allowthefueltank
torundrythroughnormaluse.Ifyoumusttip
themachinepriortorunningoutoffuel,usea
handfuelpumptoremovethefuel.Alwaystipthe
machineontoitssidewiththedipstickdown.
WARNING
Tippingthemachinemaycausethefuelto
leak.Gasolineisammableandexplosive,
andcancausepersonalinjury.
Runtheenginedryorremovethegasoline
withahandpump;neversiphon.
14

ReplacingtheAirFilter
ServiceInterval:Every25hours
1.Useascrewdrivertoopentheair-ltercover(Figure
24).
Figure24
2.Replacetheairlter(Figure25).
Figure25
3.Installthecover.
ChangingtheEngineOil
ServiceInterval:Aftertherst5hours
Yearly
ToroPremiumEngineOilisavailablefromyourAuthorized
ToroDealer.
1.Movethemachinetoalevelsurface.
2.Ensurethatthefueltankcontainslittleornofuelso
thatfueldoesnotleakoutwhenyoutipthemachine
ontoitsside.
3.Runtheengineafewminutesbeforechangingtheoil
towarmit.
Note:Warmoilowsbetterandcarriesmore
contaminants.
4.Disconnectthewirefromthesparkplug;referto
PreparingforMaintenance(page14).
5.Placeanoildrainpanbesidethemachineontheside
nearesttotheoil-lltube.
6.Removethedipstickfromtheoil-lltube(Figure26).
Figure26
1.Dipstick
7.Tipthemachineontoitsside,withtheoil-lltube
down,todraintheusedoilthroughtheoil-lltubeinto
theoil-drainpan(Figure27).
Figure27
8.Afterdrainingtheusedoil,returnthemachinetothe
operatingposition.
9.Pourabout3/4ofthecrankcasecapacityofoilinthe
crankcase.
10.Wait3minutesfortheoiltosettle.
11.Wipethedipstickcleanwithacleancloth.
12.Insertthedipstickfullyintotheoil-lltube.
13.Removethedipstickandreadtheoillevelonthe
dipstick.
•IftheoilisbelowtheAddmarkonthedipstick,
slowlypourasmallamountofoilintotheoil-ll
tube,wait3minutes,andthenrepeatsteps11
through13untiltheoillevelisattheFullmark
onthedipstick.
•IftheoilisabovetheFullmarkonthedipstick,
draintheexcessoiluntiltheoillevelisattheFull
markonthedipstick.
Important:Iftheoillevelinthecrankcaseistoo
lowortoohighandyouruntheengine,youmay
damagetheengine.
15

14.Installthedipstickintotheoil-lltubesecurely.
15.Disposeoftheusedoilproperlyatalocalrecycling
center.
ReplacingtheBlade
ServiceInterval:Yearly
Important:
Y ou will need a torque wr ench to install the
blade pr oper l y
.Ifyoudonothaveatorquewrenchor
areuncomfortableperformingthisprocedure,contact
anAuthorizedServiceDealer.
Examinethebladewheneveryourunoutofgasoline.Ifthe
bladeisdamagedorcracked,replaceitimmediately.Ifthe
bladeedgeisdullornicked,haveitsharpenedandbalanced,
orreplaceit.
WARNING
Thebladeissharp;contactingthebladecanresult
inseriouspersonalinjury.
Weargloveswhenservicingtheblade.
1.RefertoPreparingforMaintenance(page14).
2.Tipthemachineontoitssidewiththedipstickdown.
3.Removethe2bladenutsandthestiffener(Figure28).
Figure28
1.Bladenuts2.Stiffener
4.Removetheblade(Figure28).
5.Installthenewblade(Figure28).
6.Installthestiffenerwiththe2bladenutsthatyou
previouslyremovedinstep3.
Note:Torquethebladenutsto20to37N-m(15to
27ft-lb).
Cleaningthe
Blade-brake-clutchShield
ServiceInterval:Every25hours
Cleantheblade-brake-clutchshieldyearlytopreventtheblade
fromstallingwhileyoumow.
1.RefertoPreparingforMaintenance(page14).
2.Tipthemachineontoitssidewiththedipstickdown.
3.Removethe2bladenutsandthestiffener(Figure29).
Figure29
1.Bladenuts4.Bladedriver
2.Stiffener5.Anti-scalpdisk
3.Blade6.Blade-brake-clutchshield
4.Removetheblade(Figure29).
5.Removethebladedriverandtheanti-scalpdisk(Figure
29).
6.Removetheblade-brake-clutchshield(Figure29).
7.Brushorblowoutdebrisfromtheinsideoftheshield
andaroundalltheparts.
8.Installtheblade-brake-clutchshieldthatyoupreviously
removed.
9.Installthebladedriverandanti-scalpdiskthatyou
previouslyremoved.
10.Installthebladeandthestiffenerwiththe2bladenuts
thatyoupreviouslyremoved(Figure29).
Note:Torquethebladenutsto20to37N-m(15to
27ft-lb).
16

AdjustingtheSelf-propelDrive
Cable
Wheneveryouinstallanewself-propelcableorifthe
self-propeldriveisoutofadjustment,adjusttheself-propel
drivecable.
1.Loosenthecable-supportnut(Figure30).
Figure30
Thisgureissimpliedforthepurposeofclarity.
2.Pulldownthecablejacket(towardthemachine)until
thereisnoslackinthecable(Figure31).
Figure31
3.Tightenthenutonthecablesupport.
CleaningundertheMachine
Housing
ServiceInterval:Beforeeachuseordaily
WARNING
Themachinemaydislodgematerialfromunderthe
machinehousing.
•Weareyeprotection.
•Stayintheoperatingposition(behindthe
handle)whentheengineisrunning.
•Donotallowbystandersinthearea.
Forbestresults,cleanunderthemachinehousingsoonafter
youhavecompletedmowing.
1.Lowerthemachinetoitslowestcutting-heightsetting;
refertoAdjustingtheCuttingHeight(page8).
2.Movethemachineontoaatpavedsurface.
3.Washouttheareaunderthereardeectorwherethe
clippingsgofromthehousingtothegrassbag.
Note:Washouttheareawiththebag-on-demandin
boththefullyforwardandfullyrearwardpositions.
4.Attachagardenhosethatisconnectedtoawater
supplytothewashoutportonthemachinehousing
(Figure32).
Figure32
1.Washoutport
5.Turnthewateron.
6.Starttheengineandrunituntiltherearenomore
clippingsthatcomeoutfromunderthemachine
housing.
7.Stoptheengine.
8.Shutoffthewateranddisconnectthegardenhose
fromthemachine.
9.Starttheengineandrunitforafewminutestodrythe
housingtopreventitfromrusting.
10.Allowtheenginetocoolbeforestoringthemachine
inanenclosedarea.
17

Storage
Storethemachineinacool,clean,dryplace.
PreparingtheMachinefor
Storage
WARNING
Gasolinevaporscanexplode.
•Donotstoregasolinemorethan30days.
•Donotstorethemachineinanenclosurenear
anopename.
•Allowtheenginetocoolbeforestoringit.
1.Onthelastrefuelingoftheyear,addfuelstabilizerto
thefuelasdirectedbytheenginemanufacturer.
2.Disposeofanyunusedfuelproperly.Recycleit
accordingtolocalcodes,oruseitinyourautomobile.
Note:Oldfuelinthefueltankistheleadingcauseof
hardstarting.Donotstorefuelwithoutstabilizermore
than30days,anddonotstorestabilizedfuelmorethan
90days.
3.Runthemachineuntiltheenginestopsfromrunning
outoffuel.
4.Starttheengineagain.
5.Allowtheenginetorununtilitstops.Whenyoucan
nolongerstarttheengine,itissufcientlydry.
6.Disconnectthewirefromthesparkplug.
7.Removethesparkplug,add30ml(1oz)ofoilthrough
thespark-plughole,andpullthestarterropeslowly
severaltimestodistributeoilthroughoutthecylinder
topreventcylindercorrosionduringtheoff-season.
8.Looselyinstallthesparkplug.
9.Tightenallnuts,bolts,andscrews.
FoldingtheHandle
WARNING
Foldingorunfoldingthehandleimproperlycan
damagethecables,causinganunsafeoperating
condition.
•Donotdamagethecableswhenfoldingor
unfoldingthehandle.
•Ifacableisdamaged,contactanAuthorized
ServiceDealer.
1.Loosenthehandleknobsuntilyoucanmovetheupper
handlefreely.
2.FoldtheupperhandleforwardasshowninFigure33.
Important:Routethecablestotheoutsideofthe
handleknobsasyoufoldthehandle.
Figure33
3.Tounfoldthehandle,reversethestepsabove.
RemovingtheMachinefrom
Storage
1.Checkandtightenallfasteners.
2.Removethesparkplugandspintheenginerapidly
usingthestartertoblowexcessoilfromthecylinder.
3.Installthesparkplugandtightenitwithatorque
wrenchto20N-m(15ft-lb).
4.Performanyneededmaintenanceprocedures;referto
Maintenance(page14).
5.Checktheengineoillevel;refertoCheckingtheEngine
OilLevel(page8).
6.Fillthefueltankwithfreshgasoline;refertoFillingthe
FuelTank(page7).
7.Connectthewiretothesparkplug.
18

InternationalDistributorList
Distributor:Country:PhoneNumber:Distributor:Country:PhoneNumber:
AgrolancKftHungary3627539640MaquiverS.A.Colombia5712364079
BalamaPrimaEngineeringEquip.HongKong85221552163MaruyamaMfg.Co.Inc.Japan81332522285
B-RayCorporationKorea82325512076Mountelda.s.CzechRepublic420255704220
CascoSalesCompanyPuertoRico7877888383Mountelda.s.Slovakia420255704220
CeresS.A.CostaRica5062391138MunditolS.A.Argentina541148219999
CSSCTurfEquipment(pvt)Ltd.SriLanka94112746100NormaGardenRussia74954116120
CyrilJohnston&Co.NorthernIreland442890813121OslingerTurfEquipmentSAEcuador59342396970
CyrilJohnston&Co.RepublicofIreland442890813121OyHakoGroundandGardenAbFinland35898700733
EquiverMexico525553995444ParklandProductsLtd.NewZealand6433493760
FemcoS.A.Guatemala5024423277PerfettoPoland48618208416
ForGarderOUEstonia3723846060PratoverdeSRL.Italy390499128128
G.Y .K.CompanyLtd.Japan81726325861Prochaska&CieAustria4312785100
GeomechanikiofAthensGreece30109350054RTCohen2004Ltd.Israel97298617979
GolfinternationalTurizmTurkey902163365993RiversaSpain34952837500
GuandongGoldenStarChina862087651338LelyTurfcareDenmark4566109200
HakoGroundandGardenSweden4635100000SolvertS.A.S.France33130817700
HakoGroundandGardenNorway4722907760SpyprosStavrinidesLimitedCyprus35722434131
HayterLimited(U.K.)UnitedKingdom441279723444SurgeSystemsIndiaLimitedIndia911292299901
HydroturfInt.CoDubaiUnitedArabEmirates97143479479T-MarktLogisticsLtd.Hungary3626525500
HydroturfEgyptLLCEgypt2025194308ToroAustraliaAustralia61395807355
IrrimacPortugal351212388260T oroEuropeNVBelgium3214562960
IrrigationProductsInt'lPvtLtd.India00914424494387ValtechMorocco212537663636
JeanHeybroekb.v.Netherlands31306394611VictusEmakPoland48618238369
EuropeanPrivacyNotice
TheInformationToroCollects
ToroWarrantyCompany(T oro)respectsyourprivacy.Inordertoprocessyourwarrantyclaimandcontactyouintheeventofaproductrecall,weaskyou
tosharecertainpersonalinformationwithus,eitherdirectlyorthroughyourlocalT orocompanyordealer.
TheT orowarrantysystemishostedonserverslocatedwithintheUnitedStateswhereprivacylawmaynotprovidethesameprotectionasapplies
inyourcountry.
BYSHARINGYOURPERSONALINFORMATIONWITHUS,YOUARECONSENTINGTOTHEPROCESSINGOFYOURPERSONALINFORMATION
ASDESCRIBEDINTHISPRIVACYNOTICE.
TheWayT oroUsesInformation
Toromayuseyourpersonalinformationtoprocesswarrantyclaims,tocontactyouintheeventofaproductrecallandforanyotherpurposewhichwetell
youabout.ToromayshareyourinformationwithToro'safliates,dealersorotherbusinesspartnersinconnectionwithanyoftheseactivities.Wewillnot
sellyourpersonalinformationtoanyothercompany.Wereservetherighttodisclosepersonalinformationinordertocomplywithapplicablelawsand
withrequestsbytheappropriateauthorities,tooperateoursystemsproperlyorforourownprotectionorthatofotherusers.
RetentionofyourPersonalInformation
Wewillkeepyourpersonalinformationaslongasweneeditforthepurposesforwhichitwasoriginallycollectedorforotherlegitimatepurposes
(suchasregulatorycompliance),orasrequiredbyapplicablelaw.
Toro'sCommitmenttoSecurityofYourPersonalInformation
Wetakereasonableprecautionsinordertoprotectthesecurityofyourpersonalinformation.Wealsotakestepstomaintaintheaccuracyandcurrent
statusofpersonalinformation.
AccessandCorrectionofyourPersonalInformation
Ifyouwouldliketorevieworcorrectyourpersonalinformation,pleasecontactusbyemailat[email protected].
AustralianConsumerLaw
AustraliancustomerswillnddetailsrelatingtotheAustralianConsumerLaweitherinsidetheboxoratyourlocalT oroDealer.
374-0269RevH

TheToroWarrantyResidentialProducts
and
TheToroGTSStartingGuarantee
ConditionsandProductsCovered
TheT oroCompanyanditsafliate,T oroWarrantyCompany,pursuant
toanagreementbetweenthem,jointlypromisetorepairfortheoriginal
purchaser1theT oroProductlistedbelowifdefectiveinmaterialsor
workmanshiporiftheToroGTS(GuaranteedtoStart)enginewillnotstart
ontherstorsecondpull,providedtheroutinemaintenancerequiredin
theOperator'sManualhavebeenperformed.
Thefollowingtimeperiodsapplyfromthedateofpurchase:
ProductsWarrantyPeriod
WalkPowerMowers
•CastDeck5yearsResidentialUse2
90DaysCommercialUse
•Engine5yearsGTSGuarantee,
ResidentialUse3
•Battery2years
•SteelDeck2yearsResidentialUse2
30DaysCommercialUse
•Engine2yearsGTSGuarantee,
ResidentialUse3
TimeMasterMowers3yearsResidentialUse2
90DaysCommercialUse
•Engine3yearsGTSGuarantee,
ResidentialUse3
•Battery2years
ElectricHandHeldProducts2yearsResidentialUse2
NoWarrantyforCommercialUse
Snowthrowers
•SingleStage2yearsResidentialUse2
45DaysCommercialUse
•Engine2yearsGTSGuarantee,
ResidentialUse3
•TwoStage3yearsResidentialUse2
45DaysCommercialUse
•Chute,chutedeectorand
impellerhousingcover
Lifetime(originalowneronly)5
ElectricSnowthrowers2yearsResidentialUse2
NoWarrantyforCommercialUse
AllRide-OnUnitsBelow
•EngineSeeenginemanufacturer'swarranty4
•Battery2yearsResidentialUse2
•Attachments2yearsResidentialUse2
DHLawn&GardenTractors2yearsResidentialUse2
30DaysCommercialUse
XLSLawn&GardenTractors3yearsResidentialUse2
30DaysCommercialUse
TimeCutter3yearsResidentialUse2
30DaysCommercialUse
TITANMowers3yearsor240hours5
•FrameLifetime(originalowneronly)6
1OriginalPurchasermeansthepersonwhooriginallypurchasedtheToroProduct.
2Residentialusemeansuseoftheproductonthesamelotasyourhome.Useatmorethanone
locationisconsideredcommercialuseandthecommercialusewarrantywouldapply.
3TheT oroGTSStartingGuaranteedoesnotapplywhentheproductisusedcommercially.
4SomeenginesusedonT oroProductsarewarrantedbytheenginemanufacturer.
5Whicheveroccursrst.
6LifetimeFrameWarranty-Ifthemainframe,consistingofthepartsweldedtogethertoformthe
tractorstructurethatothercomponentssuchastheenginearesecuredto,cracksorbreaksin
normaluse,itwillberepairedorreplaced,atToro'soption,underwarrantyatnocostforparts
andlabor.Framefailureduetomisuseorabuseandfailureorrepairrequiredduetorustor
corrosionarenotcovered.
Warrantymaybedeniedifthehourmeterisdisconnected,altered,or
showssignsofbeingtamperedwith.
OwnerResponsibilities
YoumustmaintainyourToroProductbyfollowingthemaintenance
proceduresdescribedintheOperator'sManual.Suchroutine
maintenance,whetherperformedbyadealerorbyyou,isatyourexpense.
InstructionsforObtainingWarrantyService
IfyouthinkthatyourT oroProductcontainsadefectinmaterialsor
workmanship,followthisprocedure:
1.Contactyoursellertoarrangeserviceoftheproduct.Ifforany
reasonitisimpossibleforyoutocontactyourseller,youmaycontact
anyT oroAuthorizedDistributortoarrangeservice.Seeattached
DistributorList.
2.Bringtheproductandyourproofofpurchase(salesreceipt)to
theservicingoutlet.Ifforanyreasonyouaredissatisedwiththe
servicingoutlet’sanalysisorwiththeassistanceprovided,contact
usat:
ToroCustomerCareDepartment,RLCDivision
ToroWarrantyCompany
8111LyndaleAvenueSouth
Bloomington,MN55420-1196
001–952–948–4707
ItemsandConditionsNotCovered
Thereisnootherexpresswarrantyexceptforspecialemissionsystem
coverageandenginewarrantycoverageonsomeproducts.Thisexpress
warrantydoesnotcoverthefollowing:
•Costofregularmaintenanceserviceorparts,suchaslters,fuel,
lubricants,oilchanges,sparkplugs,airltersbladesharpening
orwornblades,cable/linkageadjustments,orbrakeandclutch
adjustments
•Componentsfailingduetonormalwear
•Anyproductorpartwhichhasbeenalteredormisusedorneglected
andrequiresreplacementorrepairduetoaccidentsorlackofproper
maintenance
•Pickupanddeliverycharges
•RepairsorattemptedrepairsbyanyoneotherthananAuthorized
ToroServiceDealer
•Repairsnecessaryduetofailuretofollowrecommendedfuel
procedure(consultOperator'sManualformoredetails)
–Removingcontaminantsfromthefuelsystemisnotcovered
–Useofoldfuel(morethanonemonthold)orfuelwhichcontains
morethan10%ethanolormorethat15%MTBE
–Failuretodrainthefuelsystempriortoanyperiodofnon-use
overonemonth
•Repairsoradjustmentstocorrectstartingdifcultiesduetothe
following:
–Failuretofollowpropermaintenanceproceduresor
recommendedfuelprocedure
–Rotarymowerbladestrikinganobject
•Specialoperationalconditionswherestartingmayrequiremorethan
twopulls:
–Firsttimestartsafterextendedperiodofnon-useoverthree
monthsorseasonalstorage
–Cooltemperaturestartssuchasthosefoundinearlyspringand
lateautumn
–Improperstartingprocedures-ifyouarehavingdifcultystarting
yourunit,pleasechecktheOperator'sManualtoensurethat
youareusingthecorrectstartingprocedures.Thiscansavean
unnecessaryvisittoanAuthorizedT oroServiceDealer.
GeneralConditions
Thepurchaseriscoveredbythenationallawsofeachcountry.Therights
towhichthepurchaserisentitledwiththesupportoftheselawsarenot
restrictedbythiswarranty.374-0268RevF
Other manuals for Recycler 20958
5
Table of contents
Other Toro Lawn Mower manuals

Toro
Toro 3780 User manual

Toro
Toro 73547 Manual

Toro
Toro 20956 User manual

Toro
Toro TimeCutter MR4800 User manual

Toro
Toro 30308 User manual

Toro
Toro 30184 ProLine User manual

Toro
Toro Greensmaster Flex 1800 User manual

Toro
Toro Recycler 20999 User manual

Toro
Toro TimeCutter 74601 User manual

Toro
Toro 30821 User manual

Toro
Toro TimeMaster 20199 User manual

Toro
Toro Z Master 74141TE Manual

Toro
Toro 04052 Greensmaster 1000 User manual

Toro
Toro 03877 User manual

Toro
Toro Recycler 20017 User manual

Toro
Toro Proline 30138 User manual

Toro
Toro Greensmaster 3320 TriFlex User manual

Toro
Toro Groundsmaster 4000-D User manual

Toro
Toro DH220 User manual

Toro
Toro Reelmaster 3550-D User manual