Toro 71255 User manual

FormNo.3372-740RevC
XLS420TLawnTractor
ModelNo.71255—SerialNo.311000001andUp
ToregisteryourproductordownloadanOperator'sManualorPartsCatalogatnocharge,gotowww.Toro.com.OriginalInstructions(EN)

ThisproductcomplieswithallrelevantEuropean
directives.Fordetails,seetheseparateproductspecic
DeclarationofConformity(DOC)sheet.
Introduction
Thisrotary-blade,ridinglawnmowerisintendedto
beusedbyresidentialhomeownersorprofessional,
hiredoperators.Itisdesignedprimarilyforcutting
grassonwell-maintainedlawnsonresidential
orcommercialproperties.Itisnotdesignedfor
cuttingbrushorforagriculturaluses.
Readthisinformationcarefullytolearnhowtooperate
andmaintainyourproductproperlyandtoavoidinjury
andproductdamage.Youareresponsibleforoperating
theproductproperlyandsafely.
YoumaycontactTorodirectlyatwww .Toro.comfor
productandaccessoryinformation,helpndingadealer,
ortoregisteryourproduct.
Wheneveryouneedservice,genuineToroparts,
oradditionalinformation,contactanAuthorized
ServiceDealerorToroCustomerServiceandhave
themodelandserialnumbersofyourproductready.
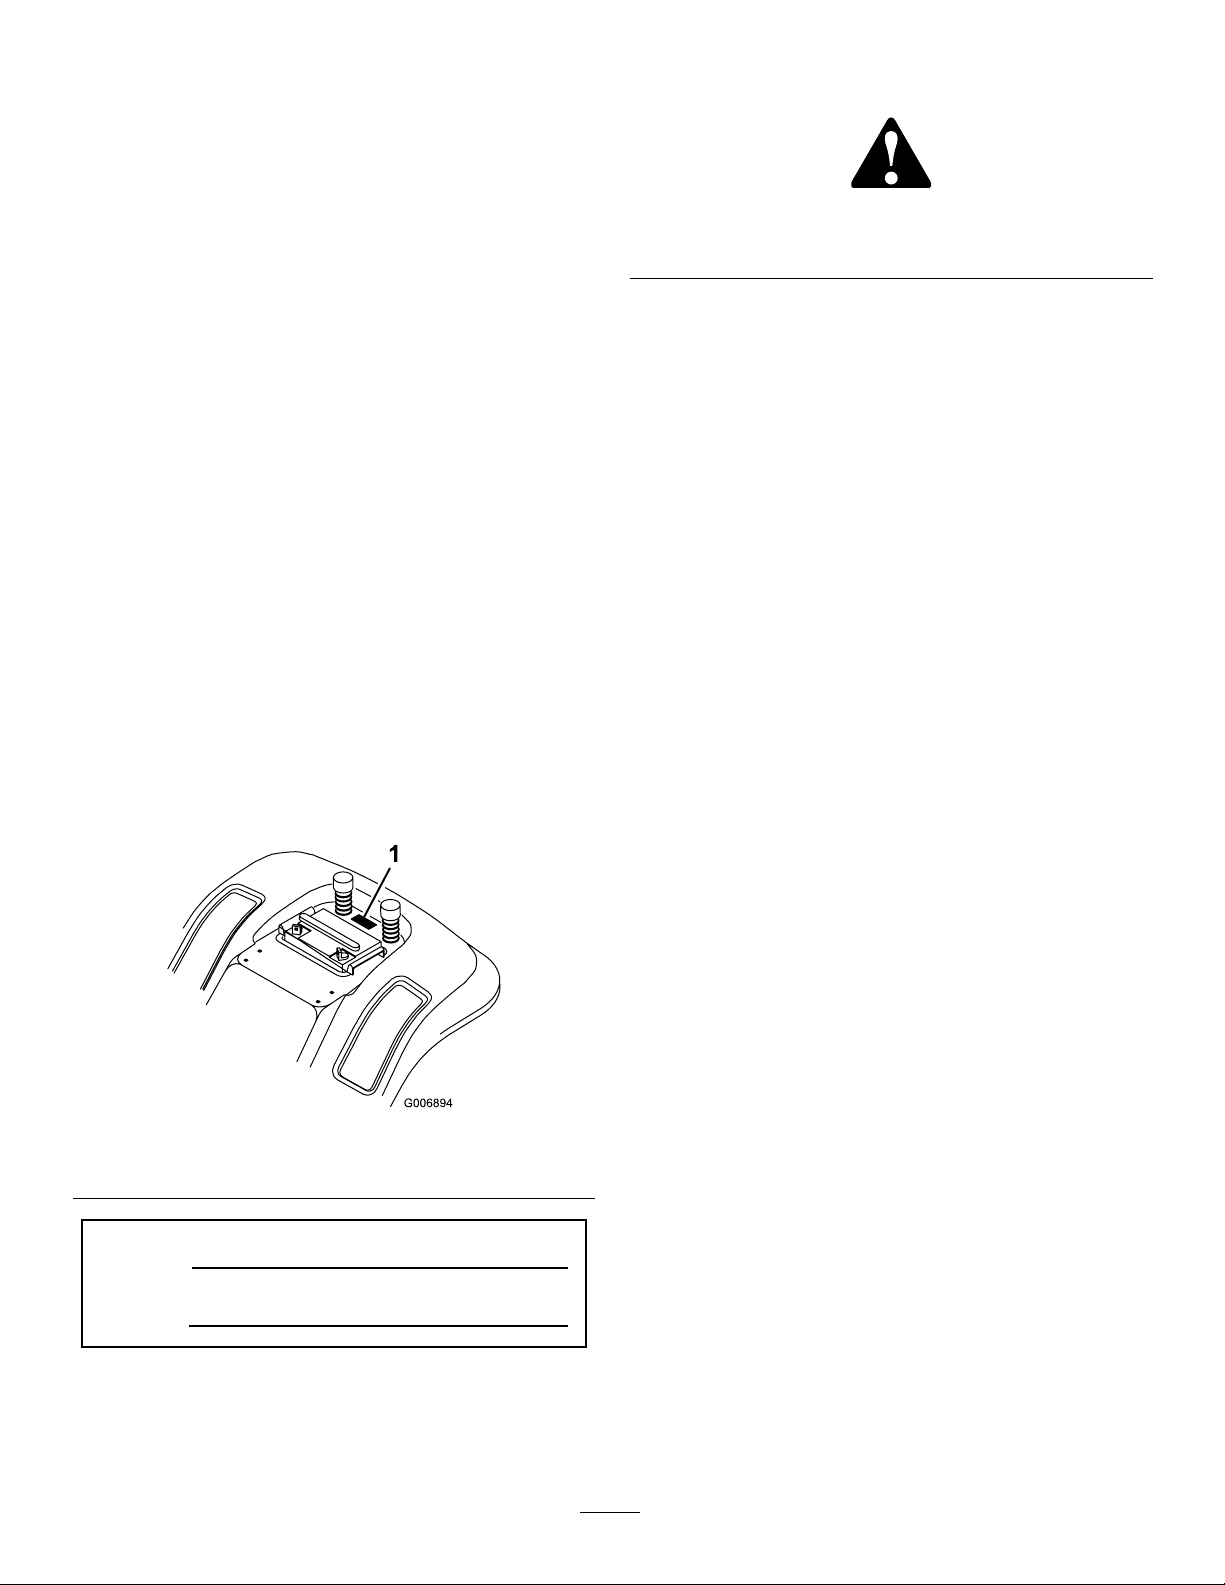
Figure1identiesthelocationofthemodelandserial
numbersontheproduct.Writethenumbersinthe
spaceprovided.
Figure1
1.Modelandserialnumberlocation(undertheseat)
ModelNo.
SerialNo.
Thismanualidentiespotentialhazardsandhassafety
messagesidentiedbythesafetyalertsymbol(Figure2),
whichsignalsahazardthatmaycauseseriousinjury
ordeathifyoudonotfollowtherecommended
precautions.
Figure2
1.Safetyalertsymbol
Thismanualuses2wordstohighlightinformation.
Importantcallsattentiontospecialmechanical
informationandNoteemphasizesgeneralinformation
worthyofspecialattention.
Contents
Introduction.................................................................2
Safety...........................................................................3
SafeOperationPracticesforRide-on(Riding)
RotaryLawnMowers........................................3
ToroRidingMowerSafety....................................5
SoundPressure.....................................................5
SoundPower........................................................5
Vibration..............................................................5
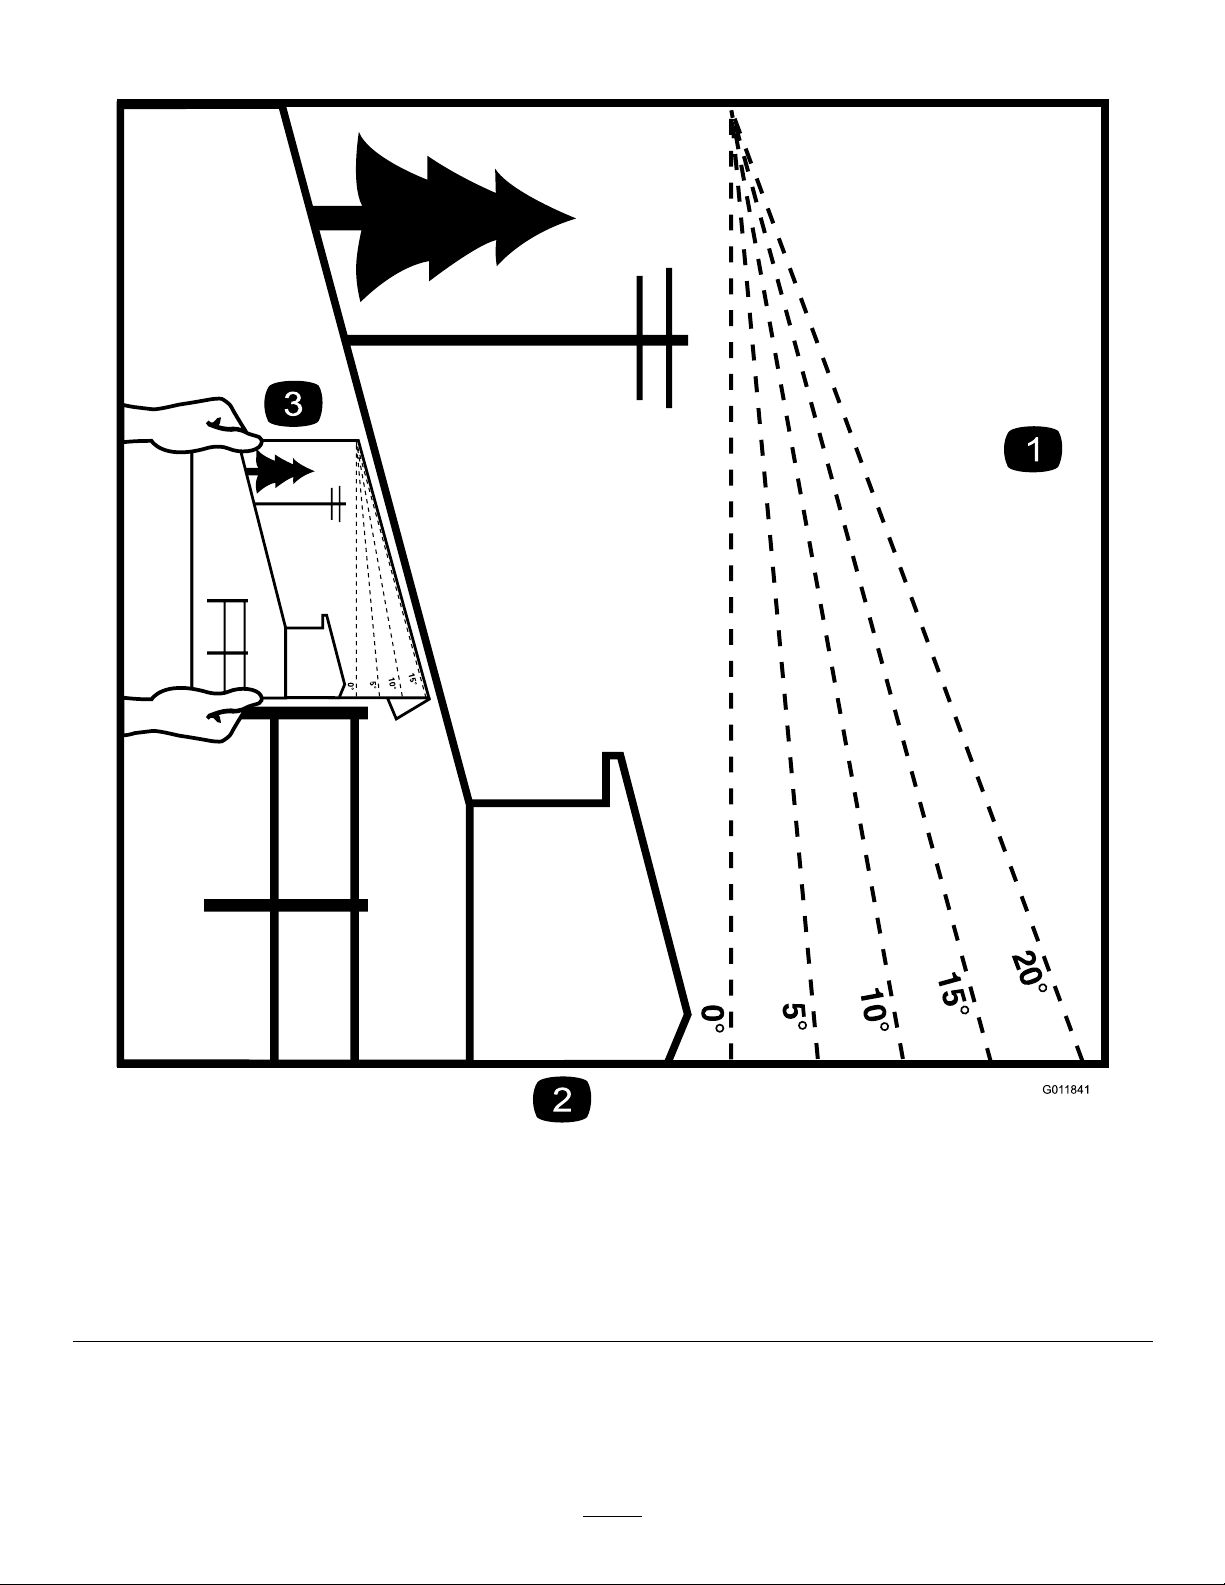
SlopeIndicator.....................................................6
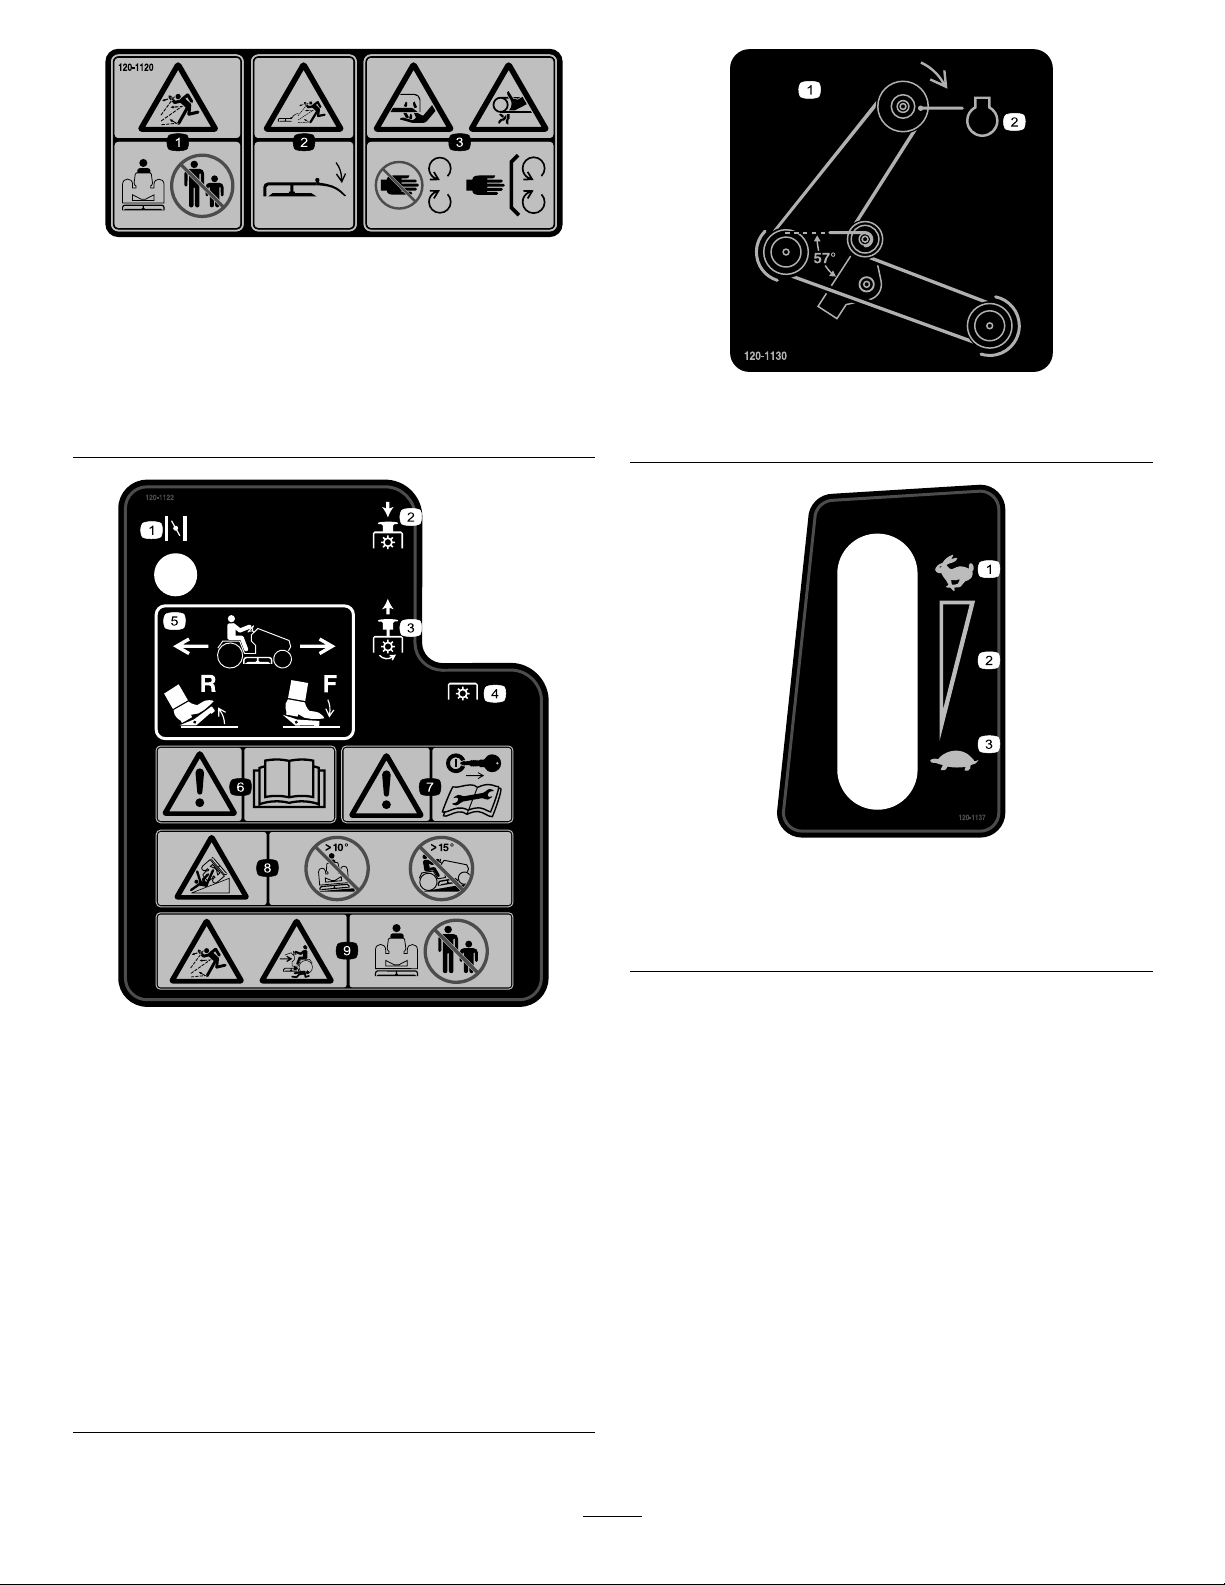
SafetyandInstructionalDecals.............................7
ProductOverview......................................................10
Controls.............................................................10
Specications.....................................................11
Operation...................................................................11
GasolineandOil................................................11
PositioningtheSeat............................................12
OperatingtheHeadlights....................................13
OperatingtheBladeControl(PTO)....................13
SettingtheHeight-of-Cut...................................13
AdjustingtheAnti-scalpWheels.........................13
StartingtheEngine.............................................13
StoppingtheEngine...........................................14
UsingtheSafetyInterlockSystem.......................14
TestingtheSafetyInterlockSystem.....................15
PushingtheTractorManually.............................15
DrivingForwardorBackward.............................16
StoppingtheTractor...........................................16
SideDischargingtheGrass.................................17
OperatingTips...................................................17
Maintenance...............................................................18
RecommendedMaintenanceSchedule(s)................18
Lubrication.............................................................19
GreasingandLubricatingtheTractor..................19
EngineMaintenance...............................................19
ServicingtheEngineOil.....................................19
ServicingtheAirCleaner....................................21
©2012—TheToro®Company
8111LyndaleAvenueSouth
Bloomington,MN554202
Contactusatwww.Toro.com.
PrintedintheUSA
AllRightsReserved

ServicingtheSparkPlugs....................................21
FuelSystemMaintenance.......................................22
ReplacingtheFuelFilter.....................................22
ElectricalSystemMaintenance................................23
ServicingtheBattery...........................................23
ServicingtheFuse..............................................25
CoolingSystemMaintenance..................................26
CleaningtheCoolingSystem...............................26
BladeMaintenance.................................................26
ServicingtheBlades............................................26
LevelingtheMowerfromSide-to-Side................28
AdjustingtheFront-to-RearBladeSlope.............29
CheckingtheTirePressure.................................30
ServicingtheHeadlights.....................................30
Cleaning.................................................................31
WashingtheUndersideoftheMower..................31
Storage.......................................................................32
Troubleshooting.........................................................33
Schematics.................................................................35
Safety
SafeOperationPracticesfor
Ride-on(Riding)RotaryLawn
Mowers
Readandunderstandthecontentsofthismanualbefore
operatingthetractor.
ThefollowinginstructionsarefromtheCENstandard
EN836:1997.
Thisproductiscapableofamputatinghandsandfeet
andofthrowingobjects.Alwaysfollowallsafety
instructionstoavoidseriousinjuryordeath.
Training
•Readtheinstructionscarefully.Befamiliarwiththe
controlsandtheproperuseoftheequipment.
•Neverallowchildrenorpeopleunfamiliarwith
theseinstructionstousethelawnmower.Local
regulationscanrestricttheageoftheoperator.
•Nevermowwhilepeople,especiallychildren,orpets
arenearby.
•Keepinmindthattheoperatororuserisresponsible
foraccidentsorhazardsoccurringtootherpeopleor
theirproperty.
•Donotcarrypassengers.
•Alldriversshouldseekandobtainprofessional
andpracticalinstruction.Suchinstructionshould
emphasize:
–theneedforcareandconcentrationwhen
workingwithride-onmachines;
–controlofaride-onmachineslidingonaslope
willnotberegainedbytheapplicationofthe
brake.Themainreasonsforlossofcontrolare:
◊insufcientwheelgrip;
◊beingdriventoofast;
◊inadequatebraking;
◊thetypeofmachineisunsuitableforitstask;
◊lackofawarenessoftheeffectofground
conditions,especiallyslopes;
◊incorrecthitchingandloaddistribution.
Preparation
•Whilemowing,alwayswearsubstantialfootwearand
longtrousers.Donotoperatetheequipmentwhen
barefootorwearingopensandals.
3

•Thoroughlyinspecttheareawheretheequipment
istobeusedandremoveallobjectswhichmaybe
thrownbythemachine.
•Warning—Fuelishighlyammable.
–Storefuelincontainersspecicallydesignedfor
thispurpose.
–Refueloutdoorsonlyanddonotsmokewhile
refuelling.
–Addfuelbeforestartingtheengine.Never
removethecapofthefueltankoraddfuelwhile
theengineisrunningorwhentheengineishot.
–Iffuelisspilled,donotattempttostartthe
enginebutmovethemachineawayfromthe
areaofspillageandavoidcreatinganysourceof
ignitionuntilfuelvaporshavedissipated.
–Replaceallfueltanksandcontainercapssecurely.
•Replacefaultysilencers.
•Beforeusing,alwaysvisuallyinspecttoseethatthe
blades,bladeboltsandcutterassemblyarenotworn
ordamaged.Replacewornordamagedbladesand
boltsinsetstopreservebalance.
•Onmulti-bladedmachines,takecareasrotatingone
bladecancauseotherbladestorotate.
Operation
•Donotoperatetheengineinaconnedspacewhere
dangerouscarbonmonoxidefumescancollect.
•Mowonlyindaylightoringoodarticiallight.
•Beforeattemptingtostarttheengine,disengageall
bladeattachmentclutchesandshiftintoneutral.
•Donotuseonslopesofmorethan
–10°whenmowingonsidehills;
–15°whenmowinguphill;
–15°whenmowingdownhill.
•Rememberthereisnosuchthingasasafeslope.
Travelongrassslopesrequiresparticularcare.To
guardagainstoverturning:
–donotstoporstartsuddenlywhengoingupor
downhill;
–applypressuretothetractioncontrolslowly,
especiallywhentravellingdownhill;
–machinespeedsshouldbekeptlowonslopes
andduringtightturns;
–stayalertforhumpsandhollowsandother
hiddenhazards;
–nevermowacrossthefaceoftheslope,unless
thelawnmowerisdesignedforthispurpose.
•Usecarewhenpullingloadsorusingheavy
equipment.
–Useonlyapproveddrawbarhitchpoints.
–Limitloadstothoseyoucansafelycontrol.
–Donotturnsharply.Usecarewhenreversing.
–Usecounterweight(s)orwheelweightswhen
suggestedintheinstructionhandbook.
•Lightningcancausesevereinjuryordeath.Ifyousee
lightningorhearthunderinthearea,donotoperate
themachine;seekshelter.
•Watchoutfortrafcwhencrossingornearroadways.
•Stopthebladesrotatingbeforecrossingsurfaces
otherthangrass.
•Whenusinganyattachments,neverdirectdischarge
ofmaterialtowardbystandersnorallowanyonenear
themachinewhileinoperation.
•Neveroperatethemachinewithdamagedguardsor
withoutsafetyprotectivedevicesinplace.
•Donotchangetheenginegovernorsettingsor
overspeedtheengine.Operatingtheengineat
excessivespeedcanincreasethehazardofpersonal
injury.
•Beforeleavingtheoperator’sposition:
–disengagethepowertake-offandlowerthe
attachments;
–removeyourfootfromthetractioncontrolpedal;
–stoptheengineandremovethekey.
•Disengagedrivetoattachments,stoptheengine,
anddisconnectthesparkplugwire(s)orremovethe
ignitionkey
–beforeclearingblockagesoruncloggingchute;
–beforechecking,cleaningorworkingonthelawn
mower;
–afterstrikingaforeignobject.Inspectthelawn
mowerfordamageandmakerepairsbefore
restartingandoperatingtheequipment;
–ifthemachinestartstovibrateabnormally(check
immediately).
•Disengagedrivetoattachmentswhentransporting
ornotinuse.
•Stoptheengineanddisengagedrivetoattachment
–beforerefuelling;
–beforeremovingthegrasscatcher;
4

–beforemakingheightadjustmentunless
adjustmentcanbemadefromtheoperator’s
position.
•Reducethethrottlesettingduringenginerun-out
and,iftheengineisprovidedwithashut-offvalve,
turnthefueloffattheconclusionofmowing.
MaintenanceandStorage
•Keepallnuts,boltsandscrewstighttobesurethe
equipmentisinsafeworkingcondition.
•Neverstoretheequipmentwithfuelinthetank
insideabuildingwherefumescanreachanopen
ameorspark.
•Allowtheenginetocoolbeforestoringinany
enclosure.
•Toreducetherehazard,keeptheengine,silencer,
batterycompartmentandfuelstorageareafreeof
grass,leaves,orexcessivegrease.
•Checkthegrasscatcherfrequentlyforwearor
deterioration.
•Replacewornordamagedpartsforsafety.
•Ifthefueltankhastobedrained,thisshouldbe
doneoutdoors.
•Onmulti-bladedmachines,takecareasrotatingone
bladecancauseotherbladestorotate.
•Whenmachineistobeparked,storedorleft
unattended,lowerthecuttingmeansunlessapositive
mechanicallockisused.
ToroRidingMowerSafety
Thefollowingparagraphcontainssafetyinformation
specictoToroproductsthatisnotincludedinthe
CENstandard.
UseonlyToro-approvedattachments.Thewarranty
maybevoidedifyouusethetractorwithunapproved
attachments.
SoundPressure
Thisunithasasoundpressurelevelattheoperator’s
earof90dBA,whichincludesanUncertaintyValue(K)
of1dBA.Thesoundpressurelevelwasdetermined
accordingtotheproceduresoutlinedinEN836.
SoundPower
Thisunithasaguaranteedsoundpowerlevelof100
dBA,whichincludesanUncertaintyValue(K)of1dBA.
Thesoundpowerlevelwasdeterminedaccordingtothe
proceduresoutlinedinISO11094.
Vibration
Hand-Arm
•Measuredvibrationlevelforlefthand=2.0m/s2
•Measuredvibrationlevelforrighthand=2.0m/s2
•UncertaintyValue(K)=1.0m/s2
Measuredvaluesweredeterminedaccordingtothe
proceduresoutlinedinEN836.
WholeBody
•Measuredvibrationlevel=0.29m/s2
•UncertaintyValue(K)=0.15m/s2
Measuredvaluesweredeterminedaccordingtothe
proceduresoutlinedinEN836.
5

SlopeIndicator
G01 1841
Figure3
Thispagemaybecopiedforpersonaluse.
1.Themaximumslopeyoucansafelyoperatethemachineonis15degrees.Usetheslopecharttodeterminethedegreeofslope
ofhillsbeforeoperating.Donotoperatethismachineonaslopegreaterthan15degrees.Foldalongtheappropriateline
tomatchtherecommendedslope.
2.Alignthisedgewithaverticalsurface,atree,building,fencepole,etc.
3.Exampleofhowtocompareslopewithfoldededge.
6

SafetyandInstructionalDecals
Safetydecalsandinstructionsareeasilyvisibletotheoperatorandarelocatednearanyareaof
potentialdanger.Replaceanydecalthatisdamagedorlost.
Manufacturer'sMark
1.Indicatesthebladeisidentiedasapartfromtheoriginal
machinemanufacturer.
93-6674
1.Crushinghazard,hand—readtheinstructionsbefore
servicingorperformingmaintenance.
99-5340
1.KeyChoice—turntoenablereversemowing.
100-7449
1.Pulltheleverouttopush
themachine.
3.Readtheinstructions
beforeservicingor
performingmaintenance.
2.Pushtheleverintorideon
themachine.
4.Donottowthemachine.
119-2730
1.Crushinghazard,bystanders—donotturnthekeywhile
childrenarepresent;keepchildrenasafedistancefrom
themachine.
7

120-1120
1.Thrownobjecthazard—keepbystandersasafedistance
fromthemachine.
2.Thrownobjecthazard,mowerdeck—keepdeectorin
place.
3.Cutting/dismembermenthazardofhandorfoot,mower
blade;entanglementhazardofhand,belt—stayawayfrom
movingparts,keepallguardsandshieldsinplace.
120-1122
1.Choke
2.Disengage
3.Engage
4.Powertake-off(PTO)
5.Tractiondrive—todriveinreverse,pressthebottomofthe
tractioncontrolpedalrearwardanddown;todriveforward,
pressthetopofthetractioncontrolpedalforwardanddown.
6.Warning—readtheOperator’sManual.
7.Warning—removetheignitionkeyandreadtheinstructions
beforeservicingorperformingmaintenance.
8.Tippinghazard—donotmowacrossslopesgreaterthan
10degrees,donotmowupanddownslopesgreaterthan
15degrees.
9.Crushing/dismembermentofabystander;thrownobject
hazard—keepbystandersasafedistancefromthemachine.
120-1130
1.Beltroutinganddirection2.Enginepulley
120-1137
1.Fast3.Slow
2.Continuousvariable
setting
8

120-1138
1.Headlights4.Engine—Start
2.Engine—Stop5.Mowinginreverseenabled
3.Engine—Run
121-0965
1.Height-of-cut3.Low
2.High
9

BatterySymbols
Someorallofthesesymbolsareonyourbattery
1.Explosionhazard6.Keepbystandersasafe
distancefromthebattery.
2.Nore,opename,or
smoking.
7.Weareyeprotection;
explosivegasescan
causeblindnessandother
injuries
3.Causticliquid/chemical
burnhazard
8.Batteryacidcancause
blindnessorsevereburns.
4.Weareyeprotection9.Flusheyesimmediately
withwaterandgetmedical
helpfast.
5.ReadtheOperator's
Manual.
10.Containslead;donot
discard.
ProductOverview
Controls
Becomefamiliarwiththecontrols(Figure4through
Figure6)beforeyoustarttheengineandoperatethe
tractor.
Figure4
1.Height-of-cutlever4.Bladecontrol(PTO)knob
2.Chokelever5.Tractioncontrolpedal
3.Steeringwheel
10

Figure5
1.Throttlelever3.Ignitionswitch
2.Lightswitch—on/off4.Operating-in-reverselight
Figure6
1.Fueltankcap3.Aircleaner
2.Oildipstick/Filltube
Specications
ModelWeightLengthWidthHeight
71255450lb
(205kg)
71in
(180cm)
45in
(114cm)
40in
(102cm)
Operation
Note:Determinetheleftandrightsidesofthe
machinefromthenormaloperatingposition.
GasolineandOil
RecommendedGasoline
Useunleadedregulargasolinesuitableforautomotive
use(87pumpoctaneminimum).Youmayuseleaded
regulargasolineifunleadedregularisnotavailable.
Important:Neverusemethanol,gasoline
containingmethanol,orgasoholcontainingmore
than10%ethanolbecausethefuelsystemcouldbe
damaged.Donotmixoilwithgasoline.
11

DANGER
Incertainconditions,gasolineisextremely
ammableandhighlyexplosive.Areorexplosion
fromgasolinecanburnyouandothersandcan
damageproperty.
•Fillthefueltankoutdoorsinanopenareawhen
theengineiscold.Wipeupanygasolinethat
spills.
•Donotllthefueltankcompletelyfull.Add
gasolinetothefueltankuntilthelevelis1/4to
1/2inch(6to13mm)belowthebottomofthe
llerneck.Thisemptyspaceinthetankallows
thegasolinetoexpand.
•Neversmokewhenhandlinggasoline,andstay
awayfromanopenameorwhereasparkmay
ignitethegasolinefumes.
•Storegasolineinanapprovedcontainerand
keepitoutofthereachofchildren.
•Neverbuymorethana30-daysupplyof
gasoline.
•Alwaysplacegasolinecontainersontheground
awayfromyourvehiclebeforelling.
•Donotllgasolinecontainersinsideavehicle
oronatruckortrailerbedbecauseinterior
carpetsorplastictruckbedlinersmayinsulate
thecontainerandslowthelossofanystatic
charge.
•Whenpractical,removegas-powered
equipmentfromthetruckortrailerandrefuel
theequipmentwithitswheelsontheground.
•Ifthisisnotpossible,refuelsuchequipmenton
atruckortrailerfromaportablecontainer,not
fromagasolinedispensernozzle.
•Ifyoumustuseagasolinedispenser,keepthe
nozzleincontactwiththerimofthefueltank
orcontaineropeningatalltimesuntilfuelingis
complete.
UsingStabilizer/Conditioner
Useafuelstabilizer/conditionerinthetractorto
providethefollowingbenets:
•Itkeepsgasolinefreshduringstorageforupto90
days.Forlongerstorage,drainthefueltank.
•Itcleanstheenginewhileitruns.
•Iteliminatesgum-likevarnishbuildupinthefuel
system,whichcauseshardstarting.
Important:Donotusefueladditivescontaining
methanolorethanol.
Addthecorrectamountoffuelstabilizer/conditioner
tothegasoline.
Note:Afuelstabilizer/conditionerismosteffective
whenitismixedwithfreshgasoline.Tominimizethe
chanceofvarnishdepositsinthefuelsystem,useafuel
stabilizer/conditioneratalltimes.
FillingtheFuelTank
1.Stoptheengine,removethekey,andwaitforall
movingpartstostopbeforeleavingtheoperating
position.
2.Cleanaroundthefueltankcapandremovethecap.
3.Addunleadedregulargasolinetothefueltankuntil
thelevelis1/4to1/2inch(6to13mm)belowthe
bottomofthellerneck.Donotllthefueltank
completelyfull.
Note:Thisspaceinthetankallowsgasolineto
expand.
4.Installthefueltankcapsecurely.
5.Wipeupanygasolinethatspills.
CheckingtheEngineOilLevel
ServiceInterval:Beforeeachuseordaily
Beforeyoustarttheengineandusethetractor,check
theoillevelintheenginecrankcase;refertoChecking
theOilLevel.
PositioningtheSeat
Theseatcanmoveforwardandbackward.Positionthe
seatwhereyouhavethebestcontrolofthetractorand
aremostcomfortable.
1.Raisetheseatandloosentheadjustmentknobs
(Figure7).
Figure7
1.Adjustmentknobs
2.Movetheseattothedesiredpositionandtighten
theknobs.
12

OperatingtheHeadlights
Adash-mountedOn/Offswitch(Figure5)controlsthe
headlights.Thelightsonlyshinewhiletheengineis
runningandtheswitchisOn.
OperatingtheBladeControl
(PTO)
Thebladecontrol(PTO)engagesanddisengagespower
totheelectricclutch.
EngagingthePowerTakeOff(PTO)
1.Removeyourfootfromthetractorcontrolpedal
tostopthetractor.
2.Pullthebladecontrol(PTO)knobtotheOn
position(Figure8).
Figure8
1.On—engaged2.Off—disengaged
DisengagingtheBladeControl(PTO)
1.Removeyourfootfromthetractorcontrolpedal
tostopthetractor.
2.Pushthebladecontrol(PTO)totheOffposition
(Figure8).
SettingtheHeight-of-Cut
Usetheheight-of-cutlevertoraiseandlowerthe
mowertothedesiredcuttingheight.Youcansetthe
height-of-cutto1of6positionsfromapproximately
1-1/2to4inches(38to102mm).
1.Parkthemachineonalevelsurface.
2.Disengagethebladecontrol(PTO).
3.Stoptheengine,removethekey,andwaitforall
movingpartstostopbeforeleavingtheoperating
position.
4.Pullontheheight-of-cutleveronthetractorand
moveittothedesiredposition(Figure9).
G017604
1
2
3
4
5
6
Figure9
1.1-1/2inches(38mm)4.3inches(76mm)
2.2inches(51mm)5.3-1/2inches(89mm)
3.2-1/2inches(64mm)6.4inches(102mm)
AdjustingtheAnti-scalp
Wheels
Themoweranti-scalpwheelsguidethemowerover
unevenground.Installthemasfollowsasappropriate
foryourheight-of-cutrequirements:
•Ifyouusetheheight-of-cutsettingAorB,install
thegaugewheelsinthehighestholeinthewheel
bracket.
•Ifyouusetheheight-of-cutsettingCthroughF,
installthegaugewheelsinthelowestholeinthe
wheelbracket.
StartingtheEngine
1.Pushthebladecontrol(PTO)totheOffposition
(Figure10).
2.ShiftthethrottlelevertoSlow(Figure10).
13

G018128
1
2
3
Figure10
1.Fast3.Throttlelever
2.Slow
3.Pullthechokeleverout(Figure4).
Note:Anenginethathasbeenrunningandis
warmmaynotrequirethisstep.
4.Turntheignitionkeyclockwiseandholditinthe
Startposition(Figure11).Whentheenginestarts,
releasethekey.
Figure11
1.Start3.Off
2.On
Important:Iftheenginedoesnotstartafter
30secondsofcontinuouscranking,turnthe
ignitionkeytoOffandletthestartermotor
cool;refertoTroubleshooting.
5.Aftertheenginestarts,slowlyshiftthethrottlelever
toFastandpushinthechokelever(Figure10).If
theenginestallsorhesitates,shiftthethrottlelever
backtoSlowandpulloutthechokeleverforafew
secondsandthenshiftthethrottlelevertoFast.
Repeatthisstepasrequired.
StoppingtheEngine
1.ShiftthethrottlelevertoFast(Figure10).
2.TurntheignitionkeytotheOffposition,waitfor
allmovingpartstostop,andremovethekeybefore
leavingtheoperatingposition.(Figure11).
UsingtheSafetyInterlock
System
ServiceInterval:Beforeeachuseordaily
CAUTION
Ifthesafetyinterlockswitchesaredisconnectedor
damaged,thetractorcouldoperateunexpectedly,
causingpersonalinjury.
•Donottamperwiththeinterlockswitches.
•Checktheoperationoftheinterlockswitches
dailyandreplaceanydamagedswitchesbefore
operatingthetractor.
UnderstandingtheSafetyInterlock
System
Thesafetyinterlocksystemisdesignedtopreventthe
enginefromstartingunless:
•Yourfootisoffthetractioncontrolpedal.
•Thebladecontrol(PTO)isintheDisengage
position.
Thesafetyinterlocksystemisdesignedtostopthe
engineifyoudothefollowing:
•Yourisefromtheseatwhenyoupressthetraction
controlpedal.
•Yourisefromtheseatwhilethebladecontrol
(PTO)isintheEngageposition.
Thesafetyinterlocksystemisdesignedtodisengagethe
bladecontrol(PTO)ifyoushiftthetransmissioninto
Reversewhilethebladecontrol(PTO)isintheEngage
position.
SettingtheKeyChoiceSwitchto
OperateinReverse
Aninterlockfeatureonthetractorpreventsthepower
take-off(PTO)fromoperatingwhenyoubackupthe
tractor.Ifyoushiftthetractioncontrolswitchinto
Reversewiththebladecontrol(PTO)engaged(i.e.,
withthemowerbladesorotherattachmentrunning),
thePTOdisengages.Donotmowinreverseunless
itisabsolutelynecessary.
14

Ifyouneedtousethebladecontrol(PTO)while
backingup,turnofftheinterlockfeatureusingthe
KeyChoiceswitchlocatedneartheseatbracket
(Figure12).
1
G006903
Figure12
1.KeyChoiceswitch
DANGER
Youcouldbackoverachildorbystanderwhilethe
mowerbladesorotherattachmentisengagedand
causeseriousinjuryordeath.
•Donotmowinreverseunlessitisabsolutely
necessary.
•DonotinserttheKeyChoicekeyunlessitis
absolutelynecessary.
•Alwayslookbackwardanddownbeforebacking
up.
•UsetheKeyChoiceswitchonlyifyouare
certainnochildrenorotherbystanderswill
enterthemowingarea.
•Beveryobservantafterdeactivatingthe
interlockbecausethesoundoftheengine
maypreventyoufromnoticingthatachildor
bystanderhasenteredtheworkarea.
•AlwaysremoveboththeignitionandKeyChoice
keysandputtheminasafeplaceoutofthe
reachofchildrenorunauthorizeduserswhen
leavingthetractorunattended.
1.Engagethebladecontrol(PTO).
2.InserttheKeyChoicekeyintotheswitch(Figure12).
3.TurntheKeyChoicekey.
Note:Aredlightonthefrontconsole(Figure5)
turnson,indicatingthattheinterlockisdisabled.
4.ShiftthetractioncontrolswitchintoReverseand
completeyourtask.
5.Disengagethebladecontrol(PTO)toactivatethe
interlock.
6.RemovetheKeyChoicekeyandputitinasafeplace
outofthereachofchildren.
TestingtheSafetyInterlock
System
CAUTION
Ifsafetyinterlockswitchesaredisconnectedor
damaged,thetractorcouldoperateunexpectedly,
causingpersonalinjury.
•Donottamperwiththeinterlockswitches.
•Checktheoperationoftheinterlockswitches
dailyandreplaceanydamagedswitchesbefore
operatingthetractor.
•Replaceswitchesevery2yearsregardlessof
whethertheyareoperatingproperlyornot.
Testthesafetysystembeforeyouusethetractoreach
time.Ifthesafetyinterlocksystemdoesnotoperateas
describedbelow ,haveanAuthorizedServiceDealer
repairthesafetyinterlocksystemimmediately.While
sittingintheseat,performthefollowingchecks:
1.Shiftthebladecontrol(PTO)toEngageandturn
theignitionkeytoStart:Theengineshouldnot
crank.
2.Shiftthebladecontrol(PTO)toDisengage,remove
yourfootfromthetractioncontrolpedal,andstart
theengine.Whiletheengineisrunning,shiftthe
bladecontrol(PTO)switchtoEngageandmove
thetractioncontrolpedaltoReverse:Theblade
control(PTO)shoulddisengage.
3.Shiftthebladecontrol(PTO)toDisengage,engage
thetractioncontrolpedalwithyourfoot,andstart
theengine:Theengineshouldnotstart.
4.Withthebladecontrol(PTO)intheDisengage
position,removeyourfootfromthetractioncontrol
pedal.Starttheengine,shiftthebladecontrol
(PTO)switchtoEngage,andturntheKeyChoice
keyandreleaseit:Theoperating-in-reversewarning
lightshouldilluminate.
5.Shiftthebladecontrol(PTO)toDisengage:The
operating-in-reversewarninglightshouldturnoff.
PushingtheTractorManually
Important:Alwayspushthetractormanually.
Nevertowthetractorbecauseyoumaydamage
thetransaxle.
ToPushtheTractor
1.Disengagethebladecontrol(PTO).
15

2.Stoptheengine,removethekey,andwaitforall
movingpartstostopbeforeleavingtheoperating
position.
3.PullthedrivecontrolouttothePushposition.
Note:Thisdisengagesthedrivesystemandallows
thewheelstoturnfreely(Figure13).
Figure13
1.Operateposition2.Pushposition
ToOperatetheTractor
PushthedrivecontrolintotheOperatepositionto
engagethedrivesystem(Figure13).
Note:Thetractorwillnotstartunlessthedrivecontrol
isintheOperateposition.
DrivingForwardorBackward
Thethrottlecontrolregulatestheenginespeedas
measuredinRPM(revolutionsperminute).Shiftthe
throttlecontrolleverintotheFastpositionforbest
performance.
Togoforwardorbackward:
Placeyourfootonthetractioncontrolpedalandslowly
pressonthetopofthepedaltomoveforwardoronthe
bottomofthepedaltomovebackward(Figure14).
Note:Thefartheryoumovethetractioncontrolpedal
ineitherdirection,thefasterthetractorwillmovein
thatdirection.
Figure14
1.Forward2.Backward
Note:Toslowdown,releasethepressureonthe
tractioncontrolpedal.
Note:Thistractorfeaturesanautomaticbrakesystem
thatengageswheneveryoutakeyourfootoffthe
tractioncontrolpedal.
Note:Toreversethetractorwiththebladecontrol
(PTO)engaged,deactivatetheoperating-in-reverse
interlockusingtheKeyChoiceswitchlocatedinfront
ofandbelowtheseat.
StoppingtheTractor
1.Releasethetractioncontrolpedal.
2.Disengagethebladecontrol(PTO).
3.TurntheignitionkeytoOfftostoptheengine.
4.Removetheignitionkeyfromtheswitch.
CAUTION
Childrenorbystandersmaybeinjuredifthey
moveorattempttooperatethetractorwhileitis
unattended.
AlwaysremovetheignitionandKeyChoicekeys
whenleavingthetractorunattended,evenifjust
forafewminutes.
16

SideDischargingtheGrass
DANGER
Withoutthegrassdeector,dischargecover,or
completegrasscatcherassemblymountedinplace,
youandothersareexposedtobladecontactand
throwndebris.Contactwithrotatingmowerblades
andthrowndebriswillcauseinjuryordeath.
•Neverremovethegrassdeectorfromthe
mowerbecausethegrassdeectorroutes
materialdowntowardtheturf.Ifthe
grassdeectoriseverdamaged,replaceit
immediately.
•Neverputyourhandsorfeetunderthemower.
•Nevertrytocleardischargeareaormower
bladesunlessyoudisengagethebladecontrol
(PTO)androtatetheignitionkeytoOff.Also
removethekeyanddisconnectthewirefrom
thesparkplug.
Themowerhasahingedgrassdeectorthatdisperses
clippingstothesideanddowntowardtheturf.
OperatingTips
•Forthebestperformance,operatetheengineat
themaximumspeed.Themowerrequiresairto
thoroughlycutgrassclippings,sodonotsetthe
height-of-cuttooloworcompletelysurroundthe
mowerinuncutgrass.Alwaysleaveonesideofthe
mowerfreefromuncutgrasstoallowtheairtobe
drawnintothemower.
•Cutthegrassslightlylongerthannormaltoensure
thatthecuttingheightofthemowerdoesnotscalp
anyunevenground.Whencuttinggrasslongerthan
6inch(15cm)tall,cutthelawntwicetoensurean
acceptableappearance.
•Itisbesttocutonlyabout1/3ofthegrassblade.
Donotcutmorethanthatunlessthegrassissparse
oritislatefallwhengrassgrowsmoreslowly.
•Alternatethemowingdirectiontokeepthegrass
standingstraight.Thisalsohelpsdisperseclippings
andenhancesdecompositionandfertilization.
•Grassgrowsatdifferentratesatdifferenttimesof
theseason.Tomaintainthesamecuttingheight,
whichisagoodpractice,mowmoreofteninearly
spring.Asthegrassgrowthrateslowsinmid
summer,mowlessfrequently.
•Toimprovethequalityofcut,useaslowerground
speed.Forbestoperationonaveragelawns,operate
theengineatfullthrottlewhilecontrollingthe
groundspeed.Youshouldoperatethetractor
between2to3.5mph(3.2to5.6km/h)while
mowing.
•Ifthegrassislongerthannormal,orifitcontains
ahighdegreeofmoisture,raisethecuttingheight
higherthanusual,cutthegrassatthatsetting,and
thencutthegrassagainatthelower,normalsetting.
•Ifyoumuststopthetractorwhilemowing,youmay
leaveaclumpofgrassclippingsonyourlawn.To
avoidthis,dothefollowing:
–Engagethebladeandmovetoapreviouslycut
area.
–Dispersetheclippingsevenlybyraisingthe
mower1or2height-of-cutsettingswhiledriving
forwardwiththebladeengaged.
•Usethewashoutporttocleanclippingsanddirt
fromtheundersideofthemoweraftereachuse.If
grassanddirtbuildupinsidethemower,thecutting
qualitywilleventuallybecomeunsatisfactory.
•Maintainasharpbladethroughouttheseason.A
sharpbladecutsgrasscleanlywithouttearingor
shreddingthegrassblades.Tearingandshredding
thegrassturnsitbrownattheedges,whichslowsits
growthandincreasesthechanceofdisease.Every
30days,checkthebladeforsharpnessandledown
anynicks.
17

Maintenance
Note:Determinetheleftandrightsidesofthemachinefromthenormaloperatingposition.
RecommendedMaintenanceSchedule(s)
MaintenanceService
IntervalMaintenanceProcedure
Aftertherst8hours•Changetheengineoil.
Beforeeachuseordaily
•Checktheengineoillevel.
•Checkthesafetysystem.
•Checkthebatteryelectrolyte.
•Servicetheblades.
•Washtheundersideofthemower.
Every25hours•Greaseandlubricatethetractor.Moreoftenindustyordirtyconditions.
•Checkthetirepressure.
Every100hours
•Changetheengineoil.
•Servicetheaircleanerlterelement(moreoftenindusty,dirtyconditions).
•Checkthesparkplugs.
•Replacethefuellter.
•Cleanthecoolingsystem.
Every200hours•Changetheoillter.
•Replacetheaircleanerlterelement(moreoftenindusty,dirtyconditions).
Beforestorage
•Performallthemaintenanceprocedureslistedabove.
•Paintanychippedsurfaces.
•Checkthetirepressure.
•Checkthesafetysystem.
•Checkthebrakes.
•Checkthesparkplug.
•Checkthebatteryelectrolyte.
•Chargethebatteryanddisconnectthecables.
•Checkthebelt(s)forwearandcracks.
Important:Refertoyourengineoperator’smanualforadditionalmaintenanceprocedures.
CAUTION
Ifyouleavethekeyintheignitionswitch,someonecouldaccidentlystarttheengineandseriouslyinjure
youorotherbystanders.
Removethekeyfromtheignitionanddisconnectthewirefromthesparkplugbeforeyoudoany
maintenance.Setthewireasidesothatitdoesnotaccidentallycontactthesparkplug.
18

Lubrication
GreasingandLubricatingthe
Tractor
ServiceInterval:Every25hours—Greaseandlubricate
thetractor.Moreoftenindustyor
dirtyconditions.
HowtoGreasetheTractor
1.Disengagethebladecontrol(PTO).
2.Stoptheengine,removethekey,andwaitforall
movingpartstostopbeforeleavingtheoperating
position.
3.Cleanthegreasettingswitharag.
Note:Ensurethatyouscrapeanypaintoffthe
frontofthettings.
4.Connectagreaseguntoeachttingandpump
greaseintoit.
5.Wipeupanyexcessgrease.
WheretoAddGrease
Lubricatethefrontwheels,steeringspindles,andfront
axlepinuntilgreasebeginstooozeoutofthebearings
(Figure15).
Figure15
1.Greasehere
EngineMaintenance
ServicingtheEngineOil
OilType:Detergentoil(APIserviceSF,SG,SH,SJ,or
higher)
CrankcaseCapacity:1.6qt.(1.5l)whenyoudonot
changethelter;1.9qt.(1.7l)whenyouchangethe
lter.
Viscosity:Seethetablebelow.
SAE V iscosity Grades
SAE 40
SAE 30
SAE 10W–30/ SAE 10W–30
-20 0 20 32 40 60 80 100
-30 -20 -10 0 10 20 30 40
°F
°C
STARTING TEMPERA TURE RANGE ANTICIPATED BEFORE NEXT OIL CHANGE
SAE 5W–20
G010686
Figure16
CheckingtheOilLevel
1.Parkthetractoronalevelsurface.
2.Disengagethebladecontrol(PTO).
3.Stoptheengine,waitforallmovingpartstostop,and
removethekeybeforeleavingtheoperatingposition.
4.Openthehood.
5.Cleanaroundtheoildipstick(Figure17)sothatdirt
cannotfallintothellholeanddamagetheengine.
Figure17
1.Fueltankcap3.Aircleaner
2.Oildipstick/llhole
19

6.Unscrewtheoildipstickandwipetheendclean.
7.Inserttheoildipstickintothellhole,butdonot
screwitintothellhole.
8.Removethedipstickagainandlookattheend.If
theoillevelislow,slowlypouronlyenoughoilinto
thellholetoraisetheleveltotheFullmarkonthe
dipstick.
Important:Donotoverllthecrankcasewith
oilandruntheengine;enginedamagemay
result.
ChangingtheOil
ServiceInterval:Aftertherst8hours
Every100hours
1.Starttheengineandletitrunfor5minutes.
Note:Thiswarmstheoilsothatitwilldrainmore
easily.
2.Parkthetractorsothattheleftsideisslightlylower
thantherightsidetoensurethattheoildrains
completely.
3.Disengagethebladecontrol(PTO).
4.Stoptheengine,waitforallmovingpartstostop,and
removethekeybeforeleavingtheoperatingposition.
5.Openthehood.
6.Placeadrainpanbelowtheoildrainplug,insert
thedraintubeontheoildrainplug,andopenthe
drainplugbyturningtheendnutcounterclockwise
(Figure18).
Figure18
1.Oildraintube2.Oildrainplug
7.Whentheoilhasdrainedcompletely,tightenthe
endnutontheoildrainplugbyturningitclockwise
untilitissnug.
Note:Disposeoftheusedoilatacertiedrecycling
center.
8.Removethedraintubefromtheoildrainplug.
9.Changetheoillter;refertoChangingtheOilFilter.
10.Slowlypourapproximately80%ofthespecied
amountofoilintothellhole(Figure17).Check
theoillevel;refertoCheckingtheOilLevel.
ChangingtheOilFilter
ServiceInterval:Every200hours
Note:Changetheoilltermorefrequentlywhenthe
operatingconditionsareextremelydustyorsandy.
1.Draintheoilfromtheengine;refertoChangingand
DrainingtheOil.
2.Removetheoldoillterandwipethelteradapter
(Figure19)gasketsurface.
G017623
Figure19
1.Oillter3.Filteradapter
2.Gasket
3.Applyathincoatofnewoiltotherubbergasketon
thenewoillter(Figure19).
4.Installthenewoilltertothelteradapter.
5.Turntheoillterclockwiseuntiltherubbergasket
contactsthelteradapter,thentightentheoillter
anadditional1/2to3/4turn(Figure19).
6.Slowlypourabout80%ofthespeciedamountof
oilintothellhole(Figure17).Checktheoillevel;
refertosteps6and7ofCheckingtheOilLevel.
7.Closethehood.
20
This manual suits for next models
1
Table of contents
Other Toro Lawn Tractor manuals