Toro 36002 User manual

FormNo.3396-369RevA
SnowMaster724/824QXESnowthrower
ModelNo.36002—SerialNo.316000001andUp
ModelNo.36003—SerialNo.316000001andUp
Operator'sManual
WARNING
CALIFORNIA
Proposition65Warning
Thisproductcontainsachemicalorchemicals
knowntotheStateofCaliforniatocausecancer,
birthdefects,orreproductiveharm.
Theengineexhaustfromthisproduct
containschemicalsknowntotheStateof
Californiatocausecancer,birthdefects,
orotherreproductiveharm.
Introduction
Thismachineisintendedtobeusedbyresidential
homeowners.Itisdesignedforremovingsnowfrom
pavedsurfaces,suchasdrivewaysandsidewalks,and
othersurfacesfortrafconresidentialorcommercial
properties.Itisnotdesignedforremovingmaterials
otherthansnow,norisitdesignedforclearingoffgravel
surfaces.
Readthisinformationcarefullytolearnhowtooperateand
maintainyourmachineproperlyandtoavoidinjuryand
machinedamage.Youareresponsibleforoperatingthe
machineproperlyandsafely.
YoumaycontactTorodirectlyatwww .Toro.comformachine
andaccessoryinformation,helpndingadealer,ortoregister
yourmachine.
Wheneveryouneedservice,genuineToroparts,oradditional
information,contactanAuthorizedServiceDealerorToro
CustomerServiceandhavethemodelandserialnumbersof
yourmachineready.Figure1identiesthelocationofthe
modelandserialnumbersonthemachine.Writethenumbers
inthespaceprovided.
Figure1
1.Modelandserialnumberlocation
ModelNo.
SerialNo.
Thismanualidentiespotentialhazardsandhassafety
messagesidentiedbythesafetyalertsymbol(Figure2),
whichsignalsahazardthatmaycauseseriousinjuryordeath
ifyoudonotfollowtherecommendedprecautions.
Figure2
1.Safetyalertsymbol
Thismanualuses2wordstohighlightinformation.
Importantcallsattentiontospecialmechanicalinformation
andNoteemphasizesgeneralinformationworthyofspecial
attention.
Formodelswithstatedpower,thenetpoweroftheenginewas
laboratoryratedbytheenginemanufacturerinaccordance
withSAEJ1940.Asconguredtomeetsafety,emission,and
operatingrequirements,theactualenginehorsepoweronthis
classofsnowthrowerwillbesignicantlylower.
©2015—TheToro®Company
8111LyndaleAvenueSouth
Bloomington,MN55420
Registeratwww.Toro.com.OriginalInstructions(EN)
PrintedintheUSA
AllRightsReserved*3396-369*A

Contents
Introduction..................................................................1
Safety...........................................................................2
SafetyandInstructionalDecals.................................3
Setup............................................................................4
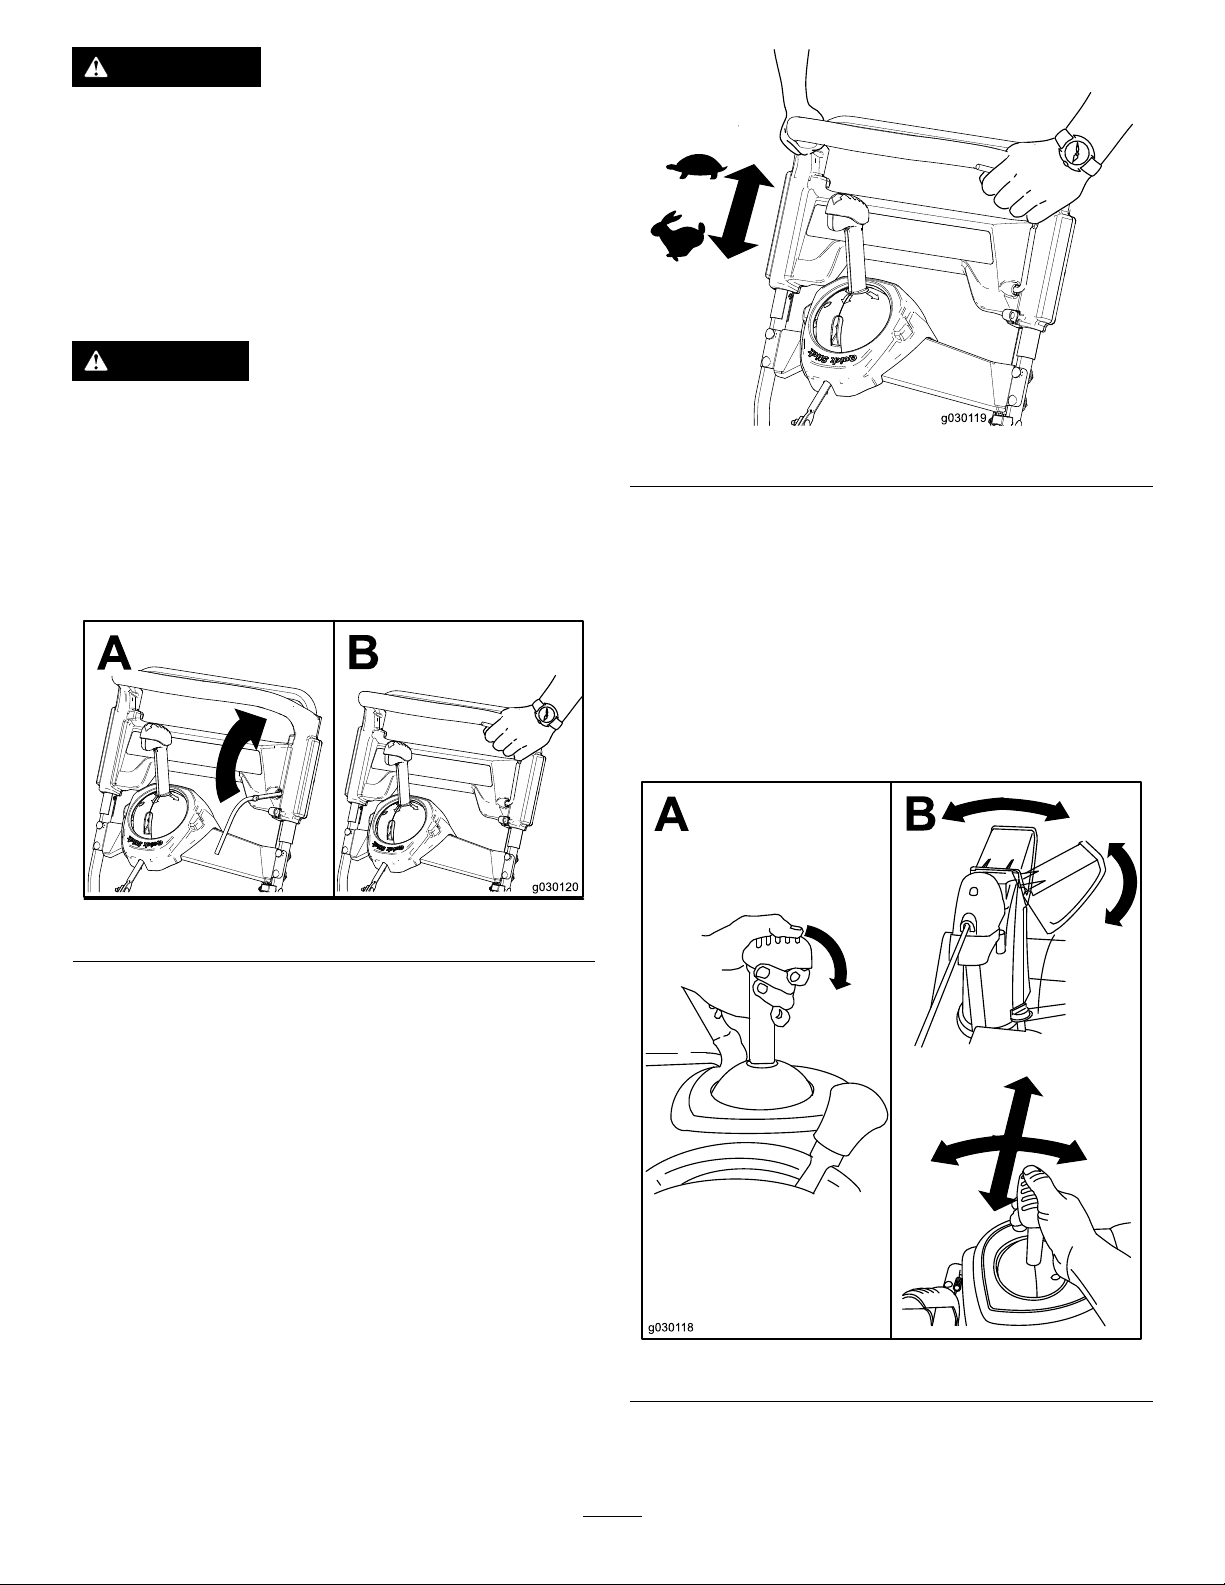
1UnfoldingtheHandle............................................4
2InstallingtheDischargeChute................................5
3FillingtheEnginewithOil......................................5
ProductOverview..........................................................7
Operation.....................................................................7
BeforeOperation.......................................................7
Safety.....................................................................7
FillingtheFuelTank................................................7
CheckingtheEngine-OilLevel..................................8
DuringOperation......................................................8
Safety.....................................................................8
StartingtheEngine..................................................8
EngagingtheAuger................................................10
DisengagingtheAuger............................................10
Self-propellingtheMachine.....................................10
StoppingtheEngine...............................................10
OperatingtheQuickStick®......................................10
ClearingaCloggedDischargeChute.........................11
OperatingTips......................................................11
AfterOperation........................................................11
Safety....................................................................11
PreventingFreeze-upafterUse.................................11
Maintenance.................................................................12
RecommendedMaintenanceSchedule(s)......................12
MaintenanceSafety.................................................12
CheckingtheEngineOilLevel.................................12
CheckingandAdjustingtheSkids.............................13
InspectingtheThrowingEdges................................13
ChangingtheEngineOil.........................................13
ReplacingtheSparkPlug.........................................15
AdjustingtheAugerCable.......................................15
AdjustingtheTransmissionCable.............................16
CheckingtheTirePressure......................................16
Storage........................................................................17
StoringtheSnowthrower.........................................17
Safety
ThismachinemeetsorexceedstheB71.3specications
oftheAmericanNationalStandardsInstituteineffect
atthetimeofproduction.
•Readandunderstandthecontentsofthemanualbefore
youstarttheengine.Makesurethateveryoneusingthis
productknowshowtousetheproductandunderstands
thewarnings.
•Donotputyourhandsorfeetnearmovingcomponents
onthemachine.
•Donotoperatethemachinewithoutallguardsandother
safetyprotectivedevicesinplaceandworkingonthe
machine.
•Keepclearofanydischargeopening.Keepbystandersa
safedistancefromthemachine.
•Keepchildrenoutoftheoperatingareaandunderthe
watchfulcareofaresponsibleadultotherthanthe
operator.Neverallowchildrentooperatethemachine.
•Shutthemachineoffbeforeservicing,fueling,or
unclogging.
2

SafetyandInstructionalDecals
Note:Safetyandinstructiondecalsarelocatednearareasofpotentialdanger.Replacedamageddecals.
131–1785
Orderpartno.131–5921
1.Augerdrive—squeezethelevertoengage;releasethelever
todisengage.
4.Thrownobjecthazard—keepbystandersasafedistancefrom
thesnowthrower.
2.Warning—readtheOperator'sManual.5.Self-propeldrive—pushdownonthehandletoengagethe
self-propeldrive.
3.Cutting/dismembermenthazardofhandorfoot,auger—keep
awayfrommovingparts;keepallguardsandshieldsinplace;
stoptheengineandwaitfortheaugertostopbeforeleaving
themachine;removetheignitionkeyandreadtheinstructions
beforeservicingorperformingmaintenance.
131–5914
Orderpartno.131–5915
1.Cutting/dismembermenthazardofhandorfoot,auger—do
notplaceyourhandinthechute;removetheignitionkey
andreadtheinstructionsbeforeservicingorperforming
maintenance.
x 3
12
34
5
120-9805
120-9805
1.Insertthekey.
2.Primetheengine3times.
3.Engagethechoke.
4.Pullthestartercord.
5.Oncetheengineisrunning,disengagethechoke.
3

Setup
LooseParts
Usethechartbelowtoverifythatallpartshavebeenshipped.
ProcedureDescriptionQty.Use
1Nopartsrequired–Unfoldthehandle.
Bolt(1/4–20X1–1/2inch)1
Locknut(1/4–20inch)1
Carriagebolt(1/4–20x1inch)3
Locknut(1/4–20inch)3
2
Screw(1/4–20X5/8inch)1
Installthedischargechute.
1
UnfoldingtheHandle
NoPartsRequired
Procedure
Important:Ensurethatthecablesarenotpinched
whenunfoldingthehandle.
Figure3
4

2
InstallingtheDischargeChute
Partsneededforthisprocedure:
1Bolt(1/4–20X1–1/2inch)
1Locknut(1/4–20inch)
3Carriagebolt(1/4–20x1inch)
3Locknut(1/4–20inch)
1Screw(1/4–20X5/8inch)
Procedure
1.Insertthechutepostthroughthebracketintothebase
ofthemachineandsecureitusingaboltandalock
nut(Figure4).
Figure4
1.Chutepost3.Locknut(1/4–20inch)
2.Bolt(1/4–20X1–1/2inch)4.Bracket
2.Assemblethechuterodandsecurethecables(Figure
5).
Figure5
1.Chuterod4.Cableclip
2.Carriagebolt(1/4–20x1
inch)
5.Screw(1/4–20X5/8inch)
3.Locknut(1/4–20inch)
5

3
FillingtheEnginewithOil
NoPartsRequired
Procedure
Yourmachinecomeswithoilintheengine.
ModelMaxll
3600216.9oz(0.5L)
3600323.7oz(0.7L)
Oiltype:automotivedetergentoilwithanAPIservice
classicationofSJ,SL,orhigher.
UseFigure6belowtoselectthebestoilviscosityforthe
outdoortemperaturerangeexpected:
Figure6
1.Movethemachinetoalevelsurface.
2.Cleanaroundtheoilllcap.
3.Checktheoillevelandaddoilifnecessary.
Note:Donottightenthedipstickwhencheckingthe
oillevel.
Figure7
1.Lowoillevel—addoil2.Correctoillevel
6

ProductOverview
Figure8
1.Augerlever6.Scraper
2.Fueltankcap7.Dischargechute
3.Dipstick8.Chutedeector
4.Skid9.QuickStick®discharge
chutecontrol
5.Auger10.Upperhandle
Figure9
1.Fueltankcap5.Recoilstarter
2.Primer6.Electricstarterplug-in
3.Ignitionkey7.Electricstarterbutton
4.Choke
Operation
BeforeOperation
Safety
•Useextensioncordsandreceptaclesasspeciedby
themanufacturerforallmachineswithelectricstarting
motors.
•Donotoperatethemachinewithoutwearingadequate
wintergarments.Avoidloosettingclothingthatcanget
caughtinmovingparts.Wearslipresistantfootwearthat
willimprovefootingonslipperysurfaces.
•Alwayswearsafetyglassesoreyeshieldsduringoperation
orwhileperforminganadjustmentorrepairtoprotect
eyesfromforeignobjectsthatmaybethrownfromthe
machine.
•Thoroughlyinspecttheareawherethemachineistobe
usedandremovealldoormats,sleds,boards,wires,and
otherforeignobjects.
•Ifashield,safetydevice,ordecalisdamaged,illegible,or
lost,repairorreplaceitbeforebeginningoperation.Also,
tightenanyloosefasteners.
DANGER
Gasolineisextremelyammableandexplosive.A
reorexplosionfromgasolinecanburnyouand
others.
•Topreventastaticchargefromignitingthe
gasoline,placethecontainerand/ormachine
onthegroundbeforelling,notinavehicleor
onanobject.
•Fillthetankoutdoorswhentheengineiscold.
Wipeupspills.
•Donothandlegasolinewhensmokingoraround
anopenameorsparks.
•Storegasolineinanapprovedfuelcontainer,out
ofthereachofchildren.
•Donottipthemachineeitherforwardor
backwardwithfuelinthefueltank;otherwise,
fuelmayleakoutofthemachine.
FillingtheFuelTank
RecommendedFuel:
•Forbestresults,useonlyclean,fresh(lessthan30days
old),unleadedgasolinewithanoctaneratingof87or
higher((R+M)/2ratingmethod).
•Ehtanol:Gasolinewithupto10%ethanol(gasohol)
or15%MTBE(methyltertiarybutylether)byvolume
isacceptable.EthanolandMTBEarenotthesame.
Gasolinewith15%ethanol(E15)byvolumeisnot
approvedforuse.Neverusegasolinethatcontainsmore
7

than10%ethanolbyvolume,suchasE15(contains15%
ethanol),E20(contains20%ethanol),orE85(contains
85%ethanol).Usingunapprovedgasolinemaycause
performanceproblemsand/orenginedamagewhichmay
notbecoveredunderwarranty.
•Donotusegasolinecontainingmethanol.
•Donotstorefueleitherinthefueltankorfuelcontainers
overthewinterunlessafuelstabilizerisused.
•Donotaddoiltogasoline.
Figure10
1.Donotllabovethebottomofthefueltankneck.
Note:Forbestresults,purchaseonlythequantityofgasoline
thatyouexpecttousein30days.Otherwise,youmayadd
fuelstabilizertonewlypurchasedgasolinetokeepitfreshfor
upto6months.
CheckingtheEngine-OilLevel
Referto3FillingtheEnginewithOil(page5).
DuringOperation
Safety
•Rotatingaugerbladescaninjurengersorhands.
Staybehindthehandlesandawayfromthedischarge
openingwhileoperatingthemachine.Keepyourface,
hands,feet,andanyotherpartofyourbodyor
clothingawayfrommovingorrotatingparts.
•Neverdirectthedischargetowardpeopleorareaswhere
propertydamagecanoccur.
•Exercisecautiontoavoidslippingorfalling.Alwaysbe
sureofyourfooting,andkeeparmholdonthehandles.
Walk;neverrun.
•Exerciseextremecautionwhenoperatingonslopes.
•Neveroperatethemachinewithoutgoodvisibilityor
light.
•Lookbehindandusecarewhenbackingupwiththe
machine.
•Whennotactivelyclearingsnow ,disengagepowertothe
rotorblades.
•Useextensioncordsandreceptaclesasspeciedby
themanufacturerforallmachineswithelectricstarting
motors.
•Donotattempttoclearsnowfromagravelorcrushed
rocksurface.Thisproductisintendedforuseonlyon
pavedsurfaces.
•Donotusethemachineonaroof.
•Neverattempttomakeanyadjustmentswhiletheengine
isrunning(exceptwhenspecicallyrecommendedby
manufacturer).
•Stayalertforhiddenhazardsortrafc.
•Afterstrikingaforeignobject,stoptheengine,remove
theignitionkey,thoroughlyinspectthemachineforany
damage,andrepairthedamagebeforerestartingand
operatingthemachine.
•Ifthemachineshouldstarttovibrateabnormally,stop
theengineandcheckimmediatelyforthecause.
•Donotruntheengineindoors,exceptwhenstarting
theengineandfortransportingthemachineinorout
ofthebuilding.Opentheoutsidedoors;exhaustfumes
aredangerous.
•Donotoverloadthemachinecapacitybyattemptingto
clearsnowattoofastarate.
•Nevertouchahotengineormufer.
•Thoroughlyinspecttheelectricalcordbeforeplugging
itintoapowersource.Ifthecordisdamaged,donot
useittostartthemachine.Replacethedamagedcord
immediately.Unplugthepowercordwheneveryouare
notstartingthemachine.
StartingtheEngine
Note:Fullyinsertthekeytostarttheengine.Themiddle
positionwillnotstarttheengine.
8

UsingtheRecoilStarter
Figure11
UsingtheElectricStarter
Figure12
Note:Tousetheelectricstarter,connectapowercordtothe
electricstarterplug-inrstandthentoapoweroutlet.Use
onlyaUL-listed,16-gaugeextensioncordrecommendedfor
outdoorusethatisnotlongerthan15m(50feet).
Important:Topreventdamagingtheelectricstarter,
runitinshortcycles(5secondson,5secondsoff),no
morethan10times.Iftheenginestilldoesnotstart,take
themachinetoanAuthorizedServiceDealerforservice.
9

WARNING
Theelectricalcordcanbecomedamaged,causing
ashockorre.
Thoroughlyinspecttheelectricalcordbeforeusing
themachine.Ifthecordisdamaged,donotoperate
themachine.Replaceorrepairthedamagedcord
immediately.ContactanAuthorizedServiceDealer
forassistance.
CAUTION
Ifyouleavethemachinepluggedintoapower
source,someonecaninadvertentlystartthe
machineandinjurepeopleordamageproperty.
Unplugthepowercordwheneveryouarenot
startingthemachine.
EngagingtheAuger
Figure13
DisengagingtheAuger
Todisengagetheauger,releasetheaugerlever.
Self-propellingtheMachine
Tooperatetheself-propeldrive,simplywalkwithyourhands
ontheupperhandleandyourelbowsatyoursides,andthe
machinewillautomaticallykeeppacewithyou(Figure14).
Note:Youcanself-propelthemachinewiththeauger
engagedordisengaged.
Figure14
StoppingtheEngine
Tostoptheengine,removethekeyfromtheignitionormove
thekeytothemiddleposition.
OperatingtheQuickStick®
Note:Theblueknobmustbefullypressedtoreleasethe
latchandoperatetheQuickStick®.
Figure15
10

ClearingaCloggedDischarge
Chute
Important:Handcontactwiththerotatingaugerinside
thedischargechuteisthemostcommoncauseofinjury
associatedwithsnowthrowers.Neveruseyourhandto
cleanoutthedischargechute.
1.Whileremainingintheoperatingposition,releasethe
self-propelhandle.
2.Engagetheauger.
3.Pushdownonthehandletoraisethefrontofthe
machineafewinches(centimeters)offthepavement.,
thenliftthehandlesquicklytobumpthefrontofthe
machineontothepavement.
4.Disengagetheauger.
5.Repeatsteps1through4,ifnecessary,untilastreamof
snowcomesoutofthedischargechute.
Note:Ifyoucannotunclogthedischargechutebybumping
thefrontofthemachine,stoptheengine,waitforall
movingpartstostop,anduseasnowcleanouttool(not
included);neveruseyourhand.
Important:Uncloggingthedischargechuteby
bumpingthefrontofthemachineonthepavementmay
causetheskidstomove.Adjusttheskidsandtighten
theskidboltssecurely;refertoCheckingandAdjusting
theSkids(page13).
OperatingTips
WARNING
Theaugercanthrowstones,toys,andotherforeign
objectsandcauseseriouspersonalinjurytothe
operatorortobystanders.
•Keeptheareatobeclearedfreeofallobjects
thattherotorbladescouldpickupandthrow.
•Keepallchildrenandpetsawayfromthearea
ofoperation.
•Removethesnowassoonaspossibleafteritfalls.
•Ifthemachinedoesnotpropelitselfforwardonslippery
surfacesorinheavysnow ,pushforwardonthehandle,
butallowthemachinetoworkatitsownpace.
•Overlapeachswathtoensurecompletesnowremoval.
•Dischargethesnowdownwindwheneverpossible.
AfterOperation
Safety
•Neverstorethemachinewithfuelinthefueltankinsidea
buildingwhereignitionsourcesarepresent,suchashot
waterheaters,spaceheaters,orclothesdryers.Allowthe
enginetocoolbeforestoringinanyenclosure.
•Whenstoringthemachineformorethan30days,referto
theStoragesectionforimportantdetails.
PreventingFreeze-upafterUse
•Lettheenginerunforafewminutestopreventmoving
partsfromfreezing.Stoptheengine,waitforallmoving
partstostop,andremoveiceandsnowfromthemachine.
•Cleanoffanysnowandicefromthebaseofthechute.
•Rotatethedischargechuteleftandrighttofreeitfrom
anyicebuildup.
•WiththeignitionkeyintheOffposition,pulltherecoil
starterhandleseveraltimesorconnecttheelectricalcord
toapowersourceandthemachineandpushtheelectric
startbuttononcetopreventtherecoilstarterand/orthe
electricstarterfromfreezingup.
•Insnowyandcoldconditions,somecontrolsandmoving
partsmayfreeze.Donotuseexcessiveforcewhen
tryingtooperatefrozencontrols.Ifyouhavedifculty
operatinganycontrolorpart,starttheengineandletit
runforafewminutes.
•Donotusethechutecontroltoattempttomoveafrozen
dischargechute.Holddowntheblueknobanduseyour
handstorotatethechute.
•Transportingthemachineinanopentrailerorvehiclecan
causethecontrolsordischargechutetofreeze.
11

Maintenance
Note:Determinetheleftandrightsidesofthemachinefromthenormaloperatingposition.
RecommendedMaintenanceSchedule(s)
MaintenanceService
IntervalMaintenanceProcedure
Afterthersthour•Checkforloosefastenersandtightenthemifnecessary.
Aftertherst2hours
•Changetheengineoil.
•Inspecttheaugercableandadjustitifnecessary.
•Inspectthetransmissioncableandadjustitifnecessary.
Beforeeachuseordaily•Checktheengineoillevelandaddoilifnecessary.
Every100hours•Replacethesparkplug.
Yearly
•Checktheskidsandadjustthemifnecessary.
•InspectthethrowingedgesandhaveanAuthorizedServiceDealerreplacethe
throwingedgesandscraperifnecessary.
•Changetheengineoil.
•Inspecttheaugercableandadjustitifnecessary.
•Inspectthetransmissioncableandadjustitifnecessary.
•Checkthetirepressure.
•Checkforloosefastenersandtightenthemifnecessary.
•HaveanAuthorizedServiceDealerinspectthedrivebeltandreplaceitifnecessary.
Yearlyorbeforestorage•Preparethemachineforstorage.
MaintenanceSafety
Readthefollowingsafetyprecautionsbeforeperformingany
maintenanceonthemachine:
•Beforeperforminganymaintenance,service,or
adjustment,stoptheengineandremovethekey.Ifmajor
repairsareeverneeded,contactanAuthorizedService
Dealer.
•Checkallfastenersatfrequentintervalsforproper
tightnesstobesurethemachineisinsafeworking
condition.
•Maintainorreplacesafetyandinstructionlabels,as
necessary.
•Donotchangethegovernorsettingsontheengine.
•PurchaseonlygenuineTororeplacementpartsand
accessories.
CheckingtheEngineOilLevel
ServiceInterval:Beforeeachuseordaily
1.Removethedipstick,wipeitclean,thenfullyinsertthe
dipstickwithoutthreadingitin.
2.Removethedipstickandchecktheoillevel.
•IftheoillevelisbelowtheAddmarkonthe
dipstick(Figure16),addoil.Referto(page).
•IftheoillevelabovetheFullmark(),drainthe
excessoiluntiltheoillevelisattheFullmarkon
thedipstick;referto(page).
Figure16
1.Lowoillevel—addoil2.Correctoillevel
12

CheckingandAdjustingthe
Skids
ServiceInterval:Yearly
Checktheskidstoensurethattheaugerdoesnotcontactthe
pavedsurface.Adjusttheskidsasneededtocompensatefor
wear(Figure17).
1.Loosentheskidbolts.
2.Slidea5mm(3/16inch)boardunderneaththescraper.
Note:Usingathinnerboardwillresultinamore
aggressivescraper.Athickerboardwillresultinaless
aggressivescraper.
3.Lowertheskidstotheground.
Note:Ensuretheskidsareatontheground.
4.Tightentheskidbolts.
Figure17
1.5mm(3/16inch)board2.Ground
InspectingtheThrowing
Edges
ServiceInterval:Yearly—Inspectthethrowingedgesand
haveanAuthorizedServiceDealer
replacethethrowingedgesandscraper
ifnecessary.
Beforeeachsession,inspectthethrowingedgesforwear.
Whenathrowingedgehasworndowntothewearindicator
hole,haveanAuthorizedServiceDealerreplacethethrowing
edges(Figure18).
Figure18
1.Thewearindicatorhole
isintact;youdonotneed
toreplacethethrowing
edges.
2.Thewearindicatorhole
isexposed;replaceboth
throwingedges.
ChangingtheEngineOil
ServiceInterval:Aftertherst2hours
Yearly
Runtheengineafewminutesbeforechangingtheoiltowarm
it.Warmoilowsbetterandcarriesmorecontaminants.
1.Movethemachinetoalevelsurface.
2.Placeanoildrainpanundertheoil-drainplug,remove
theoil-drainplug,andtipthemachinebackwardand
draintheusedoilintheoil-drainpan(Figure19).
13

Figure19
1.Oil-drainplug
3.Afterdrainingtheusedoil,returnthemachinetothe
operatingposition.
4.Installtheoildrainplugandtightenitsecurely.
5.Cleanaroundtheoilllcap.
6.UseFigure20belowtoselectthebestoilviscosityfor
theoutdoortemperaturerangeexpected:
ModelMaxll
360020.5L(16.9oz)
360030.7L(23.7oz)
Oiltype:automotivedetergentoilwithanAPIservice
classicationofSJ,SL,orhigher.
Figure20
Figure21
1.Lowoillevel—addoil2.Correctoillevel
14

ReplacingtheSparkPlug
ServiceInterval:Every100hours—Replacethesparkplug.
WARNING
Replacingthesparkplugwhiletheengineishot
canresultinburns.
Waituntiltheengineiscooltoreplacethespark
plug.
UseaTorosparkplugorequivalent(Champion®RN9YCor
NGKBPR6ES).
1.Removetheboot(Figure22).
Figure22
2.Cleanaroundthebaseofthesparkplug.
3.Removeanddiscardtheoldsparkplug.
Note:Youwillneedaratchetwrenchextensionto
removethesparkplug.
4.Setthegapbetweentheelectrodesonanewsparkplug
at0.76mm(0.030inch)(Figure23).
Figure23
1.0.76mm(0.030inch)
AdjustingtheAugerCable
ServiceInterval:Aftertherst2hours
Yearly
Ifthedrivebeltslipsorsquealsunderheavyload,adjustthe
augercable.
1.Loosenthenutonthelowercableclamp,butdonot
removeit(Figure24).
Figure24
1.Nut3.Connector
2.Cable4.Spring
2.Pullthecableuptoremovesomeslack(Figure24).
Important:Donotremovealltheslackfromthe
cable.Removingalltheslackfromthecablewill
preventtheaugerfromstoppingproperly.
3.Holdthecableinplaceandtightenthenut(Figure24).
15

AdjustingtheTransmission
Cable
ServiceInterval:Aftertherst2hours
Yearly
Ifthewheelseasilystallout,orifthewheelsdrivewithout
engagingtheself-propelhandle,adjustthetransmissioncable.
1.Loosenthenutontheuppercableclamp,butdonot
removeit(Figure25).
Figure25
1.Nut2.Cable
2.Pullthecabledowntoremovemostoftheslackinthe
cable(Figure25).
Important:Donotremovealltheslackfromthe
cable.Removingalltheslackfromthecablemay
causethewheelstoengagewithoutengagingthe
self-propelhandle.
3.Tightenthenut(Figure25).
CheckingtheTirePressure
ServiceInterval:Yearly
Setthetirepressureequallyinbothtirestobetween103and
137kPa(15and20psi).
16

Storage
StoringtheSnowthrower
WARNING
•Gasolinefumesarehighlyammable,explosive,
anddangerousifinhaled.Ifyoustorethe
machineinanareawithanopename,the
gasolinefumesmayigniteandcausean
explosion.
•Donotstorethemachineinahouse(living
area),basement,oranyotherareawhereignition
sourcesmaybepresent,suchashotwaterand
spaceheaters,clothesdryers,furnaces,and
otherlikeappliances.
•Donottipthemachinebackwardwithfuelin
thefueltank;otherwise,fuelmayleakoutof
themachine.
1.Onthelastrefuelingoftheseason,addfuelstabilizer
tofreshfuelasdirectedbytheenginemanufacturer.
2.Runtheenginefor10minutestodistributethe
conditionedfuelthroughthefuelsystem.
3.Stoptheengine,allowittocool,andsiphonthefuel
tankorruntheengineuntilitstops.
4.Starttheengineandrunituntilitstops.
5.Chokeorprimetheengine,startitathirdtime,and
runtheengineuntilitwillnotstart.
6.Drainthefuelinthecarburetorthroughthecarburetor
drainboltintoanapprovedgasolinecontainer.
7.Disposeofunusedfuelproperly.Recycleitaccording
tolocalcodes,oruseitinyourautomobile.
8.Whiletheengineisstillwarm,changetheengineoil.
RefertoChangingtheEngineOil(page13).
9.Removethesparkplug.
10.Squirt2teaspoonsofoilintothesparkplughole.
11.Installthesparkplugbyhandandthentorqueitto
27–30N-m(20–22ft-lb).
12.WiththeignitionkeyintheOffposition,pulltherecoil
starterslowlytodistributetheoilontheinsideofthe
cylinder.
13.Cleanthemachine.
14.Touchupchippedsurfaceswithpaintavailablefroman
AuthorizedServiceDealer.Sandaffectedareasbefore
painting,andusearustpreventativetopreventthe
metalpartsfromrusting.
15.Tightenanyloosefasteners.Repairorreplaceany
damagedparts.
16.Coverthemachineandstoreitinaclean,dryplace
outofthereachofchildren.Allowtheenginetocool
beforestoringitinanyenclosure.
17

*374-0299*
EmissionControlWarrantyStatement
FortheUnitedStates,California,andCanada
YourWarrantyRightsandObligations
TheCaliforniaAirResourcesBoard(CARB),theU.S.EnvironmentalProtectionAgency(EPA),andTheT oroCompany,arepleasedtoexplainthe
emissioncontrolsystemwarrantyonyour2015–2016smalloff-roadengine/equipment.InCaliforniaandtheUnitedStates,newsmalloff-road
engines/equipmentmustbedesigned,built,andcertiedtomeetstringentanti-smogstandards.TheToroCompanywarrantstheemissioncontrol
systemonyoursmalloff-roadengine/equipmentfortheperiodoftimelistedbelow,providedtherehasbeennoabuse,neglect,orimpropermaintenance
ofyoursmalloff-roadengine/equipment.
Youremissioncontrolsystemmayincludepartssuchasthecarburetor,fuel-injectionsystem,theignitionsystem,catalyticconverter,fueltanks,fuellines,
fuelcaps,valves,canisters,lters,vaporhoses,clamps,connectors,andotherassociatedemission-relatedcomponents.
Whereawarrantableconditionexists,TheToroCompanywillrepairyoursmalloff-roadengine/equipmentatnocosttoyouincludingdiagnosis,
partsandlabor.
Manufacturer’sWarrantyCoverage
Thisemissioncontrolsystemiswarrantedfortwoyears.Ifanyemission-relatedpartonyourengine/equipmentisdefective,thepartwillberepairedor
replacedbyTheToroCompany.
OwnerResponsibilities
Asthesmalloff-roadengineowner,youareresponsiblefortheperformanceoftherequiredmaintenancelistedinyourOperator'sManual.Werecommend
thatyouretainallreceiptscoveringmaintenanceonyoursmalloff-roadengine/equipment,butwecannotdenywarrantysolelyforthelackofreceipts.
Asthesmalloff-roadengine/equipmentowner,youshouldhoweverbeawarethatwemaydenyyouwarrantycoverageifyoursmalloff-road
engine/equipmentoraparthasfailedduetoabuse,neglect,impropermaintenanceorunapprovedmodications.
Youareresponsibleforpresentingyoursmalloff-roadengine/equipmenttoaT oroDistributionCenterorServiceCenterassoonasaproblemexists.The
warrantyrepairsshouldbecompletedinareasonableamountoftime,nottoexceedthirty(30)days.
Ifyouhaveanyquestionsregardingyourwarrantycoverage,contactusat:
CustomerCareDepartment,ConsumerDivision
ToroWarrantyCompany
8111LyndaleAvenueSouth
Bloomington,MN55420-1196
1–952–948–4027(U.S.andCanadiancustomers)
emailCustomerSupportat:www.toro.com
GeneralEmissionsWarrantyCoverage
TheToroCompanywarrantstotheultimatepurchaserandeachsubsequentpurchaserthatthesmalloff-roadengine/equipmentis:
•Designed,built,andcertiedtoconformwithallapplicableemissionsregulations;and
•Freefromdefectsinmaterialsandworkmanshipthatcouldcausethefailureofawarrantedpart;and
•Identicalinallmaterialrespectstothepartsasdescribedintheapplicationforcertication.
Thewarrantyperiodbeginsonthedatethesmalloff-roadengine/equipmentisdeliveredtoanultimatepurchaser.Thewarrantedperiodistwoyears.
Subjecttocertainconditionsandexclusionsasstatedbelow,thewarrantyonevaporativeemissions-relatedpartsisasfollows:
1.Anywarrantedpartthatisnotscheduledforreplacementasrequiredmaintenanceinthewritteninstructionssupplied,iswarranted
forthewarrantyperiodstatedabove.Ifthepartfailsduringtheperiodofwarrantycoverage,thepartwillberepairedorreplacedby
TheToroCompany.Anysuchpartrepairedorreplacedunderwarrantywillbewarrantedfortheremainderofthewarrantyperiod.
2.Anywarrantedpartthatisscheduledonlyforregularinspectioninthewritteninstructionssuppliediswarrantedforthewarranty
periodstatedabove.Anysuchpartrepairedorreplacedunderthewarrantywillbewarrantedfortheremainderofthewarrantyperiod.
3.Anywarrantedpartthatisscheduledforreplacementasrequiredmaintenanceinthewritteninstructionssuppliedis
warrantedfortheperiodoftimebeforetherstscheduledreplacementdateforthatpart.Ifthepartfailsbeforetherst
scheduledreplacement,thepartwillberepairedorreplacedbyTheT oroCompany.Anysuchpartrepairedorreplaced
underwarrantywillbewarrantedfortheremainderoftheperiodpriortotherstscheduledreplacementpointforthepart.
4.Repairorreplacementofanywarrantedpartunderthewarrantyprovisionshereinmustbeperformedatan
AuthorizedServiceDealeratnochargetotheowner.
5.WarrantyservicesorrepairswillbeprovidedatallServiceDealersauthorizedtoservicethesubjectenginesorequipment.
6.Thesmalloff-roadengine/equipmentownerwillnotbechargedfordiagnosticlaborthatisdirectlyassociatedwithdiagnosis
ofadefective,emission-relatedwarrantedpart,providedthatsuchdiagnosticworkisperformedatanAuthorizedServiceDealer.
7.TheT oroCompanyisliablefordamagestootherengine/equipmentcomponentscausedbyafailureunderwarrantyofanywarrantedpart.
8.Throughoutthesmalloff-roadengine/equipmentwarrantyperiodstatedabove,TheT oroCompanywillmaintainasupply
ofwarrantedpartssufcienttomeettheexpecteddemandforsuchparts.
9.Manufacturerapprovedreplacementpartsmaybeusedintheperformanceofanywarrantymaintenanceorrepairsand
mustbeprovidedwithoutchargetotheowner.SuchusewillnotreducethewarrantyobligationsofTheToroCompany.
10.Add-onormodiedpartsthatarenotapprovedbyTheToroCompanymaynotbeused.Theuseofanon-approvedadd-onormodiedpartsby
thepurchaserwillbegroundsfordisallowingawarrantyclaim.TheT oroCompanywillnotbeliabletowarrantfailuresofwarrantedpartscausedby
theuseofannon-approvedadd-onormodiedparts.
WarrantedParts
Thefollowingemissionwarrantypartsarecovered,totheextentthesepartswerepresentontheT oroengine/equipmentand/orTorosuppliedfuelsystem:
374-0299RevA

1.FuelSystemParts
•Carburetorandinternalparts
•Coldstartingenrichment(primerorchoke)
•Fuelpump
•Fuelline,ttings,andclamps
•Fueltank,cap,andtether
•Carboncanister
2.AirInductionSystem
•Aircleaner
•Intakemanifold
•Crankcaseventandline(s)
•Purgelineandttings
3.IgnitionSystem
•Sparkplug(s)andwire(s)
•Magnetoignitionsystem
4.CatalyticExhaustSystem
•Catalyticconverter
•Exhaustmanifold
•Airinjectorsystemandvalve(s)
5.MiscellaneousItemsUsedinEmissionControlSystem
•Valves,switches,andlinkages
•Connectors,ttings,andbrackets
374-0299RevA

SnowMaster
Single-StageSnowthrowers
TheToroWarranty
AThree-YearLimitedWarranty(45DayLimitedWarrantyforCommercialUse)
ConditionsandProductsCovered
TheT oroCompanyanditsafliate,T oroWarrantyCompany,pursuantto
anagreementbetweenthem,jointlypromisetorepairtheT oroProduct
listedbelowifusedforresidentialpurposes*,ifdefectiveinmaterialsor
workmanshiporifitstopsfunctioningduetothefailureofacomponent
fortheperiodlistedbelow.
Thiswarrantycoversthecostofpartsandlabor,butyoumustpay
transportationcosts.
Thefollowingtimeperiodsapplyfromtheoriginaldateofpurchase:
ProductsWarrantyPeriod
SnowMasterSnowthrowersandAttachments3years
—ChuteLifetime(originalowner
only)1
—DeectorLifetime(originalowner
only)1
—LowerChuteLifetime(originalowner
only)1
LimitedWarrantyforCommercialUse
Gas-poweredToroProductsusedforcommercial,institutional,orrental
use,arewarrantedfor45daysagainstdefectsinmaterialsorworkmanship.
Componentsfailingduetonormalweararenotcoveredbythiswarranty.
InstructionsforObtainingWarrantyService
IfyouthinkthatyourToroProductcontainsadefectinmaterialsor
workmanship,followthisprocedure:
1.ContactanyAuthorizedToroServiceDealertoarrangeserviceattheir
dealership.T olocateadealerconvenienttoyou,refertotheYellow
Pagesofyourtelephonedirectory(lookunder“LawnMowers”)or
accessourwebsiteatwww.Toro.com.Youmayalsocallthenumbers
listedinitem#3tousethe24-hourToroDealerlocatorsystem.
2.Bringtheproductandyourproofofpurchase(salesreceipt)tothe
ServiceDealer.Thedealerwilldiagnosetheproblemanddetermineif
itiscoveredunderwarranty.
3.IfforanyreasonyouaredissatisedwiththeServiceDealer’s
analysisorwiththeassistanceprovided,contactusat:
ToroWarrantyCompany
CustomerCareDepartment,RLCDivision
8111LyndaleAvenueSouth
Bloomington,MN55420-1196
Tollfreeat866-336-5205(U.S.customers)
Tollfreeat866-854-9033(Canadiancustomers)
OwnerResponsibilities
YoumustmaintainyourT oroProductbyfollowingthemaintenance
proceduresdescribedintheOperator'sManual.Suchroutinemaintenance,
whetherperformedbyadealerorbyyou,isatyourexpense.
ItemsandConditionsNotCovered
Thereisnootherexpresswarrantyexceptforspecialemissionsystem
coverageandenginewarrantycoverageonsomeproducts.Thisexpress
warrantydoesnotcoverthefollowing:
•Costofregularmaintenanceserviceorreplacementofwearparts,
suchasblades,rotorblades(paddles),scraperblades,belts,fuel,
lubricants,oilchanges,sparkplugs,lightbulbs,cable/linkageorbrake
adjustments
•Anyproductorpartwhichhasbeenalteredormisusedorneglected
orrequiresreplacementorrepairduetoaccidentsorlackofproper
maintenance
•Pickupanddeliverycharges
•Operationalmisuse,neglect,oraccidents
•RepairsorattemptedrepairsbyanyoneotherthananAuthorizedT oro
ServiceDealer
•Repairsnecessaryduetofailuretofollowrecommendedfuel
procedure(consultOperator'sManualformoredetails)
–Removingcontaminantsfromthefuelsystemisnotcovered
–Useofoldfuel(morethanonemonthold)orfuelwhichcontains
morethan10%ethanolormorethat15%MTBE
–Failuretodrainthefuelsystempriortoanyperiodofnon-use
overonemonth
GeneralConditions
AllrepairscoveredbythesewarrantiesmustbeperformedbyanAuthorized
ToroServiceDealerusingT oroapprovedreplacementparts.Repairbyan
AuthorizedT oroServiceDealerisyoursoleremedyunderthiswarranty.
NeitherTheToroCompanynorToroWarrantyCompanyisliablefor
indirect,incidental,orconsequentialdamagesinconnectionwiththe
useoftheToroProductscoveredbythesewarranties,includingany
costorexpenseofprovidingsubstituteequipmentorserviceduring
reasonableperiodsofmalfunctionornon-usependingcompletionof
repairsunderthesewarranties.
Allimpliedwarrantiesofmerchantability(thattheproductistforordinary
use)andtnessforuse(thattheproductistforaparticularpurpose)are
limitedtothedurationoftheexpresswarranty.
Somestatesdonotallowexclusionsofincidentalorconsequential
damages,orlimitationsonhowlonganimpliedwarrantylasts,sotheabove
exclusionsmaynotapplytoyou.
Thiswarrantygivesyouspeciclegalrights,andyoumayalsohaveother
rightswhichvaryfromstatetostate.
CountriesOtherthantheUnitedStatesorCanada
CustomerswhohavepurchasedT oroproductsexportedfromtheUnitedStatesorCanadashouldcontacttheirToroDistributor(Dealer)toobtain
guaranteepoliciesforyourcountry,province,orstate.IfforanyreasonyouaredissatisedwithyourDistributor'sserviceorhavedifcultyobtaining
guaranteeinformation,contacttheT oroimporter.Ifallotherremediesfail,youmaycontactusatToroWarrantyCompany.
AustralianConsumerLaw
AustraliancustomerswillnddetailsrelatingtotheAustralianConsumerLaweitherinsidetheboxoratyourlocalT oroDealer.
*Residentialpurposesmeansuseoftheproductonthesamelotasyourhome.Useatmorethanonelocation,orinstitutionalorrentaluse,isconsidered
commercialuse,andthecommercialusewarrantywouldapply.
374-0314RevA
This manual suits for next models
1
Table of contents
Other Toro Snow Thrower manuals

Toro
Toro 38629 User manual

Toro
Toro 38621 User manual

Toro
Toro snow commander 38603 User manual

Toro
Toro 38641 User manual

Toro
Toro 38811 User manual

Toro
Toro 38631 User manual

Toro
Toro 38610 User manual

Toro
Toro power max 828 OE User manual

Toro
Toro 38621 Power Max 826LE User manual

Toro
Toro 38620 User manual