Toshiba TY-AS100TW User manual

* 尺寸:148 x 210 mm
* 颜色:白底黑字
* 材质:70g白书纸
* 装钉方式:骑马订
* 详细见样板
MATESTAR DIGITAL DEVICE LTD.
ARTMKG
IN CHARGE
CHECKED DRAWN
APPROVED
MEEE
IB
CLIENT MODEL : TY-AS100TWREF. NO.:
PART NAME:
JOB NO.: / BRAND NAME: TOSHIBA
PART
NO.:
TO: MKG FROM: Aiway DATE: 28/08/2012
COMMENT:
601-S10000-020
Scale: 65%
TY-AS100TW
Toshiba DVD MICRO COMPONENT SYSTEM
Operation Manual
Thank you for purchasing the DVD MICRO COMPONENT SYSTEM.
To use this product safely, read and understand this operation manual thoroughly
before using it.
After reading this manual, keep it in a safe place so that it can be used when
necessary.
Toshiba DVD微型元件系統
操作手冊
感謝您購買此DVD微型元件系統。
為安全使用本產品,請在使用之前通讀本操作手冊。
閱讀後請妥善保管本手冊,以便需要時使用。
5006900
120821TYAS100TW.indb3 12.8.214:56:04PM

Operation Manual ..................................... 3
操作手册................................................... 17
Dolby and the double-D symbol are trademarks of Dolby Laboratories.
Dolby 和雙 D 記號是杜比實驗室的註冊商標。
Manufactured under license from Dolby Laboratories.
本產品經過杜比實驗室的授權而製造。
DivX®, DivX®Certified and associated logos are trademarks of DivX, LLC and are
used under license.
DivX®, DivX® Certified及相關標誌是DivX,LLC的商標,經授權使用。
Windows Media and the Windows logo are trademarks, or registered trademarks
of Microsoft Corporation in the United States and/or other countries.
Windows Media和Windows徽標是Microsoft Corporation在美國和/或其他國家的商
標或註冊商標。
120821TYAS100TW.indb4 12.8.214:56:04PM

3
Safety precautions
The information you need to prevent danger to the user and other people as well as property damage is described below.
“Description of signs” shows different categories of the degree of danger or damage that may occur due to wrong handling.
“Description of symbols” shows the meaning of the symbols.
Description of signs
Indicates that there is a risk of death or serious injury.
Indicates that there is a risk of light injury or property damage.
Description of symbols
Indicates “Prohibition” or “You must not do” with
pictures and text.
Indicates “Mandatory Action” or “Do as indicated” with
pictures and text.
What to do in the case of an abnormality
Stop using the device immediately in the case of an abnormality or failure.s
Remove the power plug from the receptacle immediately when any water or foreign object enters the interior of thes
device.
It may cause a fire or electric shock. Remove the power plug immediately, and contact your dealer for a repair.
Power cord and power plug
Voltage selector: Used to adjust the input rating (110-127 VAC and 220-240 VAC), please just insert the mains power plugs
into the socket-outlet with voltage within the setting of the selector.
The mains plug is used as disconnect device, the disconnect device shall remain readily operable.s
Doing so may cause a fire or electric shock.
Do not insert or remove the power plug with a wet hand.s
Doing so may cause a fire or electric shock.
When removing the power plug from the receptacle, hold the power plug.s
Doing so may cause a fire or electric shock.
Unplug this apparatus during lightning storms or when unused for long periods of time.s
Usage
Do not disassemble, repair, or modify the device.s
Doing so may cause a fire or electric shock.
Invisible laser radiation when open and interlocks defeated.
A Class 1 laser product is used in the DISC driving unit. The DISC driving unit stops when
the cover is opened. Observe the following.
Do not look directly into the laser light or reflected light.s
Avoid exposure to beam of laser.s
The laser light may cause damage to your eye or skin.
Do not insert your hand into the CD insertion slot.s
Do not place a heavy object on the device.s
Do not block the ventilation hole.s
Doing so may cause an injury or fire.
Class 1 laser product
120821TYAS100TW.indb3 12.8.214:56:05PM

4
Installation
Do not install this equipment in a confined or building-in space such as a book case or similar unit, and remain a wells
ventilation conditions. The ventilation should not be impeded by covering the ventilation openings with items such as
newspaper, table-cloths, curtains etc.
Do not install this equipment near water.s
Do not install this equipment near any heat sources such as radiators, heat registers, stoves, or other apparatus (includings
amplifiers) that produce heat.
To reduce the risk of fire or electric shock, do not expose this apparatus to rain or moisture. The apparatus shall not bes
exposed to dripping or splashing and that objects filled with liquids, such as vases, shall not be placed on apparatus.
Doing so many cause a fire or electric shock.
Thes mains plug is used as disconnect device, the disconnect device shall remain readily operable.
Doing so many cause a fire or electric shock.
Disclaimer
Toshiba shall not be responsible for any damage caused by an earthquake, thunderstorm, flood damage, fire for whichs
Toshiba is not responsible, acts of a third party, other accidents, or damages caused by the user’s willful acts or
negligence, misuse, or use in abnormal conditions.
Toshiba shall not compensate for recordings not recorded due to failure of this product.s
Toshiba shall not be responsible for any damage caused by failure to observe the information described in the operations
manual.
This device shall not guarantee a replay of all audio files recorded in USB memory.s
Proper :Ventilation CAUTION
To avoid risk of electric shock and fire, and to prevent damage, locate the apparatus as follows:
1. Front: No obstructions and open spacing.
2. Sides/Top/Back: No obstructions should be placed in the areas indicated by the dimensions in the illustration.
3. Bottom: Place on the level surface. Maintain an adequate air path for ventilation by placing on a stand with a height of
10 cm or more.
10 cm
15 cm
1 cm
15 cm
15 cm 1 cm
15 cm
15 cm
Front View Side View
Speaker Speaker
120821TYAS100TW.indb4 12.8.214:56:05PM

5
Part names
[Front]
[Tape operation buttons]
[Back]
Display Unit
REWIND button
Audio Output terminal FM Antenna terminal
Component Video
Output terminal
Speaker L +
Speaker L –
FAST-FORWARD button
PRESET/SKIP/SEARCH REW button
CLOCK/SLEEP button
TIMER button
DISC/USB
PLAY/PAUSE button
PLAY button
Video Output terminal
Speaker R –
STOP/EJECT button
TAPE button
STANDBY-ON button
RECORD button
S-Video Output terminal
Speaker R +
Power Supply
PAUSE button
LINE IN terminal
DISC/USB STOP button
Push to open or close the
DISC cover
DISC cover
PRESET/SKIP/SEACH FW button
Cassette door
VOLUME Knob
Cassette button door
PROGRAM button
USB terminal
REMOTE SENSOR
FM/LINE IN button
TUNING button
120821TYAS100TW.indb5 12.8.214:56:06PM

6
SLEEP
REPEAT1GROUP RANDOM PROG.
HBS
WMA MP3 DVD USB VCD
JAZZROCK POP CLASSIC ST
FM/
LINEIN
Notes
Only DVD/CD and USB memory can be operated.s
Before using the remote control for the first time after your purchase, remove the insulating sheet in the battery case (translucents
sheet). The batteries that come with the device are for trial use.
Battery
Do not use any battery other than specified.s
Make sure the polarity of the battery is correct.s
Using the remote control
Use it within about 5 meters and 30 degrees horizontally from the front of the remote control light receiving section of the main
unit.
Notes
The remote control may not operate correctly in the following cases.
An obstacle exists between the main unit and the remote control.s
Strong light such as direct sunlight shines on the remote control light receiving section.s
[Remote Control]
FM/LINE IN POWER
DISC/USB
TAPE
CLOCK/SLEEP
CURSOR BOK (ENTER)
EQ HBS
REPEAT/RANDOM
TIMER
MENU
CURSOR C
zPLAY/PAUSE c/W
0-9 ZOOM
MUTE
AUDIO
STOP v
TITLE
SET UP
DISPLAYA B
CURSOR bCURSOR c
ZVOLUME + –
PROGRAM/ANGLE GO TO
[Display Unit]
USB
VCD
Program playing
Random playing
MP3
Tape Recording
Timer
Frequency
DVD
WMA
Repeat playing
Repeat one track : REPEAT 1
Repeat all tracks : REPEAT
Group playing
Folder/Track/Chapter/
File number
SLEEP ROCKHBS POP StereoJAZZ CLASSIC
Lithium coin battery (CR2025)
(supplied)
Insulating sheet
120821TYAS100TW.indb6 12.8.214:56:06PM

7
ABOUT DISC/FILE/CASSETTE TAPE
Playable discs/files
Discs with one of the marks below on the surface.
For Disc playback:
Files in Audio CD format, MP3, WMA and JPEG files on a finalized CD-R or CD-RW. MP3, WMA and JPEG files on a finalized
DVD-R/-RW, +R or +RW can also be played.
For USB playback:
Files in MP3, WMA and JPEG format.
CD-R/-RW:
Recorded in the Audio CD and Video CD format. MP3, WMA and JPEG files written in accordance with the “ISO 9660” format
can also be played.
DVD-R/-RW, +R/+RW:
Recorded in the DVD Video format. MP3, WMA and JPEG files written in the UDF-Bridge format can also be played.
This unit can also play back DVD-ROM (DVD Video/MP3/WMA/JPEG format) and CD-ROM (Audio CD/Video CD/SVCD/MP3/s
WMA/JPEG format).
The following discs cannot be played back:s
DVD-RAM, CD-I (CD-I Ready) and Photo CD.
Playing back these discs will generate noise and damage the speakers.
This unit does not support a disc recorded with DVD Video Recording (VR) format.s
CD Text and DVD Text can be played, but Text information will not be shown on the display.s
In this manual, “file” and “track” are used interchangeably.s
DVD Logo is a trademark of DVD Format/Logo Licensing Corporation.s
Caution for DualDisc playback:
The Non-DVD side of a “DualDisc” does not comply with the “Compact Disc Digital Audio” standard.
Therefore, the use of Non-DVD side of a DualDisc on this product may not be recommended.
Notes on discs/files
For MP3/WMA playback...
This unit can play back MP3/WMA files with the extension code <.mp3> or <.wma> (regardless of the letter case upper/lower).s
MP3/WMA discs require a longer readout time than regular discs. (It depends on the complexity of the folder/files
configuration.)
Some MP3/WMA files cannot be played back and will be skipped. This result from their recording processes ands
conditions.
When making MP3/WMA discs, use ISO 9660 Level 1 for the disc format.s
It is recommended to make the files at the following condition:s
MP3/WMA files
MP3: 128kbps
WMA: 96kbps
Sampling frequency
MP3/WMA files: 44.1 kHz
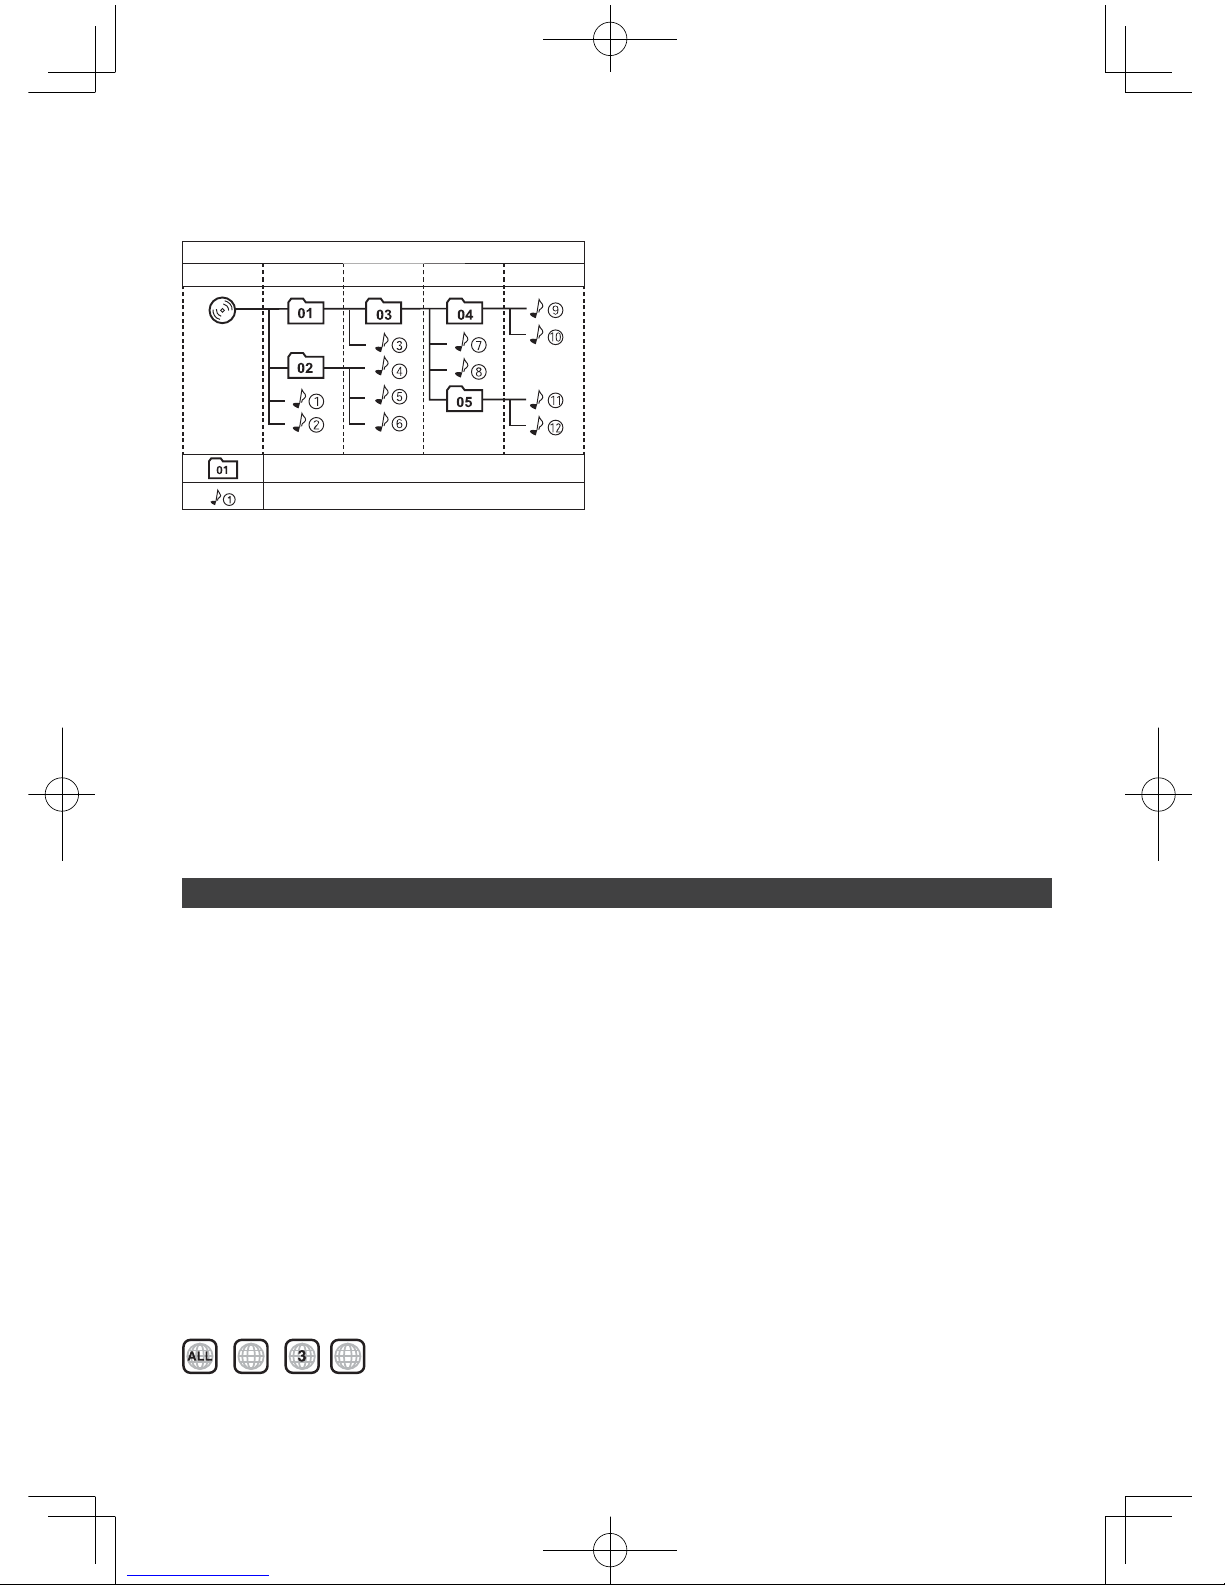
Playback order of MP3/WMA files may be different from the one you have intended while recording. If a folder does nots
include MP3/WMA files, they are ignored.
This unit cannot play “packet write” discs.s
If a CD-RW has been recorded in a different format, erase all data on the CD-RW completely before recording on it.s
This unit can recognize up to 999 tracks and 130 folders (groups) in a disc or USB device. Those exceeding the maximums
number cannot be recognized.
The reflection factor of CD-RW is lower than that of other CDs, possibly causing CD-RW to take longer time to read.s
For JPEG playback...
This unit can play back JPEG files with the extension code <.jpg> or <.jpeg> (regardless of the letter case upper/lower).s
It is recommended to make the files at 640 x 480 resolution. (If the files have been recorded at a resolution of more than 640s
x 480, it will take a long time to be shown.)
This unit can play only baseline JPEG files*. Progressive JPEG files* or lossless JPEG files* cannot be played.s
* Baseline JPEG format: Used for digital cameras, web, etc.
Progressive JPEG format: Used for web.
Lossless JPEG format: An old type and rarely used now.
120821TYAS100TW.indb7 12.8.214:56:07PM

8
MP3/WMA/JPEG folders/files configuration
This unit plays back MP3/WMA/JPEG files as follows.
The play order in the figure is for MP3/WMA/JPEG files on the disc.
MP3/WMA/JPEG files on USB mass storage class device may be played back differently.
Hierarchy
Level 1 Level 2 Level 3 Level 4 Level 5
Folder with its play order
MP3/WMA/JPEG file with its play order
For USB device
Always set volume to the minimum level when connecting or disconnecting the USB mass storage device.s
Connect one USB mass storage class device to the unit at a time. Do not use a USB hub.s
USB Memory and DAPs (Digital Audio Player) compatible with the USB mass storage class specifications are connectable.s
Some DAPs are not compatible with the unit.s
Copyrighted tracks (WMA-DRM* tracks) cannot be played back on the unit.s
You can play back MP3/WMA/JPEG files on a USB mass storage class device (maximum data transfer rate: 2 Mbps).s
This unit may not play back some files even through their formats are listed above.s
This unit is compatible with USB 2.0 Full Speed.s
You cannot play back a file larger than 2 Gigabytes.s
When playing a file of a large transfer rate, sounds may be dropped during playback.s
Some USB mass storage class devices may not be recognized or may not work properly.s
TOSHIBA bears no responsibility for any loss of data in the USB mass storage class device while using this unit.s
On cassette tapes
Type-I tape is recommended for playback on this unit. You can also play back type II and type IV tapes;s
however, the sound quality (tone) may not be reproduced properly.
REFERENCES
License and trademark
This product incorporates copyright protection technology that is protected by U.S. patents and other intellectual protections
technology must be authorized by Macrovision, and is intended for home and other limited viewing uses only unless
otherwise authorized by Macrovision. Reverse engineering or disassembly is prohibited.
Microsoft and Windows Media are either registered trademarks or trademarks of Microsoft Corporation in the United Statess
and/or other countries.
Precaution
Before playing a disc/file, make sure of the following...
Turn on the TV and select an appropriate input mode on the TV to view the pictures or on-screen displays.s
For disc/file playback, you can change the initial setting to your preference. See “SETUP MENU OPERATIONS” on anothers
sheet.
If “INVALID KEY” appears on the TV screen when you press a button, the disc/file cannot perform the operation you have trieds
to do.
About color system
This unit accommodates both NTSC and PALsystem and can play back discs/files recorded in either system.
Note on Region Code
DVD players and DVDs have their own Region Code numbers.
This unit can play back only DVDs with an appropriate Region Code number.
EX.: For South East Asia
25
Region codes:
-IDDLE%AST s3OUTH%AST!SIA s!FRICAs
120821TYAS100TW.indb8 12.8.214:56:07PM

9
CONNECTION Do not connect the AC cord until all other connections have been made.
NOTE:
Make sure the antenna conductors do not touch any other terminals, connecting cords or the power cord.
Also, keep the antennas away from metallic parts of the System, connecting cords, and the AC power cord.
Otherwise, it could cause poor reception.
Use only speakers with the same speaker impedance as indicated by the speaker terminals on the rear of
the System.
To connect the speaker cords
Make sure both speakers are connected correctly and firmly.
When connecting the speaker cords, match the polarity of the speaker terminals: The black cord to (–), the red cord to (+).
Cautions
Do not connect more than one speaker to each terminal.s
Do not allow the conductor of the speaker cords to be in touch with the metallic parts of the System.s
Note:
If the speaker cords are covered with vinyl, remove the vinyl to with the metallic parts of the System.
FM Antenna (supplies)
(Extend the antenna and direct it to the optimal
direction where the sound quality is the best.)
For better FM reception
Disconnect the supplied FM antenna,
and fixed the tip of the antenna cord in
a place with good sensitivity.
To wall outlet
2. Insert
1. Push 3. Lock
120821TYAS100TW.indb9 12.8.214:56:08PM

10
Connecting a TV
Do not connect the power cord until a TV connections have been made.
Connect your TV with the video cord to the Video output terminal.
s7HENTHESOURCEIS$)3#OR53"THESOUNDCOMESOUTOF
the speakers of the device connected via the audio cord.
Red
7HITE
Audio cords (Not supplied)
Input terminal of
another audio device
Input terminal of TV
6IDEOCORD3UPPLIED
Yellow
Setting the color system
Select PAL or NTSC according to the TV system you use.
1. Press button.
2. Press the , , or button to select "TV SYSTEM".
3. Press button, Move the cursor to the right.
4. Select "PAL" or "NTSC".
5. Press button.
Information
Connect the unit directly to a TV (or a monitor) without routing through a video cassette recorder (VCR) or an HDD/DVD recorder.s
Otherwise picture distortion may occur during playback. (Routing the connection through a VCR or an HDD/DVD recorder, however,
does not affect the audio quality.)
This unit
TV (or monitor)
Direct connection
VCR or HDD/DVD/
"LUE2AYRECORDER
Connecting the unit to a VCR-built-in-TV may also cause picture distortion during playback.s
Connecting an external device
Connect your external device with the stereo mini plug ( 3.5 mm) to the LINE IN terminal. 3TEREOMINIPLUG
( 3.5 mm)
120821TYAS100TW.indb10 12.8.214:56:08PM

11
INITIAL SETTING
NSetting the clock
1. You can set the clock only when the System is turned off
(on standby.)
Press and hold CLOCK/SLEEP button.
If you have already set the clock before, press and holds
CLOCK/SLEEP button until the clock is flashing.
“0:00” flashes on the display until you set the clock.s
2. Adjust the hour and minute.
or
The clock may gain or lose 1 to 2 minutes per month. Yous
may need to readjust the clock periodically.
To check the current time while the System is
turned on
The time is displayed for a few seconds.
If there is a power failure
The clock loses its settings. You need to set the clock again.
NTIMER
The unit turns on and play desired source (DISC/USB/TUNER)
in your desired time.
Before setting the TIMER:
1. Check that the clock is set to the correct time.
If it is not set, you cannot use the TIMER function.
2. For DISC/USB playback: Insert DISC or USB to the unit.
3. For Radio: Set preset memory.
IF you want to exit timer set mode, according to press
the STOP button.
Setting the TIMER:
1. Press POWER 1button to turn on the unit.
2. In standby mode, press and hold (2 seconds) the TIMER
button to start the clock setting mode.
The "ON TIME" is flashing.
3. Press TIMER button.
The "Hour" in flashing
4. Press the PRESET Zor zbutton to adjust the hour
and press the TIMER button.
Press the PRESET button once to advance the time by 1
hour. Hold it down to advance continuously.
5. Press the PRESET Zor zbutton to adjust the minutes
and then press the TIMER button.
Press the PRESET button once to advance the time by 1
minute.
6. Press the PRESET Zor zbutton continues to set
closing time, and press the TIMER button to confirm.
7. Press PRESET Zor zbutton to adjust the hour and
press the TIMER button.
8. Press the PRESET Zor zbutton to adjust the minutes
and then press the TIMER button.
9. Press the PRESET Zor zbutton continues to set
SOURCE, and press the TIMER button to confirm.
10. Press the function button to select the play source
(DISC/USB/TUNER), and then press the TIMER button.
TIMER icon " " will light up to indicate timer setting.
120821TYAS100TW.indb11 12.8.214:56:10PM

12
11. Press POWER 1button to turn off the unit into
standby.
12. When the unit has turned on, press the TIMER button,
the timer indicator on the display is off, and the daily
timer is turned off.
Once the Daily Timer is set, the timer indicator lights on thes
display. If you do not manually turn off the timer, the daily
timer will start at the same time Every day.
When the TIMER operation, the timer indicator will bes
displayed on the screen.
When OFF TIME comes, the unit will stop play and shuts
down into standby.
NSETTING THE SLEEP TIMER
You can set Sleep Timer only when the System is turned on.
1. Press and hold CLOCK/SLEEP button.
SLEEP
2. Specify the time (in minutes).
10 20 30 40 50
90 80 70 60
OFF
To check the remaining time until the System shuts off,s
press and hold CLOCK/SLEEP button.
If you press the button repeatedly, you can change thes
shut-off time.
NSOUND ADJUSTMENT
Muting
To drop the volume in a moment
(Remote Control)
To restore the volume, press again or adjust the volume.s
Hyper Bass Sound (HBS)
To reinforce the bass sound
(Remote Control)
Sound Mode
To select the sound mode suitable for your favorite music
(Remote Control)
NVOLUME ADJUSTMENT
You can adjust the Volume level from level 0 (“VOL MIN.”) to
level 31 (“VOL MAX.)
Remote Control Main Unit
BASIC OPERATIONS
NDISC/USB
To start playback
1. DISC: Open the DISC cover, mount the DISC with its
printed face up, and then close the DISC cover.
Push
OPEN/CLOSE
Label side
USB: Connect a USB device with the USB terminal.
USB Device
Digital Audio
Player
2. Press the DISC/USB button on remote control to select
DISC or USB function.
3. Press or button on remote control to start
playback.
Playback operations
Remote Control Main unit
The playback/pause
Press Press
To select a track
Press Press
or
To fast-forward a track
Press and hold Press and hold
(Canceled)
HBS
Canceled
(No indication)
Canceled
(No indication) CLASSIC
POPROCKJAZZ
120821TYAS100TW.indb12 12.8.214:56:12PM

13
Remote Control Main unit
To fast-reverse a track
Press and hold Press and hold
To select a directly track (MP3 only)
Press Number button
To stop playback
Press Press
Repeat /Random Play
During Playback
Press
RANDOM Random play back all tracks
REPEAT 1 Repeat the current track
REPEAT
GROUP
Repeat all the tracks in the current group (for
MP3 only)
REPEAT Repeat all (on the program during Program
Play)
Canceled No indication
Playback start in a random order.
Random Play ends when all tracks have been played.
You cannot select a track with the number buttons durings
program play.
Program Play
1. Press PROGRAM button during a stop to start program
setting.
Remote Control Main unit
Press Press
"PROG" and "P01" are displayed.
PROG.
2. Press the PRESET Zor zbutton to select the desired
track number you want to program.
You can also use the numeric keys on the remote control.s
3. Press PROGRAM button to save.
4. To program another track number, repeat steps 2 and 3
steps.
You can program up to maximum 16 tracks you like.s
5. Press PLAY/PAUSE button to finish the program setting
and start playback.
PROG.
WMA
USB
DVD
PROG.
USB
DISC
USB
6. Pressvbutton to stop programmed playback.
Note
In the program during playback, you can not use thes
number keys to select the track.
NLINE IN
Playback operation
1. Connect an LINE IN terminal of this device to the
headphone terminal of the external device with a
connection cord with the 3.5 stereo mini-plug
(separate sale).
Stereo mini plug cord
(not supplied)
2. Press FM/LINE IN button.
FM/
LINEIN
3. Replay the external device.
4. Adjust the volume.
Note
Always set volume to “VOL MIN” when connecting ors
disconnecting the external device.
Canceled
(No indication)
Canceled
(No indication)
REPEAT GROUP
(for MP3 only)
RANDOM
REPEAT 1
REPEAT
120821TYAS100TW.indb13 12.8.214:56:13PM

14
NFM radio
This System cannot receive AM broadcast.
Searching for stations
1. Press FM/LINE IN button to select RADIO.
2. Use TUNING or button or cursor Ccbutton on
the remote control to select a desired station.
Remote Control Main unit
Press and hold
Cursor Cc
Press and hold
TUNING
3 The station search stops when a station of sufficient
signal strength is found.
MHz
To manually stop the search, presss or button.
When you presss or button repeatedly, the frequency
changes step by step.
When an FM stereo broadcast is received, "ST" illuminatess
and the device enters the stereo mode.
Presetting for stations
You can preset up to 20 FM stations.
While listening to a target station.
1. Press PROGRAM button.
Remote Control Main unit
Press Press
MHz
2. Select a preset number.
You can also uses or button.
3. Press PROGRAM button to store the station.
Tuning in to a preset station
Press preset or button.
Indicator lights up on the display.s
NTAPE
You can play back type I tapes.
Playback operations (on the main unit)
1. Select “TAPE” as the source.
2. Open the cassette door and insert a tape.
With the tape
side facing down
3. Close the cassette door.
4. Press cbutton.
Replay starts.
To play back Press
To pause Press
To stop Press
To locate a
particular
portion
While playing a tape
To release, press
Note
It is not recommended to use C-120 or longer tapes.s
These tapes easily jam in the pinch roller and capstan, and
may cause characteristic deterioration.
Recording operations (on the main unit)
Before you start recording
It should be noted that it may be unlawful to re-record pre-s
recorded tapes, records, or discs without the consent of
the owner of copyright for the sound or video recording,
broadcast or cable program and for any literary, dramatic,
musical, or artistic work embodied therein.
The volume and sound adjustments do not affects
recordings.
Rewind the tape
Wind-forward the tape
120821TYAS100TW.indb14 12.8.214:57:11PM

15
Recording an FM broadcast
You can use type I tapes for recording.
Before recording
Insert a recordable cassette.
1. Tune into the FM station you want to record.
FM/
LINEIN
or
2. Starting recording.
(At the same time)
Thes REC indicator lights up on the display.
To stop recording, presss button.
Recording from a disc or USB
You can record tracks from an Audio CD/USB.
Before recording
Load a disc and insert a recordable cassette.
1. Select “DISC” or “USB” as the source.
2. Starting recording.
(At the same time)
Thes REC indicator lights up on the display.
To stop recording manually, presss button.
To start recording from a specified track, presss or
button to select the desired track you want to start
recording from.
Recording will start while playing, and then return to the
beginning of the track and will be recorded.
When the tape reaches its end before playback of
the DISC/USB finishes, the recording and playback
pause.
In this case, flip the tape and restart the recording by either
of the following ways.
To restart the recording from the position where thes
playback pauses, press and buttons.
To restart the recording from the beginning of the currents
track, press button, then press and buttons.
Recording from an external device
To connect an external device, see “LINE IN”.
Before recording
Connect a device and insert a recordable cassette.
1. Select “LINE IN” as the source and turn on the external
device.
FM/
LINEIN
2. Start playback on the external device.
Refer to the manuals supplied with the external device.
3. Starting recording.
(At the same time)
Thes REC indicator lights up on the display.
To stop recording, presss button.
Erasing a tape
You can make a blank tape by erasing the contents.
1. Select “TAPE” as the source.
2. Start erasing.
(At the same time)
TAPE
To stop recording manually, press button.
120821TYAS100TW.indb15 12.8.214:57:13PM

16
Correct Disposal of this product.This marking indicates that this product should not be disposed with other household
wastes throughout the EU. To prevent possible harm to the environment or human health from uncontrolled waste
disposal, recycle it responsibly to promote the sustainable reuse of material resources. To return your used device,
please use the return and collection systems or contact the retailer where the product was purchased. They can take
this product for environmental safe recycling.
TOSHIBA LIFESTYLE ELECTRONICS TRADING CO.,LTD.
1-1-8, Sotokanda, Chiyoda-ku Tokyo 101-0021, Japan
SPECIFICATIONS
DISC player
DISC capacity 1 DISC
Signal-to-noise ratio 60 dB
Dynamic range 60 dB
Tuner
FM tuning range 87.5 MHz – 108 MHz
Antennas Coaxial type for FM
Cassette deck
Frequency response 100 Hz – 8 000 Hz
Wow & flutter 0.35% (WRMS)
Fast wind time Approx. 170 sec. (C-60 cassette)
General
Speakers 3.5 inch cone x 2
Speaker impedance 8ȍ
Output power 10 W + 10 W, 10% THD, 8 ȍ
Input terminal
USB Playable files: MP3, WMA, JPEG
Compatible device: Mass storage class
Bus power supply: DC5V 500 mA
LINE IN Stereo mini ( 3.5mm) 500mV/47kȍ
Output terminal LINE IN ( 3.5 ) x 1
VIDEO OUT x 1
AUDIO OUT R x 1
AUDIO OUT L x 1
Y OUT x 1
Pb/Cb OUT x 1
Pr/Cr OUT x 1
Color system PAL/NTSC
Power supply AC 100 V – 240 V
50 Hz/60 Hz
Power consumption 18 W (at operation), <1 W (on standby)
Dimensions 140 mm x 209 mm x 208 mm (W/H/D)
Mass Approx. 4.1 kg (Main unit(1.7 kg) and Speaker Box(2.4 kg) )
Accessories
Provided FM Antenna cord x 1
Composite video cord x 1
Remote control x 1
Lithium coin battery CR2025 x 1
Design and specifications are subject to change without notice.
120820c1TY-AS100TWEn.indd16 12.8.280:21:09PM

17
安全注意事項
以下是防止用戶和他人遭受危險和財產損失的安全信息。
“標誌說明”對可能因操作不當而引發的危險或損害的程度進行說明。
“符號說明”說明符號的含義。
標誌說明
警告 表示有嚴重傷亡的風險。
注意 表示有輕傷或財產損失的風險。
符號說明
用圖片和文字表示“禁止”或“ 不 得 操 作 ”。用圖片和文字表示“強制操作”或“ 按 指 示 操 作 ”。
異常情況下的應對措施
警告
出現異常或故障時請立即停止使用裝置。 z
若有水或異物進入裝置內部,請立即從插座上拔下插頭z
這可能會導致火災或觸電。應立即拔下插頭並聯繫經銷商進行維修。
電源線及電源插頭
警告
電壓選擇開關:用於調節額定輸入(110-127 VAC和220-240 VAC),請僅將電源插頭插入電壓與選擇開關設置z
一致的插座。
電源插頭作為未連接裝置使用,未連接裝置應該保持可操作狀態。z
否則可能會導致火災或觸電。
切勿用濕手插入或拔出電源插頭。z
否則可能會導致火災或觸電。
注意
從插座拔出電源插頭時,請抓住電源插頭。z
否則可能會導致火災或觸電。
在雷電風暴或長時間不使用時,請拔下本裝置的電源插頭。z
使用
警告
切勿拆卸、修理或改動裝置。z
否則可能會導致火災或觸電。
打開後聯動裝置失效時,有不可見的激光輻射。
光盤驅動裝置中使用的是1級激光產品。蓋打開時,光盤驅動裝置停止運轉。請注
意以下事項。
切勿直視激光或反射光。z
避免暴露在激光束下。z
激光會對眼睛或皮膚造成傷害。
注意
切勿將手伸入CD卡槽中。z
切勿在本裝置上放置重物。z
切勿堵塞通風孔。z
否則可能會導致受傷或火災。
Class 1 laser product
120821TYAS100TW.indb17 12.8.214:57:13PM

18
安裝
警告
切勿將本裝置安裝在狹窄或內凹的地方,如書櫃或類似設備,並保持良好通風。不得在通風口處覆蓋報紙、桌z
布、窗 簾 等 物 品,以 免 阻 礙 通 風。
請勿將本裝置安裝在有水的地方附近。z
請勿將本裝置安裝在熱源附近,例如散熱器、熱寄存器、火爐或其他會產生熱的裝置(包括揚聲器)附近。z
為了減少火災或觸電的風險,切勿將本裝置暴露在雨水或濕氣中。不得讓液體滴落或潑濺到本裝置,不得將裝z
有液體的物體(如花瓶)放置在本裝置上。
否則可能會導致火災或觸電。
電源插頭z作為未連接裝置使用,未連接裝置應該保持可操作狀態。
否則可能會導致火災或觸電。
免責聲明
Toshiba 不對因地震、暴風雨、洪水、Toshiba不予負責的火災、第三方行為、其他事故而造成的任何損 z
失、或因用戶的故意行為或疏忽、錯誤使用或在異常條件下的使用而導致的損失承擔責任。
Toshiba 不為因本產品故障而造成的錄音失敗提供賠償。 z
Toshiba 不對因沒有遵守操作手冊中的說明而導致的任何損失承擔責任。 z
本裝置不承諾可以播放USB存儲設備內錄制的所有音頻文件。 z
正確:通風注意事項
為避免發生觸電和火災以及避免造成損壞,請將本裝置如下放置:
1. 前面:無障礙物並且為開放空間。
2. 側面/頂部/背面:在下圖所示的尺寸中所指示的區域不能放置任何障礙物。
3. 底部:放置在平坦的表面上。通過放置一個10 cm或更高的支架,使氣流能夠順暢的流動。
10 cm
15 cm
1 cm
15 cm
15 cm 1 cm
15 cm
15 cm
前面視圖 側面視圖
揚聲器 揚聲器
120821TYAS100TW.indb18 12.8.214:57:13PM

19
產品名稱
[前面]
[卡帶操作按鈕]
[後面]
顯示屏
快退按鈕
音頻輸出端口 FM 天線端口
分量視頻輸出端口
揚聲器 左+
揚聲器 左-
快進按鈕
PRESET -
(預設/跳動/搜索快退按鈕)
CLOCK/SLEEP(時鐘/睡眠)按鈕
TIMER(定時器)按鈕
DISC/USB
c/W(播放/暫停)按鈕
播放按鈕
視頻輸出端口
揚聲器 右-
停止/彈開按鈕
TAPE(磁帶)按鈕
STANDBY(待机)按鈕
錄制按鈕
S-視頻輸出端口
揚聲器 右+
電源
暫停按鈕
LINE IN端口
DISC/USB v(停止)按鈕
按下可打開或關閉光盤蓋
光盤蓋
PRESET +
(PRESET/SKIP/SEACH快進按鈕)
卡帶盒蓋
音量旋鈕
卡帶按鈕蓋
PROGRAM(編程)按鈕
USB 端口
遙感器
FM/LINE IN 按鈕
TUNING(調諧)按鈕
120821TYAS100TW.indb19 12.8.214:57:14PM
Table of contents
Other Toshiba Stereo System manuals