manuals.online logo
Brands
  1. Home
  2. •
  3. Brands
  4. •
  5. Toshiba
  6. •
  7. Transceiver
  8. •
  9. Toshiba TC32306FTG User manual

Toshiba TC32306FTG User manual

TC32306FTG
2015-10-01
1
TOSHIBA CMOS Integrated Circuit Silicon Monolithic
TC32306FTG
Single-Chip RF Transceiver for Low-Power Systems
1. General Description
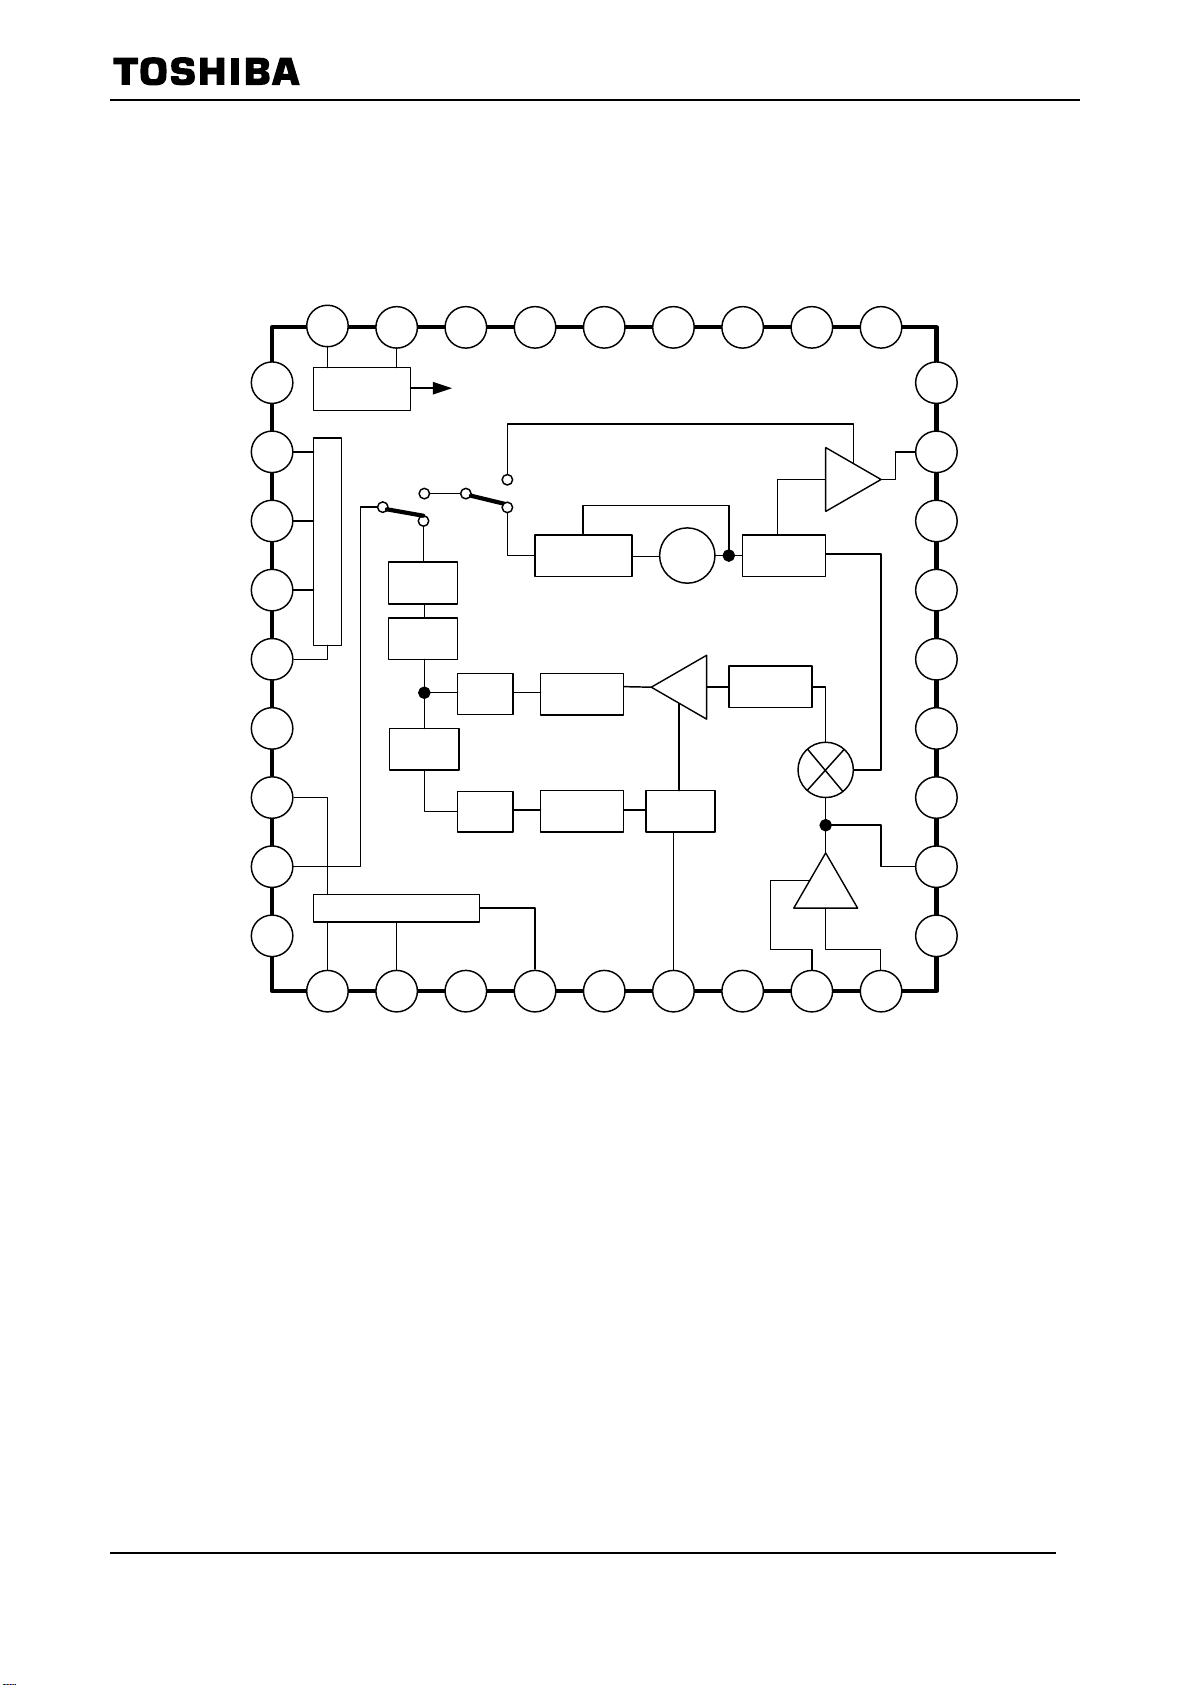
The TC32306FTG is a single-chip RF transceiver, which
provides many of the functions required for UHF-band
transceiver applications. It has the most features transmitting
and receiving the signal.
Furthermore, by digital processing, it can reduce significantly the
number of external components and allow fine adjustments.
Various type of applications are supported by this chip as
configuring various settings such as supply voltage, frequency,
modulation and detection.
2. Applications
Remote keyless entry (remote door lock / unlock of equipment),
automotive equipment applications such as tire pressure monitoring system, and remote controller, etc
3. Features
•Integrates LNA, Mixer, IF Filter, IF AMP, RSSI, Signal Detector, Bit Rate Filter, Data Comparator, PLL, VCO
and PA into a single IC.
•Operating voltage range: 2.0 to 3.3 V (For 3V Use), 2.4V to 5.5V (For 5V Use)
•Current consumption: TX 12 mA at +10dBm output level / RX 9.7 mA / Battery Saving 0μA (typ.)
•Use for four RF Band: 315, 434, 868 / 915 MHz
•Supported modulation: ASK / FSK
•Single conversion system
•Two IF Filter bandwidth: wide 320kHz(typ.) at IF = 230kHz / middle 270kHz(typ.) at IF = 280kHz
•Signal Detections: RSSI detection, Noise detection (Only for FSK), Preamble detection
•Receiver sensitivity: under -116dBm (At IF BW = 320kHz, data rate = 600Hz, frequency deviation = +/-40kHz)
•Transmitter power: +10dBm (typ. at setting maximum output)
•Serial control (4 wire SPI) / EEPROM control
•Data Comparator Quick Charge / AutoOff Control / Antenna Switch Control
QFN36-P-0606-0.50
Weight: 0.08 g (typ.)
TC32306FTG
2015-10-01
2
4. Block Diagram
19202122242526
27 23
9876432 5
36
35
34
33
32
31
30
29
28
16
17
18
13
14
15
10
11
12
IF Filter
Detector
LPF
RSSIADC
LPF
BRF
Data
COMP
VCOPLL
XOSC
Monitor
SPI
DATA_IO
DET_TMONI1
COM_VDD
MOSI
MISO
CLK
CS
IO_GND
DET_TMONI3
DET_TMONI2
DET_TMONI4
ENB
RSSI_OUT
3V/5V
RX_SW
RF_DEC
RF_IN
A_VDD_3V
RF_OUT
A_VDD_5V
A_REG
A_GND
IF_REF
PA_GND1
PA_OUT
PA_GND2
TX_SW
RESET
MODE2
MODE1
TEST
PLL_REG
PLL_GND
X_IN
X_OUT
D_REG Reference clock
IF AMP
PA
MIX
FSK
ASK
LNA
Limiter
1
RX
TX
Divider
Some of the functional blocks, circuits, or constants in the block diagram may be omitted or simplified for
explanatory purposes.
Fig 4-1 Block Diagram
TC32306FTG
2015-10-01
3
5. Pin Description
5.1 Equivalent Circuit and Function
Table 5-1 Pin Description
- All the values (resistance, capacity, etc.) shown in the internal equivalent circuit diagram are typical values.
- The equivalent circuit diagrams may be simplified or some parts of them may be omitted for explanatory purpose.
Pin No. Pin Name I/O Description Internal Equivalent Circuit
1 DET_TMONI2 Digital
Output
Monitor 2
Monitoring internal signals (digital), use
for system control
At no use, open this pin.
1
Control
DET_TMONI2
COM_VDD COM_VDD
2 DET_TMONI3 Analog
Output
Monitor 3
Monitoring internal signals (Converted to
analog / in User Test )
At no use, open this pin.
Notice:
In User Test, Supply at least 3 V to
COM_VDD pin to monitor the signal.
Lower voltage supply causes an incorrect
monitoring.
2
DET_TMONI3
COM_VDD
3 ENB Digital
Input
Enable Pin
Select to enable (In SPI Mode)
Address Setting (In EEPROM Mode)
Set a start address to read memory data.
Notice:
Do not supply higher voltage than the
level of COM_VDD. (For example, in the
case of too low / no power supply.) That
causes overcurrent at this pin, as the
ESD protection elements insertion
between the pin and the voltage source.
3
ENB
COM_VDD
4 DET_TMONI4 Analog
Output
Monitor 4
Monitoring internal signals (Converted to
analog / in User Test)
At no use, open this pin.
Notice:
In User Test, Supply at least 3 V to
COM_VDD pin to monitor the signal.
Lower voltage supply causes an incorrect
monitoring.
DET_TMONI4
4
COM_VDD
5 3V/5V Digital
Input
Supply Voltage Selector
Select supply
voltage. Connect power
supply for 5V use. / Ground for 3V use.
Notice:
Do not supply higher voltage than the
level of COM_VDD. (For example, in the
case of too low / no power supply.) That
causes overcurrent at this pin, as the
ESD protection
elements insertion
between the pin and the voltage source.
5
3V/5V
COM_VDD
TC32306FTG
2015-10-01
4
Pin No. Pin Name I/O Description Internal Equivalent Circuit
6 RSSI_OUT Analog
Output
RSSI Output
Output RSSI (= Received Signal Strength
Indication) voltage. Connect ground via a
capacitor. This IC
has another RSSI signal
for digital processing.
At no use, connect ground via a capacitor.
6
RSSI_OUT
A_VDD_3V A_VDD_3V
50kΩ
7 RX_SW
Digital
Output
Antenna Switch Control for RX (In SPI
Mode)
At no use, open this pin.
7
RX_SW
A_VDD_5V A_VDD_5V
20kΩ
100Ω
1kΩ
Digital
Input
Address Setting (In EEPROM Mode)
Set a start address to read memory data.
Notice:
Do not supply higher voltage than the level
of COM_VDD. (For example, in the case
of too low / no power supply.) That causes
overcurrent at this pin, as the ESD
protection elements insertion between the
pin and the voltage source.
8 RF_DEC -
RF Decoupling Pin
Connect a decoupling capacitor.
At no use, open this pin.
9
RF_DEC
A_REG A_VDD_3V
6kΩ
8
RF_IN
A_REG
1kΩ
5pF
9 RF_IN Analog
Input
RF Input Pin
Do not connect DC voltage except ground
to RF_IN pin.
At no use, open this pin.
TC32306FTG
2015-10-01
5
Pin No. Pin Name I/O Description Internal Equivalent Circuit
10 A_VDD_5V -
Analog 5V Supply
Supply to mainly analog block.
- For 5V use, supply 5V (typ.).
- For 3V use, connect A_VDD_3V pin and
supply 3V (typ.).
-
11 RF_OUT Analog
Output
RF Output pin
RF signal output from LNA block,
Open drain output. Connect A_VDD_3V
pin via a matching circuit.
At no use, open this pin.
RF_OUT
11
12 A_VDD_3V -
Analog 3V Supply
- For 3V use, supply 3V (typ.).
- For 5V use, voltage regulator output.
Connect a bypass capacitor.
Do not apply current or voltage on this pin
from outside. And do not supply to
external circuits except PA_OUT and
RF_OUT pin.
-
13 A_REG Analog
Output
Regulator Output for Analog Block
Supply to mainly analog block. Connect a
bypass capacitor.
Do not apply current or voltage on this pin
from outside. And do not supply to
external circuits.
A_REG
A_VDD_5V A_VDD_5V
150kΩ
100pF
13
Vref
+
-
14 A_GND - Ground (Analog) -
15 IF_REF -
IF Reference
Connect ground via a capacitor.
At no use, open this pin.
IF_REF
A_VDD_3V
105kΩ
15
+
-
100kΩ
16 PA_GND1 - Power Amplifier Ground 1
At no use of PA, connect ground. -
TC32306FTG
2015-10-01
6
Pin No. Pin Name I/O Description Internal Equivalent Circuit
17 PA_OUT
Analog
Output
Power Amplifier Output Stage
Open drain output. Connect A_VDD_3V
pin via a matching circuit.
At no use, open this pin.
PA_OUT
17
18 PA_GND2 - Power Amplifier Ground 2
At no use of PA, connect ground. -
19 TX_SW
Digital
Output
Antenna Switch Control for TX (In SPI
Mode)
At no use, open this pin.
TX_SW
A_VDD_5V A_VDD_5V
20kΩ
100Ω
19
1kΩ
Digital
Input
Address Setting (In EEPROM Mode)
Set a start address to read memory data.
Notice:
Do not supply higher voltage than the level
of COM_VDD. (For example, in the case
of too low / no power supply.) That causes
overcurrent at this pin, as the ESD
protection elements insertion between the
pin and the voltage source.
20 RESET Digital
Input
Reset
Initialize TC32306FTG.
RESET
20
21 MODE2 Digital
Input
Mode Control
Select SPI Mode, SPI User Test Mode,
EEPROM Mode, EEPROM User Test
Mode.
MODE2
21
22 MODE1 Digital
Input
Mode Control
Select SPI Mode, SPI User Test Mode,
EEPROM Mode, EEPROM User Test
Mode.
MODE1
22
40kΩ
23 TEST Digital
Input
TEST
Only use for Toshiba test.
Connect ground.
TEST
23
40kΩ
TC32306FTG
2015-10-01
7
Pin No. Pin Name I/O Description Internal Equivalent Circuit
24 PLL_REG
Analog
Output
Regulator Output for PLL
Supply to mainly PLL block. Connect a
bypass capacitor.
Do not supply voltage, and do not supply
to an external circuit.
PLL_REG
COM_VDD
150kΩ
100pF
Vref
+
-
24
COM_VDD
25 PLL_GND - Ground(Digital) -
26 X_IN
Analog
Input
Reference Clock Input
Connect crystal oscillator or external
signal generator.
Do not apply a DC bias voltage.
X_IN
PLL_REG
300kΩ
X_OUT
PLL_REG
26
27
27 X_OUT
Analog
Output
Reference Clock Output
Open this pin except a crystal oscillator
use.
Do not apply current or voltage on this pin
from outside. And do not supply the clock
signal to external circuits.
28 D_REG
Analog
Output
Regulator Output for Digital Block
Supply to mainly digital block. Connect a
bypass capacitor.
Do not apply current or voltage on this pin
from outside. And do not supply to
external circuits.
D_REG
150kΩ
100pF
Vref
+
-
28
COM_VDD COM_VDD
TC32306FTG
2015-10-01
8
Pin No. Pin Name I/O Description Internal Equivalent Circuit
29 CS
Digital
Input
Chip Select Input
In SPI Mode / SPI User Test Mode /
EEPROM User Test Mode.
Notice:
Do not supply higher voltage than the level
of COM_VDD. (For example, in the case
of too low / no power supply.) That causes
overcurrent at this pin, as the
ESD
protection
elements insertion between the
pin and the voltage source.
CS
Control
COM_VDD
COM_VDD
29
Control
Digital
Output
Chip Select Output
In EEPROM Mode.
30 CLK
Digital
Input
SPI Clock Input
In SPI Mode / SPI User Test Mode /
EEPROM User Test Mode.
Notice:
Do not supply higher voltage than the level
of COM_VDD. (For example, in the case
of too low / no power supply.) That causes
overcurrent at this pin, as the
ESD
protection
elements insertion between the
pin and the voltage source.
CLK
Control
COM_VDD
COM_VDD
30
Control
Digital
Output
SPI Clock Output
In EEPROM Mode.
31 MOSI
Digital
Input
Serial Data Input
In SPI Mode / SPI User Test Mode /
EEPROM User Test Mode.
Notice:
Do not supply higher voltage than the level
of COM_VDD. (For example, in the case
of too low / no power supply.) That causes
overcurrent at this pin, as the
ESD
protection
elements insertion between the
pin and the voltage source.
MOSI
Control
COM_VDD
COM_VDD
31
Control
Digital
Output
Serial Data Output
In EEPROM Mode.
TC32306FTG
2015-10-01
9
Pin No. Pin Name I/O Description Internal Equivalent Circuit
32 MISO
Digital
Output
Serial Data Output
In SPI Mode / SPI User Test Mode /
EEPROM User Test Mode.
MISO
Control
COM_VDD
COM_VDD
32
Control
Digital
Input
Serial Data Input
In EEPROM Mode.
Notice:
Do not supply higher voltage than the level
of COM_VDD. (For example, in the case
of too low / no power supply.) That causes
overcurrent at this pin, as the ESD
protection elements insertion between the
pin and the voltage source.
33 COM_VDD - Common Voltage Supply
Use for 3V and 5V.
Supply to mainly control block. -
34 DET_TMONI1 Digital
Output
Monitor 1
Monitoring internal signals (Digital), use
for system control.
At no use, open this pin.
Control
DET_TMONI1
COM_VDD COM_VDD
34
35 DATA_IO
Digital
Output
Data Output
Demodulated signal output at
RF-Receiving. Behavior of this pin is
different for each state of TC32306FTG
reset.
See Table 5-2.
Notice:
Output resistance of this pin is 10kΩwhen
the output drive setting is "Low". Select
proper resistance value of pull-up or pull
down resistor to get enough output level of
the pin, when the output drive setting is
"Low". Or select that the output drive
setting is "High", depending on the
resistance value of the resister. About
output drive settings, see section 6.10.5.
DATA_IO
Control
COM_VDD
COM_VDD
35
Control
Control
COM_VDD
10k
Control
Low Drive
High Drive
Digital
Input
Data Input
Signal input for modulation at
RF-Transmitting. Behavior of this pin is
different for each state of TC32306FTG
reset.
See Table 5-2.
Notice:
Do not supply higher voltage than the level
of COM_VDD. (For example, in the case
of too low /
no power supply.) That causes
overcurrent at this pin, as the ESD
protection elements insertion between the
pin and the voltage source.
36 IO_GND - Ground(I/O Block)
-
TC32306FTG
2015-10-01
10
5.2 Pin Behaviors at Reset and Register Initialized
Several pin behaviors of TC32306FTG depend on setting of Reset, register's initial value, or SPI Mode /
EEPROM Mode (including User Test). See Table 5-2.
Table 5-2 Pin Behaviors at Reset and Register Initialized
Pin
SPI Mode
(TC32306FTG is slave.)
(Including SPI User Test Mode)
EEPROM Mode
(TC32306FTG is master.) EEPROM User Test Mode
(TC32306FTG is slave.)
RESET = ”L” Register’s Initial
(Battery Saving)
RESET = ”L” Battery Saving RESET = ”L” Register’s Initial
(Battery Saving)
MODE2 IN IN IN IN IN IN
MODE1 IN IN IN IN IN IN
CS IN IN High Output High Output IN IN
CLK IN IN Low Output Low Output IN IN
MOSI IN IN Low Output Low Output IN IN
MISO Z Z Z Z Z Z
ENB IN IN IN IN IN IN
TX_SW Pull Down Pull Down IN IN IN IN
RX_SW Pull Down Pull Down IN IN IN IN
DATA_IO Z Low Output Z Low Output Z Low Output
DET_TMONI1,2
Low Output Low Output Low Output Low Output Low Output Low Output
DET_TMONI3,4
Z Z Z Z Z Z
Z: High Impedance
Notice: In SPI Mode, TC32306FTG accepts the input of SPI settings at RESET = "L", but will not act.
In Battery Saving Status, DATA_IO pin behavior changes to the value of register:h'0A[D5]RX_TX. Initial
value of register:h’0A[D5]RX_TX is “0”.
Table 5-3 DATA_IO Pin Behavior in Battery Saving
Pin h’0A[D5]RX_TX = ”0”
(RX: Initial) h'0A[D5]RX_TX = ”1”
(TX)
DATA_IO Low Output Z
Z: High Impedance
In Battery Saving Status, MISO pin changes its behavior at SPI Read when TC32306FTG is slave.
Table 5-4 MISO Pin Behavior in Battery Saving (TC32306FTG is slave.)
Pin At SPI Read Except SPI Read
MISO OUT Z
Z: High Impedance
TC32306FTG
2015-10-01
11
6. Functional Description
6.1 Voltage Supply Settings
The voltage supply of TC32306FTG is selectable either 3 V o r 5 V. The supply voltage is selected by setting
of 3V/5V pin, and it decides pin connections. At 5V use, connect 3V/5V pin to a voltage supply, then the
internal voltage regulator (A_REG30; for analog 3V) makes 3V (typ.) for internal circuit and outputs same
to A_VDD_3V pin for the matching of LNA and PA.
Table 6-1 Voltage Supply Pins Connection
Pin Name 3V Use 5V Use
3V/5V
(Behavior of A_REG30 Regulator) GND
(Disable) 5V Supply Input
(Enable)
A_VDD_3V 3V Supply Input Output of A_REG30 Regulator
(Do not supply to external circuits.)
A_VDD_5V 3V Supply Input 5V Supply Input
COM_VDD 3V Supply Input 5V Supply Input
6.1.1 3V Use
At 3V use, connect 3V/5V pin to ground. Connect COM_VDD pin, A_VDD_3V pin and A_VDD_5V pin
to a stable 3V supply.
Notice:
-Must not operate A_REG30 regulator for 5V use.
-Must not connect COM_VDD pin to voltage supply out of range of VDD(3V) shown as Table 8-1.
(This figure is conceptual. Select bypass capacitors in application circuits.)
Fig 6-1 Example of Voltage Supply Connection at 3V Use
6.1.2 5V Use
At 5V use, connect 3V/5V pin to the 5V supply. Connect A_VDD_5V pin and COM_VDD pin to a stable
5V supply.
Notice:
-Must not connect A_VDD_3V pin to outside voltage supply.
-Must not connect COM_VDD pin to voltage supply out of range of VDD(5V) shown as Table 8-1.
-Must use a voltage supply from A_VDD_3V pin (output of A_REG30 regulator), for the matching
circuit of LNA and PA.
A_VDD_3V
A_VDD_5V
COM_VDD
3V/5V
3V
TC32306FTG
2015-10-01
12
(This figure is conceptual. Select bypass capacitors in application circuits.)
Fig 6-2 Example of Voltage Supply Connection at 5V Use
6.1.3 Supply / Ground Connections
In TC32306FTG supply / ground connections are separated for each functional block. At 5V use, some
of analog functional blocks are connected internal 3V regulator (A_REG30 regulator). At 3V use, some
of analog functional blocks are connected directly 3V supply, by connecting A_VDD_3V / A_VDD_5V
pin.
(This figure shows main supply / ground lines of functional blocks.)
Fig 6-3 Conceptual Supply / Ground Connection to Functional Blocks
6.2 Control Mode Settings
TC32306FTG has two control modes, SPI (Serial Peripheral Interface) Mode and EEPROM Mode. The
control mode settings are selected by MODE2 pin. User Test Mode in each Control Mode is selected by
MODE1 pin.
A_VDD_3V
A_VDD_5V
COM_VDD
3V/5V
5V
A_REG30
(5Và3V)
A_VDD_3V
A_VDD_5V
COM_VDD
3V/5V
SPI,
Monitor
A_REG15
(VDDà1.5V)
MIX, IF AMP,
RSSI,
PLL_REG
(VDDà1.5V)
PLL, VCO,
Divider, XOSC
Detector,
LPF(FSK), ADC,
LPF(ASK),
BRF, Data COMP
D_REG
(VDDà1.5V)
A_REG30
(VDDà3V)
LNA, IF Filter,
PA
A_REG
PLL_REG
D_REG
3V 1.5V 1.5V 1.5V
VDD
VDD
A_GND IO_GND PLL_GND
TC32306FTG
2015-10-01
13
Table 6-2 Mode of Control
MODE2 Pin MODE1 Pin
Control Mode Setting
L L SPI Mode
L H SPI User Test Mode
H L EEPROM Mode
H H EEPROM User Test
Mode
SPI Mode and EEPROM Mode have a difference about an external connection, pin functions and control
signal flows. Do not change the Mode settings in the market products.
Table 6-3 Role of Pin and Control Setting
Control Setting CS
Pin CLK
Pin MOSI
Pin MISO Pin ENB Pin TX_SW
Pin RX_SW
Pin
SPI Mode “Input”
This IC is slave,
controlled by MCU.
“Output”
This IC is slave,
controlled by MCU.
“Input”
For this IC status
control.
“Output”
For antenna switches
control.
SPI User Test Mode
EEPROM Mode “Output”
This IC is master,
controls EEPROM.
“Input”
This IC is master,
reads EEPROM data. “Input”
For EEPROM configuration settings
EEPROM User Test Mode “Input”
This IC is slave,
controlled by MCU.
“Output”
This IC is slave,
controlled by MCU.
6.2.1 SPI Mode Setting and Connection
MCU and TC32306FTG are connected by SPI lines and MCU controls this IC.
Fig 6-4 Conceptual Connection MCU and TC32306FTG
6.2.2 EEPROM Mode Setting and Connection
EEPROM and MCU, connect via TC32306FTG. This IC is controlled by the register data of EEPROM.
Select up to 8 configuration that are made as registers from “h'0A” to “h'1C”, depending on the size of
EEPROM. In this mode, use of pins and external connections are different from those of SPI Mode. For
example, TX_SW / RX_SW / ENB pin are used to select configuration of EEPROM.
MCU TC32306FTG
MOSI
MISO
CLK
CS
TC32306FTG
2015-10-01
14
Fig 6-5 Conceptual Connection MCU, EEPROM and TC32306FTG
-In advance, write registers’ values to each configuration data area of EEPROM.
-MCU commands this IC for selecting configuration data area of EEPROM. (1)
-This IC read a configuration data from EEPROM by SPI lines at the rising edge of RESET pin
signal. (2)
-This IC is operated depending on EEPROM data. (3)
6.3 Universal Functions and Settings
6.3.1 Reset Status
The internal condition (such as the register value) of TC32306FTG is initialized in this Status. For this
IC Reset, input "L" signal to RESET pin surely during stable voltage supply. Also releasing Reset of
this IC should be operated during stable voltage supply.
Table 6-4 RESET Pin Control
RESET Pin IC Status
L
Initialize registers and I/O behaviors. Because I/O will be
initialized, TC32306FTG does not accept all the settings except
some settings. *
About I/O behaviors at Reset status, see Table 5-2.
H Battery Saving / Standby / Run by this IC settings.
* In EEPROM Mode, ENB pin / TX_SW pin / RX_SW pin are available.
Notice:
-Must be reset after voltage supply.
-The value of registers is initialized immediately after reset is released.
-See Table 5-2 of I/O behavior at the register initialized.
-In SPI Mode, TC32306FTG stays Battery Saving from Reset to register setting input, which
moves to Run after reset will be released.
-In EEPROM Mode, the internal oscillator circuit for reading EEPROM will start after reset is
released.
-Controlling to RESET pin in starting operation of this IC, keep reset status till supply voltage is
over 90% of system voltage stably. Wait at least 1 microsecond after reaching that voltage level.
Then reset can be released. In the transient starting operation, reset release may cause to be
unexpected operation of this IC.
About RESET pin control in starting operation, see Fig 6-6.
MOSI
MISO
CLK
CS
EEPROMTC32306FTG
TX_SW
RX_SW
ENB
RESET
(1) (2)
(3)
MCU
TC32306FTG
2015-10-01
15
Fig 6-6 Example of RESET Pin Control in Starting Operation
- Software Reset
Software Reset will start after write "b'01010101" to register: h'09[D7:D0]RESET7..0. TC32306FTG
will be reset as soon as the writing of Software Reset. Then the reset is released by next rising edge of
CLK Signal or CS Signal, whichever is earlier. This IC will stay Battery Saving Status till the next
Run / Standby command writing.
Table 6-5 Software Reset Command
Software Reset Command
h’09[D7:D0]RESET7..0 = b’01010101
Notice:
-Not available in EEPROM Mode (Except EEPROM User Test Mode)
-At Software Reset, only the register will be reset.
-TC32306FTG will output "b’00000000" to read the register: h'09[D7:D0]RESET7..0.
6.3.2 Status Control
After reset is released, TC32306FTG has three status, Battery Saving / Standby / Run, then those
status are controlled by two registers “h'0A[D7] / h'0A[D6]” and ENB pin. In EEPROM Mode, ENB pin
is used for configuration setting.
Table 6-6 IC Status in SPI Mode
MODE2
Pin ENB
Pin h'0A[D7]ENB h'0A[D6]ACT Status Description
L L X X Battery
Saving
The lowest current consumption status. TC32306FTG only
can accept control data (register setting) and control settings
and they can be changed. The transition from this status to
Run will spend longer time than Standby
L H 0 X
L H 1 0 Standby This IC can move from this status to Run quickly. This IC
can
accept control data and operate XOSC and regulators, and
consume more current than Battery Saving.
L H 1 1 Run This IC can operate TX and RX. This IC current
consumption
and status transition time depend on the behaviors.
X: Don’t care
In SPI Mode, MODE 1 pin is unrelated to the status control of TC32306FTG. Moving to Battery Saving
by AutoOff function, registers“h'0A[D7] ENB, h'0A[D6] ACT” keep the value “1”.
COM_VDD
90% of COM_VDD
0V
Example of RESET pin control
1µs≤
TC32306FTG
2015-10-01
16
Table 6-7 IC Status in EEPROM Mode
MODE2 Pin h'0A[D7]ENB h'0A[D6]ACT Status Description
H 0 X Battery
Saving
The lowest current consumption status. TC32306FTG only
can accept control settings and they can be changed. The
transition from this status to Run will spend longer time
than Standby
H 1 0 Standby This IC can move from this status to Run quickly. This IC
can accept control data and operate XOSC
and regulators,
and consume more current than Battery Saving.
H 1 1 Run This IC can operate TX and RX. This IC current
consumption and status transition time depend on the
behaviors.
X: Don’t care
In EEPROM Mode, MODE1 pin "H" leads EEPROM User Test Mode. In EEPROM User Test Mode,
this IC will change to be slave. In EEPROM Mode and EEPROM User Test Mode, ENB pin sets
EEPROM address of configuration data and is unrelated to the status control of this IC. Moving to
Battery Saving by AutoOff function, registers“h'0A[D7] ENB, h'0A[D6] ACT” keep the value “1”.
6.3.3 Output Drive Settings
Select output drive setting at DATA_IO pin / MISO pin / DET_TMONI1 pin / DET_TMONI2 pin by
setting registers“h'0D[D3]DATA_IO_D, h'0D[D2]MISO_D, h'0D[D1]TMONI_D”. The settings become
valid when reset is released (RESET = "H").
Table 6-8 Output Drive Settings
h'0D[D3]DATA_IO_D DATA_IO pin drive setting
h'0D[D2]MISO_D MISO pin drive setting
h'0D[D1]TMONI_D DET_TMONI1, DET_TMONI2 pin drive setting
0Low drive setting
1 High drive setting
6.3.4 Antenna Switch Control
It is a function to control external antenna switch. Set registers“h'0A[D3]TX_SW, h'0A[D2]RX_SW”,
and TC32306FTG outputs control signals from TX_SW / RX_SW pin. The controls become valid at Run
and Standby Status. These pins cannot be available in EEPROM Mode and EEPROM User Test Mode
as using for input pins.
Table 6-9 Antenna Switch Control Settings
MODE2 Pin Status h'0A[D3]TX_SW TX_SW Pin
h'0A[D2]RX_SW RX_SW Pin
L Buttery Saving X L
L Run / Standby 0 L
L Run / Standby 1 H
H X X Input pin
X: Don’t care
Notice: These pins condition "L" is pulled down through a resistor. External circuit cannot be driven in
these pins condition.
TC32306FTG
2015-10-01
17
6.3.5 Monitoring Control
Set registers“h'14[D6:D4], h'14[D2:D0]” and TC32306FTG outputs monitoring signals from
DET_TMONI1 pin / DET_TMONI2 pin. The controls become valid at Run or Standby Status.
Table 6-10 Monitoring Signals
Status
h'14[D6]
MONI1_SEL2 h'14[D5]
MONI1_SEL1 h'14[D4]
MONI1_SEL0
DET_TMONI1 Pin
Output Signal
h'14[D2]
MONI2_SEL2 h'14[D1]
MONI2_SEL1 h'14[D0]
MONI2_SEL0
DET_TMON2 Pin
Output Signal
Battery Saving X X X Low level output
Run / Standby 0 0 0 Low level output
Run / Standby 0 0 1 DET_out
Run / Standby 0 1 0 Preamble_DET_out
Run / Standby 0 1 1 RSSI_DET_out
Run / Standby 1 0 0 NDET_out
Run / Standby 1 0 1 Status_MONI
Run / Standby 1 1 0 Un_DET_out
Run / Standby 1 1 1 PLL_LD
X: Don’t care
(1) DET_out Signal
TC32306FTG outputs the result of overall ”Detection” judgment depending on RSSI detection,
Noise detection and/or Preamble detection.
L: NOT determine ”Signal Detection”
H: Determine ”Signal Detection”
Set register:h'10[D2]DET_out_cnt_en=”1”, TC32306FTG holds DET_out output level "H" after
first ”Signal Detection”.
Table 6-11 DET_out Signal Settings
h'10[D2] DET_out_cnt_en DET_out Signal
0 Sequential updating
1 Hold output level "H" after first ”Signal Detection”
Notice: To release DET_out signal output holding, move to Battery Saving / Standby Status.
(2) Preamble_DET_out Signal
TC32306FTG outputs the result of ”Signal Detection” by Preamble Detector.
L: NOT determine ”Signal Detection”
H: Determine ”Signal Detection”
(3) RSSI_DET_out Signal
TC32306FTG outputs the result of ”Singnal Detection” by RSSI Detector.
L: NOT determine ”Signal Detection”
H: Determine ”Signal Detection”
(4) NDET_out Signal
TC32306FTG outputs the result of ”Signal Detection” by Noise Detector.
L: NOT determine ”Signal Detection”
H: Determine ”Signal Detection”
TC32306FTG
2015-10-01
18
(5) Status_MONI Signal
TC32306FTG outputs its status.
L: Battery Saving
H: Standby / Run
(6) Un_DET_out Signal
TC32306FTG outputs the result of overall ”No Signal Detection” judgment depending on RSSI
detection , Noise detection and/or Preamble detection.
L: NOT determine ”No Signal Detection”
H: Determine ”No Signal Detection”
(7) PLL_LD Signal
TC32306FTG outputs the result of PLL lock detection.
L: No PLL lock detection
H: PLL lock detection.
Table 6-12 Logic of DET_out, Un_DET_out Signal
Detection
No Detection
RSSI
Detection
Signal
Noise
Detection
Signal
Preamble
Detection
Signal
DET_out
Signal
RSSI
Detection
Signal
Noise
Detection
Signal
Preamble
Detection
Signal
Un_DET_out
Signal
* * H H * * H H
* * L L H H L/OFF H
* H OFF H L H L/OFF L
H L/OFF OFF H OFF H L/OFF H
L/OFF L/OFF OFF L * L L/OFF L
H OFF L/OFF H
L OFF L/OFF L
OFF OFF L/OFF L
H: “Signal Detection” is determined.
L: TC32306FTG cannot determine “Signal Detection".
OFF: Stopping signal detection
*: Don’t Care
H: “No Signal Detection” is determined.
L: TC32306FTG cannot determine "No Signal Detection".
OFF: Stopping signal detection
*: Don’t Care
TC32306FTG
2015-10-01
19
6.4 Local Oscillator
6.4.1 Local Oscillation Abstracts
Table 6-13 Local Oscillation Abstracts
Item Function
Reference Clock Frequency 30.32MHz (Fixed)
PLL Fractional - N PLL
VCO Frequency 1732 - 1896MHz
Divider 1/6, 1/4, 1/2 (Setting three stages)
Local Frequency 315, 434, 868 / 915 MHz
6.4.2 Reference Clock
Prepare 30.32MHz reference clock for TC32306FTG. To use crystal oscillator, connect it between X_IN
pin and X_OUT pin with load capacitors. This IC is designed and considered to connect a crystal
oscillator with the load capacitance of 6p F.
To use an external signal generator, for example TCXO, connect it to X_IN Pin via a coupling capacitor.
Also Open X_OUT Pin and keep input signal level range from 0.5 V to 1.5 V (Peak to peak). Don't
supply reference clock signal to external circuit from X_OUT pin.
Fig 6-7 Case of Reference Clock Circuit
6.4.3 Local Oscillation
Local oscillator block consists of the fractional-N PLL, VCO and frequency divider. Local frequency is
the output of frequency divider. Select the division ratio for expected frequency band. Set
register:h'0A[D1:D0] and select the division ratio.
Table 6-14 RF Frequency & Division Ratio
h'0A[D1]
BAND1
h'0A[D0]
BAND0 RF Frequency Band Division Ratio
0 0 315MHz 6
0 1 434MHz 4
1 X 868 / 915MHz 2
X: Don’t care
Set the integer counter and fractional counter of registers“h'0B[D7:D0], h'0C[D7:D0]” to set Local
frequency. When PLL is locked to the expected frequency, PLL_LD signal turns to be "H". To output
X_ OUT X_IN
XOSC
Xtal
Crystal
XOSC
Signal Source
X_OUT X_IN
External Signal Source
TC32306FTG
2015-10-01
20
PLL_LD signal from DET_TMONI1 pin and/or DET_TMONI2 pin, set registers“h'14[D6:D4], [D2:D0]”.
(1)
Local Oscillation Setting for RX
Set Local Oscillator frequency at "Lower Local".
"Receiving Local Frequency" = "RF Recieving Frequency"–"IF Frequency" = "VCO Frequency" / "Division
Ratio"
Example 1
RF Frequency: 314.94MHz, IF Frequency: 280kHz, Division Ratio: 6 (Select 315MHz band)
”Receiving Local Frequency” = 314.94MHz - 0.28MHz = 1887.96MHz /6
Example 2
RF Frequency: 314.94MHz, IF Frequency: 230kHz, Division Ratio: 6 (Select 315MHz band)
”Receiving Local Frequency” = 314.94MHz - 0.23MHz = 1888.26MHz /6
(2)
Local Oscillation Setting for TX
Set Local Oscillator frequency equal to RF transmitting frequency.
"Transmitting Local Frequency" = "RF Transmitting Frequency" = "VCO Frequency" / "Division Ratio"
Example
RF Frequency: 314.94MHz, Division Ratio: 6 (Select 315MHz band)
”Transmitting Local Frequency” = 314.94MHz =1889.64MHz / 6
6.5 RF Receiver
For RF-Receiving, set register:h'0A[D5] = "0".
6.5.1 RF-Receiving Abstract
Table 6-15 Receiving Function Abstracts
Item Function
RF-Receiving Frequency Band 315, 434, 868 / 915 MHz
IF Frequency IF = 230kHz, setting of IF Filter Bandwidth: wide = 320kHz
IF = 280kHz, setting of IF Filter Bandwidth: middle = 270kHz
Single conversion system (Using Image Cancel Mixer)
Demodulation FSK / ASK
FSK Demodulation ASK Demodulation
IF Detection Delay Detection,
Pulse Count Detection Envelope Detection
Signal Detection RSSI Detection, Noise Detection,
Preamble Detection RSSI Detection, Preamble Detection
Additional Function NIR (Near Interference Rejection) Filter -
Bit Rate Filter Cutoff Frequency 0.436kHz -19.78kHz (12 steps)

This manual suits for next models

4

Other Toshiba Transceiver manuals

Toshiba ZS-7222A Mounting instructions

Toshiba

Toshiba ZS-7222A Mounting instructions

Toshiba NetPac User manual

Toshiba

Toshiba NetPac User manual

Popular Transceiver manuals by other brands

Sundrax CGP-3-2DE2B user manual

Sundrax

Sundrax CGP-3-2DE2B user manual

AOR AR1000 Guide

AOR

AOR AR1000 Guide

EnGenius DuraFon-UHF-HC user manual

EnGenius

EnGenius DuraFon-UHF-HC user manual

Sepura SCG22 Series installation guide

Sepura

Sepura SCG22 Series installation guide

Kenwood TS-520SE instruction manual

Kenwood

Kenwood TS-520SE instruction manual

Kenwood TS-950D instruction manual

Kenwood

Kenwood TS-950D instruction manual

Kenwood TS-850S Service manual

Kenwood

Kenwood TS-850S Service manual

Yaesu FT-80C - SERVICE Service manual

Yaesu

Yaesu FT-80C - SERVICE Service manual

Kenwood FreeTalk UBZ-GR14 instruction manual

Kenwood

Kenwood FreeTalk UBZ-GR14 instruction manual

Yaesu FT-8800 Reference

Yaesu

Yaesu FT-8800 Reference

ELECRAFT K3 manual

ELECRAFT

ELECRAFT K3 manual

AHHA-Tech EZBee S100 manual

AHHA-Tech

AHHA-Tech EZBee S100 manual

Siemens FLNX installation instructions

Siemens

Siemens FLNX installation instructions

Davicom DM9163 Layout guide

Davicom

Davicom DM9163 Layout guide

Kenwood TK-3140 Service manual

Kenwood

Kenwood TK-3140 Service manual

Adeunis RF FIELD TEST DEVICE - sigfox RC2 user guide

Adeunis RF

Adeunis RF FIELD TEST DEVICE - sigfox RC2 user guide

FreeWave FGR2-PE User manual and reference guide

FreeWave

FreeWave FGR2-PE User manual and reference guide

Kenwood TS-711A/E instruction manual

Kenwood

Kenwood TS-711A/E instruction manual

manuals.online logo
manuals.online logoBrands
  • About & Mission
  • Contact us
  • Privacy Policy
  • Terms and Conditions

Copyright 2025 Manuals.Online. All Rights Reserved.