Toshiba VCP-C8 User manual

SERVICE MANUAL
FILE NO. 120-200170
VIDEO CASSETTE RECORDER
VCP-C8
MAY, 2001
VCP-C8 6/21/01 8:11 AM Page 1

438B ALEXANDRA ROAD BLOCK B #06-01
ALEXANDRA TECHNOPARK
SINGAPORE 119968
TOSHIBA VIDEO PRODUCTS PTE LTD
VCP-C8 6/21/01 8:11 AM Page 2

TOTAL CONTENTS
1. Precautions
2. Reference Information
3. Product Specifications
4. Disassembly and Reassembly
5. Alignment and Adjustment
6. Exploded View
7. Replacement Parts List
8. Block Diagram
9. PCB Diagrams
10. Schematic Diagrams

Toshiba 1-1
1. Precautions
1. Be sure that all of the built-in protective devices are
replaced. Restore any missing protective shields.
2. When reinstalling the chassis and its assemblies, be
sure to restore all pretective devices, including :
control knobs and compartment covers.
3. Make sure that there are no cabinet openings
through which people--particularly children
--might insert fingers and contact dangerous
voltages. Such openings include the spacing
between the picture tube and the cabinet mask,
excessively wide cabinet ventilation slots, and
improperly fitted back covers.
If the measured resistance is less than 1.0 megohm
or greater than 5.2 megohms, an abnormality exists
that must be corrected before the unit is returned
to the customer.
4. Leakage Current Hot Check (See Fig. 1-1) :
Warning : Do not use an isolation transformer
during this test. Use a leakage current tester or a
metering system that complies with American
National Standards Institute (ANSI C101.1,
Leakage Current for Appliances), and Underwriters
Laboratories (UL Publication UL1410, 59.7).
5. With the unit completely reassembled, plug the AC
line cord directly the power outlet. With the unit’s
AC switch first in the ON position and then OFF,
measure the current between a known erath
ground (metal water pipe, conduit, etc.) and all
exposed metal parts, including : antennas, handle
brackets, metal cabinets, screwheads and control
shafts. The current measured should not exceed
0.5 milliamp. Reverse the power-plug prongs in the
AC outlet and repeat the test.
6. X-ray Limits :
The picture tube is designed to prohibit X-ray
emissions. To ensure continued X-ray protection,
replace the picture tube only with one that is the
same type as the original.
Fig. 1-1 AC Leakage Test
7. Antenna Cold Check :
With the unit’s AC plug disconnected from the
AC source, connect an electrical jumper across the
two AC prongs. Connect one lead of the ohmmeter
to an AC prong.
Connect the other lead to the coaxial connector.
8. High Voltage Limit :
High voltage must be measured each time
servicing is done on the B+, horizontal deflection
or high voltage circuits.
Heed the high voltage limits. These include the
X-ray protection Specifications Label, and the
Product Safety and X-ray Warning Note on the
service data schematic.
9. Some semiconductor (“solid state”) devices are
easily damaged by static electricity.
Such components are called Electrostatically
Sensitive Devices (ESDs); examples include
integrated circuits and some field-effect transistors.
The following techniques will reduce the
occurrence of component damage caused by static
electricity.
10. Immediately before handling any semiconductor
components or assemblies, drain the electrostatic
charge from your body by touching a known
earth ground. Alternatively, wear a discharging
Wrist-strap device. (Be sure to remove it prior to
applying power--this is an electric shock
precaution.)
DEVICE
UNDER
TEST
(READING SHOULD
NOT BE ABOVE
0.5mA)
LEAKAGE
CURRENT
TESTER
EARTH
GROUND
TEST ALL
EXPOSED METER
SURFACES
ALSO TEST WITH
PLUG REVERSED
(USING AC ADAPTER
PLUG AS REQUIRED)
2-WIRE CORD

Precautions
1-2 Toshiba
11. High voltage is maintained within specified limits
by close-tolerance, safety-related components and
adjustments. If the high voltage exceeds the
specified limits, check each of the special
components.
12. Design Alteration Warning :
Never alter or add to the mechanical or electrical
design of this unit. Example : Do not add
auxiliary audio or video connectors.
Such alterations might create a safety hazard.
Also, any design changes or additions will void
the manufacturer’s warranty.
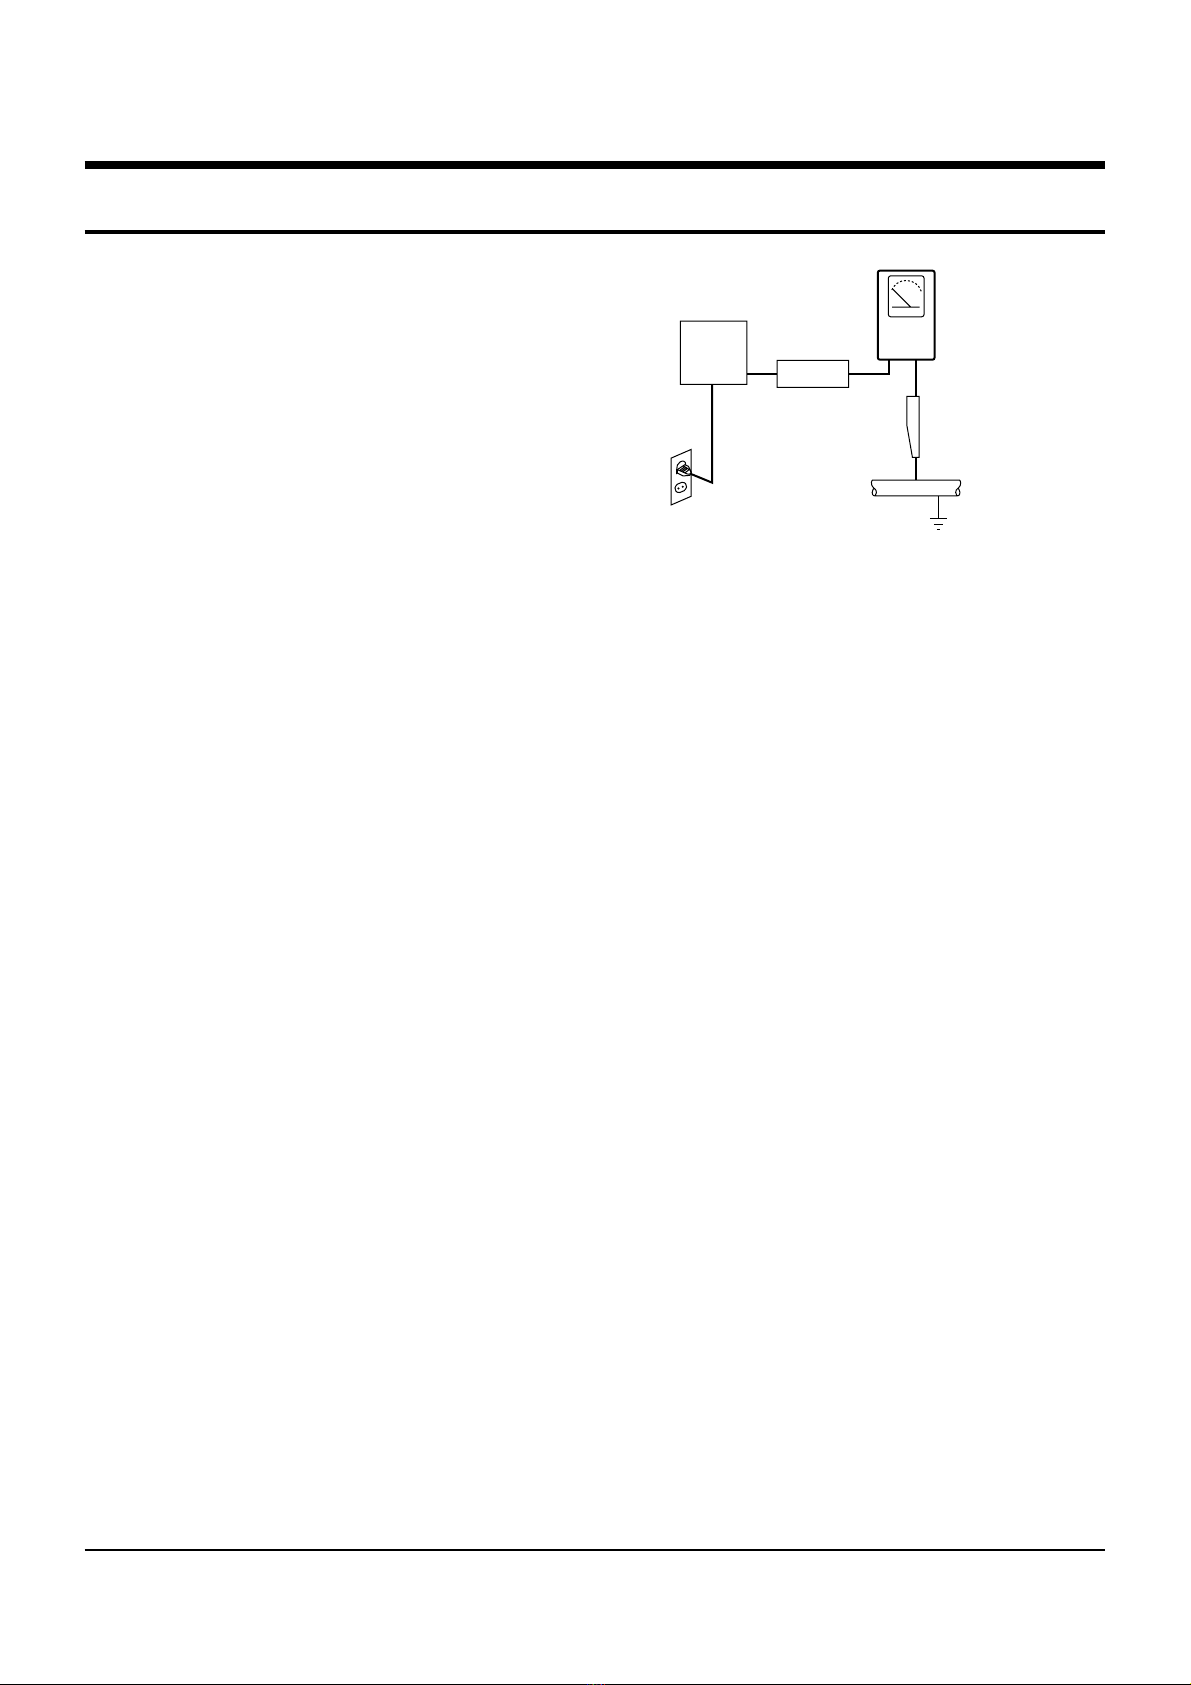
13. Hot Chassis Warning :
Some TV receiver chassis are electrically
connected directly to one conductor of the AC
power cord. If an isolation transformer is not
used, these units may be safely serviced only if
the AC power plug is inserted so that the chassis
is connected to the ground side of the AC source.
To confirm that the AC power plug is inserted
correctly, do the following : Using an AC
voltmeter, measure the voltage between the
chassis and a known earth ground. If the reading
is greater than 1.0V, remove the AC power plug,
reverse its polarity and reinsert. Re-measure the
voltage between the chassis and ground.
14. Some TV chassis are designed to operate with 85
volts AC between chassis and ground, regardless
of the AC plug polarity. These units can be safely
serviced only if an isolation transformer inserted
between the receiver and the power source.
15. Never defeat any of the B+ voltage interlocks.
Do not apply AC power to the unit (or any of its
assemblies) unless all solid-state heat sinks are
correctly installed.
16. Always connect a test instrument’s ground lead to
the instrument chassis ground before connecting
the positive lead; always remove the instrument’s
ground lead last.
17. Observe the original lead dress, especially near
the following areas : Antenna wiring, sharp
edges, and especially the AC and high voltage
power supplies. Always inspect for pinched, out-
of-place, or frayed wiring. Do not change the
spacing between components and the printed
circuit board. Check the AC power cord for
damage. Make sure that leads and components
do not touch thermally hot parts.
18. Picture Tube Implosion Warning :
The picture tube in this receiver employs
“integral implosion” protection. To ensure
continued implosion protection, make sure that
the replacement picture tube is the same as the
original.
19. Do not remove, install or handle the picture tube
without first putting on shatterproof goggles
equipped with side shields. Never handle the
picture tube by its neck. Some “in-line” picture
tubes are equipped with a permanently attached
deflection yoke; do not try to remove such
“permanently attached” yokes from the picture
tube.
20. Product Safety Notice :
Some electrical and mechanical parts have special
safety-related characteristics which might not be
obvious from visual inspection. These safety
features and the protection they give might be
lost if the replacement component differs from the
original--even if the replacement is rated for
higher voltage, wattage, etc.
Components that are critical for safety are
indicated in the circuit diagram by shading,
( or ).
Use replacement components that have the same
ratings, especially for flame resistance and
dielectric strength specifications. A replacement
part that does not have the same safety
characteristics as the original might create shock,
fire or other hazards.

Toshiba 2-1
2. Reference Information
2-1 Operation of Controls
◆Make sure that both the television and the VCP are switched offbefore connecting the cables.
TV
VIDEO
LINE
OUT
LINE IN 1
AUDIO
AV Output
Aerial (Not supplied)
TV Set (Not supplied)
➀
Aerial Connector
Aerial input
➀
Coaxial Cable
➁
RCA Cable (Not supplied)
AV input
Connecting Your VCP to the TV
Tuning Your Television for the
VCP Selecting the RF OUT Sound Mode
(G, K, I)
You must tune your television for the VCP only if
you are not using a RCA cable.
➢To view pictures from your VCP when a RCA
cable is used, the television must be set to the
audio/video mode (AV).
1
Switch on the television.
2
Switch on the VCP by pressing ON/STANDBY on the
front of the VCP or ON/STANDBY on the remote control.
3
Select a programme position on the television to be
reserved for use with your VCP.
4
Insert the video cassette in the VCP. Check that the
VCP starts reading the cassette; if not, press button.
5
Start a scan on your television or set the television to
UHF channel 36.
6
Fine tune the television until the pictures and sound
are obtained clearly.
7
If you cannot find the pictures and sound, or there is
interference from nearby channels, change the VCP
OUTPUT CHANNEL to adjust the frequency.
8
When the picture and sound are perfectly clear store this
channel at the desired programme position on the television.
Result: That programme is now reserved for use with
your VCP.
You must choose the sound mode (G, K or I)
according to the TV set connected to your VCP.
1
Press MENU on the remote control.
Result: The programming menu is displayed.
2
Press the corresponding or buttons, until the
cursor is placed in front of the USER SET option.
3
Press button to select this option.
Result: The USER SET menu is displayed.
4
Press the corresponding or buttons,until the
cursor is placed in front of the TV SYSTEM option
5
Press the
or
buttons to select G, K or I.
6
On completion, press MENU twice to exit the menu.
Then tune your television again.
Your VCP output channel may need to be changed
if the pictures suffers from interference or if your
TV cannot find the pictures. Also, you can change
the VCP output channel to adjust the frequency in
which information is displayed on the screen.
1
Press MENU on the remote control.
Result: The programming menu is displayed.
2
Press the corresponding
or
buttons, until the
cursor is placed in front of the USER SET option.
3
And then press button to select this option.
Result: The USER SET menu is displayed.
4
Press the
or
buttons, until the cursor is placed
in front of the VCR OUTPUT CH option.
5
Select the required output channel (CH21~CH69) by
pressing the or buttons.
6
On completion, press MENU twice to exit the menu.
Then tune your television again.
Setting the VCP Output Channel

Reference Information
2-2 Toshiba
R
E
P
E
A
T
ON/STANDBY DISPLAY
CNT.RESET SPEED
IIP/S IPC TRK
REC MENU
ON/STANDBY BUTTON
COUNTER RESET BUTTON
PAUSE/STILL BUTTON
RECORD BUTTON
PLAY BUTTON
(INTERVAL REPEAT BUTTON)
(MENU SELECTION UP BUTTON)
REWIND/REVERSE PICTURE SEARCH
BUTTON
(MENU SELECTION BUTTON)
STOP BUTTON
(MENU SELECTION DOWN BUTTON)
DISPLAY BUTTON
RECORDING SPEED SELECTION
BUTTON
TRACKING BUTTONS
IPC (INTELLIGENT PICTURE CONTROL)
BUTTON
MENU BUTTON
FAST-FORWARD/FORWARD SEARCH
BUTTON
(MENU SELECTION BUTTON)
1
You must insert or replace the batteries in the remote control when
you:
◆Purchase the video cassette player
◆Find that the remote control is no longer working correctly
1
Push the tab in the direction of the arrow to release the battery
compartment cover on the rear of the remote control.
2
Insert two AA, R6 or equivalent batteries, taking care to respect the
polarities:
◆+ on the battery with + on the remote control
◆–on the battery with –on the remote control
3
Replace the cover by aligning it with the base of the remote
control and pushing it back into place.
➢Do not mix different battery types (manganese and alkaline for
example).
Infrared Remote Control
Inserting Batteries in the Remote Control

Reference Information
Toshiba 2-3
1
Turn on the TV. Tune your TV channel.
2
Connect your VCP to the TV by A/V cable
as above figure.
3
Select the recording speed (SP/LP) by
pressing the SPEED button.
4
Hold down the REC (
●
) button to start line
recording.
5
Press the STOP (
■
) button to end line
recording.
➢Line recording is not available for
the TV which has no A/V
OUTPUT JACK.
Recording From TV
Recording from Another VCR
TV
VIDEO
LINE
OUT
LINE IN 1
AUDIO
ANTENNA IN
RF OUT
AUDIO OUT
VIDEO OUT
VIDEO IN AUDIO IN
TV
VIDEO
LINE
OUT
LINE IN 1
AUDIO
ANTENNA IN
RF OUT
L H
ON
OFF
ON
OFF
OUTTO TV VIDEO OUT
TEST
AUDIOOUT
INFROM ANT.
ATT R
L
AUDIO
OUT
VIDEO
OUT
VCR
VIDEO IN AUDIO IN
You can copy a cassette to your VCP from another
video source, such as another VCR.
☛
It is an infringement of copyright laws to
copy prerecorded cassettes or to re-
record them in any form without the
permission of the owners of the
corresponding copyright.
1
Turn on the TV.
2
Connect the playback side VCR’s A/V cable
to the recording side VCP’s video and audio
in (rear panel).
3
Select the recording speed (SP/LP) by
pressing the SPEED button.
4
Begin playback on the playback side VCR
and hold down REC (
●
) button.
5
Press the STOP (
■
) button to end line
recording.
➢
To prevent accidental
erasure
Remove this safety tab
with a screwdriver.
➢
To record again
Cover the tab hole with
adhesive tape.
Video system Colour system Video system
of the recording
of a VCP recorded on the
source tape
PAL AUTO or PAL PAL
SECAM MESECAM MESECAM
NTSC NT3.58 NTSC
➢Setting the colour system according to the
colour system of a source you want to record.

Reference Information
2-4 Toshiba
Using a Cassette
Playing a Cassette
Selecting the Appropriate System Standard
This function allows you to play back any pre-recorded cassette.
1
Switch on both the television and your VCP.
2
Select theAV input on the television for use with your VCP.
3
Insert the video cassette to be played. If the safety tab on
the cassette is intact, press button.
Otherwise, the cassette is played automatically.
➢When a cassette is loaded, the tape position is
optimized automatically to reduce disturbance
(Digital Auto Tracking). When playing a cassette, if
the end of the tape is reached, the cassette is
rewound automatically.
4
To... Then press...
Stop the playback (STOP).
Eject the cassette (EJECT).
Adjusting Picture Alignment Manually
The Fine Adjustment feature allows you to adjust the
alignment manually to obtain the best possible picture.
When noise bars or streaks appear during playback, adjust
alignment manually by pressing the TRK ( or ) buttons
until the picture is clear and stable.
Result:◆The tracking bar appears.
◆The image is adjusted.
◆The tracking bar disappears when you
release the button.
Before recording a cassette, you can select the
required system standard. Otherwise, the system
automatically selects the reception standard when
you select AUTO.
➢
◆ When playing back a cassette, the standard is
automatically selected by the VCP.
◆
When you playback an NTSC-recorded tape on this
VCP make a setting on the color system according
to your TV. If your TV is a PAL system only TV, set
NTPB. If your TV is Multi System TV (NTSC 4.43
compatible), set NT4.43 and you can record NT4.43.
1
Press MENU on the remote control.
Result: The programming menu is displayed.
2
Press the corresponding or buttons, until the
cursor is placed in front of the USER SET option.
3
Press the button to select this option.
Result: The USER SET menu is displayed.
4
Press the corresponding or buttons, until the
cursor is placed in front of the COLOR SYSTEM option.
5
Press the button to select AUTO ➞PAL ➞
MESECAM ➞ B/W or NT3.58 ➞ NT4.43 ➞ NTPB.
AUTO When playing back a cassette, the system
standard is automatically selected by the VCP.
B/W Black and White
6
On completion, press MENU twice to exit the menu.
Video system Your TV system Colour system
of a cassette of a VCP
PAL PAL AUTO or PAL
MESECAM SECAM AUTO or MESECAM
NTSC PAL AUTO or NTPB
NT4.43 AUTO or NT4.43
NT3.58 AUTO or NT3.58
Push the cassette into the cassette compartment with
the window side facing up and the label side towards the
front.
➢Making the colour system setting according to
your TV and a tape you want to play back.
Warning
Do not insert your hands or any foreign objects into the
compartment. This may result in injury or damage.
Take special care with children to avoid accidents.
L
X

Reference Information
Toshiba 2-5
Playing a Sequence Frame by Frame
You can:
◆Stop the cassette at a given frame (image)
◆Advance one frame at a time
➢
No sound is heard when playing back frame by
frame.
1
Press:
◆to start playing the cassette
◆IIP/S to stop the tape at a given frame
◆IIP/S to advance frame by frame
2
To return to normal playback, press .
☛
When you have been using the Frame-by-Frame
function for more than about five minutes, the VCP
will automatically play to protect the cassette and
video heads.
➢Vertical stability: When playing back frame by
frame, interference may be seen on the screen.
Press the TRK ( or ) buttons to minimize this
effect.
Selecting the Recording Speed
You can record a cassette at two different speeds:
◆SP (Standard Play)
◆LP (Long Play)
In Long Play modes:
◆Each cassette lasts twice as long
◆The recording is of a slightly lower quality
To record a cassette... Press the SPEED button on the
remote control, until...
In standard play mode SP is displayed.
In long play mode LP is displayed.
Using the Tape Counter
The tape counter:
◆Indicates the elapsed time in the play and record
modes
◆Is reset when a cassette is inserted in the VCP
◆Allows you to find the beginning of a sequence
easily
☛
If the remaining time is to be calculated correctly,
you must indicate the type of cassette being used.
1Insert a cassette in your VCP.
2Press DISPLAY.
➢
The tape counter does not necessarily start from
zero at the beginning of the tape.
3To set the tape counter to zero at the beginning of a
sequence:
◆Press DISPLAY twice to display the counter
◆Press CNT.RESET when you want to set the tape
counter to zero
4To fast-forward or rewind to the sequence at which the
counter was set to zero, simply press or .
Result: The VCP stops automatically when the counter
reaches zero.
➢Some VCP information, such as the counter, can
be displayed on the television screen.
Press DISPLAY:
◆Once to display the current function, recording
speed and counter
◆Twice to display the counter only
◆Three times to display the time remaining on the
cassette
◆Four times to clear the display
T
ype Recording Time (in SP)
E-180 180 mins. or 3 hours
E-240 240 mins. or 4 hours
E-260 260 mins. or
4 hours and 20 mins.
E-300 300 mins. or 5 hours

Reference Information
2-6 Toshiba
Auto Power Off
The Auto Power Off feature automatically turns off your
VCP if no signal is received and you do not press any
button for the selected time.
1
Press MENU on the remote control.
Result: The menu is displayed.
2
Press the corresponding or buttons, until the
cursor is placed in front of the EASY OPERATION option.
3
Press the button to select this option.
Result: The EASY OPERATION menu is displayed.
4
Press the corresponding or buttons, until the
cursor is placed in front of the
AUTO POWER OFF option.
5
Press the button, until you select the time of Auto
Power off interval.
OFF 2HOUR 3HOUR
6
On completion, press MENU twice to exit the menu.
Interval Repeat Play
You can set interval repeat play to repeat the cassette
several times for special interval.
1
Press MENU on the remote control.
Result: The menu is displayed.
2
Press the corresponding or buttons, until the
cursor is placed in front of the EASY OPERATION option.
3
Press the button to select this option.
Result: The EASY OPERATION menu is displayed.
4
Press the corresponding or buttons, until the
cursor is placed in front of the NO. OF INTERVAL
REPEAT option.
5
To... Press , until...
Interval repeat play 5, 10, 15, off is displayed.
(choose repeat time 5 times,
10 times, 15 times)
Cancel interval OFF is displayed.
repeat play
6
On completion, press MENU twice to exit the menu.
7
To select interval during playback, press the REPEAT
button at the desired start point.
Result:“INTERVAL REPEAT SETTING”is displayed.
Press the REPEAT button one more time at the desired
end point.
Result: The tape is automatically rewound to the start
point. “INTERVAL REPEAT”is displayed.
Auto Repeat Play
You can set repeat play to repeat the tape continuously
from beginning to end.
1
Press MENU on the remote control.
Result: The programming menu is displayed.
2
Press the corresponding or buttons, until the
cursor is placed in front of the EASY OPERATION option.
3
Press the button to select this option.
Result: The EASY OPERATION menu is displayed.
4
Press the corresponding or buttons, until the
cursor is placed in front of the REPEAT PLAY option.
5
To... Press or , until...
Repeat play ON is displayed.
Do not wish to OFF is displayed.
repeat play
6
On completion, press MENU twice to exit the menu.
Intelligent Picture Control
Intelligent picture control feature allows you to
adjust the sharpness of the image automatically
according to your own preferences.
1
During playback, press the MENU button on the remote
control.
Result: The menu is displayed.
2
Press the corresponding or buttons, until the
cursor is placed in front of the USER SET option.
3
Press the button to select this option.
Result: The USER SET menu is displayed.
4
Press the corresponding or buttons, until the
cursor is placed in front of the IPC option.
5
Press the button to select the IPC (intelligent picture
control) option.
Press the IPC button on the remote control.
Result: The PICTURE menu appears on the display.
➢
When intelligent picture control mode is ON, the
sharpness of the image is adjusted automatically.
6
To adjust the sharpness manually, press the button
to turn the IPC mode OFF.
7
Press the or buttons until the picture is displayed
according to your preferences.
To adjust the sharpness manually press the SHARPNESS
+ or - buttons on the front of the VCR.
➢
If you do not press a button within ten seconds, the
PICTURE menu disappears automatically.
8
On completion, press the MENU button again.

Reference Information
Toshiba 2-7
2-2-1 IC301 (LA71598M)
2-2 IC Blocks

Reference Information
2-8 Toshiba
2-2-3 IC601 (uPD784928)

Toshiba 3-1
3. Product Specifications
Design and specifications are subject to change without notice.
Format VHS PAL standard
Heads Video: 2 rotary heads
Audio/Control: 1 stationary head
Erase: 1 full track erase head Erase: 1 full track erase head
Television system STANDARD G, I, K
Luminance FM azimuth recording
Colour system PAL/MESECAM/NTSC: Down converted
subcarrier phase shifted direct recording
NTSC PB on PAL TV
Tape speed SP 23.39 mm/sec
LP 11.69 mm/sec
Recording/playback time SP 3 hours (E-180 Tape)
LP 6 hours (E-180 Tape)
REW time About 150 sec in REW with E-180
VIDEO
Input 0.5 to 2.0 Vp-p; 75 ohm unbalanced
Output 1.0 ± 0.2 Vp-p; 75 ohm unbalanced
Signal-to-noise ratio Better than 43 dB (SP)
Horizontal resolution More than 240 lines (SP)
AUDIO
Input -8 dBm, 47 Kohm unbalanced
Output -8 ± 3 dBm, 1 Kohm unbalanced
Wow and flutter (WTD) 0.4% max (SP)
Signal-to-noise ratio 42 dB min (IHF A filter)
Frequency response 100Hz - 8KHz
Power requirement AC 100-240V 50/60 Hz
Power consumption Approx. 15 watts
Operation temperature 41°F-104°F (5°C-40°C)
Operation humidity 10%-75%
Weight 3.1 Kg (net)

Product Specifications
3-2 Toshiba
MEMO

Toshiba 4-1
4. Disassembly and Reassembly
4-1 Cabinet Assembly
4-1-1 Cabinet Top Removal
ŒREMOVE 2 SCREWS
´ Lift up the Cabinet Top in the direction of
arrow by releasing the Hook.
Fig. 4-1 Cabinet Top Removal
4-1-3 Ass’y Front Panel Removal
Fig. 4-3 Ass’y Front Panel Removal
Œ RELEASE 4 HOOKS
´ RELEASE 3 HOOKS
(Top View)
(Bottom View)
ŒRELEASE 2 SNAPFITS
´ Lift up the Bottom Cover in the direction of arrow.
4-1-2 Bottom Cover Removal
Fig. 4-2 Bottom Cover Removal

4-2 Toshiba
Disassembly and Reassembly
4-1-5 Chassis Removal
Œ2 SCREWS
´ BRACKET-FRAME
¨Lift the Ass'y Deck up.
ØLift the Ass'y Main PCB up to Remove.
ˇ3 SCREWS
ASSEMBLY POINT
(ALIGN TWO ARROWS)
PUSH
ˆRELEASE 1 TAB
Fig. 4-5 Chassis Removal

Disassembly and Reassembly
Toshiba 4-3
Ϋ
ˇ¨ˆØ
Fig. 4-6 Top parts Location-1
ŒGEAR FL CAM
´MOTOR LOADING ASS’Y
ˇLEVER FL ARM ASS’Y
¨HOLDER FL CASSETTE ASS’Y
ˆLEVER FL DOOR
ØSLIDER FL DRIVE
4-2 Deck Parts Locations
4-2-1 Top View

4-4 Toshiba
Disassembly and Reassembly
Œ´ ˇ ¨ ˆ
Ø∏”’ Ô ˝ Ò
”
Fig. 4-7 Top Parts Location-2
ŒFE HEAD
´CYLINDER ASS’Y
ˇACE HEAD ASS’Y
¨LEVER UNIT PINCH ASS’Y
ˆLEVER #9 GUIDE ASS’Y
ØLEVER TENSION ASS’Y
∏BAND BRAKE ASS’Y
”DISK S REEL
’LEVER S BRAKE ASS’Y
˝GEAR IDLE
ÔLEVER IDLE
LEVER T BRAKE ASS’Y
ÒDISK T REEL

Disassembly and Reassembly
Toshiba 4-5
4-2-2 Bottom View
Œ´ˇ ¨ˆØ∏
”’˝
Fig. 4-8 Bottom Parts Location
ŒGEAR JOINT 1
´GEAR JOINT 2
ˇBRACKET GEAR
¨MOTOR CAPSTAN ASS’Y
ˆLEVER T LOAD ASS’Y
ØGEAR LOADING DRIVE
∏LEVER S LOAD ASS’Y
”HOLDER CLUTCH ASS’Y
’BELT PULLEY
˝SLIDER CAM
Table of contents
Other Toshiba VCR System manuals

Toshiba
Toshiba M769 User manual

Toshiba
Toshiba W-704C User manual

Toshiba
Toshiba kV-9960A User manual

Toshiba
Toshiba M221 User manual

Toshiba
Toshiba SD-23VB User manual

Toshiba
Toshiba W-701 User manual

Toshiba
Toshiba M46 User manual

Toshiba
Toshiba VIDEOplus+ V-855 User manual

Toshiba
Toshiba W-705 User manual

Toshiba
Toshiba W-707 User manual

Toshiba
Toshiba KV-7168A User manual

Toshiba
Toshiba M-752 User manual

Toshiba
Toshiba M-463 User manual

Toshiba
Toshiba M-462 User manual

Toshiba
Toshiba W-704 User manual

Toshiba
Toshiba Beta hi-fi V-S36 User manual

Toshiba
Toshiba RD-XV47KE User manual

Toshiba
Toshiba M43 User manual

Toshiba
Toshiba RD-XV45KB User manual

Toshiba
Toshiba KV-5024A User manual