Total Source SLRM0005 User manual
OPERATING MANUAL
MANUAL STACKER
SLRM0005 SLRM0006 SLRM0018
Original operating
manual
09/2021 – V01
from serial n°
J20111395/01-04

2/40
© 09-2021. TVH
®
and TotalSource
®
are registered trademarks. TVH Parts Holding NV, Brabantstraat 15, B-8790 Waregem. All rights reserved.
No part of this publication may be reproduced or communicated in any form or by any means, electronic or mechanical, including copying,
recording or use in an information storage or retrieval system, without prior and explicit permission of TVH Parts Holding NV. Printing errors
reserved. Photographs and illustrations are included for reference purposes only.
Responsible editor: TVH Parts Holding NV, Brabantstraat 15, BE-8790 Waregem
TVH is a supplier of after-market spare parts and accessories that are suitable for the maintenance and repair of OEM equipment.

3/40
www.tvh.com/SLRM0005-SLRM0006-SLRM0018_RV01
BG Bulgarian Можете да намерите това ръководство на Вашия език чрез линка, посочен по–
долу.
CS Czech Tento návod najdete ve svém jazyce prostřednictvím odkazu níže.
DA Danish Du kan finde denne vejledning på dit sprog via nedenstående link.
DE German Sie finden diese Bedienungsanleitung in Ihrer Sprache unter folgendem Link.
EL Greek Μπορείτε να βρείτε αυτό το εγχειρίδιο στη γλώσσα σας έσω του παρακάτω
συνδέσου.
EN English You can find this manual in your language via below link.
ES Spanish Encontrarás este manual en su propio idioma a través del siguiente enlace.
ET Estonian Oma emakeelse juhendi leiate allolevalt lingilt.
FI Finnish Löydät tämän manuaalin omalla kielelläsi alla olevan linkin takaa.
FR French Vous trouverez ce manuel dans votre langue via le lien ci-dessous.
GA Irish Tá an lámhleabhar seo ar fáil i do theanga tríd an nasc thíos.
HR Croatian Ovaj prirucnik mozete pronaci na svom jeziku putem donjeg linka.
HU Hungarian Ez a kézikönyv az Ön nyelvén az alábbi link alatt található.
IS Icelandic Hægt er að finna þessa handbók á þínu tungumáli á tenglinum hér að neðan.
IT Italian Cliccando sul link sottostante troverai il manuale nella tua lingua.
LT Lithuanian Šį vadovlėlį savo kalba rasite spustelėję žemiau esančią nuorodą.
LV Latvian Rokasgrāmatu latviešu valodā Jūs varat atrast izmantojot zemāk esošo saiti.
MT Maltese Tista’ ssib dan il-manwal bil-lingwa tiegħek permezz tal-link ta’ hawn taħt.
NL Dutch Je vindt deze handleiding in jouw taal via onderstaande link.
NO Norwegian Du finner denne håndboken på ditt språk via linken nedenfor.
PL Polish Niniejsza instrukcja obsługi dostępna jest w Twoim języku za pośrednictwem
poniższego linku.
PT Portuguese Pode encontrar este manual no seu idioma através do link abaixo.
RO Romanian Putei găsi acest manual în limba dvs. prin link-ul de mai jos.
SK Slovak Manuál vo vašom jazyku môžete nájst v priloženom vysvietenom riadku.
SL Slovenian Ta priročnik najdete v svojem jeziku preko spodnje povezave.
SV Swedish Du kan hitta denna manual på ditt språk via länken nedan.
TR Turkish Bu kılavuzu aşağıdaki bağlantıdan kendi dilinizde bulabilirsiniz.

4/40
Thank you for using our product. For your safety and to ensure a correct operation, we would
like to bring to your attention some aspects of this manual:
• This booklet supplies useful instructions for the correct operation and maintenance of the
product. It is therefore necessary to pay the utmost attention to all of the paragraphs that
illustrate the most simple and secure way to operate and use this product.
• This booklet must be considered an integral part of the machine and must be included
with the deed of sale.
• Neither this publication, nor part of it, can be reproduced without written authorisation on
the part of the manufacturer.
• All of the information reported herein is based on data available at the moment of printing;
the manufacturer reserves the right to carry out modifications to its own products at any
moment, without notice and without incurring in any sanction. It is therefore suggested to
always check for possible updates.
The person responsible for the use of the product must make sure that all of the safety rules
in force in the country of its use are applied, to guarantee that the equipment is used in
conformity with the use for which it is destined and to avoid any dangerous situation for the
user.
The following warning signs are used in this manual to warn you for dangers and risks:
Informative, be careful.
Warning, can lead to injury and damage if instructions aren’t followed.
Danger, can lead to serious or fatal injury and serious damage if instructions
aren’t followed.
The following conventions are used in this manual:
5
6
13
4
2
1 Right
2 Left
3Front
4 Back
5Top
6 Bottom

5/40
TABLE OF CONTENTS
1. INTRODUCTION..................................................................................... 6
2. DESCRIPTION....................................................................................... 7
2.1. Technical data .......................................................................................7
2.2. Main components of the product.................................................................8
2.3. Placement of the decals...........................................................................9
2.4. Type plate. . . . . . . . . . . . . . . . . . . . . . . . . . . . . . . . . . . . . . . . . . . . . . . . . . . . . . . . . . . . . . . . . . . . . . . . . . . . . . . . . . . . . . . . . . . . . 9
3. SAFETY INSTRUCTIONS.........................................................................10
3.1. Explanation of the safety decals ................................................................10
3.2. Load diagram.......................................................................................11
3.3. General safety instructions ......................................................................11
4. TRANSPORT AND STORAGE ....................................................................13
4.1. Parking the stacker................................................................................13
4.2. Transporting the stacker .........................................................................13
5. ASSEMBLY AND INSTALLATION ...............................................................14
5.1. Packing list..........................................................................................14
5.2. Safety instructions.................................................................................14
5.3. Required material for assembly.................................................................14
5.4. Assembly of the product..........................................................................14
6. OPERATION.........................................................................................15
6.1. Safety instructions for operating the product ................................................15
6.2. Operating instructions ............................................................................16
7. MAINTENANCE ....................................................................................20
7.1. Safety instructions for the repair of the product .............................................20
7.2. Maintenance schedule............................................................................20
7.3. Maintenance instructions ........................................................................20
8. TROUBLESHOOTING .............................................................................23
9. FINAL DECOMMISSIONING AND DISPOSAL ................................................24
10. ANNEXES ...........................................................................................25
10.1. CEcertificate .......................................................................................25
10.2. Hydraulic diagram .................................................................................27
10.3. Spare parts list .....................................................................................27

6/40
1. INTRODUCTION
This stacker is a manually operated stacker designed to lift and transport pallets on hard
and even surfaces. It can lift open bottom or diagonal board pallets. Suitable ambient
temperature is 5°C up to 40°C.
We guarantee a long period of trouble free operation if the unit is operated and maintained
correctly.
This stacker may be unsafe/hazardous if adequate maintenance is neglected.
Therefore, adequate maintenance facilities, trained personnel and procedures
should be provided.
Maintenance and inspection shall be performed in conformity with the following
practices:
1. A scheduled planned maintenance, lubrication and inspection system should be
followed (see maintenance instructions in chapter7).
2. Only qualified and authorized personnel shall be permitted to maintain, repair,
adjust, and inspect the stacker.
3. Modifications and additions which affect capacity and safe operation shall not
be performed by the customer or user without the manufacturers, prior written
approval. Capacity, operation and maintenance plates or decals shall be changed
accordingly.
4. If modifications are made without the written approval of the manufacturer,
thewarranty will no longer apply.
This manual contains all the necessary information on the installation and operation of the
stacker. Some of the maintenance operations should only be carried out by professional
technicians. If you require this information and the maintenance steps, please contact your
dealer.
7/40
2. DESCRIPTION
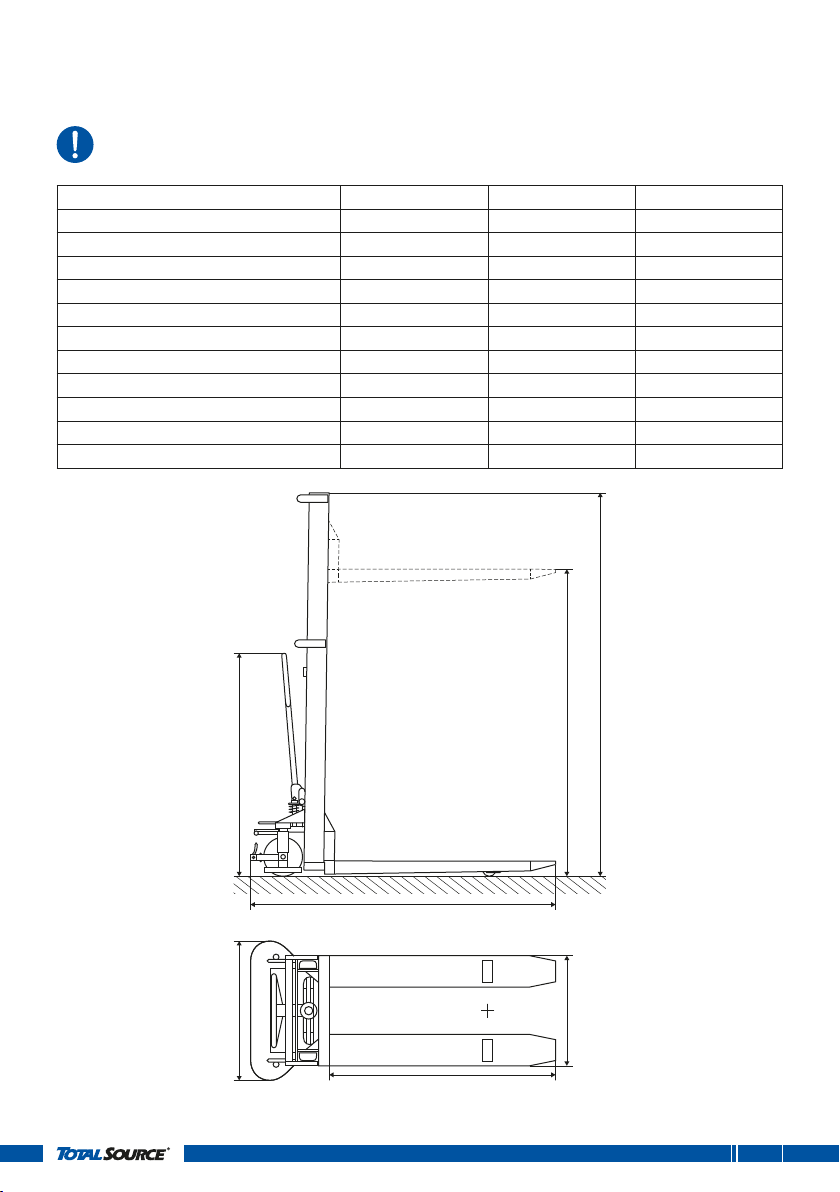
2.1. Technical data
Always check the type plate for the correct information.
Model SLRM0005 SLRM0006 SLRM0018
Load capacity (kg) 1000 1000 1000
Minimum height (H1) (mm) 2010 2060 1980
Maximum height (H4) (mm) 2010 3540 1980
Lifting height (H3) (mm) 1600 3000 1600
Length of the forks (l) (mm) 1100 1100 1150
Width across the forks (N2) (mm) 550 550 550
Total length of the stacker (L) (mm) 1480 1668 1600
Total width of the stacker (B) (mm) 740 740 740
Material of the stacker Steel Steel Steel
Weight (kg) 184 310 186
Centre of gravity (mm) 450 575 600
H1
L
H3
H4
I
N2B
8/40
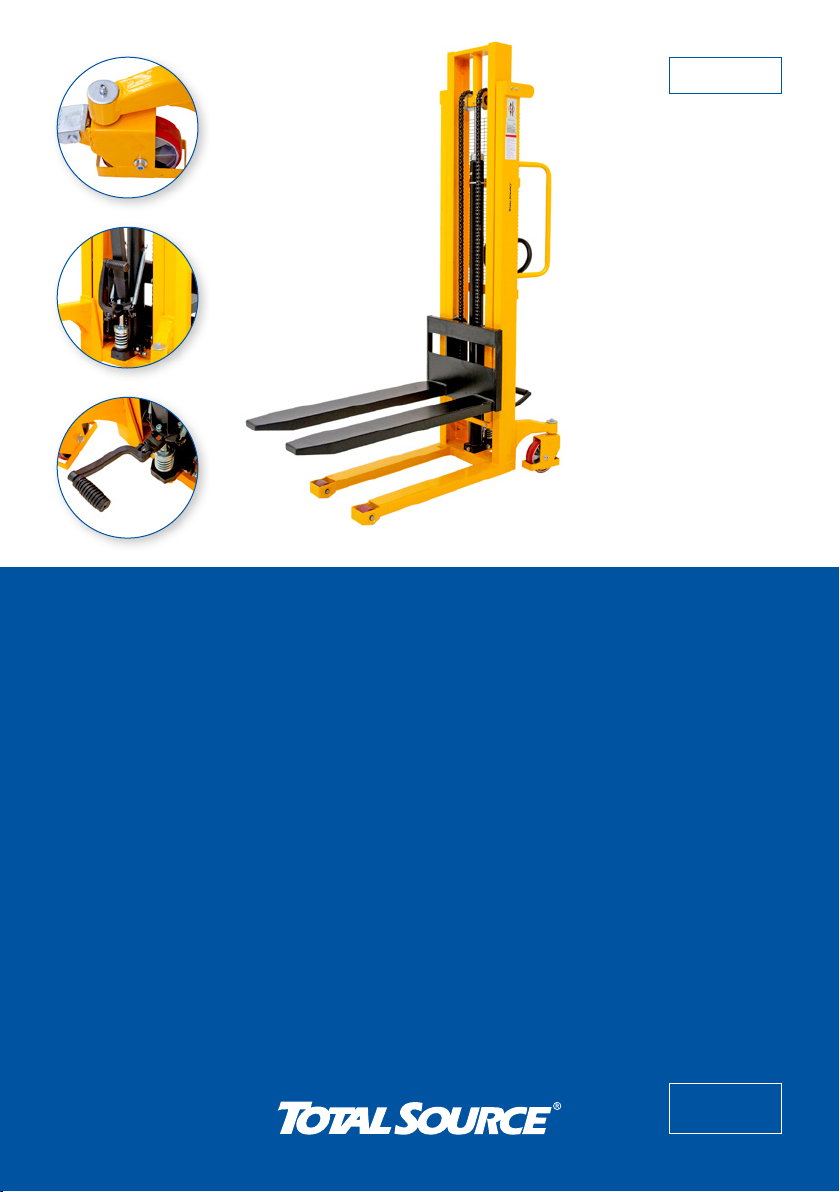
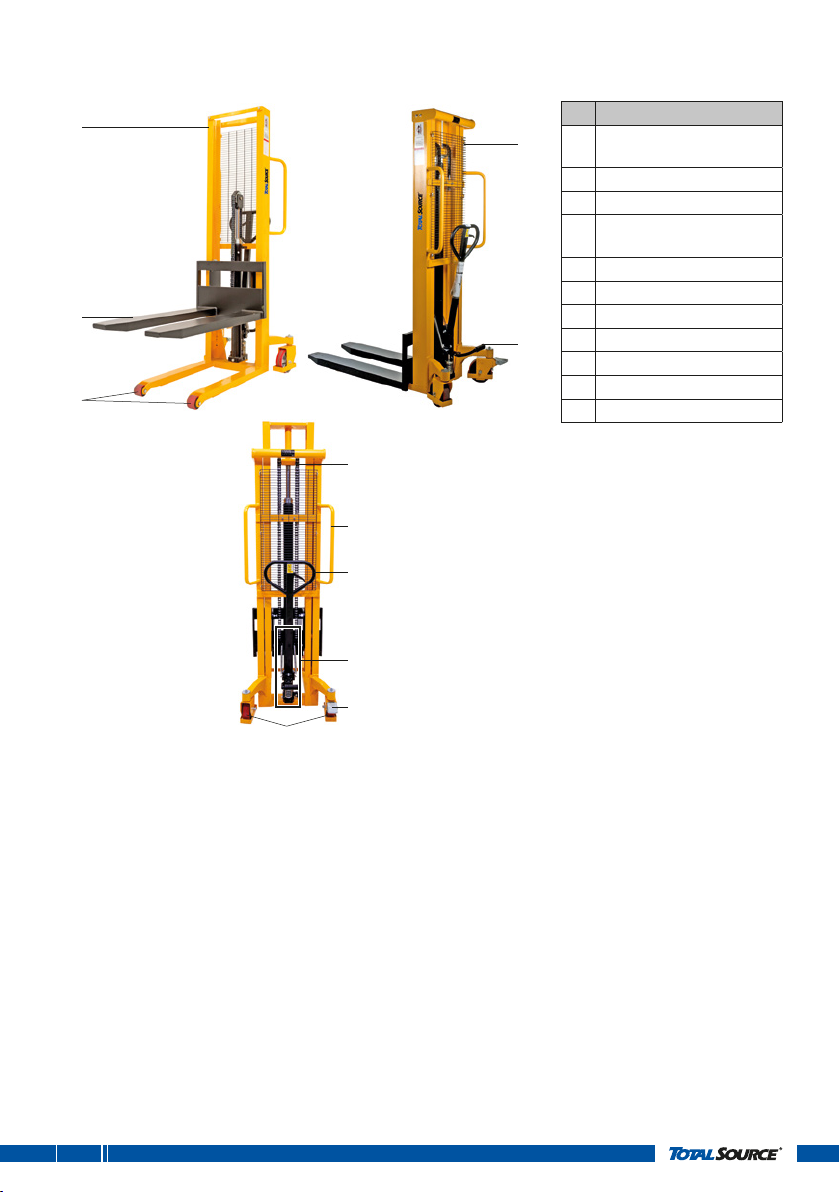
2.2. Main components of the product
Hydraulic stackers
11
6
5
10
3
7
9
1
2
8
4
N° Component
1Tiller handle with
operating lever
2Pump unit
3Foot pedal
4Steering wheels (with
brakes)
5Fork wheels
6Forks
7 Chain
8Foot brake
9Support handles
10 Safety net
11 Mast

9/40
2.3. Placement of the decals
The safety and warning labels should be placed as described in the pictures below.
Seechapter3 for the explanation of the safety warnings. If the decals are damaged or
missing, replace them.
N° Decal Explanation Reference
1Brand decal 166TA2311
2.4. Type plate
N° Type plate Explanation
2
Type
Manufactured outside the EU for:
TVH PARTS NV
Brabantstraat 15 • 8790 Waregem • Belgium
xxxxxx Fork length xxxx mm
Serial n° xxxxxx Total width xxx mm
Capacity xxxx kg Lifting height xxx
Net weight xx kg Year of manufacturing xxxx
1 6
7
8
9
10
2
3
4
5
1Type of stacker
2Serial number
3Capacity of the stacker
4Weight of the stacker
5Name and address of the
manufacturer
6Length of the forks
7Total width of the stacker
8Lifting height
9Year of manufacture
10 CE logo
4
8
5
1
4
8
2
1
6
3
10/40
3. SAFETY INSTRUCTIONS
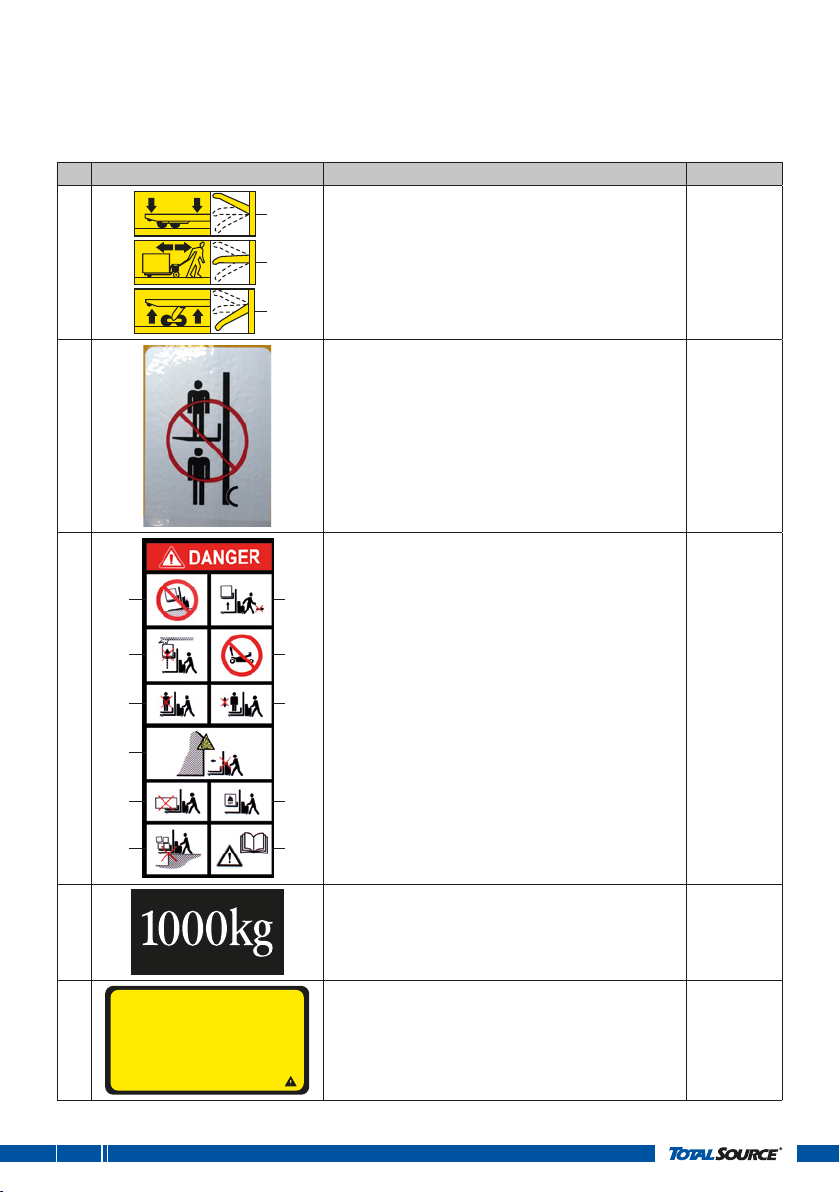
3.1. Explanation of the safety decals
If the decals are damaged or missing, please replace them.
N° Decal Explanation Reference
3
1
2
3
Operating instructions handle:
1. Handle up: lower the forks
2. Neutral: driving position
3. Handle down: pump up
163TA1676
4It is forbidden to carry or lift passengers. It is
forbidden for people to stand underneath the
forks.
Contact
your dealer
5
1
3
5
7
8
2
3
6
9
1110
1. Do not lift loads on inclines or slopes
2. Do not move with the forks in the raised
position, except when placing loads
3. Be aware of overhead clearances and
obstacles
4. Do not use the stacker as a vehicle jack
5. Do not use to lift or transport people
6. Do not use to lift or transport people
7. Do not use in potentially explosive
environments
8. Only transport secured loads
9. Do not use if there is a risk of exceeding
rated capacities./Do not violate load centre
restrictions
10. Do not use if there is a risk of unexpected
stacker movement
11. Read the operating manual before operating
166TA5084
6Maximum load capacity: 1000kg 162TA9893
7To prevent oil leaking from oil tank during transportations, air
screw is replaced with oil sealing screw from the factory. But it
has to be replaced back when you put this truck in use.
Diese Verschlussschraube ist zwecks Verpackung und
Transport angezogen. Entfernen Sie die Verschlussschraube
und ersetzen Sie diese mit einer Entlüftungsschraube vor der
Verwendung des Scherenhubwagens.
La vis du bouchon de remplissage est serrée pour l'expédition
et la manipulation. Enlevez ce bouchon et remplacez-le par le
bouchon de purge avant d'utiliser le transpalette à ciseaux.
Warning to replace bleeder screw after transport,
see chapter5.
166TA5083

11/40
3.2. Load diagram
N° Decal Reference
8 Contact
your dealer
3.3. General safety instructions
• The operator should read all warning signs and instructions in the manual and on the
stacker before using it.
• Do not operate a stacker unless you have been trained or authorised to do so.
• Do not exceed the maximum capacity.
• The operator should wear safety shoes and gloves when using or maintaining the
stacker.
• It is forbidden to carry or lift passengers.
• The stacker can’t be used if it’s damaged or when faults appear.
• Do not use the stacker on a slope. It is designed to be used on even and level floors.
• The weight of the goods should be distributed over the two forks, do not use only one
fork. The centre of gravity of the goods should be in the centre of the two forks.
• Be aware of hazardous situations like ledges or potholes, bumps and floor
obstructions, debris, overhead obstructions and high-voltage conductors, inadequate
surface support to withstand all load forces imposed by the machine.
• Never leave the stacker unattended with a load.
• When goods are being transported or lifted, bystanders should keep a minimum
distance of 1metre. The stacker is equipped with a safety net to secure the operator.
• It is forbidden for people to stand underneath the forks.
• Only release the handle once the stacker has come to a complete stop.
• Do not load unstable or loosely stacked loads.
• The stacker shall not be used for handling free swinging loads. The stacker is only
designed to lift and move pallets.
• Do not use the stacker for any other purpose than intended.
• Do not operate a stacker unless you are of age.
• The person responsible for the use of the product must make sure that all of the safety
rules in force in the country of its use are applied, to guarantee that the equipment
is used in conformity with the use for which it is destined and to avoid any dangerous
situation for the user.
• All wheels must remain in contact with the floor at all times.
• When leaving the stacker, always use the foot brake to make sure the stacker can’t
move (see chapter6).

12/40
TVH Parts Holding NV cannot envisage each possible circumstance that may result
in danger. Therefore the warnings given in this publication and which appear on
the equipment are not exhaustive. In the event that equipment, procedures, work
methods or working techniques are used that are not specifically advised by the TVH
company, it is necessary to make sure that there is no danger to the operator or other
people.
For stackers with a hydraulic pump
The stacker is equipped with a pressure valve and an overflow valve:
• The pressure valve on the machine is factory-set for the maximum load capacity of
1000kg or according to the capacity mentioned on the stacker.
• The pressure relief valve is set to avoid the risk of overloading. When the machine
is overloaded, the overflow valve opens to prevent lifting, because that could result
in a dangerous situation.
13/40
4. TRANSPORT AND STORAGE
4.1. Parking the stacker
• Park the stacker securely in a dry and frost-free environment.
• Do not park on an inclined surface.
• Always completely lower the forks.
• If the stacker is parked for longer than a month, lubricate the necessary parts,
follow the instructions in chapter7.
Safely park the stacker by following these steps:
1. Lower the forks to their lowest position by pulling the operating lever upwards.
2. Remove any load from the stacker.
3. Move the stacker to a safe parking spot; store the stacker on a firm, flat floor in a dry
area.
4. Apply the brake
(see chapter6)
to prevent any unwanted movements from the stacker.
5. Fold up the foot pedal.
6. The stacker is parked.
4.2. Transporting the stacker
Make sure that the transporting vehicle has sufficient capacity, always check the type
plate to know the weight of the stacker.
Safely transport the stacker by following these steps:
1. Remove any load from the stacker before transport.
2. Lower the forks to their lowest position by pulling the operating lever upwards.
3. Drive the stacker into the vehicle.
4. Secure the stacker so that it can’t move during transport.

14/40
5. ASSEMBLY AND INSTALLATION
5.1. Packing list
Description Amount Reference
Stacker complete SLRM0005
Stacker complete SLRM0006
Stacker complete SLRM0018
1
129TA8651
129TA8652
166TA4709
Operating manual 1 166TA8761
Spare parts list SLRM0005
Spare parts list SLRM0006
Spare parts list SLRM0018
1
166TA7659
166TA7660
166TA7862
Bleeder screw SLRM0005
Bleeder screw SLRM0006
Bleeder screw SLRM0018
1
164TA7833
164TA8008
166TA7335
5.2. Safety instructions
• Wear safety gloves and safety shoes when assembling the stacker.
• Be careful when removing the packaging.
• Position the stacker on a level surface.
5.3. Required material for assembly
• Screwdriver (type/number depends on type of stacker)
• Wrench (type/number depends on type of stacker)
• Utility knife
5.4. Assembly of the product
Hydraulic stackers
To prevent oil from leaking from the oil tank during transport,
the bleeder screw has been replaced by a sealing screw in the
factory. This must be replaced when you put the stacker into
service. To do so, follow below steps:
1. Remove the sealing screw
2. Replace it with the bleeder screw

15/40
6. OPERATION
6.1. Safety instructions for operating the product
• A damaged or malfunctioning machine must never be used. If damage or
malfunctions are discovered during pre-operation inspection or function tests, the
machine must be tagged and removed from service.
• Make sure that no elements can hinder the lowering of the forks.
• The operator may not wear any loose objects, such as necklaces, rings, scarves…
as they may become entangled in the machine and thus cause harm to the
operator.
• Do not operate a stacker unless you have been trained or authorised to do so.
• Do not exceed the maximum load capacity.
• The operator should wear safety shoes and gloves when using the stacker.
• When transporting goods, raise the forks as little as possible. Transport with
raised forks should be carried out slowly and for as short a distance as possible.
Only use the stacker on a level surface.
• Make sure that the flooring can support the combined weight of the stacker and its
load.
• Be aware of hazardous situations like ledges or potholes, bumps, floor
obstructions and debris.
• When goods are being transported or lifted, bystanders should keep a minimum
distance of 1metre.
• It is forbidden to carry or lift passengers.
• The weight of the goods should be distributed over the two forks, do not use only
one fork. The centre of gravity of the goods should be in the centre of the two forks.
• Never leave the stacker unattended with a load.
• Only release the handle once the stacker has come to a complete stop.
• All wheels must remain in contact with the floor at all times.
• When leaving the stacker, always use the foot brake to make sure the stacker can’t
move.
• In normal conditions the stacker moves without a lot of noises.
• If the stacker doesn’t lift, it may be overloaded.
• If the wheels are dragging, they are probably blocked by dirt in or around the axles.
• If the forks descend automatically, check the troubleshooting guide in chapter8.

16/40
6.2. Operating instructions
Please see chapter7 for the daily maintenance schedule.
Perform the daily maintenance check before operating the stacker.
Hydraulic stackers
1. Positions of the operating lever:
On the drawbar of the stacker, you can find the control handle which can be regulated in
three positions:
1
2
3
1. UP= to lower the forks
2. NEUTRAL= to move the load
3. LOWER= to pump up the forks
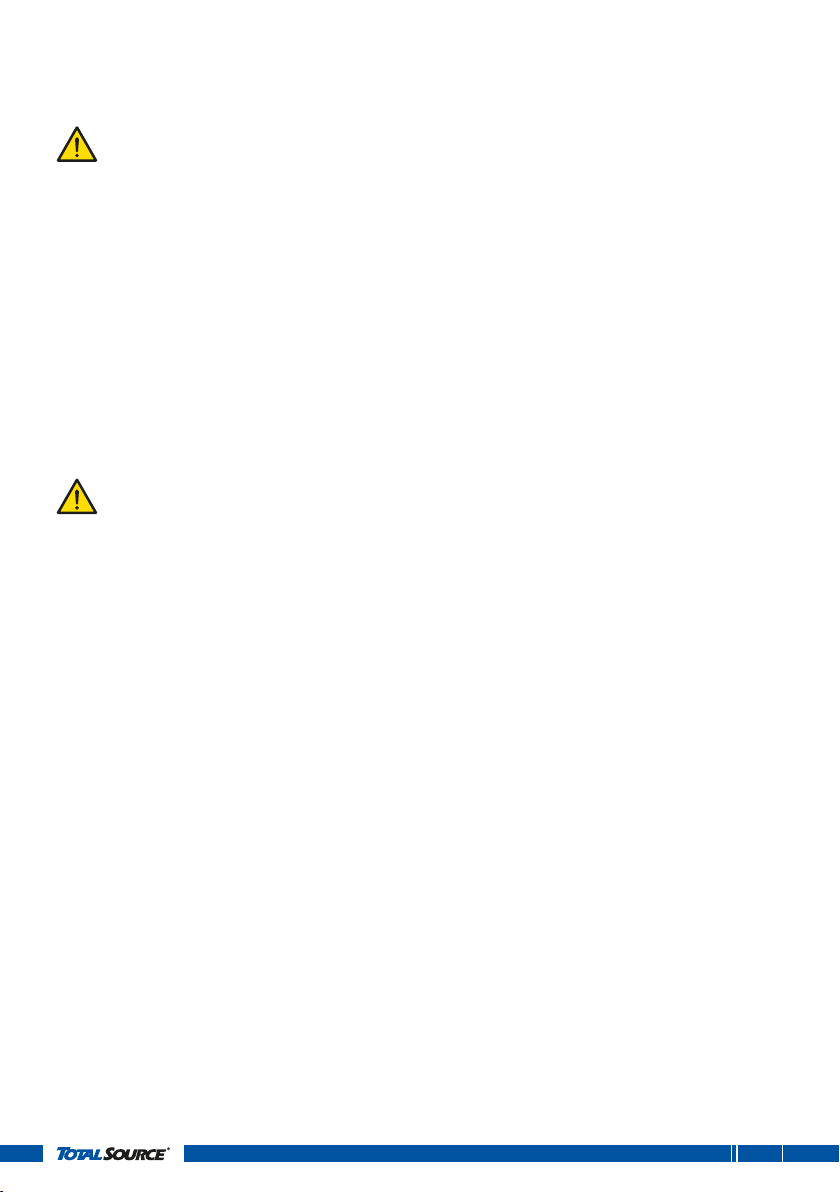
2. Loading and unloading the stacker:
1. Position and level the forks so that they are in line with the
pallet fork inlets.
2. Slowly insert the forks into the inlets until the pallet hits the
back of the forks.
3. Move backwards and make sure the load is stable.
4. Transport the goods with the forks raised as little as
possible.
17/40
5. Position the stacker in line with the storage space.
6. Move the goods into the storage space and safely unload the
stacker.
7. Move the stacker backwards.
8. Lower the forks as much as possible.
9. If the job is finished, safely store the stacker (see chapter4).
If the forks of the stacker don’t lower or lift, see the following steps to adjust the lever.
18/40
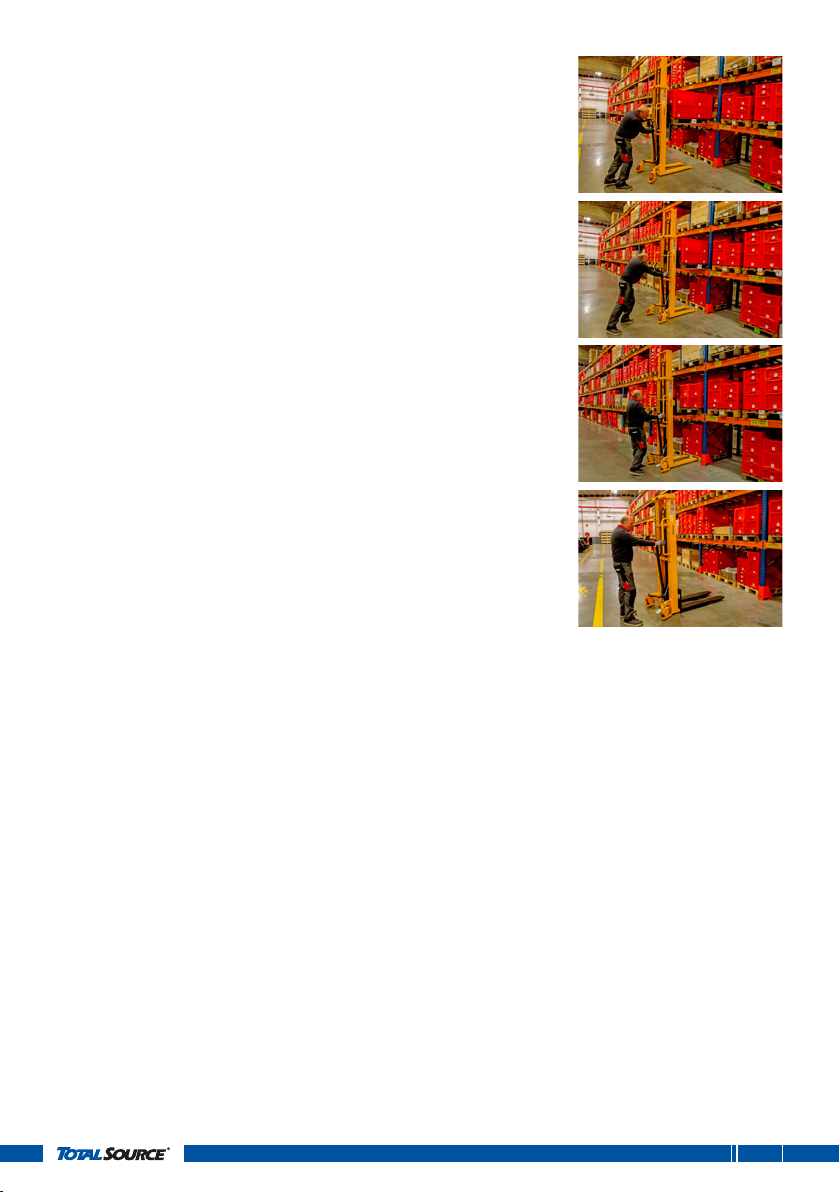
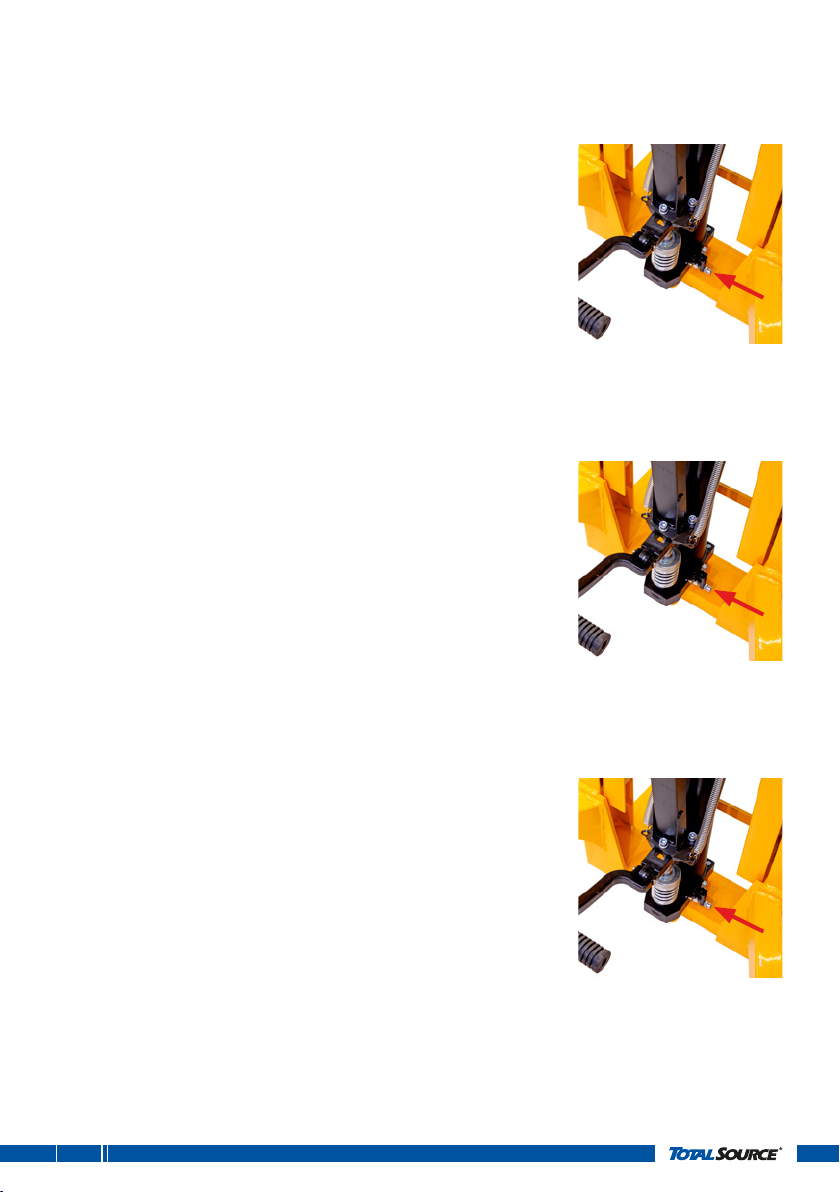
3. Adjustments of the operating lever
Adjustment of neutral position:
1. Place the operating lever in the normal position.
2. Push the tiller handle to the lowest position.
3. Regulate the adjusting nut and screw on the linkage so that,
when the tiller handle is pumped, the forks neither raise nor
lower.
Adjustment of lifting position:
1. Place the operating lever in the lifting position.
2. Pump the tiller handle; the linkage is not operated, the forks raise and tilt while the
release valve remains completely closed.
3. If the forks do not lift, regulate the adjusting nut and screw
until a normal lifting and action is attained.
Adjustment of lowering position:
1. Pull the operating lever in the lowering position.
2. The linkage is operated, causing the discharge and pressure valve to open completely,
and the forks to lower.
3. If the forks don’t lower, regulate the adjusting nut and screw
until a normal lowering action is attained.
19/40
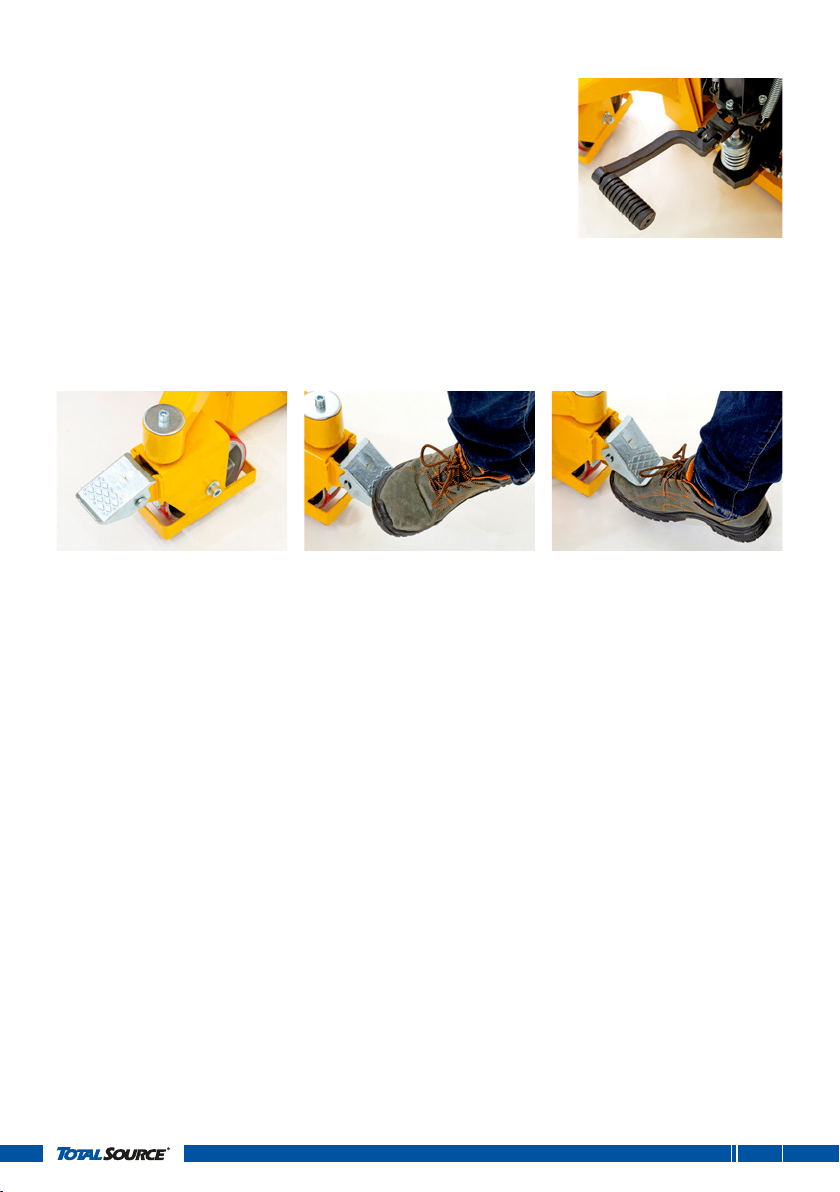
Stackers with foot pedal
The foot pedal is equipped with a quick lift function. This means
that when the stacker is unloaded, you can use the foot pedal to
quickly raise the forks or drum mechanism of the stacker. When
the stacker is not in use fold up the foot pedal.
Stackers with foot brake
The stacker is equipped with a foot brake on one wheel. Whenapplied, the foot brake
prevents the stacker from moving.
To apply the brake, push the brake down with your feet. Torelease the brake, pull the brake
up.

20/40
7. MAINTENANCE
7.1. Safety instructions for the repair of the product
• No modifications or alterations which could affect capacity, stability or safety
requirements of the stacker but not limited to these examples, shall be made
without the prior written approval of the original manufacturer, its authorised
representative, or a successor thereof.
• Make sure that the truck is in a secured and stable position, ensuring that it will not
suddenly move. Brakes must be applied.
• The person responsible for the maintenance should wear safety shoes and gloves
when maintaining the stacker.
7.2. Maintenance schedule
Task D W M 6M
1. Daily maintenance check
2. Oil level, pump (for stackers with hydraulic pump)
3. Lubrication
4. Brakes
5. Cleaning
D: daily, W: weekly, M: monthly, 6M: every 6months
7.3. Maintenance instructions
1. Daily maintenance check
A daily maintenance check of the stacker can limit wear to a minimum:
• Check the wheels and axles for blockages.
• Check if there are any damaged or loose bolts, nuts or cotter pins. Replace them if
necessary, see spare parts list.
• Check for oil leaks (for stackers with hydraulic pump).
• Check if the lifting and lowering functions work properly (see chapter6).
• Ensure that the instruction manual is complete, legible and available for reference.
• Ensure that all decals are legible and in place.
• Check the entire machine for damage, corrosion or cracks in structural components.
A damaged or malfunctioning machine must never be used. If damage or
malfunctions are discovered during daily inspection or function tests, the machine
must be tagged and removed from service.
2. Oil level, pump (for stackers with hydraulic pump)
Please check the oil level every six months; as long as the stacker reaches its maximum
height the oil level is sufficient. The oil capacity is about 2l. Use the correct type of hydraulic
oil.
Type oil Reference
Hydraulic oil ISO VG32 141TA2734
This manual suits for next models
2
Table of contents
Other Total Source Forklift manuals


