Total 03/T600AF User manual

LPGSASA Permit number: 1051-192/1-RSA-17-A
This appliance complies with the requirements of SANS 1539
Model No: 03/T600ABF (Black)
Model No: 03/T600AF (White)
Instructions for use for Totai 6 burner
Freestanding Stoves
Read these instructions carefully before using the
appliance and retain them for future reference
PO Box 34191Erasmia 0023
Distributed by: D.K.Gas Appliances
Safe Appliance
LP Gas Safety Association

Technical Data
Model No:
03/T600AF & 03/T600ABF
Gas Type
LPG
Operating Pressure
2,8 kPa
Gas consumption
Oven burner
1
160g/h
Small Cooker Burners l
2
60 g/h per burner
Medium Cooker burners
2
90 g/h per burner
Large Cooker Burners
2
120 g/h per burner
2 7
1. General
ŸThis model requires a low pressure 2,8 kPa LPG Regulator to be fitted to the gas cylinder.
Ensure that you obtain the correct regulator for the type of cylinder used with the appliance.
Cylinders suitable for use with the appliance are as follows:
Ÿ1 x 19 kg cylinder, These cylinders require a regulator fitted with a G5/8 left hand thread (Bull
nose fitting)
ŸThe connection between the regulator and the appliance is by means of a flexible LPG hose.
The hose must comply with the requirements of SANS 1156-2. The hose must be clamped with
a suitable hose clamp at both ends Note: The hose and regulator are not supplied with the Totai
Stoves. Do not connect the appliance directly to a cylinder with a hose. It is dangerous to do so.
Contact your local gas dealer to purchase the correct regulator.
ŸThese appliances are fitted with a flame failure device on the cooker burners and therefore may
be connected to a fixed pipework system. The stove may also be used when connected to a gas
cylinder that is placed adjacent to the stove but not closer than 300 mm to the stove, and is
connected to the regulator outlet by means of a flexible hose. See Fig 1.
Important information for the user
ŸIf connected to a fixed pipework system with the cylinder outside the premises the appliance
may only be installed by a registered LP Gas installer . All registered installers are issued with a
card carrying their registration number. Ask to be shown the card before allowing the installation
work to commence and make a note of the Installer QCC number. Upon completion of the
installation, the installer is required to explain the operational details of the appliance together
with the safety instructions. You will be asked to sign acceptance of the installation and be
provided with a completion certificate. You should only sign for acceptance of the installation
when the installation is completed to your satisfaction. Note that your invoice is required in the
event that you wish make a guarantee claim.
Important information for the installer
·This appliance may only be installed by a LP gas installer registered by the Liquefied Petroleum
Gas Association of Southern Africa. The appliance must be installed in accordance with the
requirements of SANS 10087-1 and any fire department regulations and/or local bylaws
applicable to the area. If in doubt check with the relevant authority before undertaking the
installation. Upon completion of the installation you are required to fully explain and demonstrate
to the user the operational details and safety practices applicable to the appliance and the
installation.
Fig 4
Fig. 5
Fig. 7
Pot support
Oven Grid
Removable
Oven Bottom
Oven burner
ignition hole
Burner Cap
Door window
Oven burner
Burner
Cap
Ignitor
Post
Burner
Body
Flame
Failure
Sensor
Off
Ignite & Max
Low
Fig.3 Fig 6
Cooker burners, oven burner and ignitor button control panel Fig. 2
Ignitor
button
Oven control
knob
Medium
burner
Front left
control knob
Rear left
control knob
Medium
burner Large burner
Rear centre
control knob Rear right
control knob
Small burner
Front right
control knob
Large burner
Front centre
control knob
Small burner

6 3
2. Safety Information
ŸEnsure the appliance is used away from flammable materials. Minimum safe distances are:
above the appliance 600 mm, at the rear and sides 500 mm.
ŸDo not place the stove near doors and windows in order to avoid the possibility of draughts
affecting the burners
ŸDo not place the stove in a damp area in order to prevent corrosion of the parts
ŸDo not use an appliance that is leaking, damaged or which does not operate properly.
ŸKeep gas cylinders away from heat and flame.
ŸIn the event of a burnback, where the flame burns back and ignites at the jet, immediately turn off
the gas supply by firstly closing the control valve on the gas cylinder or ,where the cylinder is
outside , the isolation valve and then the appliance burner valve. Wait 1 to 2 minutes and light the
affected burner in the normal manner. If the burnback re-occurs call a service technician to
examine the appliance and do not use it until it has been certified as safe to do so.
ŸKeep a minimum distance of 300mm between the cylinder and a stove of any type. See Fig. 1.
ŸDo not cover up or change the air holes in the mixing tube as this will affect the performance of
the product and may lead to an unstable flame.
ŸIf there is a leak on your appliance (smell of gas), check for a gas leak as indicated below.
ŸDo not try to detect leaks using a flame, use soapy water.
ŸIf used with a cylinder adjacent to the appliance the cylinder must stand on the floor.
ŸBefore testing for a leak firstly check that the regulator seal is in place and in good condition.
Replace if in doubt. Also check that the hose clamps on the regulator and the appliance are in
place and properly tightened. Examine the hose for signs of splitting or any other type of damage
or wear. Replace if in doubt.
ŸWhen satisfied that the above points are all in order then follow the steps below to check for a
leak
ŸThe hose and seal on the regulator must be checked for wear or damage before every use and
before connecting to the gas cylinder .
ŸEnsure that the gas cylinder is fitted or changed in a well-ventilated location, away from any
sources of ignition, such as naked flames and away from other people.
ŸConnect the cylinder to the appliance, open the cylinder valve and with the appliance valves in
the closed position, check for a gas leak as indicated below.
ŸTo check for a gas leak, brush all the connection joints with soapy water.
ŸIf a gas leak persists return the product to your gas dealer for inspection and/or repair.
ŸIn the event of a gas leak or smell of gas in the house or room in which the stove is installed, close
the isolation or emergency shut off valve and open all the door and windows to ventilate the area.
Do not use any device with a flame, or turn any electrical switch on or off until the area is clear of
gas and the leak has been fixed by a qualified technician.
ŸDo not modify the appliance. Do not use it as a heater
ŸDuring use, parts of the appliance will become hot. Avoid touching hot parts with bare hands.
The use of oven type gloves is recommended.
ŸIf bubbles form then there is a gas leak. Immediately turn off the gas supply firstly by closing the
control valve on the gas cylinder and then the appliance valve, check that all the connections are
properly tightened. Re-check with soapy water.
ŸKeep young children away from the appliance at all times.
ŸHot oil and fats are flammable, use them very carefully. In the event of a fire involving hot oil or
fats, turn all the control knobs to the off position and extinguish the flames by smothering them with a
See the Table below for solutions to common problems
7. Troubleshooting
8 Spares
Use only spares supplied by the distibutor or one of their recognised dealers.
Check if
Problem
Burners
do not
light
Yellow flame or
sooty bottoms
on the pots
Smell of
gas
The gas cylinder is empty
X
There is a kink in the gas hose
X
X
The burners are dirty or wet
X
X
The burners are correctly placed
X
X
The cylinder is nearly empty
X
All the control knobs are closed
X
The gas hose is damaged or pierced
X
The hose is not correctly clamped at the stove end
X
Airbrick
300 mm min.
Gap under the
door should be
at least 6 mm
Regulator
Flexible Hose
Fig. 1

45
ŸRemove all packing materials and protective film, where used
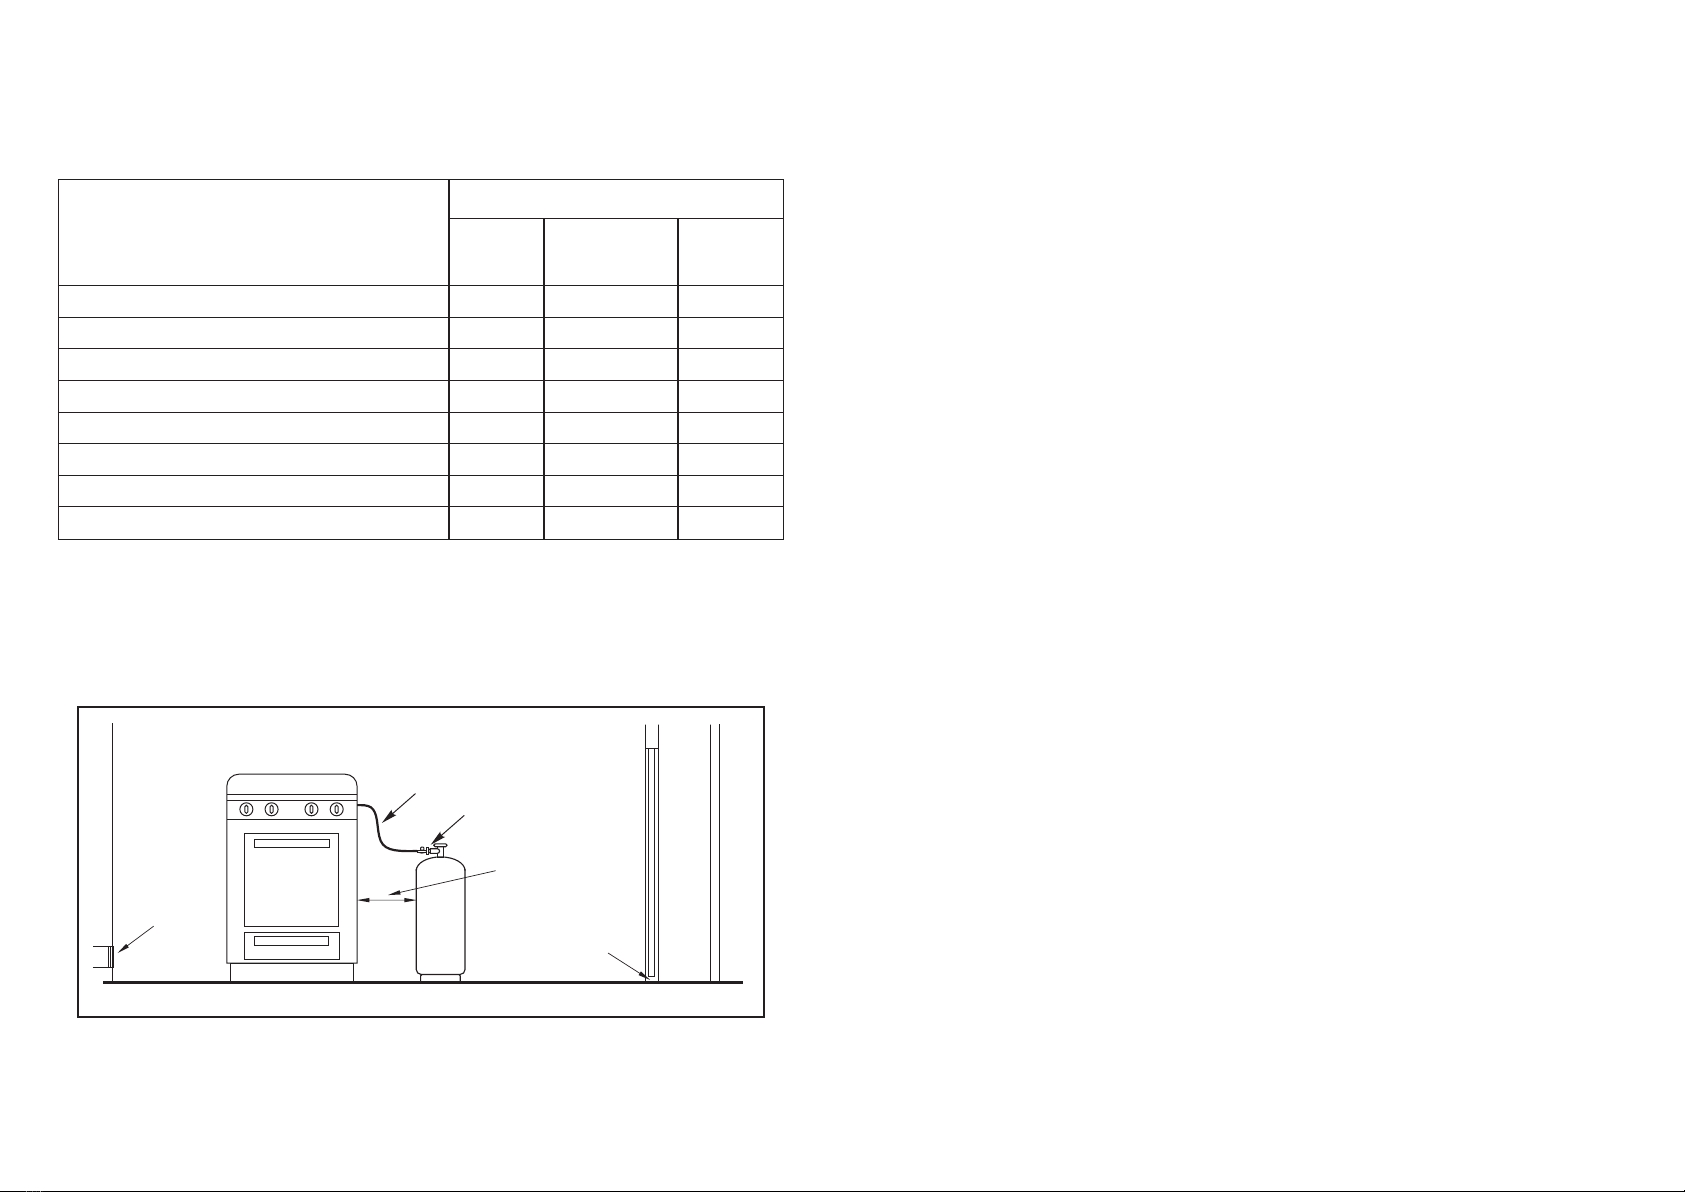
ŸMake sure that the area behind the stove is kept clear and that there are no flammable
materials above the stove. At the back of the stove is a flue for the oven burner and hot air
will rise from this area. It is best to keep the stove about 150 mm away from the wall.
ŸEnsure that the top burners and burner caps are correctly fitted into their specific locations
ŸCheck that the pot support grids are in place.
3. Preparing the appliance for use
pot lid or a wet towel. Never throw water onto the flames as this will not extinguish
them and may even cause the flames to spread.
ŸMake sure that flammable materials are not place closer than 500 mm to the stove.
ŸWhere the stove is placed adjacent to work tops or cupboards, keep a minimum clearance
of 50 mm between the sides of the stove and the work tops or cupboards.
ŸThis stove is equipped with battery powered semi automatic ignition.(see Fig 5) The battery is
housed in a recessed box at the back of the stove on the right hand side towards to bottom It is
protected by a removable cover plate. To fit or change the battery remove the cover plate. When
fitting or changing a battery ensure the battery is a Type D LR20 (1,5v). Once the battery, is fitted
remember to replace and secure the cover plate (see Fig 6).
ŸRepeat the above process to ignite the other burners as required.
ŸTurning the control knob in a clockwise direction from the mid position will again reduce the
flame level and it the knob is turn fully in a clockwise direction it will shut down the burner.
ŸTo adjust the flame to the required level, turn the burner control knob further in an anti clockwise
direction to reduce the flame. If turned to fully in this direction the flame will continue to burn at
the simmer position. Turning the control knob back to the mid position will give the maximum
flame level.
ŸThe flame height of the oven burner can be adjusted by turning in an anti clockwise direction to
ŸTo light the oven burner, open the oven door and with the light a match or hand held igniter torch.
Turn the Oven control knob to the high position (See Figs.2 & 5) and then place the lit match or
igniter torch to the hole in the centre front of the oven floor(see Fig. 6). This will ignite the oven
burner.
ŸTo light the cooker burners. Push in and turn the control knob of the burner you wish to light in an
anti clockwise direction to the mid position (see Figs. 2 & 3) and then press the ignitor button(See
Fig.2). This will create the ignitor spark to all burners at the same time but only the burner you
have activated will ignite. Once the burner is ignited, continue to hold the control knob in the
pushed in position for about 10 seconds to allow the flame failure sensor (see Fig.5) to recognise
that the burner is alight and then release the knob. The burner flame should remain lit. If it does
not, repeat the above process and hold the knob in for a few more seconds once the flame is lit.
ŸIf for any reason the ignition system does not function - e.g. in the case of a flat ignitor battery,
then hold a lit match or igniter torch to the selected burner with the control knob at the ignite
position and pushed in. The burner will then ignite.
ŸIt is not necessary or desired to put the lit match or igniter through the hole. All that is required is
to offer it up to the hole and that will ignite the oven burner.
ŸNote that each burner is fitted with a flame failure sensor which will shut off the gas supply if the
burner flame goes out (see Fig. 5). After lighting the burner hold the control knob in the pressed
in position for 5-10 seconds to allow the flame failure sensor to function correctly, If the fame
goes out when the knob is released, repeat the light procedure and hold the control knob in for a
few more seconds
4. Lighting the Burners
ŸTo clean the enameled and stainless steel surfaces of the appliance use a wet cloth or non
abrasive sponge and a mild soapy detergent. Abrasive cleaners and scourers should not be
used as this may permanently damage the surface.
ŸTo turn off the oven burner turn the oven control knob fully in a clockwise direction.
ŸThe pot support grids may be immersed in a soapy solution in order to clean them. Take note of
the locations for the pot supports to make sure they are firmly in place once refitted.
ŸWhen placing food in the oven, always place the food on the wire grid supplied with the stove.
Best results will be obtained with the grid in the middle position.
ŸWhen cooking using the top burner always use the burner that suits the pot size. For pots
smaller that 200 mm diameter use the medium burners. For larger pots use the large burner This
will ensure that you will achieve the best cooking efficiency. If the flame appears to extend up the
sides of the pot either place the pot on a smaller burner or reduce the flame height by adjusting
the required burner control knob.
ŸNever let water dry or evaporate on the cleaned surfaces as this may cause stains . It is best to
dry the cleaned surfaces immediately after cleaning.
ŸPre heat the oven for 10 minutes on a medium heat before placing any food in the oven.
ŸWhen cleaning the area around the burners never let water get into the burner ports as this may
prevent them from igniting or operating correctly.
ŸNever place any food or container on the oven floor.
ŸTo remove the burners from the stove top, firstly remove the pot support grids an place them to
one side. Lift off the burner caps from the burners and then lit out the burners from the stove top,
noting the relative positions of the medium and large burners.(See Figs. 2 & 3)
ŸIn the event that water does get into the burner ports, remove the burners from the stove and
shake them dry. Also blow through them to make sure that no water remains in the burners
before placing them back on the stove.
ŸWhilst it is acceptable to wash the burner caps in a soapy water solution it is best to simply wipe
the burners wit a damp cloth soaked in a detergent solution rather than to immerse them. Be
sure to make sure the burners and burner caps are dry before replacing them in their original
positions.
ŸClean the stove top and oven afer every use to prevent the build up of fat or food particles which if
left may be difficult to remove.
ŸAvoid opening the oven door during cooking as this will affect the cooking time. Examine the
food through the window in the oven door.
increase the flame and in a clockwise direction to decrease it.
ŸWhen using the oven, always open or close the oven door slowly to avoid air movement
which could affect the flame.
ŸFor details of the oven temperature settings refer to the Table and Fig. 7 below
6. Cleaning and Maintenance
5. Using the stove
ŸThere are no preset maintenance periods for this appliance but it is recommend that the stove
be examined by a qualified technician on and annual basis.. This will ensure continued effective
and safe operation of the appliance.
ŸBe careful when using proprietary oven cleaners as these may damage the oven surface. A
soapy detergent is the best option .
This manual suits for next models
1
Popular Stove manuals by other brands

Sierra Products
Sierra Products Pellet Stoves Specification sheet

RAIS
RAIS attika Q-BE INSERT user manual

Charnwood
Charnwood Island 1 Operating & installation instructions

SCAN
SCAN 5003 FR Assembly and instruction manual

Premier
Premier EF-0579E Instructlon manual

Continental Refrigerator
Continental Refrigerator CEFS22H-LOWC Installation and operation manual