T+A KW 650 User manual

Bestell-Nummer / Order No. 9103-0423
BETRIEBSANLEITUNG
USER MANUAL
KW 650
SUBWOOFER

2
Seite / Page
Deutsch ............................................................................................ 3
English ............................................................................................. 11
Anhang / Appendix:
Technische Daten / Technical specifications .......... 19

3
Willkommen.
Wir freuen uns, dass Sie sich für ein -Produkt entschieden haben. Durch Ihre Wahl
sind Sie Besitzer eines absolut hochwertigen Subwoofers geworden, die sich auf dem
neuesten technologischen Stand befindet.
Ständige Qualitätskontrollen während des Fertigungsprozesses und die ausschließliche
Verwendung hochwertigen Materials garantieren erstklassige Verarbeitung und Spitzen-
qualität.
Die Erzeugnisse unseres Hauses werden von qualifizierten und geschulten Fachkräften in
Handarbeit gefertigt und erst nach strengster Kontrolle freigegeben.
Zu Ihrer eigenen Sicherheit sollten Sie bitte unbedingt diese Betriebsanleitung
vollständig lesen und insbesondere die Aufstellungs-, Betriebs- und Sicherheitshinweise
genau befolgen.
Wir bedanken uns für Ihr Vertrauen und wünschen Ihnen viel Freude und Hörvergnügen
mit Ihrem Subwoofer KW 650.
elektroakustik GmbH & Co KG
Inhalt
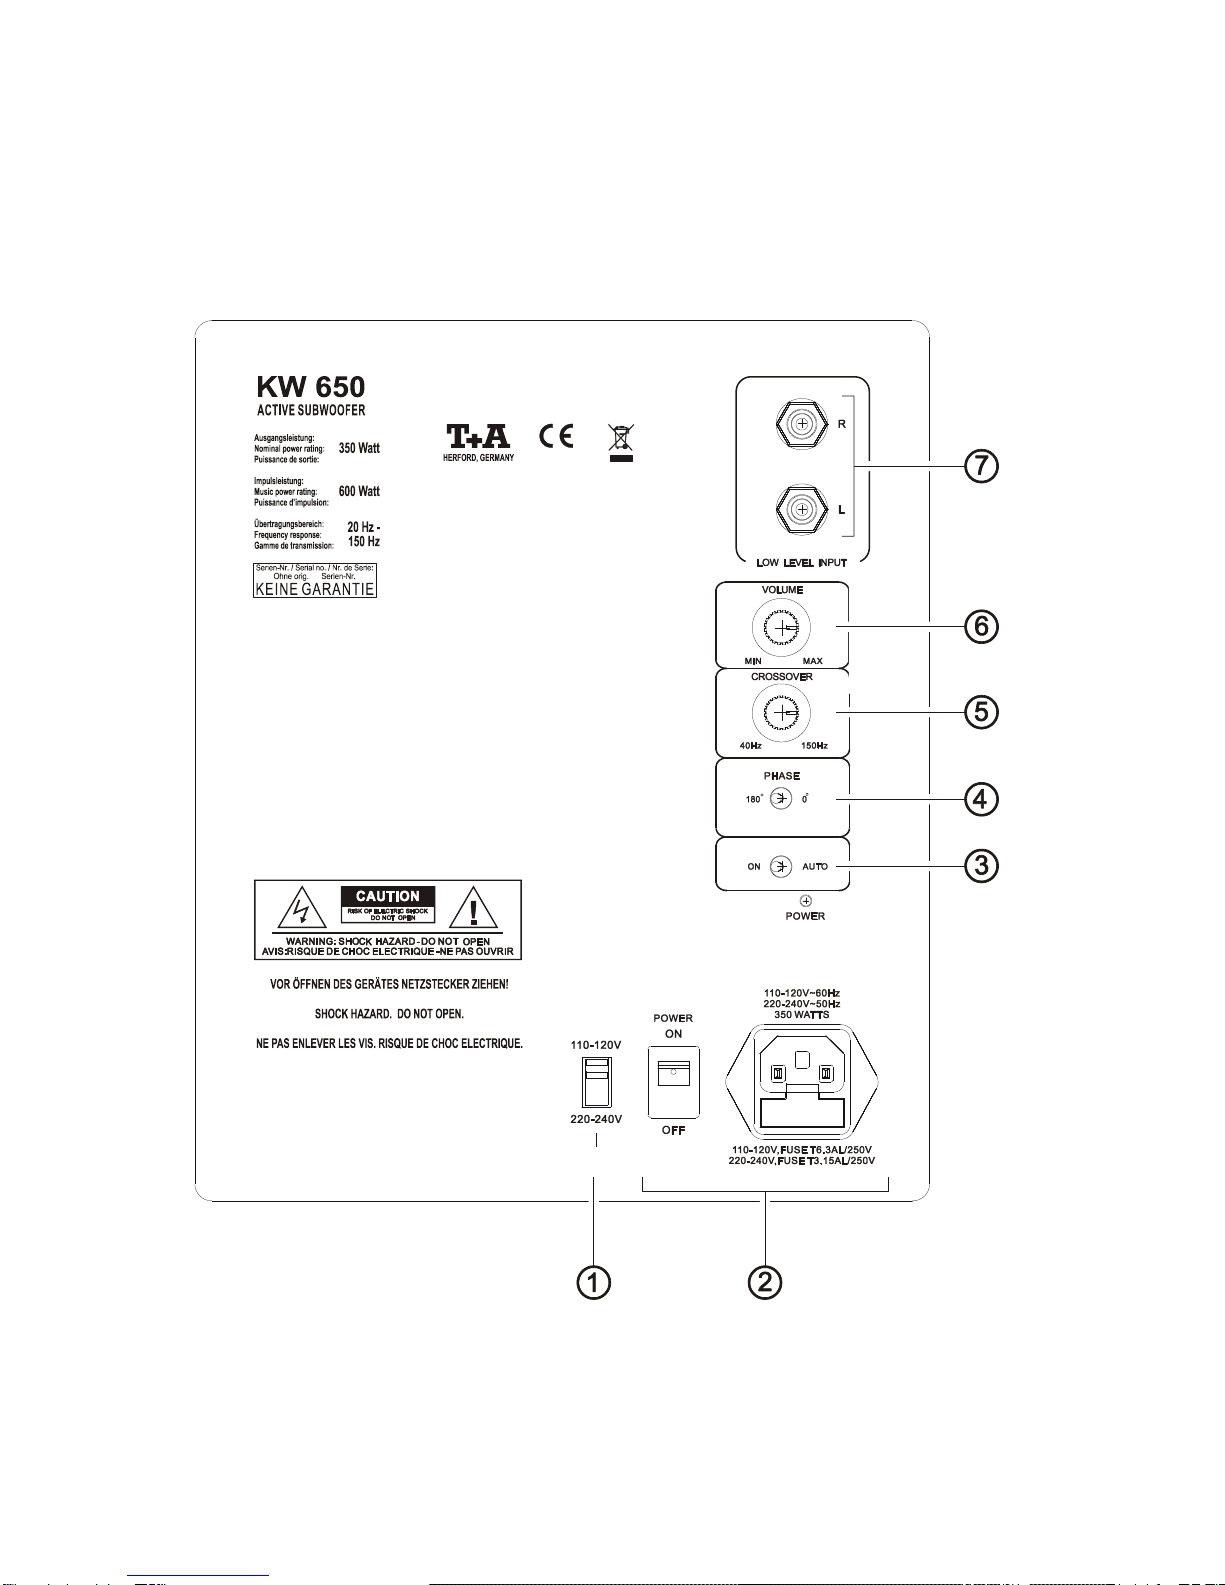
Bedienungs- und Anschlusselemente ......................................................... 4
Aufstellung und Inbetriebnahme
Auspacken ..................................................................................................... 7
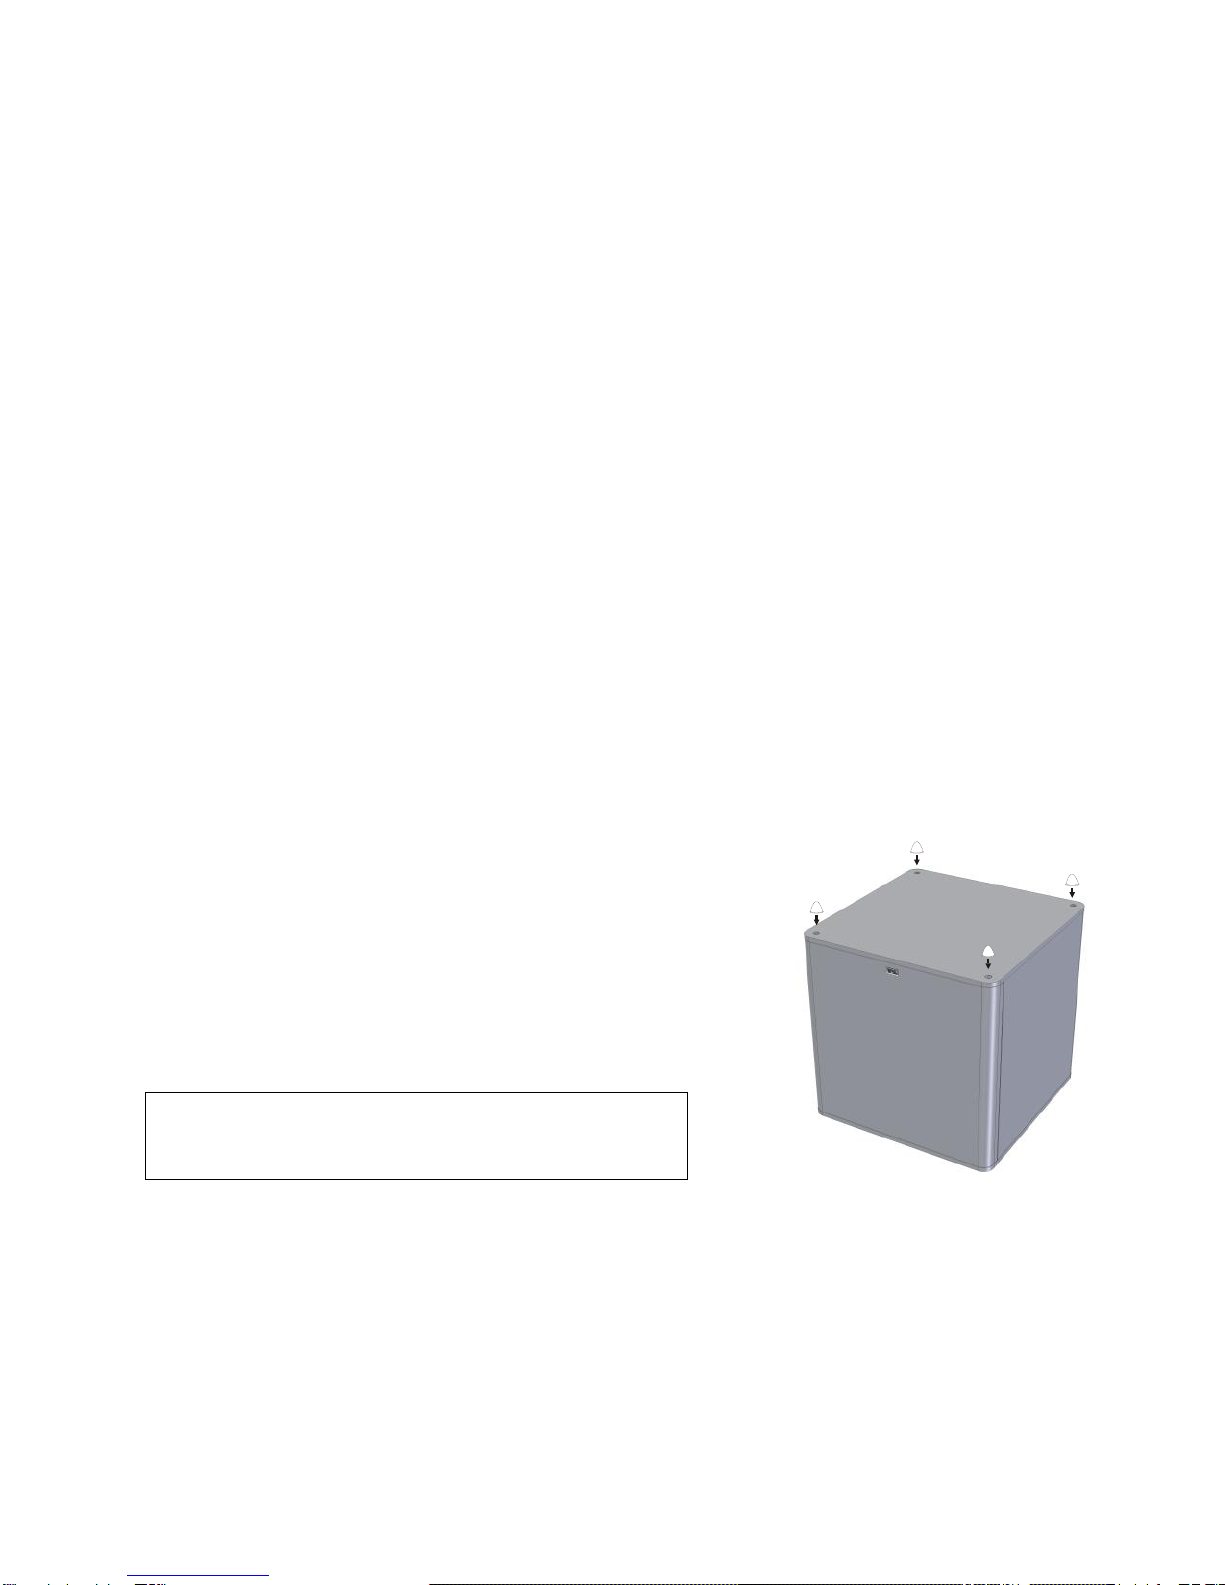
Montagehinweise ............................................................................................ 7
Aufstell-Position .............................................................................................. 7
Sicherheitshinweise ....................................................................................... 8
Anschluss-Varianten
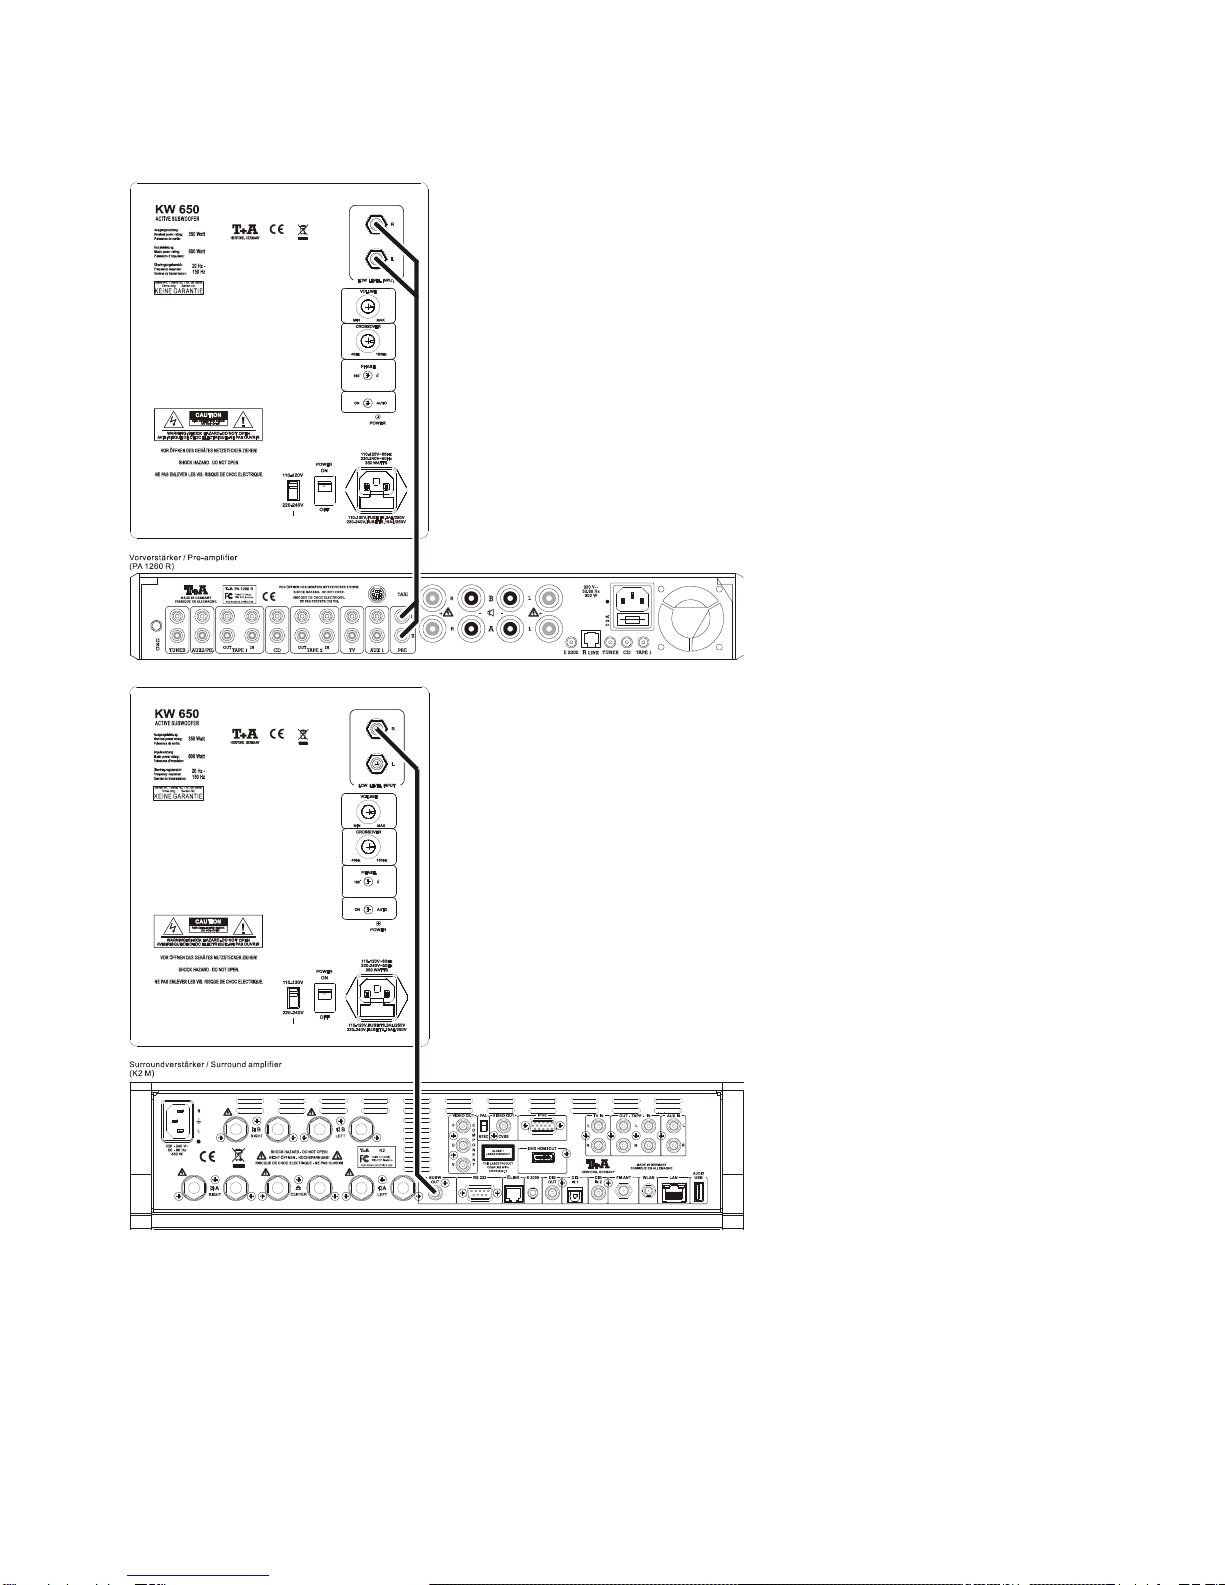
Anschluss des Subwoofers an einen Vor- oder Vollverstärker (PA 1260 R) ............ 10
Anschluss des Subwoofers an einen Surroundverstärker (K2 M) ........................... 10
Technische Daten .......................................................................................... 19

4
Bedienungs- und Anschlusselemente

5
NETZSPANNUNGSUMSCHALTER
Stellen Sie die für Ihr Land entsprechende Netzspannung ein.
AUTO –ON / Netzschalter
Die Schalter und bestimmen das Ein- und Ausschaltverhalten des Subwoofers:
POWER ON/OFF / NETZBUCHSE
Der Netzschalter arbeitet als Netztrenner. Er schaltet den Subwoofer dauerhaft aus. Bei
längerer Abwesenheit sollte der Netzschalter in jedem Fall ausgeschaltet, oder das
Netzkabel gezogen werden.
AUTO / ON
Durch diesen Schalter wird entweder die Einschaltautomatik des Subwoofers aktiviert
(Stellung 'AUTO') oder Dauerbetrieb gewählt (Stellung 'ON').
Stellung 'AUTO'
Die Einheit schaltet automatisch ein, sobald . . .
- ein Musiksignal anliegt. Die LED an der Rückseite leuchtet grün.
- ca. 20 Minuten nach Verstummen des Musiksignals schaltet der Subwoofer auto-
matisch in die Bereitschaftsstellung (Standby); –die LED an der Rückseite leuchtet
rot.
Stellung 'ON'
Befindet sich der Schalter in Stellung 'ON', so bleibt der Subwoofer dauerhaft
eingeschaltet, unabhängig vom Eingangs-Signal.
Hinweis:
Die Stellung 'ON' ist für den Betrieb an einer geschalteten Netzsteckdose geeignet.
PHASE ( 0° - 180°)
Mit dem PHASE-Schalter kann die Phasenlage des Ausgangssignals um 180°
gegenüber dem Eingangssignal gedreht werden.
Hinweise:
Je nach Aufstellung des Subwoofers kann es vorteilhaft sein, die Phasenlage zu
verändern. Die korrekte Einstellung ist so zu wählen, dass sich der günstigste
akustische Eindruck im Tief- Mitteltonbereich ergibt.

6
CROSSOVER
Mit diesem Regler kann die Trennfrequenz zwischen Subwoofer und
Satellitenlautsprechern eingestellt werden. Je größer die Satellitenlautsprecher, desto
tiefer sollte die Trennfrequenz eingestellt werden.
Um die Ortbarkeit des Subwoofers auszuschließen, wählen Sie die Trennfrequenz so
tief, wie es die Satellitenlautsprecher zulassen.
VOLUME
Mit diesem Regler kann die Verstärkung der Aktiveinheit geregelt werden. Benutzen Sie
diesen Regler, um die Basswiedergabe dem Pegel der Lautsprecher anzupassen.
LOW LEVEL INPUT
Um den Subwoofer mit einem Vorverstärker anzusteuern, verbinden Sie die Stereo-
Vorverstärkerausgänge mit diesen Eingangsbuchsen.
Diese Buchsen dienen auch zum Anschluss an den Subwooferausgang eines
Surround-Decoders. Falls am Surroundverstärker nur ein Subwoofer Ausgang zur
Verfügung steht, reicht es, diesen mit einem Eingang am Subwoofer (z. B. links) zu
verbinden, da beide Eingänge gleichwertig sind.

7
Aufstellung und Inbetriebnahme
Auspacken
Bitte packen Sie den Subwoofer KW 650 und das Zubehör vorsichtig aus. Zum
Lieferumfang gehören die folgenden Einzelteile:
KW 650
1 Netzkabel
4 selbstklebende Gerätefüße
1 Betriebsanleitung
1 Garantieunterlagen
Heben Sie die Originalverpackung zusammengefaltet auf. Der Karton und das
Verpackungsmaterial sind speziell für diese Boxen konzipiert. Sie stellen einen sicheren
Behälter für spätere Transporte dar und erhalten den Wiederverkaufswert des
Lautsprechers.
Falls Sie die Verpackung nicht mehr benötigen, geben Sie diese Ihrem Händler zurück,
um eine fachgerechte Entsorgung zu gewährleisten.
Montagehinweise
Zur Montage der Gerätefüße stellen Sie den
Subwoofer kopfüber auf eine nicht kratzende
Unterlage.
Kleben Sie die Füße in die Ecken der Unterseite
des Subwoofers.
Hinweis:
Der Subwoofer wird mit einem festen, nicht
abnehmbarem Abdeckgitter ausgeliefert
Aufstell-Position
Der Subwoofer sollte nach Möglichkeit an der gleichen Raumseite aufgestellt werden
wie die Satellitenlautsprecher.
Die günstigste Platzierung für den Subwoofer ist in der Regel auf dem Fußboden in
Wandnähe.

8
Sicherheitshinweise
Bitte lesen Sie die Bedienungsanleitung vor Gebrauch des Subwoofers sorgfältig durch.
Befolgen Sie unbedingt die folgenden Sicherheitsvorschriften!
1. Der Subwoofer darf nur in trockenen Räumen betrieben werden. Es ist darauf zu
achten, dass er für kleine Kinder unerreichbar ist.
2. Schützen Sie den Subwoofer vor Tropf- und Spritzwasser und stellen Sie keine
Blumenvasen oder andere Gefäße mit Flüssigkeiten auf das Gerät.
3. Es dürfen keine Flüssigkeiten oder Fremdkörper in den Subwoofer gelangen. Sollte
dennoch eine Flüssigkeit oder ein Fremdkörper eingedrungen sein, ziehen Sie sofort
den Netzstecker und lassen das Gerät in einer autorisierten Fachwerkstatt
überprüfen!
4. Wie alle Elektrogeräte, so sollte auch dieser Subwoofer nicht unbeaufsichtigt
betrieben werden.
5. Bei längerer Nichtbenutzung sollte der Netzstecker des Subwoofers aus der
Steckdose gezogen werden.
6. War der Subwoofer größerer Kälte ausgesetzt (z. B. beim Transport), so ist mit der
Inbetriebnahme zu warten, bis es sich auf Raumtemperatur aufgewärmt hat und das
Kondenswasser restlos verdunstet ist.
7. Beim Aufstellen ist darauf zu achten, dass die Kühlluftzufuhr zum Kühlkörper
(Rückseite des Subwoofers) nicht behindert wird.
Ein Wärmestau beeinträchtigt die Lebensdauer des Subwoofers und ist eine
Gefahrenquelle!
8. Die erforderliche Stromversorgung ist dem Aufdruck am Bedien- und Anschlussfeld
zu entnehmen.
An andere Stromversorgungen darf der Subwoofer nicht angeschlossen
werden!
9. Das Netzkabel muss so verlegt werden, dass keine Gefahr der Beschädigung (z. B.
durch Trittbelastung oder durch Möbelstücke) besteht. Besondere Vorsicht ist dabei
an den Steckern, Verteilern und an den Anschlussstellen des Subwoofers geboten.
Auf den Netzstecker darf keine übermäßige Krafteinwirkung ausgeübt werden!

9
10.Der Subwoofer ist so aufzustellen, dass eine Berührung sämtlicher
Geräteanschlüsse (insbesondere durch Kinder) ausgeschlossen ist.
11.Außer den in der Bedienungsanleitung beschriebenen Handgriffen sollten vom
Benutzer keinerlei Arbeiten am Subwoofer vorgenommen werden.
12.Der Subwoofer darf nur vom qualifizierten Fachmann geöffnet werden. Reparaturen
und das Auswechseln von Sicherungen sind von einer autorisierten
Fachwerkstatt durchzuführen.
13.Bei Beschädigungen oder bei Verdacht auf eine nicht ordnungsgemäße Funktion
des Subwoofers sollte sofort der Netzstecker gezogen, und das Gerät zur
Überprüfung in eine autorisierte Fachwerkstatt gegeben werden.
14.Pflege des Subwoofers.
Vor Reinigungsarbeiten am Subwoofer ist der Netzstecker zu ziehen!
Verwenden Sie keine scharfen Reinigungs- oder Lösungsmittel!
Vor der Wiederinbetriebnahme muss sichergestellt sein, dass keine
Kurzschlüsse an den Anschlussstellen bestehen und dass alle Anschlüsse
ordnungsgemäß sind.

10
Anschluss-Varianten
Anschluss des
Subwoofers an einen Vor-
oder Vollverstärker mit
Vorverstärkerausgängen
Anschluss des
Subwoofers an einen
Surroundverstärker
Die LOW LEVEL INPUT-Buchsen des Subwoofers werden mit Cinchkabeln an die
Ausgangsbuchsen des Vorverstärkers angeschlossen.
Die interne Frequenzweiche des Subwoofers lenkt die tieffrequenten Signalanteile zum
Subwoofer.
Betrieb ohne Steuerspannung:
Die Einschaltautomatik wird durch das Vorverstärkersignal ausgelöst.

11
Welcome.
We are delighted that you have selected a product. You are now the owner of a
sub-woofer of the highest possible quality, which reflects the very latest state of technology.
Constant quality checking during the manufacturing process, and the exclusive use of
high-quality materials, guarantees that the quality of our products is consistently of the
highest level.
The products manufactured by our company are hand-made by highly trained and qualified
staff, and are only released for sale after passing the strictest quality control tests.
In the interests of your own safety please be sure to read right through these operating
instructions. It is particularly important to observe our recommendations regarding setting
up, operating, and safety measures.
Please accept our thanks for your faith in us; we wish you many hours of pleasure with
your KW 650 sub-woofer.
elektroakustik GmbH & Co KG
Contents
Controls and connections ............................................................................ 12
Setting up, using the speaker for the first time
Unpacking ..................................................................................................... 15
Assembly notes ............................................................................................. 15
Set-up position .............................................................................................. 15
Safety notes .................................................................................................... 16
FCC Information to the user ......................................................................... 17
Wiring variants
Connecting the sub-woofer to a pre- or integrated amplifier (PA 1260 R) ............... 18
Connecting the sub-woofer to a surround amplifier (K2 M) .................................... 18
Specification ................................................................................................... 19

12
Controls and connections

13
SELECTOR FOR MAIN POWER
Set the mains voltage to the appropriate voltage for your country.
AUTO –ON / mains switch
Switches and determine the sub-woofer's behaviour when switched on and off:
MAINS SWITCH / MAINS SOCKET
The mains switch acts as a mains isolation switch, i.e. it switches the sub-woofer off
permanently. If you will not be using the speaker for a long period, the mains switch
should always be switched off, or the mains lead disconnected.
AUTO / ON
This switch either activates the sub-woofer's automatic power-on circuit ('AUTO' setting)
or switches it on permanently ('ON' setting).
'AUTO' setting
The speaker switches on automatically as soon as:
- a musical signal is present. The LED on the back panel glows green.
- About twenty minutes after the last music signal the sub-woofer automatically
switches to stand-by mode (Standby); –the LED on the back panel glows red.
'ON' setting
If the switch is set to the 'ON' position, the sub-woofer remains switched on
permanently, regardless of the input signal.
Note:
The 'ON' setting is suitable for use with a switched mains power supply socket.
PHASE ( 0° - 180°)
The PHASE switch can be used to invert the phase of the output signal, i.e. turn it
through 180° compared to the input signal.
Notes:
It may be advantageous to change the phase, depending on the position of the sub-
woofer. We suggest that you adjust the settings until you obtain the most pleasing
subjective impression in the bass / mid-range area.

14
CROSSOVER
This adjustor is used to adjust the separation frequency between sub-woofer and
satellite loudspeakers. The larger the satellite speakers, the lower the separation
frequency that should be set.
Set the separation frequency to the lowest point commensurate with the frequency
response of the satellite speakers, otherwise the physical location of the sub-woofer
may become apparent when listening.
VOLUME
This adjustor is used to regulate the amplification of the active unit. Use this adjustor to
match the bass output level to your loudspeakers.
LOW LEVEL INPUT
If you wish to operate your sub-woofer with a pre-amplifier, connect the stereo pre-
amplifier outputs to these input sockets.
These sockets can also be used to connect the unit to the sub-woofer output of a
surround decoder. If the surround amplifier only provides one sub-woofer output, it
sufficient to connect this to one of the sub-woofer’s inputs (e.g. left), as both inputs are
identical.

15
Setting up, using the speaker for the first time
Unpacking
Please unpack your KW 650 sub-woofer and accessories carefully. The carton contains
the following components:
KW 650
1 Mains lead
4 Self-adhesive Speaker feet
1 Operating instructions
1 Guarantee documents
Fold up the original packaging and store it in a safe place. The carton and packing
pieces are specially designed for these speakers. They form a secure container if you
ever need to transport the sub-woofer, and help to maintain the speaker's value if you
ever wish to sell it.
If you do not want to keep the packaging materials, kindly return them to your dealer
who will dispose of them in the proper way.
Assembly notes
To fit the speaker feet invert the sub-woofer and
lay it on a non-scratching surface.
Stick the feet in the corners of the underside of
the sub-woofer.
Note:
The sub-woofer is supplied with a fixed, non-
detachable cover grille.
Set-up position
Wherever possible the sub-woofer should be positioned on the same side of the room
as the satellite loud-speakers.
In most cases the most favourable position for the sub-woofer is on the floor close to a
wall.

16
Safety notes
For your own safety please be sure to read right through these operating instructions
before you use the sub-woofer. It is especially important to observe the following safety
notes.
1. The sub-woofer may only be operated in a dry indoor room. Ensure that it is kept out
of the reach of children.
2. Protect the sub-woofer from drips or splashes of water. Never place flower vases or
other vessels containing fluids on top of the case.
3. Do not allow any liquid or foreign bodies to enter the sub-woofer. If any liquid or
foreign body should penetrate the cabinet despite your best efforts, disconnect the
mains plug at the wall socket immediately, and have the unit checked by an
authorised service workshop.
4. This sub-woofer should never be operated without proper supervision. This applies
to all electrical equipment.
5. If the sub-woofer is not to be used for a long period, we recommend that you isolate
it from the mains by pulling out the plug at the wall socket.
6. If the sub-woofer gets very cold (e.g. when being transported) condensation may
form inside it. Please do not switch it on until it has had plenty of time to warm up to
room temperature, so that any condensation evaporates completely.
7. When setting up the speaker, ensure that there is an unhindered flow of cooling air
to the heat-sink (rear face of the sub-woofer).
Any heat build-up will shorten the life of the sub-woofer, and could be a
source of danger!
8. The power supply required for this equipment is printed on the control panel /
terminal plate.
The sub-woofer must never be connected to any other form of power
supply.
9. The mains lead must be deployed in such a way that there is no danger of damage
from furniture, or people treading on it. Take particular care with plugs, distribution
panels and the connections on the sub-woofer. Never exert undue force on the
mains plug.

17
10.The sub-woofer must be set up in such a way that there is no chance of anyone -
especially children - touching the back panel connections.
11.With the exception of the connections and procedures described in these
instructions, no work of any kind may be carried out on the sub-woofer by the user.
12.The sub-woofer should only ever be opened by a qualified technician. Repairs and
fuse replacements should be entrusted to an authorised specialist
13.If the sub-woofer is damaged, or if you suspect that it is not functioning correctly,
immediately disconnect the mains plug at the wall socket and ask an authorised
specialist workshop to check it.
14.Care of the sub-woofer.
Always disconnect the system from the mains supply before cleaning it.
Never use abrasive or solvent-based cleaning agents.
Before switching the unit on again, check carefully that no short-circuits exist at
the terminals, and that you have not disturbed any connections.
FCC Information to the
user
(for use in the United States of America only)
Class B digital device –instructions:
Note: This equipment has been tested and found to comply with the limits for a Class B
digital device, pursuant to Part 15 of the FCC Rules. These limits are designed to
provide reasonable protection against harmful interference in a residential installation.
This equipment generates, uses and can radiate radio frequency energy and, if not
installed and used in accordance with the instructions, may cause harmful interference
to radio communications. However, there is no guarantee that interference will not occur
in a particular installation. If this equipment does cause harmful interference to radio or
television reception, which can be determined by turning the equipment off and on, the
user is encouraged to try to correct the interference by one or more of the following
measures:
- Reorient or relocate the receiving antenna.
- Increase the separation between the equipment and receiver.
- Connect the equipment into an outlet on a circuit different form that to which the
receiver is connected.
- Consult the dealer or an experienced radio/TV technician for help.

18
Wiring variants
Connecting the sub-woofer
to a pre-amplifier or
integrated amplifier with
pre-amplifier outputs
Connecting the sub-woofer
to a surround amplifier
The LOW LEVEL INPUT sockets on the sub-woofer are connected to the output
sockets of the pre-amplifier using Cinch leads.
The speaker's internal crossover passes the low-frequency part of the signal to the sub-
woofer.
Use without control voltage:
The automatic power-on circuit is triggered by the pre-amplifier signal.

19
Technische Daten / Specification
Aktiver Subwoofer / Active sub-woofer
Geschlossenes Gehäuse / sealed cabinet
LOW LEVEL INPUT
400 mV . . . 4 Veff
Ausgangsleistung / Output power
350 W /4
Impulsleistung / Peak output
600 W /4
Übertragungsbereich / Transmission range
20 –150 Hz
Bestückung Tiefton / Bass drive unit
1 x 220 mm
Trennfrequenz / Crossover frequencies
40 –150 Hz
Abschaltzeit im Auto-Modus / Power-off time in auto-
mode
ca. 15 Minuten / approx.
15 minutes
Leistungsaufnahme / Power
consumption
max.
400 W
Standby / stand-by
0,7 W
Ausstattung / Features
Einschaltautomatik / Automatic power-on circuit
Phasen-Umkehr / Phase reverse
Verstärkungsregelung / Regulated amplification
Aktive Frequenzweiche mit variabler Trennfrequenz /
Active crossover with variable cut-offfrequency
Aussteuerung durch Vorverstärker /
Full output with pre-amplifier
Schutzschaltung gegen Überhitzung und Überlastung /
Protective circuit to guard against overheating and
overload
Anti Clipping Regelung / Anti clipping control
Zubehör / Accessories
1 Netzkabel / Mains lead
4 selbstklebende Gerätefüße / Self-adhesive Speaker feet
1 Betriebsanleitung / Operating instructions
1 Garantieunterlagen / guarantee documents
Technische Änderungen vorbehalten. / Technical modifications reserved.

elektroakustik GmbH & Co. KG
Herford
Deutschland * Germany
Table of contents
Languages:
Other T+A Subwoofer manuals
Popular Subwoofer manuals by other brands

Klipsch
Klipsch Synergy SUB-10 owner's manual

Nexo
Nexo RS18 user manual

Bowers & Wilkins
Bowers & Wilkins DB1D quick start guide

Hybrid Audio Technologies
Hybrid Audio Technologies Imagine-Series Installation manual & user's reference

Mordaunt Short
Mordaunt Short Aviano 7 installation guide

Precision Power
Precision Power POWERCLASS PC10 owner's manual