Trac Vac 854 Product guide

3/12/2020
Model 854/856
Operating and
Assembly Manual
Midwest Equipment Mfg.
5225 Serum Plant Road
Thorntown, IN 46071

1
SAFETY RULES
Remember, any power equipment can cause injury if operated improperly or if the user does not understand
how to operate the equipment. Exercise caution at all times when using power equipment.
This symbol means Attention!!!!! It is used to point out safety precautions.
▪ Read and follow all instructions in this manual before assembly or operation of this equipment.
Failure to comply with these instructions may result in personal injury. Keep this manual for
future reference and for ordering replacement parts.
▪Read this instruction manual carefully. Become familiar with the controls and proper use of this
equipment.
▪Read the engine owners manual and safe operation rules before using this equipment.
▪Never allow children less than 16 years of age to operate the Trac-Vac. Children 16 years
and older should operate only under close parental supervision.
▪Do not allow anyone to operate this equipment without proper instruction.
▪Do not allow passengers to ride on the Trac-Vac or on the towing vehicle.
▪Keep children and pets out of area of operation.
▪Check fuel before starting engine. Do Not fill fuel tank indoors, or while engine is running or hot.
Wipe off any spilled fuel before starting engine.
▪Engine and muffler get HOT! Do Not touch! Keep debris from accumulating on or around engine
and muffler to avoid fire hazard.
▪Allow engine to cool before storing in any enclosed area. Never store Trac-Vac with fuel in tank.
▪Do not operate engine if air cleaner or cover is removed, except for adjustments. Removal of the
part could create a fire hazard.
▪Keep hands, feet, face, long hair and clothing out of inlet and discharge areas. There are
ROTATING BLADES inside these openings.
▪Make certain that all moving parts come to a complete stop before cleaning, repairing or inspection.
Disconnect spark plug wire and keep away from plug to prevent accidental starting.
▪If Trac-Vac should become clogged with debris, SHUT OFF ALL ENGINES and wait until
impeller comes to a complete stop before attempting to remove obstruction. Disconnect spark plug
wire to prevent accidental starting.
▪If excessive vibration occurs while operating your Trac-Vac, stop the engine immediately,
disconnect the spark plug wire and allow all moving parts to stop completely before taking the
following steps.
A. Inspect for damage.
B. Repair or replace any damaged parts.
C. Check for loose parts and tighten to assure continued safe operation.
▪Check all hardware periodically to insure safe operation.
▪Check cart cover periodically for wear and replace if worn or damaged.
▪Never operate Trac-Vac without intake hose and exhaust hose attached in proper place.
▪Do Not remove exhaust hose or attempt to empty contents of container while engine in running.
▪Keep all shields and guards in place and securely attached.
▪Always wear eye protection (safety glasses or goggles) when operating this equipment.
▪Do Not stand behind unit in exhaust discharge area while engine is running.
▪Do Not operate this equipment while intoxicated or while taking medications that could impair
reactions or senses.
▪Operate this equipment at reduced ground speed on rough terrain, along creeks and ditches and on
slopes to prevent tipping or loss of control.
▪Vehicle stability and braking are affected by the addition of this unit. Do not fill the Trac-Vac to its
full capacity without checking the capability of the towing vehicle to safely pull and stop with the
unit attached.
▪Do Not operate on slopes in excess of 10 degrees. STAY OFF OF STEEP SLOPES!
▪Follow the maintenance instructions outlined in this manual.
2
General Instructions
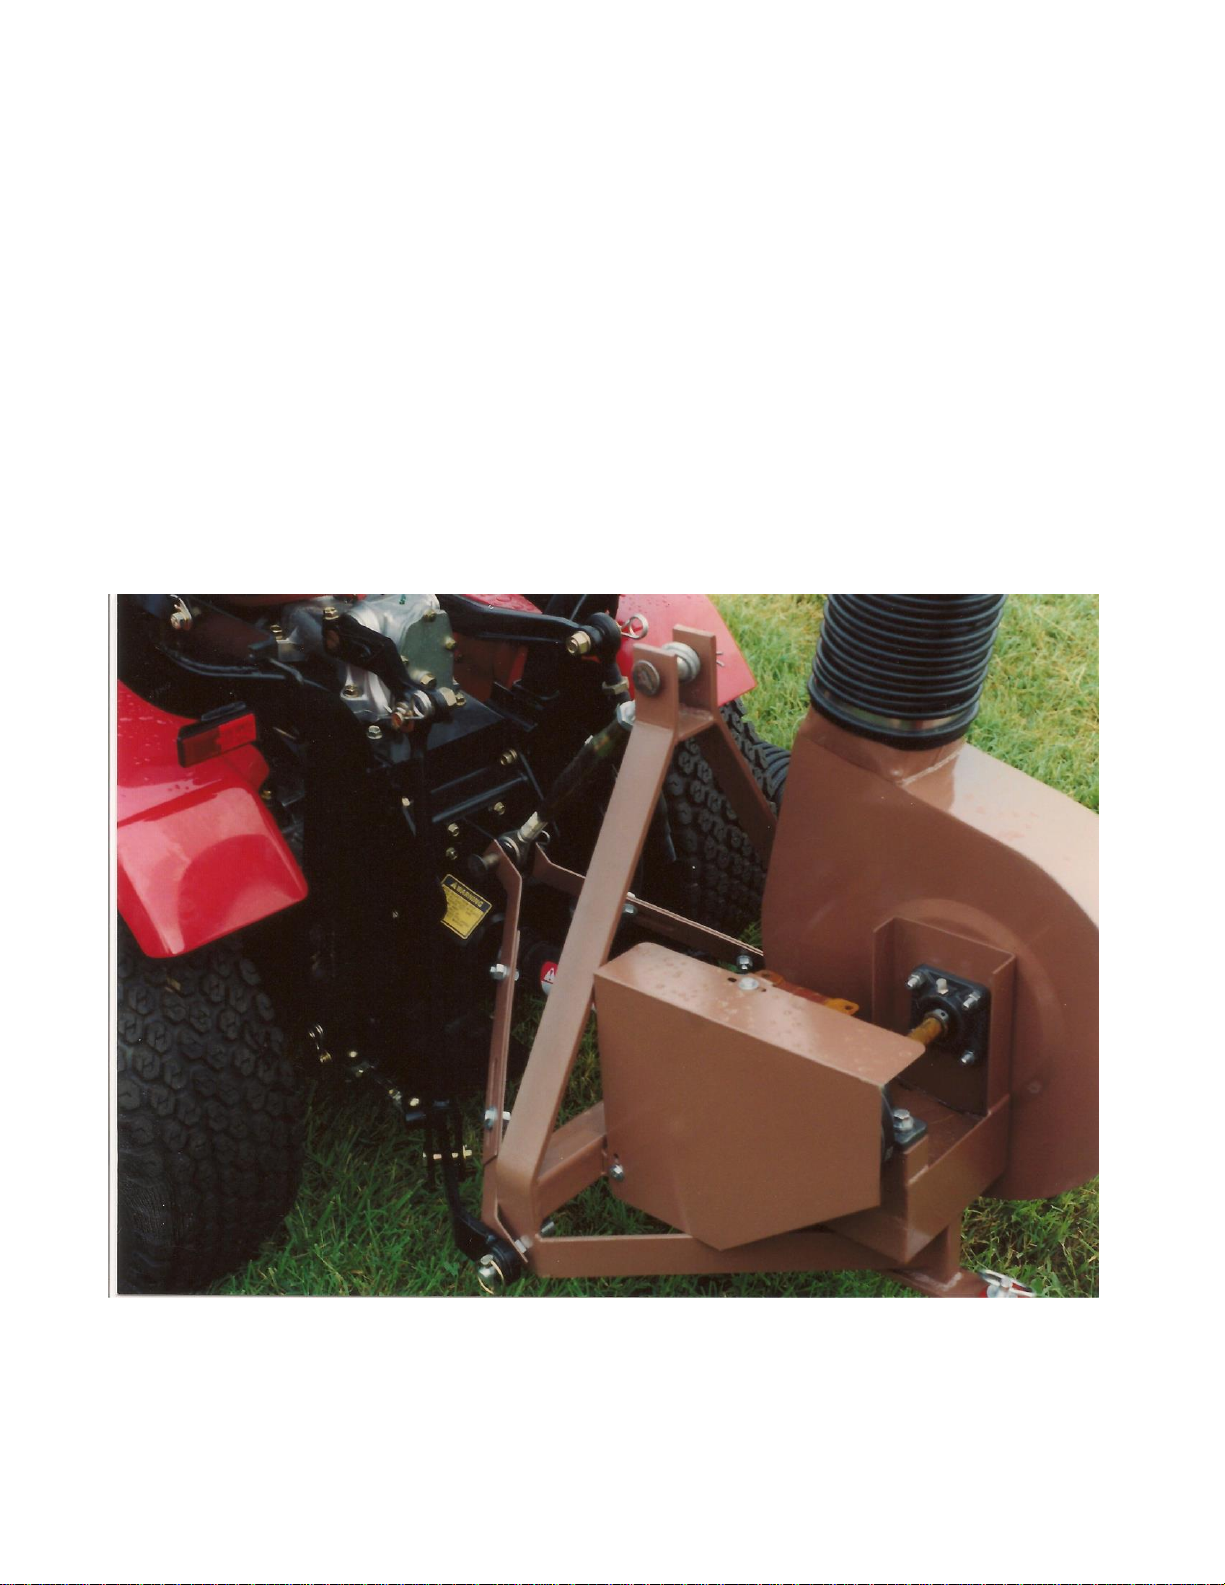
Your Model 854/856 Trac-Vac is designed to mount directly
to the 3 point attachment on your lawn and garden tractor. A
lift kit must be installed before mounting a vacuum attachment
on the 3-point draw arms.
3
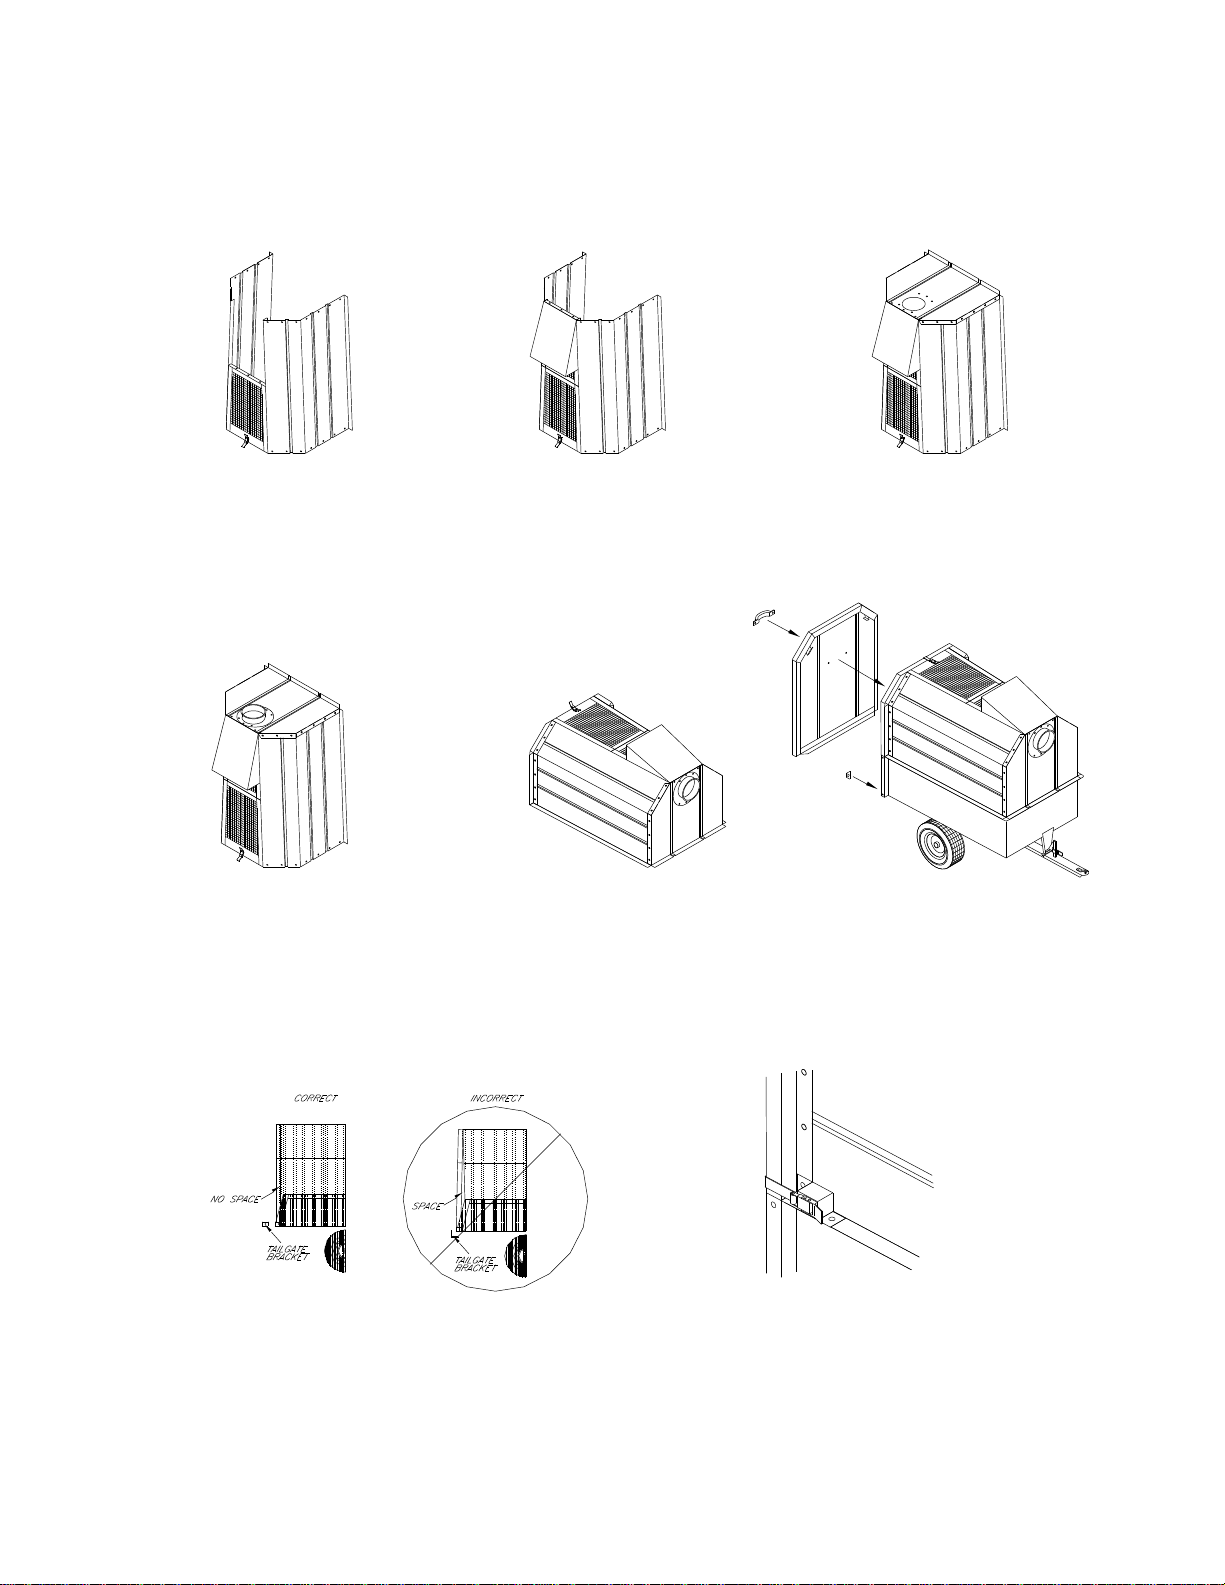
P lace side panels on end w ith decal
outw ard an d ab out a fo ot apart at
to p. Place screen w ith latch, ( rear
screen ), on end b etw een sid es w ith
latch ou tw a rd an d to th e floor.
A ttach to sid es w ith 1 /4 x 1/2 bolts.
P la ce sc re en w ith ou t la tc h, (fro n t
screen ), on top of rear sc reen an d
betw een sides. Secure to rear
screen w ith 1/4 x 1/2 b olts. Slip
deflecto r be tw een sid es and fro nt
screen w ith ta pered end up .
S ec ure w ith 1 /4 x 1/2 bolts.
P la ce fro nt o n s id es w ith f lan g es o n
o utsid e . S ta rt co rn er b olts in s id es
an d screen b efo re tig htening. Start
bolts at top & botto m o f sid e p anels
an d w ork y our w ay tow ard center,
w ith truss h ead, ro und , to th e o utside.
P lace cov er flat on floor and atta ch ang les
to side pan els a t rear o f co ver w ith an gles
on th e outside of co ver. Secu re w ith 1 /4 x
1/2 bolts. Start at the top and sec ond h ole
from th e b ottom , (latch u ses b ottom hole),
th en w o rk tow a rds the center o f the pane ls.
B o lts truss, (ro und ), h ead sh ould be to the
in side o f ca rt.
A ttach h an dle to tailg ate on sm ooth
side. P lace cov er o n cart. M ake sure
th e tw o low e r black ang le b rac kets
have be en in stalled o n the low e r rear
of the cart. F it tailgate to the cove r
usin g th e to p la tc h an d lo w er brackets
only.
P lace latch on each sid e of cart w ith
to ngu e of latch to rear. A ttach to
side panel and cart w ith 1 /4 x 1 /2 b olts.
P lace co nne cto r, (packed in w ith vac),
on ou tside of front w ith th e lip to the
outside. A ttach w ith 1/4 x 1 /2 b olts.
M o del 280 C art C over A ssem bly Instructions
G ently m ov e cove r to the rear to insure
co ntac t b etw een th e tailgate and c over,
(alo ng entire contactin g su rface). C enter
1/4 x 1/2 bolts.
drill 9/3 2" h oles. A ttach co ver w ith
front on cart. M ark h ole lo cations, a nd
N O T E : D o not tighten any bo lts until the end of con stru ction.
T ig hten a ll h ard w a re.

4
2
3
4
22
20
19
18
M o del 85 6 T rac-V a c P arts L ist
3-31-15
22
22
1
13
15
29
28
27
22
25 26
30
12
7
5
11
810
24
24
16
17
6
T O T R A C T O R
21
23
9
14
D raw bar K it
Part N o. 1062 0
31
34
32
34

5
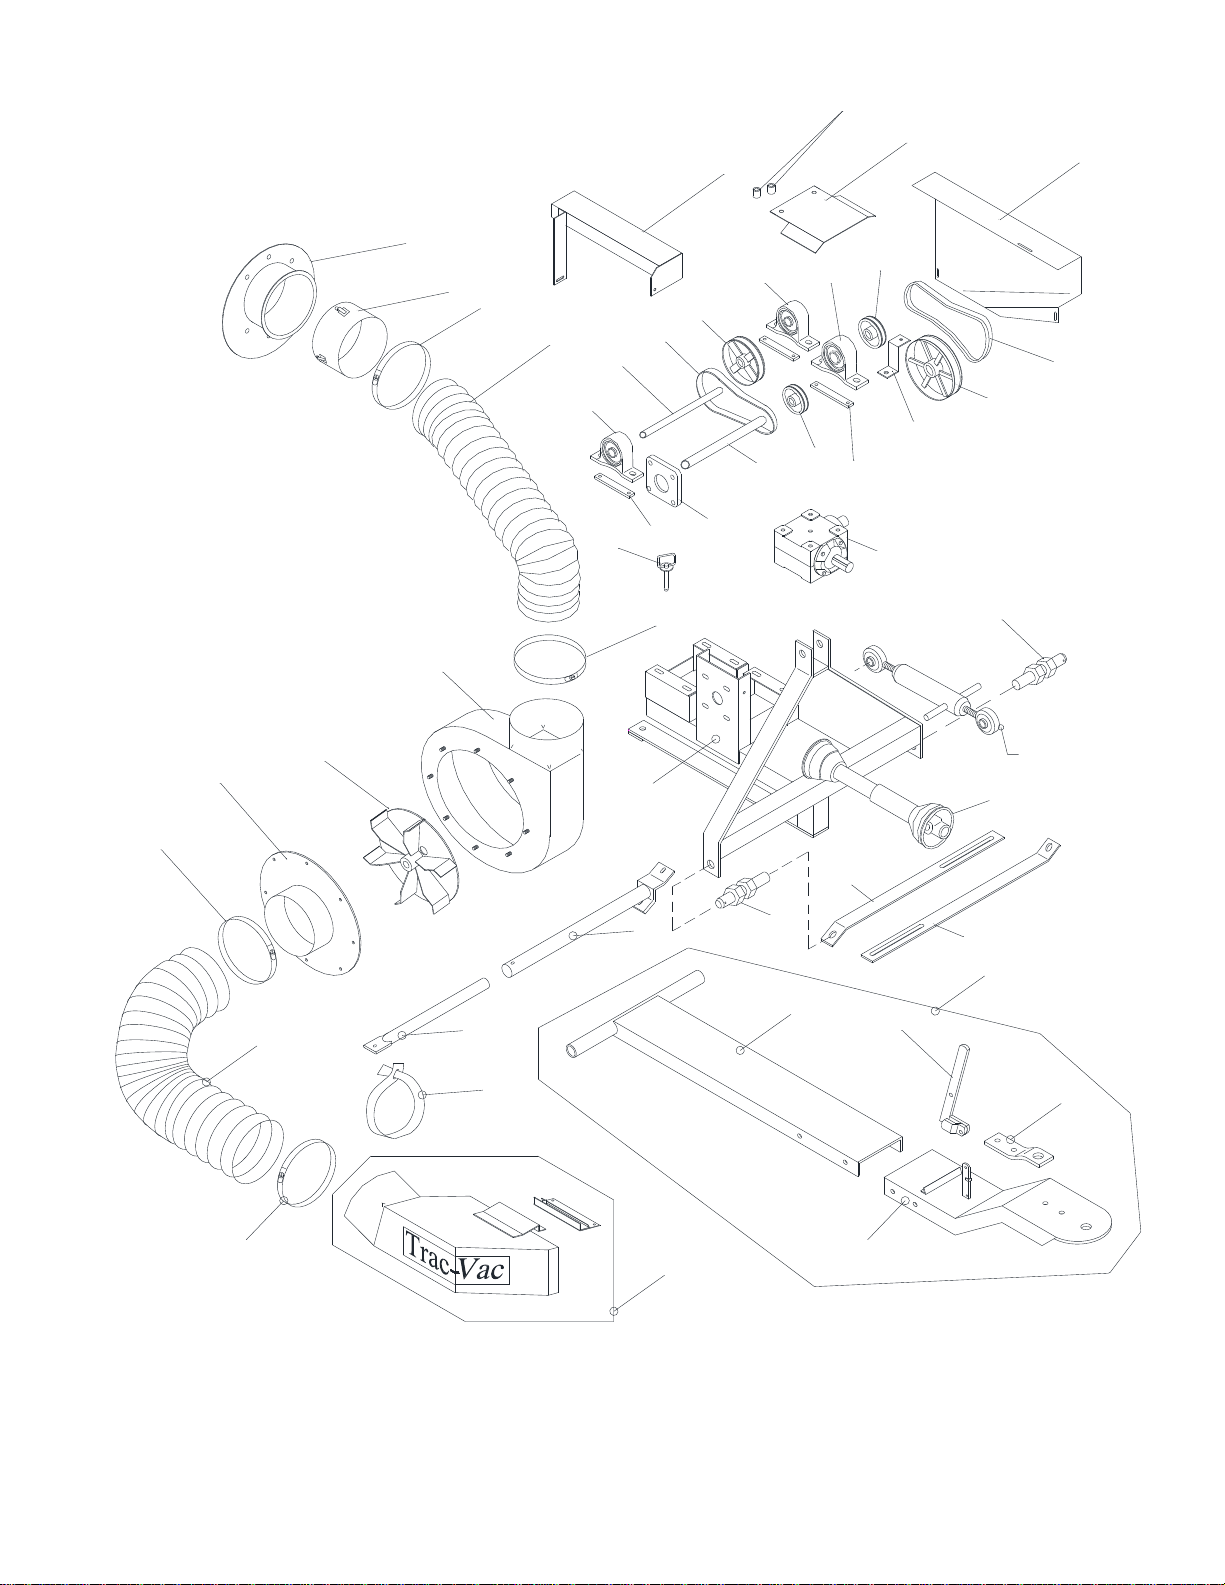
Model 856 Trac-Vac Parts List
Key Part No. Description Qty.
1 85012 Frame, 856 1
2 18030 Turbine Housing, RH 1
3 86040 Turbine 1
4 18050 8" Inlet 1
5 85001 Gearbox 1
6 85002 PTO Shaft 1
7 85014 Pulley, AK74 x 1" 1
8 85029 Bearing, 1” Pillow Block 2
9 85028 Bearing, 1" Flange 1
10 85027 Pulley, 8400 x 1" 1
11 85025 Shaft 1
12 85017 Belt, AX28 1
13 85201 Belt Guard 1
14 85018 Spacer 2
15 85008 U-Joint Guard 1
16 85060 Upper Sway Bracket 2
17 85061 Lower Sway Bracket 2
18 86101 Exhaust Hose, 8” x 60’ 1
19 86060 Hose Connector 1
20 18070 Cart Connector 1
21 88101 Intake Hose, 8" x 90" 1
22 18119 Hose Clamp, 8” 4
23 58104 Hitch Pin 1
24 85024 Draw Pin, 7/8” 2
25 85109 Bearing Support 1
26 85206 Belt Guard Support Bracket 1
27 85110 Support Arm Bracket 1
28 58022 Support Arm Extension 1
29 18118 8” Hose Support Strap 1
30 ***-8 8” Deck Chute Assembly 1
85688 Hardware Bag 1
45131 Decal, 2” x 8” Trac-Vac White 1
45133 Decal, Warning Stop Engine 1
85695 Decal, 856 Serial# 1
86090 Carton, 860 1
10620 Drawbar Kit
31 10606 Drawbar
32 58061 Cart Latch
33 58067 Hitch Plate (Comes w/cart)
34 10605 Extension, Drawbar

6
Model 854 Trac-Vac Parts List
Key Part No. Description Qty
1 85010 Frame, 854-RH 1
85011 Frame, 854-LH 1
2 18030 Turbine Housing, RH 1
18031 Turbine Housing, LH 1
3 86040 Turbine 1
4 18050 8” Inlet 1
5 85001 Gearbox 1
6 85023 PTO Shaft, 22” 1
85002 PTO Shaft, 18” 1
7 85016 Pulley, MA 55 x 3/4” 1
8 85009 Bearing, ¾” Pillow Block 2
9 85028 Bearing, 1” Flange 1
10 85029 Bearing, 1” Pillow Block 1
11 85027 Pulley, 8400 x 1” 1
12 85015 Pulley, 8400 x ¾” 1
13 18104 Shaft, ¾” 1
14 18109 Shaft, 1” 1
15 85101 Belt, AX25 1
16 85102 Belt, AX40 1
17 85032 Belt Guard, RH 1
85033 Belt Guard, LH 1
18 85018 Spacer 2
19 85020 Belt Guard, Outer, RH 1
85022 Belt Guard, Outer, LH 1
20 85008 U-Joint Guard 1
21 85060 Upper Sway Brackets 2
22 85061 Lower Sway Bracket 2
23 86101 Exhaust Hose, 8” x 60” 1
24 86060 Hose Connector 1
25 18070 Cart Connector 1
26 88101 Intake Hose, 8” x 90” 1
27 18119 8” Hose Clamp 4
28 58104 Hitch Pin 1
29 85024 Draw Pin, 7/8” 2
30 85019 Bearing Support 2
31 85026 Support, Belt Guard 1
32 85014 Pulley, AK74 x 1” 1
33 85110 Support Arm Brace 1
34 58022 Support Arm Extensoin 1
35 18118 8” Hose Support Strap 1
36 85034 Bearing Support, 1” Pillow 1
37 ***-8 8” Deck Chute Assembly 1
10620 Draw Bar Kit 1
38 10606 Drawbar
39 58061 Cart Latch
40 10605 Extension, Drawbar
41 58067 Hitch Plate (comes w/cart)
7
2
3
4
27
25
24
23
M o d el 8 54 T rac-V ac P arts L ist
3-31-15
27
27
1
17 19
20
35
34
33
27
30
36
18
31
37
16
32
11
5
14
13
7
9
8
8
10 12
29
29
21
22
6
T O T R A C T O R
15
26
28
D R A W B A R K IT
P A R T N O . 10 620
41
38 39
40
Operation
The Model 854 Trac-Vac is designed to operate at a 540 RPM PTO speed. Poor performance will

8
result if ran much below recommended speed.
The Model 856 is designed to operate at 856 PTO speed. The variable pitch pulley will permit
operation at 750 PTO speed. To change the ratio, loosen the bolts under the gearbox. Loosen the
set screw on the side of the small pulley. Turn outer half of pulley clockwise and close
completely, then turn counterclockwise no more than 5 turns. The pulley should be 13/16" at top
of the V. Move the gearbox forward to tighten the belt and secure the bolts. The turbine shaft
should turn at 3600 RPM.
1. Inspect area to be vacuumed and pick up all harmful objects and litter. Rocks and other
harmful debris can do serious damage to vacuum assembly and cause bodily injury.
2. For best vacuuming results operate tractor at manufacturers’ recommended speed for best
cutting. If grass is high, reduce ground speed to prevent overloading mower and vacuum.
If grass is wet, wait until dry for best results.
3. When mowing, keep discharge chute to the outside of the cutting area for better cut of
grass and efficient pickup of grass clippings and leaves.
4. Do not overload cart. When it is filled shut off vacuum, disconnect hose at snap
disconnect, remove tailgate and dump.
5. When operating tractor on slope or grade, exercise much caution. Do not cut across grade
or slope. Mow directly up or down hill.
6. Periodically tighten all bolts.
7. Listen for unusual vibration of air turbine. If excessive vibration is present, STOP
vacuum and check for damaged blade.
8. Always shut off tractor engine before servicing vacuum.
9. Replace deflector shield when discharge chute is removed.
10. When removing clogs, SHUT OFF ALL engines.
Maintenance
Your 854/856 Trac-Vac has been serviced at the factory for initial operation.
Bearings should be greased and gearbox oil checked. Gearbox oil level should be to the bottom of
the cross shaft bearing. Overfilling will cause oil to be forced out though the vent. Fill with 90
weight gear lube.
Check belt tension after the first hour of operation and every ten hours thereafter.
On Model 856, adjust belt by moving gearbox forward.
On Model 854, adjust inboard belt first by moving jack shaft bearing to the rear, then adjust
outboard belt by moving gearbox forward.
TRAC VAC WARRANTY POLICY
Midwest Equipment Mfg. will repair o replace, free of charge, any part or parts that are defective in material
or workmanship or both for a period of one year residential use, and 90 days for commercial and rental use.
The purchaser will pay transportation charges on parts submitted for replacement under warranty. For
warranty service, contact your local dealer from whom the unit was purchased. There are no other express or
implied warranties. Some states do not allow limitations on how long an implied warranty lasts, and some
states do not allow the exclusion or limitation of incidental or consequential damages, so the above limitation
and exclusion may not apply to you. This warranty gives you specific legal rights and you may also have
other rights, which vary from state to state.
MIDWEST EQUIPMENT MFG. 5225 Serum Plant Road,
Thorntown, IN 46071Phone: 1-800-Trac-Vac
This manual suits for next models
1
Table of contents
Other Trac Vac Blower manuals


Popular Blower manuals by other brands


Poulan Pro
Poulan Pro 967672701 instruction manual

Tuchel
Tuchel FARM-CLEAN Operation instructions

Robuschi
Robuschi Robox Evolution RB-DV Operating and maintenance instructions

Yard-Man
Yard-Man YM2BV Operator's manual

Heatcraft Refrigeration Products
Heatcraft Refrigeration Products 4346B001 Installation & operation manual

Greenlee
Greenlee Li'l Fisher 390 instruction manual


