Track24 PMLP II User manual

PMLP II Quick Start Guide
The PackMaster Lo-Pro II is powered by a 1.95 A-Hr Lithium-Ion battery which is supplied in a partially
charged state. It can either be charged using a mains power supply or a USB-mini cable. The mains
power supply can recharge the PackMaster Lo-Pro II rechargeable battery in approximately five hours. A
USB 1.0 should be able to charge the PackMaster Lo-Pro II in about a day assuming the port is capable
of producing an output current of 100mA. A USB 2.0 can charge the device in about four hours.
The PackMaster Lo-Pro II has a battery icon on the LCD screen indicating the charging status. The
device can be safely operated and does not need to be turned off while charging; however, the battery
icon will not correctly display the charging status unless the unit is unplugged from a power source. When
fully charged the Lithium-Ion battery should power the PackMaster Lo-Pro II for up to 1,200 position
reports (which is roughly 10 days when reporting at 10 minute intervals).
The default reporting rate for the PackMaster Lo-Pro II is set at 15 minute intervals. A user can manually
change the device reporting rate from the ‘Home’ screen by selecting Tracking> Report Rate before then
choosing which reporting rate the device should operate to.
Track24 recommends that the PMLP II unit is tested monthly to ensure a steady Iridium and GPS fix. This
will be shown on the homepage of the unit, with vertical bars indicating successful satellite and GPS
communication.
Public 1
Version 1.0
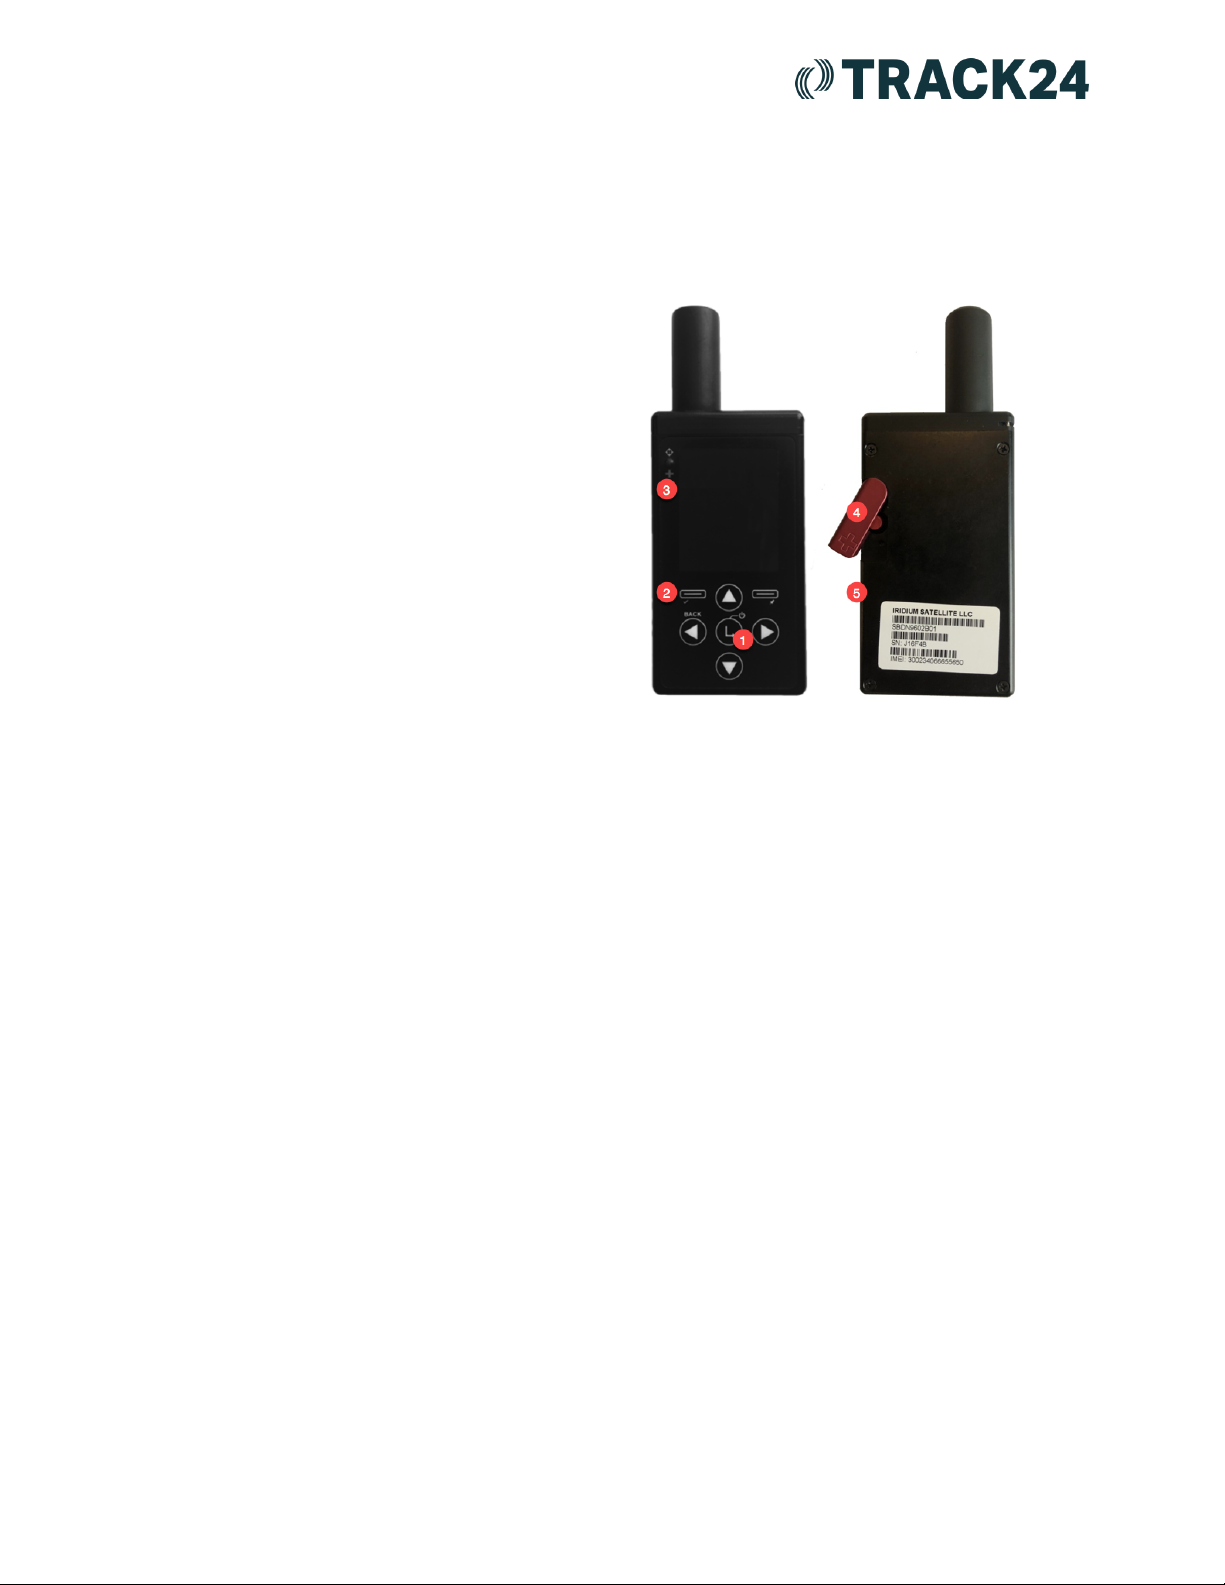
Key Areas:
1. Power Button/Enter: A. Turns device
ON/OFF when held down for two seconds.
B. Selects highlighted item on the menu.
2. Check-In: This button sends a Check-in to
the platform.
3. LED Lights: The LED on the top left corner
of the device flashes when Track On/Off is
enabled and the device sleeps (in between
tracking reports). The LED turns solid green
when Emergency mode is enabled
regardless of whether the device is on or
off. The LED can be turned off for either of
these two cases to save battery power
using this LED option.
4. Panic Button: To activate a panic alarm
the user should press and hold the panic
button for 2 seconds. When pressed, the
emergency LED turns solid green and the
top and bottom bars on the screen turn red.
5. USB Port: Used to charge the battery.
The device needs to be activated and added to your Grid platform before it can report in. Please contact
[email protected] with the IMEI and preferred call sign of the device to activate the device with the
satellite provider and to add the unit to your platform.
Please ensure the following have been set up when using the PMLP II device for the first time:
1. Make sure the PMLP II device has had a full 5 hours charge.
2. Make sure tracking is enabled: Homescreen>Tracking>Track on/off>Enable Tracking
3. Set the preferred tracking interval: Homescreen>Tracking>Report Rate>X Mins/Hours
4. When setting the tracking interval you will also be prompted to set the Mailbox Check Rate. Select
your preferred Mailbox Check Rate and confirm with Yes.
5. Make sure the message format is set to 30 bytes: Homescreen>Tracking> Format>Full, 30 Bytes
6. Enable GPS to be included with check-ins: Homescreen>Settings>Include GPS>On
7. Make sure the device has a clear line of sight to the sky as it needs a satellite signal in order to
report into the platform.
Public 2
Version 1.0

Cancel Panic Alarm on Device
After the panic button on the back of the PMLP II is pressed, a user can deactivate the emergency alert
directly on the device. The panic alarm will then reset on the device when the cancellation message has
been acknowledged by the satellite network, so please make sure your device has a clear line of sight to
the sky when trying to reset a panic alarm.
●How to cancel a panic alarm from the device:
a. Homescreen>Tracking>Cancel 911>With Gateway Ack>Yes
Messaging
You can both send and receive messages on the PMLP II unit in order to communicate with the Grid
monitoring platform.
●How to compose a message and send it to the Grid platform:
a. Homescreen>Messaging>Compose>Enter Text
b. Enter the message you wish to send using the on-screen keyboard>Done
c. Click Next>Click Next again>Send
Once a message is sent, a success screen will appear to indicate that the message has been added to
the Outbox. The Outbox folder contains either messages in the queue ready to be sent, or messages
failed to send. A message in the process of being sent has a << symbol next to it. A message failed to
send has an X symbol next to it. A message in the queue waiting to be sent has no symbol. Once a
message is failed to send, it will stay in the Outbox until the user decides to either resend or delete.
The Inbox folder contains all incoming messages sent from the Grid platform with the newest message on
top of the list.
The Sent folder contains messages successfully sent to the Grid platform. When the enter button is
pressed on a highlighted message, detailed information about the message appears.
Public 3
Version 1.0
This manual suits for next models
1
Table of contents
Other Track24 GPS manuals


Popular GPS manuals by other brands


SperryMarine
SperryMarine Visionmaster FT ECDIS user guide

CalAmp
CalAmp LMU-3000 Hardware installation guide

RF Technology
RF Technology SEEKER user manual

Global Sat
Global Sat GH-561 GPS Trek Pro quick start guide

TitanGPS
TitanGPS TT33003G Quick install guide

FineDigital
FineDigital Finedrive 500 user manual


