Tradgardsteknik ST25M-5S4 User manual

Instructions
Important Safety Instructions
Read all warnings and instructions in this
manual. Save these instructions.
Spring Rewind
Hose Reel
Models
ST25M-5S4
*ST25M-5S4 hose reel shown in the tables below is available in several colors.
Model No.
Rewind Type
Working Pressure
Rating; Psi (bar)
Media
Hose Size
(Inches)
Hose Length
(MR)
ST25M-5S4 Spring Rewind 290psi (20bar) Water 1 inch 30
Spring Rewind
Hose Reel
TRÄDGÅRDSTEKNIK AB 0431-222 90, info@tradgardsteknik.se
Helsingborgsvägen 578, 262 96 ÄNGELHOLM www.tradgardsteknik.se
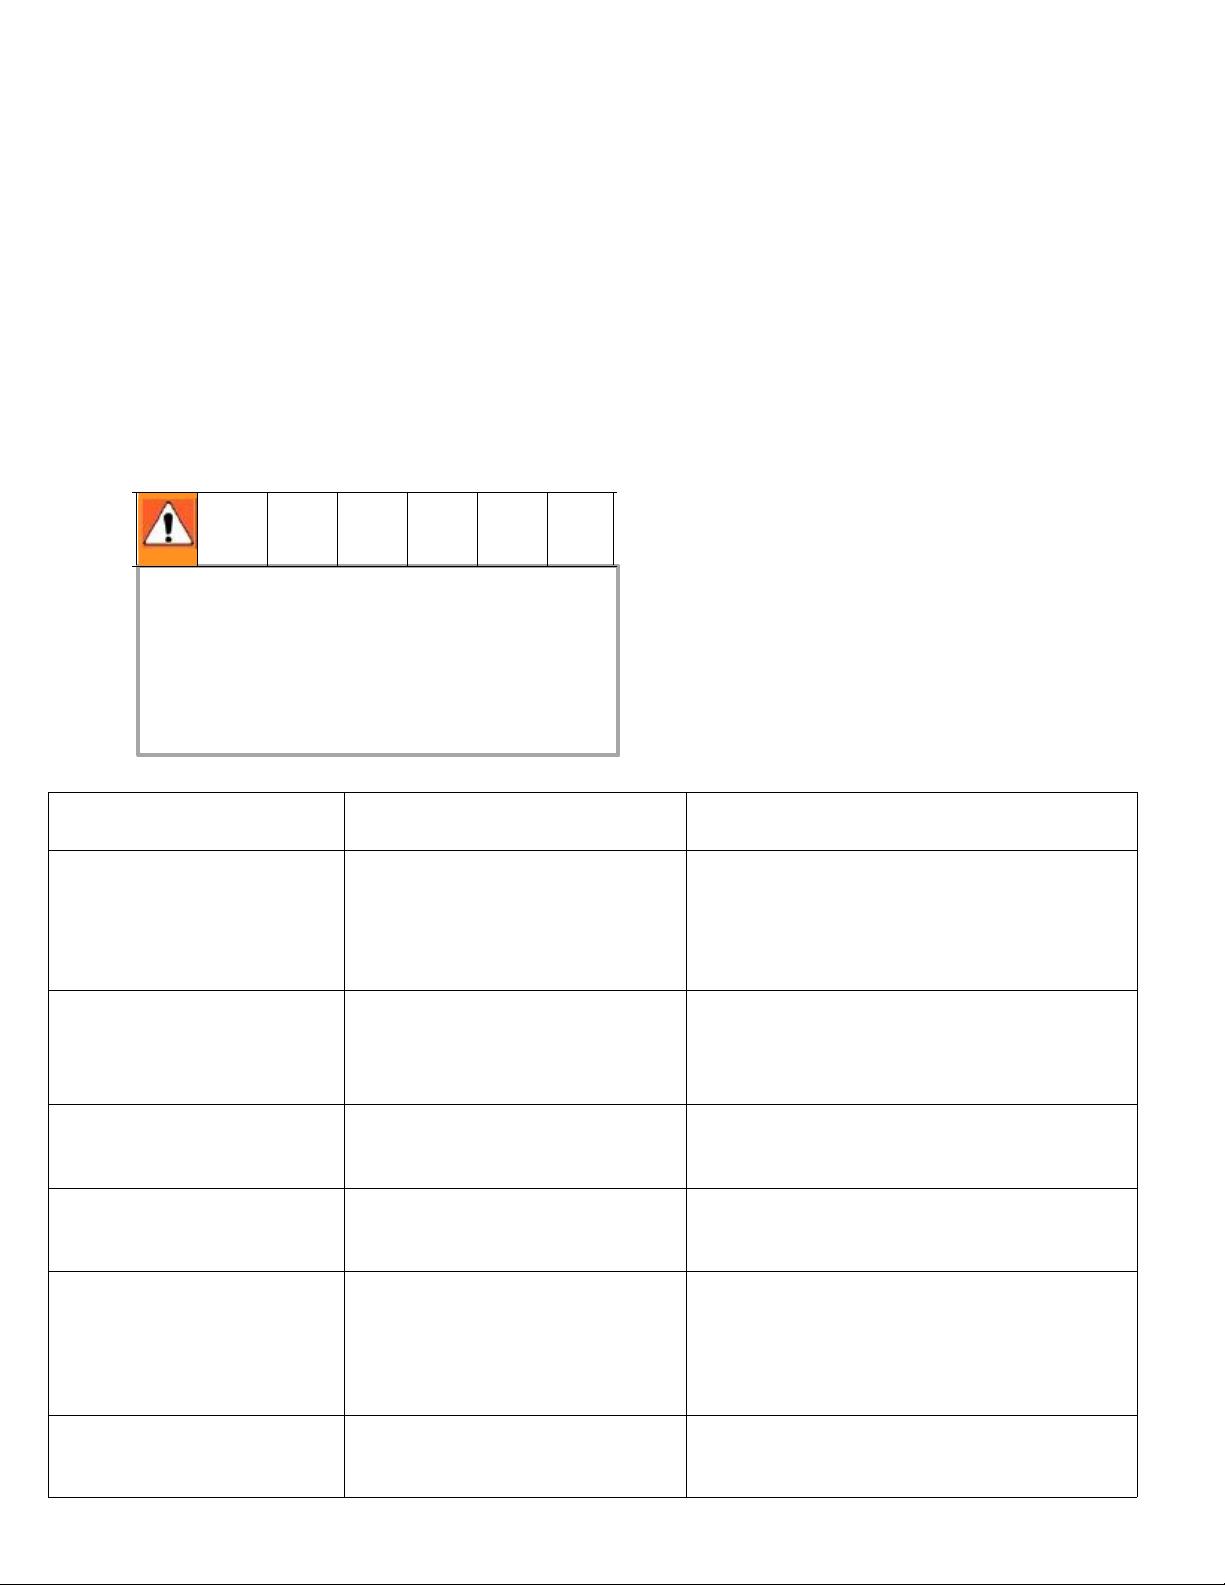
Warnings
Warnings
The following warnings are for the setup, use, grounding, maintenance, and repair of this equipment. The exclama-
tion point symbol alerts you to a general warning and the hazard symbol refers to procedure-specific risk. Refer back
to these warnings. Additional, product-specific warnings may be found throughout the body of this manual where
applicable.
WARNING
FIRE AND EXPLOSION HAZARD
When flammable fluids are present in the work area, such as gasoline and windshield wiper fluid, be
aware that flammable fumes can ignite or explode. To help prevent fire and explosion:
•Use equipment only in well ventilated area.
•Eliminate all ignition sources, such as cigarettes and portable electric lamps.
•Keep work area free of debris, including rags and spilled or open containers of solvent and gasoline.
•Do not plug or unplug power cords or turn lights on or off when flammable fumes are present.
•Ground all equipment in the work area.
•Use only grounded hoses.
•If there is static sparking or you feel a shock, stop operation immediately. Do not use equipment
until you identify and correct the problem.
•Keep a working fire extinguisher in the work area.
EQUIPMENT MISUSE HAZARD
Misuse can cause death or serious injury.
•Do not operate the unit when fatigued or under the influence of drugs or alcohol.
•Do not exceed the maximum working pressure or temperature rating of the lowest rated system
component. See Technical Data in all equipment manuals.
•Use fluids and solvents that are compatible with equipment wetted parts. See Technical Data in all
equipment manuals. Read fluid and solvent manufacturer’s warnings. For complete information
about your material, request MSDS forms from distributor or retailer.
•Check equipment daily. Repair or replace worn or damaged parts immediately with genuine manu-
facturer’s replacement parts only.
•Do not alter or modify equipment.
•Use equipment only for its intended purpose. Call your distributor for information.
•Route hoses and cables away from traffic areas, sharp edges, moving parts, and hot surfaces.
•Do not kink or over bend hoses or use hoses to pull equipment.
•Keep children and animals away from work area.
•Comply with all applicable safety regulations.
SKIN INJECTION HAZARD
High-pressure fluid from dispense valve, hose leaks, or ruptured components will pierce skin. This may
look like just a cut, but it is a serious injury that can result in amputation. Get immediate surgical
treatment.
•Do not point dispense valve at anyone or at any part of the body.
•Do not put your hand over the end of the dispense nozzle.
•Do not stop or deflect leaks with your hand, body, glove, or rag.
•Follow Pressure Relief Procedure in this manual, when you stop spraying and before cleaning,
checking, or servicing equipment.
Warnings
WARNING
MOVING PARTS HAZARD
Moving parts can pinch or amputate fingers and other body parts.
•Keep clear of moving parts.
•Do not operate equipment with protective guards or covers removed.
•Pressurized equipment can start without warning. Before checking, moving, or servicing equipment,
follow the Pressure Relief Procedure in this manual. Disconnect power or air supply.
PRESSURIZED EQUIPMENT HAZARD
Fluid from the gun/dispense valve, leaks, or ruptured components can splash in the eyes or on skin and
cause serious injury.
•Follow Pressure Relief Procedure in this manual, when you stop spraying and before cleaning,
checking, or servicing equipment.
•Tighten all fluid connections before operating the equipment.
•Check hoses, tubes, and couplings daily. Replace worn or damaged parts immediately.

1.A=Screws
2.A=Screws
1.A=Screws
2.A=Screws
Wall Mounting
Ceiling Mounting
Floor Mounting
A
A
Maximum distance
to floor-16ft(4.87m)
Maximum distance
to floor-16ft(4.87m)
1.A=Screws
A
A
A
A
Installation
Installation - Hose
Installation
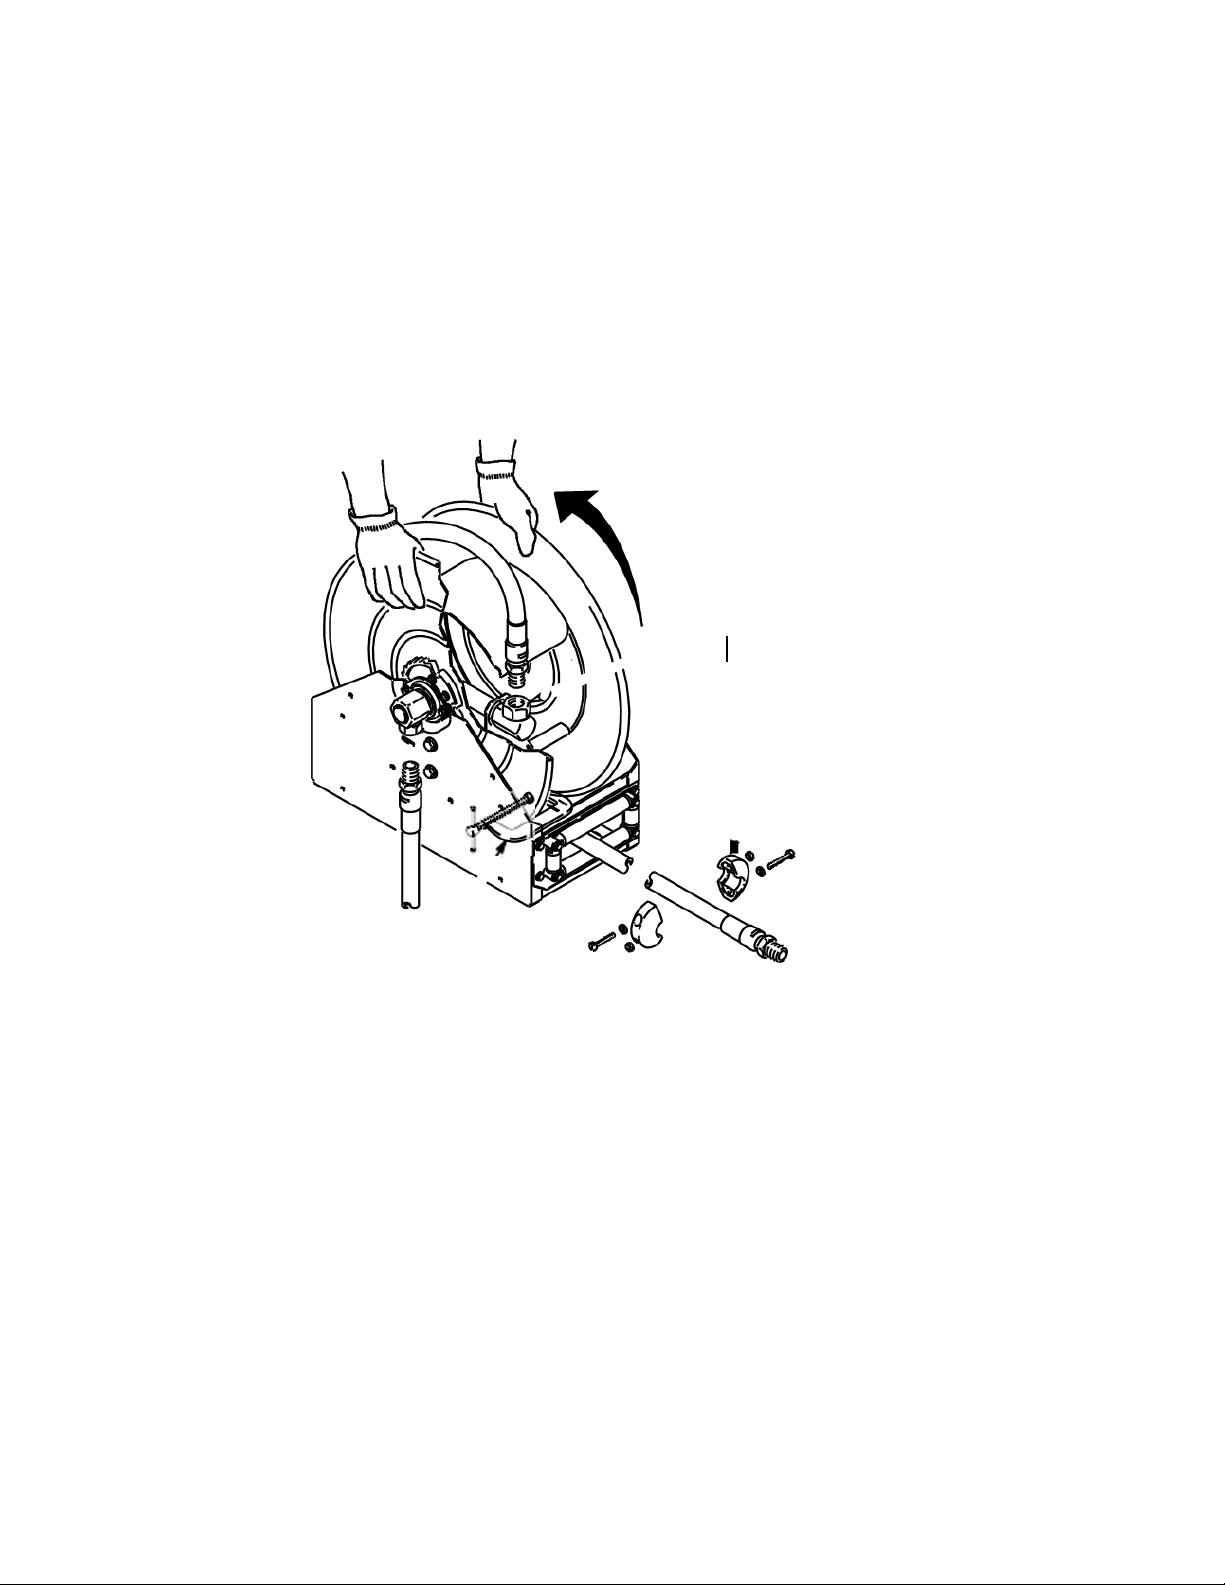
1. Clamp the hose reel to a flat surface.
2. Unlatch the reel drum, and allow it to slowly rotate until all spring tension has been released.
Then rotate the reel in the direction of the arrow shown below to achieve the proper amount of spring tension
for the hose you are installing.
3. Engage the latch so as not to rotate the disc.
4. Uncoil and extend the new hose, and loosely install the hose stop near the outlet end of the hose
5. Attach the other end of the new hose to the goose neck.
6. Pull the hose firmly enough to release the latch, then slowly allow the hose to retract.
7. Ensure that the hose can be pulled out all the way and that it fully retract.
If it does not pull out or retract properly, see Adjusting Spring Tension on the next page.
8. Position the hose stop so that the hose extends far enough for all operators to reach the dispensing valve.
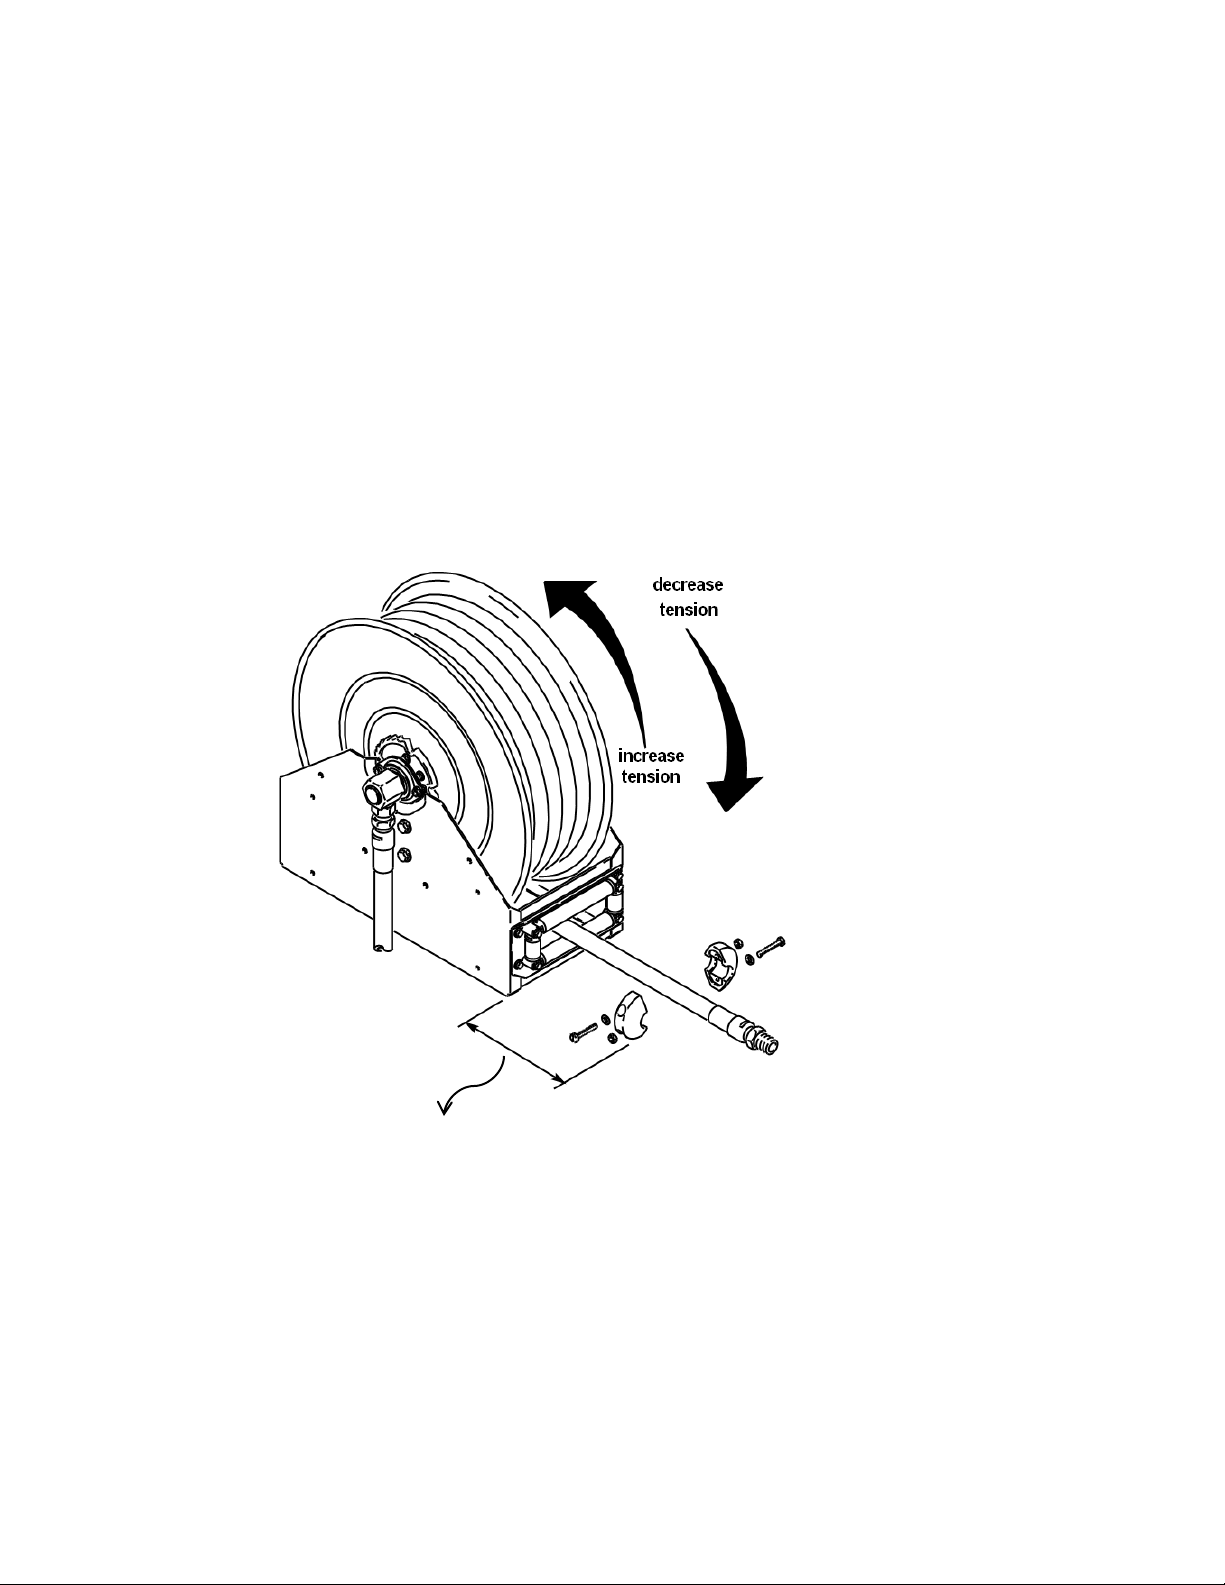
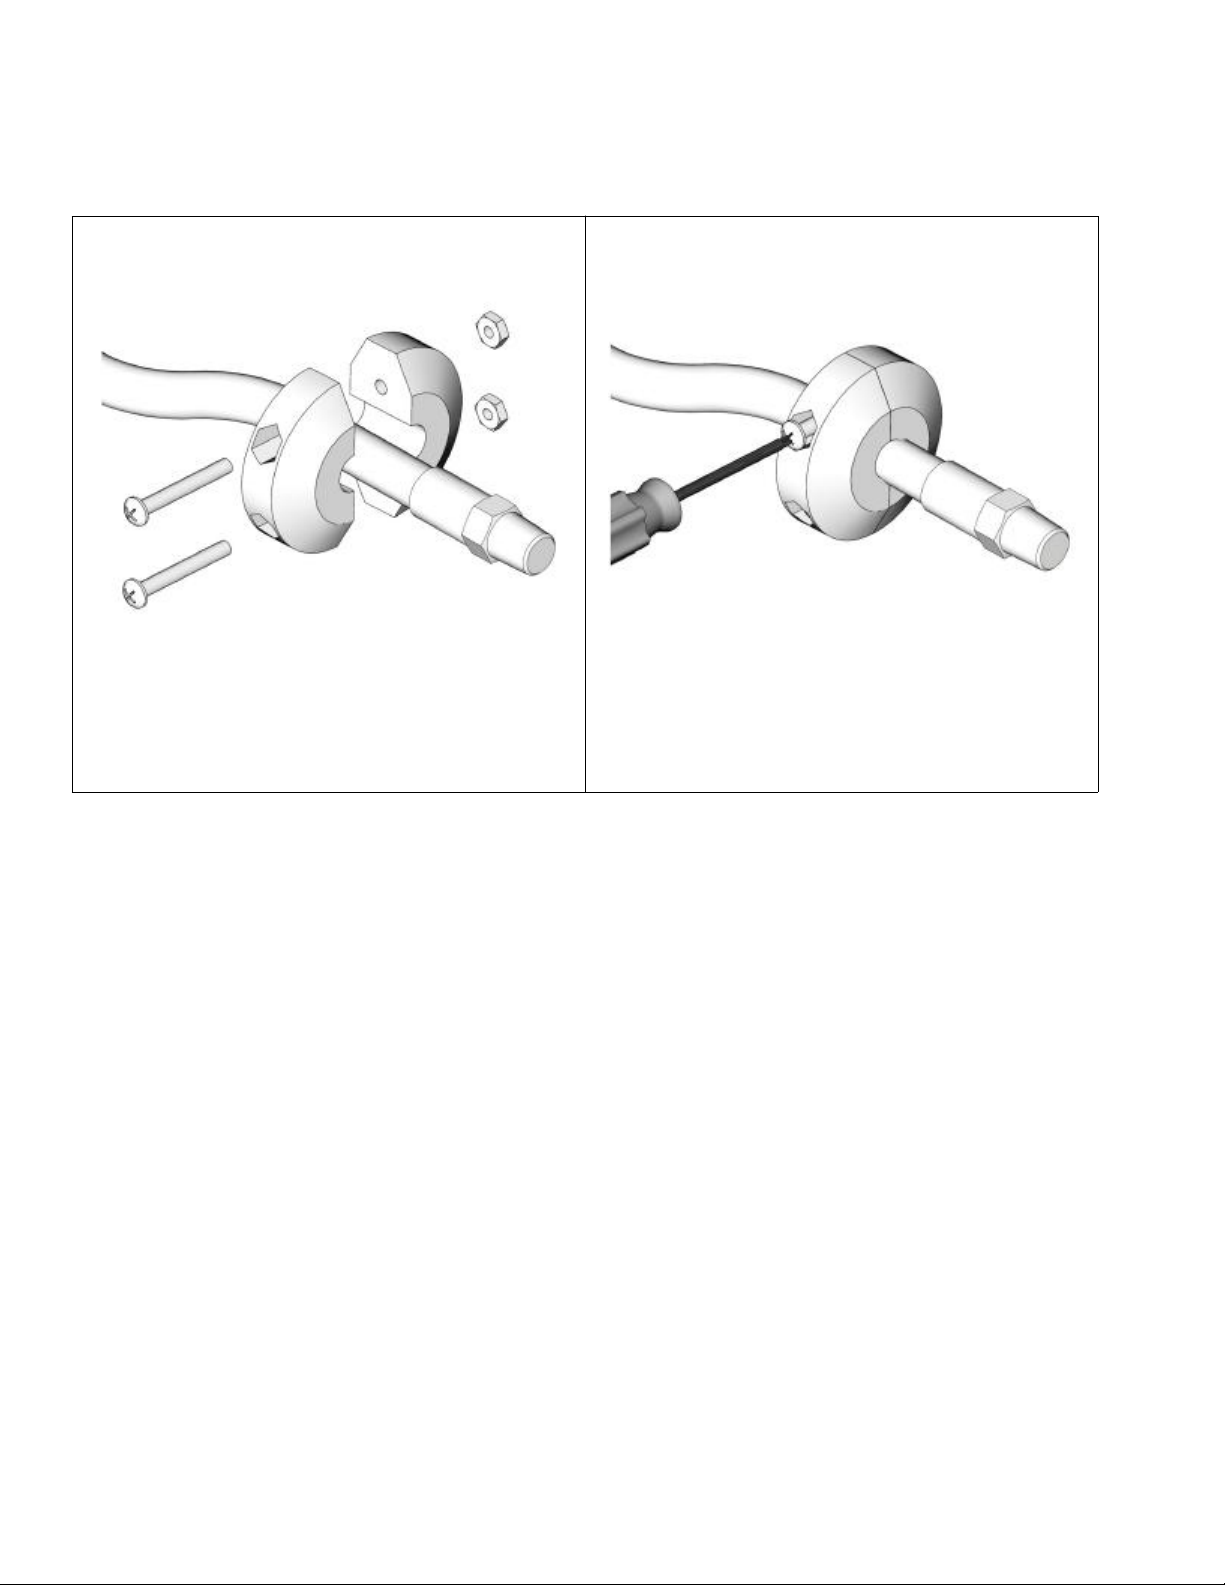
Installation –Adjusting Spring Tension
1. Pull the hose out and engage the latch.
2. Remove the dispensing valve and the hose stop.
3. Pull the loose end of the hose back in through the hose rollers, and manually wrap the hose onto the reel.
4. Rotate the reel in the direction of the appropriate arrow shown below, keeping the hose wrapped on the reel.
Each rotation of the reel increases or decreases enough spring tension to retract or let out approximately
1.5m of hose.
5. Check the spring tension. The hose must pull out fully and retract fully.
6. Repeat Steps 4 and 5 until you have the proper amount of spring tension.
7. Reroute the hose through the hose rollers, and reinstall the hose stop and dispensing valve.
Position hose stop within operator’s reach
Installation
Hose Stopper Installation
2.
Installation
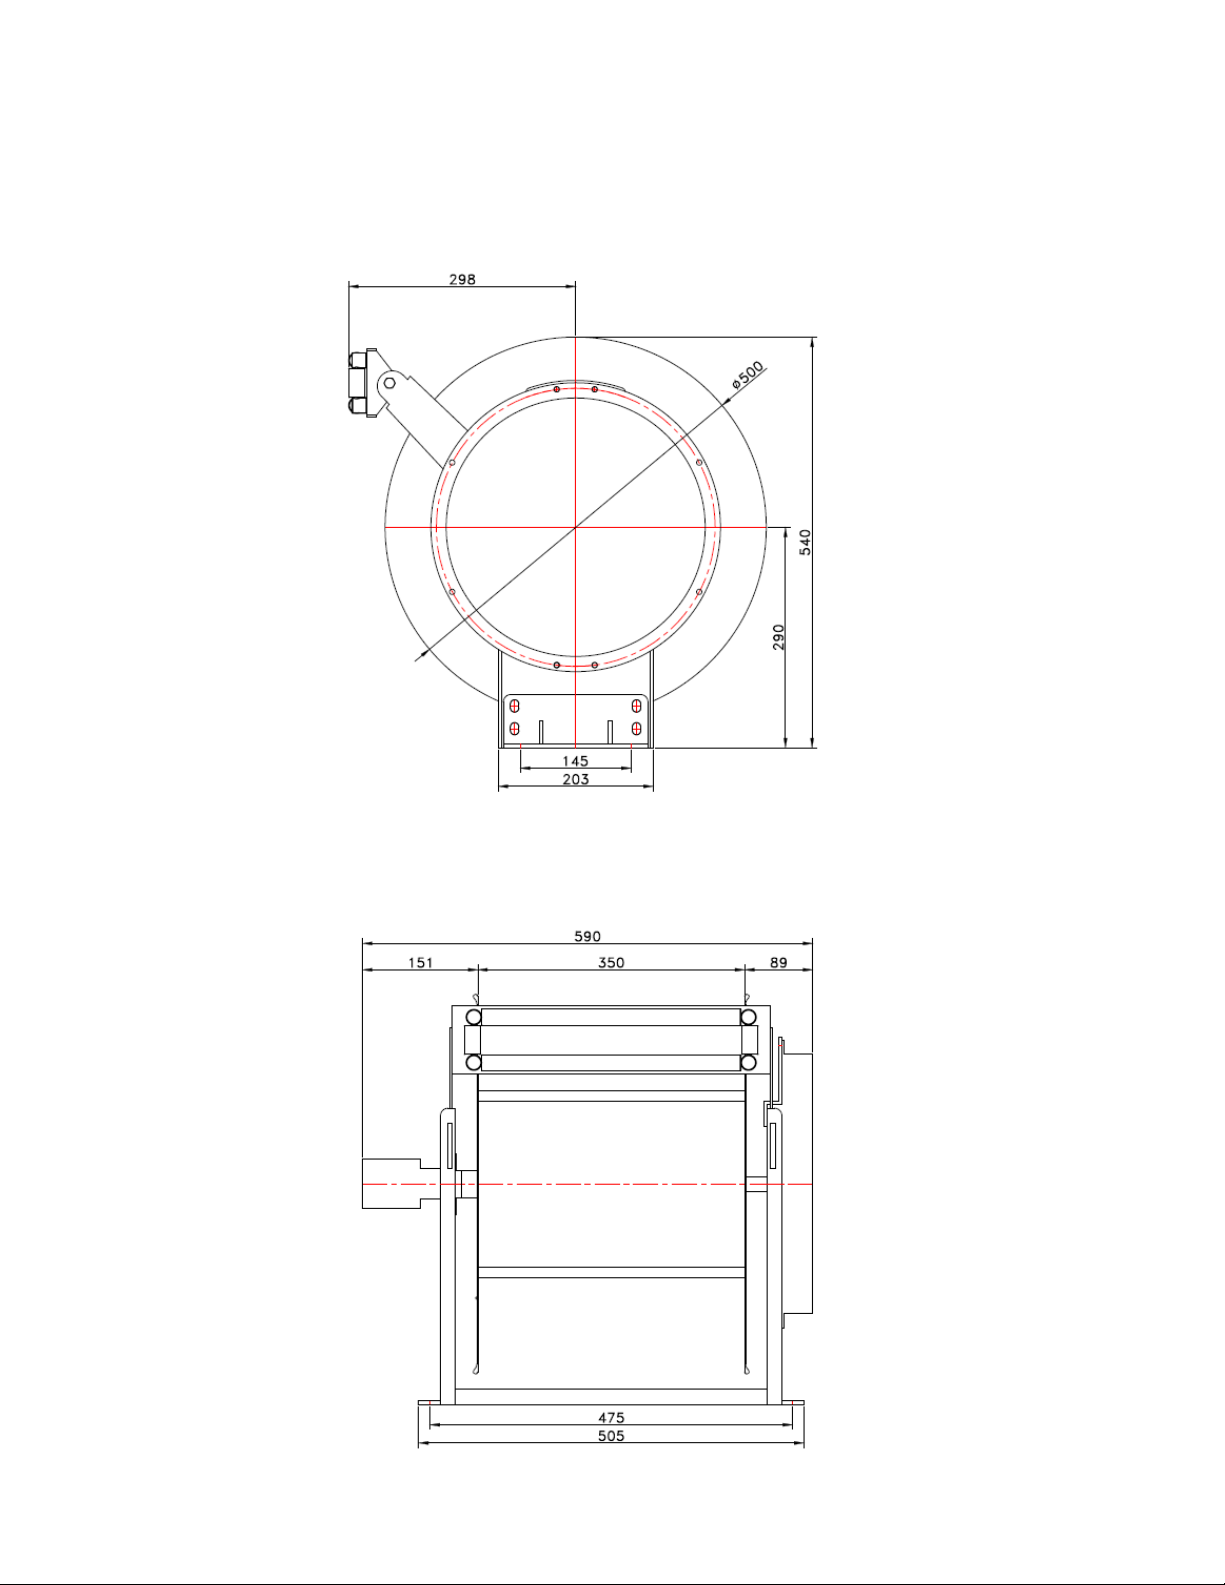
Technical Data
Dimensions
SD25M-5S4
Maintenance
1) Use a hose reel & hose properly rated for the job.
3) Use a flexible-hose connector between a swivel joint and inlet piping.
2) Never exceed the pressure rating specified for a particular reel and hose. Remember, even low
pressure is dangerous and can cause injury or death. Also, make sure that the size and material of
both the reel and hose are designed for the intended use.
4) Check for possible leaks at fluid connections prior to use. If a leak occurs in the hose or reel,
remove from system pressure immediately.
5) Release pressure in hose before removing fittings or performing any maintenance.
6) Filter should be drained daily and cleaned frequently, depending upon type of service.
TROUBLE SHOOTING GUIDE
▣REELTEC reels will not assume
any responsibility for any remodeling
and modifications to our Reels or
products are manufactured by
REELEC nor for uses other than for
which these products are intended.
General Maintenance
TROUBLE
CAUSE
REMEDY
HOSE WILL NOT FULLY FIT ON
TO DRUM OF REEL
a) Hose is longer than specified.
b) Outside diameter of hose is larger
than specification.
c) Hose was not hand guided onto reel
and wound up evenly on drum.
a) Cut down hose to meet reels specified capacity.
b) Replace hose with a hose that meets the specified
maximum outside diameter requirements.
c) Hand guide hose on to drum to wrap evenly as it
is wound on to the reel.
HOSE WILL NOT FULLY
RETRACT
a) Outlet nozzle, gun or tool is too
heavy.
b) Spring is fatigued.
c) Installed hose is too long.
a) Add spring tension
b) Add spring tension
c) Cut down hose to meet reels specified capacity.
HOSE WILL NOT RETRACT AT
ALL
Spring has lost all tension or has
possibly broken.
a) Adjust spring tension
b) Replace the spring
REEL WILL NOT LATCH
a) Incorrect operation.
b) Dog spring is broken or worn.
a) Reel latches on first, second, third or fourth “click”
b) After forth “click” it automatically rewinds.
c) Replace dog spring.
FLUID PATH (PLUMBING
AND/OR SWIVEL) IS LEAKING
OR DAMAGED
a) Maximum pressure rating for reel
has been exceeded.
b) Application is not compatible with
plumbing and/or swivel seal
materials.
a) Replace or repair damaged components.
Consult factory.
Check maximum pressure rating of reel.
b) Contact factory to determine chemical
compatibility or environmental issues (i.e.
temperature rating)
FLUID LEAKS FROM SWIVEL
Swivel seals are damaged or worn.
Replace swivel seals.
Caution: Be sure leak is not at Hose Fitting!
Component WarrantyPeriod
Wear parts, including but not limited to: hose,
Swivel seals, roller guide 12months
Reel structural components and spring 12months
Bare hose reels: all components 12months
Reeltec Hose Reel Warranty
Reeltec warrants all equipment referenced in this document which is manufactured by Reeltec and bearing its name to be free from defects in
material and workmanship on the date of sale to the original purchaser for use. With the exception of any special, extended, or limited warranty
published by Reeltec, Reeltec will, for a period as defined in the table below from the date of sale, repair or replace equipment covered by this
warranty and determined by Reeltec to be defective. This warranty applies only when the equipment is installed, operated and maintained in
accordance with Reeltec’s written recommendations.
This warranty does not cover, and Reeltec shall not be liable for general wear and tear, or any malfunction, damage or wear caused by faulty
installation, misapplication, abrasion, corrosion, inadequate or improper maintenance, negligence, accident, tampering, or substitution of
non-Reeltec component parts. Nor shall Reeltec be liable for malfunction, damage or wear caused by the incompatibility of Reeltec equipment with
structures, accessories, equipment or materials not supplied by Reeltec, or the improper design, manufacture, installation, operation or
maintenance of structures, accessories, equipment or materials not supplied by Reeltec.
This warranty is conditioned upon the prepaid return of the equipment claimed to be defective to an authorized Reeltec distributor for verification of
the claimed defect. If the claimed defect is verified, Reeltec will repair or replace free of charge any defective parts. The equipment will be returned
to the original purchaser transportation prepaid. If inspection of the equipment does not disclose any defect in material or workmanship, repairs will
be made at a reasonable charge, which charges may include the costs of parts, labor, and transportation.
THIS WARRANTY IS EXCLUSIVE, ANDIS IN LIEU OF ANYOTHER WARRANTIES, EXPRESS OR IMPLIED, INCLUDING BUT NOT LIMITED
TO WARRANTY OF MERCHANTABILITY OR WARRANTY OF FITNESS FOR APARTICULAR PURPOSE.
Reeltec’s sole obligation and buyer’ssole remedy for any breach of warranty shall be as set forth above. The buyer agrees that no other remedy
(including, but not limited to, incidental or consequential damages for lost profits, lost sales, injury to person or property, or any other incidental or
consequential loss) shall be available. Any action for breach of warranty must be brought within 48 months of the date of sale, or 24 months for all
other parts.
Reeltec MAKES NO WARRANTY, ANDDISCLAIMS ALL IMPLIED WARRANTIES OF MERCHANTABILITY ANDFITNESS FOR A
PARTICULAR PURPOSE, IN CONNECTION WITH ACCESSORIES, EQUIPMENT, MATERIALS OR COMPONENTS SOLD BUT NOT
MANUFACTURED BY Reeltec. These items sold, but not manufactured by Reeltec (such as electric motors, switches, hose, etc.), are subject to
the warranty, if any, of their manufacturer. Reeltec will provide purchaser with reasonable assistance in making any claim for breach of these
warranties.
In no event will Reeltec be liable for indirect, incidental, special or consequential damages resulting from Reeltec supplying equipment hereunder, or
the furnishing, performance, or use of any products or other goods sold hereto, whether due to a breach of contract, breach of warranty, the
negligence of Reeltec, or otherwise.
Table of contents


