Trail-Gear DURALINE Series Configuration guide

5356 PINE AVE • FRESNO, CA • 93727
USA TOLL FREE: 877.4X4.TOYS • WORLDWIDE: 559.252.4950
WWW.TRAIL-GEAR.COM
duraline™& duraline™exoshield winch lines
303417 (3/8”x 75’DuraLine™ExoShield™)
303418 (3/8”x 100’DuraLine™ExoShield™)
303827 (3/8”x 125’DuraLine™ExoShield™)
303828 (3/8”x 150’DuraLine™ExoShield™)
303501 (3/8”x 50’DuraLine™)
303502 (3/8”x 75’DuraLine™)
InstalL Instructions
303503 (3/8”x 100’DuraLine™)
303829 (3/8”x 125’DuraLine™)
303830 (3/8”x 150’DuraLine™)
303437 (5/16”x 15’DuraLine™)
303504 (5/16”x 25’DuraLine™)
303505 (5/16”x 50’DuraLine™)
kit contents
DuraLine™ ExoShield
DuraLine™ Winch Line (5/16”)
DuraLine™ Winch Line (3/8”)
DuraLine™ Suspension Winch Line (5/16” x 15’)
303814-ins

InstalL Instructions (Cont'd.)
caution
1. Read all instructions completely and carefully before you begin. If anything is not clear,
please call our tech support line at 1.877.4X4.TOYS or 559.252.4950 before proceeding.
2. Check to make sure the kit is complete and that no parts are missing (refer to the Kit
Contents Section on the rst page of these instructions). If anything is missing, please
contact Trail-Gear at 1.877.4X4.TOYS or 559.252.4950.
3. Park vehicle on a clean, dry, at, level surface and block the tires so the vehicle cannot
roll in either direction.
4. This product is for off-road use only. It is recommended that the installation steps below
be performed by a competent mechanic. DO NOT use this product for lifting, climbing, or
any life-safety use. DO NOT use this product for towing or any on-road use. Buyers and
users of this product hereby expressly assume all risks associated with the installation and
use of this product.
5. This instruction cannot cover all possible recovery scenarios. The user is responsible for
evaluating each recovery situation and taking the appropriate actions. The safety of the
user and others in the recovery area should be the rst priority.
6. This installation is typical for most winches. Some winches vary. If necessary, refer to the
proper installation instructions for the model of your winch.
5356 PINE AVE • FRESNO, CA • 93727
USA TOLL FREE: 877.4X4.TOYS • WORLDWIDE: 559.252.4950
WWW.TRAIL-GEAR.COM
recommended tools
Screwdriver
Ball Peen Hammer
Recovery Gloves (Trail-Gear P/N: 303823)
Safety Glasses
Winch Hook Pull Strap (Trail-Gear P/N: 300522-KIT)

winch line parts
InstalL Instructions (Cont'd.)
DuraLine™ ExoShield Winch Lines
DuraLine™ Standard Winch Lines
Note: 5/16” x 15’ Suspension Winch Line is not provided with a hook or polyester sleeves.

InstalL Instructions (Cont'd.)
step 1
Inspect your winch drum. Verify that there are no sharp
features or protrusions that will damage the winch line.
File or sand down any sharp burrs or gouges until they
are smooth.
step 2
Inspect your fairlead. We recommend using only
Hawse-style fairleads. We DO NOT recommend
the use of roller fairleads, as the winch line can get
pinched or torn between the rollers. Make sure
there is at least 3/8” of clearance between the
opening of the fairlead and the edges of the
mounting plate. This will prevent damage to the
winch line from the fairlead mounting bracket.
step 4 (Mounting Lug)
Insert the mounting lug end of the winch line
through the fairlead. Feed the line underneath the
drum and pull it over the top of the drum. Securely
attach the mounting lug to the drum with the
mounting screw. A longer M6 screw has been
provided for use with TG 8000 & TG 10000 winch-
es. Other brands of winches may require a different
size mounting screw. Note: If your winch has a
different method of mounting the end of the winch
line to the drum of your winch, follow the winch line
mounting instructions provided with your winch.
step 3
Uncoil the winch line and lay it out at in front of your
vehicle.
step 4 (Mounting Loop)
Insert the mounting loop end of the winch line
through the fairlead. Feed the line underneath the
drum and pull it over the top of the drum. Securely
attach the mounting loop to the drum with the M6
mounting screw and adapter provided with the
winch line. Some brands of winches may require a
different size mounting screw. Note: If your winch
has a different method of mounting the end of the
winch line to the drum of your winch, follow the
winch line mounting instructions provided with your
winch.

InstalL Instructions (Cont'd.)
Attach the hook to a convenient mounting point on the
front of your vehicle. Spool the remaining line in until
the winch line is slightly taunt. DO NOT spool all the
way in with the hook. Damage to the thimble, hook, and
fairlead may result. DO NOT drive with an unsecured
hook, as damage to the front of your vehicle may result.
step 7
Neatly spool the second layer onto the winch.
Tight, even wraps function better and allow you to
put more winch line on the winch.
step 6
Activate your winch and neatly spool the rst layer onto
the winch drum. Make sure to keep your hands away
from the winch at all times while spooling.
step 5
step 8
Stop the winch when there is a few feet of unspooled
line. If supplied with a G80 hook, assemble the hook
onto the winch line thimble and tap the pin in with a ball
peen hammer. If supplied with a G70 hook, install the
hook on the thimble and secure the pin with the provid-
ed cotter pin.

InstalL Instructions (Cont'd.)
Always wear a sturdy pair of gloves when handling winch
line or using recovery equipment. Wear safety glasses
during the recovery process. DO NOT handle winch line
or put your hands near the fairlead while the winch line is
moving.
step 1
Always use a hook pull strap when spooling winch line in
or out to avoid injury to hands or ngers. If you do not
have a pull strap, a length of rope or cord can be used.
step 2
Never loop the winch line around an object and hook back onto the winch line. This will cause damage to the winch
line. Instead, loop a tree strap or recovery strap around the anchor point and secure the ends with a D-Ring shackle.
Attach the hook to the D-Ring shackle.
step 3
When setting up your recovery, make sure the winch line will not be in contact with any sharp edges or abrasive surfac-
es during the recovery pull. If contact with an abrasive surface cannot be avoided, use the Rope Guard (included with
ExoShield™ winch lines) to prevent damage to the winch line. DO NOT let the Rope Guard spool in past the fairlead,
as damage to the Rope Guard may result.
step 4
using your duraline™winch line

InstalL Instructions (Cont'd.)
Inspect the winch line and hook after each and every use.
If any of the main strands are cut or worn through,
discard and replace the winch line (see picture below). If
the hook is damaged, elongated, or twisted, discard and
replace the hook.
step 1
Always keep one full layer (at least 10 wraps) of winch line on the drum. Friction keeps the winch line on the drum. The
screw attachment to the drum IS NOT meant to support a load. If you see the red Kevlar-wrapped section or the red
polyester sleeve come out past the fairlead, STOP THE WINCH IMMEDIATELY. THERE IS NOT ENOUGH LINE LEFT ON
THE DRUM TO SUPPORT THE WINCHING LOAD.
step 5
step 2
Dirt and sand can wear and weaken your winch line
over time. For maximum longevity, periodically
unspool your winch line and wash it with water and
mild soap (e.g. liquid dish soap). Rinse with clean
water and allow the winch line to air dry before
respooling the winch line. DO NOT use any other
cleaning agents other than mild soap and water, as
they may damage and weaken your winch line. DO
NOT use a washing machine to clean your winch line,
as damage to the winch line may result. DO NOT use a
clothes dryer to dry your winch line, as damage to the
winch line and/or the clothes dryer may result.
care and maintenance
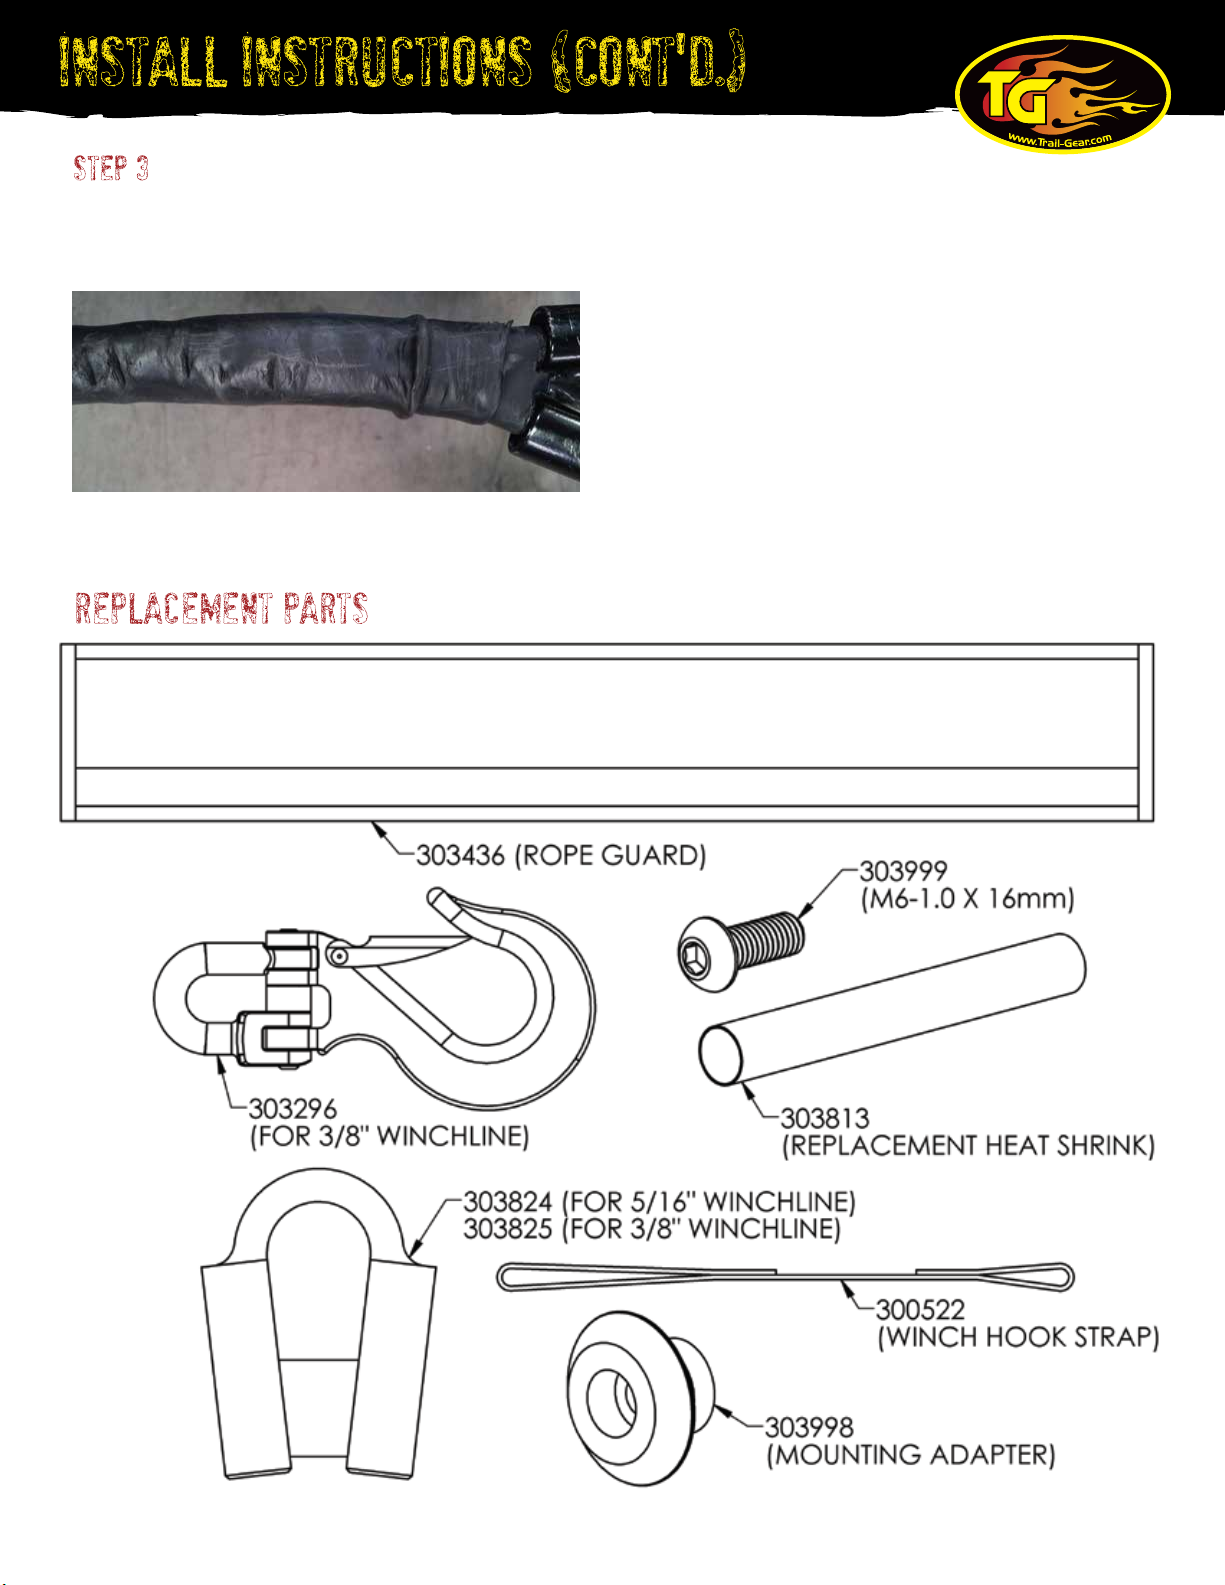
InstalL Instructions (Cont'd.)
The shrink wrap over the splice may become abraded or
damaged from use. Damage to the shrink wrap does not
affect performance of the winch line and is not grounds
for a warranty return.
step 3
replacement parts
This manual suits for next models
13
Table of contents
Popular Winch manuals by other brands


Warn
Warn 2000 user guide

AL-KO
AL-KO A BASIC Series Translation of the original operating instructions

Farmi Forest
Farmi Forest JL 450 OPERATION, MAINTENANCE AND SPARE PARTS MANUAL

TRAC
TRAC T10210-sw Big Water Seaside Installation and operating instructions

AEV
AEV BISON WINCH KIT installation guide

Comeup
Comeup CWG-31500 manual


