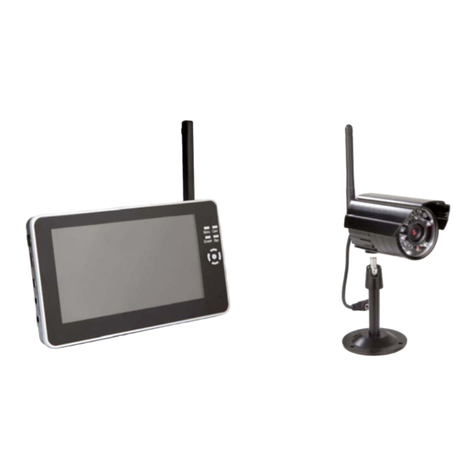
Trailer Eyes B2 User manual

5.8 GHz
Instant Wireless Monitoring System
Easy setup
No tools required
Minimal interference
Range up to 1200 ft
Can be used everywhere!
Our concept :
Instant Wireless Monitorin System
Can be used in
barns, horse trailers,
outbuildings, ofces, pastures etc.
Long range up to 1200 ft,
Practical, Mobile, Durable,
& Affordable.
Trailer Eyes ® is a registered trademark
www.trailereyes.com
Instruction Manual

Trailer Eyes ®B2
Built for barns, outbuildings, and trailers
Antenna Cable ------------------------ 5 meters / 16.4 Feet
Signal strength gain ----------------- 7 Db.
Weight----------------------------------- 14 Oz. With cable
Trailer Eyes®B2 set Unit weight
Net weight ----------------------------- 4 Lb. 8 oz.
Gross weight -------------------------- 5 Lb. 4 oz.
Warranty
• Trailer Eyes® products are guaranteed with a one year
warranty, which covers workmanship and materials. The warranty
is limited to repairs or replacement.
• This warranty becomes void if the product shows evidence of
having
been misused, mishandled or tampered with contrary to the
applicable instruction manual.
• Normal cosmetic and mechanical wear and tear are not covered
under the terms of this warranty.
• The warranty does not cover the shipping cost, insurance or any
other incidental charges.
• Call Trailer Eyes® before sending any product back for repair. We
will issue you a return authorization number and the instructions
for warranty service. We will need a copy of the purchase receipt
and a brief explanation of the problem.
• To the maximum extent permitted by applicable law, Trailer Eyes®,
its subsidiaries and licensors hereby disclaim all liability arising out
of any use of this product and its contents.
Email Tech Support : info@TrailerEyes.com
Phone Tech Support : 1-630-513-9591
(Monday - Friday, 9 am - 5 pm CST )
www.TrailerEyes.com
Trailer Eyes / Mark Point Corp.
St. Charles, IL USA
13

Table of contents
• Safety Disclaimer ---------------------------------------------------------------- 1
• Safety Warning ------------------------------------------------------------------- 2
• Performance Disclaimer -------------------------------------------------------- 2
• Parts Included and Features ----------------------------------------------------- 3
• Setup Instructions --------------------------------------------------------------- 4
* Trailer Use --------------------------------------------------------------------- 4
• Camera ---------------------------------------------------------------------- 4
•Monitor ---------------------------------------------------------------------- 6
* Barn and outbuilding use ------------------------------------------------- 9
• Camera ---------------------------------------------------------------------- 9
• Monitor --------------------------------------------------------------------- 9
• Best Result Tips --------------------------------------------------------------- 10
• Troubleshooting -------------------------------------------------------------- 11
• Specications ------------------------------------------------------------------ 11
• Monitor -------------------------------------------------------------------------- 11
• Camera ----------------------------------------------------------------------------- 12
• Booster antenna --------------------------------------------------------------- 12
• Warranty -------------------------------------------------------------------------- 13
Safety Disclaimer
This product should not be used by the driver of a motor vehicle
while driving. Always keep your hands free to operate a vehicle while
driving. Obey all local laws. Your rst consideration while driving
should be safety. To the maximum extent permitted by applicable law,
Trailer Eyes®, its subsidiaries and licensors hereby disclaim all liability
arising out of any use of this product and its contents.
Trailer Eyes ®B2
Built for barns, outbuildings, and trailers
Trailer Eyes ®B2
Built for barns, outbuildings, and trailers
Weight----------------------------------- One pound
Up to 8 cameras can be hosted by the monitor
Camera
Transmission Frequency------------ ISM 5.8 GHz
Transmission Power----------------- 200 MW
Operating Frequency---------------- 5.645GHZ, 5.665GHZ, 5.685GHZ,
5.705GHZ, 5.885GHZ, 5.905GHZ,
5.925GHZ, 5.945GHZ
Unobstructed Effective Range----- 1200 ft. Maximum
Operating Temperature ------------ 10 ~ +50(Degree C) / +14~ +122
(Degree F)
Storage Temperature --------------- 20 ~ +60(Degree C) / -4 ~ +140
(Degree F)
Operating Humidity ---------------- ≤85%RH
Imaging Sensor Type ---------------- CMOS Color
Picture Total Pixels ------------------ PAL: 628×582 Pixels , NTSC: 510×492
Pixels
Horizontal Resolution -------------- 380 TV Lines
View Angle ---------------------------- PAL 60°; NTSC:40° Lens: 6.0mm
Minimum Illumination ------------- 0Lux
Night Vision Range ------------------ 30 Ft.
Bandwidth------------------------------ 18M
Consumption Current --------------- 12V 130 mA(IR OFF) & 12V 280mA
(IR ON)(Max.)
Power Supply-------------------------- DC 9V to 12V
Dimensions ---------------------------- 2 ¼” Dia. x 3 ½ L” (Without antenna
and power cord)
Weight ---------------------------------- 9 oz. (Excludes clamping base)
Booster antenna (Two antennas are included)
Transmission Frequency------------ ISM 5.8 GHz
Weather proof magnet base with permanent mount tting.
Antenna base dimensions --------- 4&1/4” Dia. X 2&1/2” H
Antenna rod --------------------------- 11” Long x ½” Dia. 113 2

Safety Warning
• This product should not be used by the driver of a motor vehicle
while driving.
• Please obey your local trafc laws and codes. Drive safely.
• Notice to drivers in California and Minnesota: State law
prohibits drivers in California and Minnesota from using suction
mounts on their windshields while operating motor vehicles. Other
mounting options should be used. Trailer Eyes® does not take any
responsibility for any nes, penalties, or damages that may be
incurred as a result of disregarding this notice (See California
Vehicle code section 26708(a); Minnesota Statutes 2005, section
169.71) Other states may have passed a similar law; please check
your state’s trafc laws and codes.
Performance Disclaimer
5.8 GHz wireless video technology has eight channel frequencies:
The FCC has only opened these eight channels for public use. As a
result, any brand’s 5.8 GHz wireless video monitor can receive the
signal sent from this unit. Also, this unit’s monitor can receive another
camera’s signal (signal interference). Please be warned that there is no
guarantee of your privacy while you are using this unit. Anyone with a
5.8 GHz wireless monitor within 1200 ft. range of this unit’s camera can
receive the signal from this unit.
Trailer Eyes ®B2
Built for barns, outbuildings, and trailers
Trailer Eyes ®B2
Built for barns, outbuildings, and trailers
Troubleshooting
Specications
Monitor
Monitor Type-------------------------- Color TFT-LCD
Screen Size------------------------------ 7”
Wireless Frequency------------------- 5.8 GHz
Supply Voltage------------------------ DC12V, Ripple: <120mVp-p
Consumption Current--------------- 320 mAh.
Operation Temperature------------- 14F~+140F , 10 C--50 C.
Operation Humidity----------------- 85% RH (Max)
Received Frequencies---------------- 5.645GHZ, 5.665GHZ, 5.685GHZ ,
5.705GHZ, 5.885GHZ, 5.905GHZ,
5.925GHZ, 5.945GHZ
Color conguration------------------ RGB. 480X234 delta
Video System-------------------------- PAL/NTSC
Dimensions----------------------------- 7” x 4&3/4” x 7/8”, Excludes base
and power cord 12 1
Problem Possible Solution
1. Check all connections and power.
(In order to have power in the lighter
socket, some vehicles need to have the
engine turned on.)
2. Make sure the camera and monitor are
switched to ON.
3. If you are using a 9V battery to power
the camera, change the battery.
4. Camera and monitor are within range.
Picture Interference 1. Reposition the monitor’s antenna.
2. Mount the camera next to an open win
dow or panel.
3. Drive the vehicle and the trailer for a
short distance. Once away from a
heavy interference area, the picture
will improve.
No camera picture

Trailer Eyes ®B2
Built for barns, outbuildings, and trailers
Trailer Eyes ®B2
Built for barns, outbuildings, and trailers
Parts included
1. Windshield suction mounting bracket for monitor
2. Booster antenna (7-pin connector, 16 ft. cable, magnet base) for
monitor
3. Booster antenna (5-pin connector, 16 ft. cable, magnet base) for
camera
4. Two screw sets for antenna bases (for permanent mounting use)
5. Monitor ( 7” , 5.8 GHz. TFT LCD color, wireless )
6. Camera (weather proof, color, with automatic infrared night vision
function) Note: in order to receive color pictures, the light and
settings must be in decent studio conditions. Otherwise, it will not
show the true color.
7. Two AC/DC power adapters (one for the monitor, one for the
camera)
8. Desktop mounting bracket for monitor
9. Car lighter power adapter for monitor
10. Permanent mounting bracket for camera
11. 9V battery
Best Result Tips
Minor interference will occur when using open commercial 5.8 GHz
video signal technology. The running engine and motor will generate
some interference and show in the monitor. Overall, 5.8 GHz channels
have much less interference than 2.4 GHz. channels.
The range of the signals is usually stated based on line of sight. This
means the antenna of the camera can see the antenna of the monitor.
The wireless signal will need about a 30 ft. diameter clearing between
antennas for maximum range. We strongly recommend the antenna
be mounted as high as possible. The signal power will be reduced by
obstacles such as trees, bushes and buildings; the more obstacles in
between the less distance can be achieved. Metal and concrete are the
hardest for the signals to penetrate.
For best performance, please consider these few guidelines:
• The distance between the monitor and camera
-- Straight line, clear view, no obstacles in between, up to 1200 feet.
-- When the camera is in the trailer and the signal needs to go
through layers of metal and the antennas can’t see each other; up
to 60 feet.
• A fresh 9V battery to provide adequate power to transmit the signal.
A name brand alkaline 9V battery can operate the camera up to 2
hours during the day or 1 hour in night vision mode. Once you
know where you’d like to mount your camera, please hard wire the
12V trailer light power adapter to your trailer’s lighting system so
you won’t need to worry about changing the battery afterward.
• Mount the monitor booster antenna low and far back on the side of
your vehicle.
• Camera booster antenna should be mounted next to an opened win
dow or panel.
• Turn off the camera while it is not in use.
• When not in use for long periods of time, please store the unit in a
cool, dry place.
311 0

Trailer Eyes ®B2
Built for barns, outbuildings, and trailers
Trailer Eyes ®B2
Built for barns, outbuildings, and trailers
12. C Clamp mounting base for camera, with battery case attached.
13. 12V power adapter for camera
14. Screw set for permanent camera mounting bracket
Features
• 5.8GHz wireless, night vision, color, weatherproof camera
• No tools required for installation. Can be setup in 5 minutes.
• Removable clamping base and permanent camera mounting bracket
are included.
• Adjustable color monitor (brightness, contrast). Note: in order to
have color in the monitor, the light and settings must be in decent
studio conditions.
• Two outdoor, weather proof booster antennas for guaranteed
reception.
• Automatic Infrared Night Vision camera. Can be operated in total
darkness within a 10 meter range (When the night vision function is
on, the monitor will only show black and white pictures)
• Power source can be from a 9V battery , 12V car lighter jack or 110V
/240V AC/DC adapters
• A single alkaline 9V battery can operate the camera for up to 2 hours
in daytime, or one hour in night vision mode.
Trailer Eyes® B2 set can be used everywhere and setup in 5 minutes.
Setup Instructions
For trailers
Setting up the camera in the trailer
1. Insert a 9V battery into the battery compartment. Turn the ON/OFF
switch to the OFF position. Or hard wire the 12V power adapter to
the trailer’s lighting power.
For barns and outbuildings
Setting up the camera in the barn
1. Use the clamping base or the permanent bracket to mount the
camera. The clamping base can be clamped on any pole or board
which is less than 2 ¼” diameters thick. Choose the mounting spot
(as high as possible) and tighten the clip bolt on the clamping base.
2. Plug the 110 /240V AC adapter into the power outlet and to the
camera.
3. Attach the antenna 5-pin connector to the camera, tighten the pin
screw.
4. Loose the tilt lock knob, adjust the camera, point it in the direction
you wish to monitor, tighten the tilt lock knob.
5. Position the camera booster antenna (outdoor preferred) as high as
possible. The antenna has a magnet base, and can stick to any steel
surface. Or you can mount it permanently with a screw.
6. Arrange the antenna cable neatly.
Setting up the monitor in the house or ofce
1. Attach the monitor to the desktop mounting bracket.
2. Attach the 7-pin connector antenna to the monitor.
3. Position the monitor booster antenna (outdoor preferred) as high
as possible. The antenna has a magnet base, and can stick to any
steel surface. Or you can mount it permanently with a screw.
4. Plug the 110 /240V AC adapter into the power outlet and monitor.
5. To turn on the monitor—Press the “POWER” button.
6. Switch to the correct channel that coordinates with your camera’s
channel. To switch channels- Press the “CH” (Channel) button,
cycle through the channels. There are 8 channels to cycle through.
Once the correct channel is found, the screen will show the object
you are monitoring.
7. Arrange the monitor power wire and the antenna cable neatly.
94

Trailer Eyes ®B2
Built for barns, outbuildings, and trailers
Trailer Eyes ®B2
Built for barns, outbuildings, and trailers
2. Use the clamping base to mount the camera. The clamping base can
be clamped on any pole or board with less than 2 ¼” diameter
thickness. Choose the mounting spot and tighten the clip bolt on the
clamping base.
3. Loosen the tilt lock knob, adjust the camera, point it in the direction
you wish to monitor then tighten the tilt lock knob.
4. Attach the booster antenna (5-pin connector) to the camera, tighten
the pin connector screw.
5. Position and secure the booster antenna close to an opened window
or panel (the antenna has a magnet base). Unless your trailer is lon
ger than 40 feet, you don’t need to mount the camera booster
antenna outside of your trailer.
6. Arrange the excess antenna cable neatly.
7. Turn the camera ON/OFF switch to the ON position.
(Note : Once you know where you would like to clamp the camera, a
few trips later, please hard wire the 12V trailer light power adapter to
your trailer’s lighting system. That way, you won’t need to worry about
changing the battery any more.)
8. Adjust the position of the monitor, the antenna wire and the power
wire to avoid interference with the driver. You should be able to see
the observation object in your monitor now. You might need to
adjust the camera angle and/or the position of the booster antenna
for better reception.
To remove suction mount from windshield
1. Flip back the lever lock
2. Pull the tab on the suction mount rubber pad. The unit
should come off easily. Do not use excessive force to pull off
the suction mounting unit. You may cause damage to the unit
or windshield.
58

Trailer Eyes ®B2
Built for barns, outbuildings, and trailers
Trailer Eyes ®B2
Built for barns, outbuildings, and trailers
Setting up the monitor in the vehicle
1. Attach the monitor to the suction mounting bracket.
2. Mount the suction mounting bracket to the windshield.
3. Attach the 7-pin connector antenna to the monitor. Tighten the
connector screw.
4. Place the monitor booster antenna inside of your vehicle, near a
window (window does not need to be opened) . Secure the antenna
and excess cable neatly. Do not let monitor or antenna interfere with
driver or passengers.
5. If your trailer is more than 40 feet long or has problems receiving
the signal from the camera, you may need to mount the booster
antenna outside of your vehicle.
Please refer to the following steps
– Open the car door, mount the monitor booster antenna
(magnet base) on the roof of your vehicle; Or, for better
results, mount the monitor booster antenna low and far back
on the side of your vehicle. (When using Trailer Eyes B2 set
in truck and trailer setting, the antenna rod can be folded
down.) Run the wire between the antenna and the monitor
through the car door and the car frame, not through the car
window and door frame. After the antenna is mounted, tuck
the antenna cable into the rubber frame edge, then shut the
car door. The cable will not be cut.
6. Plug the power jack into the monitor then plug the 12V car lighter
adapter into the car lighter socket. Turn the monitor on. (Press the
“Power” button, blue light will be lit) Some vehicles need the engine
turned on to supply power to the lighter socket.
7. Switch to the correct channel that coordinates with your camera’s
channel. To switch channels- Press the “CH” (Channel) button,
cycle through the channels. There are 8 channels to cycle through.
Once the correct channel is found, the screen will show the object
you are monitoring.
6 7
Table of contents
Popular Security System manuals by other brands
Interlogix
Interlogix ACL800SUW-BSMF installation manual
Whelen Engineering Company
Whelen Engineering Company 1010 installation guide

Apollo
Apollo REACH WIRELESS RW1500-110APO quick start guide
Texecom
Texecom Premier Elite 8XP-W installation manual
Federal Signal Corporation
Federal Signal Corporation Pathway Installation and maintenance instructions
AV
AV Portable Studio manual
CIAS Elettronica S.r.l.
CIAS Elettronica S.r.l. ERMO 482x PRO Installation handbook
Defender
Defender DFSW2K8B4 quick start guide
Alderon Industries
Alderon Industries Wireless Versa'larm VA01B Operation, maintenance and installation manual

ACTi
ACTi B41 Manual guide
Jaxon
Jaxon XTR CARP FLEX VT Operation manual
OneSpan
OneSpan Digipass FIDO Touch user guide
