Trakm8 T8 Operator's manual

Page 1 of 27 Company Confidential
Version 1.0
The AA Ltd
AA Signs Division
Installation Documentation
Ford Transit
Page 2 of 27 The AA Signs– Company Confidential
Version 1.0
Overvie
The Signs division of The AA Ltd require Trakm8 to provide a telematics solution that will monitor, collate and stream data
including:
CAN us data to show fuel usage
Beacons– input zero to monitor when the eacons are operational
Green/red switch enclosure – input 1 and input 2 to monitor when sign(s) deployed and collected
GPS tracking
Driver Feed ack
Please note that driver identification (dallas key) is no longer required on The AA Signs. Disconnect the driver id receiver from the
T8 premium iring loom (2 molex connectors) but DO NOT remove it from the vehicle panel.
This document has een produced to provide exact instructions on how this equipment is to e installed, input location and
any interfaces have een agreed with The AA Ltd and under no circumstances should e deviated from without written
permission.
Please note that you are not insured to drive / move The AA Ltd vehicle during the installation process.
Ensure the ignition remains s itched OFF at all times during the installation. Any connections made ith po er to the Trakm8
unit ill cause faults on the vehicle ECU.
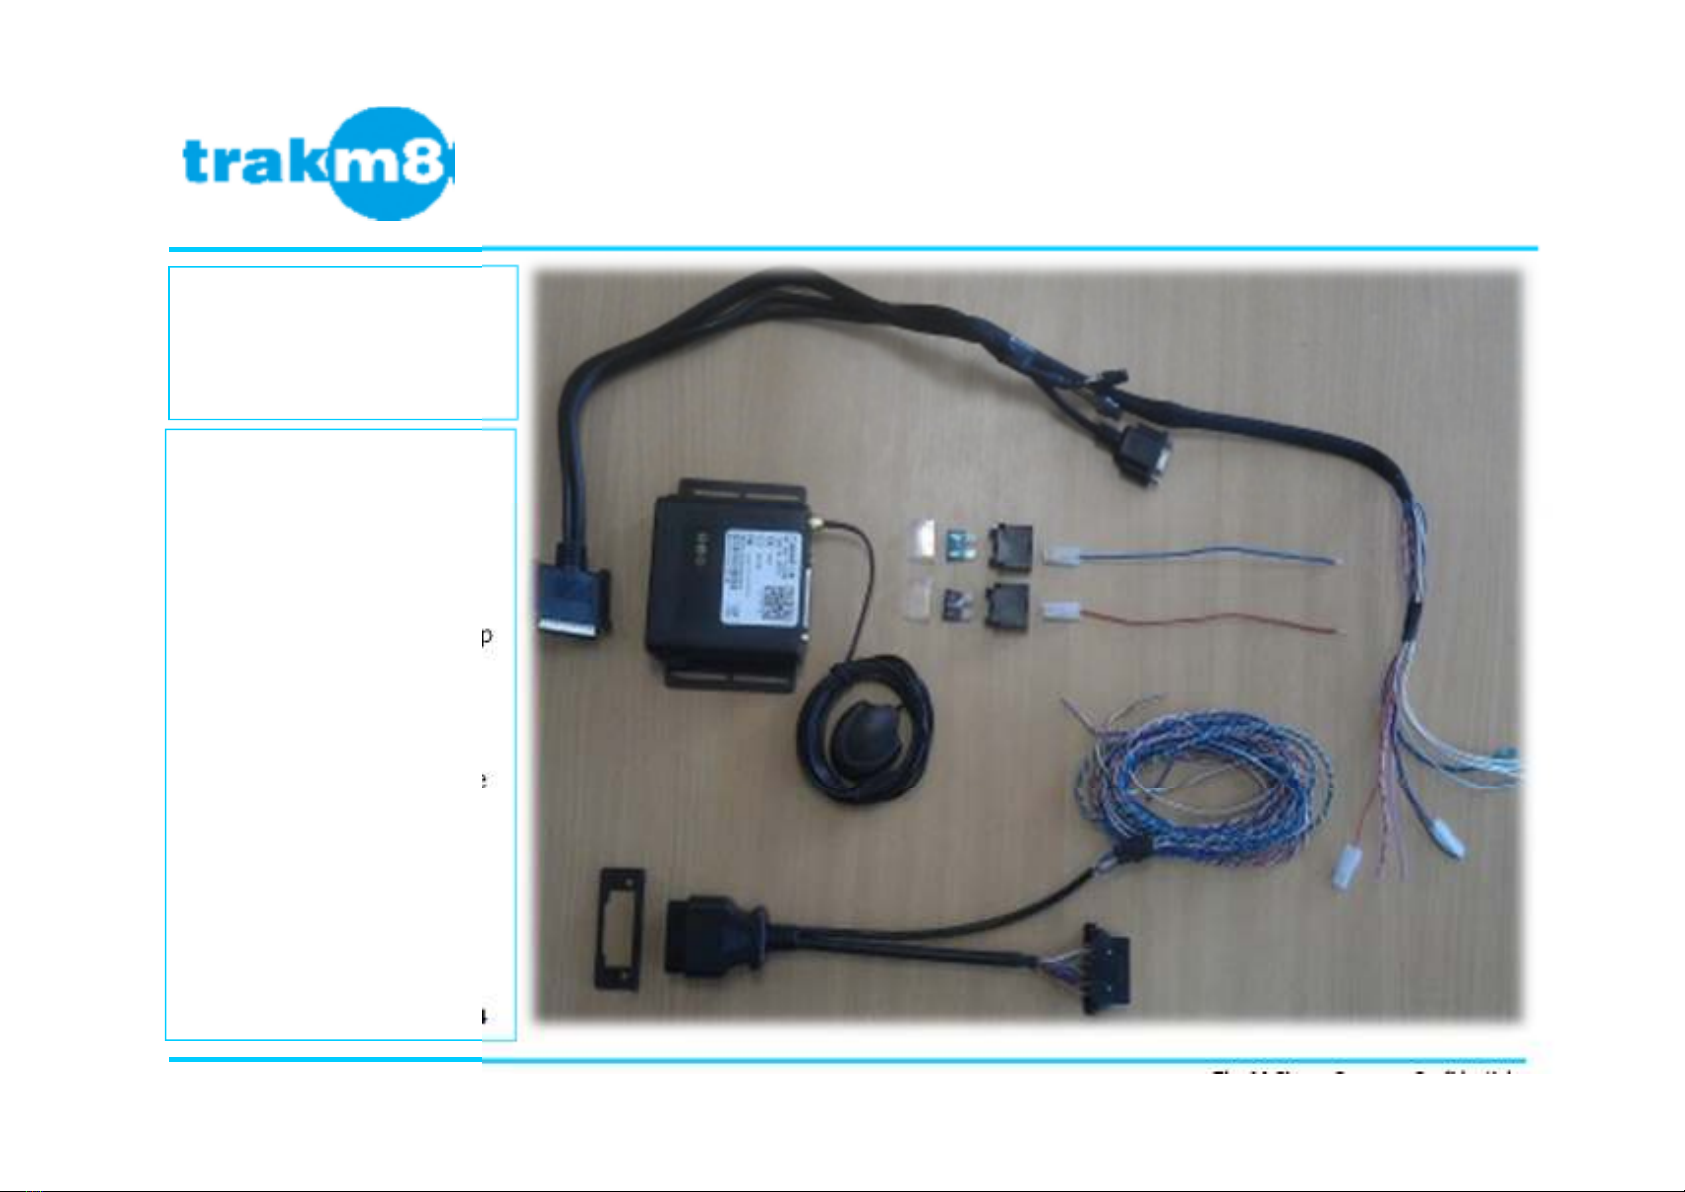
Hardware required for Ford
Transit
•Trakm8 T8
•Premium Wiring Loom
•GPS Antenna
•Fuse Kit (2 x Holder + 1 Amp
and 2 Amp fuse)
•T-Piece
•T-Piece Bracket
•T-Piece CAN Extension Ca le
Hard are continued on page 4
Page 3 of 27
Hardware for
Ford Transit
The AA Signs– Company Confidential
Version 1.0
Trakm8 Install Ford Transit
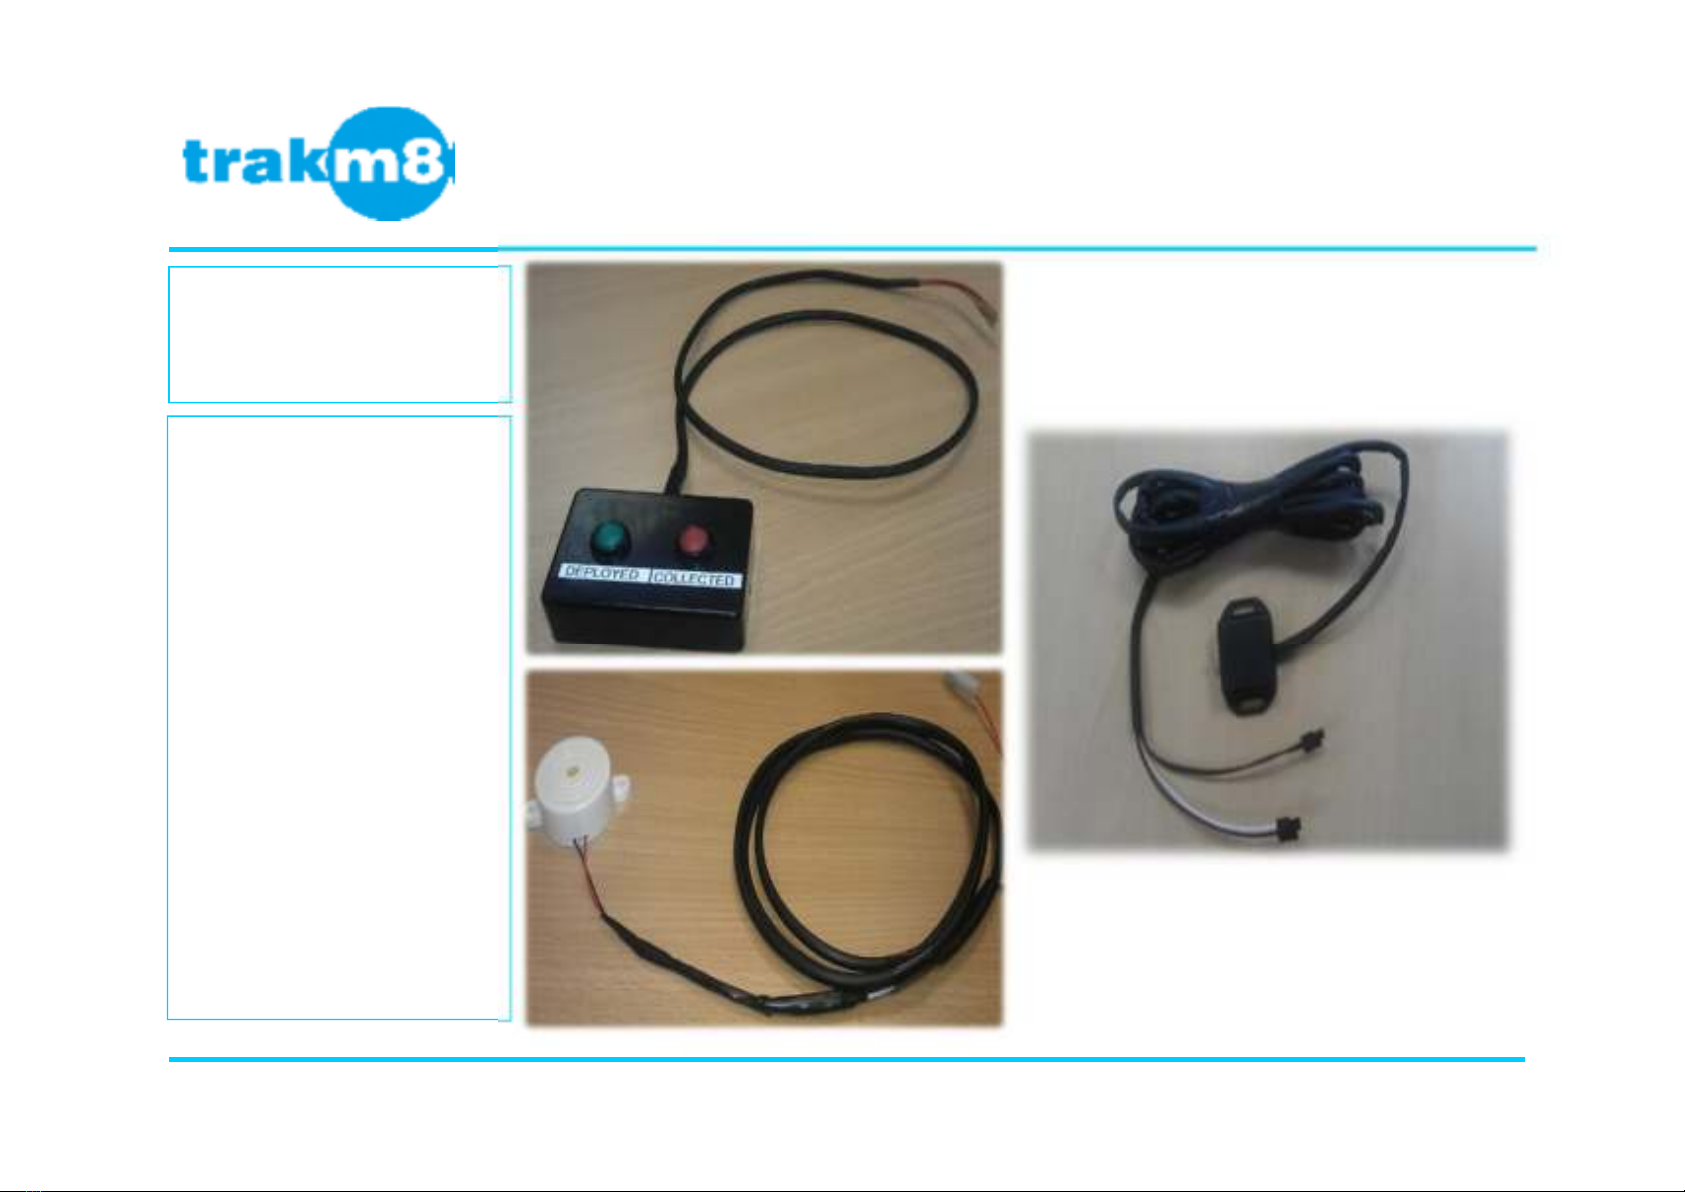
Hardware required for Ford
Transit
•Push utton enclosure
- GREEN (Deployed)
- RED (Collected)
•Single LED Driver Feed ack
Module
•Buzzer
•1K Resistor
Page 4 of 27
Hardware for Ford
Transit
The AA Signs– Company Confidential
Version 1.0
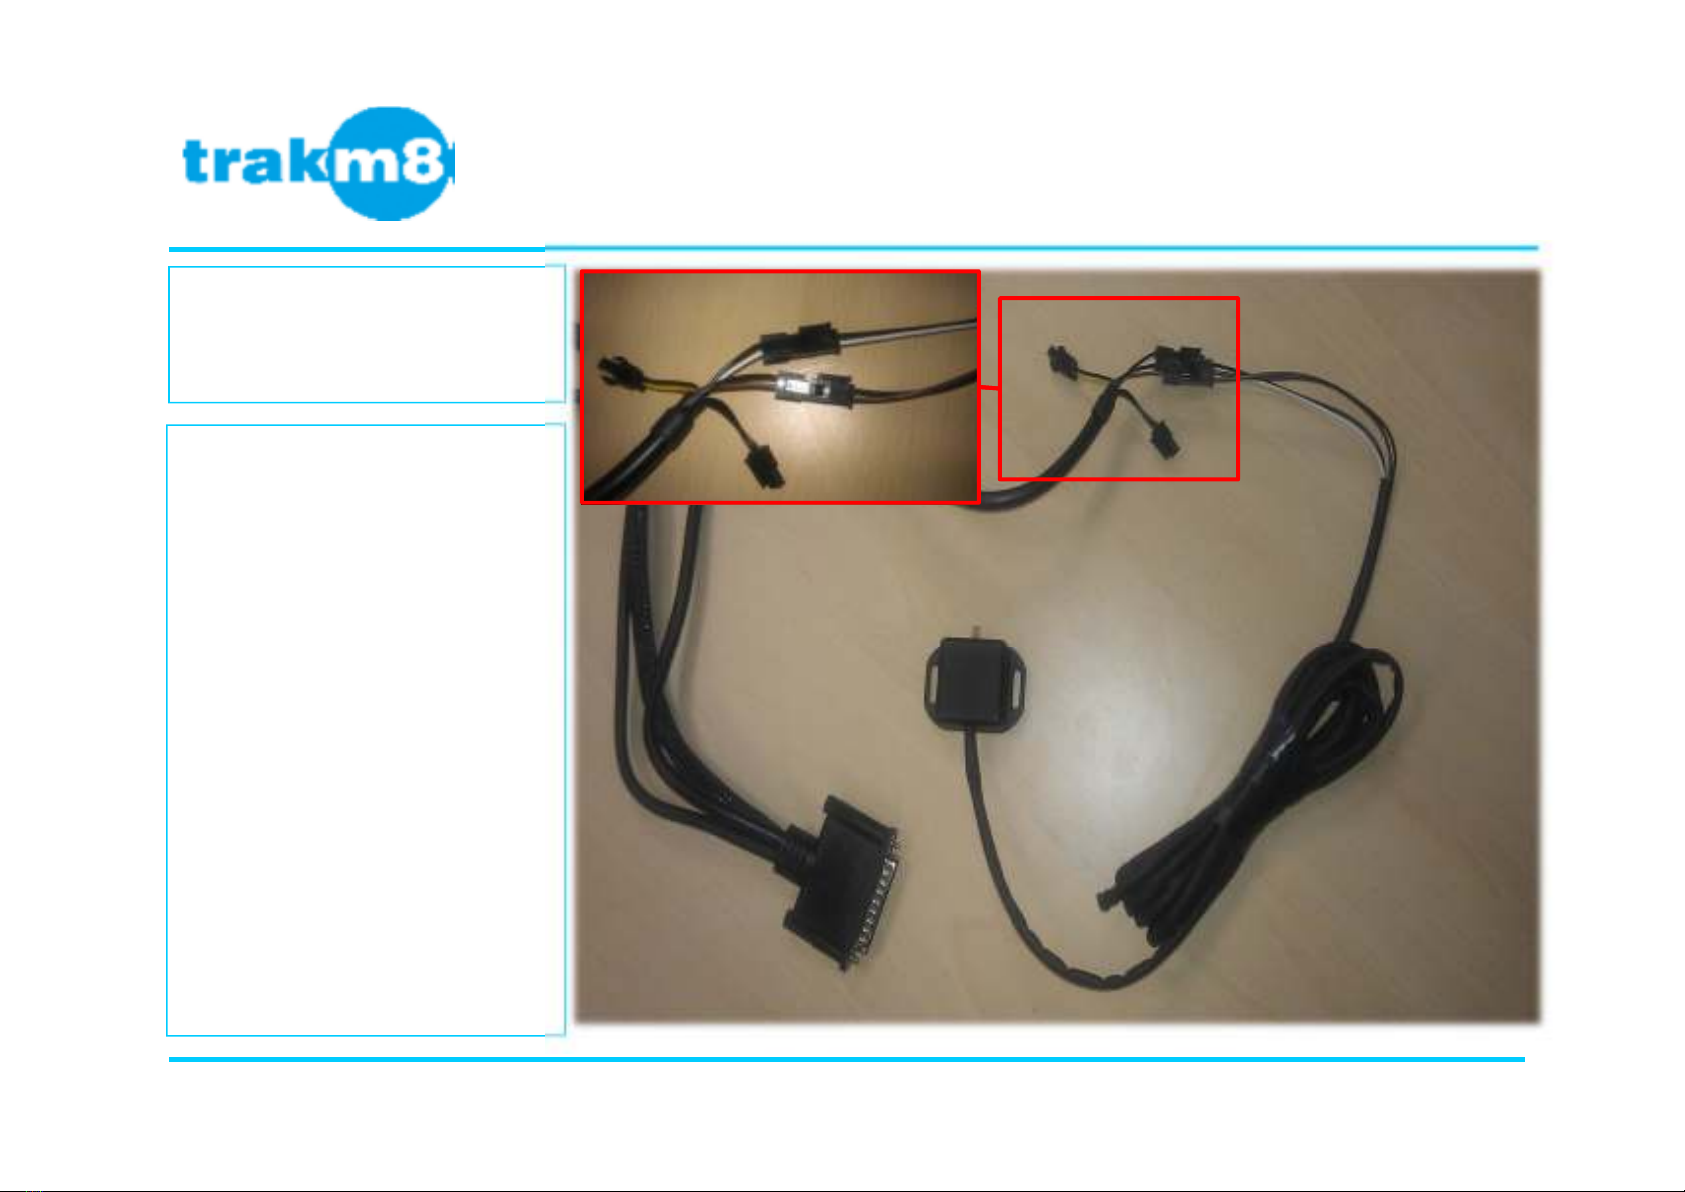
Trakm8 Install Ford Transit

Complete kit
(Pre-installation)
OBD
Trakm8 CAN us (T-Piece) Install
Page 5 of 27 Version 1.0 The AA Signs– Company Confidential
This image shows the wires
required for installation
(Also see wiring notes on
page 26)
•Red = Live (12volts on
vehicle)
•Blue = Ignition on vehicle
•Black = Earth to a
chassis olt on vehicle
•Green/White (part of
twisted pair) = CAN us
High
•Blue/White (part of
twisted pair) = CAN us Low

The purpose of this
information is to provide
a guide and specification
for the installation of the
TrakM8 telematics unit
into a Ford Transit.
This instruction is
specific to the Ford
Transit.
Page 6 of 27
Purpose Of
Information
The AA Signs– Company Confidential
Version 1.0
Trakm8 Install Ford Transit
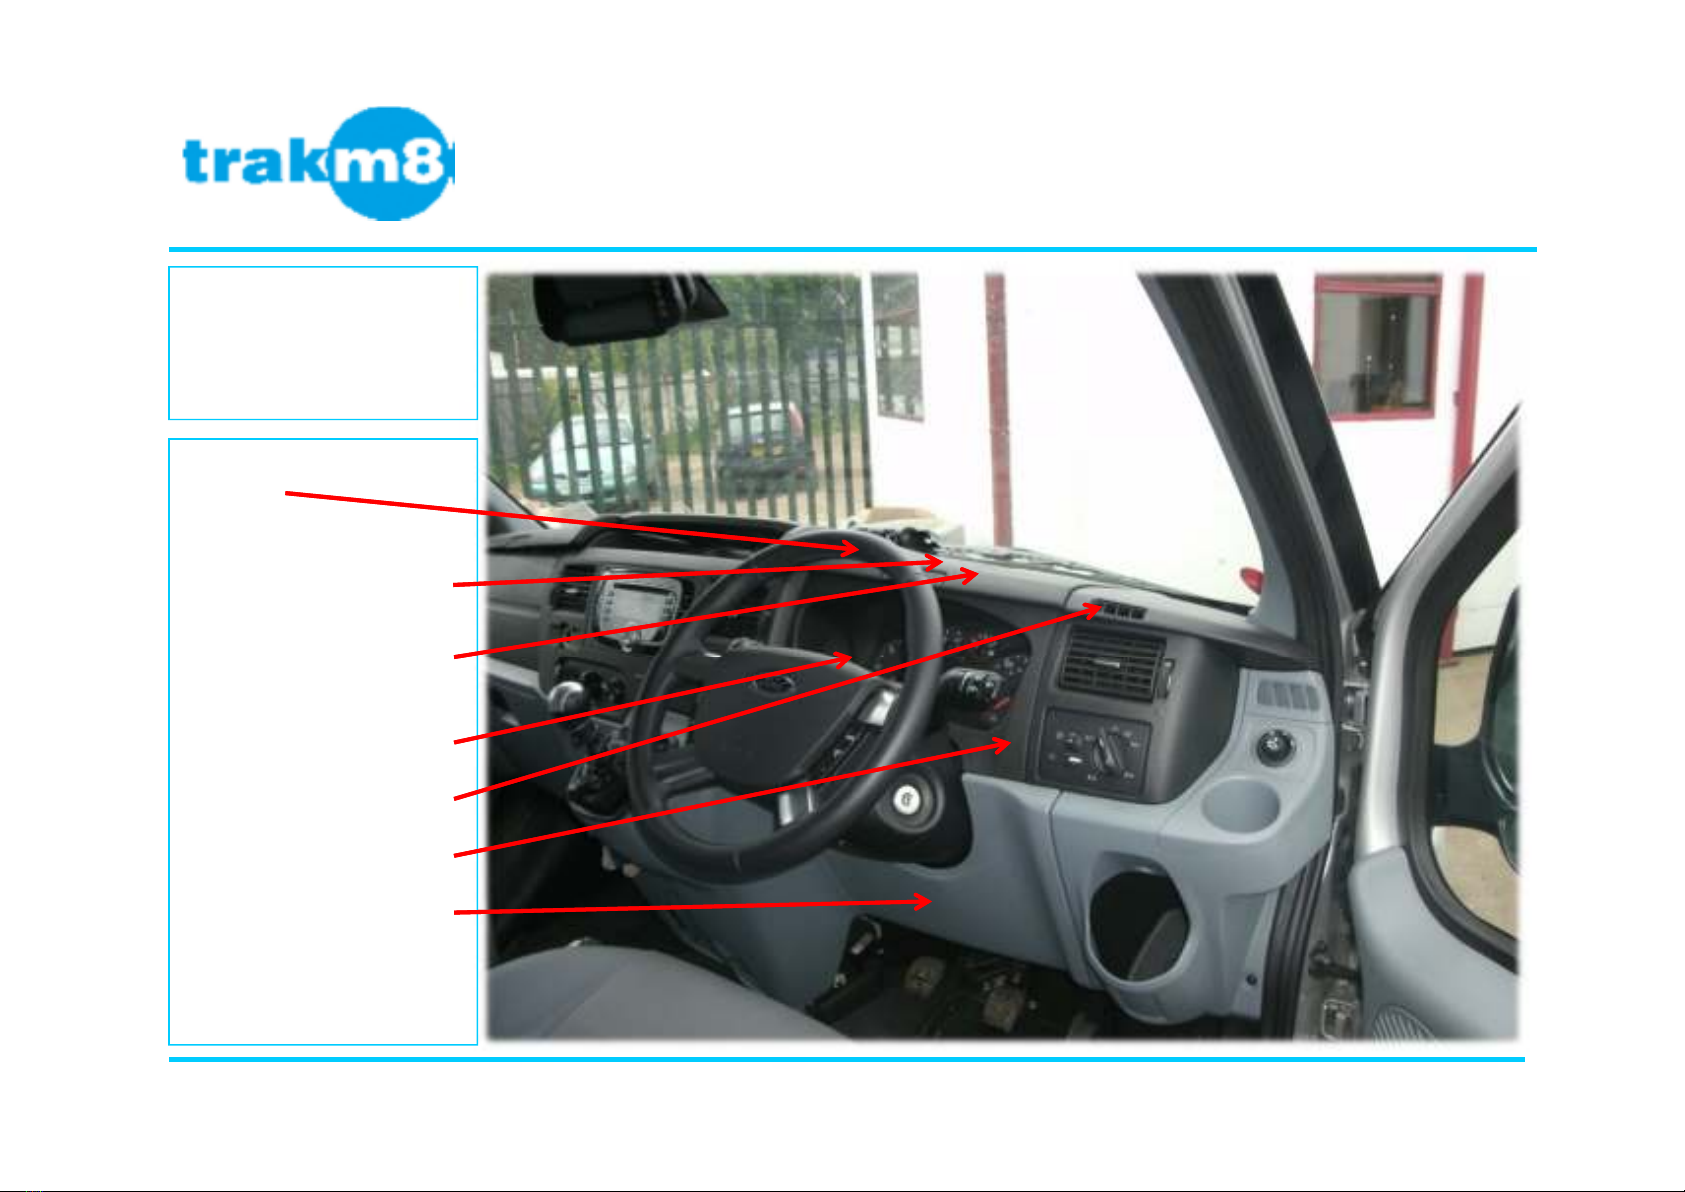
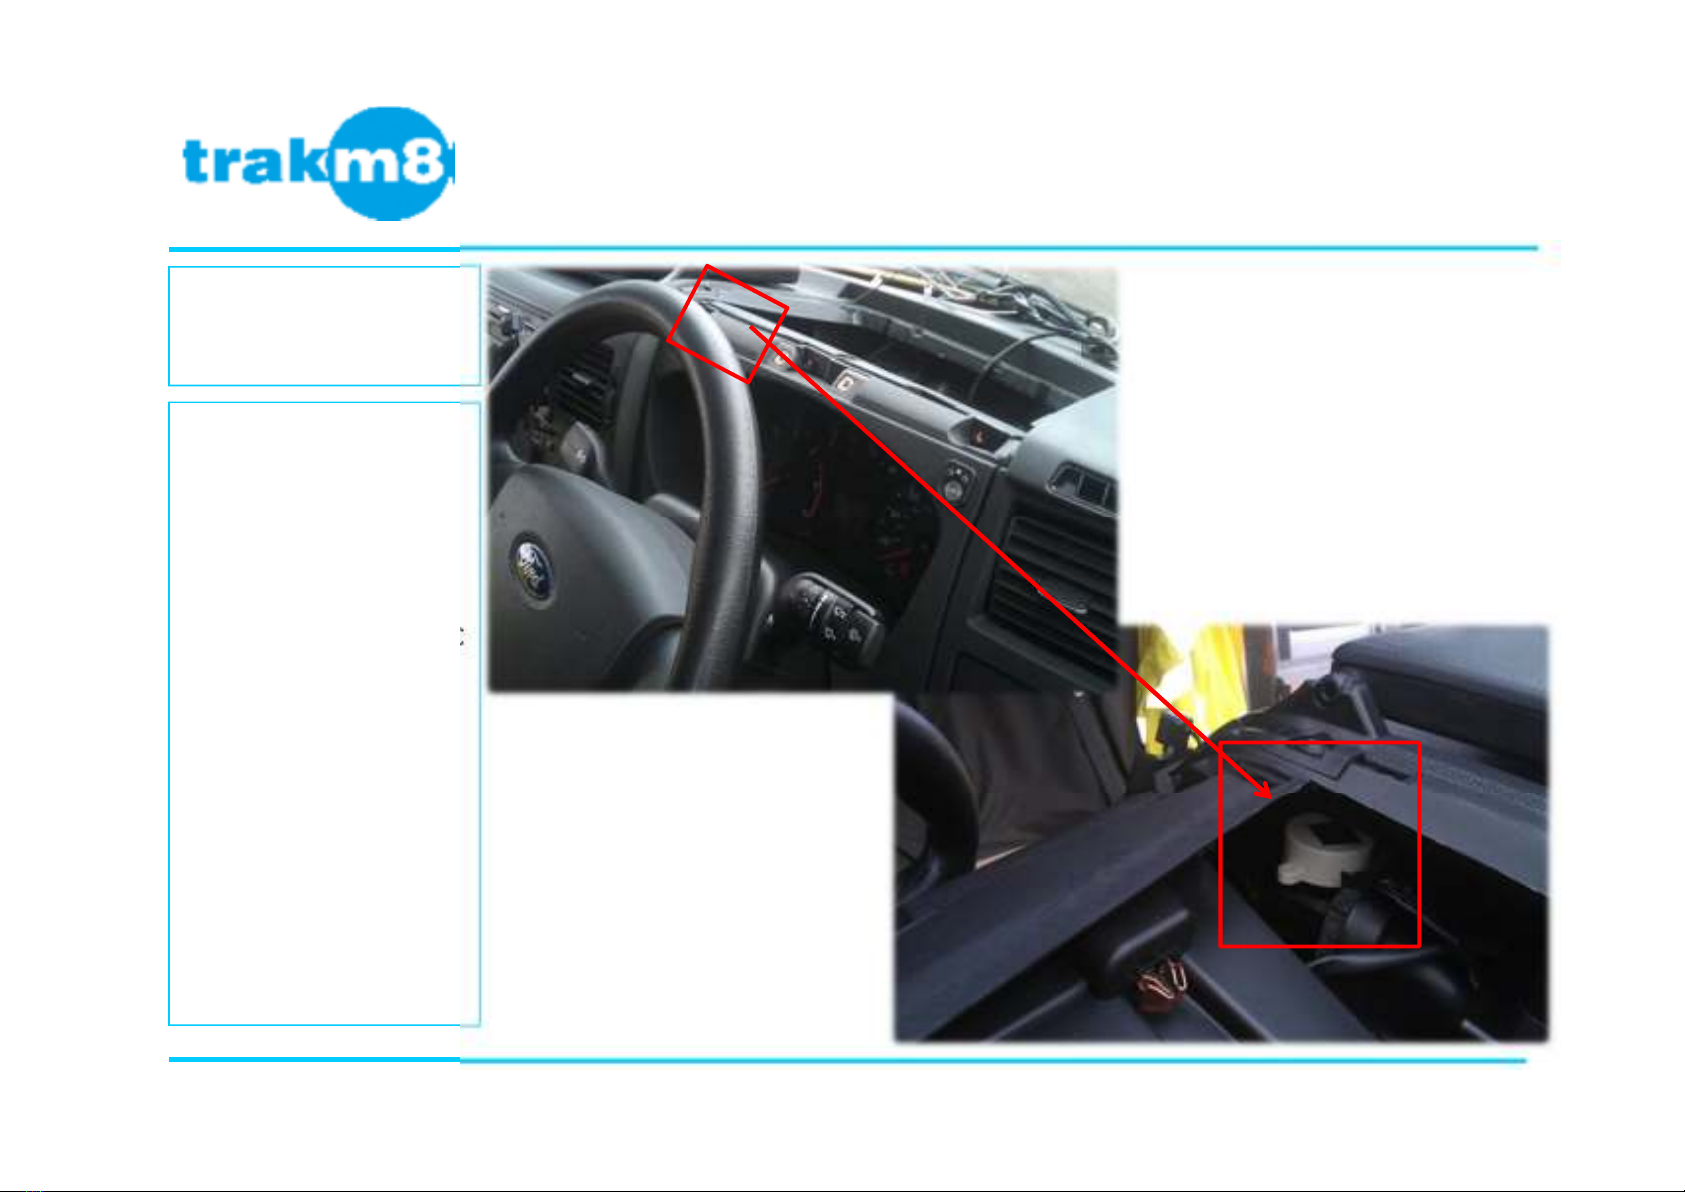
The key points are:
•Buzzer
•Main TCU location
mounted under glove ox
ehind clocks.
•Power pick up points in
loom under glove ox
ehind clocks.
•Driver Feed ack Module
in front of clocks
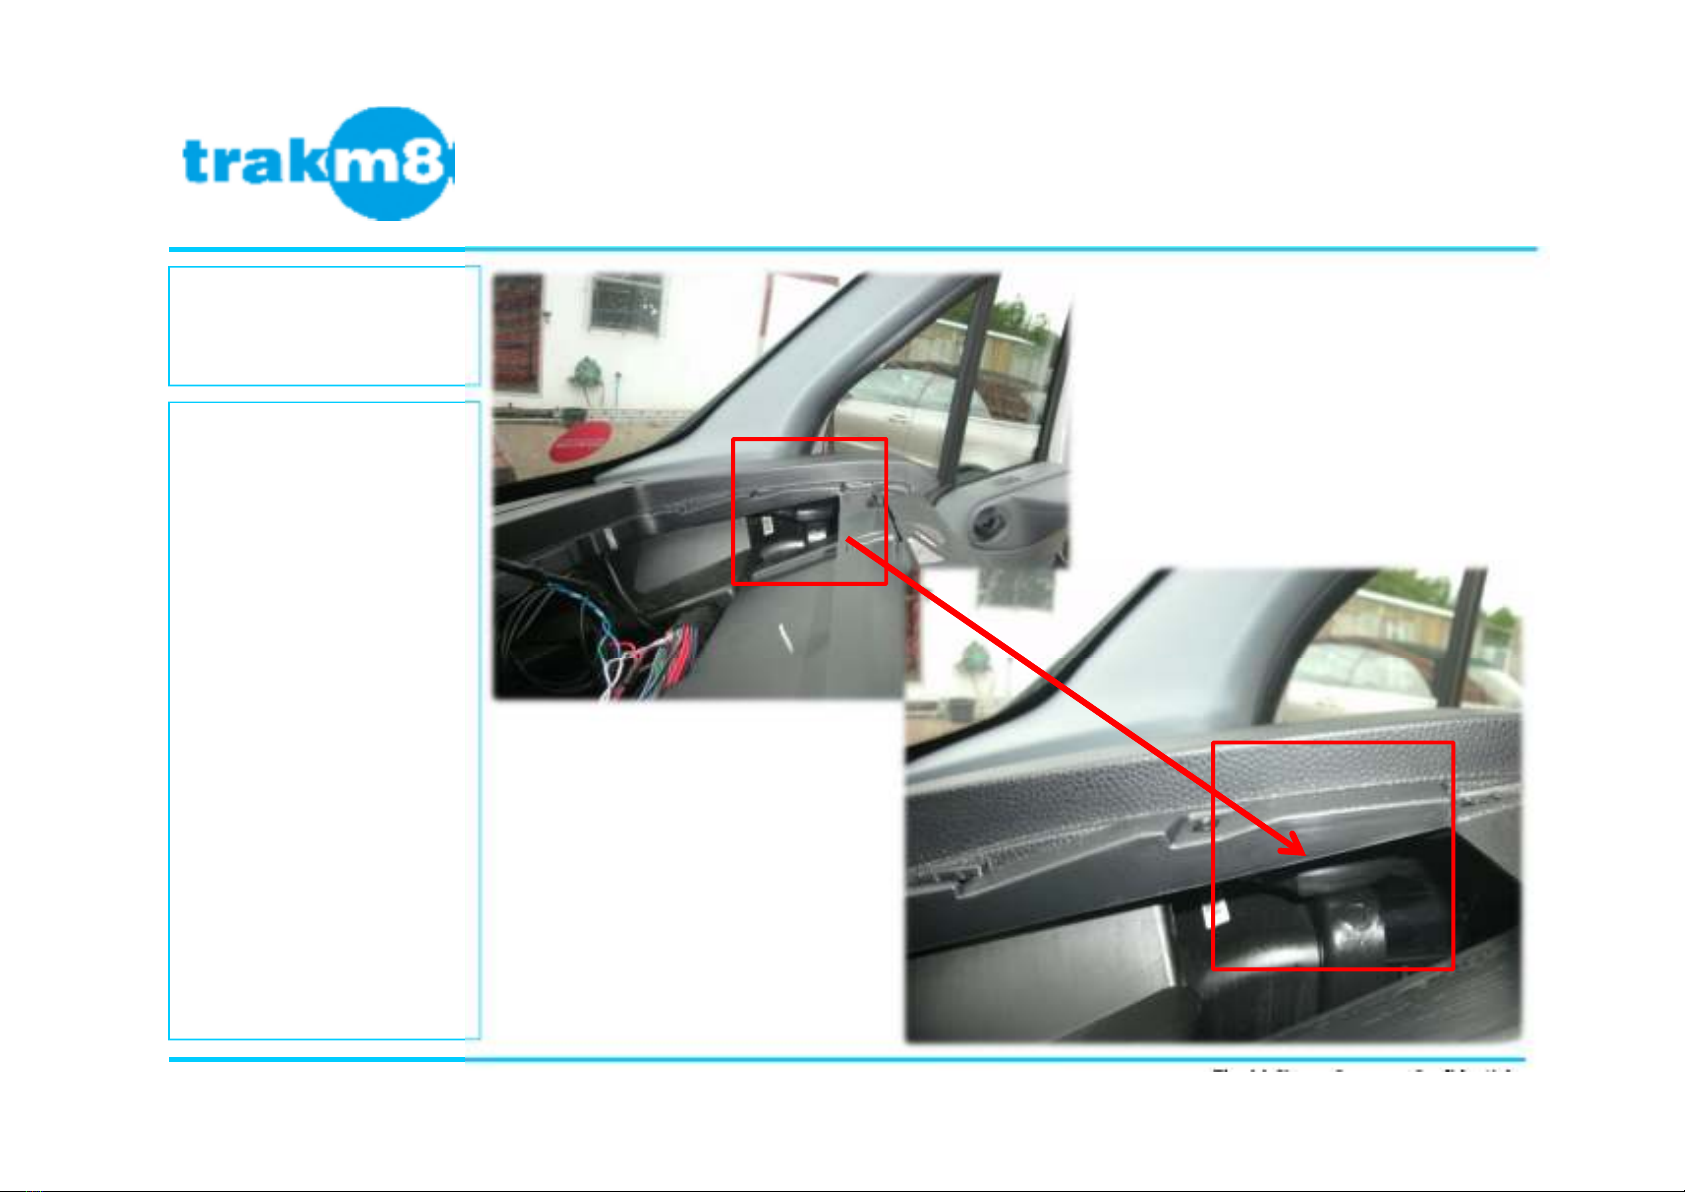
•GPS Antenna location
a ove heater vent.
•Push utton enclosure
•CAN us pick up from T
Piece at OBD socket.
Page 7 of 27
Overview
The AA Signs– Company Confidential
Version 1.0
Trakm8 Install Ford Transit
•The Driver Feed ack Module
(DFM) is located onto the left
hand side of the driver
instrument console as shown.
•Thoroughly clean the surface
and adhere the DFM to the
surface with the adhesive pad
supplied.
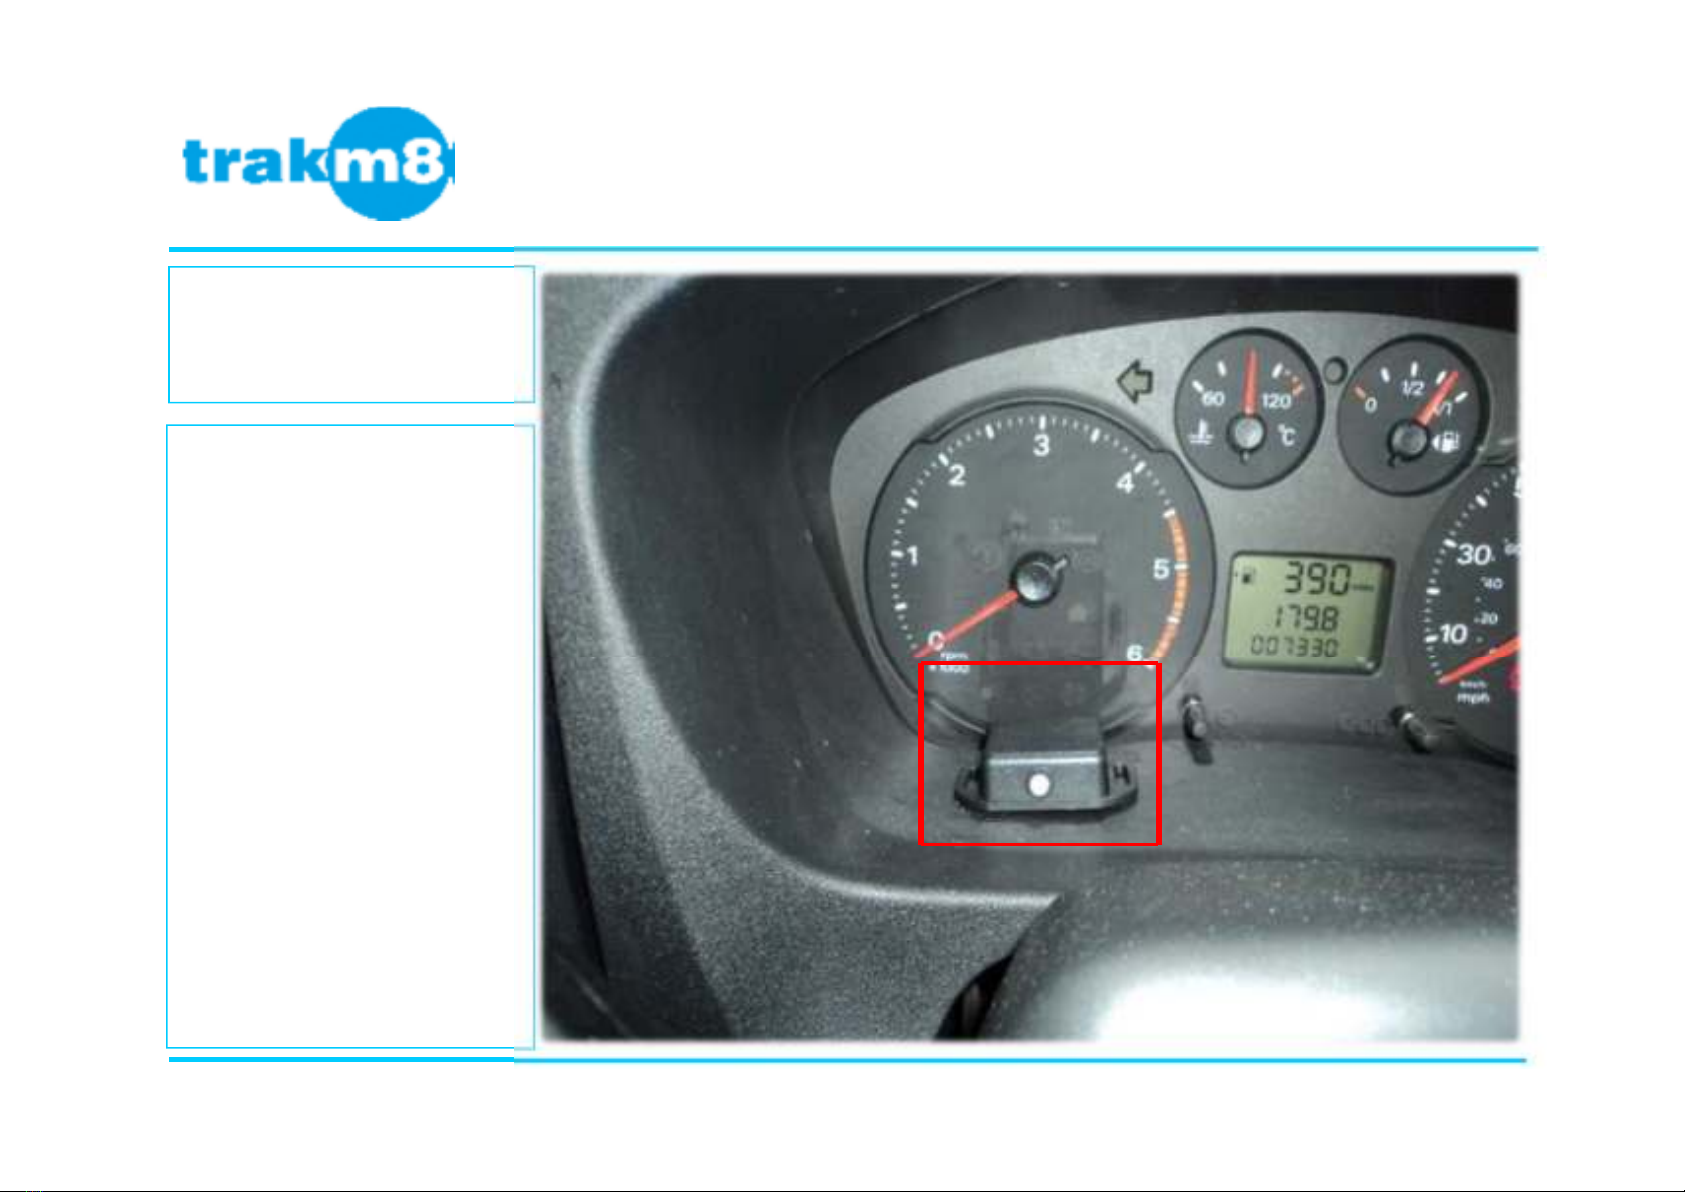
Page 8 of 27
Secure the Driver
Feed ack Display
The AA Signs– Company Confidential
Version 1.0
Trakm8 Install Ford Transit
•Attach DFM Molex connectors to
the corresponding female Molex
connectors the T8 main loom:
BLACK/WHITE to BLACK/WHITE
BLACK/BROWN to BLACK/BROWN
•Neatly store any excess ca le
alongside the unit.
Page 9 of 27
Connect the DFM to the
Trakm8 Unit
The AA Signs– Company Confidential
Version 1.0
Trakm8 Install Ford Transit

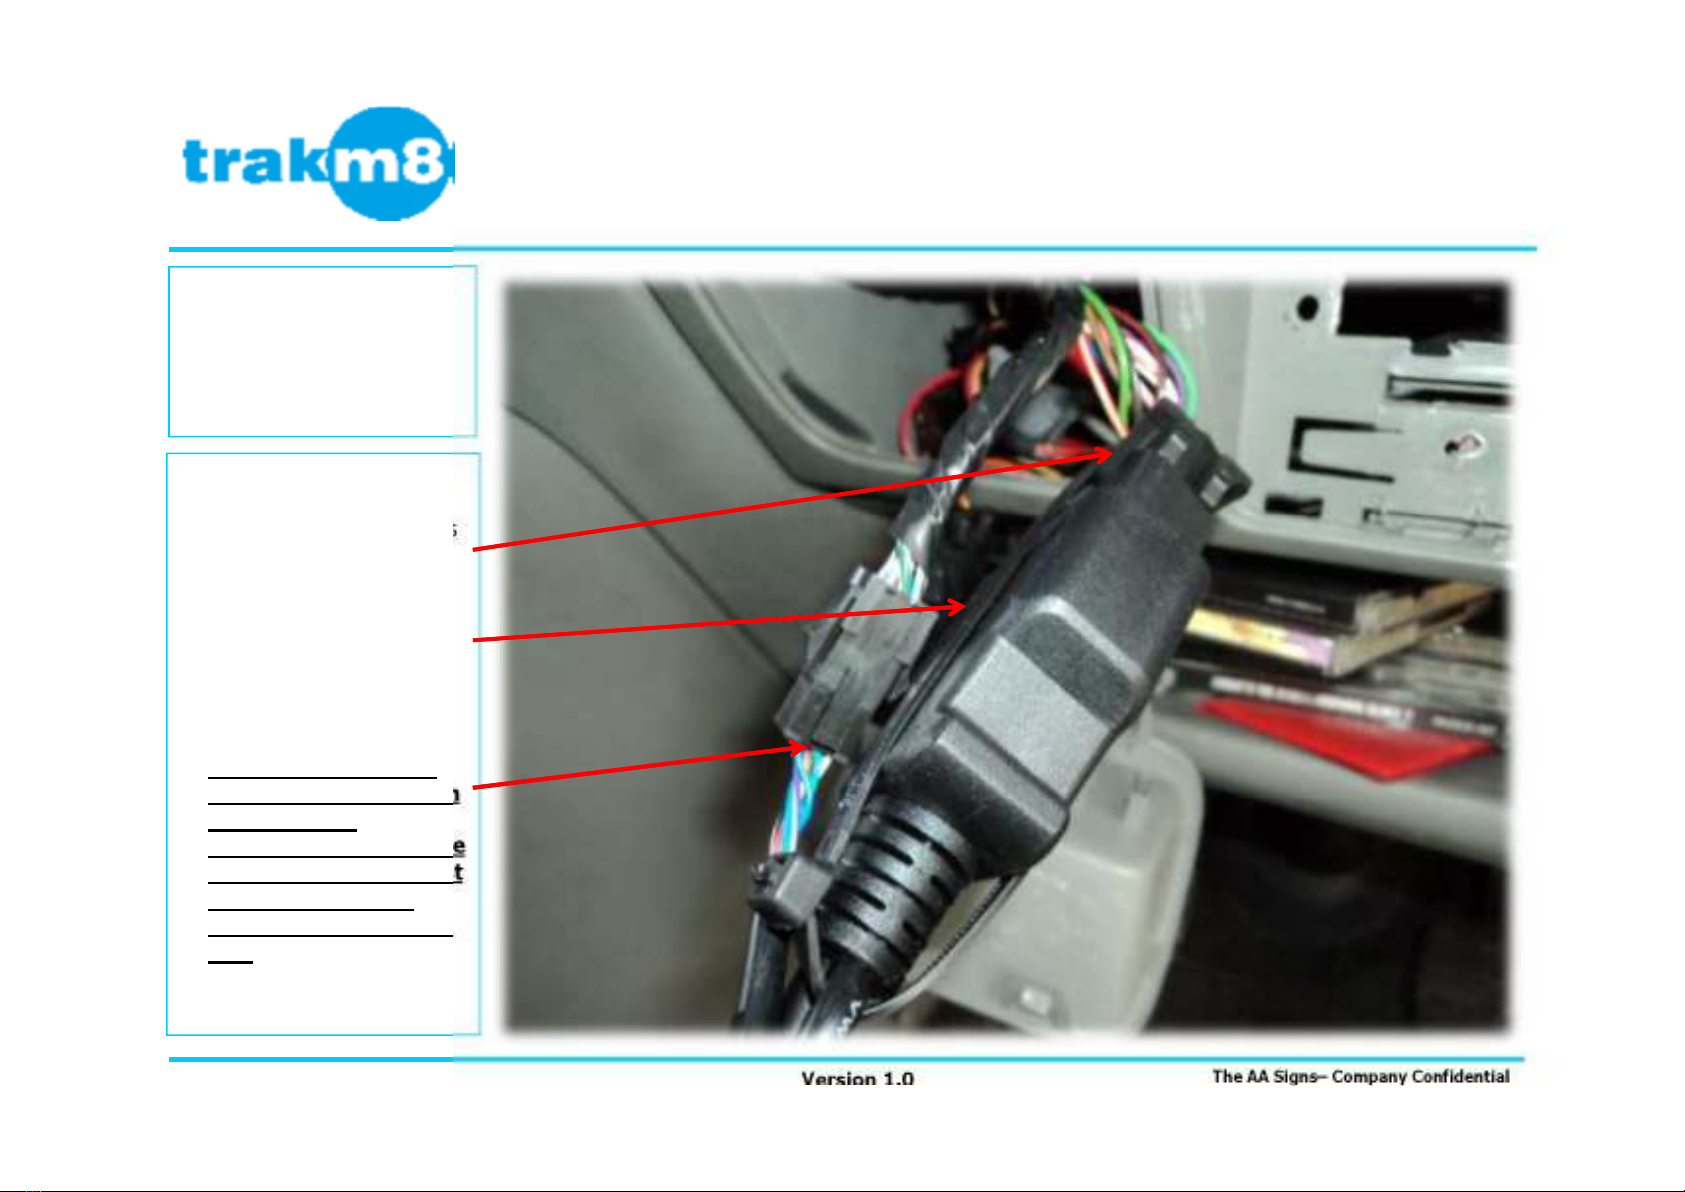
•Remove the lower dash
panel y carefully
releasing from the metal
clips
•Remove the original OBD
connecter y removing 2
philips screws.
Page 10 of 27
Locate the vehicle
OBD socket
The AA Signs– Company Confidential
Version 1.0
Trakm8 Install Ford Transit

Page 11 of 27 Version 1.0 The AA Signs– Company Confidential
Trakm8 Install Ford Transit
CAN us Pick Up
OBD
•Cut the T-Piece extension ca le
to the required length and then
identify the green/white and
lue/white twisted pair of wires
on oth the T-Piece and the
extension ca le and solder
accordingly:
Blue/White to Blue/White
Green/White to Green/White
•Ensure the T-Piece is
connected to the extension
ca le as shown.
•Tape exposed joints with self
amalgamating and insulation
tape.
•Connect the vehicle OBD
socket into the T-Piece as
shown.
•Ensure that the OBD
socket locates firmly into
the T-Piece and provide
additional security with a
ca le tie
•NB: The T-Piece CAN
extension cable sho n
alongside the
connector is part of the
Trakm8 loom and must
be routed ith the
OBD cable to the Main
TCU
Page 12 of 27
Attach the T-Piece to
the vehicle OBD
socket
The AA Signs– Company Confidential
Version 1.0
Trakm8 Install Ford Transit

•Attach the T-Piece
racket to the Trakm8
OBD socket. Ensure that
the plug locates firmly
and securely into the
racket.
•Locate the Trakm8 OBD
socket in the original
OBD position.
•Secure the racket in
place with the 2 original
screws.
Page 13 of 27
Secure the T-Piece to
the racket
The AA Signs– Company Confidential
Version 1.0
Trakm8 Install Ford Transit
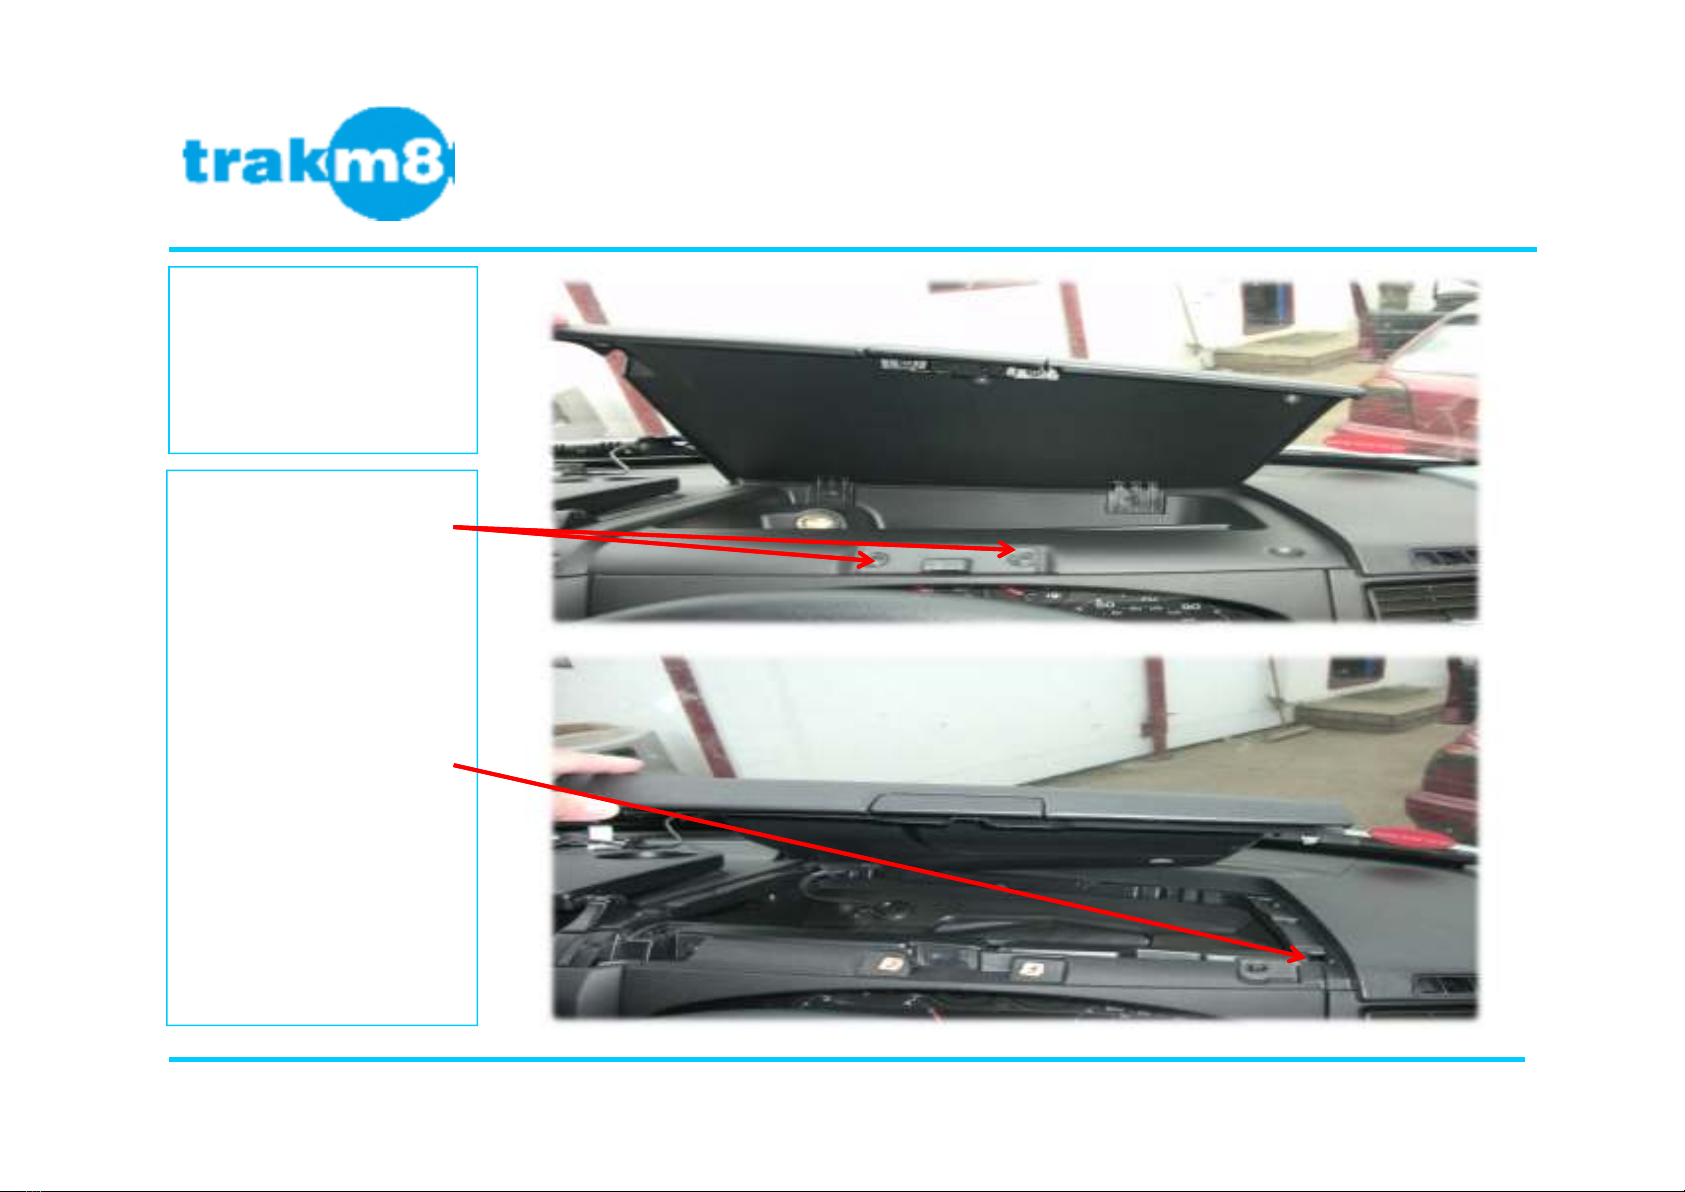
•Remove two philips
screws from front of
glove ox.
•Use a trim tool to remove
four clips that hold in
glove ox, then you can
unplug cigarette lighter
and remove completely.
Page 14 of 27
Removal of dash
panels
The AA Signs– Company Confidential
Version 1.0
Trakm8 Install Ford Transit
•GPS Antenna is to e
located on top of the
heater vent located right
hand side ehind glove
ox.
•Secure in place using
dou le sided tape.
•Run ca le neatly to main
T8 location.
Page 15 of 27
GPS Antenna
Mounting
The AA Signs– Company Confidential
Version 1.0
Trakm8 Install Ford Transit

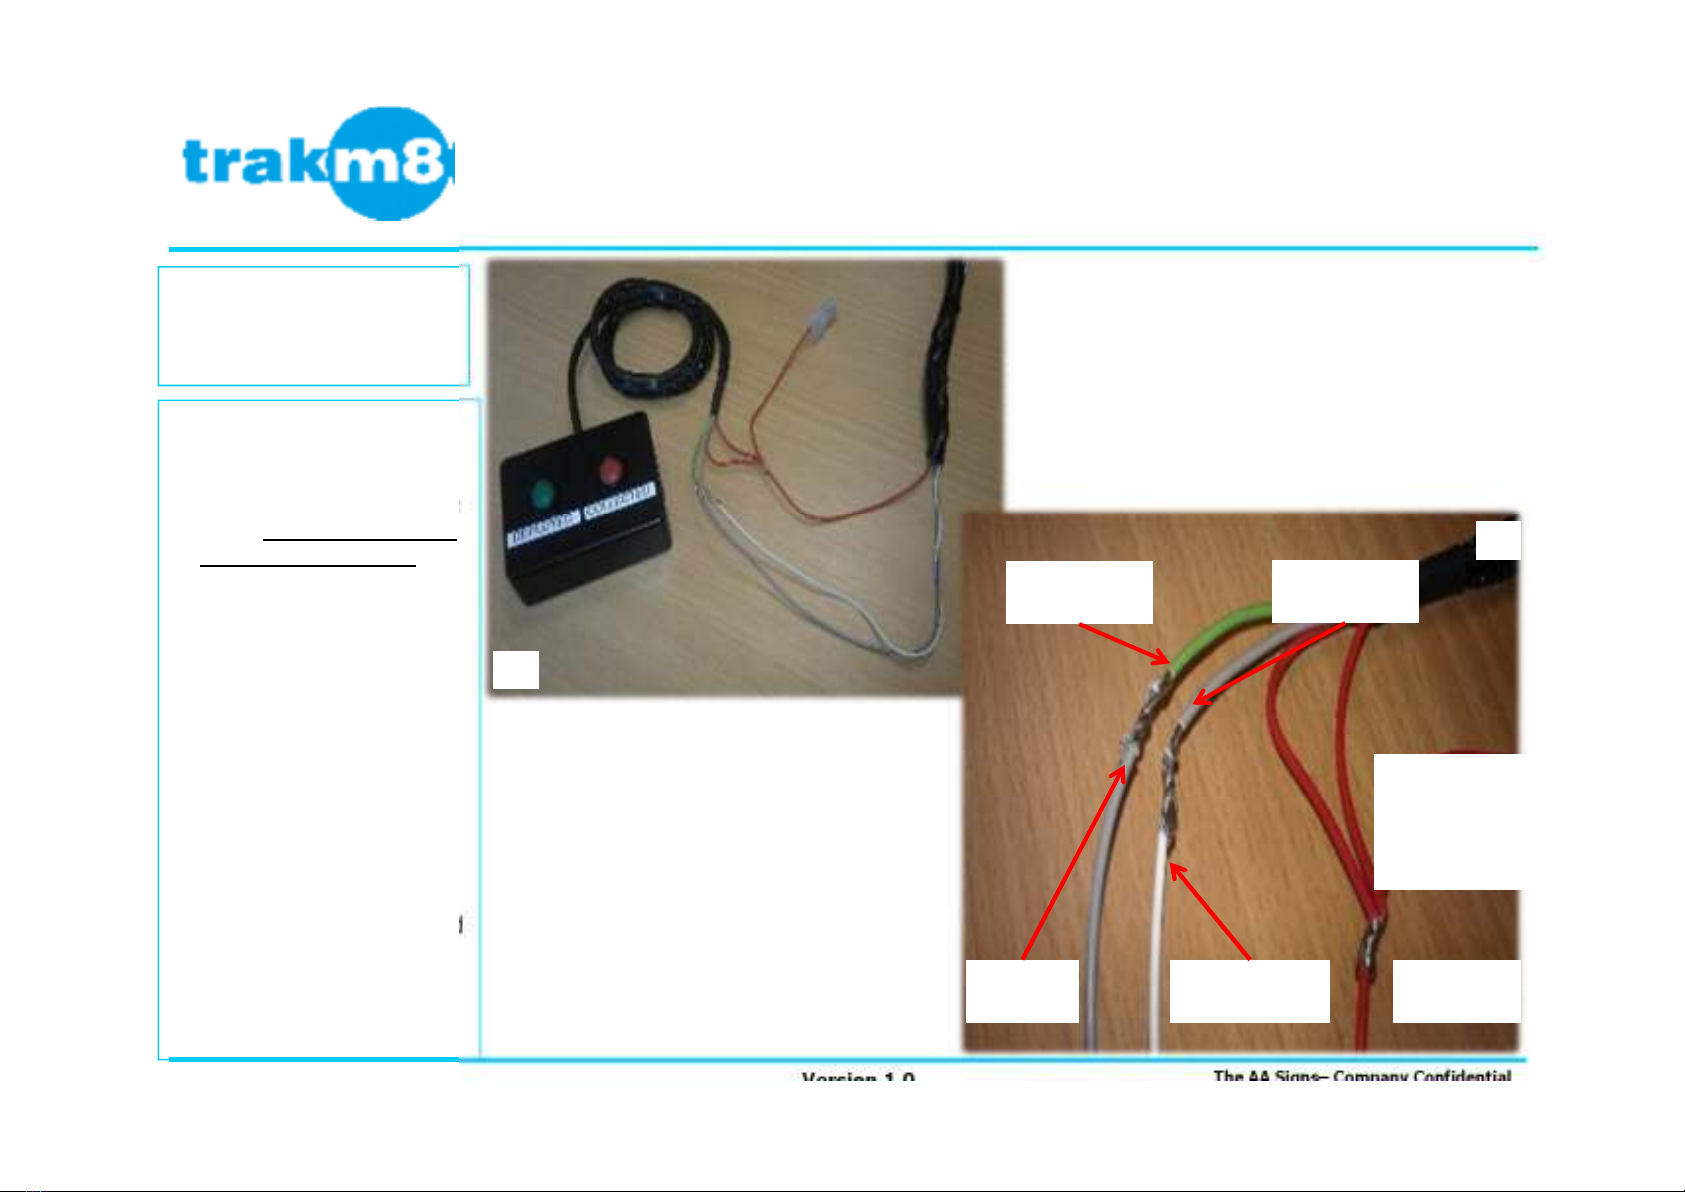
•Strip the uzzer RED and
BLACK wires as shown.
•Solder the 1K resistor in
parallel across the uzzer
RED and BLACK wires.
•Cut and remove the 2 pin
molex connector from the
uzzer.
Buzzer BLACK to T8
WHITE/ORANGE
Buzzer WHITE to T8 RED
(POSITIVE)
•Solder the connections
and insulate firstly with
self amalgamating tape
then cover with PVC tape.
Page 16 of 27
Buzzer
Wiring
The AA Signs– Company Confidential
Version 1.0
Trakm8 Install Ford Transit
1K resistor in
series
Buzzer
BLACK
T8
WHITE/ORANGE
T8 RED
(POSITIVE)
Buzzer White
(Positive)
Insulate all
connections
1
2
3
•The uzzer is secured
within the driver side
glove ox.
•Secure in place with
dou le sided tape.
•Place a small piece of PVC
insulation tape across the
top of the uzzer hole.
•The uzzer will give an
audi le tone which will
vary for green and red
utton press:
GREEN (Sign Deployed)
= 1 second beep
RED (Sign Collected) = 1
second trill
Page 17 of 27
Buzzer
Mounting
The AA Signs– Company Confidential
Version 1.0
Trakm8 Install Ford Transit
2
•The push utton enclosure
records when a driver has
collected and deployed the
signs. Ensure that ires
are not transposed.
•GREEN (SIGNS
DEPLOYED) = GREY to
T8 BLUE/WHITE
•RED (SIGNS
COLLECTED) = GREEN
to T8 GREY
•GREEN AND RED
SWITCH POSITIVE =
RED to T8 RED
•Solder the connections and
insulate firstly with self
amalgamating tape then
cover with PVC tape.
Page 18 of 27
Button Enclosure
Wiring
The AA Signs– Company Confidential
Version 1.0
Trakm8 Install Ford Transit
T8 Grey
(Input 1)
T8 Blue/White
(Input 2)
T8 Red
(Positive)
RED s itch
GREEN
RED and
GREEN s itch
Positive
GREEN
s itch GREY
1
2
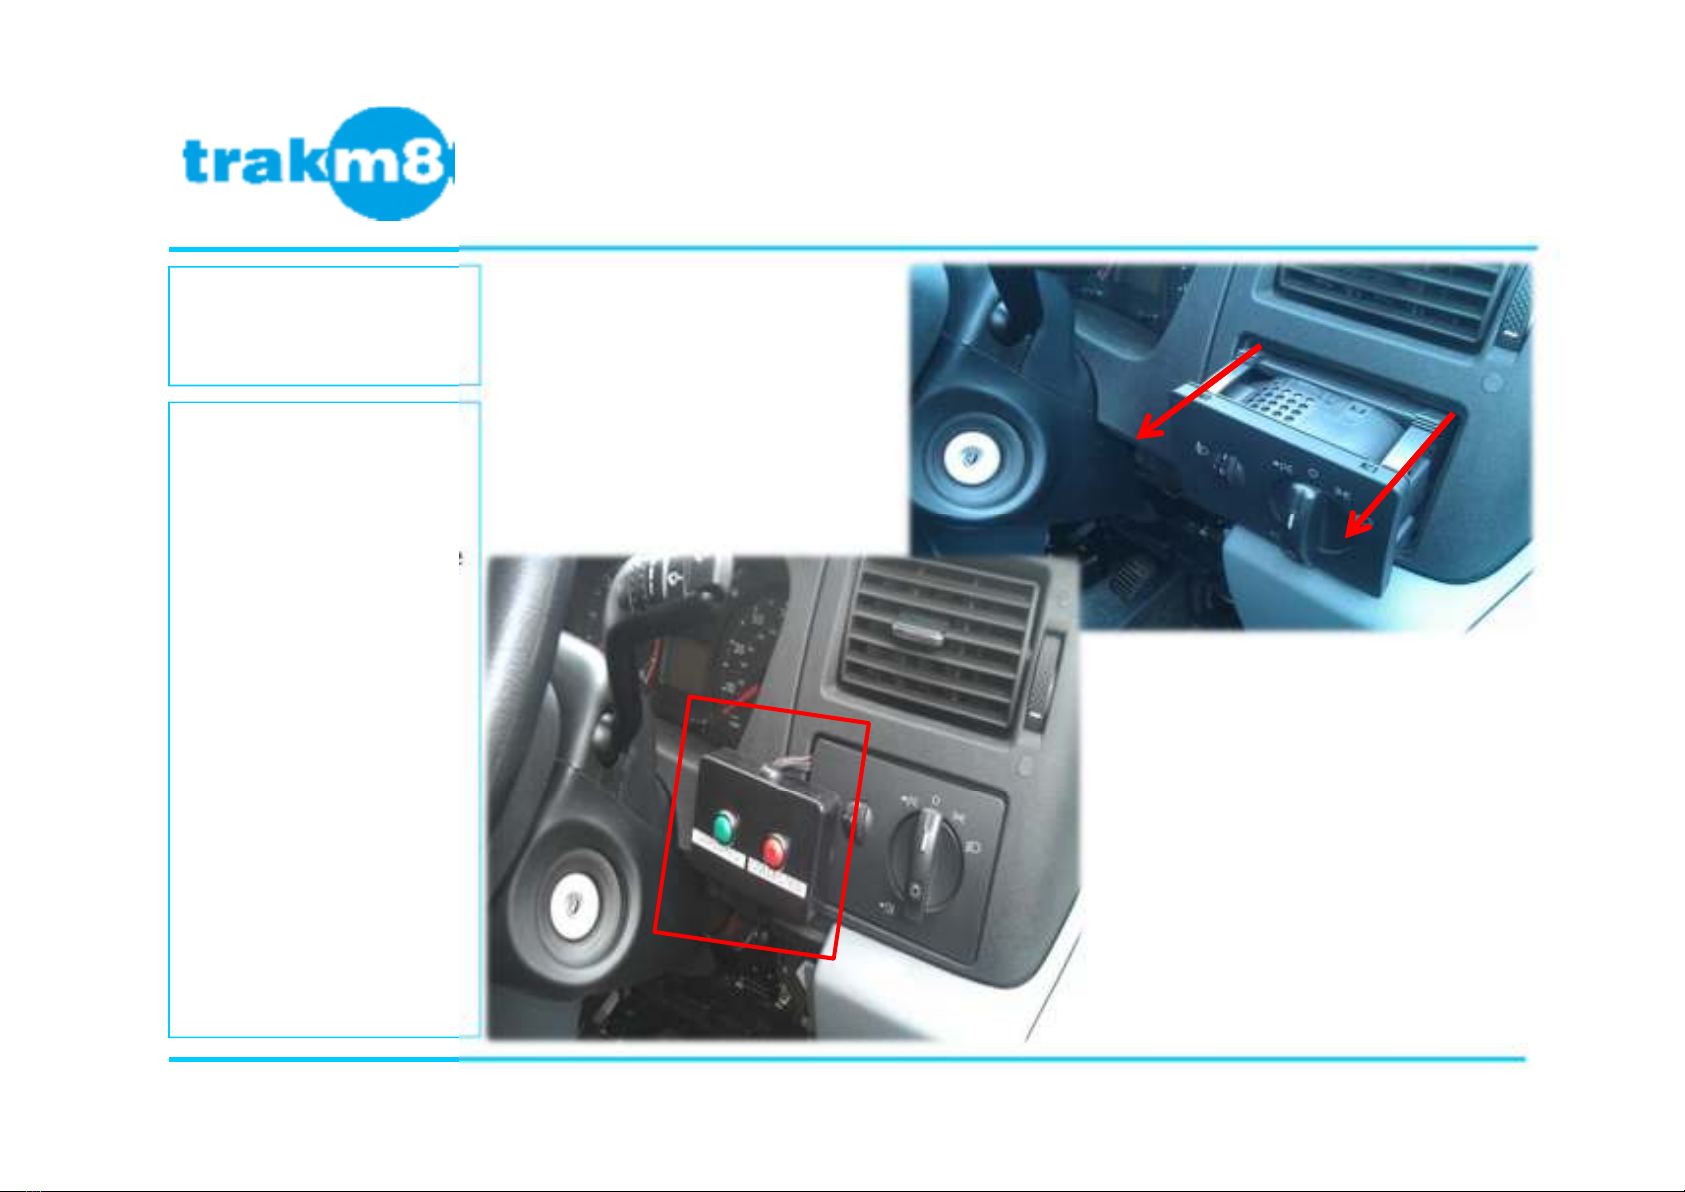
•Use a trim tool to
carefully remove the
headlight switch cluster.
•The push utton enclosure
is positioned facing the
driver as shown.
•Thoroughly clean the
surface and adhere the
push utton enclosure to
the surface with the
adhesive pad supplied.
•Feed the enclosure ca le
ehind the headlight
switch cluster.
Page 19 of 27
Push utton Enclosure
Mounting
The AA Signs– Company Confidential
Version 1.0
Trakm8 Install Ford Transit

•Identify the eacons
ca le that runs within
the storage shelf
located in the ack of
the vehicle.
•The eacons wire is in
the 2 core ca le that
runs to the eacons
side light a ove the
driver side door.
BEACONS RED to T8
PURPLE (Input 0)
•Extend the eacons
wire to the T8 at the
front of the vehicle.
Page 20 of 27
Beacon Ca le route
The AA Signs– Company Confidential
Version 1.0
Trakm8 Install Ford Transit
1 2
3
Other manuals for T8
1
Table of contents
Other Trakm8 Automobile Accessories manuals


