PAC SR-TAC16H User manual

Stinger HEIGH10 Radio Replacement Kit
for 2016-2021 Toyota Tacoma
SR-TAC16H
© 2021 AAMP Global. All rights reserved. PAC is a Power Brand of AAMP Global. PAC-audio.com
Pacific Accessory Corporation
Page 1
Rev: V1
Date:122121
®
®
Introduction and Features
Important Notes
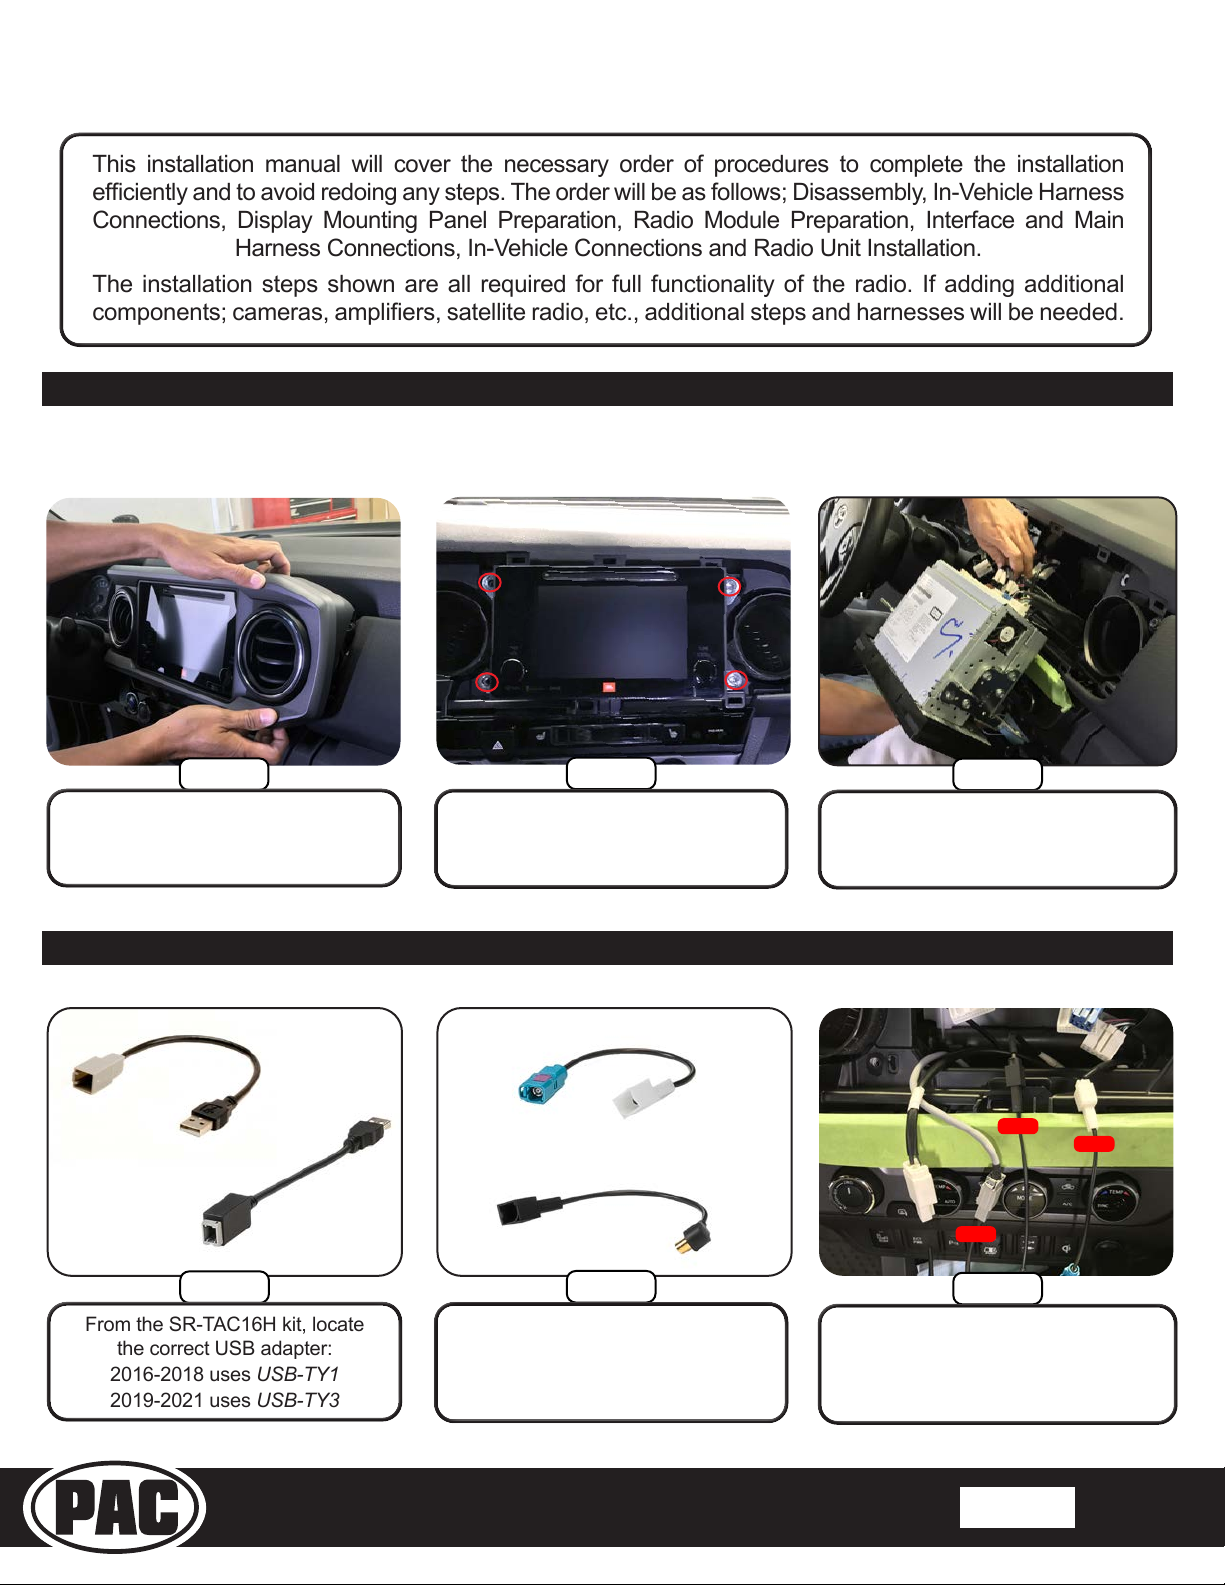
The SR-TAC16H is a complete radio replacement kit for the installation of the Stinger HEIGH10®modular radio in Toyota Tacoma
trucks equipped with either 6” or 7” factory display radios. All modules, cables and adapters are included to retain important features
of the factory system, including: steering wheel-mounted radio controls, factory amplier, factory reverse camera, factory USB port
and AM/FM reception. Plug & Play wiring harnesses allow for quick and easy installation without the need to cut or splice any wiring.
The display mounting panel allows mounting the 10 inch display without modifying/cutting any part of the vehicle’s sub-dash.
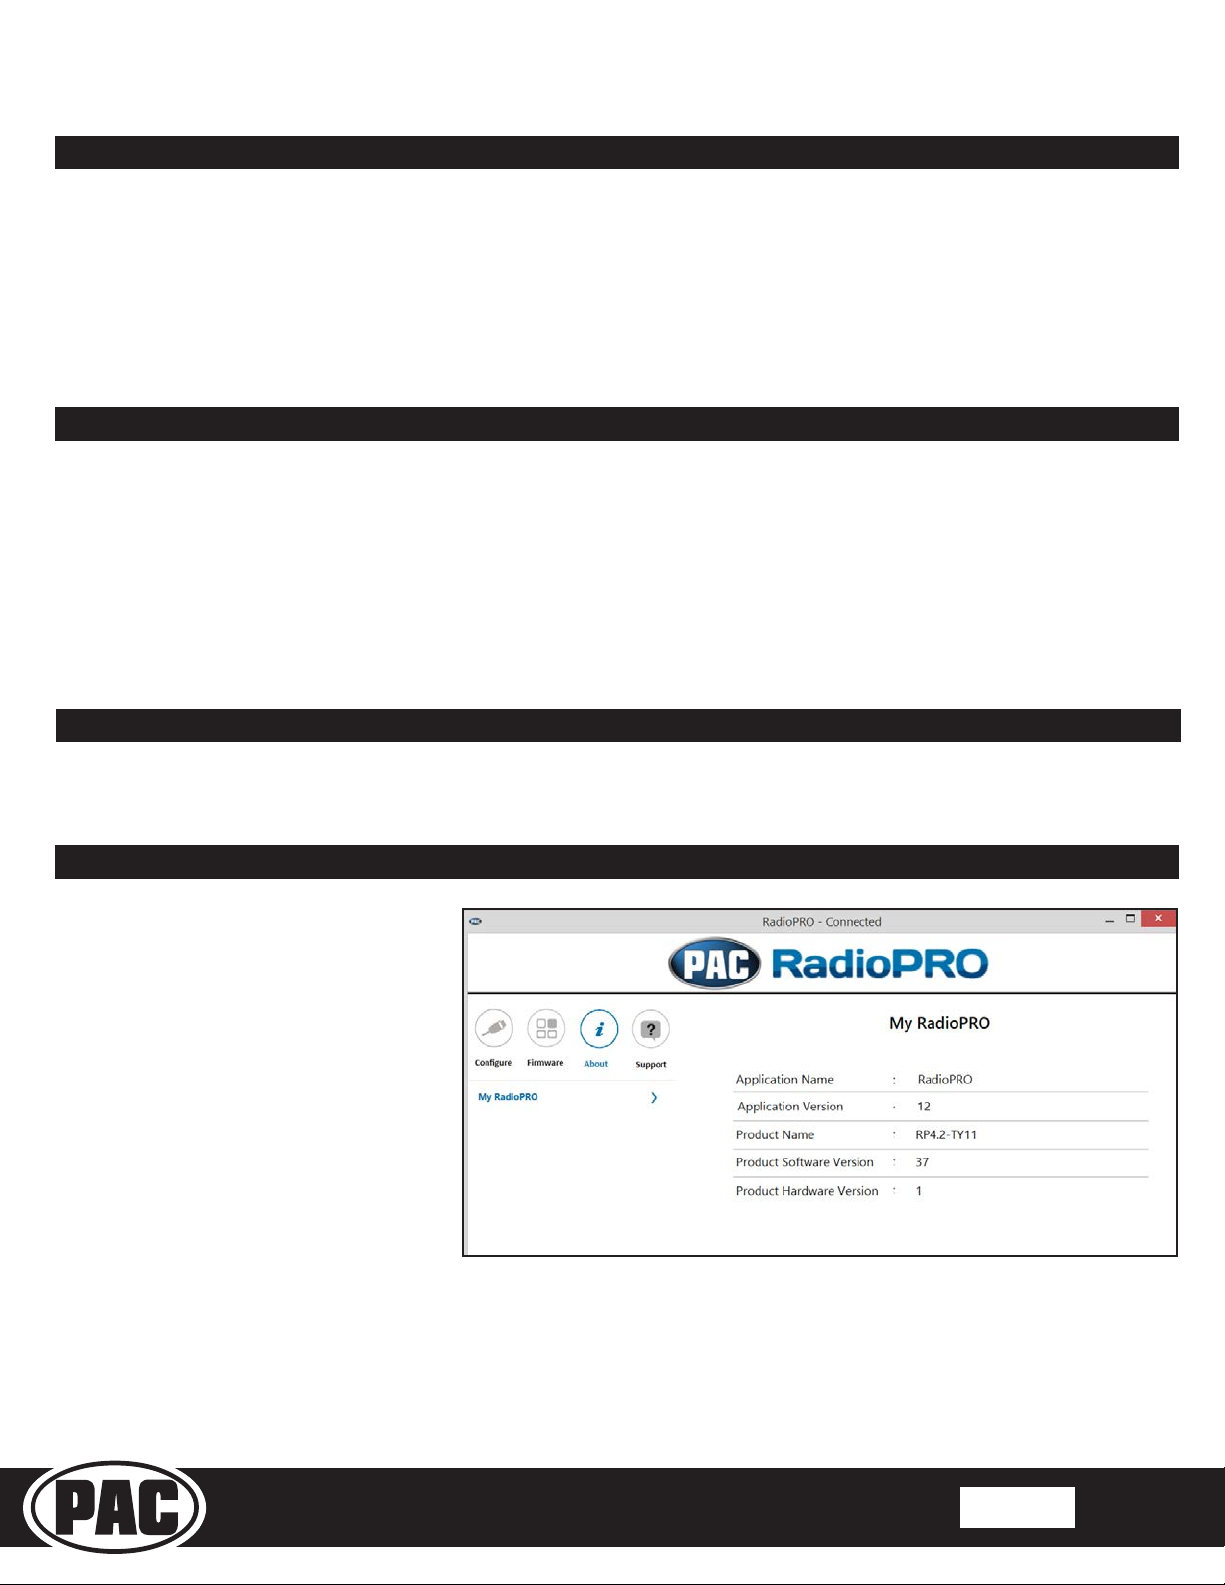
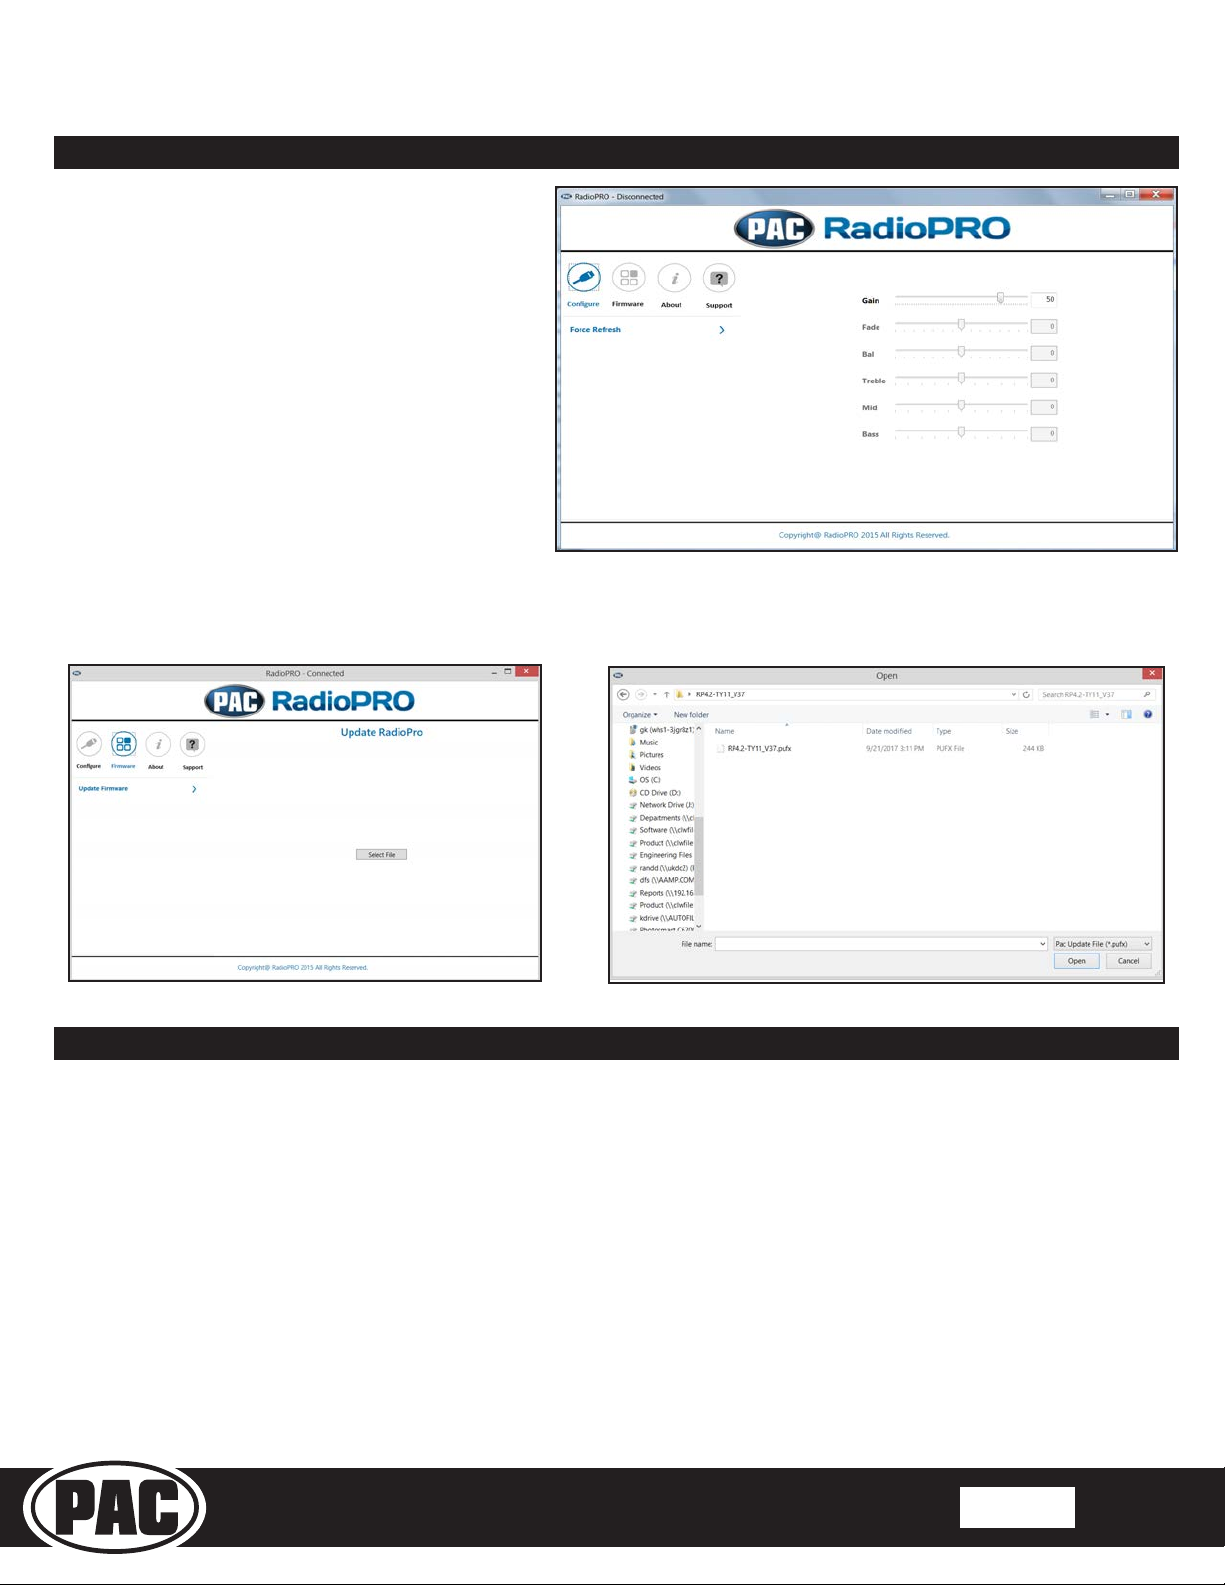
1. Adjustment of the vehicle settings through the original radio’s vehicle settings menu will be disabled after installation of the new
radio. It is advised to make sure all settings are as you desire prior to removal of the original radio.
2. The RP4.2-TY11 does not retain Rear Seat Entertainment.
3. To retain SiriusXM Radio, a SXV300 Tuner is required and sold separately.
4. After installation, if you do not initially hear any audio, you may need to cycle the ignition again to initialize the factory amplier.
5. Speaker fading on factory amplied systems is only supported with the “amplied output” connection of the RP4.2-TY11.
6. When using real time fade, if the fader setting is biased more to the front or rear, as the radio turns on the sound may begin at
the default setting and then quickly transition to your custom setting.
7. Radio features such as High Pass Filters (crossovers) will interfere with proper fader function. In order for the RP4.2-TY11’s
fader function to work, the audio from the radio’s output must match so it can compare the front and rear audio levels and
determine the proper fader setting for the factory amplier.
8. If the truck is equipped with a factory 360° camera system, changing camera views using the touch screen will no longer be
available. Camera views can be changed using the steering wheel controls only.
We recommend reading this manual thoroughly to familiarize yourself
with the entire process prior to beginning the installation.
Recommended Tools
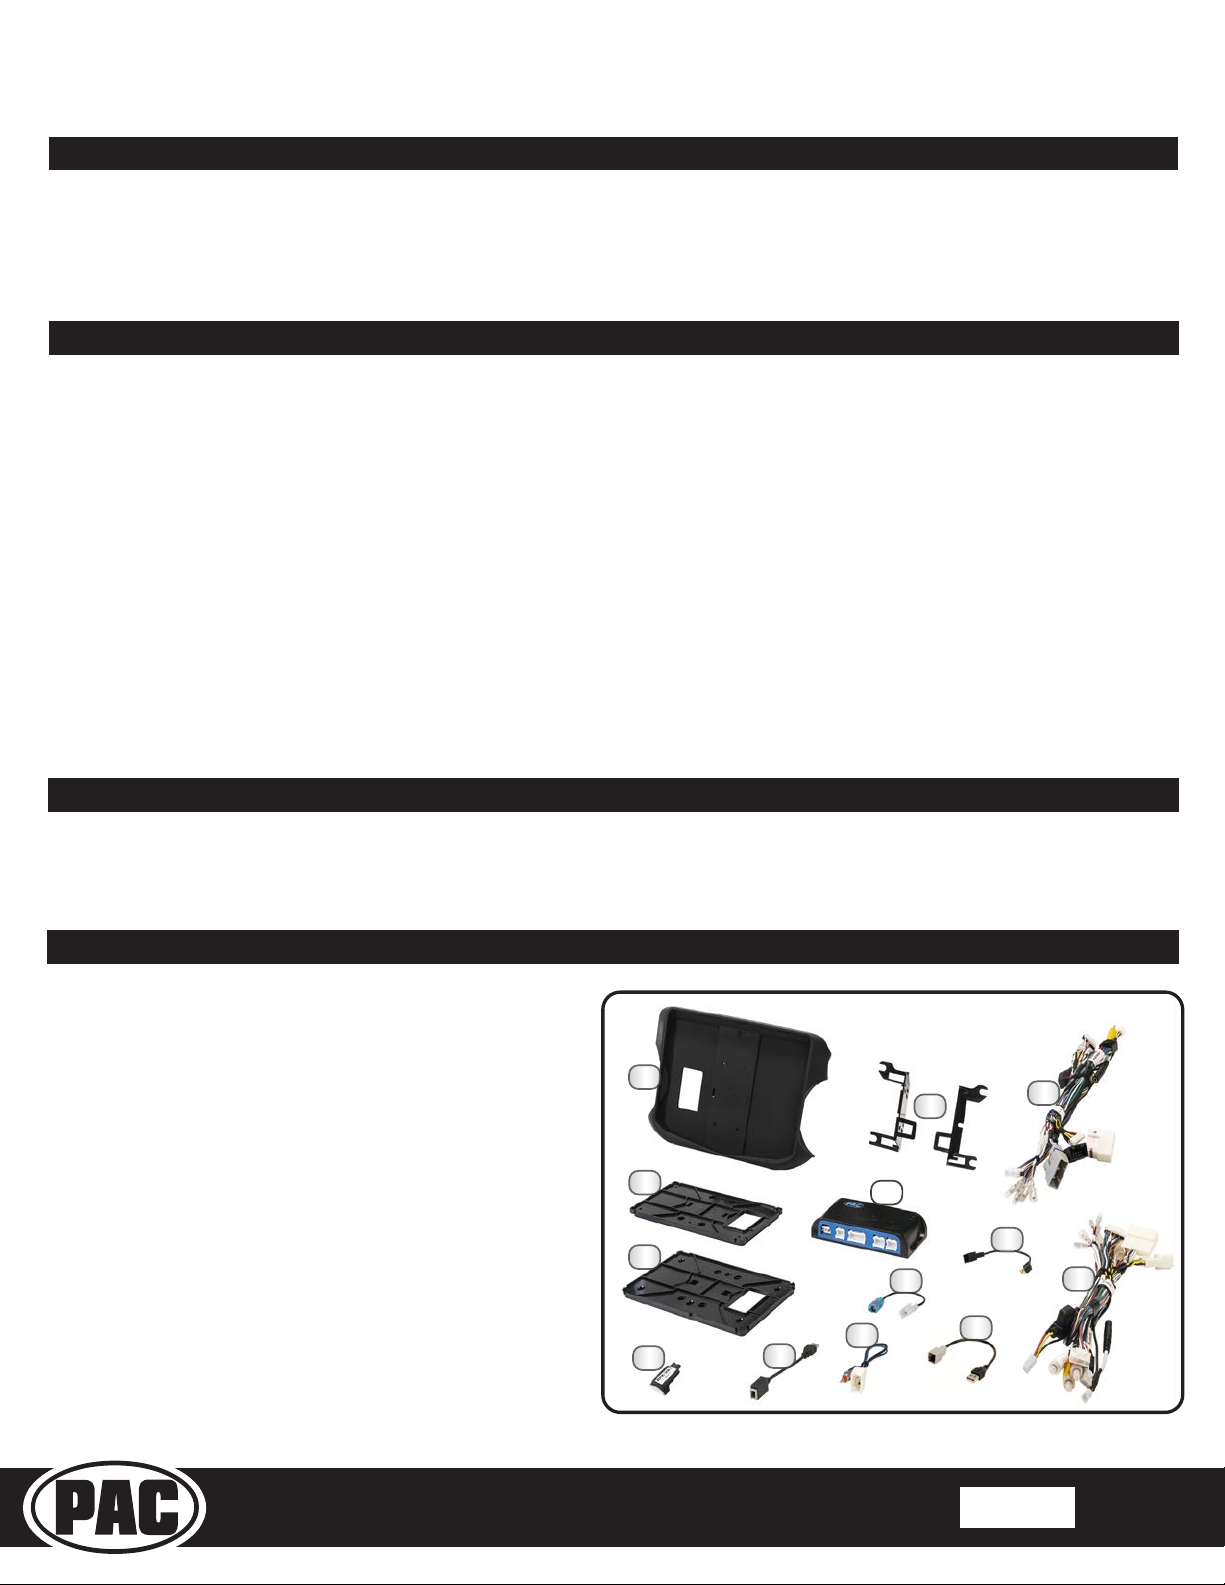
1. HEIGH10 Display Mounting Panel
2. Side Brackets (TOYK971/974)
3. Main Harness 2019-2021 (SR-TAC19H-HAR)
4. 6” Mounting Plate (TAC16H-6)
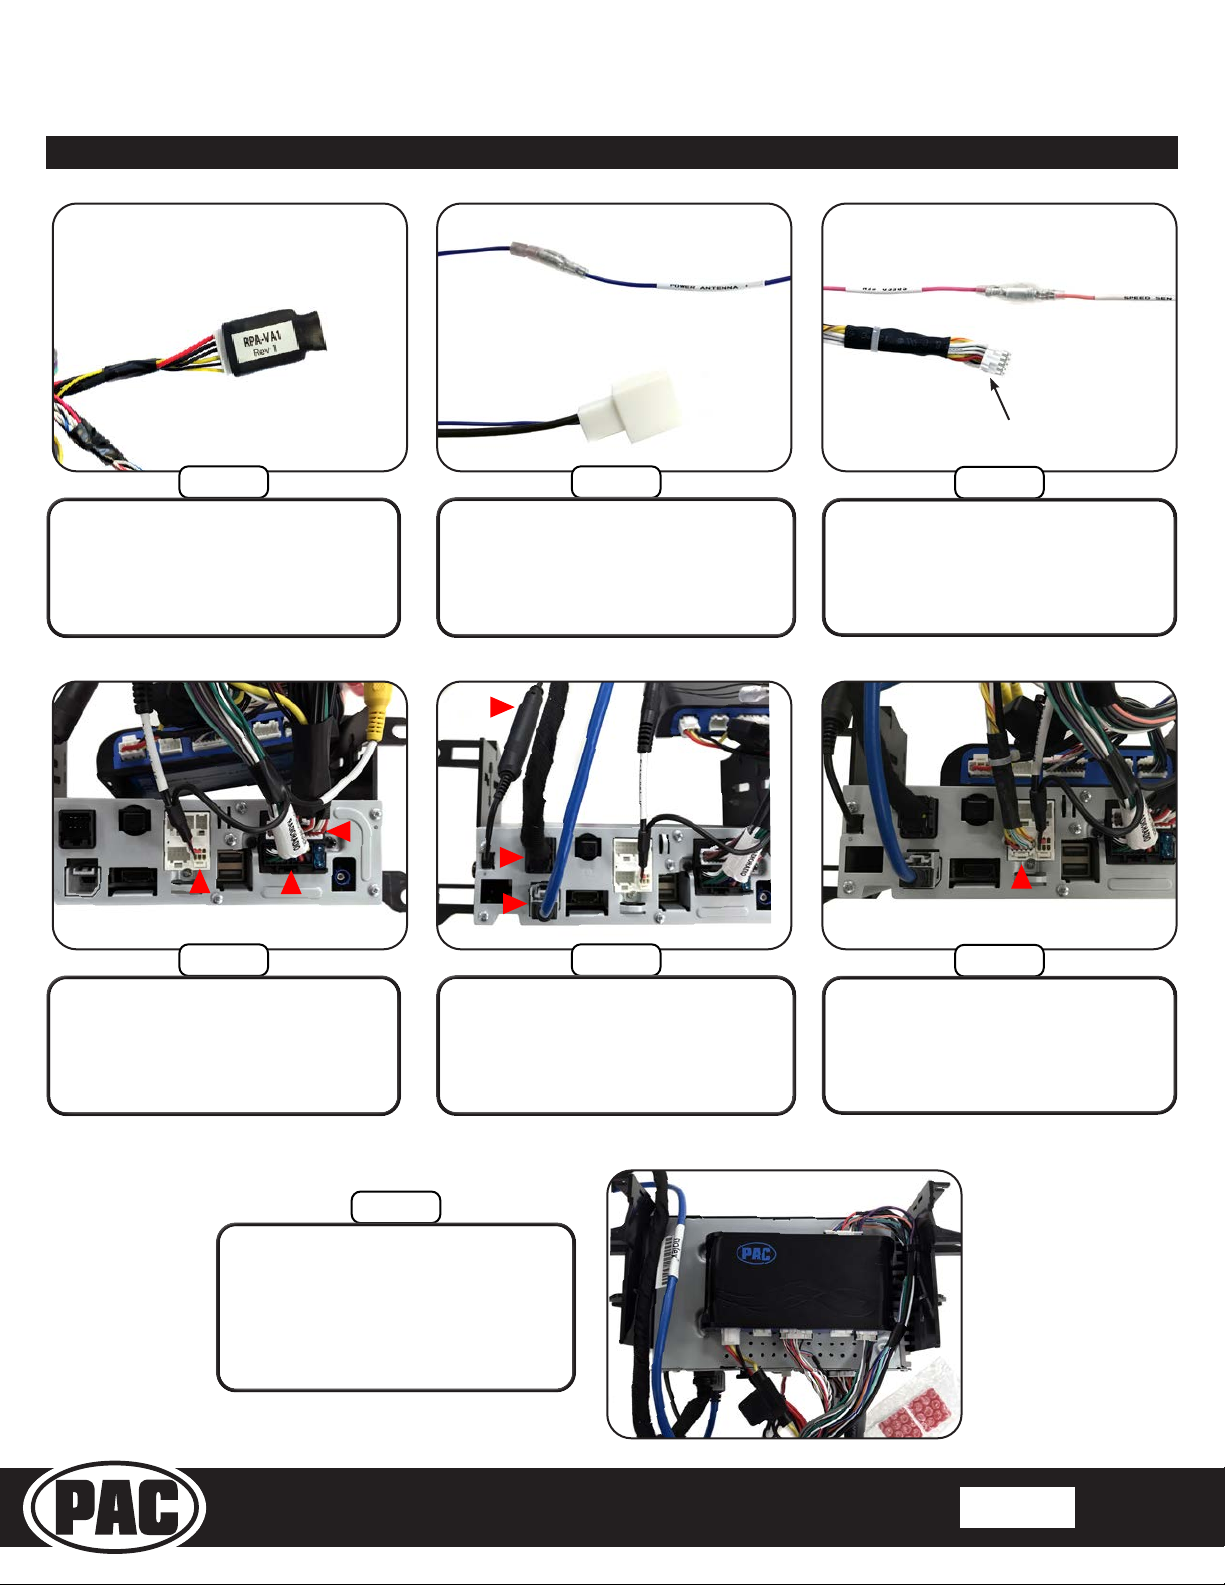
5. Radio Interface (RP4.2-TY11)
6. Satellite Radio Antenna Adapter (SAT-01)
7. Main Harness 2016-2018 (SR-TAC16H-HAR)
8. 7” Mounting Plate (TAC16H-7)
9. GPS Antenna Adapter (GPS-03)
10. Dierential Video Adapter (RPA-VA1)
11. USB Adapter (USB-TY3)
12. AM/FM Antenna Adapter (RPA-VA1)
13. USB Adapter (USB-TY1)
Included Components
1
4
6
10
8
5
2
11
3
7
9
12 13
10mm Socket
Ratchet
Phillips Screwdriver
Flush Cutters
Painters Tape
NOTE: Along with the SR-TAC16H components,
additional hardware and wire harnesses from the
HEIGH10 (UN1810) kit will also be used in the
installation. Refer to the UN1810 Installation Guide
for harness and hardware descriptions. Included double-sided tape, zip ties and M4 x 12 Zinc Screws (6x) not shown.

Stinger HEIGH10 Radio Replacement Kit
for 2016-2021 Toyota Tacoma
SR-TAC16H
© 2021 AAMP Global. All rights reserved. PAC is a Power Brand of AAMP Global. PAC-audio.com
Pacific Accessory Corporation
Page 2
Rev: V1
Date:122121
®
®
Wiring Overview
UN1810
USB1 USB2
STINGER
BLACK
GRAY
10PIN6PIN
24PIN 16PINGPS AM/FM
ANT.
Stinger
Connection
Main Harness
Connection Connections shown are
all required for full
functionality of the kit
and radio. If adding
additional components,
additional connections
will be needed.
Connects to
SXV300 Satellite
Radio Tuner
(sold separately)
REVERSE CAM
RPA-VA1
REVERSE CAM
16PIN RADIO
16PIN RADIO
6PIN RADIO
PWR ANT
SWI
OR
A/V IN
AUX
SR-TAC16H-HAR
VEHICLE CONNECTORS
SR-TAC19H-HAR
VEHICLE CONNECTORS
SR-TAC16H-HAR
Only

Stinger HEIGH10 Radio Replacement Kit
for 2016-2021 Toyota Tacoma
SR-TAC16H
© 2021 AAMP Global. All rights reserved. PAC is a Power Brand of AAMP Global. PAC-audio.com
Pacific Accessory Corporation
Page 3
Rev: V1
Date:122121
®
®
Section 1: Disassembly
Section 2: In-Vehicle Harness Preparation
This installation manual will cover the necessary order of procedures to complete the installation
efciently and to avoid redoing any steps. The order will be as follows; Disassembly, In-Vehicle Harness
Connections, Display Mounting Panel Preparation, Radio Module Preparation, Interface and Main
Harness Connections, In-Vehicle Connections and Radio Unit Installation.
The installation steps shown are all required for full functionality of the radio. If adding additional
components; cameras, ampliers, satellite radio, etc., additional steps and harnesses will be needed.
Before removing the factory radio, ensure that all vehicle settings that are
programmed using the factory radio are set to the desired settings.
Step 3
Step 2
Step 1
Remove all connectors and cables
from the back of the radio.
Remove the four 10mm bolts
securing the radio. Remove the
radio from the sub-dash.
Using your hands or soft tool, pull
and remove the radio trim and air
vent panel.
Step 3
Step 2
Step 1
Connect the adapters to the matching
colored connectors removed from the
factory radio.
From the SR-TAC16H kit, locate
the correct USB adapter:
2016-2018 uses USB-TY1
2019-2021 uses USB-TY3
From the SR-TAC16H kit, locate
the GPS Antenna Adapter and
Satellite Antenna Adapter if
installing a SXM tuner.
USB
GPS
SXM
GPS-03
USB-TY1
USB-TY3
SAT-01
OR

Stinger HEIGH10 Radio Replacement Kit
for 2016-2021 Toyota Tacoma
SR-TAC16H
© 2021 AAMP Global. All rights reserved. PAC is a Power Brand of AAMP Global. PAC-audio.com
Pacific Accessory Corporation
Page 4
Rev: V1
Date:122121
®
®
Section 3: Display Mounting Panel Preparation
Step 2
With the display face down on a
soft surface, attach the display
to the panel using four M4 x
12 screws from the HEIGH10
hardware pack.
TAC16H-6
TAC16H-7 1
Step 1
Place the HEIGH10 display into
the mounting panel. Carefully turn
the panel over while holding the
display in place.
Step 3
Place the factory radio/air vent panel
face down on the back of the display
mounting panel as shown.
Step 5 Step 6Step 4
With the arrow pointing up, align the
mounting plate to the locking clips (1)
and push down until both clips engage.
Move the panel side-to-side to ensure
the mounting panel is centered.
Secure the mounting plate to the
display main frame using six M4 X 12
screws provided in the SR-TAC16H kit.
From the SR-TAC16H kit,
choose the appropriate mounting
plate. TAC16H-6 is used when
replacing a 6” factory display and
TAC16H-7 is used when replacing a
7” factory display radio.

Stinger HEIGH10 Radio Replacement Kit
for 2016-2021 Toyota Tacoma
SR-TAC16H
© 2021 AAMP Global. All rights reserved. PAC is a Power Brand of AAMP Global. PAC-audio.com
Pacific Accessory Corporation
Page 5
Rev: V1
Date:122121
®
®
Section 4: Radio Module Preparation
Step 7
Secure the left side bracket using
two M5 x 10 screws from the
HEIGH10 hardware.
Left Bracket
Top
Right Bracket
Top
Step 3Step 2
Step 1
The HEIGH10 Radio Module will be
mounted using the lower slots on
the side brackets. The Radio Module
will be inverted and set back ¾”.
Locate the left and right side
brackets included in the
SR-TAC16H kit and four M5 X
10 screws from the HEIGH10
hardware.
Remove the tabs located on the
inside of the left and right side
brackets.
Step 6Step 5Step 4
Position the right side bracket as
shown and align the bracket to
the mounting holes indicated.
Position the left side bracket as
shown and align the bracket to
the mounting holes indicated.
Secure the right side bracket
using two M5 x 10 screws from
the HEIGH10 hardware.

Stinger HEIGH10 Radio Replacement Kit
for 2016-2021 Toyota Tacoma
SR-TAC16H
© 2021 AAMP Global. All rights reserved. PAC is a Power Brand of AAMP Global. PAC-audio.com
Pacific Accessory Corporation
Page 6
Rev: V1
Date:122121
®
®
Section 5: Interface and Main Harness Connections
For 2019-2021 Tacoma, the
SR-TAC19H-HAR (3-Plug) Main
Harness will be used.
Step
1A
Step
1B
For 2016-2018 Tacoma, the
SR-TAC16H-HAR (4-Plug) Main
Harness will be used.
Step 2
Set dip switch #3 to the down (ON)
position on the side of the
RP4.2-TY11 interface.
All other switches up (OFF).
Step 3
Plug in the 3-pin (1), 20-pin (2)
and the 24-pin (3) plugs on the
main harness to the appropriate
ports on the interface.
Step 4
Referencing the sticker on the
back, connect the 12-pin connector (4)
to the appropriate port. Amplied
if the truck has a factory amplier,
Non-Amplied for base audio.
Step 5
Step 6
Connect the OEM Camera RCA on
the main harness to the Reverse
Camera In RCA on the HEIGH10
24-pin A/V harness.
For 2016-2018 Tacoma using the
SR-TAC16H-HAR harness, connect
the pair of RCA’s labeled AUX
AUDIO to the AUX IN RCA’s on the
HEIGH10’s 24-pin A/V Harness.
1 2 4
3
HEIGH10 24-pin
A/V harness
OR

Stinger HEIGH10 Radio Replacement Kit
for 2016-2021 Toyota Tacoma
SR-TAC16H
© 2021 AAMP Global. All rights reserved. PAC is a Power Brand of AAMP Global. PAC-audio.com
Pacific Accessory Corporation
Page 7
Rev: V1
Date:122121
®
®
Step 9
Step 12
Connect the SPEED SEN wire
on the HEIGH10’s 10-pin Multi-
Camera harness to the SPEED
SEN wire on the main harness.
Plug in the 10-pin
Multi-Camera harness (7).
Step 7
Step 10
From the SR-TAC16H kit, connect the
RPA-VA1 Video Adapter to the 6-pin
plug on the main harness.
From the main harness, plug the
6-pin (1) and 16-pin (2) plugs into the
HEIGH10 Radio Module. Plug in the
HEIGH10 24-pin A/V harness (3).
Step 8
Step 11
Connect the blue wire on the
BAA44 Antenna Adapter to the blue
POWER ANTENNA + lead on the
main harness.
Connect the AM/FM antenna (4).
From the HEIGH10 harnesses, plug
in the 8-pin (5) and LVDS (6) display
cables into the radio module.
Section 5: Interface and Main Harness Connections (cont.)
HEIGH10 10-pin
Multi-Camera Harness
12
3
4
5
6
7
Step 13
Using the supplied two-sided tape,
mount the interface to the top of the
radio module. Position the interface
so that it does not cover the vent
holes.

Stinger HEIGH10 Radio Replacement Kit
for 2016-2021 Toyota Tacoma
SR-TAC16H
© 2021 AAMP Global. All rights reserved. PAC is a Power Brand of AAMP Global. PAC-audio.com
Pacific Accessory Corporation
Page 8
Rev: V1
Date:122121
®
®
Section 3: In-Vehicle Connections and Radio Unit Installation
Step 2
Connect the BAA44 antennna
adapter to the vehicle’s antenna
connector.
Step 1
Step 4
Connect the three or four vehicle
side connectors on the main
harness to the vehicle’s radio
plugs.
These are the connections for the basic installation. If adding additional components
such as a second USB, SXM tuner or additional cameras, those connections should be
made at this point, before mounting the radio module.
With the two display cables
routed over the top of the radio
assembly, slide the assembly into
position and re-install the four
factory 10mm bolts.
Step 3
Step 5
Plug in the GPS (1) and USB (2)
adapters. Note: The USB cable
must be plugged into the USB port
closest to edge of the radio chassis
for Apple CarPlay and Android Auto.
Plug in the 8-pin and LVDS display
cables into the back of the display.
12
X
Step 6
Re-install the factory radio/air vent
panel by aligning the retaining
clips and pushing until all the clips
engage.

Stinger HEIGH10 Radio Replacement Kit
for 2016-2021 Toyota Tacoma
SR-TAC16H
© 2021 AAMP Global. All rights reserved. PAC is a Power Brand of AAMP Global. PAC-audio.com
Pacific Accessory Corporation
Page 9
Rev: V1
Date:122121
®
®
Restoring Factory Settings
Testing and Verication
RadioPRO App
Use of the RadioPRO App allows
you to do the following:
• Congure User Interface Options such
as:
• Aftermarket radio Parking Brake
Sequencing
• Factory amplier settings (Bass,
Mid, Treble, Gain, Fader and
Balance)
• Real Time Fading
• Update Product Firmware
• Read Firmware/Hardware Versions
• Access Product User Manuals
PLEASE NOTE:
The interface must be connected to the vehicle when using the following features of the Radio PRO App:
• Factory Amplier Settings
The interface does not need to be connected to the vehicle when using the following features of the Radio PRO App:
• Firmware Updates
• Reading rmware/hardware versions
1. Turn on the radio and check volume, balance and fade. If you do not hear any audio you may need to cycle the ignition to
initialize the factory amplier. If there is still no audio, reset the interface according to the procedure in the next section.
2. For JBL systems, if the overall volume is too low, use the gain adjustment on the side of the RP4.2 interface to set it to the
desired level. The best way to do this is to turn the volume on the radio to 3/4 volume, then turn the gain on the RP4.2 until
some distortion is heard, then back it down a little.
3. Verify that all SWC are functioning properly. If any of the SWC are not functioning properly you may need to reset the
interface.
4. Verify AM/FM Reception, Bluetooth, USB, Apple Carplay, Android Auto and Camera(s) are functioning correctly.
You can restore the RP4.2-TY11 interface to factory default settings by pressing and holding the programming button on the side
of the module until the status LED starts blinking red. Once the LED starts blinking red, release the button. You must release the
button while the LED is blinking red in order to perform the reset. Please note, the LED will go through two stages before it starts
blinking red. First it will blink green, then amber, then red.
This reset will restore the following settings to their factory defaults:
• SWC Mapping
• Parking Brake Output Settings
• Factory Amplier Settings
• Real Time Fade will be reset to on
Firmware Updates (Stinger HEIGH10)
To update the Stinger radio rmware, refer to the HEIGH10 product page at:
www.stingerelectronics.com/products/heigh10

Stinger HEIGH10 Radio Replacement Kit
for 2016-2021 Toyota Tacoma
SR-TAC16H
© 2021 AAMP Global. All rights reserved. PAC is a Power Brand of AAMP Global. PAC-audio.com
Pacific Accessory Corporation
Page 10
Rev: V1
Date:122121
®
®
Infotainment/Factory Amplier Settings
The RadioPRO app will also allow you to adjust the
settings of the factory amplier. You can adjust Amp
Gain, Fader, Balance, Bass, Mid and Treble and real
time fade. When real time fade is enabled in amplied
systems, it will allow fading to be controlled directly
from the aftermarket radio. Restoring factory settings
on the module will default all values back to middle.
RadioPRO App (cont.)
Firmware Updates
The RadioPRO app will also allow you to update the
interface with new rmware as it becomes available.
Please visit www.pac-audio.com or contact our tech
support department to see if there is a rmware update
for your interface.
In order to update the interface all DIP switches must be set to the down position. Connect the interface to your PC and select
“Update Firmware”. Now select “Select File”. Finally, browse to the place where you saved the le and select it. This will begin
the updating process. Once nished, disconnect the interface from the PC and set the DIP switches back according to the radio
you have installed.
Technical Support
Email: support@PAC-audio.com
Phone: 727-592-5991
Chat: PAC-Audio.com
Table of contents
Other PAC Automobile Accessories manuals