manuals.online logo
Brands
  1. Home
  2. •
  3. Brands
  4. •
  5. Tramontina
  6. •
  7. Plumbing Product
  8. •
  9. Tramontina Angolare Export 94520/022 User manual

Tramontina Angolare Export 94520/022 User manual

This manual suits for next models

1

Other Tramontina Plumbing Product manuals

Tramontina Design QUADRUM 50 User manual

Tramontina

Tramontina Design QUADRUM 50 User manual

Tramontina 94062 User manual

Tramontina

Tramontina 94062 User manual

Popular Plumbing Product manuals by other brands

Weka 506.2020.00E ASSEMBLY, USER AND MAINTENANCE INSTRUCTIONS

Weka

Weka 506.2020.00E ASSEMBLY, USER AND MAINTENANCE INSTRUCTIONS

American Standard DetectLink 6072121 manual

American Standard

American Standard DetectLink 6072121 manual

Kohler K-6228 Installation and care guide

Kohler

Kohler K-6228 Installation and care guide

Uponor Contec TS Mounting instructions

Uponor

Uponor Contec TS Mounting instructions

Pfister Selia 49-SL Quick installation guide

Pfister

Pfister Selia 49-SL Quick installation guide

Fortis VITRINA 6068700 quick start guide

Fortis

Fortis VITRINA 6068700 quick start guide

Kohler K-12183 Homeowner's guide

Kohler

Kohler K-12183 Homeowner's guide

Maxxus MX-M206-01 instruction manual

Maxxus

Maxxus MX-M206-01 instruction manual

Viega Prevista Pure 8512 Instructions for use

Viega

Viega Prevista Pure 8512 Instructions for use

Kohler Centerset K-15240 Homeowner's guide

Kohler

Kohler Centerset K-15240 Homeowner's guide

Viega Prevista Dry 8522.33 Instructions for use

Viega

Viega Prevista Dry 8522.33 Instructions for use

Sanela Lema SLP 59RB Instructions for use

Sanela

Sanela Lema SLP 59RB Instructions for use

Elkay EDF15AC Installation, care & use manual

Elkay

Elkay EDF15AC Installation, care & use manual

Hans Grohe AXOR Citterio E 36702000 Instructions for use/assembly instructions

Hans Grohe

Hans Grohe AXOR Citterio E 36702000 Instructions for use/assembly instructions

baliv WT-140 manual

baliv

baliv WT-140 manual

Kohler Mira Eco Installation & user guide

Kohler

Kohler Mira Eco Installation & user guide

BELLOSTA romina 0308/CC Installation instruction

BELLOSTA

BELLOSTA romina 0308/CC Installation instruction

Bristan PS2 BAS C D2 Installation instructions & user guide

Bristan

Bristan PS2 BAS C D2 Installation instructions & user guide

manuals.online logo
manuals.online logoBrands
  • About & Mission
  • Contact us
  • Privacy Policy
  • Terms and Conditions

Copyright 2025 Manuals.Online. All Rights Reserved.

Warranty terms
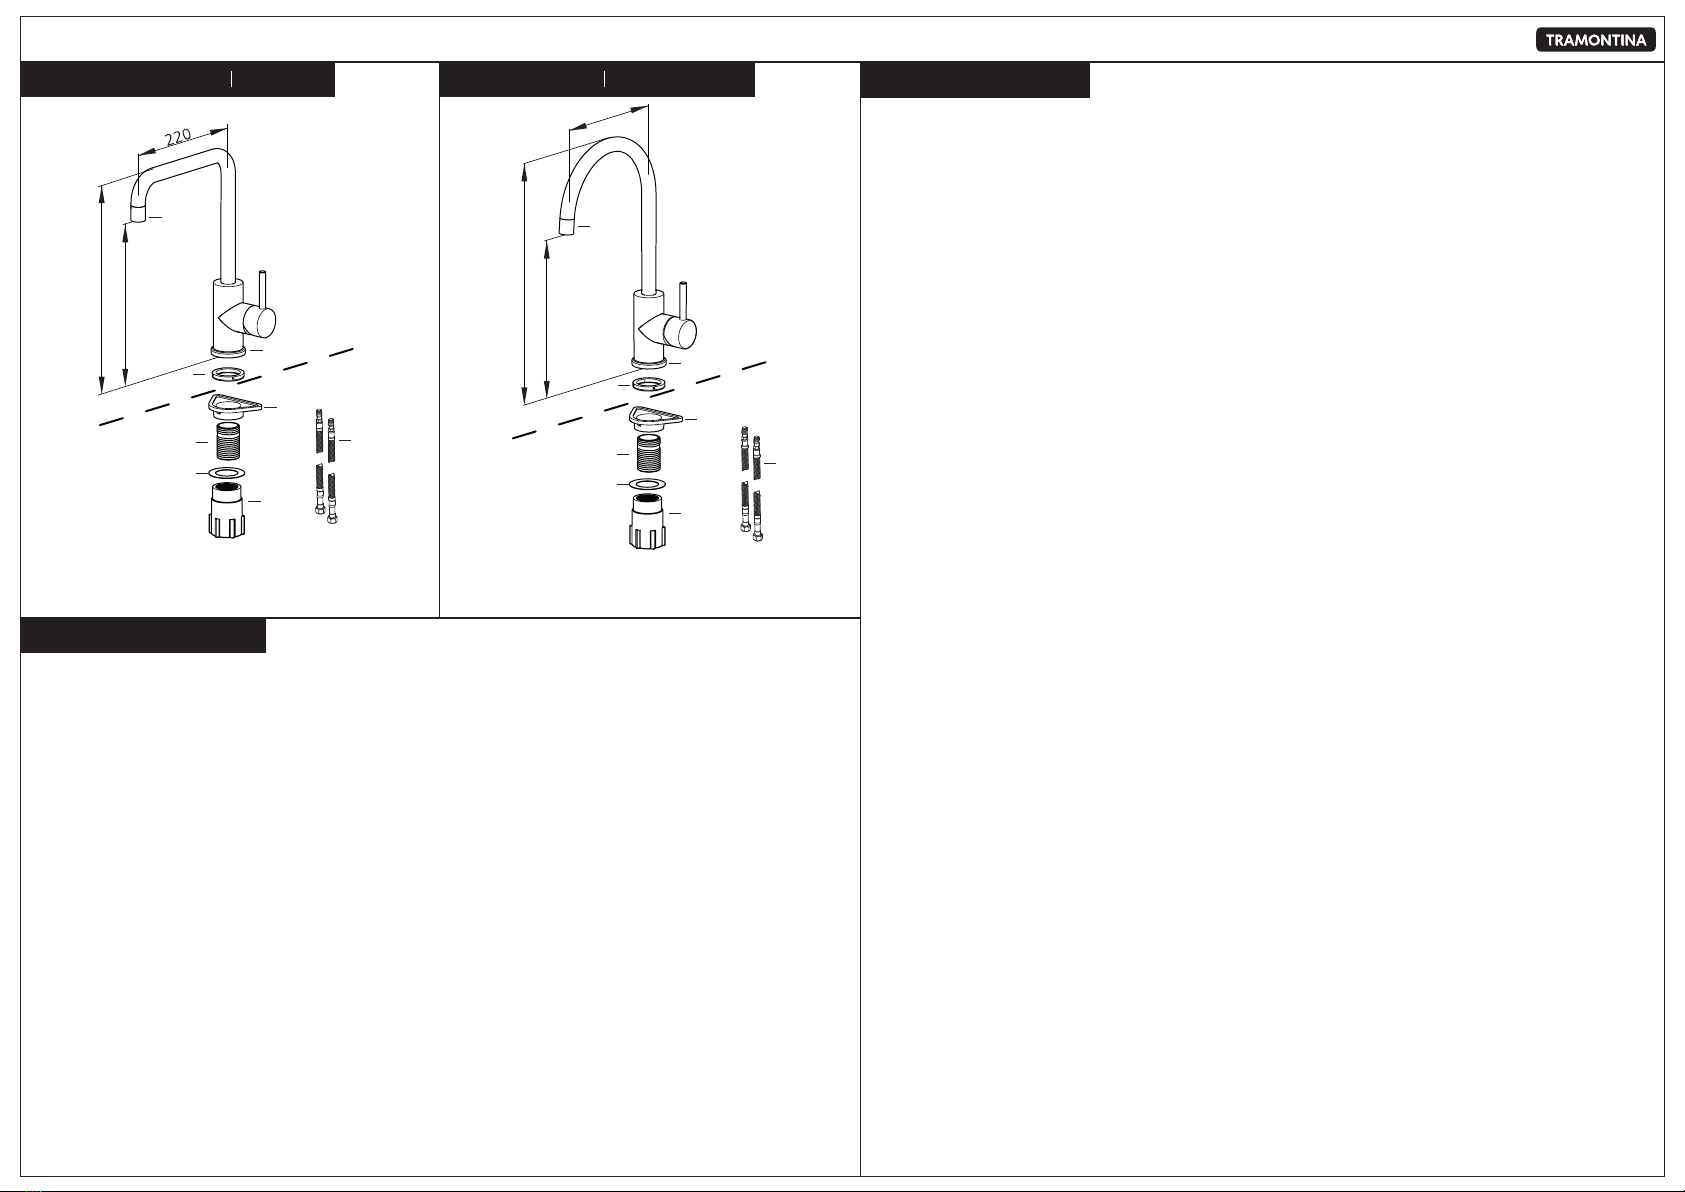
Arko Export 94520/021Angolare Export 94520/022
Single mixer faucet
Components
1- O-ring
2- Aerator
3- Metal washer (x2)
4- Surface flange
5- Flexible part (x2)
6- Quick connection nut
7- Connector thread
8- ABS washer
5
Worktop
1
4
2
5
Worktop
2
1
4
3
7
6
8
3
7
6
8
• TRAMONTINA warranties this product sold by the company against any manufacturing defects for a total period of 10 years (120
months).
• The warranty period begins when the sales receipt is issued, which should be attached to these terms. The warranty is only valid if
presented with the sales receipt
• The warranty includes replacement of parts and labor when repairing manufacturing defects verified by TRAMONTINA.
• O-rings, sealing mechanisms, gaskets, wedges, flexible parts, aerator, and ceramic cartridges, as well as labor used to apply the parts and
consequences of such occurrences are not covered by the warranty.
THE WARRANTY WILL BECOME VOID IF:
• The use and care instructions outlined in this manual are not followed.
• The Tramontina mixer faucet is installed or used in disagreement with the Instructions Manual.
• The Tramontina mixer faucet has been misused or has not been cared for adequately (it shows scratch marks, deformities or similar
damage as a result of misuse, as well as application of chemicals, abrasives or similar products which may damage the quality of the
material or components).
• The defect was caused by an accident or product misuse by the customer.
THE WARRANTY DOES NOT COVER:
• Normal/natural wear.
• Malfunctioning or flaws resulting from interruptions to the water supply where the Tramontina mixer faucet is installed or oscillations
of pressure and temperature.
• Damaged parts due to transport or handling accidents, dents, scratches, falls, or acts of nature, such as rain, flooding, etc.
• Transport to the definitive place of installation, parts, materials, and labor to prepare the place where the Tramontina mixer faucet will
be installed, such as the hydraulic grid.
• Abnormal operation of the Tramontina mixer faucet resulting from lack of cleaning and excess residue, or even from objects stuck
inside the faucet which are foreign to its operation and purpose.
• Use of water coming from a well to supply the running water distribution, as this water may contain dirt which might damage the
product.
• If it is necessary to use materials not included with the product, as well as specific labor to prepare the place for installation, incurring
expenses will be the sole responsibility of the customer.
• Transporting the product from the factory to the client's residence and vice-versa.
• Expenses related to the installation location.
• Expenses for service when no defect can be found, or expenses related to use guidelines that can be found in this instructions manual or
on the product itself, may be charged to the customer.
WARRANTY CONDITIONS:
• Expenses incurred from the installation of parts not included with the Tramontina mixer faucet are the customer's responsibility.
• TRAMONTINA, due to the ongoing development of its products, reserves the right to alter general, technical, and aesthetic features
without prior warning.
• Original replacement parts can be obtained from TRAMONTINA.
• Any necessary maintenance or adjustment work must be carried out with care and by qualified professionals.
• Any defects found with this product must be immediately communicated to Tramontina, whose contact and address is listed below.
• All parts with proven manufacturing defects and within the warranty period will be replaced free of charge, but the whole appliance will
not be replaced.
ATTENTION!
• If the mixer faucet is installed directly in sinks/basins, using the ABS washer is essential. FAILING to install this component
will void the mixer faucet warranty and Tramontina will not be held liable for future problems with the mixer faucet or any
products in which the mixer faucet is installed.
• Products installed for industrial, commercial, or public use are not covered under this warranty.
339
258
216
356
235
Mounting the mixer faucets
Single mixer faucet
Connect the flexible parts (5) to the water
supply with the nipples (9).
1. 2.
35mm
30 mm
7
3.
4
1
4.
6
6
5
9
4
3
6
Control
5
QUENTE
FRIO
5.
Components
Cleaning and care
• To clean the mixer faucet, use a soft cotton cloth, preferably dry. If necessary, use mild detergent/soap with a damp cloth. Rinse
the detergent/soap completely with water and dry with a soft, dry cotton cloth.
• Never use steel wool pads, abrasive products, chemicals, or solvents to clean.
• We recommend keeping the item dry after each use to prevent accumulated water to dry on the product.
• Clean the aerator periodically by removing it from the mixer faucet and placing under running water in the direction opposite
to the one it operates, or using a small brush. This will help maintain a good water flow.
9- Nipple G 1/2"x 1/2"(x2) -
Not included
1- O-ring
2- Aerator
3- Metal washer (x2)
4- Surface flange
5- Flexible part (x2)
6- Quick connection nut
7- Connector thread
8- ABS washer
Attach the components in the same order as
illustrated above. We recommend that the control
remains to the right.
Connect the flexible parts (5) to the mixer faucet,
tightening them by hand. When threading them
in, avoiding twisting the parts.
The hole dimension is Ø 35 mm, and the worktop
must be no more than 30 mm thick.
Attach the components in the same order as
illustrated above.
ATENTION!
Before installing the mixer faucet, open the valve and let abundant water run to remove any dirt from the pipes.
• For a good performance, the pressure of hot and cold water must be the same.
• The mixer faucet should be installed at a point with minimum pressure of 5 mH2O. and maximum pressure of 40 mH2O. (mH2O =
meter of water column).
• Never use toxic products on the inlet threads.
• Connect flexible parts without sealing tape.
• Avoid using wrenches in the chrome-plated and/on stainless steel parts. If their use is needed, protect the part well.
• Do not use wrenches on any flexible parts, hand-tightening them is enough.
• The water temperature should not be above 90 °C.
All installation expenses are the client's responsibility. We recommend hiring a qualified professional to install the mixer
faucet.
After installation, we recommend running the water for a few seconds, observing all connectors. After that, with the mixer
faucet off, observe whether everything is properly sealed.
Note: The images in this manual are for illustration only. The manufacturer reserves the right to make changes to the products whenever
they consider necessary, or in the user's interest, without modifying essential characteristics of operation and safety.
installation
Revisão 1 / September 2018 / 200597
8