Tranjo Ultimate Travel Banjo User manual

Warranty
Your Tranjo is guaranteed to the original owner
against defects in workmanship and materials for a
period of five (5) years from the date of purchase. If
you have any problems with your Tranjo during that
time, I will make every effort to do whatever it takes
to make it right to your complete satisfaction. Normal
wear and travel damage is not included in this
guarantee, however if something happens I’ll do my
best to fix it at a fair price.
Normal wear and/or travel damage repairs will entail
labor, parts and shipping cost.
FARRIS TRAVEL BANJO CO.
409 Benton Lane
Franklin, Tennessee 37067
615-456-5486
www.tranjo.com
The
Tranjo
name and design is
copyrighted and registered to the
Farris Travel Banjo Company. Copying
of either its design or name is
forbidden by law.

OWNERS MANUAL
General Features
Your Tranjo was
designed by Sam Farris to
be sturdy and portable
without sacrificing
playability or a quality
sound. Its unique features
are a full 26 3/8” scale
fingerboard, a detachable
neck without tools or string
removal, and recessed
string ends and tuning pegs. Sam designed the
Tranjo to meet the needs of the traveling banjo
player, so you can Pack It & Pick It without the
worry of damage to your “regular” banjo, and can
conveniently practice and play a high quality
instrument wherever you go. It is our hope that you
will enjoy many, many hours and miles of playing
your Tranjo.
Farris Travel Banjo Company
www.Tranjo.com
P
Pa
ac
ck
k
I
It
t
&
&
P
Pi
ic
ck
k
I
It
t!
!
Tuning Tips
Hold the Tranjo with the body in your lap and
perpendicular to you. Pluck a string with your right hand
and adjust the corresponding tuner with your left. Make
sure you are turning the correct knob –it can be a little
confusing at first, but you’ll get the hang of it quickly.
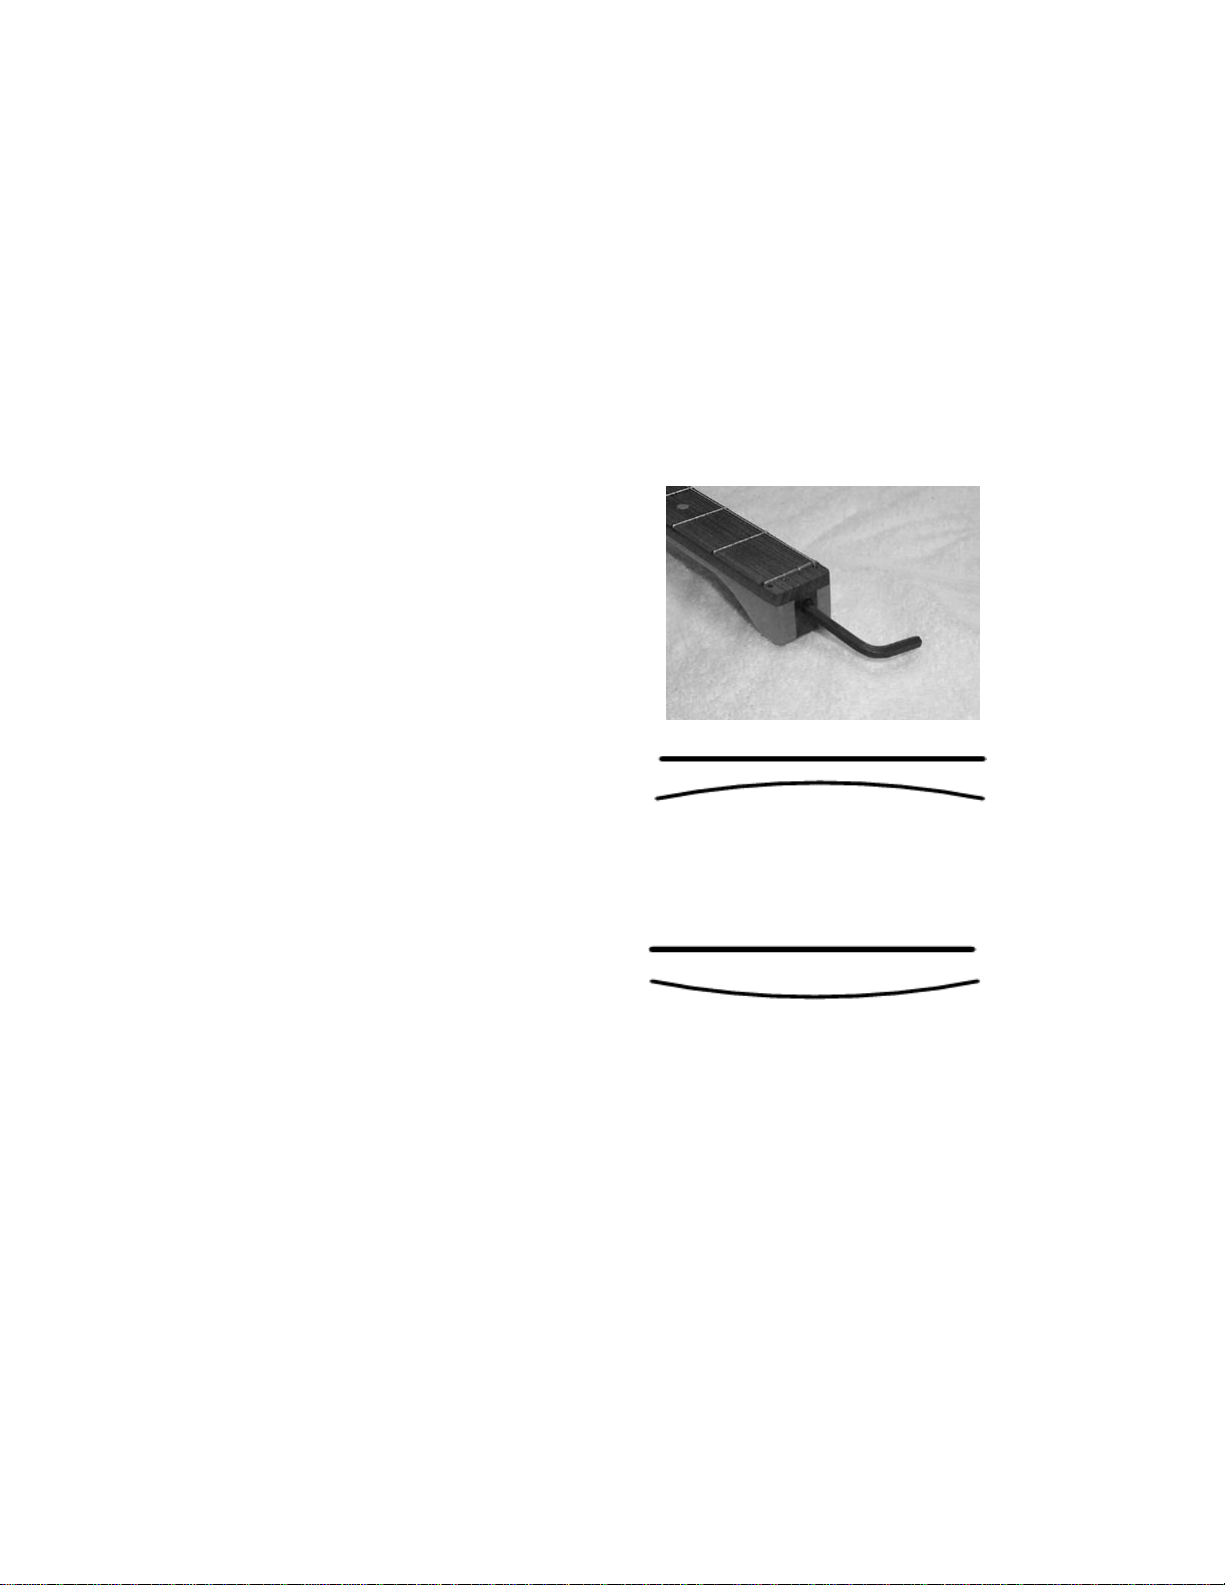
Truss Rod Adjustment
Normally, your Tranjo neck will never need
adjustment. If a slight adjustment is required to correct a
bend in the neck, insert the adjustment wrench and make
gradual adjustments (1/4 turn at a time) until the problem
is corrected. When in doubt about truss rod adjustment,
consult an experienced musical instrument repairman.
The two-way adjustable truss
rod is accessible from the end
of the neck.
Turn the wrench clockwise to
correct a back bow
Turn the wrench counter-
clockwise to correct a forward
bow.
5th String Replacement
There is a smaller post in the side of the neck for the
fifth string. A ball-ended fifth string can fit over the small
post as well, or can just be held in place by
friction behind the access hole in the
fingerboard. Be sure to feed the fifth string
over the metal string guide in the access
hole.
The Tranjo uses Steinberger
gearless tuners, which lock the strings onto
the tuning posts and allows for precise, consistent tuning.
A separate instruction sheet for changing strings and
tuning is enclosed.
Maintenance
If you disassemble your Tranjo, use a small drop of
light oil (3-in-One or similar) on each bolt when reattaching
the rear plate. Do not use excessive force to turn a bolt –
you may strip the bolt or the threaded insert. A little oil on
the neck bolt once in a while will keep the neck attachment
smooth and easy. The same goes for the thumbscrew on
the string clamp.
You can vary the tone of your Tranjo by adjusting the
tension of the head. Loosen or tighten the 6 (or 8) plate
attachment bolts evenly to the desired tension. To replace
the head, remove all 6 or 8 bolts and separate the front
and back plates of the Tranjo.
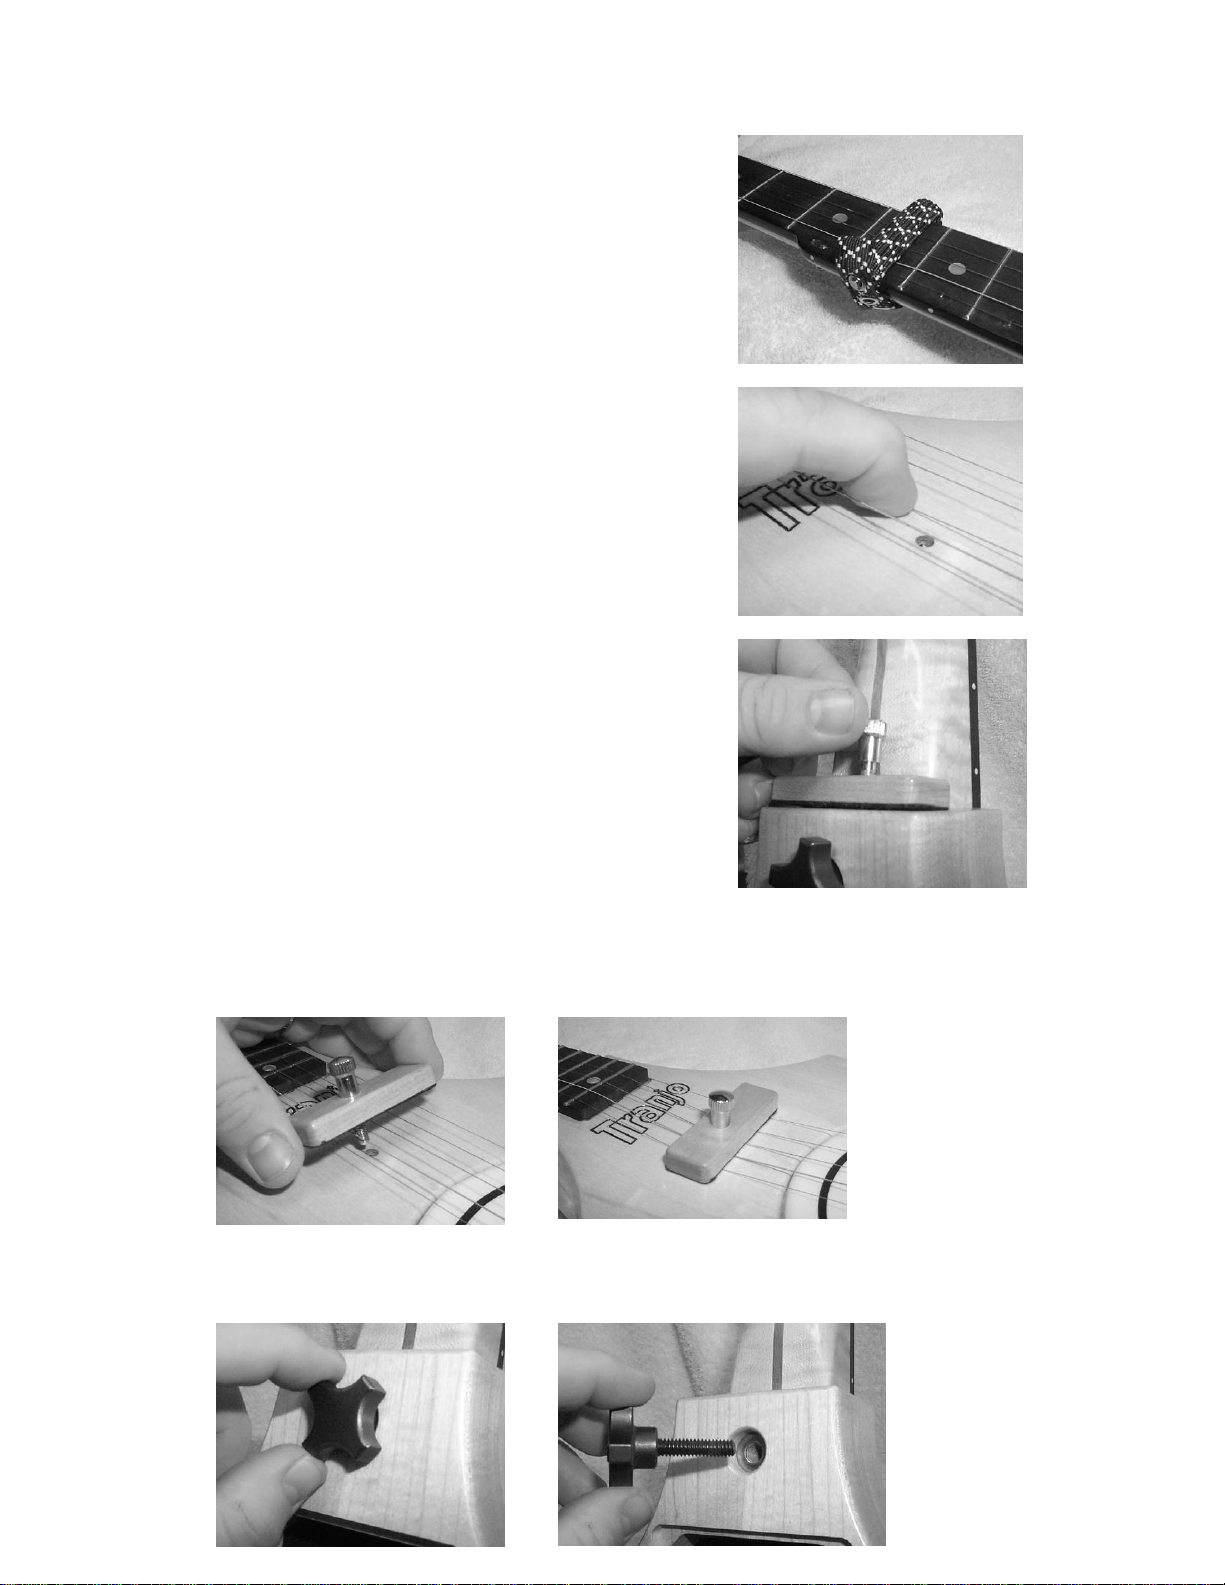
Neck Removal
Put the capo on the sixth fret
De-tune all the strings enough so
that they may be easily pressed to
touch the wooden face of the
Tranjo
Remove the bridge (optional)
Unscrew the thumbscrew holding
the string clamp from its storage
area underneath the neck.
Reattach the string clamp to the
face of the Tranjo, clamping down
all the strings. Be careful not to
cross thread or strip the thumbscrew and do not over
tighten!
Remove the knobbed bolt that holds the neck.

Neck Removal (cont.)
Pull the neck away from the body (parallel to the strings)
and then rotate the neck forward to remove it from its
mounting cavity.
If you have trouble pulling out the neck, loosen the strings
a little more.
To reattach the neck, perform these steps in reverse
order. Be careful not to strip the knobbed bolt when
screwing it into the neck –don’t force it! After reattaching
the neck and tuning up the strings, it may take a few
minutes for the tuning to stabilize as the neck settles back
into its regular tension. Make sure to reposition the bridge
if necessary. There are small pencil marks on the head to
help position the bridge. The metronome can play a fixed
pitch A –440 to help you tune (third string, second fret is
A).
You can unscrew the neck bolt slightly to make small
adjustments to the playing action. Permanent adjustments
can be made by using a slightly taller or shorter bridge.
The knobbed bolt can be replaced by a standard 1” long
¼-20 bolt if you not need to remove the neck regularly.

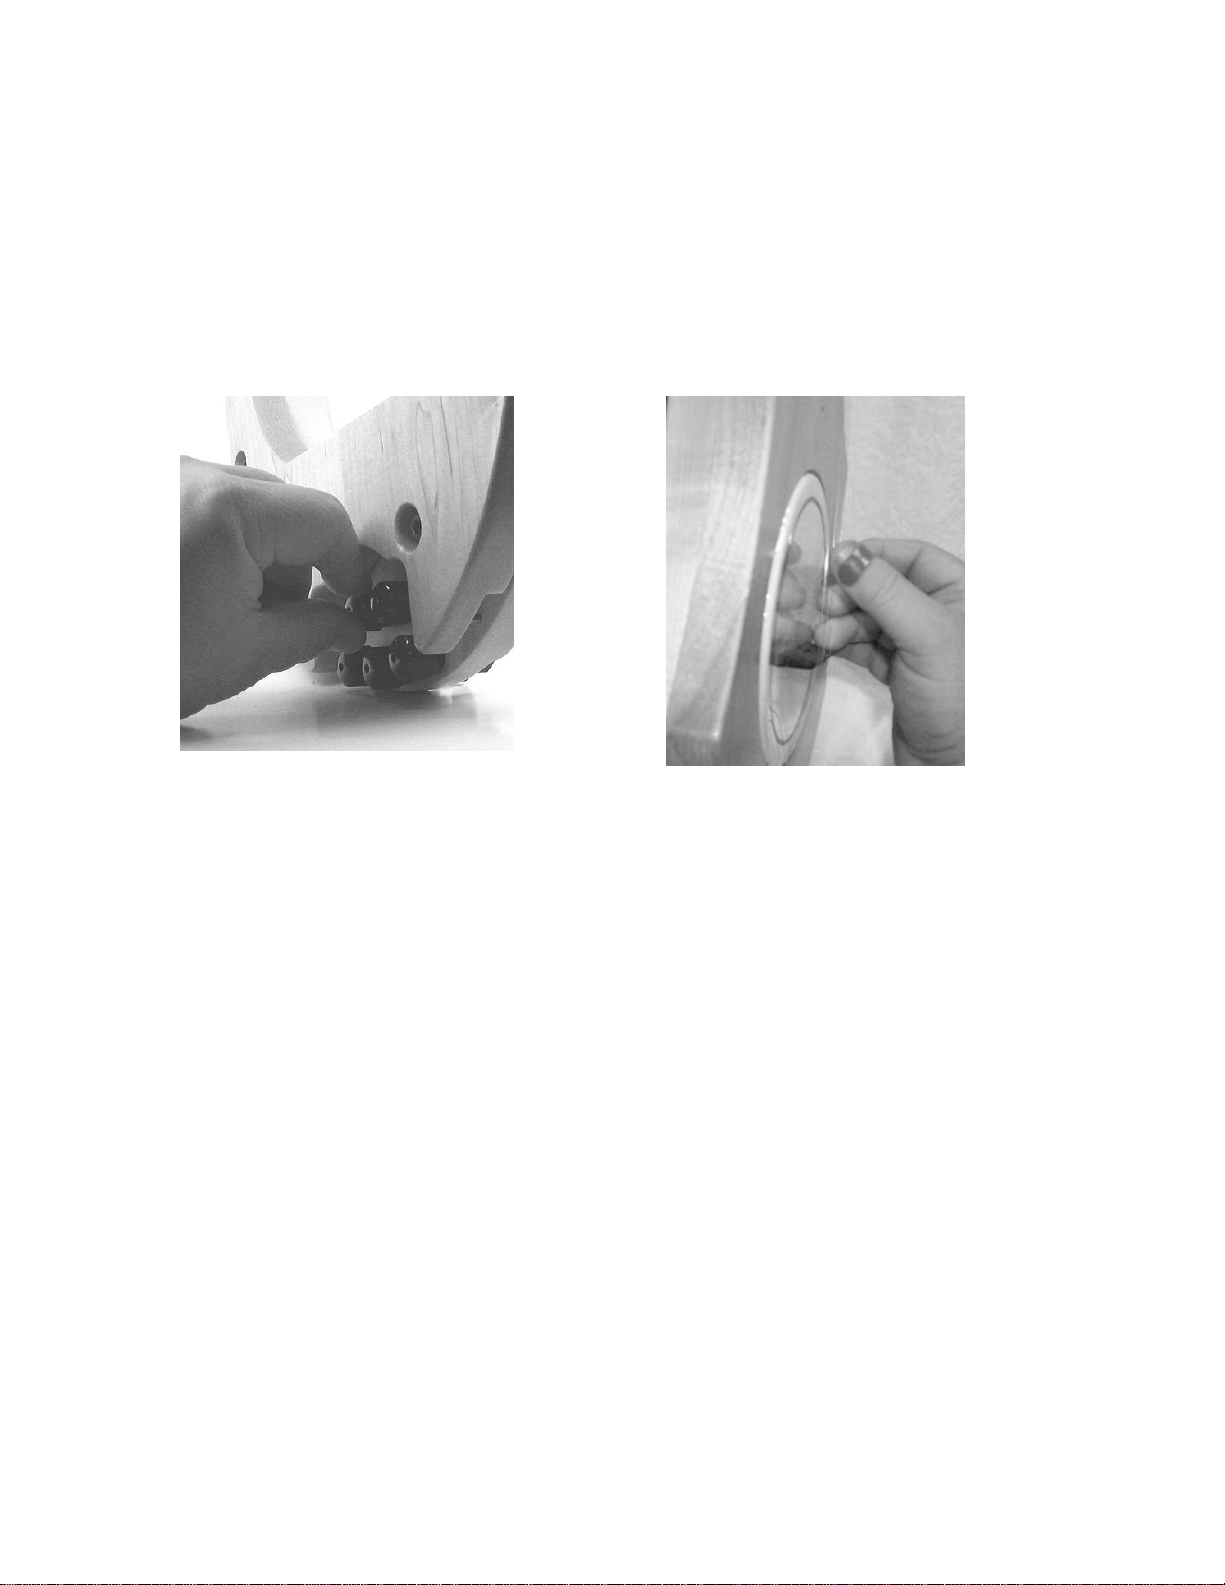
Strap
The custom-made strap that
comes with your Tranjo attaches
to the thumbscrew behind the
base of the neck and the other end
clips onto the recessed post near
the rollers.
To attach the clip end, hold the clip
as shown and press it onto the
post.
String Replacement
Regular ball-end guitar strings are
easiest to use to string up your Tranjo.
Some stores may carry banjo strings with
ball ends, but most banjo strings are loop
ended. You can buy individual guitar
strings in your preferred gauges at most
music stores or online. Regular loop end
banjo strings will work just fine, or you
can mix and match. There are 2 posts at the end of the
neck to attach to the loops –2 strings per post. To replace
the bottom string on a post you will need to loosen the
other string enough to slip it off the post as well.
Your Tranjo was shipped with .010, .012, .014, .022w,
.010, 1st to 5th strings.
Table of contents


