Transonic TC2302DVD User manual

DVD Player
with 5.1 channel audio output
Instruction Manual
Model TC2302DVD
Please read these instructions carefully and retain for future reference.
For assistance during normal working hours (9am-5pm, Mon-Fri) call Oriental Pacific International Ltd.
New Zealand call: 0800 89 85 80 or email: service@orientalpacific.com

1
When using any electrical apparatus always observe safety regulations and use
basic safety precautions to reduce the risk of fire, electric shock and personal
injury, including the following
Read, Keep and Follow these instructions, heeding all Warnings.
CAUTION! This is a class 1 laser product. However this player uses a visible laser beam which
could cause hazardous radiation exposure if directed. Be sure to operate the equipment as
directed. Do not place eyes close to any openings when connected to the mains supply.
WARNING! Do not remove any cover.
WARNING! No objects filled with liquid, such as vases, shall be placed on this equipment or in any
position where liquid may fall into this equipment or any other electrical apparatus.
WARNING! Do not insert any objects into any openings of this equipment or any other electrical
apparatus.
WARNING! Do not use this apparatus near water. To avoid the risk of fire or electric shock, do not
expose this apparatus to rain or moisture. The apparatus shall not be exposed to dripping or
splashes and is strictly for indoor use only.
WARNING!
Not for use in Tropical humid climates.
WARNING! Do not immerse in any liquid whilst in use or cleaning. Clean only with a damp cloth,
dry with a dry towel. Do not use harsh abrasives as these may damage the plastic parts.
WARNING! DO NOT block any ventilation openings. Keep away from curtains, newspapers and
restricted areas. Install in accordance with any specific manufacturer’s instructions. Always allow a
sufficient gap around the apparatus to avoid overheating.
WARNING! Do not install near any heat sources such as radiators, gas heaters, stoves or other
apparatus (including amplifiers) that produce heat. Do not leave in direct sunlight.
WARNING! Do not place any naked flame source, such as lighted candles on any electrical
apparatus.
WARNING! Connect to a suitable 230-240V ~ 50 Hz power supply only. This equipment must be
connected to a mains socket with a protective earth connection suitable for class 1 equipment.
WARNING! Keep out of reach of young children. This apparatus is not suitable for use by young
children or infirm persons without supervision. Young children must be supervised to ensure that
they do not play with the apparatus. Ensure young children have enough knowledge to operate the
equipment safely if they do have access to this equipment.
WARNING! Do not abuse or damage a power cord. If any power cord is damaged, it must be
replaced by the manufacturer, its service agent or a similarly qualified person in order to avoid a
hazard. A replaceable cord must be replaced with an authorised replacement from an authorised
service agent only.
WARNING! Only use attachments/accessories specified by the manufacturer.
WARNING! Unplug completely from the power source this apparatus during lightening storms or
when unused for long periods of time.
WARNING! Attention is drawn to the environmental aspects of disposing of any battery.
WARNING! Refer all servicing to qualified personnel. Servicing is required when the apparatus
has been damaged in any way, such as when the power supply cord or plug is damaged, liquid
has been spilled or objects have fallen into the apparatus, the apparatus has been exposed to rain
or moisture, does not operate normally, or has been dropped.
WARNING! For household use only, this apparatus is not intended for commercial use.
1.0
Important Safety Instructions
2
WARNING! If this apparatus is to be used by a third party, please supply these instructions with it.
WARNING! Do not prevent easy access to the main wall switch and plug.
WARNING! No liability will be accepted for any personal injury or damage caused by failure
to follow these instructions.
This product incorporates copyright protection technology that is protected by U S patent
rights. Use of this copyright protection technology must be authorised by the Macrovision,
and is intended for home and other limited viewing use only unless otherwise authorised by
Macrovision. Reverse engineering or disassembly is prohibited.
Manufactured under licence from Dolby Laboratories. Dolby and the double-D symbol are
trademarks of Dolby Laboratories.
Confidential Unpublished Works, 1992-1997 Dolby Laboratories. Inc. All rights reserved.
Content Guide Page
1.0 Important safety information 1
2.0 Preparations before using 3
2.1 Front panel 3
2.2 Rear panel 3
2.3 Basic connection 4
2.4 Playing a DVD 5
2.5 Frequently Used Remote Buttons 5
3.0 Remote Control 6
3.1 Remote Control Buttons 6
3.2 Remote Button Descriptions 7
4.0 Connection Options 9
4.1 Component & Composite Video System Connections 9
4.2 S-Video & 5.1 Channel System Connections 10
5.0 Setup Menu 11
5.1 Menu Operation & Navigation 11
5.2 General Setup Page 11
5.3 Audio Setup Page 12
5.4 Dolby Digital Setup 12
5.5 Video Setup Page 13
5.6 Preference Page 13
6.0 Trouble Shooting 14
7.0 Specification 15
Warranty Card 16
1.0
Important Safety Instructions (Continued)
Contents

3
2.1 Front Panel
1. Power Button 4. Remote Sensor 7. Stop Button
2. Disc Tray 5. LED Display 8. PREV Button
3. Open / Close Button 6. Play / Pause Button 9. NEXT Button
2.2 Rear Panel
10. Component Video Out 13. Audio Right Output 16. Optical Digital Audio Out
11. Composite (AV) Video Out 14. Coaxial Digital Audio Out 17. 5.1 Channel Out
12. Audio Left Output 15. S-Video Out
2.0
Preparations before using
1 3 4 52 6 987
4
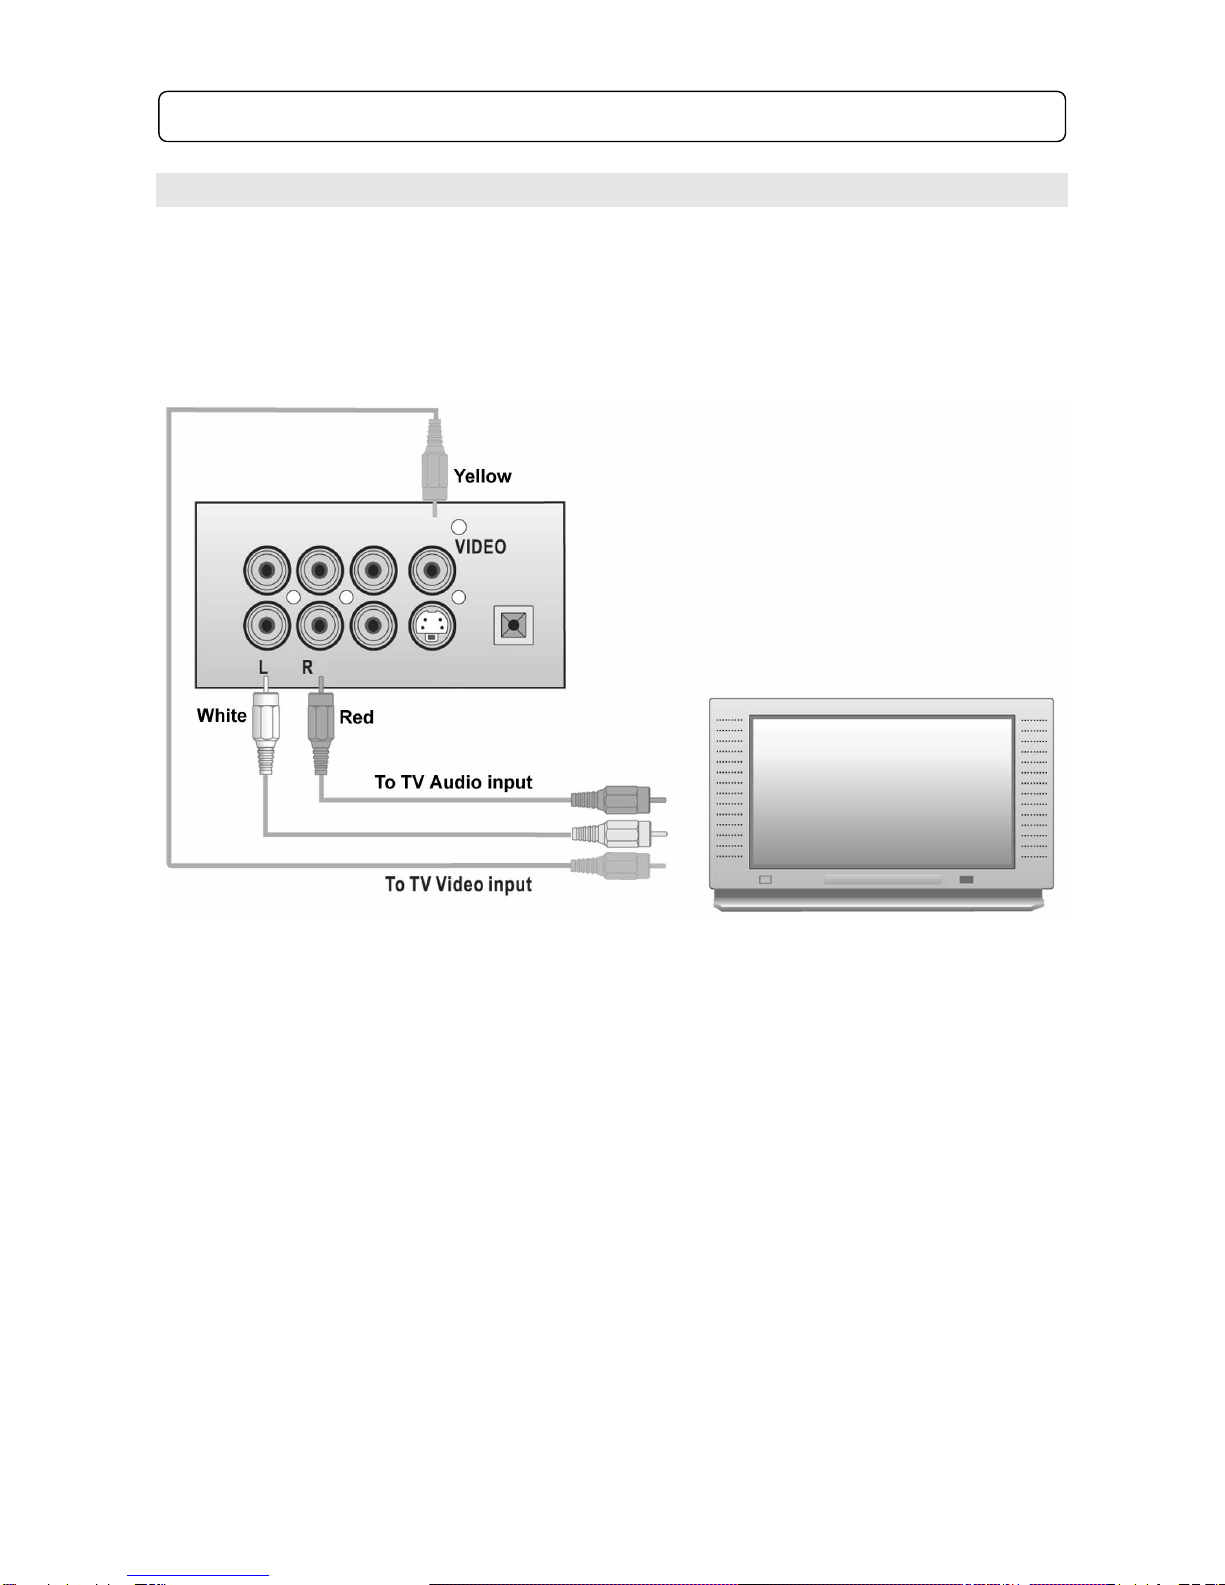
2.3 Basic Connection
Unpacking: You should have 1 DVD – 1 Remote – 1 Set Batteries – 1 set AV Connection cable.
Basic Connection: Using AV cable (with Yellow, Red & White colour coded plugs)
Note: Make sure the power off, before connecting the unit to Television or any other device.
DVD Connections: Connect the Yellow plug to the Yellow Video output jack
Connect the Red plug to the Red R (Audio Right) output jack
Connect the White plug to the White L (Audio Left) output jack
TV Connections: Connect the Yellow plug to the Video IN jack on your TV
Connect the Red plug to the Audio IN (Right) jack
Connect the White plug to the Audio IN (Left) jack
Power Connections: Connect the supply plug into a suitable power outlet socket.
You now have basic AV connection. Turn on your TV & DVD Player and switch the TV channel to
AV to view the DVD screen. You should see the start-up TRANSONIC logo.
2.0
Preparations before using
Table of contents
Other Transonic DVD Player manuals


