Transonic TC2620DVD User manual

PORTABLE DVD PLAYER
Instruction Manual
Model TC2620DVD
Please read these instructions carefully and retain for future reference.
Help line
For assistance during normal working hours (9am-5pm, Mon-Fri, New Zealand local time) call
Oriental Pacific International Ltd.
NZ call: 0800 89 85 80
Email: service@orientalpacific.com
SYMBOLS
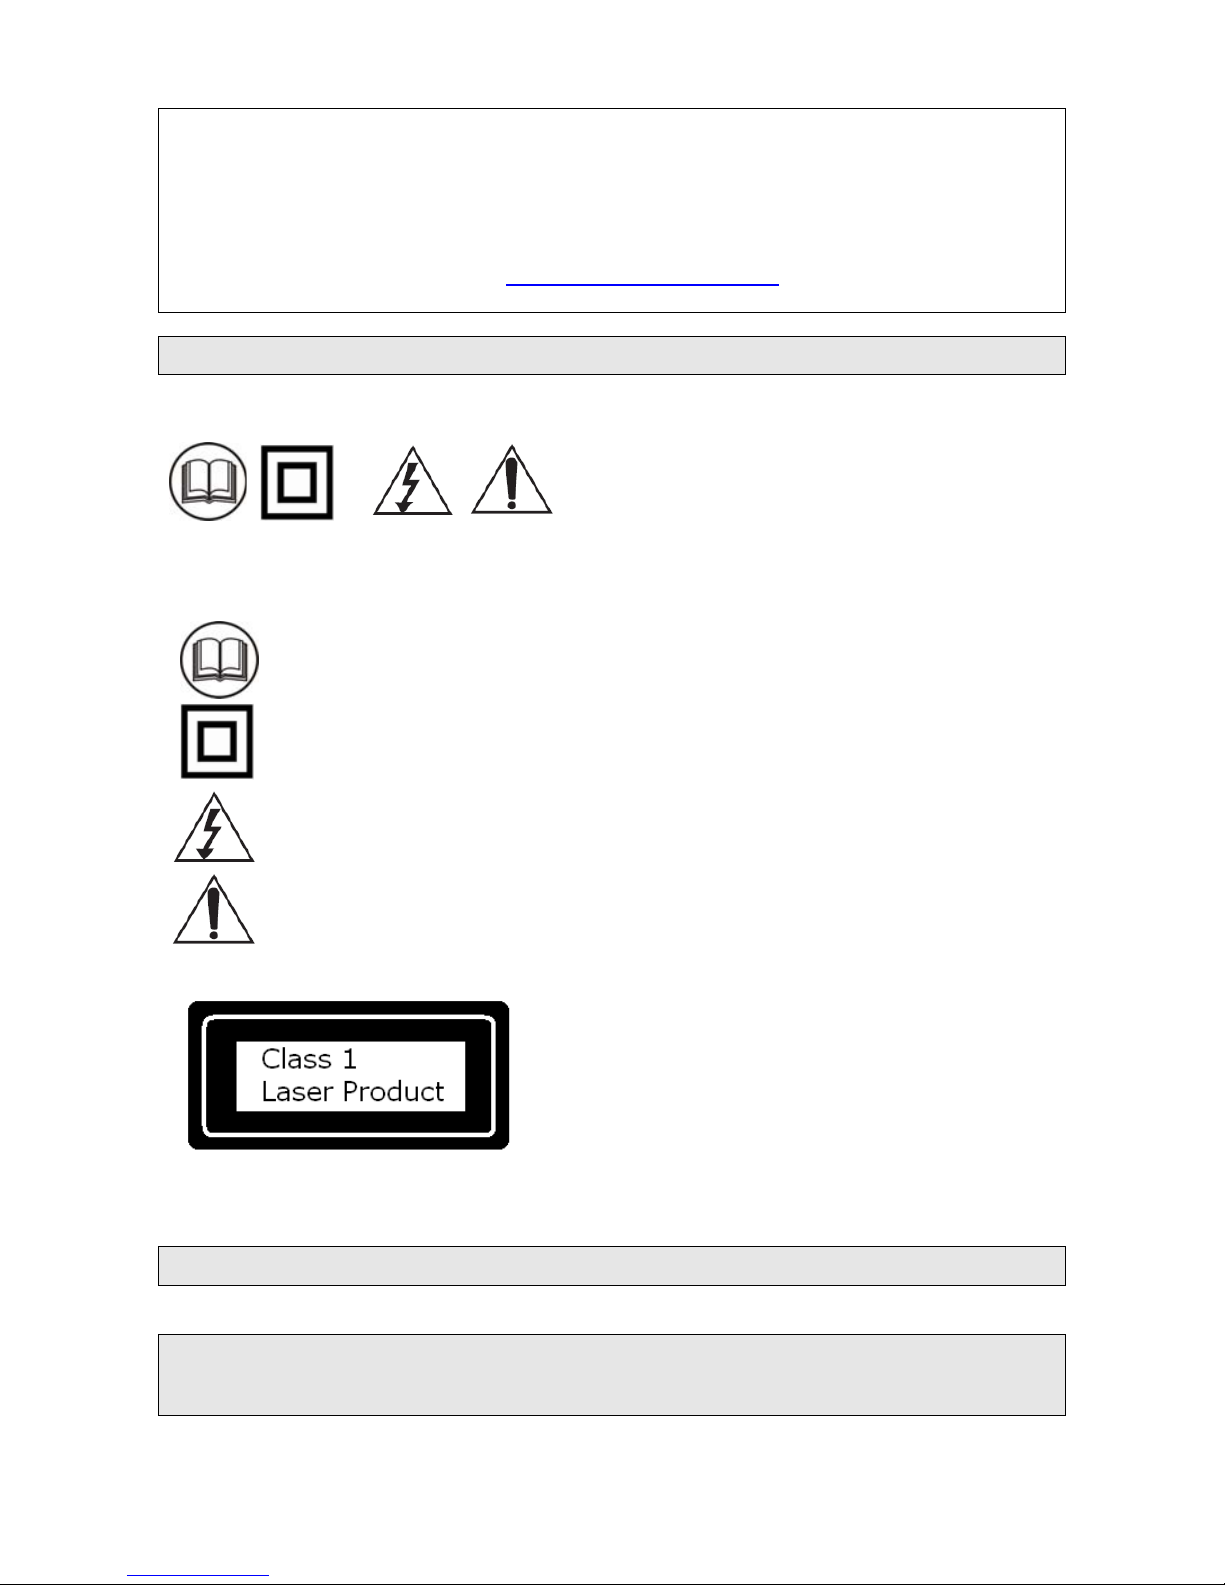
The graphic symbols used in this manual or on the back cover of the set mean the
following:
Read this manual in full before use.
Class II Double insulated Appliance
The lightning flash symbol is intended to alert the user to the enclosures that
contain hazardous voltages.
The exclamation symbol is intended to alert the user to the presence of
important operating and maintenance (servicing) instructions in the literature
accompanying the appliance.
IMPORTANT SAFEGUARDS
When using any electrical apparatus always observe safety regulations and use
basic safety precautions to reduce the risk of fire, electric shock and personal
injury, including the following
Read, Keep and Follow these instructions, heeding all Warnings.
--1--

CAUTION! This is a class 1 laser product. However this player uses a visible laser beam which
could cause hazardous radiation exposure if directed. Be sure to operate the equipment as
directed. Do not place eyes close to any openings when connected to the mains supply.
WARNING! Do not remove any cover.
WARNING! No objects filled with liquid, such as vases, shall be placed on this equipment or in any
position where liquid may fall into this equipment or any other electrical apparatus.
WARNING! Do not insert any objects into any openings of this equipment or any other electrical
apparatus.
WARNING! Do not use this apparatus near water. To avoid the risk of fire or electric shock, do not
expose this apparatus to rain or moisture. The apparatus shall not be exposed to dripping or
splashes and is strictly for indoor use only.
WARNING! Do not immerse in any liquid whilst in use or cleaning. Clean only with a damp cloth,
dry with a dry towel. Do not use harsh abrasives as these may damage the plastic parts.
WARNING! DO NOT block any ventilation openings. Keep away from curtains, newspapers and
restricted areas. Install in accordance with any specific manufacturer’s instructions. Always allow a
sufficient gap around the apparatus to avoid overheating.
WARNING! Do not install near any heat sources such as radiators, gas heaters, stoves or other
apparatus (including amplifiers) that produce heat. Do not leave in direct sunlight.
WARNING! Do not place any naked flame source, such as lighted candles on any electrical
apparatus.
WARNING! Connect to a suitable 230V ~ 50 Hz power supply only.
WARNING! Keep out of reach of young children. This apparatus is not suitable for use by young
children or infirm persons without supervision. Young children must be supervised to ensure that
they do not play with the apparatus. Ensure young children have enough knowledge to operate the
equipment safely if they do have access to this equipment.
WARNING! Do not abuse or damage a power cord. If any power cord is damaged, it must be
replaced by the manufacturer, its service agent or a similarly qualified person in order to avoid a
hazard. A replaceable cord must be replaced with an authorised replacement from an authorised
service agent only.
WARNING! Only use attachments/accessories specified by the manufacturer.
WARNING! Unplug completely from the power source this apparatus during lightening storms or
when unused for long periods of time.
WARNING! Attention is drawn to the environmental aspects of disposing of any battery.
WARNING! Refer all servicing to qualified personnel. Servicing is required when the apparatus
has been damaged in any way, such as when the power supply cord or plug is damaged, liquid
has been spilled or objects have fallen into the apparatus, the apparatus has been exposed to rain
or moisture, does not operate normally, or has been dropped.
WARNING! For household use only, this apparatus is not intended for commercial use.
WARNING! If this apparatus is to be used by a third party, please supply these instructions with it.
WARNING! No liability will be accepted for any personal injury or damage caused by failure
to follow these instructions.
--2--

Tables of contents
snoitarepOdecnavdAdetratSgnitteG
SYMBOLS
IMPORTANT SAFEGUARDS
Features
Definition of DVD terms
DVD player overview
Remote control function
Remote Control Preparation
System Connection
Using the built-in battery or AC adapter
1
1
4
5
6
7
8
9
10
Program play
Repeat play
A-B Repeat play
Changing Subtitle language (DVD Only)
ZOOM play
Changing audio soundtrack language
(DVD /VCD disc)
Viewing from different angles (DVD only)
Picture CD playback
12
12
12
13
13
13
13
13
sgnitteSlaitinInoitarepOcisaB
System Setup
Language Setup
Audio Setup
Video Setup
Speaker Setup
14
15
15
15
15
REFERENCE
Basic play
Stopping play
Skipping ahead or back
Rapid advance/Rapid reverse
Step play
Slow-motion play (DVD)
Playing WMA, MP3, JPEG, MPEG or DIVX
discs
Enjoying Video CDs with playback control
On Screen Display information
10
10
10
10
10
11
11
11
12
Definitions of terms
Specifications
Troubleshooting
Disc handling and maintenance
Accessories
Warranty
16
16
17
18
18
19
--3--

Dear Customers
May we take this opportunity to thank you for purchasing this Portable DVD Player.
We strongly recommend that you carefully study the Operating Instructions before attempting to operate the player and that you
note the listed precaution.
Features
HIGH QUALITY SOUND AND PICTURE
96 kHz / 24 bit audio D/A converter
This player enables 96 kHz/24 bit linear PCM signals, which
constitute the highest specifications in the DVD standards, to
be reproduced faithfully. To support 96 kHz sampling/24 bit
sound, the shaping noise of this multi-level digital sigma type of
D/A converter is kept flat up to 44 kHz, thus preventing the
important audio signals from being affected in any way. In
terms of the bottom line, the sound in all of its various modes is
reproduced faithfully.
10 bit video D/A converter
With its 10-bit capability, this D/A converter reproduces images
faithfully.
The player can play back discs with signal system of NTSC
and PAL.
GRAPHICAL USER INTERFACE SCREEN
Simply by pressing the “OSD” button on the remote control unit,
information on the player and disc can be displayed on the
screen for easy identification, The player's operations and
settings can easily be performed by operating the remote control
while monitoring the screen.
MULTI-ANGLE FUNCTION
This function allows you to choose the viewing angle of scenes
which were shot from a number of different angles. (Limited to
DVD recorded with multiple camera angles.)
PARENTAL LOCK FUNCTION
This can prevent play of DVD unsuitable for children.
DISC FORMATS SUPPORTED BY PLAYER
The player can play back discs bearing any of the following
marks:
--4--

Definition of DVD terms
DVD player is very popular audiovisual product due to
its high quality pictures and sound. However, each disc
has its own features and symbols to indicate its
features. For example: DTS audio effect is different
from stereo audio effect. To understand these special
features and symbols, it is helpful to purchase the
suitable DVD discs. Following are some definitions of
DVD terms:
Subtitles
This is the appearance of the dialogue at the bottom of
the screen which is prerecorded on some DVD discs.
Multi Angle
Recorded onto some DVD discs are scenes which have
been simultaneously shot from a number of different
angles (the same scene is shot from the front, from the
left side, from the fight side, etc.). With such discs, the
ANGLE button can be used to view the scene from
different angles.
Aspect ratio
Depending on the type of television you have, you may
want to adjust the screen setting (also called the aspect
ratio).
16:9 (Widescreen)—Choose this option if
your DVD player is connected to a widescreen TV, the
images on the screen might appear distorted due to
vertical compression. If you play a disc recorded in 4:3
format on a widescreen TV, the left and right side of the
screen appears black.
4:3 PS (Pan and Scan)—Choose this
option if you want the movie to fill the entire screen of
your TV. This might mean that parts of the picture (the
left and right edge ) won’t be seen.
4:3 LB (Letterbox)—Choose this option
if you want to see movies in their original aspect ratio
(height-to-width ratio). You’ll see the entire frame of the
movie, but it takes up a smaller portion of the screen
vertically. The movie might appear with black bars at
the top and bottom of the screen.
Multi Audio language
The audio soundtrack can be heard in up to 8
languages. (The number of audio sound languages
depends on the software.)
Region code
DVD discs contain Regional Codes which can be used
to prevent the playback of certain discs depending upon
the geographical area it is played in. The various
studios and home video companies lobbied to make
sure this coding system was a required part of the
current DVD standards, because they wish to control
how their DVD titles are exported to other countries.
(For example, while a recent film may already have
played theatrically in the United States and been
released to the home video market, that same film may
not yet have opened in some European or Asian
countries.) In most instances, discs manufactured in
one region will usually only play on players that were
manufactured in that same region - this means that
discs bought or imported from Japan will not play on
U.S. players, and vice versa. However, the regional
coding system is entirely optional, and discs without
Regional Codes will play on any player in any country.
The disc’s region code must match your DVD player’s
region code to playback.
Region 1 - The U.S., U.S. territories and Canada
Region 2 - Europe, Japan, the Middle East, Egypt,
South Africa, Greenland
Region 3 - Taiwan, Korea, the Philippines, Indonesia,
Hong Kong
Region 4 - Mexico, South America, Central America,
Australia, New Zealand, Pacific Islands, Caribbean
Region 5 - Russia, Eastern Europe, India, most of
Africa, North Korea, Mongolia
Region 6 – The mainland of China
Dolby digital
“Dolby” and the double-D symbols are trademarks of
Dolby Laboratories. The disc bearing these symbols
contains the Dolby sound effect, but does not mean to
contain the digital surround sound effect. In addition, if
there is a symbol with LPCM words on the disc, it
means the disc contains the super high quality sound
LPCM effect.
--5--
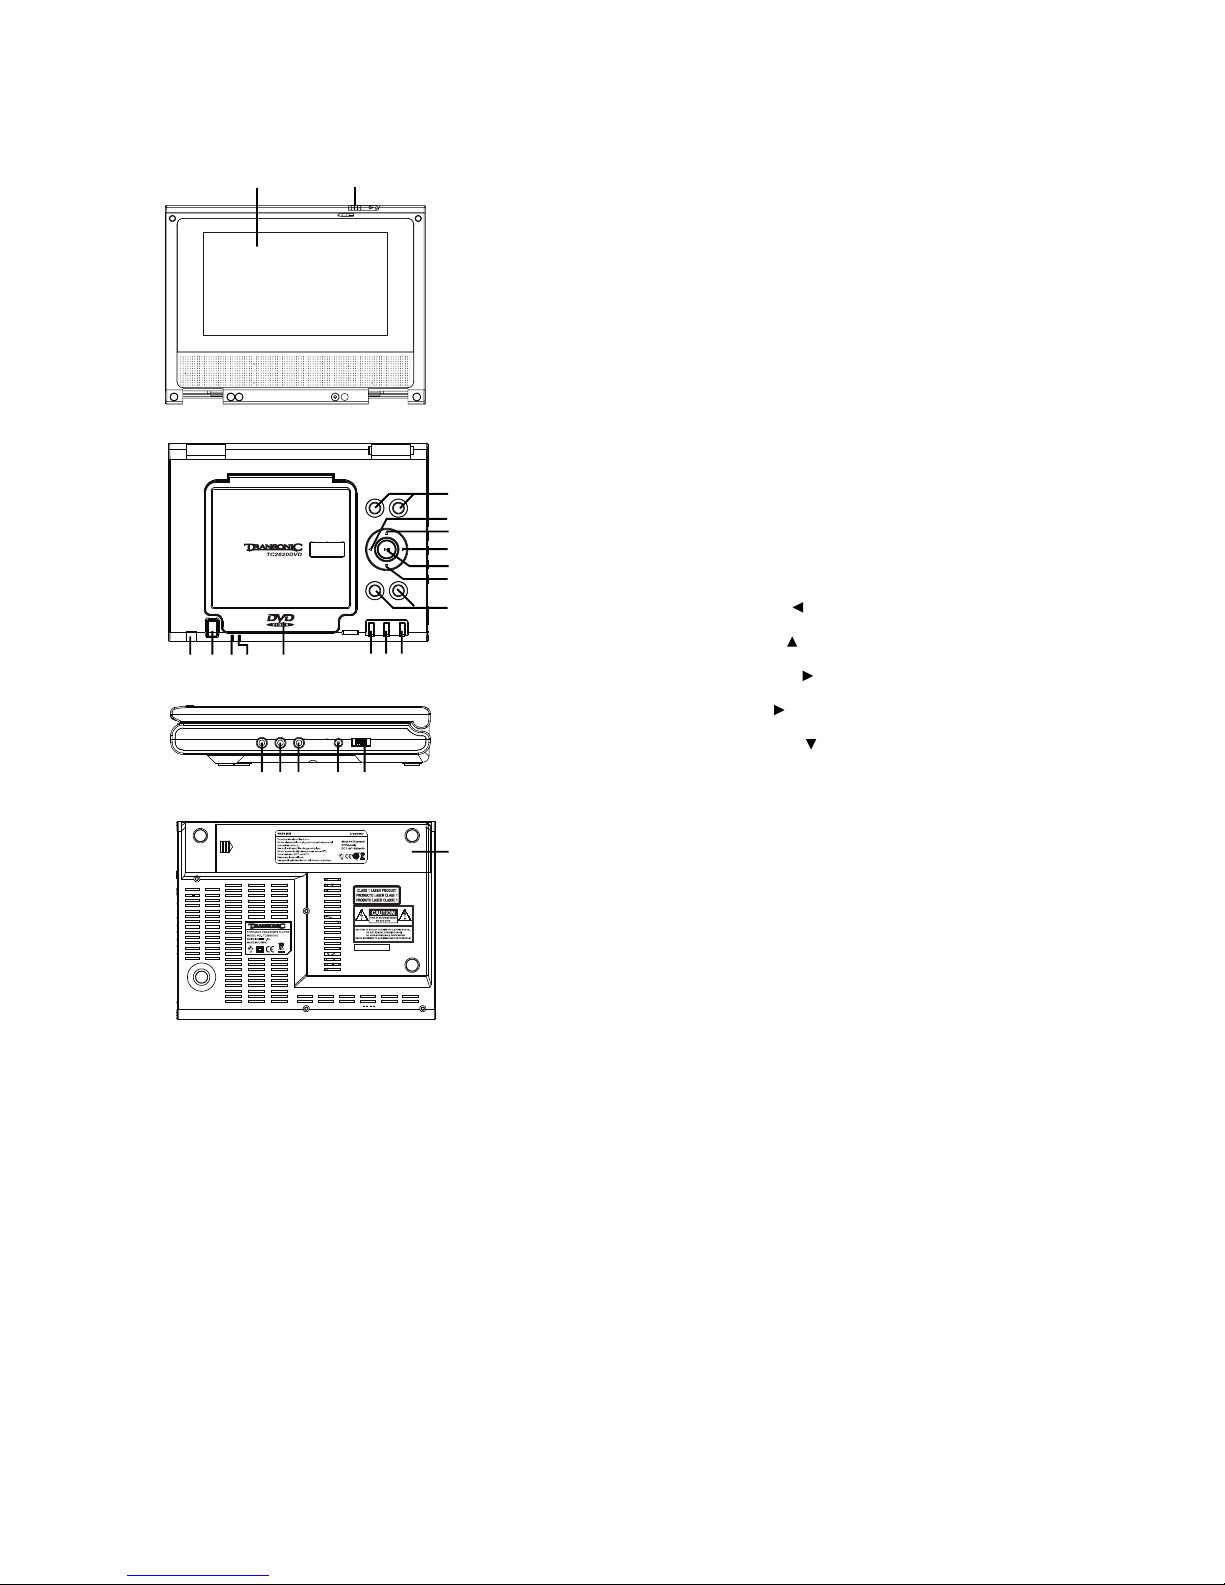
DVD player overview
1. TFT display screen
2. Latch
3. Remote sensor
4. OPEN button
5. Charge indicator
6. Power Indicator
7. CD door
8. SET UP button
9. ENTER button
10. STOP button
11. VOL+/- button
12. Navigation (Left)
13. Navigation (Up)
14. Navigation (Right)
15. PLAY/PAUSE II button
16. Navigation (Down)
17. SKIP/SEARCH +/- button
18. HEADPHONE OUT jack
19. AV OUT jack
20. COAXIAL jack
21. DC IN 12V jack
22. POWER switch
23. Battery Compartment
1 2
3 4 5 6 7 8 9 10
11
12
13
14
15
16
17
18 19 20 21 22
23
SKIP / SEAR CH
- -
SKIP / SEAR CH
+ +
SETU P ENTE R STO P
REMO TE
OPEN /
CLOS E
CH
.
POWE R
VOL
-
VOL
+
HP- OUT AV O UT COA XIAL DC I N 12V POW ER
OFF O N
S/N :0 90 300 00 1
--6--

Remote control function
(In alphabetical order)
Numeric buttons (1-9, 0, 10+)—Input track numbers. Press the “10+” button first
if you want to input numbers more than ten. For example: to input track 13, press
the “10+” button first and then the “3” button. To input track 20, press the “10+”
button twice and then the “0” button.
Arrow buttons ( ,,,) (navigation buttons)—Highlight on–screen menu
items.
“A-B” —Sets the A and B point for A-B point.
“ANGLE”—Selects the available camera angles.
“CLEAR”—Clears on-screen information and clear the selected program tracks.
“ENTER”—Selects the item that is highlighted on-screen.
“FWD. ”(Fast Forward)—Fast forwards playback when playing discs.
“LANGUAGE”—Selects the available audio languages on the disc.
“L/R”—Toggles the stereo or mono settings for VCD discs.
“MENU”—When playing a DVD disc, access the disc’s menu.
“MUTE”—Reduces the audio to a minimum level.
“NEXT I”— Skips to the next chapter or track.
“PBC”—toggles the playback control (PBC) menu on and off. The PBC feature is
used with some VCD and SVCD discs.
“PLAY/PAUSE II”—Play a disc. Also pauses playback. Press again to resume
play.
“PREV. I ”—Skips to the previous chapter or track.
“PROG”—Use to program chapters and tracks in a desired order.
“RANDOM”—Toggles random play.
“REPEAT”—Repeats the chapter or track of the disc. Press repeatedly to scroll
through the options.
“RETURN”—When using PBC, returns you to the list of tracks.
“REV. ”—Fast reverses playback when playing discs.
“SETUP”—Brings up the DVD player setup system.
“SLOW”— Starts a slow speed playback.
“STEP”— When paused, advances the frame forward.
“STOP ”—Stops playback.
“SUBTITLE”—Selects the available subtitles.
“TIME”— Allows you enter a chapter or track time to have the player jump to.
TITLE —Selects the available titles on the disc.
“OSD”—Displays the disc information.
VOL+/- buttons—Increases or decreases the volume as desired.
ZOOM —Enlarges the picture on the screen.
--7--
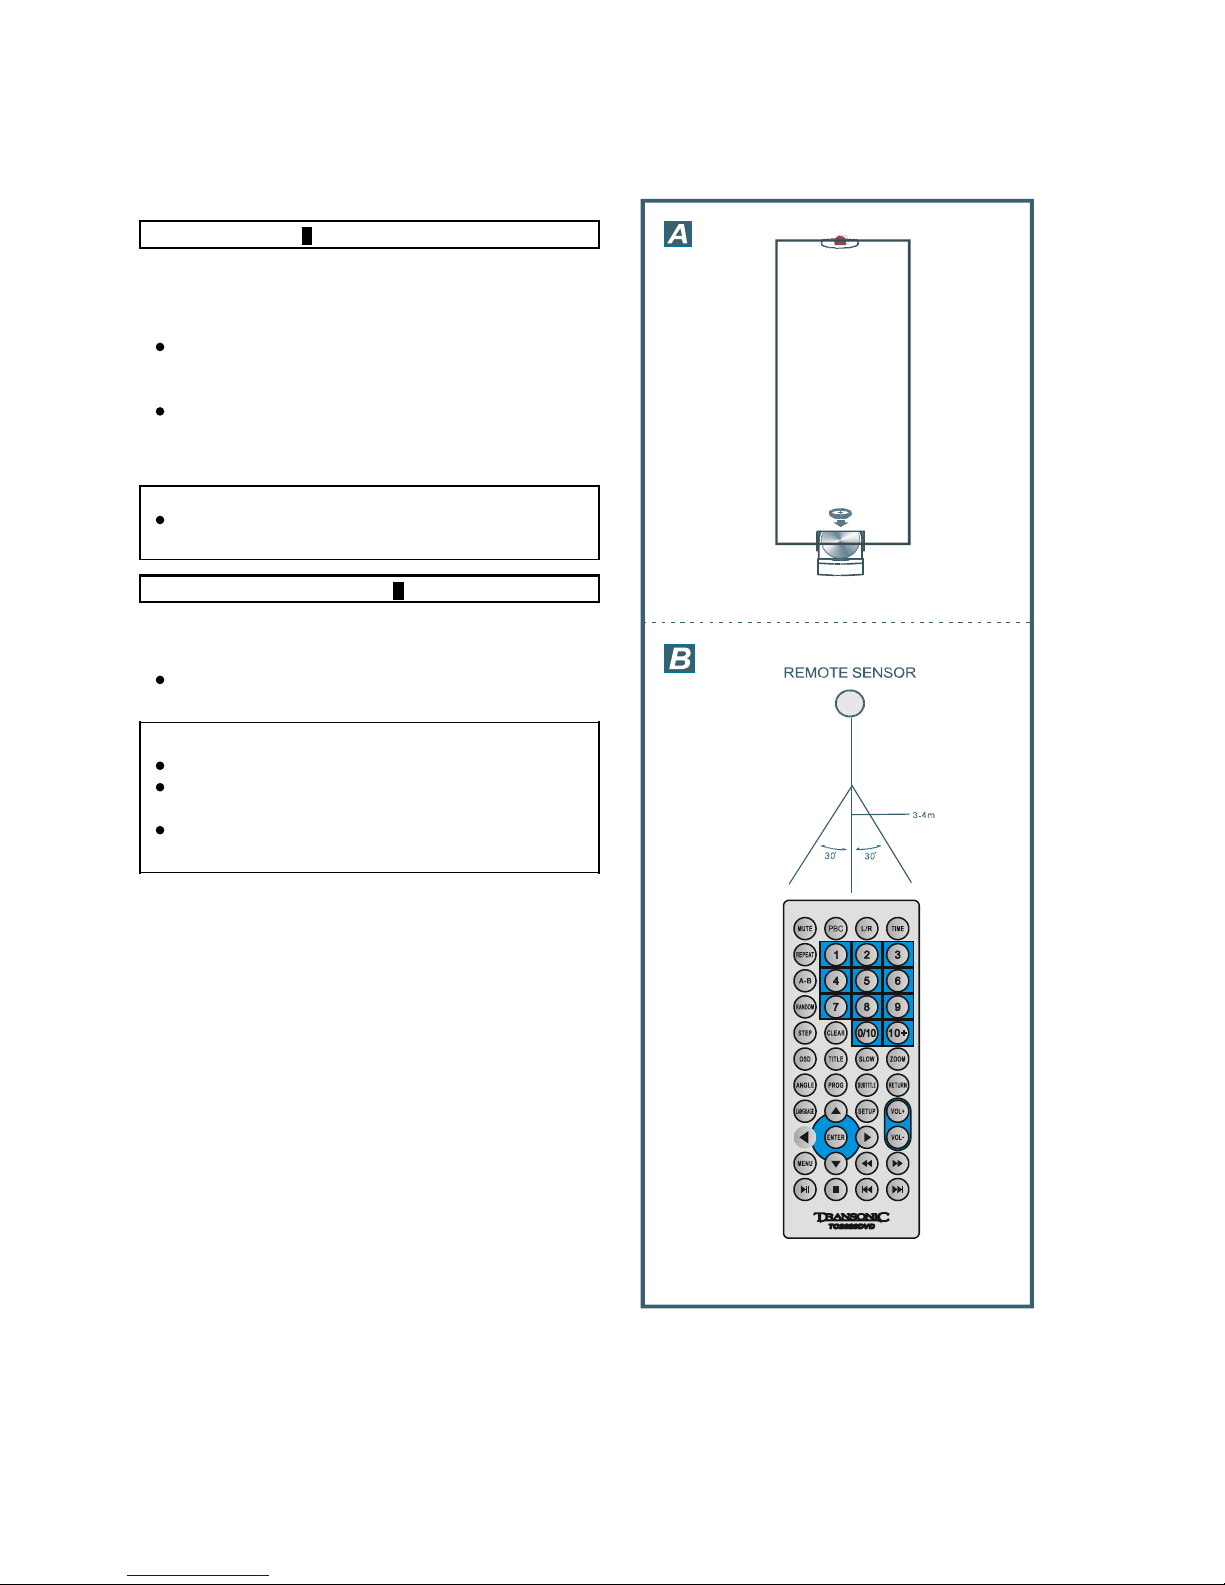
Remote control unit preparation
Battery installation A
Insert the batteries while observing the correct (+) and (-)
polarities as illustrated at right.
Service life of batteries
The batteries normally last for about one year although
this depends on how often, and for what operations, the
remote control unit is used.
If the remote control unit fails to work even when it is
operated near the player, replace the batteries.
Use one CR2025 3V button battery.
Note:
Do not drop, step on or apply impact to the remote control
unit. This may damage the parts and lead to malfunction.
Remote control operation range B
Point the remote control unit within 3-4 m from the remote control
sensor and about 60º at the front of the player.
The operating distance may vary according to the brightness
of the room.
Note:
Do not point bright lights at the remote control sensor.
Do not place objects between the remote control unit and the
remote control sensor.
Do not use this remote control unit while simultaneously
operating the remote control unit of any other equipment.
--8--
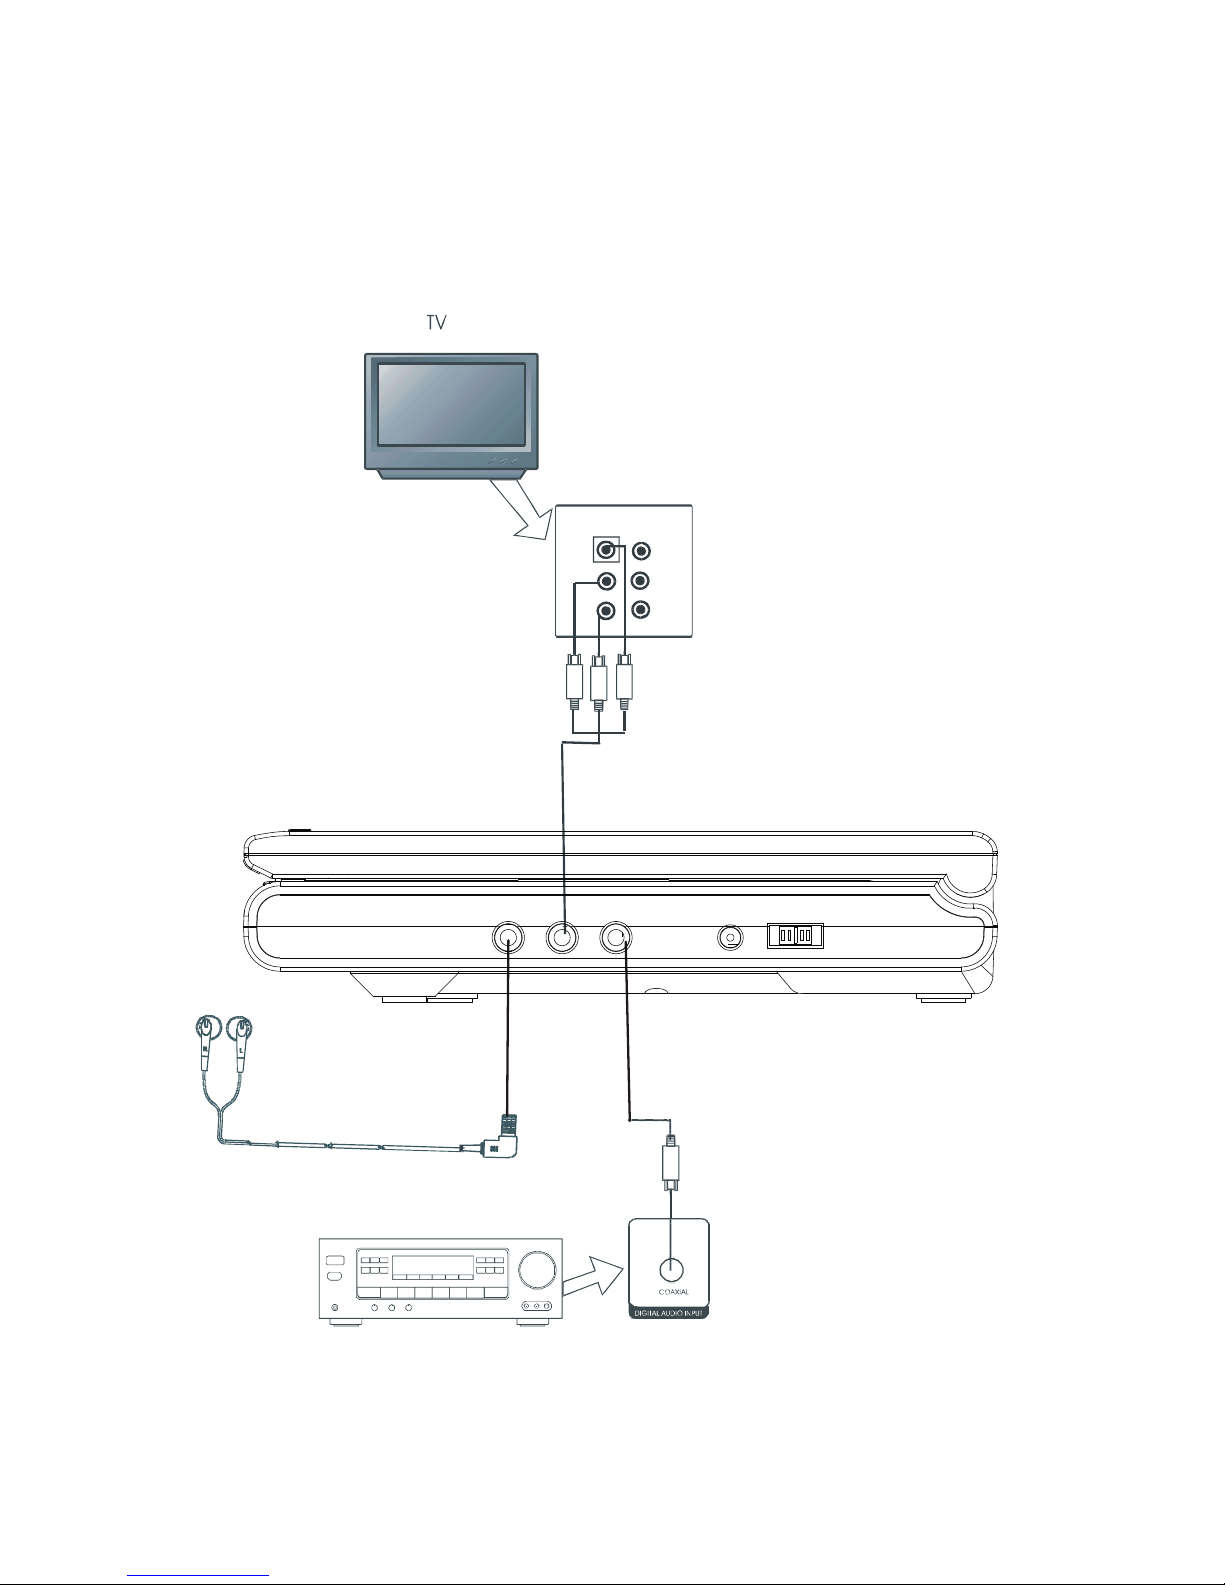
System connection
1. Before connecting, make sure to turn off the power of all apparatus.
2. Connect the player’s analog output jacks to your TV’S input jacks.
3. Insert the plugs fully into the jacks. Loose connection may produce intermittent problems.
Note: This picture is only for your reference; all the functions should be based on the real unit machine.
Amplifier
AB
L
R
INPUT
EARPHONES
HP-OUT AV OUT COAXIAL DC IN 12V POWER
OFF ON
--9--

yalpgnippotSretpadaCAroyrettabni-tliubehtgnisU
There is a built-in rechargeable battery in the player. You can
operate your player by it. If the low power symbols flashes in
the display, or the display screen is blank when the Power
switch is in “on” position, your batteries are weak. Please use
the AC adapter instead. Plug one end of the AC adapter into
the DC IN jack of the player, then plug the other into an AC
outlet.
You can charge rechargeable batteries with the AC adapter.
Once the AC adapter is connected, the built-in battery is
charged in the player itself. During charging, the indicator
flashes. Charging time takes approximately 4-8 hours.
Important AC Power Notes:
Press “STOP ”
For your convenience:
When player is stopped, the player records the point where
“STOP ” was pressed (RESUME function). Press the
“PLAY II” again, player will resume from this point.
When the tray is opened or “STOP ” is pressed again, the
RESUME function will be cleared.
Skipping ahead or back
Do not touch the power adapter with wet hands. Doing so is
dangerous, as this could result in an electrical shock.
If the power adapter is connected, the power supply is
automatically switched to the AC power source and the
batteries are disconnected.
Before enjoying DVD/ CD
Skipping ahead
Press the “NEXT I” button during play.
A chapter (DVD) or a track (CD) is skipped forward each
time the button is pressed.
Skipping back
Press the “PREV. I” button during play.
A chapter (DVD) or a track (CD) is skipped backward each
time the button is pressed.
Rapid advance (Rapid reverse)
During playback, press the “ ” button or “ ” button to fast
forward/rewind.
Press the “PLAY II” button to resume normal play.
The forward/rewind speed as follows:
2X -- 4X -- 8X – 20X
Step play
During playing, press the “STEP” button, the play will be paused,
and in this mode, each time the “STEP” button is pressed, the
player will only play one picture. To resume normal play, press the
“PLAY II” button.
If you would like to change the menu language to other
language, please refer to "LANGUAGE SETUP".
In the explanation given below is assumed that English has
been selected as the OSD language.
Basic Play
1. Turn the power switch to ON position.
2. Press OPEN/CLOSE to open the disc tray.
3. Place a disc onto the disc tray.
Hold the disc without touching either of its surfaces, position
it with the printed title side facing up, align it with the guides,
and place it in its proper position.
4. Close the CD door, and the player will start to read the disc
automatically.
5. When a menu screen appears on the screen, press the
navigation buttons or press the numeric buttons to select
preferred track number, then press the “ENTER” button to
confirm.
6. When the menu continues onto another screen, press the
“NEXT I” button to view the next screen, or press the
“PREV. I” button to skip to previous screen.
NOTE: Due to the different design of some software titles,
the “NEXT I” button may not always work.
7. To stop play and return to the menu screen, press the
“TITLE” button, or “MENU” button (which button is
pressed differs depending on the disc used).
For DVD, press “TITLE”, “MENU” or “RETURN”.
For VCD, press “RETURN".
--10--
lortnockcabyalphtiwsDCoediVgniyojnEVD)D(yalpnoitom-wolS
On the remote control unit
Press the “SLOW” button during playback.
Play the disc at a 1/2 of normal speed at first,
Each time the button is pressed, the play speed becomes
slower (1/2, 1/3, 1/4, 1/5, 1/6, 1/7).
Press PLAY button, normal play will resume.
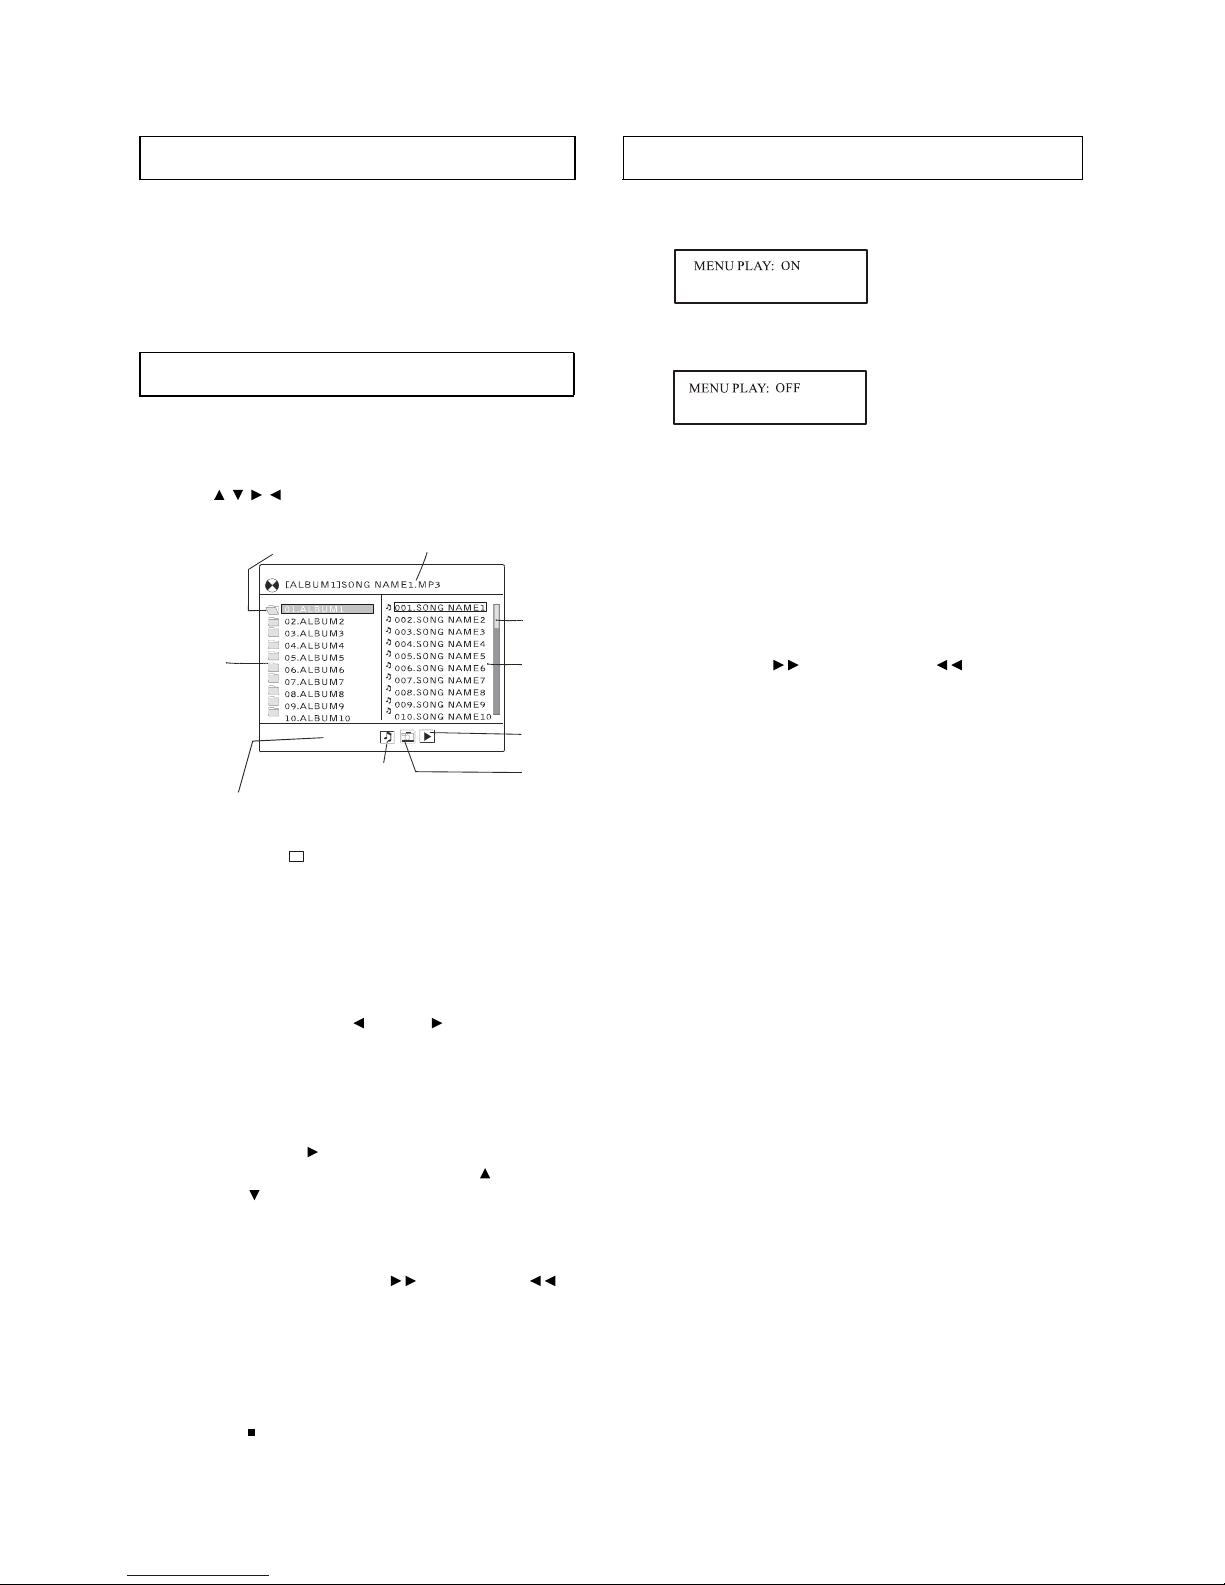
Playing WMA, MP3, JPEG MPEG or DIVX discs
Playing WMA, MP3, JPEG or MPEG discs
Insert the disc containing the files in WMA, MP3, JPEG ,
MPEG or DIVX format to be played, and after a few minutes,
the screen will show all folders on the disc. Using the arrow
buttons ( , , , ) and ENTER button to operate.
1. After detecting the disc contents, the player will go to
the first directory and play the first song if there are
available songs.
2. To select the audio, picture, or MPEG file format for
playing, press the left ( ) or right ( ) button to
highlight the file format logo in file format switch region
and press ENTER.
3. After selecting the desired file format, using the arrow
buttons to select the directory you want to play, then
press the right ( ) arrow button to go to file region.
Select your favorable file by using the up ( ) and
down ( ) arrow buttons and press ENTER button to
start playback.
4. During playing, press NEXT I or PREVIOUS I
button to play correctly.
5. Press the REPEAT button on the remote to change
play mode.
6. When playing picture or MPEG files, press RETURN or
STOP button to return to the list of files.
When playing VCD2.0/3.0 with PBC, use PBC button the player
will show
Press PBC button once, the player will show
When the PBC is ON (menu play)
1. Press numeric button to select corresponding track, if the track
number is under 10, choose one of the numeric buttons 1-9.
2. If the track number is exceed10, press the “10+” button first,
then press numeric buttons 1-9.
3. During playback, press the “RETURN” button to main menu.
4. Press the “NEXT I” button or “PREV. I” button; the
player will play in the scheduled sequence on the disc.
Directory Region
C
urrent song name
File Region
Current song
position
Current directory
Audio file Picture file
MPEG file
File Format Switch Region
Note: If there is available audio, picture, or MPEG format file on the
disc, the logo of audio file, picture file, or MPEG file will have a
outline border ( ) . Using the left and right arrow buttons to
select the desired file format.
--11--
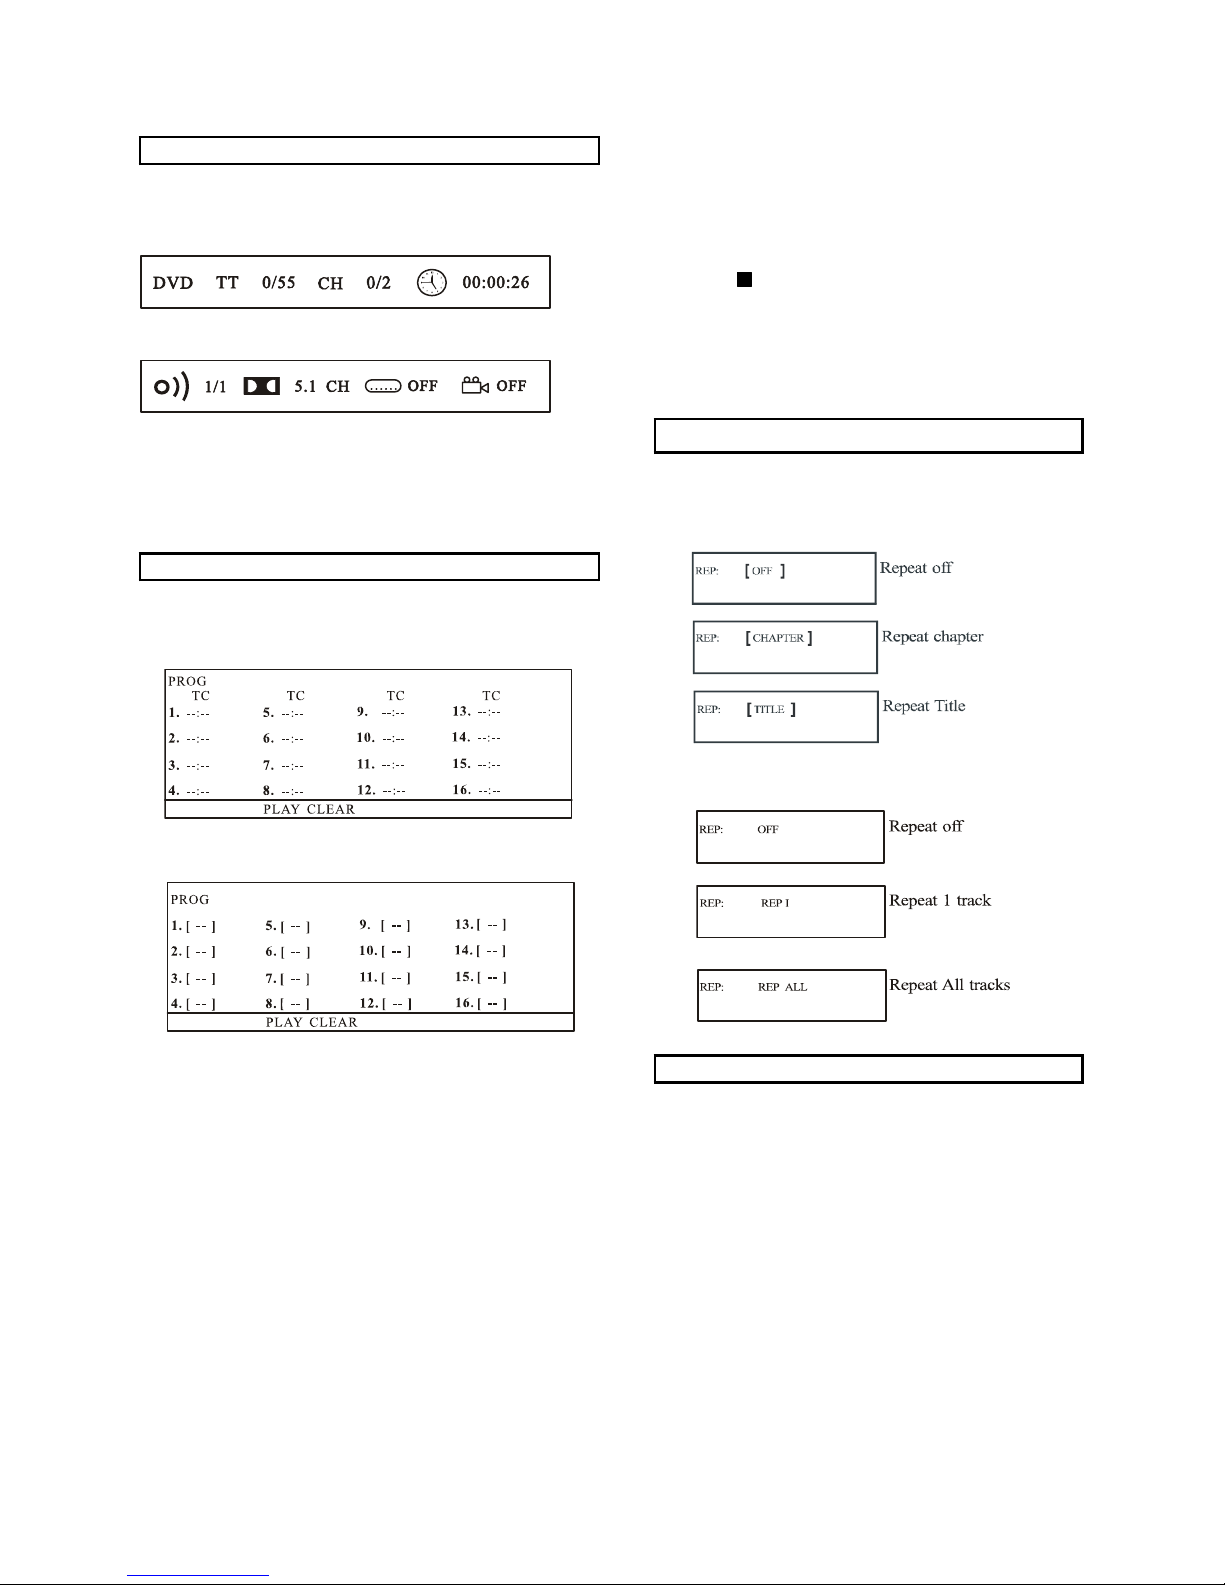
On Screen Display information
Examples: Track 3, press “3”
Track 12, press “10+” then “2”
Track 21, press “10+” twice then “1”
3. To start program play, select PLAY on the menu or select
“STOP ”button to exit without program play.
4. To clear programmed items. Scroll the navigation button
to the items to be cleared and press the “CLEAR” button
on the remote control, the selected items will be deleted.
Repeat Play
When the player is under operation, press the “OSD” button
continuously on the remote control, the screen will display
sequent parts of information, all information and clear information.
Press once more, it will show
Press the “OSD” button continuously to show more information
until the screen display is cleared.
Advanced Operations:
Program Play
Press the “REPEAT” button during play, it will repeat play one
chapter or one title (for DVD), or repeat play track (for CD).
For DVD:
For CD disc (In the PBC OFF mode)
A-B Repeat play
The player plays the tracks in the disc in an order you desired.
1. Press the “PROG” button and the screen will display the
program menu.
For DVD
For VCD
2. Press navigation buttons to choose memory index and then
press the desired Titles/Chapters number by using the
numeric buttons. The selected Titles and Chapters are stored
into the memory. Up to 16 memories can be stored.
Note: Leading zero is not necessary. If the track number is
more than 10, press the “10+” key first and then the unit digit.
Repeating sections between two specified points (A-B
repeat)
1. Press the “A-B” button during play at the point where
repeat play is to be started (A).
2. Press “A-B” button at the point where repeat play is to be
ended (B). Repeat play of the selection between points A
and B starts.
3. Press “A-B” button to return to normal play.
--12--

kcabyalpDCerutciP)ylnoDVD(egaugnaleltitbuSgnignahC
It is possible to change the subtitle language to a different
language from the one selected at the initial settings. (This
operation works only with discs on which multiple subtitle
languages are recorded.)
1. Press the “SUBTITLE” button during play, the screen will
display the current language.
2. Press the “SUBTITLE” button again to change language or
turn off.
NOTE: When no subtitles are recorded, press this button will
not work.
Kodak Picture CD/JPEG CD
If Kodak Picture CD is inserted, slide show begins
automatically.
For JPEG picture CD, select the folder you want to play
by the navigation buttons and press the “ENTER” button
to confirm.
The files in this folder are displayed and select your
favorable pictures by using the up/down navigation
buttons and press the “ENTER” button to start playing.
Thumbnail of picture will be displayed while you scrolling
across the file name.
Play Mode
ZOOM play
This function allows you to enjoy a motion or motionless picture.
Press the “ZOOM” button when playing, the screen will show
ZOOM 2. Each “ZOOM” button press will change the picture in the
following procedure: ZOOM (2, 3, 4, 1/2, 1/3, 1/4) until off.
Press NAVIGATION buttons to scroll across the enlarged picture.
Changing audio soundtrack language (DVD/VCD)
REPEAT ONE –repeat one file.
REPEAT ALL – all the folder will be played repeatedly.
Once a folder and file is selected, the picture is loaded
onto the screen.
Note: The time to load and display picture depends on the
file size of the pictures.
During playback, press the “STOP ” button to return to
folder selection.
Skip to next / previous picture
Press the “NEXT I” button to skip to the next picture or
“PREV. I ” button to skip to the previous picture.
Rotating pictures
Press RIGHT “ ”navigation button to rotate the picture
clockwise.
Press LEFT “ ” navigation button to rotate the picture counter
– clockwise.
Flipping pictures
Press UP “ ” navigation button to flip the picture vertically.
Press DOWN ” ” navigation button to flip the picture
horizontally.
Picture Shrink/ZOOM
It is possible to change the audio soundtrack language to a
different language from the one selected at the initial settings.
(This operation works only with discs on which multiple audio
soundtrack languages are recorded)
For DVD disc
Press the “Language” button during DVD disc, the screen will
display the number of current soundtrack language, press the
button again will change the language.
For VCD disc
Press the “L/R” button to change the audio output mode:
L audio soundtrack. R audio soundtrack. And Stereo
soundtrack.
NOTE: When no soundtrack languages are recorded, press
this button will not work.
Press the “ZOOM” button to enter the zoom mode.
If the picture is enlarged, you may press navigation buttons to
see other portions of the picture.
stceffewohs-edilS)ylnoDVD(elgnarehtonamorfgniweiV
Some DVDs may contain scenes, which have been shot
simultaneously from a number of different angles. For these discs,
the same scene can be views from each of these different angles
by using the “ANGLE” button.
Press “ANGLE” during play, number of angle being playback will
be displayed in the screen, press the button will change to
different angles.
Press the “PROGRAM” button to select one of the effects
when changing from one picture to another:
For example: WIPE TOP, COMPRESS FROM CENTER V,
DIAGONAL WIPE LEFT TOP, etc.
--13--

Initial Settings
Once the initial programming is entered it is stored in memory until changed, the player can always be operated under the same conditions.
The settings will be retained in the memory until the settings are changed even after setting the player to the standby mode.
Common procedure for initial settings
1. Press the “SETUP” button.
2. Use the navigation buttons to move and select preferred option, then press the “ENTER” button.
3. Use navigation buttons to move to another main setup items when not selecting any submenu option.
4. Press the “SETUP” button or choose “EXIT SETUP” item to close setup menu in any mode.
1. SYSTEM SETUP
TV SYSTEM
SCREEN SAVER
TV TYPE
PASSWORD
RATING
DEFAULT
EXIT SETUP
1.1 TV SYSTEM- It is used to select the TV system. There are two options: NTSC and PAL.
1.2 SCREEN SAVER- When your DVD player is in stop, tray open, or no disc state, the screen saver will turn on after 3 minutes. This
feature is to protect the screen from damage. You can set the screen saver on or off.
1.3 TV TYPE- it is used to select the TV output mode.
Options: 4:3 PS (Pan & scan mode)
4:3 LB (Letter box)
16:9 (Wide screen)
4:3 PS: Choose this setting if your DVD player is connected to a normal TV (4:3 ratio). You can fill the movie to the entire screen of you
TV. This might mean that parts of the picture (the left and right edges) won’t be seen.
4:3 LB: Choose this setting if your DVD player is connected to a normal TV (4:3 ratio). Selecting this setting you’ll see the entire frame of
the movie, but it will take up a smaller portion of the screen vertically. The movie might appear with black bars at the top and bottom of
the screen.
16:9: Choose this setting if your DVD player is connected to a wide screen TV.
1.4 PASSWORD-
The PASSWORD option allows you to set up the rating limits and lock your player to control the type of content your family watches. The
parental control feature is a rating system for DVDs, like movie ratings.
When the player is locked, you need to enter the password in order to play discs that have a higher rating than what you’ve allowed. If
the player is unlocked, no password is required to play discs. Even if you’ve set rating limits, they won’t be enforced until the player is
locked.
Note: Once the player is unlocked, you can change the password to any 4-digit number.
If you forget your password, enter the factory preset password: 0000.
1.5 RATING- it is used to set the rating of the disc.
Options: 1. KID SAFE
2. G
3. PG
4. PG13
5. PG-R
6. R
7. NC-17
8. ADULT
The higher the level is, the fewer the restricted discs are. If set at level 8, there is almost no disc restriction.
If set at R level, maybe some types of discs can’t be played, unless enter correct password, unlock and amend the age control level.
1.6 Default- Restore to factory settings.
--14--

2. LANGUAGE SETUP
2.1 OSD LANG- to select the ON-SCREEN DISPLAY language. English is the defaulted language in the factory default.
2.2 AUDIO LANG- to select the preferred Audio language. English is the defaulted language in the factory default.
2.3 SUBTITLE LANG- to select the preferred Subtitle language. English is the defaulted language in the factory default.
2.4 MENU LANG- to select the preferred Menu language. English is the defaulted language in the factory default.
3. AUDIO SETUP
AUDIO OUT
DUAL MONO
EXIT SETUP
3.1 AUDIO OUT-
There are three options: SPDIF/OFF, SPDIF/RAW and SPDIF/PCM.
SPDIF/OFF: There will be no signal from the coaxial output.
SPDIF/RAW: Choose this setting if your DVD player is connected to a power amplifier with a coaxial cable, and playing a disc
recorded with Dolby Digital, DTS and MPEG audio formats. The corresponding digital signals will be output from the Coaxial Output
jack. This player’s digital output jacks are designed for a connection to a Dolby Digital, DTS or MPEG receiver or decoder.
SPDIF/PCM: Choose this setting if your DVD player is connected to a 2-channel digital stereo amplifier; When playing a disc
recorded with Dolby Digital and MPEG audio formats. The audio signals will be modulated into a 2-channel PCM signal, and it will be
output from the Coaxial Output jack.
3.2 DUAL MONO- it is used to set up the audio output mode.
There are three options: STEREO, MONO L, MONO R.:
4. VIDEO SETUP
BRIGHTNESS
CONTRAST
HUE
SATURATION
SHARPNESS
EXIT SETUP
4.1 BRIGHTNESS- it is used to adjust the brightness.
4.2 CONTRAST- it is used to adjust the contrast.
4.3 HUE- it is used to adjust the hue.
4.4 SATURATION- it is used to adjust the saturation.
4.5 SHARPNESS- it is used to adjust the sharpness of the video.
5. SPEAKER SETUP
DOWN MIX
EXIT SETUP
5.1 DOWN MIX- it is used to setup the Audio output.
There are three options: LT/RT STEREO and VSS.
LT/RT: Choose this setting, the sound will be output form left and right audio output terminal.
STEREO: Choose this setting, and while 5.1 channel sound playing, the two channels of signals will be output from the left and right
VSS:Virtual Surround System.
soundtrack; when 2-channel sound playing, the stereo signal will be output.
OSD LANG
AUDIO LANG
SUBTITLE LANG
MENU LANG
EXIT SETUP
--15--

Definition of terms
Specifications
Angle
Some DVD discs are recorded onto scenes which have been
simultaneously shot from a number of different angles (the same
scene is shot from the front, from the left side, from the fight side,
etc.). With such discs, the “ANGLE” button can be used to view
the scene from different angles.
Chapter number
This refers to a high-density optical disc on which high-quality
pictures and sound have been obtained by means of digital
signals. Incorporation a new video compression technology
(MPEG II) and high-density recording technology, DVD enables
esthetically pleasing full-motion video to be recorded over long
periods of time (for instance, a whole movie can be recorded).
DVD has a structure consisting of two 0.6 mm thin discs which are
adhered to each other. Since the thinner the disc, the higher the
density at which the information can be recorded, a DVD disc has
a greater capacity than a single 1.2 mm thick disc. Since the two
thin discs are adhered to each other, there is the potential to
achieve double-sided play sometime in the future for even longer
duration play.
Playback control (PBC)
This is recorded on a Video CD (version 2.0). The scenes or
information to be viewed (or listened to) can be selected
interactively with the TV monitor by looking at the menu show on
the TV monitor.
Subtitles
This is the appearance of the dialogue at the bottom of the screen
which are prerecorded on some DVD discs.
Time indication
This indicates the play time which has elapsed from the start of
the disc or the title. It can be used to find a specific scene quickly.
(It may not work with some discs.)
Title number
These numbers are recorded on DVD discs. When a disc contains
two or more movies, these movies are numbered as title 1, title 2,
etc.
Video CD
This contains recordings of pictures and sound whose quality is on
a par with that of videotape. This player also supports Video CDs
with playback control (version 2.0).
Power
Requirements: AC110~240V-DC IN 12V
Power
Consumption: 15W
Compatible Discs: DVD/ DVD-R/ CD/ CD-DA/ HD-CD/ CD-R/
CD-RW/ MP3/ JPEG
Signal system: NTSC / PAL
Operating temperature range:
+5 to +35ºC
Operating humidity range:
5 to 90% (no condensation)
Resolution: 480X3(RGB)X234
Discs played:
(1) DVD –VIDEO disc
12 cm single-sided, single-layer
12 cm single-sided, dual-layer
12 cm double-sided, single-layer
8 cm single-sided, single-layer
8 cm single-sided, dual-layer
8 cm double-sided, single-layer
(2) Compact disc (VIDEO CD)
12 cm disc
8 cm disc
Video output level: 1 Vp-p
Audio output level: 2 Vp-p (1 KHz, 0dB)
Audio signal output characteristics:
DVD (linear audio):
(1) Frequency response:
20Hz – 20KHz (48KHz sampling)
20Hz – 20KHz (96KHz sampling)
(2) S/N ratio: >65dB
(3) Dynamic range: 90 dB
(4) Wow and flutter: below measurable level
CD audio:
(1) Frequency response:
20Hz – 20KHz
(2) S/N ratio: >65 dB
(3) Dynamic range: 90dB
(4) Wow and flutter: below measurable level
Pickup: Wave length: 655nm
Laser power: CLASS 1
Specifications are subject to change without notice.
--16--
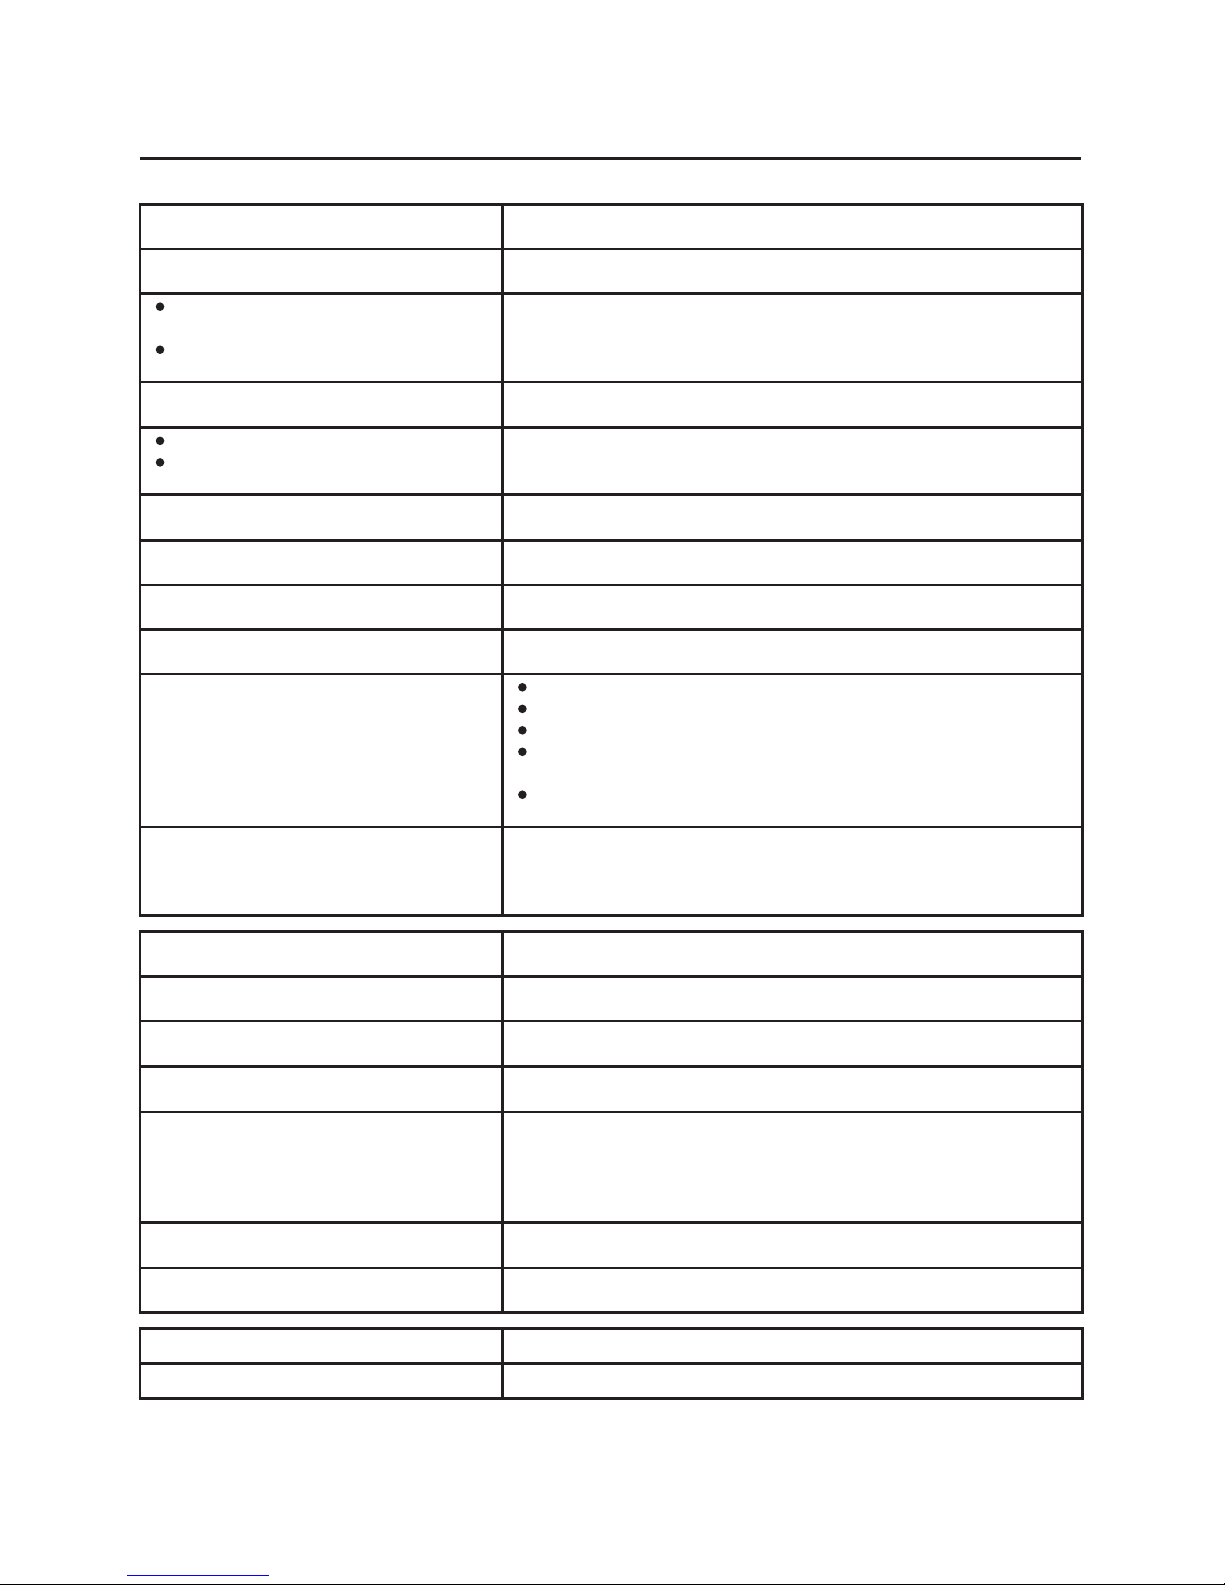
Troubleshooting
Before requesting service for this player, check the chart below for a possible cause of the problem you are experiencing.
Some simple checks or adjustments on your part may eliminate the problem and restore proper operation.
ydemeR)nommoC(motpmyS
.teltuorewopehtotniylerucesgulprewopCAehttresnIrewopoN
Play fails to start even when “PLAY” is
pressed.
Play starts but then stops immediately
Condensation has formed: wait about 1 to 2 hours to allow the player to dry out.
This player cannot play a disc other than DVD, Video CD and CD.
The disc may be dirty and may require cleaning.
Ensure that the disc is installed with the label side up.
No picture Ensure that the equipment is connected properly.
Ensure that the input setting for the TV is “Video”.
No sound.
Distorted sound.
Ensure that the equipment is connected properly.
Ensure that the input setting for the TV and stereo system are correct.
Adjust the master volume using the GUI screen for player information.
Picture is distorted during rapid advance or rapid
reverse. The picture will be somewhat distorted at times: this is normal.
No rapid advance or rapid reverse play. Some discs may have sections, which prohibit rapid advance (or rapid reverse.)
.desutesVTehtsehctamhcihw,metiputestcerrocehtesoohC.erutcip)9:61(3:4oN
.”nO“tceles:detcelessignittes”ffO“ehT.yalpsidneercs-nooN
No operations can be performed with the remote
control unit.
Check the battery is installed with the correct polarities (+ and -).
The battery is exhausted: replace it with a new one.
Point the remote control unit at the remote control sensor and operate.
Operate the remote control unit at a distance of not more than 3-4 m from the
remote control sensor.
Remove the obstacles between the remote control unit and remote control
sensor.
No key operation (by the main unit and/or the
remote control unit) is defective.
Press POWER to set the player to the standby mode and then back to ON.
Alternatively, press POWER to set the player to the standby mode, disconnect the
power plug and then re-connect it. (The player may not be operating properly due to
lightning, static electricity or some other extreme factor
ydemeR]DVD[motpmyS
Play does not start even when title is selected. Confirm the setting.
Audio soundtrack and/or subtitle language is not
the initial settings.
If the audio soundtrack and/or subtitle language does not exist on the disc, the
language selected at the initial settings will not be seen/heard.
.mehtniatnochcihw,scsidhtiwylnoraeppaseltitbuS.seltitbusoN
Subtitles are cleared from the TV monitor; Perform the steps to display the subtitles.
Alternative audio soundtrack (or subtitle)
languages fail to be selected.
An alternative language is not selected with discs which do not contain more than
one language.
In the case of some discs, the alternative language cannot be selected by operating
the “AUDIO” or “SUBTITLE” button. Try selecting it from the DVD menu if one is
available.
forebmunasahcsidafinevE.ytilibaliavaerawtfosnotnednepedsinoitcnufsihT.degnahcebtonnacelgnA
angles recorded, these angles may be recorded for specific scenes only.
The password for rating level has been forgotten. Please contact your local sales dealer.
ydemeR]DCoediV[motpmyS
.lortnockcabyalpunemhtiwsDCoediVrofylnoskrownoitcnufsihT.yalpunemoN
--17--

Disc handling and maintenance
Handling precautions
Hold the disc by the edges so the surface will not be soiled with fingerprints.
Fingerprints, dirt and scratches can cause skipping and distortion.
Do not write on the label side with a ballpoint pen or other writing utensils.
Do not use record cleaning sprays, benzene, thinner, static electricity prevention liquids or bend the disc.
Be careful not to drop or bend the disc.
Do not install more than 1 disc on the disc tray.
Do not try to close the disc tray when the disc is not installed properly.
Be sure to store the disc in its exclusive case when not in use.
If the surface is soiled
Wipe gently with a soft, damp (water only) cloth.
When wiping discs, always move the cloth from the centre hole toward the edge.
(If you wipe the discs using a circular motion, circular scratches are likely to occur, which will cause noise. )
If the disc is brought from a cold to warm environment moisture may form on the disc.
Wipe this moisture off with a soft, dry, lint-free cloth before using the disc.
Improper disc storage
You can damage discs if you store them in the following places:
Areas exposed to direct sunlight
Humid or dusty areas
Areas directly exposed to a heat outlet or heating appliance.
Maintenance
Be sure to turn POWER to set the player to the standby mode and disconnect the AC power cord before maintaining the player.
Wipe this player with a dry, soft cloth.
If the surfaces are extremely dirty, wipe clean with a cloth, which has been dipped in a weak soap-and-water solution and wrung out
thoroughly, and then wipe again with a dry cloth.
Never use alcohol, benzene. Thinner, cleaning fluid or other chemicals. And do not use compressed air to remove dust.
Region management Information
Region management Information: This DVD/VCD/CD player is designed and manufactured to respond to the Region Management
Information that is recorded on a DVD disc. If the Region number described on the DVD disc does not correspond to the Region number of
this DVD/VCD/CD player, this DVD/VCD/CD player cannot play this disc.
MACROVISION Information
This DVD/VCD/CD player is protected by MACROVISION™ and no unauthorized copy can be made by VIDEO CASSETTE RECORDED.
This product incorporates copyright protection technology that is protected by method claims of certain U. S. patents and other intellectual
property rights owned by Macrovision Corporation and other rights owners. Use of this copyright protection technology must be authorized by
Macrovision Corporation, and is intended for home and other limited viewing uses otherwise authorized by Macrovision Corporation. Reverse
engineering or disassembly is prohibited.
Accessories
AV cable--------------------------------------------------------------------------------------------------------------------------------------------------------------------1pcs
Car adapter-------------------------------------------------------------------------------------------------------------------------------------------------------------- 1pcs
AC/DC adapter-------------------------------------------------------------------------------------------------------------------------------------------------------- 1pcs
Earphone----------------------------------------------------------------------------------------------------------------------------------------------------------------- 1pair
Remote Control----------------------------------------------------------- -------------------------------------------------------------------------------------------- 1pcs
Instruction manual-------------------------------------------------------------------------------------------------------------------------------------------------------1pcs
--18--

Warranty Card
This product is guaranteed against faulty materials and workmanship for a period of twelve
months from the date of purchase with proof of purchase. The obligation to the purchaser
under this warranty is limited to servicing the unit and replacing defective parts or refund
when the product is returned freight prepaid to the retailer with proof of purchase. This
warranty becomes void if the product has been tampered with, damaged by accident,
damaged in any other way by improper use or has been purchased second hand. All
production orders have quality inspections. In the unlikely event of a deficiency, please
contact the retailer from which this product was purchased.
WARRANTY FOR APPLIANCES USED COMMERCIALLY LIMITED TO 90 DAYS
Type of Appliance: _______________________________________________________________
Model No.: __________________________________ Purchase Date: ____________________
Product Purchased From: ________________________________________________________
__________________________________________________________________________________
Your Name: ______________________________________________________________________
Address: _________________________________________________________________________
_______________________________________________ Phone Number: __________________
IMPORTANT!
Please retain this warranty card along with your purchase receipt. Please do not
post to the retailer. If service or a warranty claim is required, both of these
documents are to be returned with the appliance to your retailer, otherwise a fee
may be charged or warranty declined. For technical help contact the helpline.
This manual suits for next models
1
Table of contents
Other Transonic Portable DVD Player manuals


