TransTank PantherPatrol User manual

“HELPING TO DEVELOP AND PROTECT THE LAND”
Operator’s Product HandBook
Fire Fighting Trailer
PantherPatrol™

www.tti.com.au
PantherPatrol™
PRODUCT HANDBOOK
Freecall: 1800 816 277
2
Contents
Safety 4
General Safety Instructions 5
General Information 6
Specifications 6
Description 7
Machine Limitations 9
Driving Stability 9
Operating Instructions 9
Before First Use 9
Pump Operation – Petrol Engine 11
Pump Operation – Diesel Engine Option 12
Filling the Tank 12
PantherPatrol Operation 14
Risk Assessment 18
Maintenance 19
Periodic Checks 19
Maintenance Schedule 19
Trouble Shooting 22
Warranty 23
Warranty Policy 23
What this Warranty Does Not Cover? 23
How to Obtain Service Under this Warranty? 23
Warranty Limitations 23

www.tti.com.au
PantherPatrol™
PRODUCT HANDBOOK
Freecall: 1800 816 277
3
Disclaimer
All information, illustrations, and specifications contained in this manual are based on the latest product
information available at the time of this publication’s printing. TransTank International (TTi) reserves the right
to alter and substitute specifications and methods at any time, in line with our commitment to continuous
improvement.
No patent liability is assumed with respect to the use of information contained within this manual. While
every precaution has been taken in the preparation of this manual, TTi assumes no responsibility for errors or
omissions.
Thank you for purchasing a PantherPatrol™ Fireghting Trailer
(PantherPatrol), which will provide many years of reliable service when
operated and maintained in accordance with this manual.
TTi manufacture the PantherPatrol with a 1,100-litre tank, supplied with petrol or diesel pump options. This
manual describes the operation, driving stability and maintenance procedures applicable to all units, noting
additional requirements to options where necessary.
All TTi PantherPatrol tanks are rotationally moulded from quality polyethylene, purpose designed and
manufactured to high standards. The PantherPatrol is a trailer-mounted tank water dispensing system
designed for firefighting, tree watering and similar manually conducted watering activities. With the optional
single or dual deflector system fitted, the PantherPatrol can be used for dust suppression on unmade roads,
construction sites, etc.
The PantherPatrol unit is supplied complete, tested and ready to go. TTi recommends that only water be
used in the PantherPatrol unit. TTi warrants that the PantherPatrol has been designed and built for its
intended purpose for firefighting and dispensing water, such as tree watering. With the optional deflector
system, it can be used as a dust suppression system too.
The owner is responsible to ensure that the equipment is operated in accordance with this manual, with
Australian WorkSafe requirements, applicable road rules and local council regulations. TTi is not liable for
any loss, injury or death resulting from the failure to observe all safe working regulations as required by law.
Included with your PantherPatrol unit is the following documents:
• Operator’s Handbook (this manual, which includes the Warranty Registration Card)
• Integral Honda Petrol or Yanmar Diesel engine and pump manufacturer’s handbook (whichever option
selected)
• Tank Quality Check Form. This is your verification that the unit has been quality checked, and verifies the
serial number affixed to the unit.

www.tti.com.au
PantherPatrol™
PRODUCT HANDBOOK
Freecall: 1800 816 277
4
Safety
This manual is intended for use by personnel experienced in the use of this and similar equipment. Read and
understand this manual before attempting to operate or perform routine maintenance on this equipment.
Your safety is of prime priority.
A WARNING highlights an essential operating or maintenance procedure,
practice, condition or statement, which, if not strictly observed, could
result in injury or death of personnel, or long-term health hazards.
A CAUTION highlights an essential operating or maintenance procedure,
practice, condition or statement, which, if not observed, could result in
damage or destruction of equipment.
A NOTE highlights or clarifies an essential systems description, operating or
maintenance procedure, condition or statement.

www.tti.com.au
PantherPatrol™
PRODUCT HANDBOOK
Freecall: 1800 816 277
5
General Safety Instructions
1. This unit is designed and manufactured solely for the purpose of carrying and pumping water for
firefighting, tree watering and optional dust suppression duties. Under no circumstances should it be
used for any other purpose. It must never be used for transporting fuel or chemicals.
2. Only authorised and trained personnel are to operate this equipment. Operators must have read and
fully understood this manual before operating the Storm unit.
3. Do not operate this equipment while under the influence of alcohol or any drugs that could impair your
capabilities in any way.
4. Personal Protection Equipment (PPE) must be worn when refuelling the or operating the pump on the
PantherPatrol. Exposure to excessive noise over an extended period can cause impairment or loss of
hearing.
5. Avoid diesel or unleaded petrol contact with skin and eyes, and avoid breathing vapours or mists. Refer
to the relevant Safety Data Sheet (SDS).
6. Any spillage of fuel while refilling the pump engine’s tank should be immediately cleaned up and the
materials used in the clean-up disposed of safely and in accordance with relevant regulations applying
to the safe use, storage and disposal of fuel.
7. Disconnect the battery, if fitted, before conducting any electrical maintenance work.
8. Ensure the capacity of the vehicle is suitable for the loaded mass of the PantherPatrol. Refer to the
vehicle’s operator manual for safe working loads and relevant safety instructions. Do not exceed the
carrying and braking capacity as specified by the vehicle manufacturer. As a guide, one litre of water
weights one kilogram (kg), therefore a full 1,100 litre PantherPatrol will weigh in excess of 1,600kg.
9. Ensure the tow vehicle is equipped with a 7-pin plug, with the AUX pin wired for 12-volt power. This pin
connects to the brake safety unit.
10. The PantherPatrol must never be left unattended while being filled with water.
11. Do not operate the pump when there is no water in the tank.
12. Do not disconnect any hoses, nozzles or filters while the equipment is operating. Disconnecting any
components while under pressure may result in uncontrolled water discharge which may be hazardous.
13. Care should be taken at all times, particularly when operating on rough or steep terrain. Drivers should
be aware of fluid surge affecting the centre of gravity.
14. The PantherPatrol has safety labels affixed to various locations on the unit. These labels should be kept
clean and legible, and replaced if damaged.
15. Any unauthorised modifications to this equipment may affect its function and create a serious safety
risk. Any unauthorised modifications will void any warranty on the unit.

www.tti.com.au
PantherPatrol™
PRODUCT HANDBOOK
Freecall: 1800 816 277
6
General Information
Specifications
Tank UV resistant polyethylene tank (1,100 litre capacity), integrated 10 litre
handwash tank with tap and 70 litre flush tank
Trailer Fully welded and galvanised heavy duty steel frame, single axle with 15”
Sunraysia wheels with 6-stud pattern
Standard
Equipment
LiquidLocker™ Baffle Safety System
Honda GX200 Petrol engine with 400L/min Davey twin impeller pump
36m 19mm fire hose reel with adjustable nozzle
Pressure regulator
Open funnel for stand pipe fill
Tank bottom fill kit via integral pump
Options Single and dual deflector spray head options
Solenoid operation of dual deflector spray head option
Hydraulic braked or unbraked trailer options
Yanmar Diesel engine pump upgrade option
Electric start on engines (with solenoid operated deflector option)
20m 19mm spring rewind hose reel

www.tti.com.au
PantherPatrol™
PRODUCT HANDBOOK
Freecall: 1800 816 277
7
Description
The TTi PantherPatrol is designed to carry and distribute water using a self-contained pump and various
water dispensing systems. The PantherPatrol has the following features, refer to Figure 1.
Figure 1 – Component Identification
Tank
All TTi tanks are constructed from UV resistant, virgin material polyethylene. Due to the rotational moulding
process, there may be a small variance in the overall dimensions of the tank, therefore, calibration markings
should be used as a guide only. Integrated at the rear of the tank is a 10L handwash tank with tap and a 70L
flush water tank.
A LiquidLocker Safety Baffle System
The LiquidLocker baffle system within the tank demonstrates measurable improvements in braking
performance and dynamic stability and controllability. The system has been independently tested, with the
report available upon request.
Storage Box
Integrated into the front of the PantherPatrol tank is a lockable heavy duty toolbox with hinged lid.
Pressure Regulator
A pressure regulator is fitted to the pump discharge flange to control line pressure and prevent pump
cavitation. The factory-set regulator feeds excess water back to the tank and is set to relieve at 50 – 60 psi.
Hose Reel
Each PantherPatrol is fitted with a 36m 19mm diameter fire hose mounted on a manually operated hose reel.
The hose is fitted with an adjustable nozzle which locates in a securing bracket on the hose reel support
when the hose is stowed. The nozzle adjusts from closed through to jet and mist sprays, depending on
requirement.

www.tti.com.au
PantherPatrol™
PRODUCT HANDBOOK
Freecall: 1800 816 277
8
A spring rewind 20m hose reel is available as an option.
Pump
The PantherPatrol is fitted with a twin impeller Davey 400L/min firefighting pump as standard. The pump is
coupled to a Honda GX200 engine or optional Yanmar diesel engine. The petrol engine is recoil (pull) start
with local or remote electric start upgrade options available. The diesel engine is electric start with a remote
start option available.
Batteries
With optional electric brakes installed on the PantherPatrol trailer, a dedicated 12-volt battery is mounted at
the front of the tank, housed in a battery box.
With the optioned electric pump start upgrade, a separate, dedicated 12-volt battery is installed behind the
hose reel. Power to start the pump is always provided by this battery.
Quick Fill Hose Kit
Each PantherPatrol is fitted with a front-mounted hose bracket, housing the 6m quick fill hose. The hose is
fitted with a filter at one end and a camlock coupling on the opposite end, for direct connection to the pump.
Trailer
The trailer frame is an all steel, fully welded construction and hot dip galvanised for corrosion resistance.
The frame has additional welded gussets for added strength and filled-in chequer plate mudguards to
protect the tank. The single 50mm solid axle is fitted with 6-stud 15’ Sunraysia wheels and 6-ply tyres.
The trailers are available as unbraked or braked (registerable), with hydraulic brakes fitted when optioned.
Deflector Spray Head
Optional single water deflector spray head or dual deflector spray heads are available. Each deflector spray
head is fitted with its own dedicated ball valve for individual operation. An optional solenoid actuated valve
enables the dual water deflector spray head system to be activated via the remote control unit.
Each of the dual deflectors are mounted on a hot dip galvanised steel manifold fed directly from the pump
outlet manifold via a high pressure flexible hose, which absorbs vibration from the pump. The single deflector
spray head is connected directly the pump outlet manifold via a flexible hose.
Each deflector spray head is secured with a camlock fitting, allowing removal for cleaning and adjustment
for water spray direction.
Ball Control Valves
The PantherPatrol has several ball control valves (depending on options) used to open or close water flow
from the pump to the discharge points (hose reel and optional deflector spray head(s)). Ball control valves
are also fitted on the suction line and the discharge side of the tank prior to entering the pump.
Solenoid Valveww
An optional electrically operated solenoid valve is fitted to the deflector manifold to enable spray control
via the remote control unit. The solenoid valve receives its power from the tow vehicle via the Anderson
plug located adjacent to the tow hitch. Where the PantherPatrol is fitted with the electric start option, the
solenoid valve may be operated by selecting the SELF POWERED position on the three-way switch of the

www.tti.com.au
PantherPatrol™
PRODUCT HANDBOOK
Freecall: 1800 816 277
9
control box mounted at the rear of the PantherPatrol. This should only be used where power is not available
via the Anderson plug from the tow vehicle.
Remote Control Unit
An optional remote control unit enables the operator to start the optional dual water deflector spray system
while in the tow vehicle’s cab. If the optional petrol or diesel pump with electric start is fitted, the remote
control unit enables pump start and stop, in addition to the water deflector spray system operation.
Machine Limitations
The PantherPatrol unit is subject to operating limitations. It is the operators’ responsibility to ensure that
this equipment is being operated safely and within these limitations.
Driving Stability
The PantherPatrol unit is heavy when filled with water. To maintain stability while operating this unit:
• Ensure the trailer tyres are inflated to their correct pressure at all times. Underinflated tyres can cause
excessive lateral motion of the tyre, which may cause a rollover.
• Allow extra room for braking and turning when the tank is full.
• Ensure any side gradient (slope) is accounted for, especially when the PantherPatrol tank is full, as the
unit will have a higher centre of gravity.
Operating Instructions
Before first use
Your PantherPatrol Firefighting Trailer is delivered fully assembled. Before use, it needs to be set up using
the following instructions:
• Complete the warranty registration online at www.tti.com.au/warranty-registration, or use the Warranty
Registration Card at the back of this handbook.
• Store this handbook, along with the Tank Quality Check Form and pump unit’s manual in the provided
leather pouch, in a safe and easily accessible place for future reference.
NOTE! The operator must fully understand all aspects of this handbook. Do
not operate the PantherPatrol if you are unfamiliar with its operation until
you have read this handbook.
• Read and thoroughly understand this handbook, paying particular attention to all safety requirements,
before using the PantherPatrol for the first time.
• Check that all fittings, valves, hoses and electrical leads are secure following transit, and are not
damaged in any way.
• Inspect the tank for any damage or abrasions.

www.tti.com.au
PantherPatrol™
PRODUCT HANDBOOK
Freecall: 1800 816 277
10
• Connect the PantherPatrol to the tow vehicle, ensuring the tow hitch engages correctly and locks in
place. Connect the safety chains using rated D-shackles.
• Connect the 7-pin trailer plug to the tow vehicle, ensuring it locks firmly, refer to Figure 2. Check lights
and indicators operate correctly.
• If fitted, connect the PantherPatrol’s Anderson plug socket to the tow vehicle for power supply to the
optional solenoid operated ball valve, refer to Figure 2.
Figure 2 – Anderson Plug and 7-Pin Plug
CAUTION! The engine must be inspected and prepared in accordance with
the manufacturer. Failure to fulfil this requirement may void the engine’s
warranty.
• Prepare the pump engine in accordance with the selected engine’s manual supplied with your
PantherPatrol unit.
• Where an electric start petrol option or diesel pump is fitted, ensure the 12-volt battery is fully charged
and correctly connected to the pump unit’s engine. The battery box is located behind the hose reel.
Refer to the supplied pump unit’s manual and prepare the engine for use, such as filling its tank with fuel.

www.tti.com.au
PantherPatrol™
PRODUCT HANDBOOK
Freecall: 1800 816 277
11
Pump Operation – Petrol Engine
The PantherPatrol’s petrol pump engine is started as follows, refer to Figure 3:
• Turn the fuel lever to ON.
• If the engine is cold, turn the choke lever to ON.
CAUTION! Ensure the engine’s throttle is set to idle if the engine is cold. Do
not adjust the throttle to maximum speed until the engine has warmed up.
• Set the throttle lever to idle for cold starting. If restarting a warm engine, the throttle can be left at normal
engine operating speed.
• For a manual start engine, turn the power switch to ON. Pull the recoil starter handle until the engine
starts, then back off the choke lever to OFF.
• For an optional electric start engine, insert the key and switch the engine to ON and START. When the
engine starts, release the key, which will return to the ON position. Back off the choke lever to OFF.
• For an optional electric start engine using the remote control, insert the key and switch the engine to
ON. Press and hold the No. 1 button of the remote control unit for several seconds. When the engine
starts, release the pushbutton and back off the choke lever to OFF.
• Once the engine is warmed up, adjust the throttle to increase the engine speed to normal operating revs.
• When the engine needs to be stopped, turn the power (manual start) or key switch (electric start) to the
OFF position. For the remote control option, press the No. 2 button.
If the PantherPatrol is not going to be used within the next few hours, shut the system down by turning the
fuel tap to OFF.
Figure 3 – Engine Start-up (Petrol Engine shown)

www.tti.com.au
PantherPatrol™
PRODUCT HANDBOOK
Freecall: 1800 816 277
12
Pump Operation – Diesel Engine Option
The PantherPatrol’s optional diesel pump engine is started as follows, refer to Figure 3:
• Turn the fuel tap to ON.
CAUTION! Ensure the engine’s throttle is set to the start position. Do not
adjust the throttle to maximum speed until the engine has warmed up.
• Set the throttle lever to the START or RUN position (depending on model).
• Insert the key and switch the engine to ON and START. When the engine starts, release the key, which
will return to the ON position.
• For the optional remote control electric start engine, press the No. 1 button of the remote control unit
to turn the ignition ON, then press and hold No. 2 button for several seconds. When the engine starts,
release the pushbutton.
• Once warmed up, adjust the engine speed to normal operating revs using the throttle lever.
• When the engine needs to be stopped, turn the throttle lever back to the idle position.
• Turn the key switch to the OFF position. For the remote control option, press the No. 1 button to turn the
ignition OFF.
If the PantherPatrol is not going to be used within the next few hours, shut the system down by turning the
fuel tap to OFF.
Filling the Tank
The PantherPatrol tank can be filled in either of the following two ways:
CAUTION! The PantherPatrol unit is designed for water use only. It must not
be used for chemicals or fuel.
• Standpipe filling method using a standpipe to fill directly into the top of the tank via the open mesh funnel.
• Bottom filling method, using the pump to draw water from a dam or other source.
Standpipe Filling Operation
The PantherPatrol tank is filled by gravity from an overhead standpipe as follows:
• Position the PantherPatrol unit’s top-mounted fill point funnel under the standpipe.
• Remove the filling lid from the tank’s top opening.
• Open the standpipe’s valve and allow water to flow into the tank.

www.tti.com.au
PantherPatrol™
PRODUCT HANDBOOK
Freecall: 1800 816 277
13
CAUTION! To prevent overflow, do not leave the filling operation unattended.
• Calibrated markings on the tank provide an idication of the level of water in the tank. Use this or observe
the water level directly in the tank. When the tank is filled, close the standpipe’s valve.
• Upon completion of filling, replace the tank’s filling lid.
Bottom Filling Operation
The tank is filled by drawing water using the PantherPatrol’s pump as follows, referring to Figure 4:
NOTE! Ensure all ball valves have been correctly set prior to commencing
the filling operation, and that all camlock fittings are securely engaged and
fully locked.
• Ensure the ball valve on the suction line from the bottom of the tank to the pump is closed.
• Remove the camlock cap from the discharge port of the pump.
• Release the camlock fittings and disconnect the suction line from the pump, then connect it to the
pump’s discharge manifold port above.
• A bottom fill supply hose is located on its bracket at the front of the PantherPatrol’s trailer. Remove it
from the bracket and attach the camlock end to the pump’s suction port.
• Place the filter end of the bottom fill hose into the water source. Ensure the filter is deep enough in the
water to prevent it sucking air.
• Open the ball valve on the suction line from the bottom of the tank – this line is now connected to the
pump’s discharge port.
• If required, prime the pump by unscrewing the cap at the top of the pump and fill it with water. Once full,
replace the cap and tighten firmly.
• Referring to Pump Operation procedures (diesel or petrol engine), start the pump.
• Ensure the pump is drawing water and discharging it into the PantherPatrol’s tank.
CAUTION! To prevent overflow, do not leave the filling operation unattended.
• Calibrated markings on the tank provide an idication of the level of water in the tank. Use this or observe
the water level directly in the tank. When the tank is filled, stop the pump.
• Close the ball valve on the line to the bottom of the tank.
• Disconnect the bottom fill supply hose from the pump’s suction port.
• Disconnect the tank’s suction line from the pump’s discharge port and reconnect it to the pump’s suction
port.
• Reinstall the camlock cap to the pumps’ discharge manifold.

www.tti.com.au
PantherPatrol™
PRODUCT HANDBOOK
Freecall: 1800 816 277
14
• Open the tank valve.
• Drain and clean the hose and return it to its stowage bracket at the front of the trailer.
Figure 4 – Tank Filling Operation
PantherPatrol Operation
Bottom Filling Operation
The FireCombat’s petrol pump engine is started as follows, refer to Figure 3:
• Connect the unit to the tow vehicle and check security of all connections (refer to Before First Use
procedure above).
• Fill the tank from an appropriate water source, refer to the Filling the Tank procedure above.
• Open the ball valve on the suction hose at the bottom of the tank.
• Start the pump (referring to the procedure above) and allow to warm up. The regulator (bypass valve)
fitted to the top of the pump will divert the water back into the tank.
Fire Hose Use
With the PantherPatrol unit operating as described above, the fire hose is used as follows, refer to Figure 5:
• Unlock the hose reel and release the hose’s nozzle from its retaining bracket. Pull out the length of fire
hose required.

www.tti.com.au
PantherPatrol™
PRODUCT HANDBOOK
Freecall: 1800 816 277
15
• Adjust the pump engine’s speed to achieve the optimum flow rate.
• Open the fire hose’s nozzle by rotating it to achieve the desired spray pattern.
• Upon completion of the task, close the fire hose nozzle and turn the pump engine to OFF, referring to the
appropriate Pump Operation procedure above.
• Open the fire hose nozzle again to release the residual pressure.
• Rewind the hose onto the reel by manually winding the handle on the side of the reel. Close the nozzle
and lock the nozzle back into its bracket.
• Close the ball valve on the suction hose at the bottom of the tank.
Figure 5 – Fire Hose Reel
Water Deflector Spray Head
The PantherPatrol can be optionally fitted with a single, centrally mounted water deflector spray head, or
a dual deflector spray head system mounted across the back of the unit. The dual system has a deflector
spray head located at each corner. These systems may be used for dust suppression or similar watering
activities.
NOTE! The solenoid is electrically active when in use. Ensure it is switched
to the POWERED position at the three-way switch.
If fitted with the optional solenoid actuated valve, move the three-way switch at the rear of the PantherPatrol
from OFF to the POWERED position, refer to Figure 6. This will draw power from the tow vehicle via the
Anderson plug. If power is not available, move the switch to the SELF POWERED position. This will draw
power from the pump engine’s battery. Using this battery should only be for short periods as the battery has
limited charging capacity.

www.tti.com.au
PantherPatrol™
PRODUCT HANDBOOK
Freecall: 1800 816 277
16
Figure 6 – Solenoid Control Switch
The optional single, centrally mounted deflector spray head is operated as follows:
• If required, release the camlock connector to rotate the deflector spray head to the desired angle, refer
to Figure 7. Lock the spray head back into place, ensuring the camlock levers are fully home.
• Start the PantherPatrol’s pump system as described above.
• For manual operation of the deflector spray head, open the ball valve. Water will spray from the deflector.
• Where the optional solenoid actuated valve is fitted, press button No.3 on the remote control. Water will
spray from the deflector.
• Commence driving the tow vehicle at a moderate speed to achieve the required water coverage.
• Upon completion, stop the vehicle and shut the pump down.
• Close the deflector spray head’s ball valve.
• For the solenoid actuated valve, press button No. 3 on the remote control to close the valve.
• Close the ball valve on the suction hose at the bottom of the tank.
• For the solenoid actuated valve option, move the three-way switch to the OFF position.

www.tti.com.au
PantherPatrol™
PRODUCT HANDBOOK
Freecall: 1800 816 277
17
Figure 7 – Water Deflector Spray Head (optional)
• If required, release the camlock connector to rotate the deflector spray head to the desired angle, refer
to Figure 7. Lock the spray head back into place, ensuring the camlock levers are fully home.
• Start the PantherPatrol’s pump system as described above.
• At each deflector spray head, open the ball valve. Water will spray from the deflector.
• Where the optional solenoid actuated valve is fitted, press button No.3 on the remote control. Water will
spray from the deflector/s.
• Commence driving the tow vehicle at a moderate speed to achieve the required water coverage.
• For the solenoid actuated valve, press button No. 3 on the remote control to close the valve.
• Upon completion, stop the vehicle and shut the pump down.
• Close each of the deflector spray head’s ball valves.
• Close the ball valve on the suction hose at the bottom of the tank.
• For the solenoid actuated valve option, move the three-way switch to the OFF position.

www.tti.com.au
PantherPatrol™
PRODUCT HANDBOOK
Freecall: 1800 816 277
18
Risk Assessment
Task Hazard Risk Control Measure/Mitigation
Partially fill the tank
with water, start
the motor & test the
spray unit
Manual handling; slips,
trips or falls; petrol;
diesel; fumes; fingers
jammed
Medium Concentrate on task; follow safe
manual handling techniques:
• Don’t lift on your own if > 20kg,
bend knees & keep back straight;
Keep fingers clear;
• Keep unit at least 8m away from
overhead powerlines;
• Fire extinguisher nearby;
• Follow warning stickers on tanks;
Wear PPE for petrol & diesel
fumes-mask & gloves.
Check weather
conditions
Manual handling; slips,
trips or falls
Low • Follow safe manual handling
techniques: don’t lift on your own
if >20kg, bend knees & keep back
straight.
Use spray or fire
fighter units.
As above; loss of
load; heat & cold;
noise; exceed load
limit of vehicle; hose
entanglement; exhaust
fumes; terrain & slopes;
run over by unit
High • As above
• Wear clothes to suit heat & cold;
• Wear hearing protection if noise
>85 dBa;
• Follow the manufacturer ’s safe
operation instruction for the
vehicle and the spray unit
• Don’t overload - water weighs 1kg
for every 1 litre
• Secure unit to tow vehicle;
• Keep hose tidy;
• Put unit brakes on (if fitted).
Clean up,
maintenance &
storage
As above Low • As above;
• Wear PPE for clean up;
• Store unit in a dry, well ventilated
area.
Burn risk Hot exhaust/muffler Med • Do not reach over hot exhaust
• Do not service engine while hot
• Wear appropriate PPE

www.tti.com.au
PantherPatrol™
PRODUCT HANDBOOK
Freecall: 1800 816 277
19
Maintenance
Your PantherPatrol Firefighting Trailer requires minimal maintenance but regular cleaning and checks will
ensure safe and reliable service over its lifetime. Periodic checks and inspections will identify any potential
issues, enabling timely rectification and minimising downtime.
Periodic Checks
CAUTION! In dusty, dirty or smoky environments, cleaning, inspection and
servicing of the unit on a regular basis is essential. The cleaning, inspection
and servicing must be undertaken more frequently in harsh conditions to
avoid damage or destruction of equipment.
The following checks and cleaning operations should be undertaken on a regular basis. The frequency of
these activities will depend on the nature of the operating environment and the operational hours of the
PantherPatrol unit. Refer to the maintenance schedule tables below for details of maintenance intervals.
• Clean the unit and inspect it for any signs of damage or wear. Replace any safety labels if they are
damaged or illegible.
• Check all hoses, fasteners and fittings are firmly secured, tighten if necessary.
• Unwind the hose from the reel fully to check that hose is in good order. Pressurise the line and check
operation of spray nozzle. Rewind the hose onto the reel, ensuring it retracts all the way.
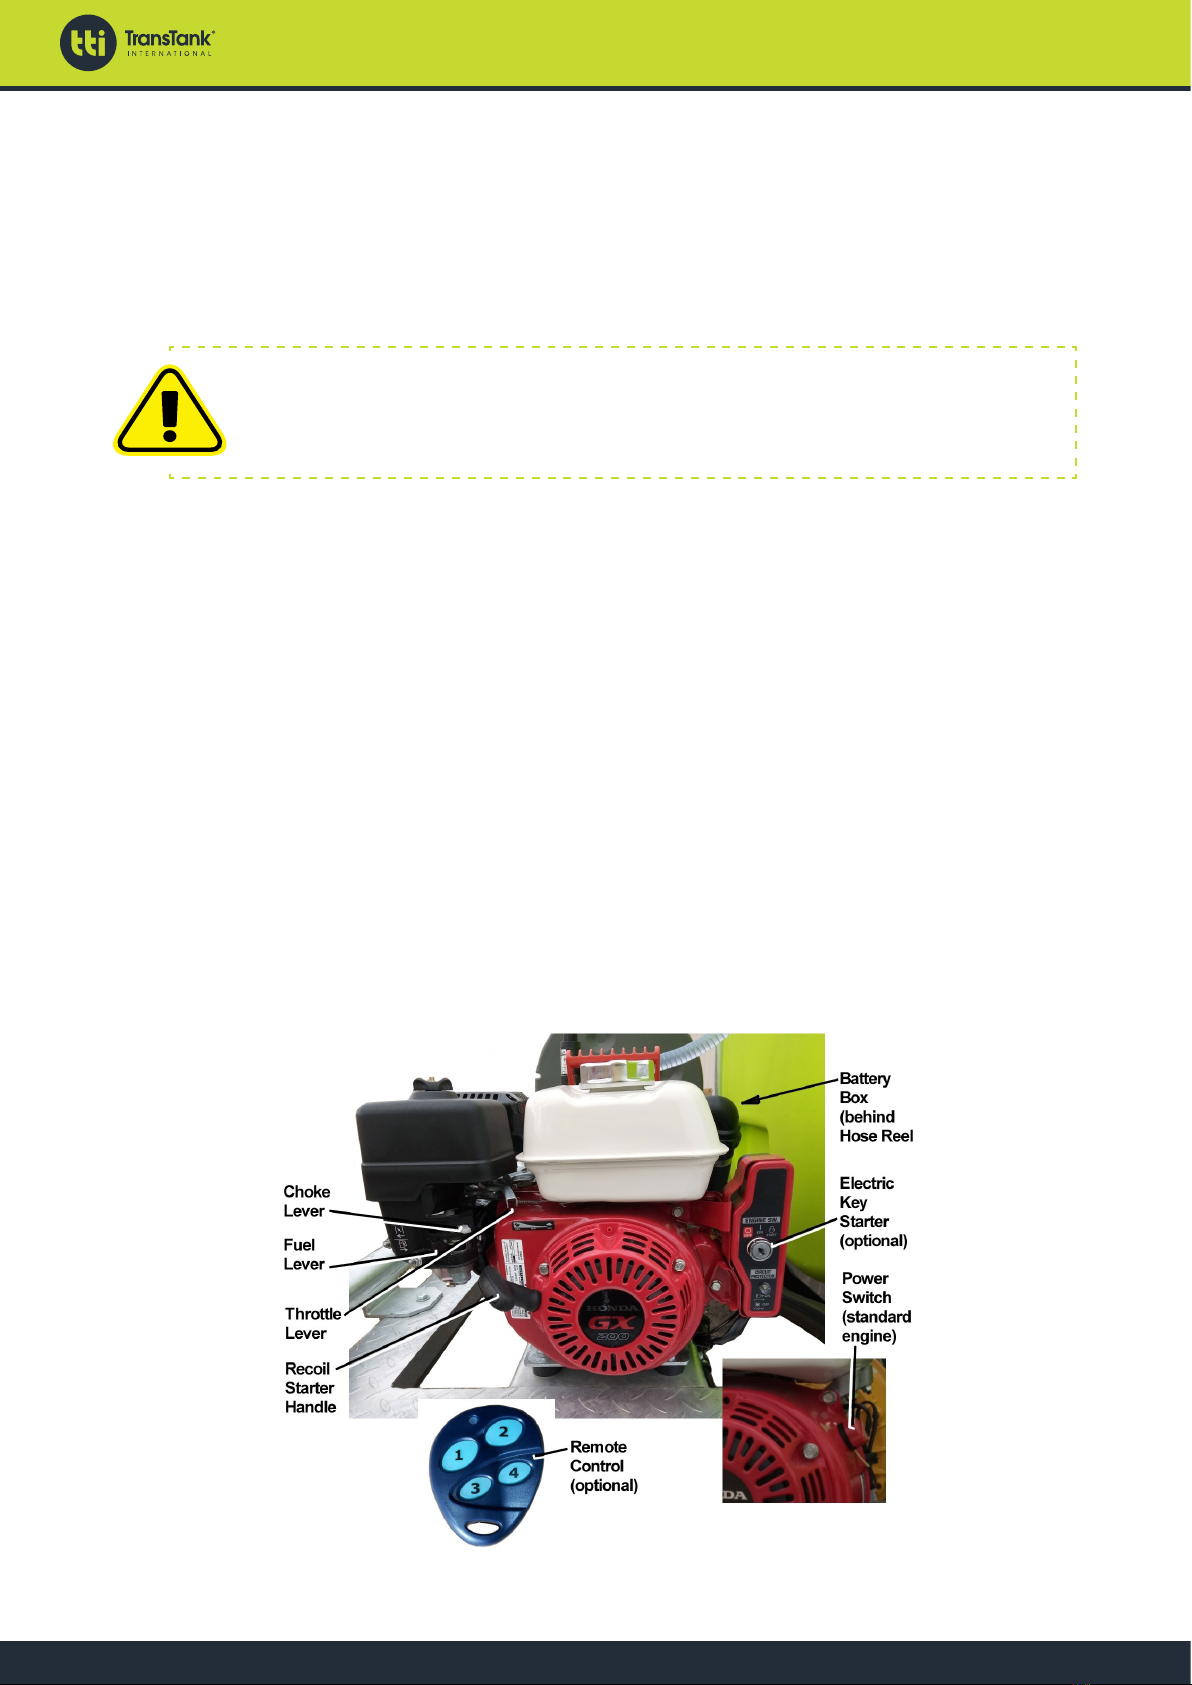
• For the petrol or optional diesel engine driven pump, check the engine’s oil level weekly. Top up as
required.
• Check for any signs of fuel or oil leaks. If detected, investigate and rectify immediately.
• Check the condition of the optional diesel or petrol pump engine’s 12 volt battery, replace it or charge it
as necessary.
• Check the condition of the optional electrical brake’s 12 volt battery, replace it or charge it as necessary.
• For the petrol or optional diesel engine driven pump, refer to the supplied pump manual, drain and replace
the engine oil in accordance with the manufacturer’s recommendations.
• If the PantherPatrol is to be stored for an extended period, ensure the tank and all pipelines are empty
and are not pressurised. Store the unit is a clean, dry and well-ventilated area.
Maintenance Schedule
The following tasks are be conducted in accordance with each of the schedules. All scheduled tasks are to
be undertaken concurrently. For example, at the three month maintenance interval, all task listed are to be
undertaken, in addition to the daily, weekly and monthly tasks.
NOTE! Maintenance is important. Keep a record of all maintenance tasks
conducted on the PantherPatrol unit.
TTi recommends photocopying these schedules in order to keep a detailed log of all maintenance tasks. A
copy of these schedules will be required to support any warranty claim.

www.tti.com.au
PantherPatrol™
PRODUCT HANDBOOK
Freecall: 1800 816 277
20
Daily Tasks
The following tasks are to be undertaken daily, or prior to each use, of the PantherPatrol unit.
No. Task Notes
1Inspect the PantherPatrol for any signs of damage or wear Clean, repair or replace
2Check plug connections and test lights/indicators Top up as required
3Check fuel Clean, replace as necessary
4Inspect engine’s air filter and housing for dust Clean, replace as necessary
5Press button on brake safety unit (Figure 2) to test charge Charge brake battery
Weekly Tasks
The following tasks are to be undertaken each week or 10 operating hours, whichever occurs first.
No. Task Date Signed
1All Daily tasks
2Remove and clean the engine’s air filter
3Check engine oil level, top up as required
Monthly Tasks
The following tasks are to be undertaken each month or 20 operating hours, whichever occurs first.
No. Task Date Signed
1All Daily and Weekly tasks
2Check tyre pressures are 36psi (248kPa or 2.48 Bar)
3Visually inspect tyres for wear or damage
4Check wheel nut tension
5Visually inspect suspension components
6Visually inspect hydraulic brake lines, check for leaks, top
up reservoir as required
7Check for damaged electrical brake cables
8Check hose and hose reel by unwinding fully
9* Change pump engine oil (and filter, if fitted) (first change,
thereafter every six months or 100 operating hours)
Table of contents
Other TransTank Firefighting Equipment manuals
Popular Firefighting Equipment manuals by other brands

Global Fire Equipment
Global Fire Equipment ORION MINI-REP V2 Installation, operation & maintenance manual

IST
IST FYRAL Series User's information guide

Tyco
Tyco PROTECTOSPRAY EA-1 manual

Mueller
Mueller Super Centurion 350 operating instructions

Waterous
Waterous Advantus Foam Manager Operation and maintenance manual

Task Force Tips
Task Force Tips Twister Series Instruction for operation and maintenance