Treekeeper Medium PRO User manual
STEP 1 STEP 2
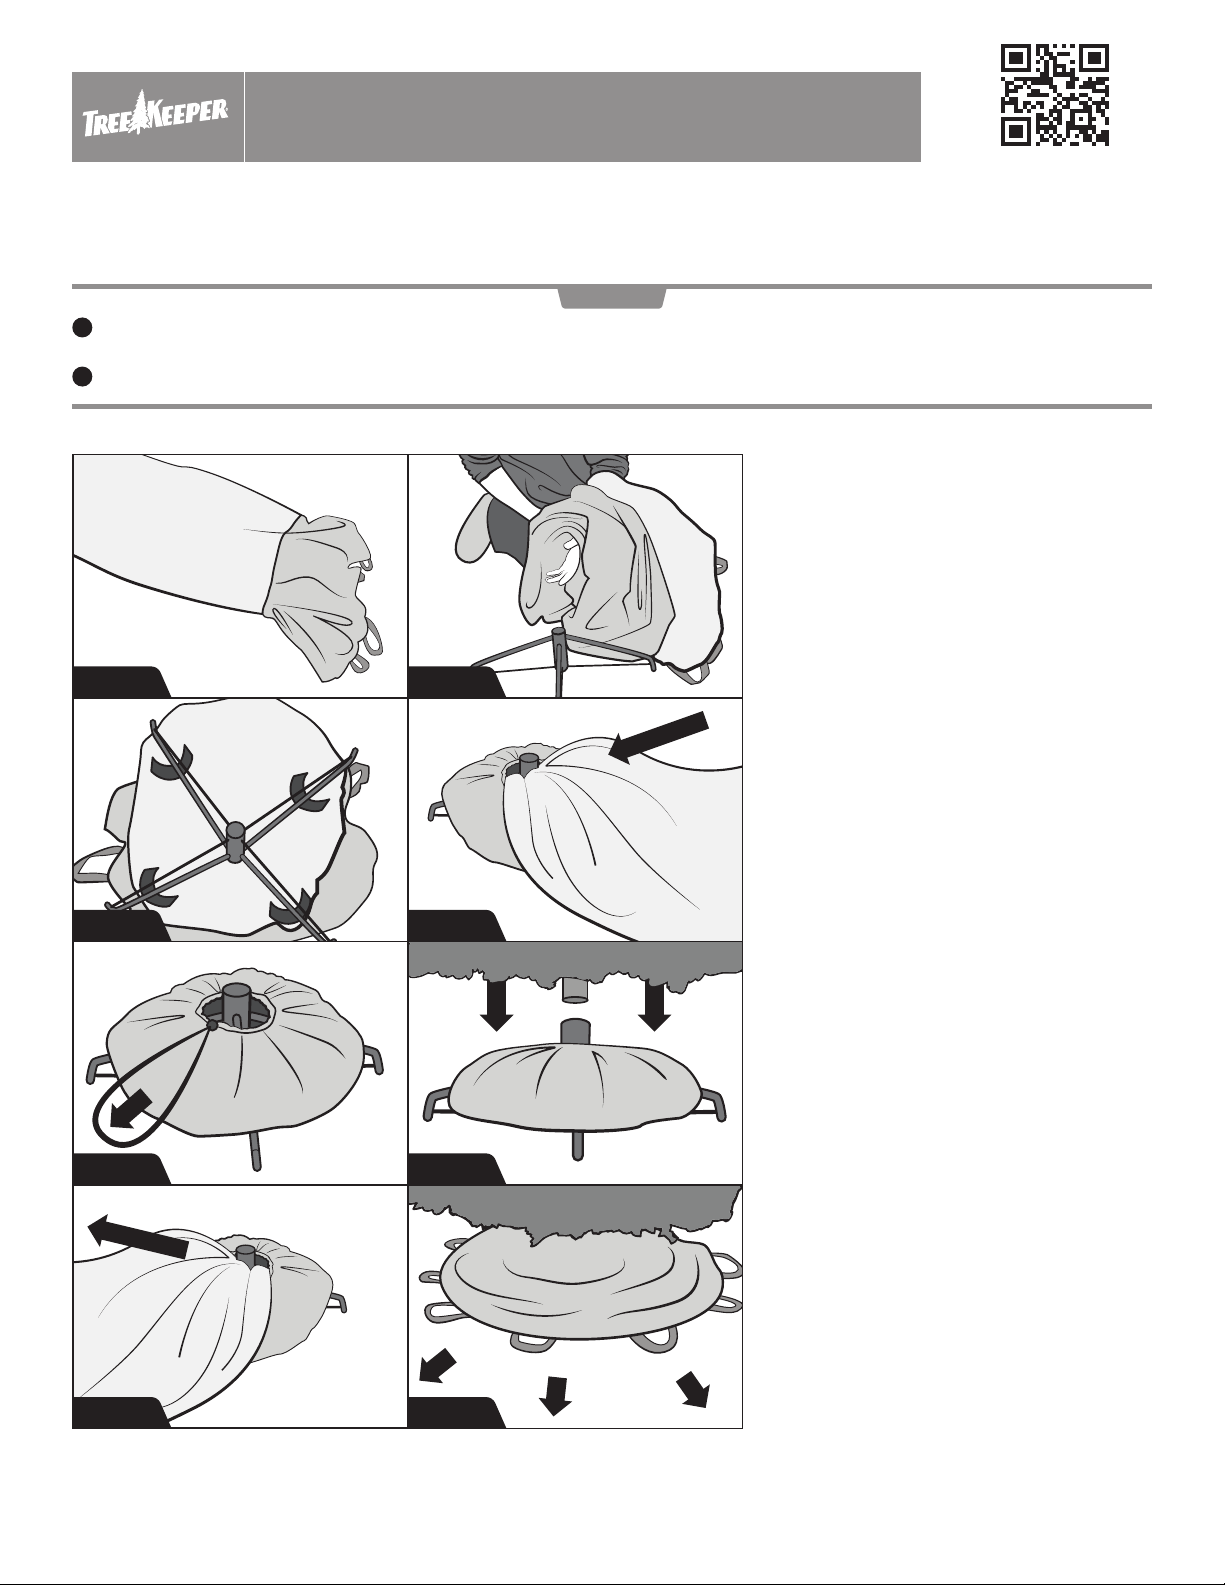
(BOTTOM OF
THE BAG)
STEP 3 STEP 4
STEP 5 STEP 6
DO NOT RETURN TO VENDOR.
For assistance with assembly including instructional videos, parts and customer service visit
www.TreeKeeperBags.com
Step 1. Take the bag out of the box and lay it at on
the ground. Make sure to have your stand nearby.
Step 2. Put your arm into the top portion of the bag
and slide the bag onto your arm until you are able to
put your arm all the way through the bag and out
the bottom tree base hole. Align the bag with your
tree base and slide the bag onto it.
Step 3. Use the buckles to secure the bag onto your
tree stand. For stands with only three legs attach
Velcro straps onto two of the three legs.
Step 4. Stu the entire tree storage bag into its base
tree skirt. This hides the bag while your tree is in use.
Step 5. Use the drawstring to pull the top skirt of
the bag tight. Position the top skirt of the bag
directly over the stand and use it to cover the rest of
the storage bag fabric until only the tree skirt
portion of the bag can be seen.
Step 6. Following the directions from your tree
manufacturer install the tree onto the tree stand.
IMPORTANT: Make sure the tree is securely
fastened into the tree base. NEVER over tighten the
bolts on the tree stand that secures the tree as this
could damage the trunk.
Step 7. After the holidays are over remove all
ornaments from your tree. Then loosen the
drawstring (mentioned in Step 5) and pull the
storage bag out of the tree skirt.
Step 8. Then fully open and expand the tree bag
skirt until all the bag’s handles are exposed and
accessible on the ground. Be sure to also unfasten
the buckles and zippers that are located at both
sides of the top ring of the storage bag prior to
moving onto the next step.
Medium PRO upright tree bag instructions
1
2
STEP 7 STEP 8
Items TK-10105, TK-10105RS
For trees over 7 feet tall it is likely needed that you detach the top section of your tree before proceeding to store your tree. You will have a place to
store your top tree section as illustrated in Step 14.
Always remember to undo all buckles and zippers before you either pull the bag over your tree to store it or when you pull it down for the season.
IMPORTANT
Scan the QR code above
with your smart phone to
view a instructional
assembly video

Step 9. Using two people, pull upwards on the bag
compressing the tree branches upwards. Pull even
and slowly. Do not pull one side too hard as the tree
may become uneven and fall over. Pay attention to
the fabric as it might have become twisted during
storage. If this is the case stop pulling and untwist
the fabric before resuming. It might be necessary to
place your foot onto the tree stand while pulling
upward to steady the tree.
Step 10. If the bag becomes tight on the tree don’t
worry that is normal. This can happen either when
pulling up the storage bag to store your tree or
when you pull down the bag to use the tree during
the holiday season. Simply just push the branches in
and work the bag up or down the tree.
Step 11. After the top skirt is pulled all the way up
and over your tree, fasten the two buckles on each
side of the top ring of the bag.
Step 12. Once the buckles are clamped, gather the
tree bag at the top and pull tight with the
drawstring.
Step 13. Carefully zip up the top of the bag. For
extra thick trees you may need to compress the tree
with your hand slightly to allow the zipper to
function. Repeat on the opposite side of bag.
Step 14. For many trees over 7 feet tall, you will
need to remove the top tree section and place it in
the bottom access pocket as shown. Note: Pocket
design may vary from the illustration however the
function is exactly the same as shown.
Your tree is now stored and ready to move into
storage. Carefully lean the tree onto its side and
carry the tree into storage. Please read the cautions
below prior to moving.
For more assistance including instructional videos,
parts and customer service please visit
www.TreeKeeperBags.com
STEP 12
TREE
TOP
STEP 14
STEP 11
STEP 13
STEP 9 STEP 10
CAUTION: DO NOT LEAN ON SIDE AND PUT ALL WEIGHT OF THE
TREE ON ONE OR TWO LEGS. THIS WILL DAMAGE YOUR STAND
AND TREE. Always use two people and use caution when leaning the tree
over. Do not put too much pressure on the stand while tipped as this could
result in damaging the trunk of the tree. Use caution when lifting the tree
as it may be heavy. Use extreme caution when moving the tree up or down
stairs. Whenever possible use two or three people to store your tree.

x4
Step 1. Slide a stand leg (C) into the notched section on the base collar (B). Secure
by fastening a screw (F) with the provided screwdriver. Repeat this with all legs.
Step 2. Attach a castor (E) to each of the four legs (C). Tighten with the provided
wrench. READ IMPORTANT NOTE BELOW BEFORE PROCEEDING.
Step 3. When installing the inner collar (A) make sure the rest of the stand is
sitting on a at surface. In order to avoid installation problems make sure to align
the inner collar (A) perfectly with the base collar (B) and making sure to align the
rivets with the corresponding indentations in the base before pushing it in.
Step 4. Once perfectly aligned, push straight down with your hand while the
stand rests on a at surface. Make sure the metal inner collar is completely
inserted all the way into the molded plastic center piece. You may have to exert
some pressure directly down onto the metal collar to completely slide it into
place. Remember to keep the collar aligned while pushing.
Step 5. Screw in all three tension knobs (D) into the stand collar (A) through the
bolt holes. Once you set your tree into the stand. Tighten the knobs (E) equally to
secure the tree trunk.
Step 6 - TROUBLESHOOTING. If you were unable to successfully install the inner
collar in Step 4 due to misalignment then have someone hold the base of the
stand while you use the knobs to get an appropriate grip. Next twist back and
forth to loosen the inner collar from the base collar and pull it out as to allow you
to then properly align it and reinsert it correctly.
assembly instructions
IMPORTANT! PLEASE READ INSTRUCTIONS BEFORE ASSEMBLING!
important note: WHICH TRUNK DO YOU HAVE?
rolling stand instructions
STEP 1 STEP 2
STEP 4
STEP 6
x3
STEP 5
x4
A B C D E F G
QTY: 1 QTY: 1 QTY: 4 QTY: 3 QTY: 4 QTY: 4 QTY: 1
contents INCLUDED TOOLS: Screwdriver & Wrench
FLAT TRUNK
Before you begin, note the bottom of your tree trunk. If you have a pointed trunk then the below instructions are sucient. However, if you have a at trunk then there is one additional step to
ensure your tree’s stability involving the included cone, Part G. Before Step 3, simply rest the cone (G) in the hole on the bottom of the base collar (B). If you have already performed steps three and
four just remove the inner collar and insert the cone (G). Then insert the inner collar (A), which will rest on top of the cone. Proceed onto step 4 as normal.
POINTED TRUNK
MAKE SURE BASE OF TRUNK IS CENTERED IN STAND MAKE SURE BASE OF TRUNK IS CENTERED IN STAND
PUT CONE IN
BEFORE METAL TUBE
STEP 3
IMPORTANT:
Align rivets to
the corresponding
grooves in the base.
This manual suits for next models
2
Table of contents
Other Treekeeper Household Appliance manuals


Popular Household Appliance manuals by other brands


Southern Enterprises
Southern Enterprises CK622500TX-Espresso Finish Assembly

Veritable
Veritable CLASSIC user manual

Klarstein
Klarstein SARTHE manual

Wolverine
Wolverine Siding and Vinyl Carpentry Soffit and Decorative... installation guide

Home Accents Holiday
Home Accents Holiday 24SV24386 Use and care guide

Brunton
Brunton HYDROLYSER user manual


