Trejon 1800HD Specification sheet

TREJON FÖRSÄLJNINGS AB
Företagsvägen 9
SE-911 35 VÄNNÄSBY
SWEDEN
Tel: + 46 (0)935 39 900
Webb: trejon.se
Instructions for Use and
Maintenance
Snow Blower
1800HD-2402HD
Edition: 2018-10
Note!
Read instructions before use

Instructions for Use and maintenance 1800HD-2402HD (1810)
2
Breddningsvinge
n monteras på
insidan av
maskinen

Instructions for Use and maintenance 1800HD-2402HD (1810)
3
Breddningsvinge
n monteras på
insidan av
maskinen
TABLE OF CONTENT
1Introduction....................................................................................................7
1.1 Foreword ...................................................................................................7
1.2 Description.................................................................................................7
1.3 Working stages..........................................................................................7
1.4 Detailed description...................................................................................8
1.5 Technical data...........................................................................................9
2Safety instructions ......................................................................................10
2.1 Safety precautions...................................................................................10
2.2 Explanation of the symbols......................................................................13
3Using the equipment...................................................................................15
3.1 Assembly.................................................................................................15
3.2 Attaching machine to the tractor..............................................................16
3.3 Before starting up....................................................................................18
3.4 Adjustments.............................................................................................18
3.5 Operating the machine............................................................................20
4Service and maintenance ...........................................................................22
4.1 General....................................................................................................22
4.2 Maintenance schedule.............................................................................23
4.3 Before the snowy season........................................................................23
4.4 After the snowy season ...........................................................................24
4.5 Gear box oil check and change...............................................................24
5Troubleshooting..........................................................................................25
6Options.........................................................................................................26
6.1 Mounting of extension wing (accessories)...............................................26
7Spare Parts ..................................................................................................28
EC-Certificate of Conformity ............................................................................31
Instructions for Use and maintenance 1800HD-2402HD (1810)
4
Breddningsvinge
n monteras på
insidan av
maskinen
SAFETY SYMBOLS
Note! This warning symbol is used throughout this instruction manual to call attention to safety
precautions that you, your employees or any other people that may come near the implement
must read and understand. Failure to follow these instructions may result in serious injury or
even death.
This symbol means:
WARNING!
CAUTION!
YOUR SAFETY IS
ENDANGERED!
A word of advice
Pay special attention to the words WARNING!, CAUTION! and NOTE! in the safety instructions.
The words have been chosen from of the following:
WARNING! This safety sign is used to identify potential hazards that can lead to serious injury
or even death. These hazards include situations that may occur when the safety equipment
and/or the safety shields are removed. Signal words can also be used to alert about dangerous
use.
CAUTION! Failure to observe this warning sign could result in light personal injuries. The sign is
also used to indicate that the disregarding of these instructions may cause damage to the
implement.

Instructions for Use and maintenance 1800HD-2402HD (1810)
5
Breddningsvinge
n monteras på
insidan av
maskinen
Dear Customer,
You have made a good choice. We congratulate you to your selection of a TREJON OPTIMAL
product that offers quality and performance with reliable service.
By reading the manual and following its recommendations you will ensure the long and effective
use of the equipment.
We have produced this manual for you to get a good understanding of the functioning of the
machine and what safety and maintenance instructions to follow when working with it.
If any question should arise when using the machine or when reading this manual, you are
welcome to contact us for further information.
TREJON AB
Företagsvägen 9
SE-911 35 Vännäsby
Sweden
Tel: + 46 (0)935 399 00
Email: [email protected]
Website: www.trejonindustries.se

Instructions for Use and maintenance 1800HD-2402HD (1810)
6
Breddningsvinge
n monteras på
insidan av
maskinen
Honoured retailer,
in order for the guarantee to be valid and to forfill all legal requirements, we ask you to fill out
the guarantee form together with the customer and register at trejon.se
The guarantee is valid from the day the equipment is handed over to the customer.
Delivery checklist:
Check for damages caused in transporting. Inform the transporting company.
Check that all packing material has been taken away. Dispose packing material in an
environmentally friendly way
Check if the PTO-shaft with shear bolt 2920Nm is included.
Check that the machine is lubricated, see section “Service and maintenance”.
Check that all screws are properly tightened, see section “Service and
maintenance”.
Check that all guards and safety shields are properly fastened.
Check the oil level in the gearbox. See section “Service and maintenance”.
Check chain tension, see section “Service and maintenance”
Make a funtion test.
Having gone through and explained to the customer, with the help of the manual, the
startup, use and maintenance of the equipment and it’s accessories.
Fill out the guarantee form with the customer and register at trejon.se
Instruction manual given to the customer.
Enter the serialnumber of the machine to the
right.
S/N:

Instructions for Use and maintenance 1800HD-2402HD (1810)
7
Breddningsvinge
n monteras på
insidan av
maskinen
1 Introduction
1.1 Foreword
Thank you for choosing this TREJON OPTIMAL machine. We have concentrated our efforts in
order to develop a sturdy machine that will operate trouble-free for many years. The working life
of the machine, however, depends not only on us but also on you. We have compiled this
instruction manual in order to facilitate the use of the implement and describe proper
maintenance procedures. Read these instructions carefully. Contact the retailer from whom you
purchased the machine whenever you want to order repair parts or need any other assistance.
When you are ordering repair parts, make sure that you know the right model, type and serial
number. See the identification plate on the chassis.
1.2 Description
The equipment is designed to clear snow from level ground such as roads and parking lots. The
snow blower is to be mounted at the front or at the rear on the three point lift of the tractor. Cat.
II/III. A double acting hydraulic connection is needed to turn the ejector tube. If the equipment is
fitted with an hydraulic flap regulator, an added double acting connection is needed. The
equipment is powered by the PTO of the tractor. When mounted to the rear of an pulling tractor:
540 rpm (just 2000HD). When mounted on a reversing tractor: 1000 rpm. When mounted to the
front of a tractor: 1000 rpm.
1.3 Working stages
The equipment works in three stages:
1. Break-up and feeding in with self-cleaning feed screws with cutting action.
2. Transport to the ejecting rotor.
3. The ejecting rotor will powerfully throw out the snow through the ejector tube. The
ejector tube is adjustable as to the direction and the distance of the thrown snow.

Instructions for Use and maintenance 1800HD-2402HD (1810)
8
Breddningsvinge
n monteras på
insidan av
maskinen
1.4 Detailed description
1
Chassie
2
Ejector tube (long or short tube)
3
Twinflap
4
Ejecting rotor
5
Feeding augers (1pcs at 1800 and 2000HD)
6
Flap control
7
Turntable gear
8
Reversible wearing edge
9
Gearbox
10
Drive shaft for frontal mounting, 1000 rpm
11
Drive shaft for rear mounting, 540 rpm
12
Shear bolt clutch for the feeder screw
13
Tool box with holders for spare shear bolts
14
3-point/A-frame, adjustable, bolted pulling frame
4.
1.
3.
2.
5.
6.
7.
12.
9.
8.
11.
10.
14.
13.

Instructions for Use and maintenance 1800HD-2402HD (1810)
9
Breddningsvinge
n monteras på
insidan av
maskinen
1.5 Technical data
Technical data / model
1800HD
2000HD
2002HD
2202HD
2402HD
Working width, mm
1820
1950
1950
2150
2350
Frame height, mm
820
820
820
820
820
Cutting auger, units
1
1
2
2
2
Cutting auger, mm
340
340
340
340
340
Ejecting rotor, mm
680
680
680
680
680
Recommended tractor
power (kW)
45-100 kW
50-110 kW
50-110 kW
55-120 kW
55-120 kW
Rotating ejector tube,
standard
Hydraulic
Hydraulic
Hydraulic
Hydraulic
Hydraulic
Flap control, standard
Mechanical
Mechanical
Mechanical
Mechanical
Mechanical
Weight, basic unit (kg)
560
590
730
760
790
PTO operational rpm
540/1000
540/1000
540/1000
540/1000
540/1000
Mounting variations
R-T-F
R-T-F
F-R
F-R
F-R
Due to continuous product development, any data is subject to change without prior notice.
R=Reversing: 540 rpm, T=Towed: 540 rpm, F=Front mounted: 1000 rpm.

Instructions for Use and maintenance 1800HD-2402HD (1810)
10
Breddningsvinge
n monteras på
insidan av
maskinen
2 Safety instructions
2.1 Safety precautions
Read operator’s manual. All drivers of the machine must read and understand all the contents
of this operator’s manual, so there is no doubt about management before using the equipment
for the first time. If any hesitation, ask your Trejon dealer about advise. It is forbidden to use the
equipment if user don’t know the risk factors at handling, and don’t know how to act in an
emergency situation.
Read, observe and understand meaning of all safety-, use-, warning- and position- symbols at
machine and in user manual.
Safety is the primary concern in the design and manufacture of our products. Unfortunately our
efforts to provide safe equipment can be wiped out by a single careless act of an operator.
In addition to the design and configuration of equipment, hazard control and accident prevention
are dependent upon the awareness, concern, prudence and proper training of personnel
involved in the operation, transport, maintenance and storage of equipment.
Allow only properly trained personnel to operate the equipment.
The machine is intended only for outdoor use.
Management. Learn how to operate the machine and how to use the controls properly before
operating the machine.
Connect the machine. Attach the machine correctly; don’t stand behind the tractor during
installation. Ensure machine is properly mounted, adjusted and in good operating condition.
Failure to ensure a secure coupling of the implement to the tractor can cause injury and
damage to the implement or tractor.
Secure the working area. Unauthorized persons, particularly children, are not allowed near the
machine while it is running or is being repaired. Before backing up, look behind carefully.
Pay attention to the injury and damage that can be caused by material thrown by machine
during operating, therefore clear area of stones, branches or other debris that might be thrown,
causing injury or damage. Take care never to aim the snow outlet towards people, animals or
buildings.
The rotating parts of this machine have been designed and tested for rugged use. However,
they could fail upon impact with heavy, solid objects such as steel guard rails and concrete
abutments. Such impact could cause the broken objects to be thrown outward at very high
velocities. To reduce the possibility of property damage, serious injury, or even death, never
allow the cutting blades to contact such obstacles.
Machines protective equipment. Do not operate the machine if not all safety guards and
shields for moving parts are in place and in good condition.
Ensure that all safety and operating signs are in good condition.
Additional safety and operating decals are available at no extra charge. Please specify model
and serial number when ordering.
Moving parts. Keep hands, feet, hair and clothing away from moving parts of the machine.
Let the machine work by it self, don’t try to help the machine with hands and fingers.

Instructions for Use and maintenance 1800HD-2402HD (1810)
11
Breddningsvinge
n monteras på
insidan av
maskinen
PTO-shaft. When changing tractor always check the length of the PTO-shaft, a to long shaft
can damage both tractor and machine. It is forbidden to use PTO-shaft that does not fulfill
requirements from manufacture.
Make sure that PTO-shields are in good condition and fastened securely to the tractor. It is
forbidden to use a PTO-shaft with damaged or missing shield. Purchase a new shield if old
shield is damaged or missing.
Lifting and lowering machine. Be careful when lifting or lowering the machine.
Stability. The machine should not be mounted on a tractor with insufficient front shaft /back
shaft weight when the tractor becomes unstable and difficult to operate. When using a unit, a
minimum 20% of tractor and equipment weight must be on tractor front wheels. Without this
weight, tractor could tip over, causing personal injury or death. The weight may be attained with
a front end loader, front wheel weights, and ballast in tires or front tractor weights, read the
tractor’s instructions manual for more information.
In extremely uneven terrain rear wheel weights, front tractor weights, and/or tire ballast should
be used to improve stability.
Operating machine. Be careful and reduce the speed when working on uneven surfaces.
Watch for holes, roots, rocks or other hidden objects. Do not drive near the edge of a gully,
ditch or stream bank. When mowing over uneven terrain, observe the type of terrain and
develop a safe mowing pattern.
When driving in slopes:
Operate the machine up and down steep slopes, not across slopes, to prevent the tractor from
tipping. Avoid sudden stops and starts, slow down before changing directions on a slope. Pass
diagonally through sharp dips and avoid sharp drops to prevent hanging up the tractor and
machine. If tractor overturns, hold tight to steering wheel.
Operating in darkness. When working in the dark hours, make sure there is sufficient lighting
in the working area.
Driver. Do not operate the equipment when you are tired, sick or when using medication.
Only properly trained people with driver’s license is allowed to operate this machine.
Do not allow riders on the machine or tractor at any time. There is no safe place for riders.
Personal protective equipment. Personal protection equipment including hard hat, safety
glasses, safety shoes, and gloves are recommended during assembly, installation, adjustment,
maintaining and/or repairing the implement. Avoid loose fitting clothing which can become
entangled. Wear sturdy, tough-soled work shoes and protective equipment for eyes, hands,
ears and head.
Safety cabin. Operate the machine only with a tractor equipped with an approved Roll-Over-
Protective-System (ROPS). Keep doors at tractors cabin closed during operating, serious injury
or even death could result from falling off the tractor.
Daily maintenance. Inspect the entire machine periodically. Look for loose fasteners, worn or
broken parts, and leaky or loose fittings. Periodically tighten all bolts, nuts and screws and
check that all cotter pins are properly installed to ensure unit is in a safe condition.
No wrappings or foreign objects are around the machine.
Frequently check mower blades. They should be sharp, free of nicks and cracks and securely
fastened.

Instructions for Use and maintenance 1800HD-2402HD (1810)
12
Breddningsvinge
n monteras på
insidan av
maskinen
Safety during maintenance and repairing. Apply hand brake and place the machine on a
hard level surface when maintaining or adjusting it. Always stop the tractor, set brake, shut off
the tractor engine, remove the ignition key, and allow machines moving parts to come to a
complete stop before dismounting tractor. Ensure that all moving parts have stopped completely
before making adjustments, servicing or cleaning the machine. If the machine has been raised
for cleaning, maintenance, inspection or repairs, it is imperative that you prevent it from sinking
or falling down by placing supports under the machine. Never work under equipment unless it is
blocked securely. Keep service area clean and dry. After servicing, be sure all tools, parts and
service equipment are removed. Clean the machine thoroughly before repairs or storage. Be
sure to thoroughly wash the machine without using excessive pressure especially on the moving
parts, bearings and electric components. After cleaning, carefully dry the machine and lubricate
it and perform a short test drive.
Vibrations. Do not use the machine if it is vibrating or shaking. Stop and investigate the cause.
Change any damaged parts.
Emergency stop. Know how to stop the tractor and machine quickly in case of an emergency.
After striking an obstacle, shut the tractor down and thoroughly inspect for damage before
restarting.
Hydraulic hoses. The machine’s hydraulic hoses contain oil under high pressure. Never
touch the hoses or other hydraulic components while there is still pressure in the system. In
case of leakage, oil under high pressure can penetrate the skin and cause serious injuries. If
accident happen, contact doctor.
Check the condition of the hydraulic hoses every day. Worn or leaking hoses must be replaced
immediately with new hoses that meet the manufacturer’s technical requirements.
The hydraulic motor and the hoses become hot during work; there is a risk for burn injury.
Never loosen the hoses while the oil is still hot. Wait until it cools down. When changing tractor,
check length of hydraulic hoses, if to long or short, they can easily be damaged.
Welding. Protect bearings, electronic and hydraulic components before any welding is done.
Place earth connection close to the place for welding.
Fire danger. If any component gets over heated, stop machine and check reason. There is an
increased risk of fire when working in dry areas.
Spare parts. Use only original repair parts
Where replacement parts are necessary for periodic maintenance and servicing, genuine
replacement parts must be used to restore your equipment to original specifications. The
company will not claim responsibility for use of unapproved parts and/or accessories and other
damages as a result of their use.
Unauthorized modifications to the machine may impair the function and/or safety of the machine
and reduce its life. If equipment has been altered in any way from original design, the
manufacturer does not accept any liability for injury or warranty.
Instructions for Use and maintenance 1800HD-2402HD (1810)
13
Breddningsvinge
n monteras på
insidan av
maskinen
2.2 Explanation of the symbols
The warning symbol must always be recognizable. If the warning symbols are missing from your
equipment or if they are damaged, replace them at once.
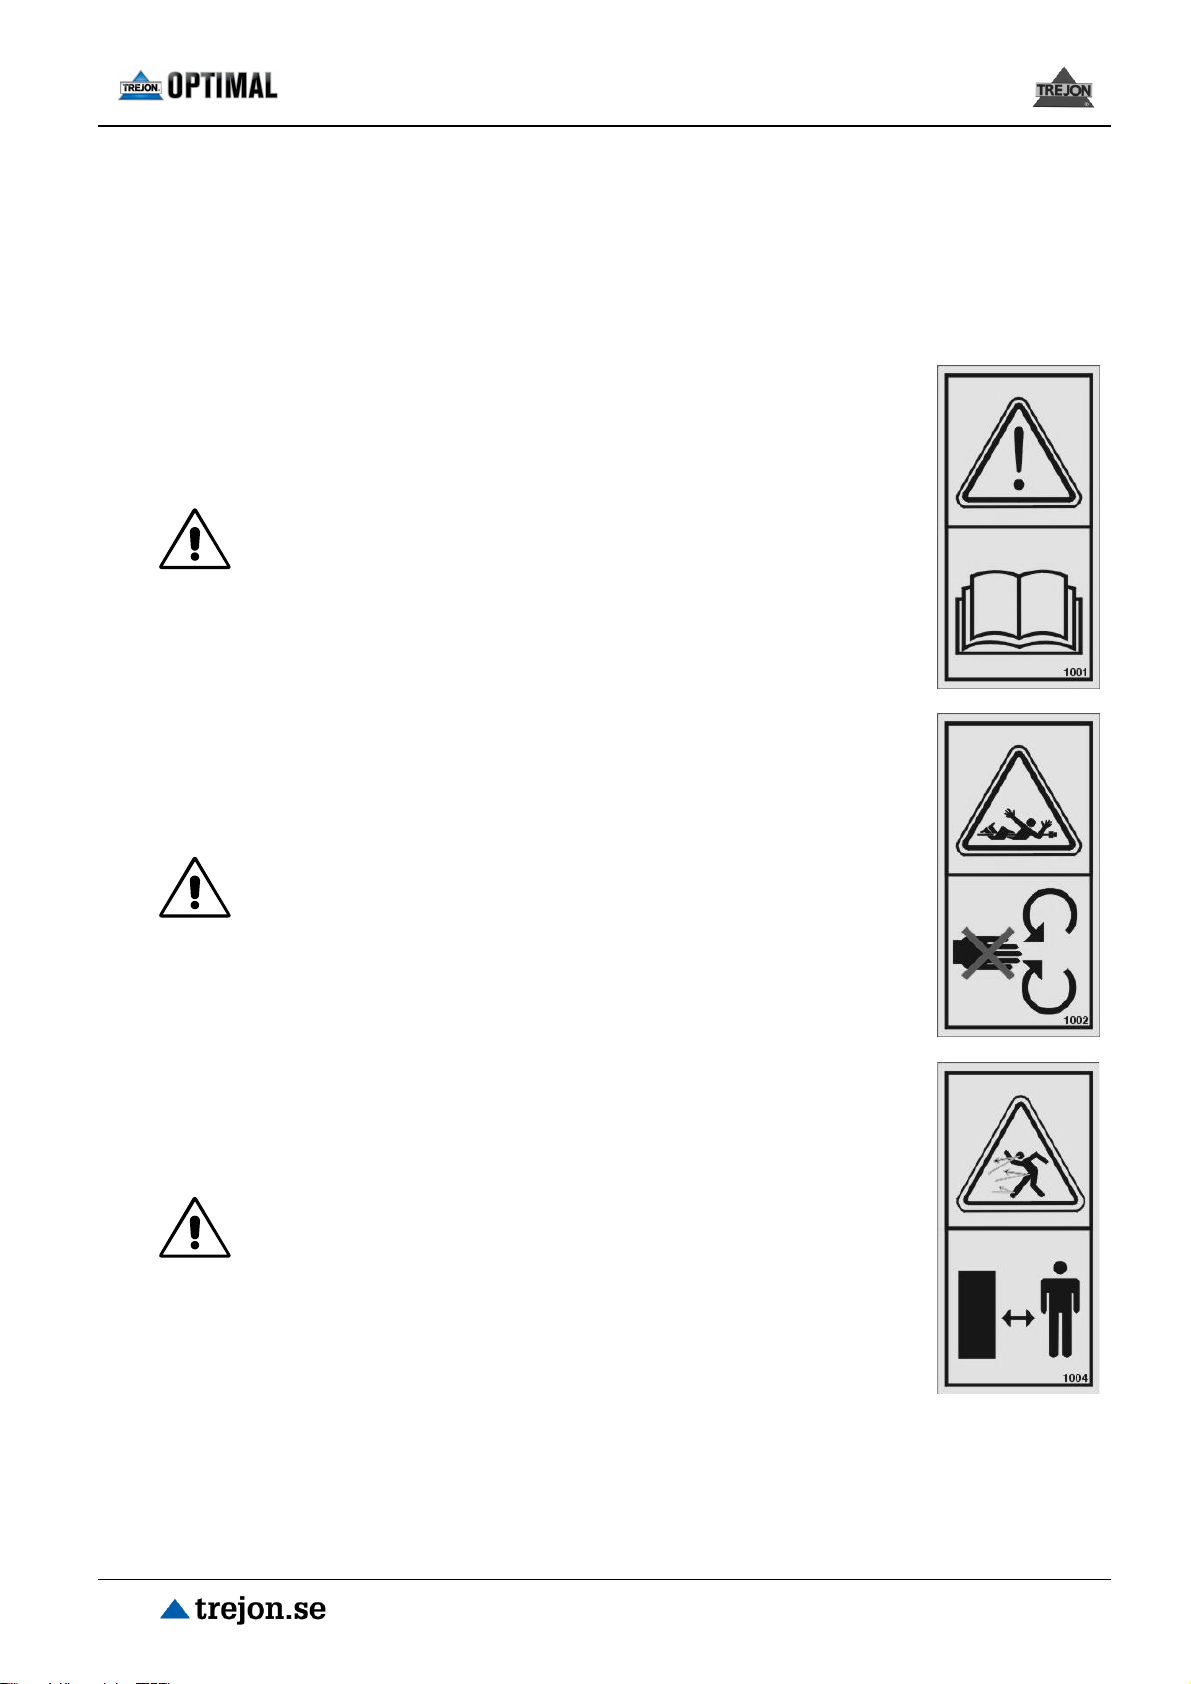
The symbol to the right shows:
Warning!
Read and follow the manual and the safety instructions
before using the equipment. Pass on all safety instructions
to other users of the equipment.
Warning!
Do not touch moving parts. Do not move about near the
PTO when the equipment is operating.
Warning!
Matter such as stones and clumps of ice may fly away
when the equipment is being used. The operator must pay
attention to where the snow is blown, and should avoid
working where people, animals and buildings are.
Maintain the safety distance.

Instructions for Use and maintenance 1800HD-2402HD (1810)
14
Breddningsvinge
n monteras på
insidan av
maskinen
Warning!
Do not touch the feed blades or the feed screws as long as
the tractor’s engine is running and the PTO shaft is
engaged.
Maintain the safety distance.
Warning!
Crushing hazard! When connecting, never stand between
the tractor and the equipment as long as the tractor is
moving. The tractor must be immobilized with the parking
brake whenever the operator leaves the cabin.
Warning!
Crushing hazard! When the ejector tube is lowered the
engine of the tractor and the PTO must be switched off.
Never use your arms or your legs to clear the ejector tube.
The CE symbol mounted by the manufacturer
confirms that the equipment altogether meets all
requirements concerning machinery directives
and other corresponding EG directives.
The serial number and model is stamped on the
identifying plate (see the picture).

Instructions for Use and maintenance 1800HD-2402HD (1810)
15
Breddningsvinge
n monteras på
insidan av
maskinen
3 Using the equipment
3.1 Assembly
Caution!
No persons is allowed to be in danger area during lifting
Be carefully when cutting bands and wire because they can be very tensed. They can
also be very sharp.
Following steps will be performed during the assembling:
Take away all packing and wrapping material, and discard it in an environmentally friendly way.
Assemble the ejector pipe and tighten the bolts.
The 3-point/A-Frame towing connection is bolted to the equipment. When delivered, the
equipment is fitted for front/reverse drive operation.
The towing frame can be mounted at different heights. The towing frame can be adjusted
according to the tractor to which it is attached. Adjust the height so that you can lift the
equipment off the ground and at the same time being able to lower it when working.
The towing frame can be mounted at different heights.
Screws and nuts - M20, 30 mm spanner.

Instructions for Use and maintenance 1800HD-2402HD (1810)
16
Breddningsvinge
n monteras på
insidan av
maskinen
If the equipment is mounted on the front, or is to be used on a reversing machine, one
should strive to mount the towing frame so low that the lifting arms of the tractor steers
the equipment as low as possible. This insures that the equipment goes over obstacles
as smoothly as possible.
Check that all protective devices are undamaged and correctly attached to the equipment.
Before operating the machine, tasks in section 3.3 –“Before starting up” must be cleared.
3.2 Attaching machine to the tractor
Warning!
Crushing hazard! When connecting, never stand between the tractor and the equipment
as long as the tractor is moving. Always immobilize the tractor when leaving the cabin
for any coupling/decoupling work.
The machine should not be mounted on a tractor with insufficient front shaft weight,
when the tractor becomes unstable and difficult to operate. If necessary use attain
ballast weights, read the tractor’s instructions manual for more information.
Only use original PTO-shaft. Read carefully instructions attached at PTO-shaft.
Information in this snow blower instruction manual doesn’t replace information from
PTO-shaft manufacturer.
Caution!
Check that rpm-speed and direction at tractors PTO, agree with signs and symbols at
machine.
Machine front mounted to a tractor
using the A-frame connection.

Instructions for Use and maintenance 1800HD-2402HD (1810)
17
Breddningsvinge
n monteras på
insidan av
maskinen
Attach the machine at a hard level surface.
Attach tractors lifting arms to lower connection points at machine, and there after the top link,
(choose connection points that make lifting arms and top link as parallel as possible, all to make
machine levelled during lifting)
Turn of tractor’s engine and apply the hand brake.
Adjust the length of the PTO shaft. Pull the shaft apart, and fit the end with the shear pin and
mounting flange on to the tractor. Check that the shaft does not bottom out in any position,
(min. play 30mm) and that the sliding part is sufficiently seated in the cuff part (min. 300 mm)*.
If not, shorten the shaft. See the instructions that came with the shaft, (trim any cutting edges of
, to avoid damages on pipes when telescoping). Try to attain longest possible shaft overlap. Be
extra careful with shaft overlap when using hydraulic top link, when this equipment can make
quick changes at measure. Note that usually the shaft is shorter when mounting at the front
than when mounting at the rear.
*Alternative for PTO-shafts shorter than 1000mm, use at least half of maximum overlap.
Duty rpm’s and rotational directions for drive shafts 1-3/4” Z6
When used on a reversing tractor and when mounted on the front, the shear bolt clutch must
always be closest to the tractor. A wrongly mounted PTO shaft can result in a breakage of the
drive shaft.
Use the chains to fasten the PTO-shaft guards, so they don’t rotate.
Lock lifting arms sideways with the stabilizer rods.
Attach hydraulic hoses for ejecting pipe control to double acting outlets at tractor. Clean the
connections carefully before attaching. Before using the equipment, test the operation of the
ejector pipe control.
Check that machine can work freely from tractor in all predictable situations.
1000 rpm
540 rpm

Instructions for Use and maintenance 1800HD-2402HD (1810)
18
Breddningsvinge
n monteras på
insidan av
maskinen
3.3 Before starting up
Before starting up, following items must be checked.
Check the screws and bolts at the machine and tighten if necessary. See table with
recommended torque settings in section “Service and maintenance”.
Check that all protective devices are undamaged and correctly attached to the equipment.
Lubricate the machine (see section ”Service and maintenance”).
Check the oil level in the gearbox. The oil should reach the lower part of the glass (see section
“Service and maintenance”). The gearbox is filled with oil SAE 80W/90 API GL4/GL5, Industrial
gear oil ISO VG 220.
Adjust height of scraper steel with support pads, and machine tilt with top link (see section
“Adjustments”)
Check that no objects have wrapped themselves around moving parts.
Perform a trial run of entire machine.
3.4 Adjustments
Warning!
No work is allowed unless the equipment is safely secured (don’t completely rely on
tractors 3-point connection).
Be careful when undoing the pierced rod of flap control, crushing hazard!
At any time when performing repairs and maintenance, the engine must be switched off
and the PTO shaft disconnected. Withdraw the ignition key from the switch.
Support pads
The height of the equipment is adjusted with two supporting pads located at the back. The
angle of the equipment is adjusted with the top-link. This determines the how well the
equipment follows the variations in the surface. If the equipment is angled forward, it is easier
for it to cut through packed snow and ice. A suitable basic adjustment when the machine rest on
the support pads, is that the wearing edge of the scraper steel is 10mm above ground. Aim at
keeping the machine levelled during work.
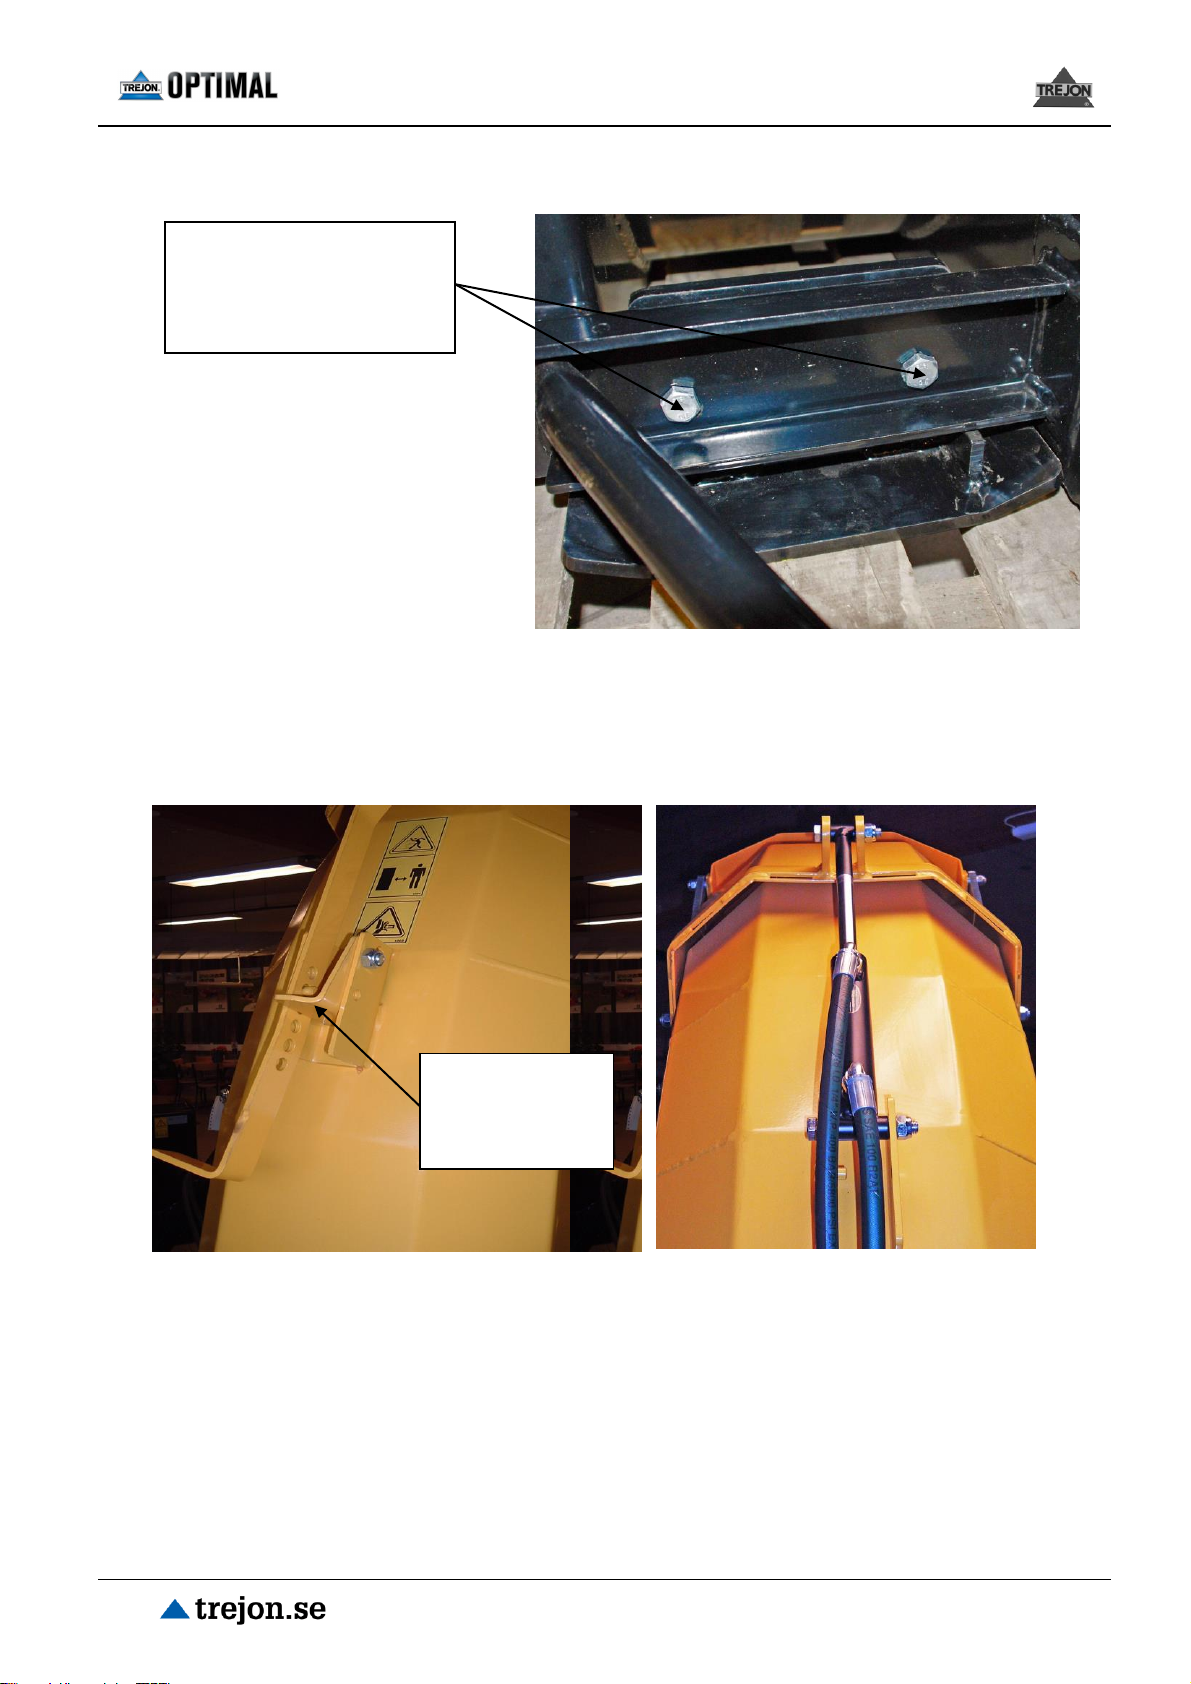
The supporting pads are to be adjusted as the wearing edge is being worn down. The
supporting pads are adjusted by undoing the mounting screws, and mount them in other holes.
Instructions for Use and maintenance 1800HD-2402HD (1810)
19
Breddningsvinge
n monteras på
insidan av
maskinen
Ejector tube
The equipment comes fitted with a hydraulically turntable ejector tube as standard. At the end of
the tube is a flap that regulates the distance the snow is thrown. Turn up the handle that locks
the pierced rod, move the rod to the desired position and lock it again.
A hydraulically (or electrically) operated flap is available as an option. This is suitable for those
that need to change the placing of the ejected snow while operating the equipment.
Mechanical flap control (Standard) Hydraulic flap control (Option)
Screws that must be
taken away, when the
height is adjusted at the
support pads.
Locking handle
for mechanical
flap control.

Instructions for Use and maintenance 1800HD-2402HD (1810)
20
Breddningsvinge
n monteras på
insidan av
maskinen
The ejector tube has two mounting holes. These will enable you to regulate the distance the
ejected snow is thrown.
The height of the equipment is adjusted with two supporting pads located at the back. The
angle of the equipment is adjusted with the top-link. This determines the how well the
equipment follows the variations in the surface. If the equipment is angled forward, it is easier
for it to cut through packed snow and ice.
The supporting pads are to be adjusted as the wearing edge is being worn down. The
supporting pads are adjusted by undoing the mounting screws and move the pads. When the
pads are worn out they have to be replaced by new ones.
3.5 Operating the machine
Warning!
Operator must have a good view over the working area and the area where the ejected
snow lands. Heavy items in the snow, such as stones etc., can be propelled much further
than the snow itself.
Before leaving tractors cabin ensure that all moving parts have come to a complete stop.
Caution!
The shear bolt is No guarantee for machine not being damaged at impact with heavy,
solid objects.
To avoid damages on machine, lift snow blower before going backwards with the
equipment.
A doubled driving speed, make the stress at the equipment four times higher. Damages
on snow blower caused by impact with heavy, solid objects isn’t covered by the
warranty.
Optional mounting holes for the ejector
tube.
This manual suits for next models
4
Table of contents
Other Trejon Snow Blower manuals


