TRENDnet ClearSky TVP-SP1BK User manual

1

2
Federal Communication Commission Interference Statement
This equipment has been tested and found to comply with the limits for a Class B digital device,
pursuant to Part 15 of the CC Rules. These limits are designed to provide reasonable protection
against harmful interference in a residential installation. This equipment generates, uses and can
radiate radio frequency energy and, if not installed and used in accordance with the instructions,
may cause harmful interference to radio communications. However, there is no guarantee that
interference will not occur in a particular installation. If this equipment does cause harmful
interference to radio or television reception, which can be determined by turning the equipment off
and on, the user is encouraged to try to correct the interference by one of the following measures:
- Reorient or relocate the receiving antenna.
- Increase the separation between the equipment and receiver.
- Connect the equipment into an outlet on a circuit different from that
to which the receiver is connected.
- Consult the dealer or an experienced radio/TV technician for help.
CC Caution: Any changes or modifications not expressly approved by the party responsible for
compliance could void the user's authority to operate this equipment.
This device complies with Part 15 of the CC Rules. Operation is subject to the following two
conditions: (1) This device may not cause harmful interference, and (2) this device must accept any
interference received, including interference that may cause undesired operation.
IMPORTANT NOTE:
FCC Radiation Exposure Statement:
This equipment complies with CC radiation exposure limits set forth for an uncontrolled environment.
This device complies with CC R Exposure limits set forth for an uncontrolled environment, under
47 C R 2.1093 paragraph (d)(2).
This transmitter must not be co-located or operating in conjunction with any other antenna or
transmitter.
This equipment has been SAR-evaluated for use in laptops (notebooks) with side slot configuration.

3
Table Contents
Introduction..............................................................................................................4
etting to know the Telephone Kit ......................................................................... 4
Packing Contents....................................................................................................................... 4
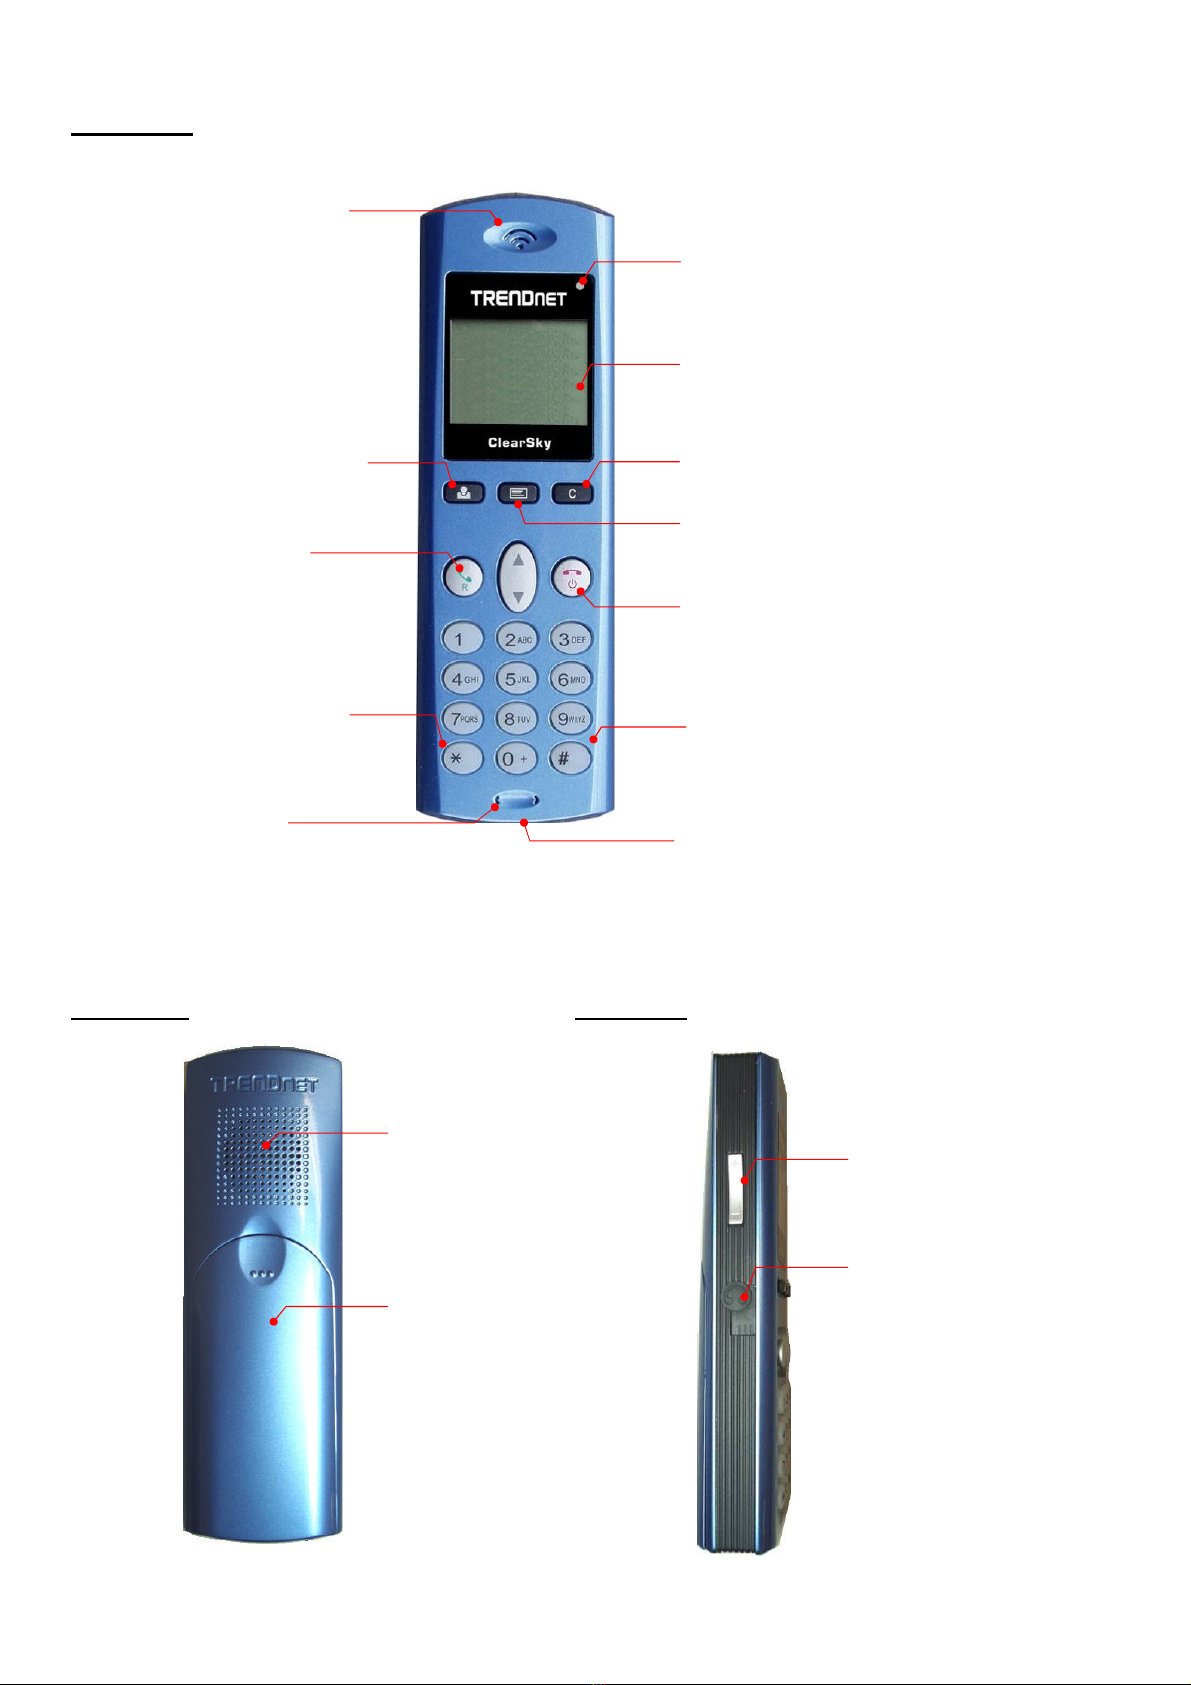
Identifying Components ............................................................................................................. 4
etting Started.........................................................................................................6
Minimum System Requirements ................................................................................................ 6
Setting up the telephone kit ....................................................................................................... 6
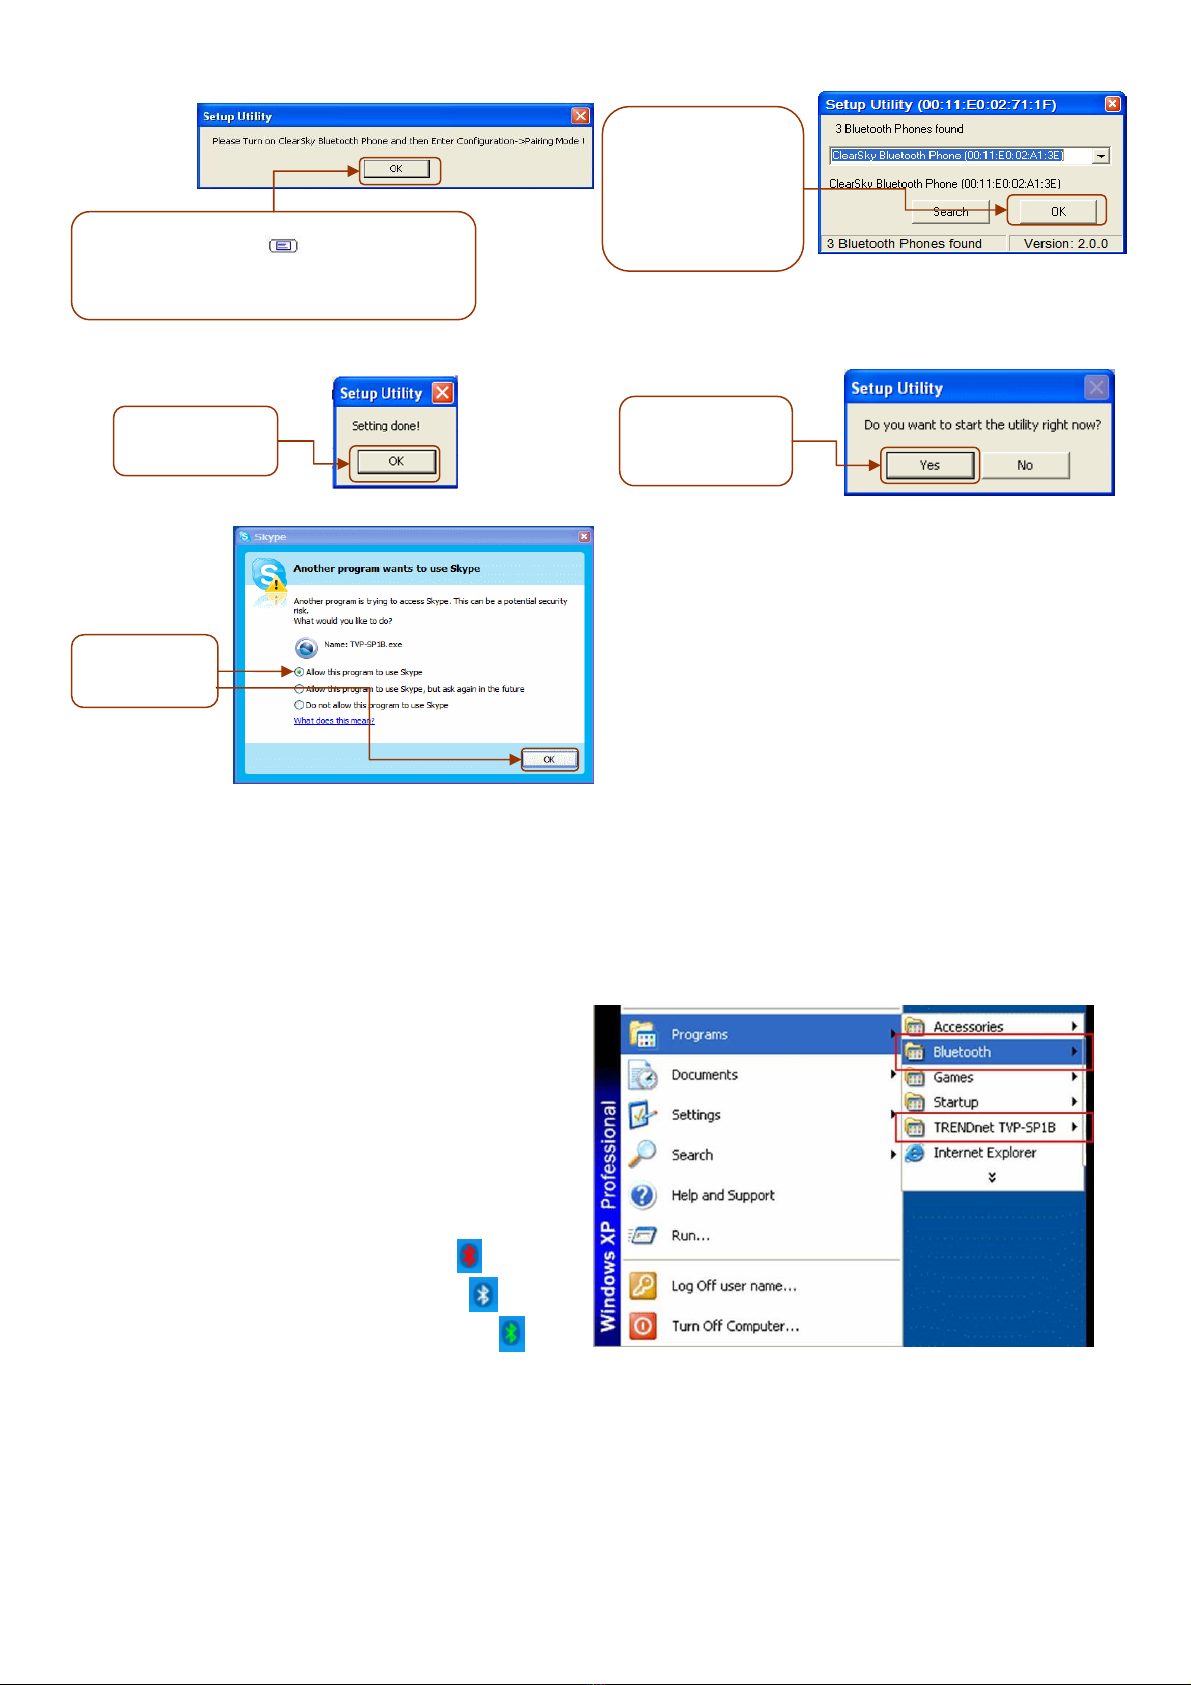
Software / Driver Installation ...................................................................................................... 6
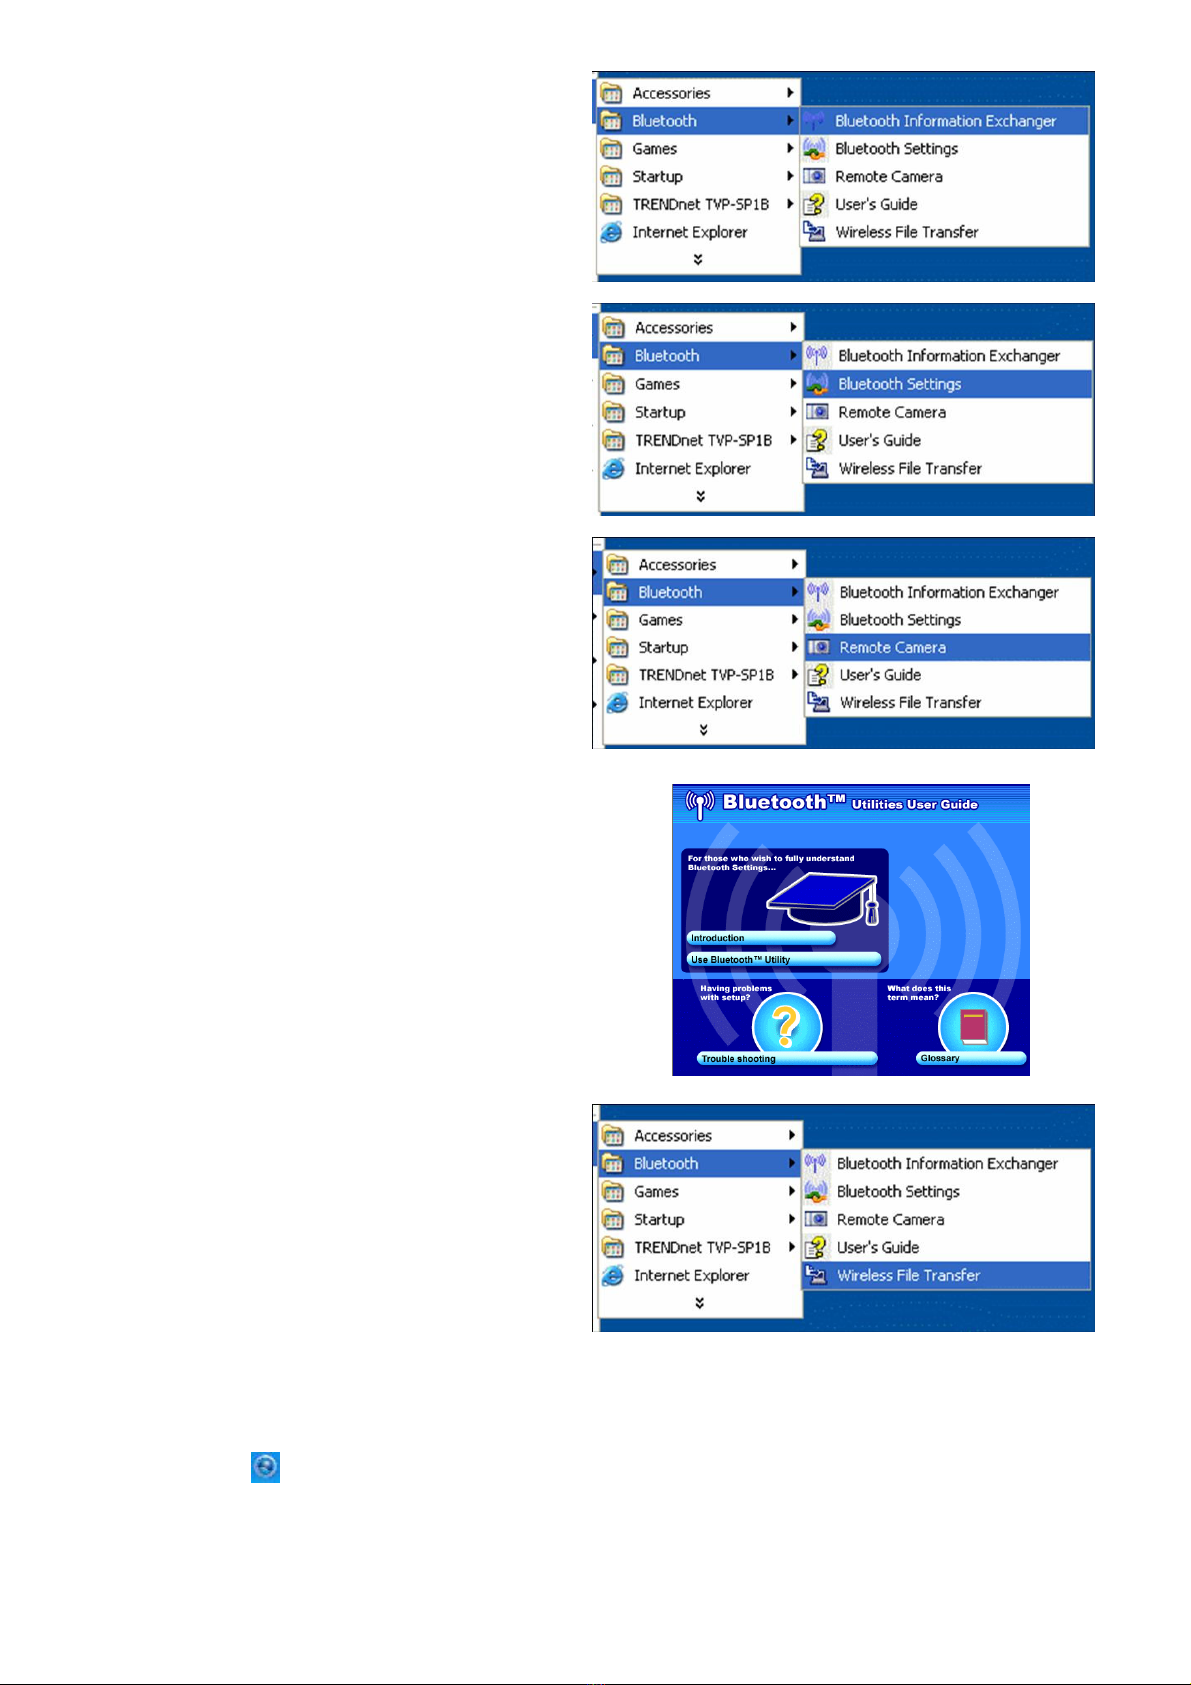
Appliactions Installed ................................................................................................................. 8
Exploring the Telephone Kit Display.................................................................... 11
Handset Display Icons ............................................................................................................. 11
Main page................................................................................................................................ 12
Contact List Page .................................................................................................................... 12
Configuration Menu ................................................................................................................. 13
uide to Basic Functions...................................................................................... 14
Call skype contact.................................................................................................................... 14
Call an ordinary phone number (skype out)............................................................................. 14
Answer a call ........................................................................................................................... 14
Make a conference call............................................................................................................ 14
Redial outgoing calls................................................................................................................ 15
Redial any call from History ..................................................................................................... 15
Operations during a call........................................................................................................... 15
Appendix ................................................................................................................ 16
Toshiba Bluetooth Utility Contents ........................................................................................... 16
Specifications........................................................................................................................... 19
Troubleshooting ....................................................................................................................... 20

4
Introduction
Welcome to the VoIP Bluetooth Phone Kit manual. In this manual, you will learn how to use this Phone Kit to
do all popular Skype standard functions, such as Contacts, History, SkypeOut, SkypeIn, Conference Call etc.
This Phone kit enables you to make and receive Skype calls anywhere, without being in front of the PC. With
a long life rechargeable Lithium battery, this Phone kit can sustain up to 6 hours talking time, so you don’t
need to speak in rush every time.
Key Features
Support long range Bluetooth class 1 standard that reaches up to 100 meters distance in outdoor clean
environment.
eature easy of use graphical user interface.
Support long life Lithium rechargeable battery.
Support advanced power down management to extend battery life.
Support USB-port charging while traveling on the road.
etting to know the Telephone Kit
Packing Contents
TVP-SP1B Bluetooth VoIP Phone
TBW-104UB Advanced High Power Bluetooth USB Adapter
700 mAh Li-on battery
1m/3ft. USB cable
Quick Guide
Utility & Driver CD-ROM
Identifying Components
TBW-104UB TVP-SP1B

5
TVP-SP1B
Front View
Back View
Side View
Speaker
LCD Display
Viewing Area: 30x32 mm,
Active Area: 24x14 mm
Clear / Delete / Back
•
Power ON/O
•
End a call
•
Back to Main page
LED
USB Connector for Charging
•
Make a call
•
Answer a call
•
Redial
Sync Skype Contacts
Microphone
Menu
•
Select contacts to
a conference call
•
Hold a call
•
Move to right
•
Mute Microphone
Volume
Headset
Speaker
Battery
Compartment

6
etting Started
Minimum System Requirements
PC running Windows XP, 2000
Skype software installed
At least 400 MHz processor
At least 128 MB RAM
At least 50MB free disk space on your hard drive
CD-ROM drive
Setting up the telephone kit
1. Place the included 700 mAh Li-on battery into the TVP-SP1B’s battery compartment
2. Connect USB cable to charge battery pack (please let the battery charge for a full 6 hours before using
the phone for the first time)
Software / Driver Installation
1. Please insert the Utility & Driver CD into CD-ROM drive, and then follow the instruction below to install
Utility and drivers.
Note: DO NOT connect the TBW-104UB USB adapter until instructed to do so.
4. When you reach this
screen, please select
Yes, I do. Click Next.
3. Please click Next.
2. Please click Next.
1. Insert the
Utility &
Driver CD ROM into
your computer’s
CD-ROM Drive and
then click Install
Driver/Utility.

7
16. After the computer
restarts and the Windows
desktop appears the
Setup Utility should
pop-op, if not
Double-click the
ClearySky icon. Click
Search.
15. Please click
Yes to restart
your computer
14.
Disregard all popup
Windows except for
the installation
Window shown to the
right and click Finish
13. Connect the
TBW-104UB
into the
computer’s USB
port. Click OK
12.
Please
Click
Yes
11. Please Click
Install
10. Please select
I
accept the terms in
the license
agreement. Click
Next
9.
Please Click
Next
8. Please select
Language from
the drop down
menu and then
click OK.
7. Please click
Yes
to
begin Bluetooth
adapter
installation.
6. Please click Finish.
5. Please click Install.

8
Appliactions Installed
After you finish above installations, “Bluetooth” and
“TRENDnet TVP-SP1B” items will be added to
Windows Start Menu Programs group.
Bluetooth
The Bluetooth icon in windows system tray will
indicate Bluetooth status by changing appearance.
Blue with Red: services are disabled.
Blue with White: services are enabled.
Blue with Green: services are connected.
21. Select Allow the
program to use
Skype and then
click OK.
20. Please click
Yes
to launch the
Bluetooth Phone
Utility.
19. To finishing
Bluetooth
pairing click OK.
18. Select your Bluetooth
Phone (Please check
the MAC address to
select the right device.
Please remove the
battery to locate the
MAC address label).
Click OK.
17. Power On The Bluetooth Phone and press the
Configuration button ( )
located below the LCD
screen. Select Pairing from the menu and then
press the Call button to enter BT pairing Mode.
Click
OK

9
TRENDnet TVP-SP1B Phone Utility
Phone Utility icon ( ) in system tray can display phone utility version and has some options by right-clicking
the icon.
1. Bluetooth Information Exchanger:
This program enables you to transfer files and
images to a wireless device.
or details, please refer to Bluetooth->User’s Guide.
2. Bluetooth Settings:
This program enables you to configure settings when
you connect to a Bluetooth wireless technology
device for the first time.
or details, please refer to Bluetooth->User’s Guide.
3. Remote Cameras
When you connect to a Bluetooth wireless
technology-
compatible digital camera, you ca operate
it from the PC side and send captured images to the
PC.
4. User’s Guide:
This Bluetooth Utilities User Guide help you
understand Bluetooth settings and trouble shootings.
5. Wireless ile Transfer:
You can send a file wirelessly to another device by
right-clicking on the intended file and using the
“Sending to Bluetooth Device” menu that appears.

10
1. BT Phone Setting Utility:
This utility help you pair Clearsky Bluetooth Phone
with USB bluetooth adapter.
2. TVP-SP1B Utility:
This is the main program which enables you doing
skype functions from this Bluetooth phone.
3. Uninstall:
Remove the TVP-SP1B phone utility from your
computer.

11
Exploring the Telephone Kit Display
Handset Display Icons
Icons Description
Operation Indicate which operation your phone is doing.
Main page
Sync Skype contact lists
Configuration Menu
Incoming or Outgoing calls connected
Incoming call ringing
Key Lock Indicate keypad is locked
‘#’ + “on-hook” (red button) Lock. ‘#’ + “C” UnLock
Skype Status
Skype Me Offline
Online Invisible
Away Pending
Do Not Disturb Skype Out
Not Available Block
Ringtone off Turn off ringtone from MenuSoundsRing Level
Indicate ringtone is set to mute
Volume level
Adjust earpiece volume ( )
Battery Status
Indicate Battery status.
This bar goes lower as the battery charge runs low
Charging
ull charge
Key Lock
Skype status
Battery Status
Volume level
Ringtone off
Operation

12
Main page
Press
to go to main page.
4 possible displays on main page:
1.Show ‘ClearSky sync’
when Bluetooth connection
is not ready
2.Show ‘ClearSky’
when Bluetooth connection
is ready
3.Show ‘# Missed Calls”
when you have missed
calls (Skype new events).
Note: This message is sync with Skype new
events. When you delete skype new
events from Skype window, this
message will diappear.
4. Show ‘Skype Unavailable’
when
1. User has not signed in
Skype
2. User does not allow TVP-SP1B to access
Skype (check settings in
SkypeToolsPrivacyManage other
programs’ access to Skype)
Contact List Page
Press can go to Contact List page
Sort by Skype status (Online / Offline)
Sort by first letter
Quick Access
1. Press the first letter of the name. (Press a key once to insert the first letter on the key, twice for the second
letter, and so on.)
2. Press ‘1’ to go back to the top of the contact list
3. Press ‘1’ again to go to the last online contact, so you can rolling from bottom to the beginning
Scrolling Long Display Name (long name which cannot be displayed completely on LCD)
1. Press to move to right.
2.
Press to go back to first character

13
Configuration Menu
Press to enter configuration menu
Submenus Descriptions
Missed Display Missed call lists
Incoming Display Incoming call lists
History
Outgoing Display Outgoing call lists
Status Change my status. Status options: “Skypeme”, “Online”, “Away”, “Not
Available”, “Do Not Disturb”, “Invisible”, “Offline”
Pairing Let Bluetooth Phone enter Pairing Mode
Skype Credit Showing how many skype out credits you have
Sounds
Ring Select Select Ring tones
Ring Volume Adjust ring volume by using Up/Down button
Key Tone ON Turn on keypad tone
Key Tone O Turn off keypad tone
Headset mode Enter Headset Mode. Bluetooth Phone acts as a headset to support audio
over MSN Messenger, Yahoo Messenger and more
Press On-hook (red button) to return to normal mode
/W Version Showing /W version installed in your TVP-SP1B
ResetDefault Reset to default Sounds setting
- Ringtone: Sound1
- Ring Volume: Max
- Key Tone: ON
Menu

14
uide to Basic Functions
Call skype contact
1. Press
3 sec. Wait until phone shows “ClearSky sync”press to sync contact lists with
PC skype
2. Use List button to scroll up/down the contact lists
3. Press to start a call.
4. Press
to disconnect this call
Call an ordinary phone number (skype out)
1. Enter “+” + phone number you want to call. (Press to delete an incorrect digit)
2. Press to start a call.
Answer a call
1. Press to answer any incoming call.
Make a conference call
A. invite another contact when you are chatting
1. Press Make 1
st
call
2. Press to invite 2
nd
contact Press to place call
3. Choose “CON CALL” to invite 2
nd
contact to join this conference call with 1
st
contact
4. Choose “P2P CALL” to hold 1
st
call and talk to 2
nd
contact.
B. invite contacts and conference them together
1. Press to go to the contact list menu.
2. Press “*” to mark the contact you want to include in this conference call. (Conference participants (max
4+host)

15
3. Press to start this conference call
Redial outgoing calls
1. Press to show outgoing call lists.
2. Select the contact (from the outgoing call list) you want to dial to make a call.
3. Press to make a call
Redial any call from History
1. Redial from Missed Calls: Press HistoryMissedChoose one contact to dial. (press
to
cancel this action and go back to home)
2. Redial from Incoming Calls: Press History Incoming CallsChoose one contact to dial.
3. Redial from Outgoing Calls: Press History Outgoing CallsChoose one contact to dial.
Operations during a call
Mute Microphone
Press to mute / unmute microphone
Hold a call
Press to hold / continue the call

16
Appendix
Toshiba Bluetooth Utility Contents
Bluetooth Functions
Toshiba Bluetooth stack supports the following Bluetooth functions (profiles)
Term Definition
DUN
Dial-Up Networking
Enables you to establish a dial-up BluetoothTM wireless technology connection to the Internet or
other networks with a wireless modem station, mobile telephone, or similar device.
FAX
FAX
Enables you to establish a BluetoothTM wireless technology connection with a wireless modem
station, mobile telephone, or similar device to send or receive a fax.
LAP
LAN Access Profile
Enables you to establish a BluetoothTM wireless technology connection with a LAN access point
to access the services of a LAN using PPP.
SPP
Serial Port Profile
Enables communication with a device through a virtual serial port configured for a BluetoothTM
wireless technology connection. This can be used for printers and printer adapters with PDAs,
using a different method from HCRP or ActiveSync.
HID Human Interface Device Profile
Allows connections to wireless mice, keyboards and other input devices.
HCRP
Hardcopy Cable Replacement Profile
Enables printing with a printer driver.
FTP
File Transfer Profile
Enables you to browse folders on a wireless device and transfer files to and from the local
device.
OPP Object Push Profile
Allows business card data to be exchanged with a wireless device.
A2DP
Advanced Audio Distribution Profile
Allows audio data to be exchanged between wireless headsets and other audio devices, as well
as allowing high-quality music playback.
AVRCP
Audio/Video Remote Control Profile
A/V remote control functions such as play and stop. The BluetoothTM Utility supports remote
control operation.

17
AVDP
eneric Audio/Video Distribution Profile
Basic profile used to support A2DP, AVRCP and other protocols.
HSP
Head Set Profile
Profile used for headsets.
Allows you to connect to a PC and communicate as well as connect to a mobile telephone.
PAN Personal Area Networking Profile
Supports IP base network. Allows connection to an ad-hoc or wired network via an access point.
BIP
Basic Imaging Profile
Allows image files to be sent and received after having been converted to a size suitable for the
destination. In addition to being able to transfer image files, the Bluetooth
TM
Utility allows camera
shutters to be operated by remote control, as well as other offering other functionalities.
Bluetooth Settings
1. Right-click on the BluetoothTM wireless
technology icon in the task tray, and select
[Bluetooth Settings] from the menu that appears.
Alternatively, click [Start]→[All
Programs]→[Bluetooth]→[Bluetooth Settings].
2. Please Click “New Connection” to add new
Bluetooth device.
3. Please choose “Express Mode”

18
On-line User uide
When you have troubles in using Toshiba Bluetooth stack, please get on-line help by click Bluetooth->User’s
Guide
4. Searching for Bluetooth devices
5. Select the device name from [Devi
ce List] and click
on the [Next] button.
6. Please Click “Next”
7. Searching remote devices
8. When a service has been detected, a window
prompting you to enter the Bluetooth passkey (PIN
code) may appear. Please enter the passkey and
click on the [OK] button.
Please refer to your device instruction manual for
information on which passkey to use.
9. T
he icons of the registered devices will appear and
the devices will be ready to use.

19
Specifications
RF Standard Class 1 Bluetooth v2.0 with EDR, backward compatible with Bluetooth v1.1 & v1.2
RF Frequency 2.4~2.4835 GHz, ISM band
Spread Spectrum requency Hopping and Adaptive requency Hopping
RF Output Power Up to 17 dBm
Display 96 x 64 pixel, graphical type STN LCD with back light
Interfaces One mini-USB connector for charging from computer USB port or external power
adapter
One earphone jack at 2.5 mm
Built-in mono-earpiece, microphone
LED Indicator Handset status (active, standby, sleep, etc.…)
Battery 3.6V 700 mAh Lithium-ion rechargeable and user replaceable battery pack
Power Can be charged through computer USB port
Power Adapter: DC 5V, 1A with mini-USB interface
AC 100~240V (option)
Antenna One internal antenna
Consumption Standby: 60+ hrs, Talking: 6+ hrs continuous talking
Dimension 143.5 (L) x 45 (W) x 22 (D) mm
Environmental
Condition
Operating Temperature: 0 ~50° C , Humidity:10 ~ 90%
Storage Temperature: -20 ~70° C, Humidity:10 ~ 90%
Certifications CC, CE

20
Troubleshooting
Problem: Press “Power on” button, but nothing happen, no display
Solution:
1. Make sure the included rechargeable battery is fitted in the handset correctly.
2. Please press “Power on” button for about 3 sec. until you see an icons.
Problem: Pop up a Bluetooth Security window
Solution:
1. Bluetooth PIN should be self-assigned when pairing with Bluetooth phone. If this window pop up, please
input default Bluetooth PIN: “0000”.
Question: How to distinguish standby mode and power-off mode
Answer: Please check LED, if LED not blinking, Bluetooth phone is in power-off mode. If LED blinks every 5
seconds, Phone is in standby mode.
Problem: When you press “contact” ( ), LCD keeps showing “connecting…” and phone cannot
connect to your PC skype.
Solution:
1. Please check the Bluetooth icons in system tray. You must wait until this icon turn to blue with green
appearance.
2. If the Bluetooth icons is blue with green, but LCD keeps showing “connecting…” when you press “contact”,
please quit phone utility, by right-clicking phone utility icon and click “Exit” and then launch Bluetooth VoIP
Phone utility again.
3. If you cannot quit phone utility by right-clicking phone utility icon, please press “Ctrl-Alt-Del” to run
Windows Task Manager and then disconnect “TVP-SP1B” application
4. If Windows Task Manager cannot disconnect “TVP-SP1B”, please restart your computer.
Problem: No response on your phone (LCD stuck in the same page no matter which key you enter).
Solution: Please remove battery to restart your Bluetooth phone.
Problem: PC music plays in Bluetooth phone
Solution: When you finish installation, system default audio device will be set to Bluetooth wave. If you want
to change back to PC original default audio device, please go to SettingsControl PanelSounds and Audio
DevicesAudio to choose default device.
Other manuals for ClearSky TVP-SP1BK
5
Table of contents
Other TRENDnet IP Phone manuals