Trends Audio Combo One User manual

Trends Combo One Hi-Fi System User Guide
Trends Combo One
Hi-Fi System
Version 1.0
USER GUIDE
Trends Combo One Hi-Fi System User Guide
Copyright Notice
Copyright © 2006 ITOK Technologies Limited, All rights reserved.
All rights in this publication are reserved and no part may be reproduced without
the prior written permission of the publisher. The contents of this publication are
believed to be correct at the time of going to press, but any information,
specifications, products or services mentioned may be modified, supplemented or
withdrawn without further notice.
Trademarks
Trends, Trends Audio, and ITOK are the trademarks owned by ITOK Technologies
Limited
Tripath is the registered trademark owned by Tripath Technology Inc.
All other trademarks are the property of their respective owners.
ITOK Technologies Limited
Rm. K, 11/F, Kwun Tong Ind. Centre, Phase 1
472-484 Kwun Tong Road, Kowloon, Hong Kong
Tel : +852 2304 0730
Fax : +852 2566 5740
Email : sales@TrendsAudio.com
Website : www.TrendsAudio.com

Trends Combo One Hi-Fi System User Guide
Table of Content
3
T
Ta
ab
bl
le
eo
of
fC
Co
on
nt
te
en
nt
t
T
TA
AB
BL
LE
EO
OF
FC
CO
ON
NT
TE
EN
NT
T
.....................................................................3
1. SAFETY INSTRUCTIONS...................................................4
2. INTRODUCTION ...............................................................5
3. PACKING LIST..................................................................6
4. FEATURES.......................................................................6
5. OVERVIEW.......................................................................7
5.1 TRENDS PA-10 TUBE HEADPHONE/PRE-AMPLIFIER ...................................... 7
5.2 TRENDS TA-10.2P SE CLASS-T POWER AMPLIFIER...................................... 8
5.3 TRENDS PW-10 POWER SUPPLY UNIT ........................................................ 9
5.4 COMPLETE TRENDS COMBO ONE ..............................................................10
6. CONNECTION AND OPERATION...................................... 10
7. TECHNICAL NOTES (FOR PROFESSIONAL USER ONLY) .. 11
7.1 JUMPER SETTING FOR DIFFERENT TUBE SERIES..........................................11
7.2 DC BIAS VOLTAGE TUNING .......................................................................12
7.3 OFFSET THE DC BIAS VOLTAGE OF THE SPEAKER TERMINALS .........................12
8. SPECIFICATION.............................................................. 13
8.1 SPECIFICATION OF TRENDS PA-10 TUBE HEADPHONE/PRE-AMPLIFIER ...........13
8.2 SPECIFICATION OF TRENDS PW-10 POWER SUPPLY UNIT .............................13
8.3 SPECIFICATION OF TRENDS TA-10.2P SE CLASS-T POWER AMPLIFIER ..........14
8.4 SPECIFICATION OF TRENDS CQ-121 AUDIOPHILE AUDIO CABLE (0.47M).........14
9. TROUBLESHOOTING...................................................... 15
10. ACCESSORIES............................................................... 15
11. REGULATORY COMPLIANCE .......................................... 16
12. CONTACT US ................................................................. 16
Trends Combo One Hi-Fi System User Guide
Section 1. Safety Instructions
4
1
1.
.S
Sa
af
fe
et
ty
yI
In
ns
st
tr
ru
uc
ct
ti
io
on
ns
s
Please take note the following instructions before installing your Trends Combo
One Hi-Fi System, they will enable you to get the best performance and prolong
the life of the product.
1.) Ensure that Trends PW-10 PSU’s I/O switch is off when it does not
operate. It is recommended that you return your Trends PW-10 PSU to us or
a qualified dealer for any service or repair. Incorrect assembly may result in
electric shock or fire.
2.) To reduce the risk of electric shock, unplug the power supply from the outlet
before attempting any maintenance or cleaning. Turning off controls will not
reduce this risk.
3.) Never use an extension cord unless absolutely necessary. If an extension
cord must be used make sure that the pins on the plug are the same
number, size and shape as those of the original power supply plug.
4.) Place the unit in an area that will allow air to flow freely around the unit. DO
NOT block or obstruct vent openings on the side/bottom of the unit.
5.) Your power supply should be grounded to reduce the risk of electric shock.
6.) The cord must be plugged into an outlet that is properly installed and
grounded in accordance with all local codes and ordinances. Never alter the
AC cord of plug provided. If the cord will not fit the outlet, have a proper
outlet installed by qualified electrician. Improper connection can result in risk
of electric shock.
7.) This unit must not be exposed to dripping or splashing water or other liquids.
No objects filled with liquid, such as vases, shall be placed on the unit. In the
event, switch off immediately, disconnect from the main supply and contact
your dealer or us for advice.
8.) Do not route the power cable so that it can be walked upon or damaged by
other items near it.
9.) Electronic audio components have a running in period of around a week (if
used several hours per day). This will allow the new components to settle
down; the sonic properties will improve over this time.
10.) If you do not intend to use this unit for a long period of time, unplug it from
main socket.
11.) To clean the unit, wipe its case with a moist, lint-free cloth. Do not use any
cleaning fluids containing alcohol, ammonia or abrasives. Do not spray an
aerosol at or near any component of Trends Combo One.
12.) These units are not user serviceable, never attempt to repair, disassemble or
reconstruct the unit if there seems to be a problem. A serious electric shock
could result if this precautionary measure is ignored. In the event of a
problem or failure, please contact your dealer or us.

Trends Combo One Hi-Fi System User Guide
Section 2. Introduction
5
2
2.
.I
In
nt
tr
ro
od
du
uc
ct
ti
io
on
n
Thank you for purchasing Trends Combo One Hi-Fi System.
This package offers a set of advanced Hi-Fi System, including one tube
headphone/pre-amplifier, one power amplifier, and one specialized power supply
unit. The Trends Combo One couples our highly acclaimed Power Amplifier and
Tube Preamplifier with a dedicated power supply. The Power Amplifier, Trends
TA-10.2P SE, has received critical acclaim world wide as an audiophile "best buy."
Combining this amp with our equally acclaimed Trends PA-10 Tube Headphone/Pre
Amplifier makes the Trends Combo One the perfect way of integrating your CD
player, desktop, iPhone/iPod/iPad or Smartphone into your audio system. Sound
quality this good is now available in a size and price that you can afford, and is no
longer the exclusive domain of larger "audiophile" systems.
Trends Combo One Hi-Fi System User Guide
Section 3. Packing List / Section 4. Features
6
3
3.
.P
Pa
ac
ck
ki
in
ng
gL
Li
is
st
t
- Trends PA-10 Tube Headphone/Pre-Amplifier (body) x 1 pcs
- Trends TA-10.2P SE Class-T Power Amplifier (body) x 1 pcs
- Trends PW-10 Power Supply Unit x 1 pcs
- Trends CQ-121 Audiophile Audio Cable (0.47m) x 1 Pair
4
4.
.F
Fe
ea
at
tu
ur
re
es
s
·Combine the award-winning Trends TA-10.2P SE Class-T Power Amplifier,
Trends PA-10 Tube Headphone/Pre Amplifier, and Trends PW-10 PSU.
·Provide all functions of headphone amplifier, pre-amplifier and power amplifier.
·Compact design (mini-size & light weight), easy portable and setup for Hi-Fi room,
living room and sleeping room.
·Specific circuit design and components of Trends PW-10 PSU applied for
different power usage characteristics, which perfect match the different
applications in high-frequency, high-current, digital and/or analog circuits for
Trends Combo Hi-Fi System.
·High quality EMI noise filter in Trends PW-10 PSU is added to filter out those high
frequency noise inducted from the global electricity network from Trends Combo
Hi-Fi System.
·Built-in over-current protection and over-temperature protection design in the
power amplifier, and unique air-core inductor in power amplifier used (instead of
magnetic-core) for better sound.
·Innovative circuit design of low voltage hybrid (tube/transistor) and pure class-A
circuit pre-amplifier to provide the best sound performance and easy/safe DIYer
accessibility.
·The pre-amplifier supports both 6DJ8/6922 series and 12AU7 series tubes by
simply switching the jumpers. DIYers can easily change their both series tubes to
enjoy the fun.
·With ONE bi-triode 6DJ8/6922 or 12AU7 tube as voltage amplification and TWO
MOSFETs as output driver, the pre-amp performs warm, comfortable tube sound.
·Provide TWO sets of switchable audio inputs in the pre-amplifier. Besides the
normal CD input, the PC/iPod input with higher gain is provided for small output
PC/Mac/iPod/iPad or PC/Mac.
·Use iPhone Line Out cable or RCA cable and PC/iPod input works with low
output-voltage sources, making Trends Combo System perfect for integrating
your iPhone/iPod/iPad or PC into your audio system and achieves the sound
quality of high-end Hi-Fi.
·ONE headphone output in the front of the pre-amplifier is able to drive even
high-impedance audiophile-grade headphones.
·The stylish aluminum case provides outstanding shielding & grounding capability
to keeps the background silent and maximizes the S/N ratio.
Trends Combo One Hi-Fi System User Guide
Section 5. Overview
7
5
5.
.O
Ov
ve
er
rv
vi
ie
ew
w
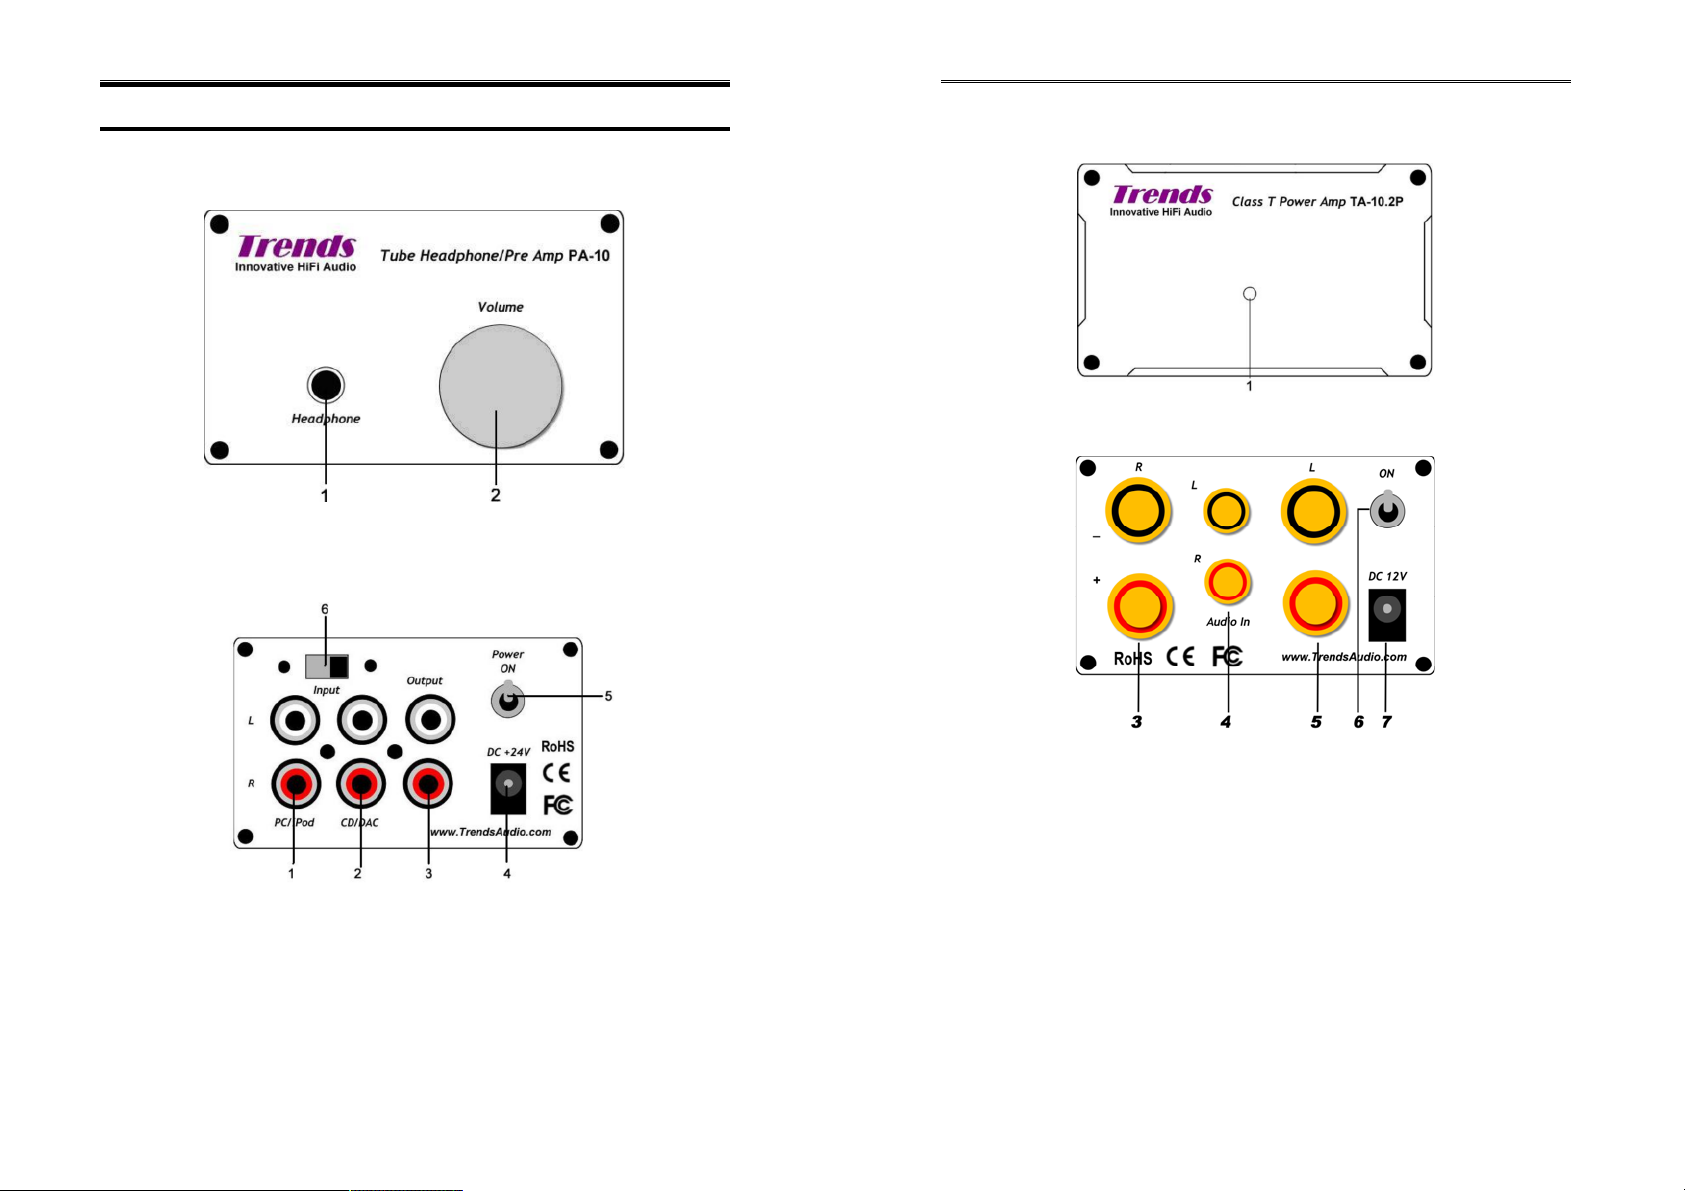
5.1 Trends PA-10 Tube Headphone/Pre-Amplifier
Front View
1. Headphone Socket
2. Volume Controller – Turn anti-clockwise to lower down volume, and vice versa
Back View
1. PC/iPod - Input from PC/Mac/iPod with higher gain using 2RCA-2RCA cable
2. CD/DAC - Input from CD/DAC using audio cable (2RCA-2RCA)
3. Output - To any line level input on your amplifier using audio cable (2RCA-2RCA)
4. Power Supply Socket - Plug Trends PW-10 PSU to this socket to supply power
5. Power ON/OFF switch - pull up to power on and pull down to off
6. Input - Selection for CD/DAC or PC/iPod input. The default is CD/DAC input
Trends Combo One Hi-Fi System User Guide
Section 5. Overview
8
5.2 Trends TA-10.2P SE Class-T Power Amplifier
Front View
1. Power Indicator
Back View
3. RIGHT Speaker Output – The negative (-ve) and positive (+ve) speaker terminals
of the RIGHT channel
4. Audio Input – The audio signal input (LEFT/RIGHT) connects from audio source
(e.g. CD player) to the amplifier by the RCA audio cable
5. LEFT Speaker Output – The negative (-ve) and positive (+ve) speaker terminals
of the LEFT channel
6. Power ON/OFF switch – pull up to power on and pull down to off
7. Power Supply Socket – Plug Trends PW-10 PSU to this socket to supply power
Trends Combo One Hi-Fi System User Guide
Section 5. Overview
9
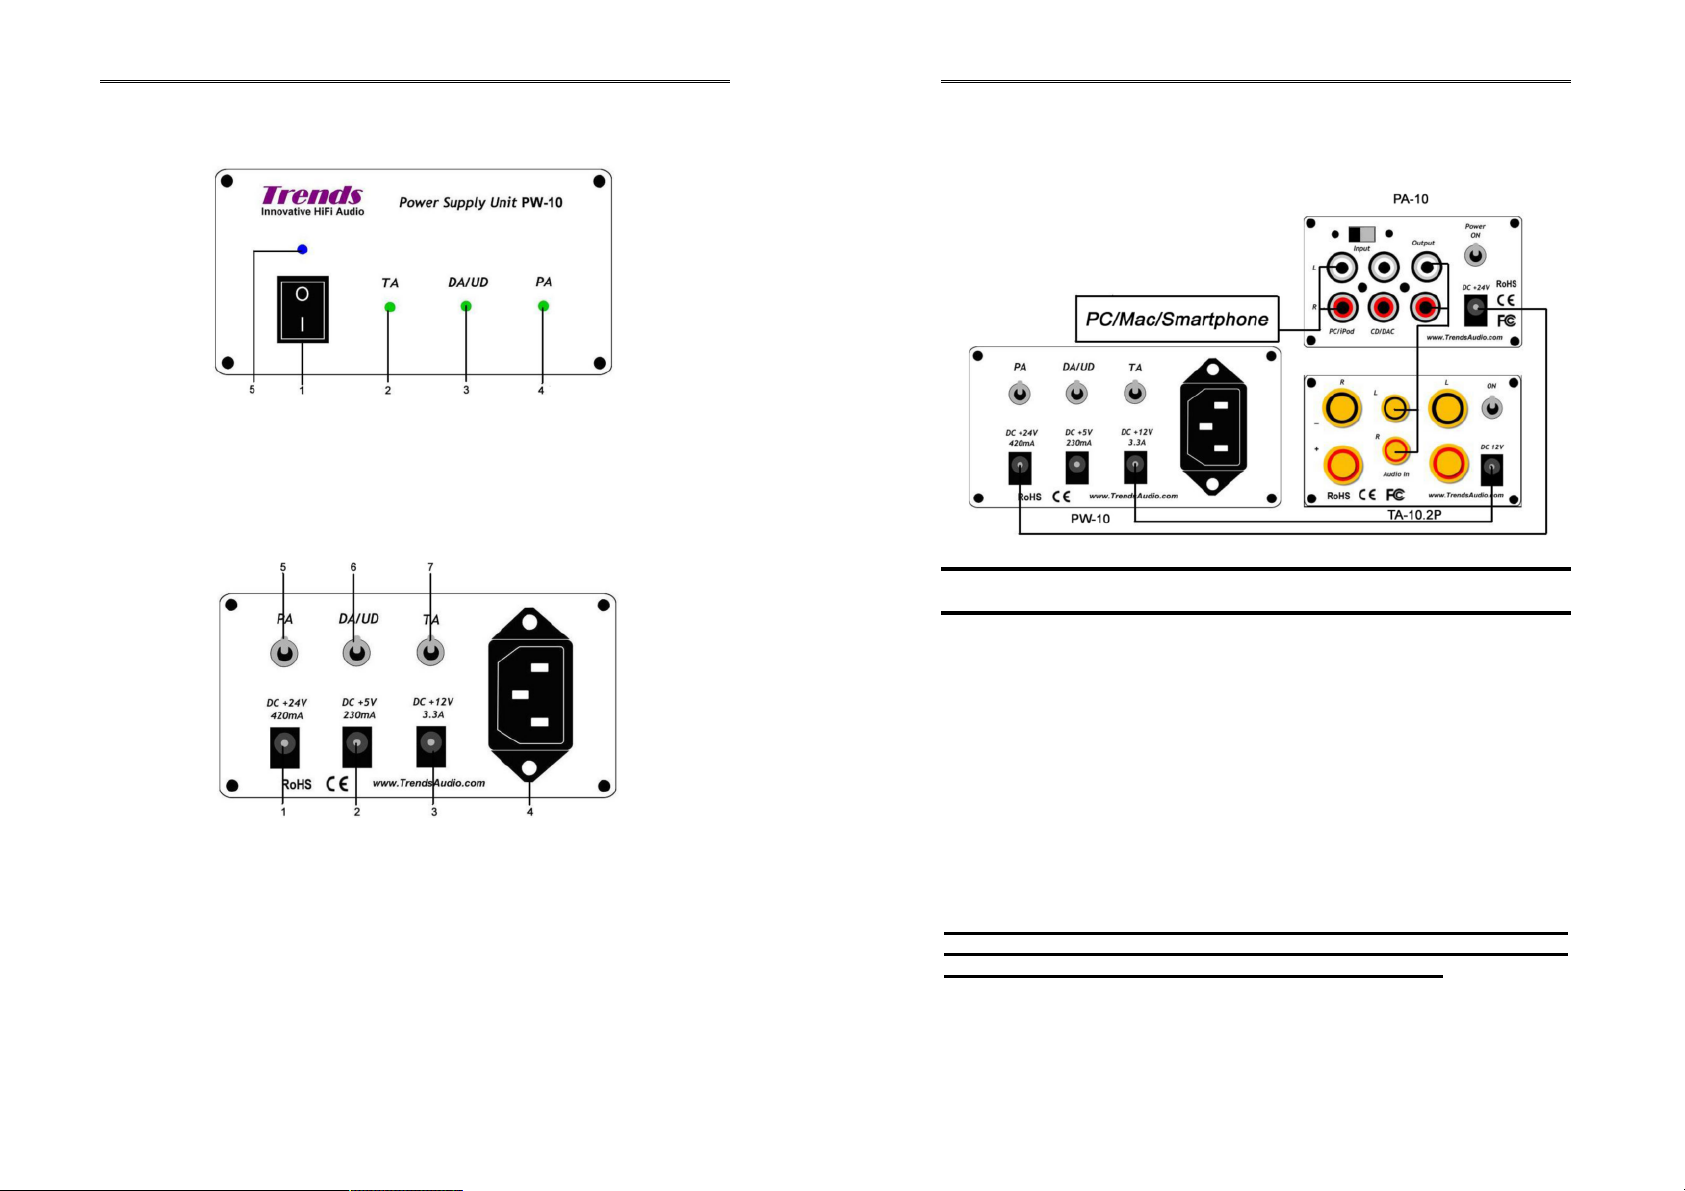
5.3 Trends PW-10 Power Supply Unit
Front View
1. Power ON/OFF Switch
2. Power Indicator of the Amplifier Unit
3. Power Indicator of the Digital/Analogue Converter Unit
4. Power Indicator of the Pre-Amp Unit
5. Main Power Indicator
Back View
1. Power Supply Socket for the Pre-Amp Unit
2. Power Supply Socket for the DA/UD Unit
3. Power Supply Socket for the Amplifier Unit
4. Main Power Supply Socket
5. Power ON/OFF Switch - pull up to power on the Pre-Amp Unit, pull down to off
6. Power ON/OFF Switch - pull up to power on the DA/UD Unit, pull down to off
7. Power ON/OFF Switch - pull up to power on the Amplifier Unit, pull down to off
Trends Combo One Hi-Fi System User Guide
Section 5. Overview / Section 6. Connection and Operation
10
5.4 Complete Trends Combo One
6
6.
.C
Co
on
nn
ne
ec
ct
ti
io
on
na
an
nd
dO
Op
pe
er
ra
at
ti
io
on
n
WARNING! Before plugging the unit to the AC outlet, please check that your local
supply voltage is 110V AC or 220V AC (specific model should be selected, not
compatible)
·Turn off the I/O switch of Trends PW-10 PSU, unplug it from the AC outlet.
·Ensure that the connections are secure and tight.
·Plug the Trends PW-10 PSU into the AC outlet, and press the I/O switch of the
Trends PW-10 PSU to “I”, then “Blue” indicator in the switch illuminates.
·If the indicator fails to light, recheck the connection and AC outlet.
·Turn on TA and observe that the “Green” indicator, and then switch on Trends
TA-10.2P SE Class-T Power Amplifier.
·Turn on PA and observe that the “Green” indicator, and then switch on Trends
PA-10 Tube Headphone/Pre-Amplifier.
OPERATE IN A WELL VENTILATED OPEN AND COOL AREA. DO
NOT BLOCK THE OPENINGS AT THE FAN DISCHARGE ON THE
BOTTOM AND THE SUCTION OPENINGS ON THE SIDES.
Trends Combo One Hi-Fi System User Guide
Section 7. Technical Notes
11
7
7.
.T
Te
ec
ch
hn
ni
ic
ca
al
lN
No
ot
te
es
s(
(F
Fo
or
rP
Pr
ro
of
fe
es
ss
si
io
on
na
al
lU
Us
se
er
rO
On
nl
ly
y)
)
7.1 Offset the DC bias voltage of the speaker terminals
There are two blue adjustable potentiometers (Rt) inside Trends TA-10.2P SE
Class-T Power Amplifier for offsetting the DC bias voltage between the positive (+ve)
and negative (-ve) terminals of each channel. Offset this DC bias voltage can
enhance the purity of the sound and minimize the “pop” sound when power on and
off. The DC bias has been pre-set in factory. But after run-in for a period, it would be
slightly changed that the fine-tuning is needed.
Before you tune these, you need a screwdriver (take off the case), a small
screwdriver (turn the screw of the potentiometer) and a (digital) multi-meter to
detect the DC bias voltage.
1. Use screwdriver to take out the two top level screws in the front panel &
another two screws in the back panel. Then, open the upper case.
2. Power ON the amplifier.
3. Use the multi-meter to detect the DC voltage (200mV) between +ve & -ve
terminals of the RIGHT channel.
4. Turn the screw on the top of the LEFT (near the front panel) potentiometer by a
small screwdriver clockwise or anticlockwise until the voltage as close as to
±0mV.
5. Then, repeat step 3 and 4 for the LEFT channel by turning the screw on the top
of the RIGHT (near the back panel) potentiometer.
6. Power OFF the amplifier
7. Cover back the upper case and tighten the screws.
7.2 Jumper Setting for Different Tube Series
Trends Audio has already pre-set the jumpers and fine-tuned the DC bias voltage
of each PA-10 with the packaged vacuum tube before shipping. However, changing
different tubes to taste for different sound is the great fun for many audiophiles and
also a great feature of PA-10. There are some important notes should be aware
before changing tubes.
Trends PA-10 supports two major tube series: (1) 6DJ8, 6922, 6N11, 6H23n,
ECC88, E88CC, etc…, and (2) 12AU7, 5963, 5814, ECC82, etc… If you change
the tube within the same series, it needs to re-tune the DC bias voltages ONLY. If
you change the tube from another series, it needs both to re-tune the DC bias
voltages and re-set the jumpers. Otherwise, the tube may be burnt out.
You can simply configure the amplifier to support the two different tube series by
resetting the jumpers in J3, J4, J5 in the PCB as follows. (Remember to power OFF
the machine before setting)
6DJ8 Series 12AU7 Series
J3 O O O
O O O
O O O
O O O
J4 O O O O O O
J5 O O O O O O
Trends Combo One Hi-Fi System User Guide
Section 7. Technical Notes
12
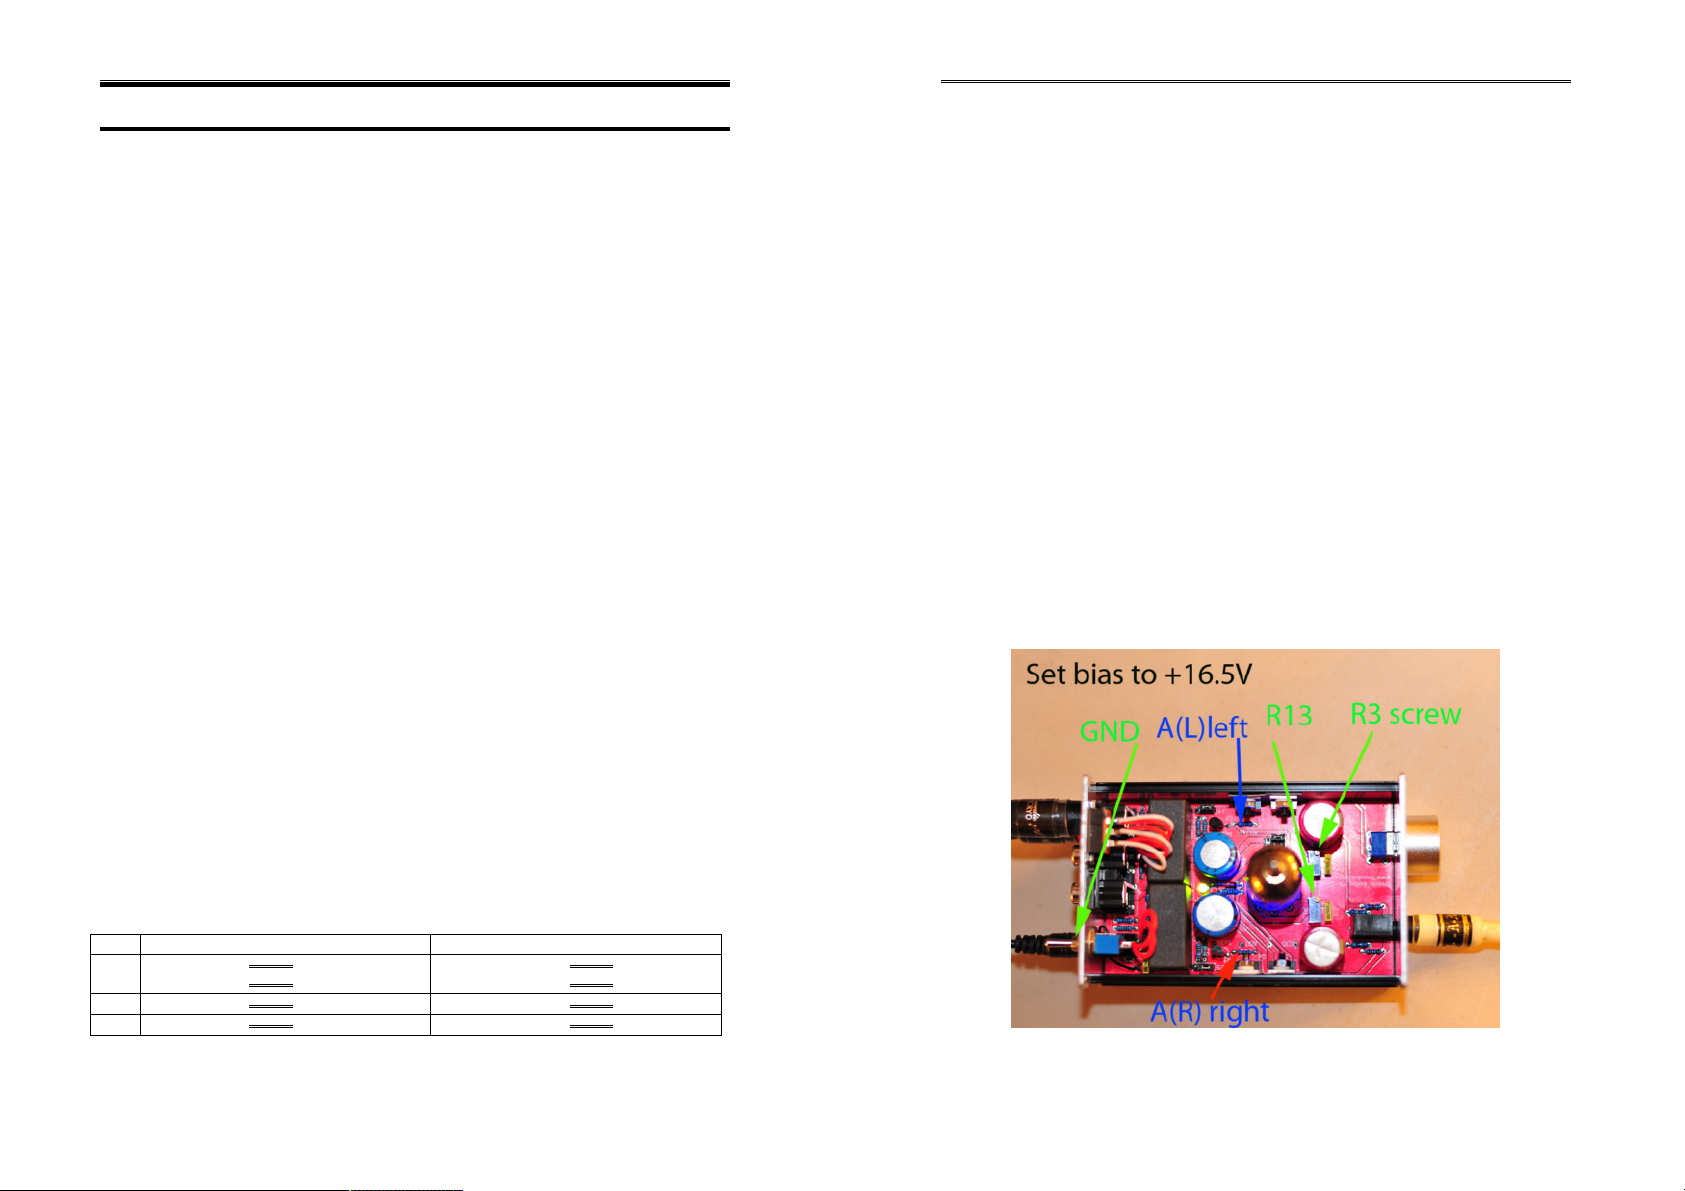
7.3 DC Bias Voltage Tuning
Since each tube may derivate a bit in parameters, especially from different series, it
needs to re-tune the DC bias voltages to guarantee the machine is working in the
best point and performing the best sound quality.
There are two blue precise adjustable potentiometers (R3, R13) inside Trends
PA-10 for tuning the DC bias voltage of each channel. The DC bias has been tuned
in factory. But after run-in for a period or changed another tube, it would be deviated
that the fine-tuning is needed.
Before you tune these, you need a screwdriver (take off the case), a small
screwdriver (turn the screw of the potentiometer) and a (digital) multi-meter to
detect the DC bias voltage.
1. Use screwdriver to take out the two upper level screws in the front panel &
another two screws in the back panel. Then, open the upper case.
2. Power ON the machine with no audio signal input.
3. Wait at least 5 minutes for the machine to run in.
4. Use the multi-meter to detect the DC voltage between the test point A(L) [red]
in the PCB & the GND [black] (e.g. the ring of the power switch or the outer
ring of those RCA sockets) of the LEFT channel.
5. Turn the screw on the top of the R3 potentiometer by a small screwdriver
clockwise or anticlockwise until the voltage as close as to +16.5V.
6. Then, repeat step 4 and 5 for the RIGHT channel by changing the test point to
A(R) [red] and turning the screw on the top of the R13 potentiometer.
7. Power OFF the amplifier.
8. Cover back the upper case and tighten the screws.
Trends Combo One Hi-Fi System User Guide
Section 8. Specification
13
8
8.
.S
Sp
pe
ec
ci
if
fi
ic
ca
at
ti
io
on
n
8.1 Specification of Trends PA-10 Tube Headphone/Pre-Amplifier
Vacuum Tube 6DJ8/6922 series or 12AU7 series (exchangeable)
Standard Edition: Chinese 6N11 Tube
SE Edition: Russian 6H23n
GE Edition: USA 12AU7 Tube
Output Stage MOSFET x 2
Amplifier Gain x3 (for Audio CD/DAC IN)
x6 (for Audio PC/iPod IN)
Signal-to-Noise Ratio
(SNR)
92dB
Power Output 3.0 Watts per channel on 33 Ohm Headphone
Frequency response: 15 Hz - 100 kHz -1db
Input Impedance: 100k Ohms
THD+Noise 0.05% @ 10k ohm
0.15% @ 33 ohm
Input Audio CD/DAC IN RCA (Left/Right) x 1 [3Vpp max.]
Audio PC/iPod IN RCA (Left/Right) x 1 [0.55Vpp max.]
Power Socket (5.5mm/2.1mm) x 1
Output Audio OUT RCA(Left/Right) x 1
Headphone OUT (3.5mm) x 1
Other Switch & Knob Audio IN selection switch x 1
Power ON/OFF switch x 1
Power Indicator (Blue LED under Tube Socket) x1
Volume Knob x 1
Power Supply DC 24V-26.5V (max.)
Dimensions (W)76mm x (H)46mm x (D)114mm
Weight 380g
8.2 Specification of Trends PW-10 Power Supply Unit
AC Power Input: 110V /50~60 Hz or 220V / 50~60Hz
(specific model should be selected, not compatible)
DC Power Output: TA: +12V/3.3A
DA/UD: +5V/230mA
PA: +24V/420mA
AC Input Socket: IEC
socket
IEC socket
DC Output Socket: DC 2.1 socket
LED Indicator: Main Power (Blue)
TA (Green)
DA/UD (Green)
PA (Green)
Power Switch: Main Power (Front)
TA (Back)
DA/UD (Back)
PA (Back)
Dimensions (DxWxH) 205mm x 105mm x 55mm
Trends Combo One Hi-Fi System User Guide
Section 8. Specification
14
8.3 Specification of Trends TA-10.2P SE Class-T Power Amplifier
T-Amp IC Tripath TA2024
Output Power 2x15W @4ohm
2x10W @8ohm
Signal-to-Noise Ratio
(SNR)
98dB
Dynamic Range 98dB
IHF IM Distortion 0.10% @ 1W, 4ohm
THD+Noise Audiophile Quality
0.03% @ 9W 4ohm
0.1% @ 11W 4ohm
0.1% @ 6W 8ohm
High Power
10% @ 15W 4ohm
10% @ 10W 8ohm
Power Efficiency 81% @ 15W 4ohm
90% @ 10W 8ohm
Input Audio IN RCA (Left/Right) x 1
Power Socket (5.5mm/2.1mm) x 1
Output Speaker OUT (Left) x 1 pair (+/-)
Speaker OUT (Right) x 1 pair (+/-)
Other Switch & Knob Power ON/OFF switch x 1
Power Indicator (Blue LED) x1
Power Supply DC 12V-13.2V (max.)
Dimensions(WxHxD) 46mm x 76mm x 114mm [case] / 135mm [incl. sockets & knob]
Weight 500g
8.4 Specification of Trends CQ-121 Audiophile Audio Cable (0.47M)
Conductor Oxygen-Free Copper OFC
Braiding Shield Oxygen-Free Copper OFC
Plug 1x RCA ~1 x RCA
Plug Material 24K Gold-Plated Pure Copper
Overall Diameter 5 mm
Snack-Skin Sleeve Yes
Ferrite Ring Noise Filter No
Color Black
Weight 0.5 KG
*The warranty provides parts and labor for all components, except tubes. Tubes are
guaranteed for 1 year.
**To continuously improve our product, we reserve the rights to change some
specifications without further notice.

Trends Combo One Hi-Fi System User Guide
Section 9. Troubleshooting / Section 10. Accessories
15
9
9.
.T
Tr
ro
ou
ub
bl
le
es
sh
ho
oo
ot
ti
in
ng
g
If your Trends Combo One is out of order, it may not be very serious. Before you call
your local distributor or us to repair, you are suggested to check the following:
Symptoms Possible Reasons Handling Methods
power cords not properly
connected
properly connect the power
cords
cannot power ON
indicator not bright
power switch is OFF switch ON the power
the volume level is too low turn volume level higher
the audio cable not properly
connected
properly connect the audio
cable
the audio source (e.g. CD
player) not started playing
start playing the audio
source
wrong input is selected check input selection
no sound at all
the speaker cables not
properly connected
properly connect the
speaker cables
tube not fully pushed in insert Tube securely
audio connector plug not fully
pushed in
insert plug securely
hum
incorrect input switch position check the corresponding
input switch
sound out(s) out loose connection check input and output
connections. When all has
been double-checked
reduce volume and switch
unit back on
the Input voltage is very low Check that the input voltage
is 120V or 220 V, (specific
model should be selected,
not compatible)
The output voltage is 0 V or
very low
The unit is in current limit
condition due to overload
caused by large reactive
loading r by the output being
short circuited
Check the output terminals
are not shorted. Remove
the load. If the output
voltage gets restored, the
load is shorted or is offering
large reactive impedance
AC side fuse blows as soon
as power is turned on.
Unit is defective Call technical support or by
email
support@trendsaudio.com.
1
10
0.
.A
Ac
cc
ce
es
ss
so
or
ri
ie
es
s
·3 Pins Power Cord x 1 pcs (IEC plug and another plug with different country
standards)
·User Guide x1
·Warranty Card x1
Trends Combo One Hi-Fi System User Guide
Section 11. Regulatory Compliance / Section 12. Contact Us
16
1
11
1.
.R
Re
eg
gu
ul
la
at
to
or
ry
yC
Co
om
mp
pl
li
ia
an
nc
ce
e
This device complies with Part 15 of the FCC Rules. Operation is subject to the
following two conditions:
(1) this device may not cause harmful interference, and
(2) this device must accept any interference received, including interference that
may cause undesired operation.
Warning: Changes or modifications to this unit not expressly approved by the party
responsible for compliance could void the user's authority to operate the equipment.
NOTE: This equipment has been tested and found to comply with the limits for a
Class B digital device, pursuant to Part 15 of the FCC Rules. These limits are
designed to provide reasonable protection against harmful interference in a
residential installation. This equipment generates, uses, and can radiate radio
frequency energy and, if not installed and used in accordance with the instructions,
may cause harmful interference to radio communications.
However, there is no guarantee that interference will not occur in a particular
installation. If this equipment does cause harmful interference to radio or television
reception, which can be determined by turning the equipment off and on, the user is
encouraged to try to correct the interference by one or more of the following
measures:
- Reorient or relocate the receiving antenna.
- Increase the separation between the equipment and receiver.
- Connect the equipment into an outlet on a circuit different from that to which
the receiver is connected.
- Consult the dealer or an experienced radio/TV technician for help.
1
12
2.
.C
Co
on
nt
ta
ac
ct
tU
Us
s
ITOK Technologies Limited (Trends Audio)
Address : Rm. K, 11/F, Kwun Tong Industrial Centre, Phase 1
472-784 Kwun Tong Road, Kowloon, Hong Kong
Tel : +852 2304 0730 (9am-6pm, GMT+8:00)
Fax : +852 2566-5740
Email : sales@TrendsAudio.com (Marketing)
support@TrendsAudio.com (Technical Support)
Website : http://www.TrendsAudio.com
Table of contents
Other Trends Audio Stereo System manuals


