tri-Ace PlayStation PlayStation 2 User manual

STAR OCEAN™
TILL THE END OF TIME™
Twelve heroes thwarted the Ten Wise Men’s plot to destroy the universe. Four hundred years have
since passed…
The time is SD 772. The Pangalactic Federation is at the zenith of its might, with unparalleled power in
the universe. Having already explored one third of the Milky Way, the Federation continues research in
its insatiable quest for even more power.
The young Earthling Fayt Leingod and his family visit Hyda IV, a resort planet in the Kappa Sector. His
parents lead busy lives as premier authorities on symbological genetics. With their first extended
break in some time, they have decided to take a family trip. Fayt is far from enthusiastic, but his
childhood friend Sophia Esteed pesters him into going along. Despite his complaints, Fayt enjoys the
trip in his own way; it gives him the chance to escape his studies and play battle simulator games to
his heart’s content.
Fayt strolls around the hotel and plays the battle simulator with Sophia while his parents relax on the
beach. This tranquility is abruptly shattered when an unknown military space force attacks Hyda IV. The
assault leaves buildings destroyed and the resort’s natural surroundings in ruins. Amidst the chaos,
Fayt attempts to escape with Sophia and the other resort guests to an emergency shelter, joining his
parents along the way. But even their escape route falls under attack. Fayt manages to reach the
shelter, but he is separated from Robert and Ryoko, his parents…
GETTING STARTED
Set up your PlayStation®2 computer entertainment system according to the instructions in its
instruction manual. Make sure the MAIN POWER switch (located on the back of the console) is turned
off. BEFORE you switch your console on, connect an analog controller (DUALSHOCK®2) to controller
port 1, and other peripherals as appropriate. It is advised that you do not insert or remove peripherals
once the power is turned on.
Now turn the console ON at the MAIN POWER switch and press the
3
/RESET button. When the
3
indicator lights up green, press the
4
button and the disc tray will open. Place the STAR OCEAN™
TILL THE END OF TIME™disc in the disc tray with the label side facing up. Press the
4
button again
and the disc tray will close. Finally, press the
3
/RESET button again before commencing play.
PLEASE NOTE: The information in this manual was correct at the time of going to print, but some
minor changes may have been made late in the game’s development and some screenshots might have
been taken from pre-completion screens that differ slightly from those in the finished game.
MEMORY CARD (8MB) (FOR PLAYSTATION®2)
PLEASE NOTE: Throughout this manual, the term "Memory Card" is used to describe the memory card
(8MB) (for PlayStation®2) - (SCPH-10020 E). Memory Cards (product code SCPH-1020 E) designed for
use with the PlayStation® format software are not compatible with this game.
To save/load game settings and progress, insert a memory card (8MB) (for PlayStation®2) into MEMORY
CARD slot 1 of your PlayStation®2 computer entertainment system. The player will need at least 175KB
of free space on a Memory Card to save the game data. You will need an additional 1,200KB of free
space to collect Battle Trophies.
START MENU
Getting Started and the Start Menu
The title screen and start menu will appear when the
÷
button is pressed during the intro, or when
the intro has finished playing. Select an option with the left analog stick or directional buttons, then
press the
S
button.
• If you are playing the game for the first time, please start from Disc 1. See
BEGINNING A GAME section for more information.
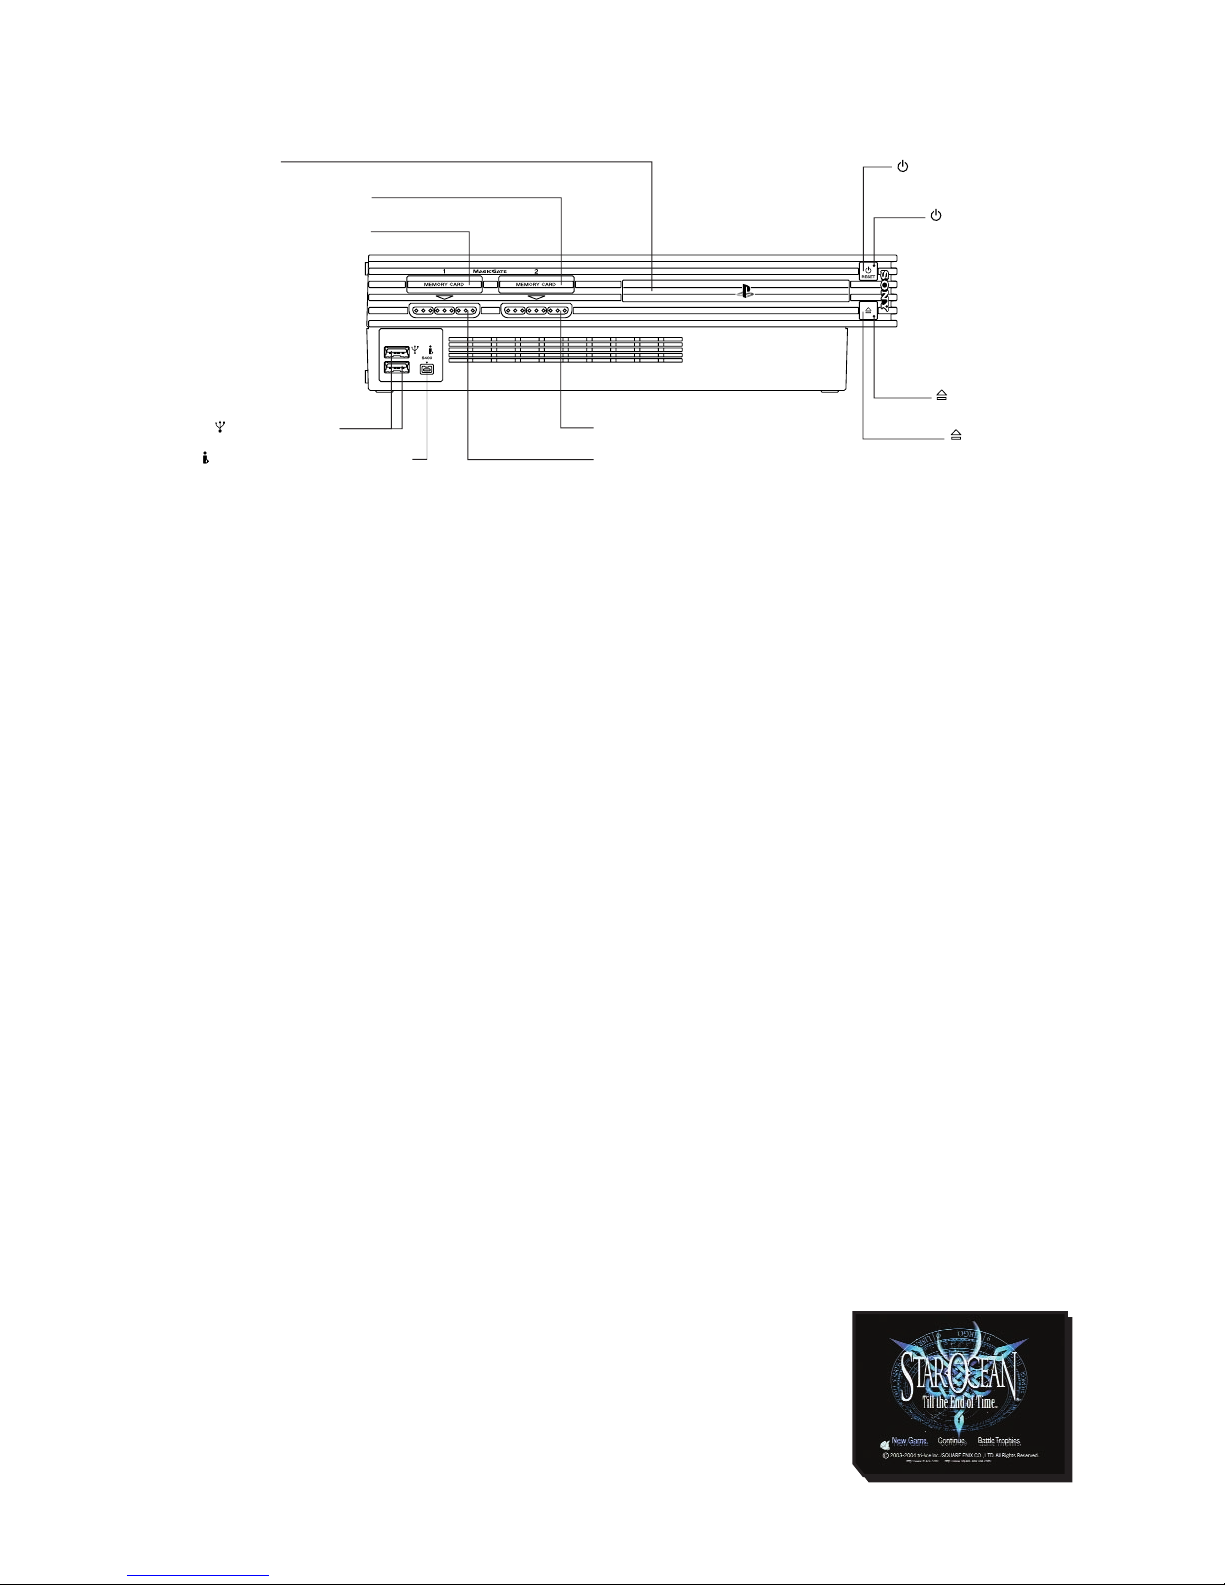
disc tray
controller port 1
controller port 2
MEMORY CARD slot 1
MEMORY CARD slot 2
/RESET button
indicator
indicator
USB connectors
i.LINK (IEEE1394) connector
button

New Game / Continue
Select "New Game" to start the game from the beginning. The
game will begin after you have configured your initial settings.
To continue from where you left off, select "Continue". Select
the game data you want to load to resume your adventure.
Battle Trophies
After meeting certain conditions in the game, you can select
"Battle Trophies" from the start menu. When selecting
Alternative Player Colors, please load "Battle Trophies" first.
Save your game data if you wish to keep that Color.
Changing Discs
An image like the one shown on the right will appear when you
need to change discs during the game. Please follow the on-
screen instructions when changing discs. Do not change discs
at any other time.
• Please do not insert any discs that are incompatible with the
PlayStation®2. Refer to your PlayStation®2 Instruction
Manual for more information on compatible discs.
BASIC CONTROLS
ANALOG CONTROLLER (DUALSHOCK®2)
CONFIGURATIONS
This software can only be used with the DUALSHOCK®2 analog controller. This section explains
controller components and basic controls. Controls will vary depending on whether you are in the
field/towns, in battle, or in the Main Menu (also referred to as Camp menu). Please see details below.
• To turn the vibration function on or off, select "Config" from the Main Menu or select "New Game" at
the title screen.
CONTROLS IN FIELDS/TOWNS/DUNGEONS
left analog stick Move character (run)
Directional buttons Move character (run)
button Examine / Talk
A
button Hold down while moving with the left analog stick or
directional buttons to walk
D
button Open Main Menu
F
button Used in conjunction with disintegrable objects -
Q
button Turn camera anti-clockwise
E
button Turn camera clockwise
W
button Not used
R
button Display, enlarge or hide map
÷
button Return camera to default angle
≥
button Not used
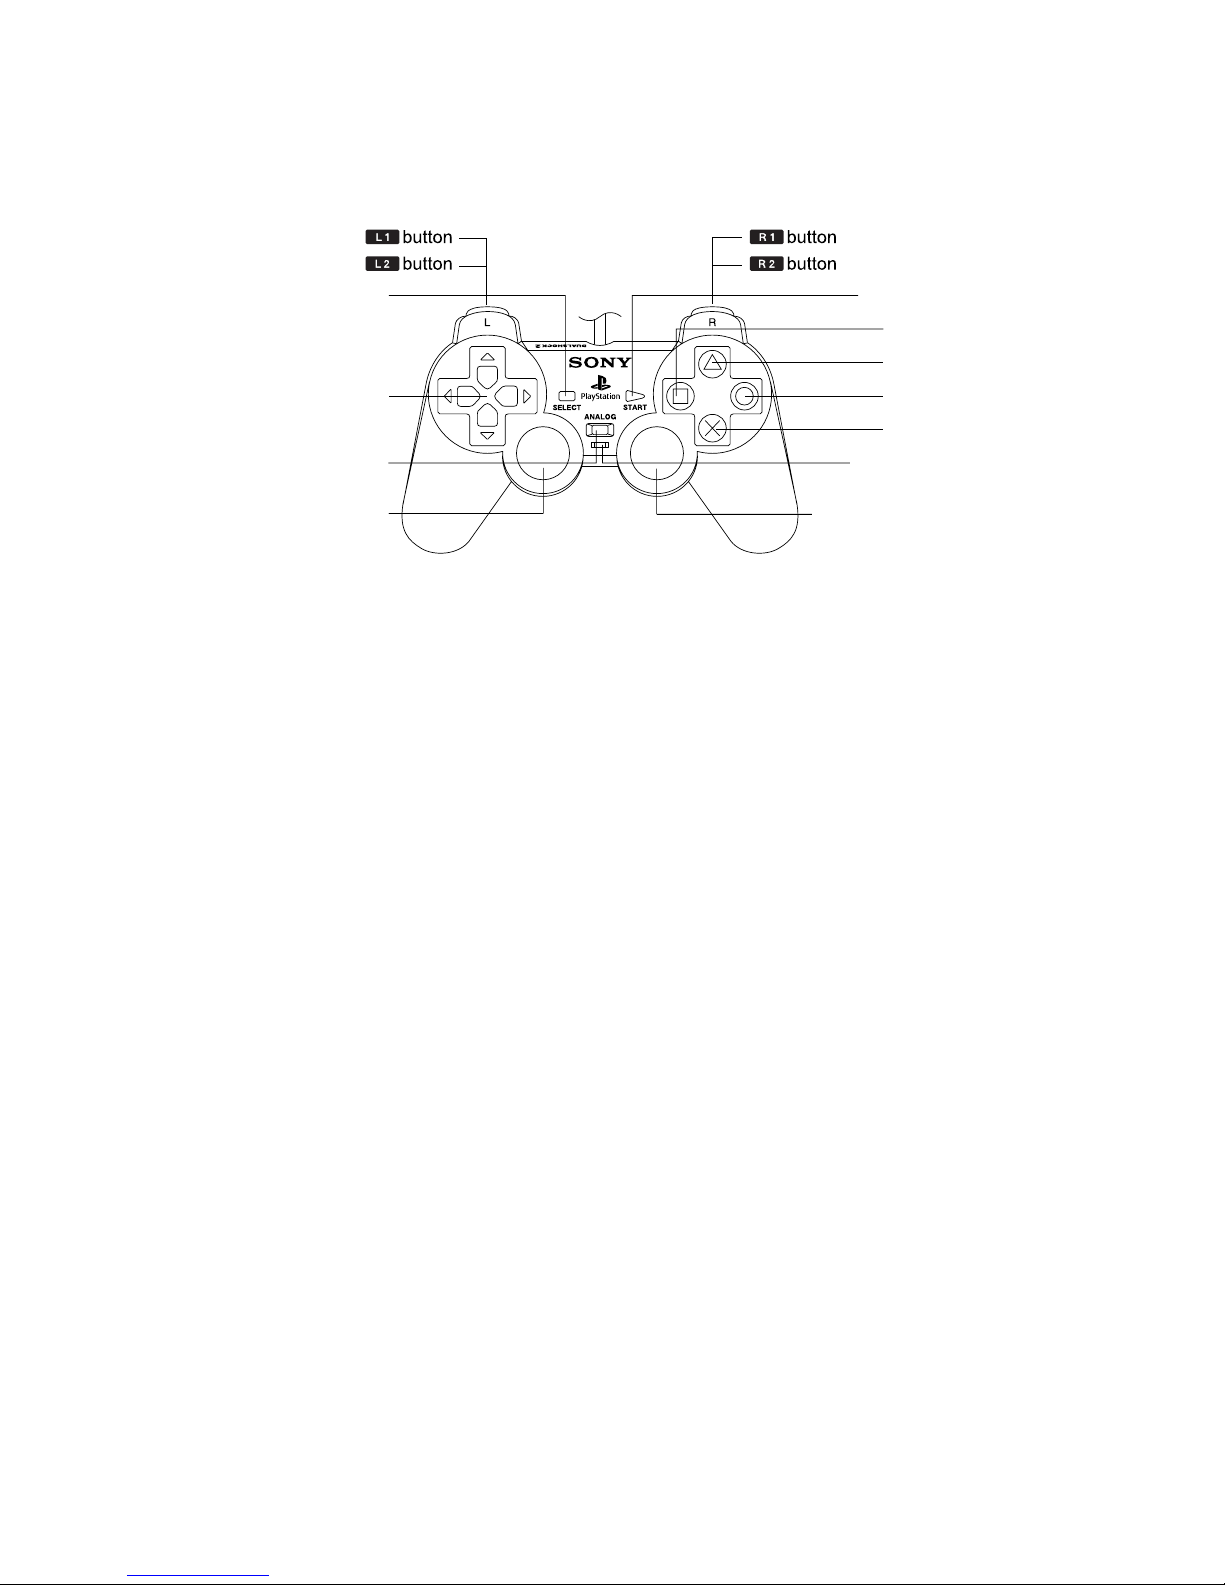
÷button
≥button
directional
buttons
Dbutton
Abutton
Sbutton
Fbutton
ANALOG mode button mode indicator
left analog stick
(L3 button when
pushed down)
Right analog stick
(R3 button when
pushed down)

BATTLE CONTROLS
(SEE BATTLES SECTION FOR MORE DETAILS)
left analog stick Move character / Sidestep / Select command (in Battle Menu)
Directional buttons Move character / Sidestep / Select command (in Battle Menu)
S
button Execute minor attack / Confirm selection (in Battle Menu)
A
button Execute major attack / Cancel selection (in Battle Menu)
D
button Open Battle Menu
F
button Switch target in manual targeting mode
Q
button Switch characters
E
button Switch characters
W
button Hold down while moving with left analog stick to sidestep (only if selected
in the Config menu)
R
button Toggle between manual mode and auto mode
÷
button Not used
≥
button Not used
MAIN MENU CONTROLS
(SEE THE MAIN MENU SECTION FOR MORE DETAILS)
left analog stick Move cursor
Directional buttons Move cursor
S
button Confirm selection
A
button Cancel selection / Close Main Menu
D
button Display details on selected item
F
button Discard selected item / Turn Tactical Skills on or off
Q
button Scroll page
E
button Scroll page
W
button Switch characters (Skills / Equipment / Status)
R
button Switch characters (Skills / Equipment / Status)
÷
button Not used
≥
button Not used

CHARACTERS
New characters will appear as you progress through the story. Here are some of the main characters
you’ll meet:
FAYT LEINGOD
"Sometimes, you're the only one that can make a difference."
Fayt is the son of leading authorities on symbological genetics, and he
himself is a serious student of the subject. He is an athlete who loves
games, his current favourite being the battle simulator. A young man of
integrity who can’t desert a person in trouble, he also has a stubborn
side.
Sex: Male / Age: 19
Height: 5’9" / Weight: 148 lbs
Race: Earthling / Weapon: Sword
SOPHIA ESTEED
"You just have to believe what you feel in your heart. Let's choose to
believe."
A childhood friend of Fayt’s, Sophia is an independent and caring girl who
looks up to Fayt as a big brother. She’s never afraid to speak her mind,
but her charming smile softens the hearts of everyone around her. She
seems to be an ordinary high school girl who likes cooking and shopping.
Sex: Female / Age: 17
Height: 5’3"
Weight: 108 lbs
Race: Earthling / Weapons: Staff & Symbology
PEPPITA ROSSETTI
"There's no use thinking about it! Let's just dive right in!"
Sex: Female / Age: 14
Height: 4’4" / Weight: 79 lbs
Race: Velbaysian / Weapon: Shoe/Capes
CLIFF FITTIR
"Wait a second. You mean 'we', right? You plannin' on going there alone?"
Sex: Male / Age: 36
Height: 6’2" / Weight: 212 lbs
Race: Klausian / Weapon: Gauntlets
NEL ZELPHER
"No thanks needed. I'm just doing my job."
Sex: Female / Age: 23
Height: 5’7" / Weight: 112 lbs
Race: Elicoorian / Weapon: Daggers & Runology

ROGER S. HUXLEY
"Sometimes a real man’s just gotta keep on goin’."
Sex: Male / Age: 12
Height: 3’1" / 66 lbs
Race: Elicoorian / Weapon: Axe
BEGINNING A GAME
INITIAL SETTINGS
You must configure your initial settings before starting the game.
The Initial Settings screen will appear when you select "New Game".
Make your selections with the directional buttons and press the
S
button to confirm. Pressing the
A
button will take you back to
previous settings.
SAVING YOUR PROGRESS
Game data can be saved at any save point inside dungeons or at inns
in towns. You should save your progress frequently. Select "DATA "
from the Main Menu to save or load data.
Note: once you save or load game data, please do not remove or
insert the Memory Card from the MEMORY CARD slot until you are
ready to turn the game off. Doing so may prevent you from saving
game completion data after you have completed the game.
Ending the Game
Remember to save your game data before you turn off the game. You can then resume play from the
last point you saved. Please make sure that the disc tray is closed before turning the power off.
This game can be played using Dolby Pro Logic II. To enjoy the game in surround sound, connect the AV
MULTI OUT connector or the DIGITAL OUT (OPTICAL) connector on your PlayStation®2 computer
entertainment system to your home theatre system with a Dolby Pro Logic II or Dolby Pro Logic
decoder, then turn either function on. The Dolby Pro Logic II audio is also compatible with monaural or
stereo settings, so you can enjoy the game even without the PRO LOGIC II feature.

GAME PROGRESSION
Reading the Map
The map is displayed in the lower right corner of your screen at all times except during battles. Press
the
R
button to cycle through the display options bottom right", "full screen" and "hide. Details on
how to read the map are below.
1. Player cursor
This indicates your current location. The translucent light indicates the
camera direction.
2. Entrance cursors
These cursors indicate doors and entrances. The colour varies with what you
can find inside.
3. People cursors
These cursors indicate party members or townspeople.
4. Map coverage
This percentage indicates how much of the map you have explored.
BATTLES
BATTLE CONTROLS
Minor Attacks -
S
button
Press the
S
button to execute swift attacks with little motion.
The method and force of attack will vary depending on your
distance from the target.
Major Attacks -
A
button
Press the
A
button to execute slower attacks with greater force.
The method and force of attack will vary depending on your
distance from the target.
Guard – Stand Still (100% Fury)
When your Fury gauge is at 100%, Guard can protect you from
attacks.
1
4
2
3
GUARD AND ANTI-ATTACK AURAS
Obtaining certain items will allow you to use Anti-Attack Auras. You can customise the effects of Anti
Attack Auras through the Skills menu (see THE MAIN MENU section for more details).
BATTLE SKILLS
Hold down the
S
button or
A
button.
Hold down the
S
button or
A
button to execute the Battle Skills you’ve assigned to each button.
Battle Skills can be set up through the Skills menu (see THE MAIN MENU section for more details).
See later in the BATTLES section for a list of Battle Skills.
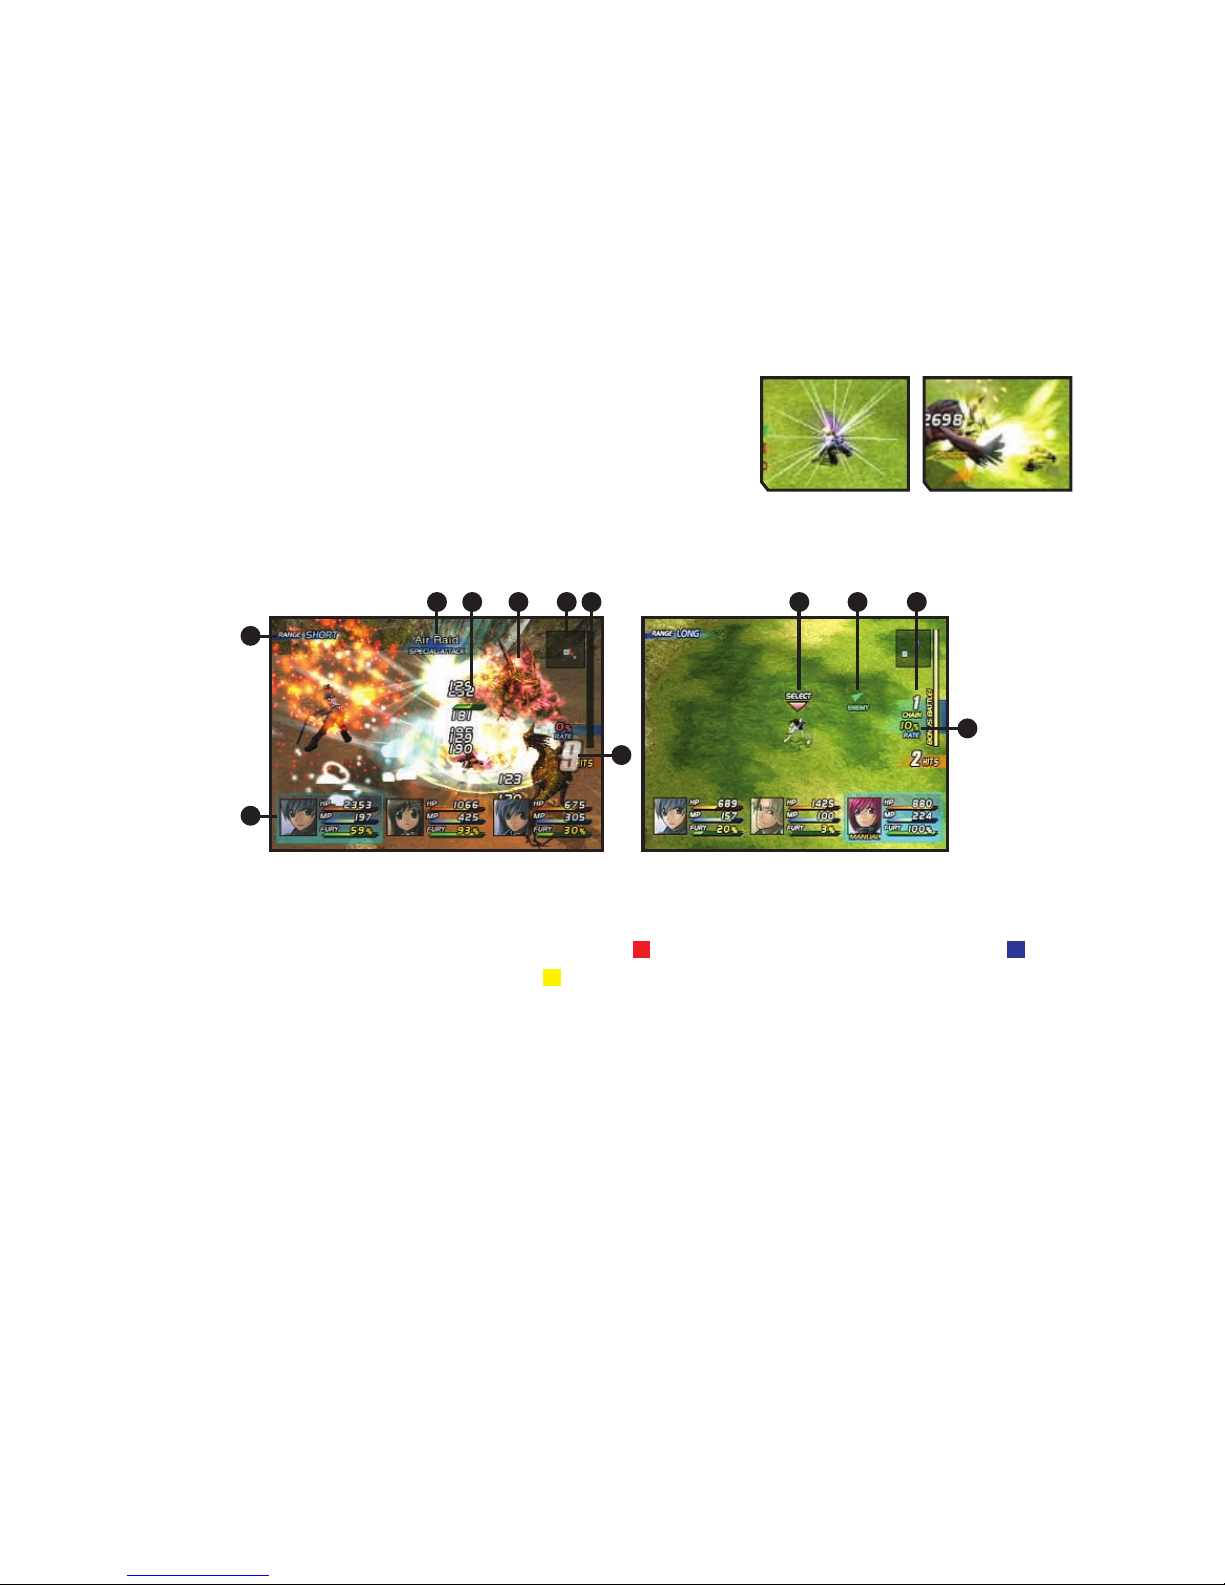
THE BATTLE SCREEN
The battle screen displays a variety of information. You must
understand the meaning and importance of each part in order to
make quick decisions.
1) Range – Indicates the distance between you and the enemy (SHORT / LONG).
2) Battle Radar – A simple map of the battlefield. (Red squares) indicate enemies, while
(Blue squares) indicate party members. (Yellow square) indicate party members with low HP.
3) Monster – This is an example of a monster. The gauges next to monsters indicate their Fury levels.
4) Character Windows – These windows show the attributes of the characters in battle.
5) Damage – Shows the amount of damage inflicted when an attack hits.
6) Combo Hits – Shows the number of consecutive hits.
7) Bonus Battle Gauge – When full you enter a Bonus Battle.
8) Skills Used – Shows the skills being used by party members (blue) and enemies (red).
9) Controlled Character – Indicates the character you are currently controlling.
10) Enemy Cursor – Shows the direction of an enemy out of view.
11) CHAIN – Indicates the number of consecutive Bonus Battles.
12) RATE – Indicates the charge rate of the Bonus Battle Gauge.
1
4
6
12
2 78 35 9 10 11

THE CHARACTER WINDOW
HP Current HP level. You will be unable to fight if this drops to 0.
MP Current MP level. You will be unable to fight if this drops to 0.
Fury Current Fury level. Fury is expended with every move, but is
recharged when you stand still.
SPECIAL CONDITIONS DURING BATTLE
Stun – Being struck by an Anti-Attack Aura or certain specific attacks will stun you. You
should recover and be able to move again soon afterwards.
Guard Broken – A Major Attack can break through Guard. Once Guard is broken, you will
be vulnerable even to Minor Attacks until you regain 100% Fury.
Down – Some attacks will knock you to the ground. Others may throw you up in the air,
unprotected, before you hit the ground.
THE BATTLE MENU
(ALSO REFERRED TO AS THE BATTLE CAMP)
Pressing the
D
button during battle will open the Battle Menu. The Battle Menu can be used for
various purposes such as invoking Symbols or using items. Use the left analog stick or directional
buttons to make your selection from the menu, then press the
S
button to confirm. Please note that
time stops while the Battle Menu is open. Also, pressing the
F
button while the Battle Menu is open
will give you a bird’s-eye view of the battlefield.
SYMBOLOGY
Select this to use the Symbols you have learned. Some Symbols require
you to choose a target. Symbols are slow to activate because of the
invocation time required.
ESCAPE
To run from a battle, select "ESCAPE". Your characters will attempt to
flee, but a successful escape is not guaranteed.
TACTICS
Select this to set up action guidelines for your computer-controlled party
members. All characters except for the one you control will act according
to these tactics.
TACTICAL SKILLS
Select this to activate the Tactical Skills you have set up within "Skills
Setup". Some skills such as Taunt and Scan Enemy appear only in the
Tactical Skills section of the Battle Menu.
EQUIPMENT
If you want to change equipment such as weapons and armour, select
"EQUIPMENT", the piece of equipment you want to replace, and then the
new item. Equipment can also be changed from the Main Menu.
ITEMS
To use an item in your possession, select "ITEMS" the item you want to use,
then the enemy or party member on which to use the item.
STATUS AILMENTS
Enemy attacks can inflict status ailments. Ailments are indicated by changes in a character’s
appearance as well as restrictions to his or her movement in battle. The following are some examples
of status ailments:
Poison
Poisoned characters turn green, and their HP slowly drains away.
Petrification
Characters turn brown when turned to stone. If all your party members are petrified, the
game is over.
Paralysis
Yellow bolts of lightning indicate that a character cannot move due to paralysis. Characters
are completely defenceless against enemy attacks while paralysed.
Freezing
Frozen characters turn blue and are immobilised for a short time. A single blow from the
enemy can incapacitate them.
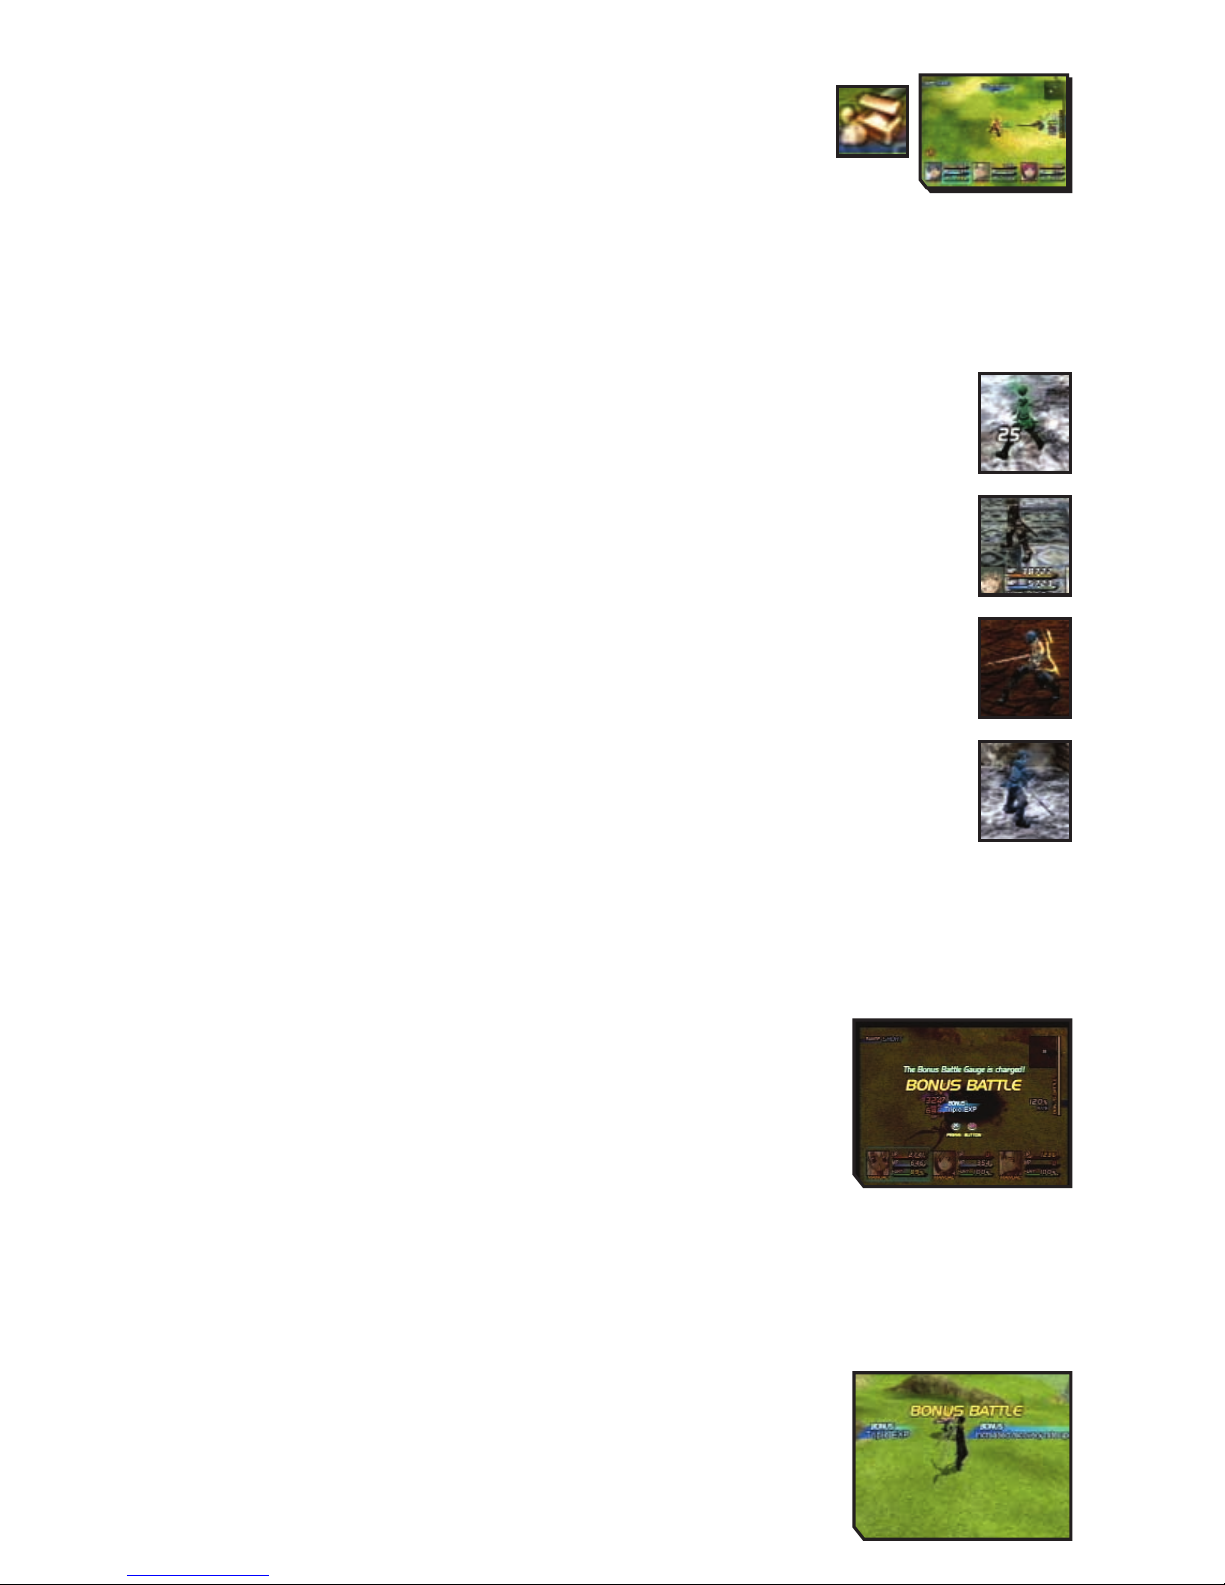
BONUS BATTLES
The Bonus Battle Gauge on the right of the screen charges as your attacks hit the enemy. Once the
gauge is full, you enter a Bonus Battle. Winning Bonus Battles offers rewards like multiplying
experience points or the amount of fol acquired.
Charging the Battle Bonus Gauge:
1) Attack the Enemy
2) Bonus Battle Gauge Full
3) Bonus Battle
4) End of Battle
5) Get Bonuses!
The Bonus Battle Gauge charges as you attack, and once it reaches 100%, a Bonus Battle begins. Be
aware that the gauge will break and end the Bonus Battle if any of the conditions below are met.
The Bonus Battle Gauge returns to 0 if:
• the character you control takes a critical hit
• the character you control is incapacitated
• you escape from battle
Executing Chains
A winning streak with the Bonus Battle Gauge maintained at 100% produces
a Chain. Continuing the streak will yield a wider variety of bonuses.

Cancel Attacks to Gain Bonuses
You can enter commands for attacks and then immediately cancel them to
increase the strength of the final blow. For example, try a Minor Attack
(normal attack) followed by a minor battle skill, then a major battle skill, and
end with a minor battle skill. Each time you cancel an attack, a damage bonus
is applied to the subsequent attack. Bonuses of up to 300% can be attained.
Game Over
If your HP or MP falls to 0 or you are petrified, you are no longer able to fight. If none
of your party members are able to fight anymore, the game is over. You can resume
play from the last point at which you saved your progress.
THE MAIN MENU
The Main Menu screen shows the following.
1. Submenu Headings - This consists of ten
menus. Select one to proceed to the next
screen
2. Time Elapsed - This displays the time that
has elapsed since you started the game
3. Money - This is the amount of money (fol)
you currently possess
4. Number of Battles - This displays the
number of battles you have fought
5. Menu Notes - This displays information on
the highlighted submenu
6. Character Status - This displays a
simplified view of your characters’ status
7. The character’s current level
8. Experience points needed to reach the next
level
9. Current HP / Maximum HP
10. Current MP / Maximum MP
There are ten submenus on the Main Menu screen that you can select.
USE SYMBOLOGY
You can use Symbols to heal characters here if you have enough MP. Attack Symbols are for
use in battle only and cannot be used from this menu.
Select a character with the left analog stick or directional buttons, then press the
F
button to confirm.
Sophia, Adray, Fayt, Maria and Nel will learn a variety of Symbols as they gain levels. However, some
Symbols (such as Common Attack Symbols and Common Support Symbols) can only be learnt from
Special Tomes. Apart from Sophia and Adray, party members will not acquire such Symbols automatically.
5
1
234
6
79
810
SKILL SETUP
This is where you can allocate available SP (Skill Points) and set up Battle Skills and Tactical
Skills.
BATTLE – SETTING UP BATTLE SKILLS
Here you can set up special attacks and Symbology. The Battle Skills you set up
here will be available for use in battle.
STEP 1: Select a slot for the Battle Skill
First, select a slot with the left analog stick or directional buttons, then press the
S
button to confirm.
A maximum of six Battle Skills can be selected at one time. See below on how to view this screen.
STEP 2: Select a Battle Skill
Next, select a Battle Skill with the left analog stick or directional buttons, then press the
S
button to
confirm. Skills can be allocated to the
S
button (short range / long range), the
A
button (short range
/ long range) and Support (two choices). Each skill has CP (capacity points); you cannot allocate more
than the maximum available CP for each character. Maximum CP will vary by character and level, but
the maximum CP for any character is 15.
• Common Support Symbols and Common Attack Symbols must be set up in the "Support" slots before
characters can use them in battle.
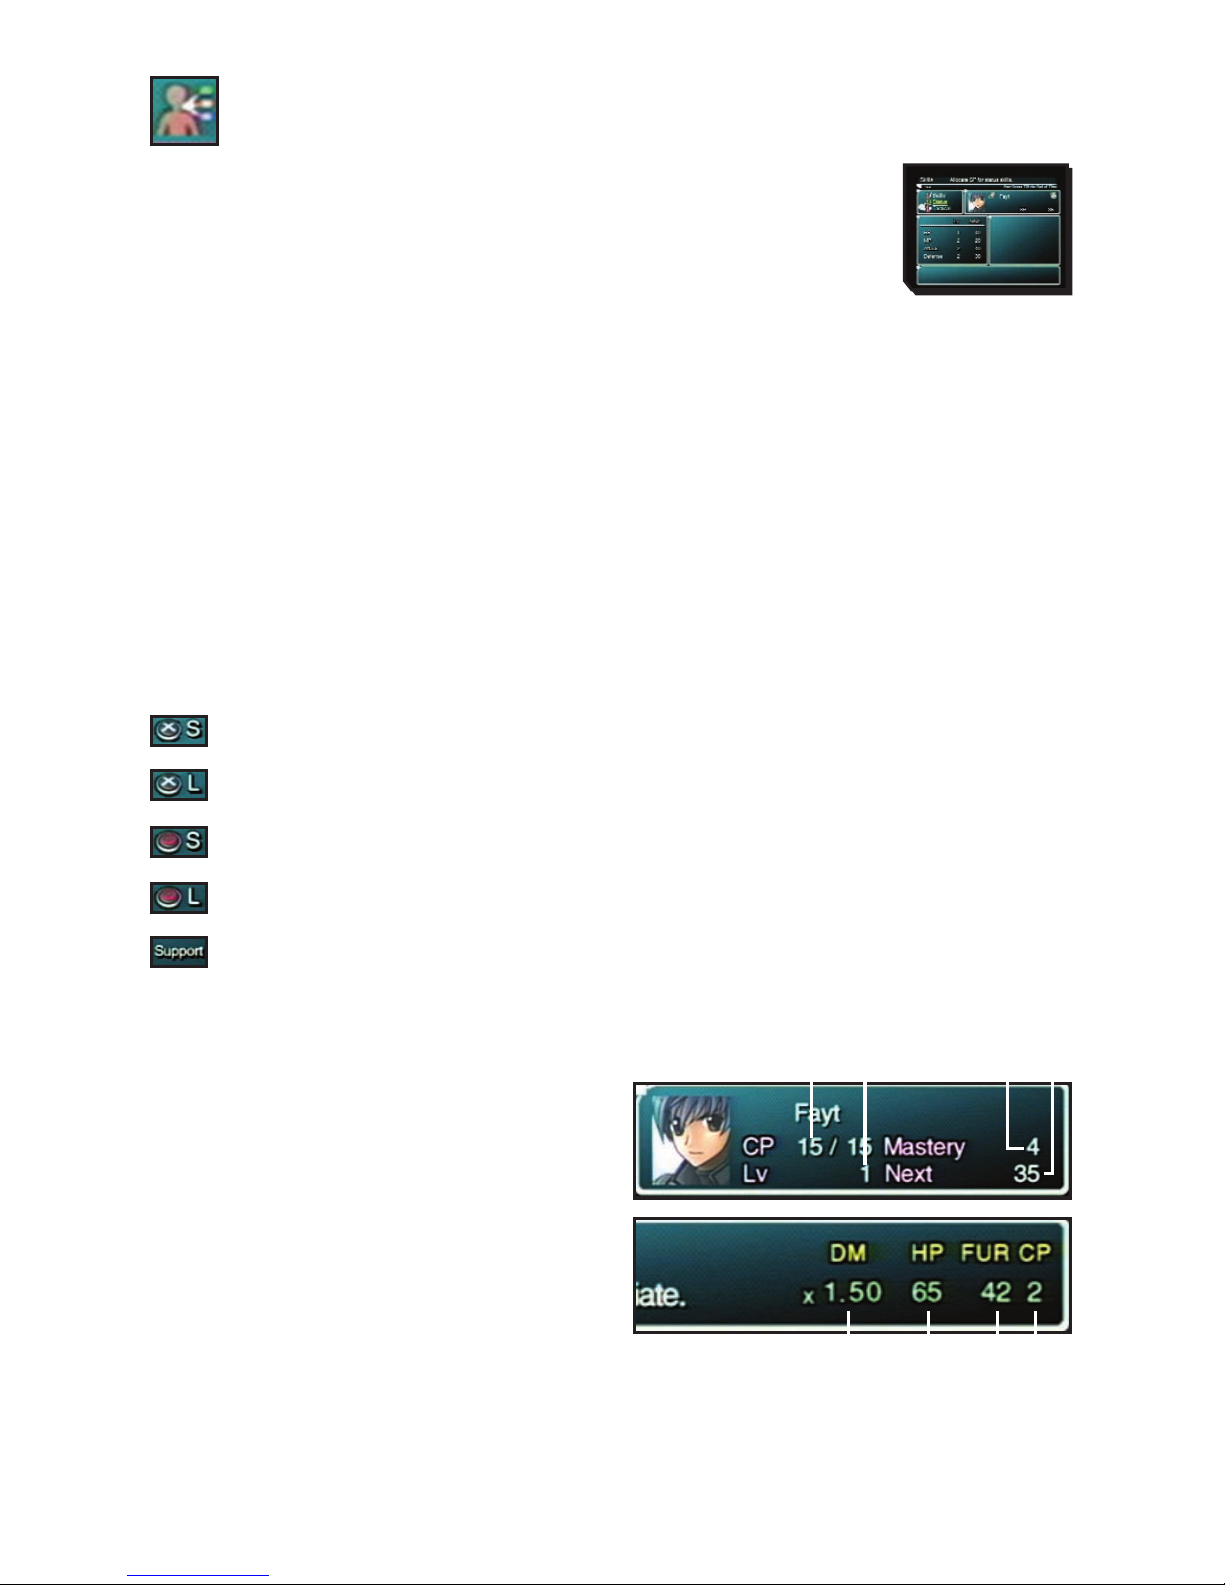
VIEWING THE BATTLE SKILLS SETUP SCREEN
Hold down the Minor Attack button to activate skill when near the enemy.
Hold down the Minor Attack button to activate skill when far from the enemy.
Hold down the Minor Attack button to activate skill when near the enemy.
Hold down the Minor Attack button to activate skill when far from the enemy.
Skills automatically activated (up to two).
1. The number on the left indicates the CP
currently used the number on the right indicates
the maximum CP available.
2. Your skill level for the selected Battle Skill.
3. Your mastery of the selected Battle Skill.
4. Experience points needed to reach the next level
for that Battle Skill.
5. Severity of damage to the enemy.
6. HP expended when the selected Battle Skill is
used.
7. Fury expended when the selected Battle Skill is
used.
8. CP needed to set up the selected Battle Skill.
1 2
5 6 7 8
43
STATUS – ALLOCATE SKILL POINTS TO STATUS SKILLS
As you gain SP (skill points) with each level, you can allocate them to the four Status Skills.
These skills raise the level of a character’s attributes such as HP and MP.
STEP 1: Check your Skill Points
First, check your current SP, which is displayed at the bottom right of each character’s name. These
are the points you can allocate to increase the level of each Status Skill.
STEP 2: Select the skills to which you want to allocate SP
Next, choose the skill to which you want to allocate SP. Select a skill with the
left analog stick or directional buttons, then press the Sbutton to confirm.
"LV" indicates the current skill level, while "NEXT" indicates the SP required to
reach the next level.
The Four Types Of Status Skill
HP Gives a character bonus HP. A higher skill level here increases the
character's HP.
MP Gives a character bonus MP. A higher skill level here increases the
character's MP.
Attack A higher skill level here enables more effective attacks against the enemy.
Defense A higher skill level here enables more effective defence against the enemy’s minor attacks.
TACTICAL – SET UP TACTICAL SKILLS
Here you set up Tactical Skills, which can greatly influence battles. You can update these settings
during battle through the Battle Menu for even more effective fighting. You can use some Tactical Skills
by selecting commands in the Battle Menu.
What are Tactical Skills?
Tactical Skills are skills such as Anti-Attack Auras and special skills that can change a character’s
condition during battle.
STEP 1:
Select the skill to be set up. Select a skill with the left analog stick or directional buttons. You can cycle
through characters by pressing the
W
and
R
buttons. Battle Skills Become More Powerful with
Use!
STEP 2: Set up the selected skill
Select a skill and press the
S
button to activate or deactivate it (deactivated skills are greyed out).
For some skills, pressing the
S
buttons will display another screen for detailed settings. See below for
a list of major Tactical Skills.
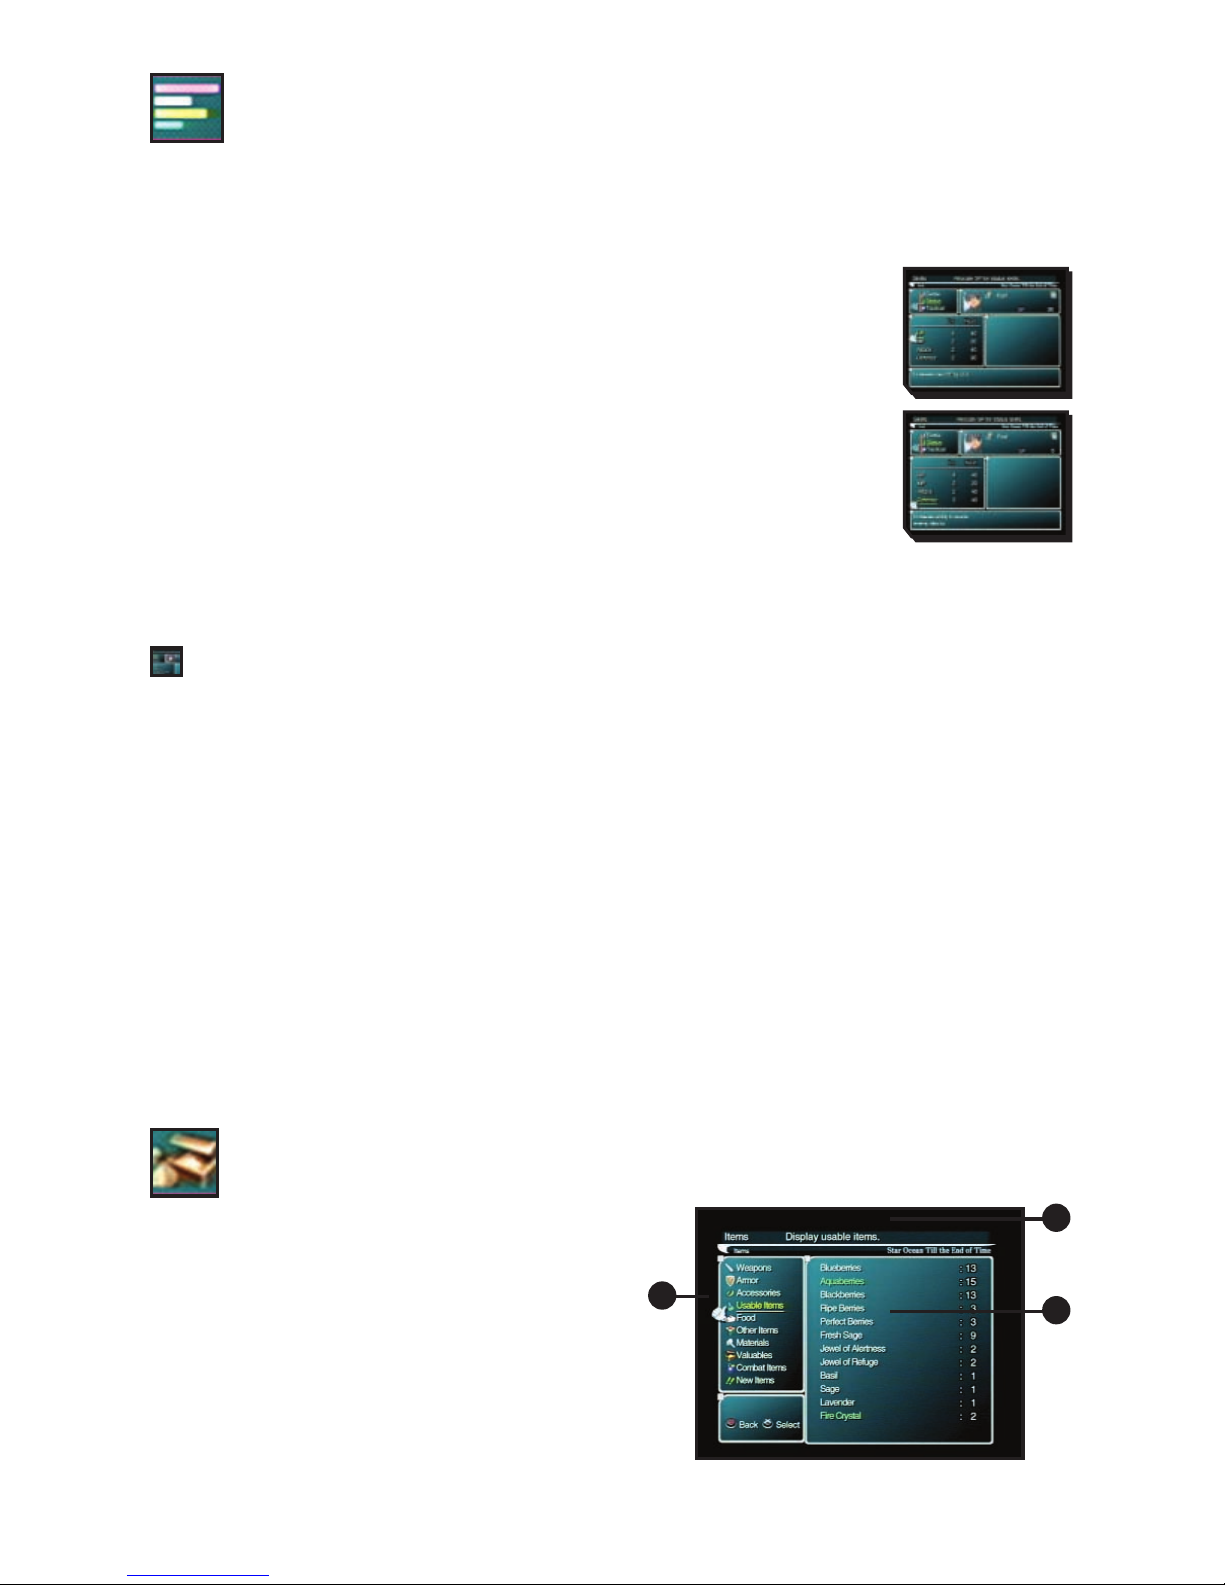
ITEMS
You can check what kind of items you have and use
them. Items are divided into nine categories. Select a
category to see a list of items within that category.
Select an item to see each available item of that type.
From this screen, you can also drop the item by pressing
the
F
button, or view details of the item by pressing the
D
button.
VIEWING THE ITEMS SCREEN
1) List of item categories.
2) Explanation of the selected category.
3) List of items in the selected category.
1
2
3
EQUIPMENT
You can equip your characters with weapons, armour and accessories in your possession.
Whenever you acquire a new weapon, use this command to equip it and try it out.
STEP 1: Select the character to equip
First, select a character with the left analog stick or directional buttons, then press the Sbutton to confirm.
STEP 2: Select the type of equipment
A list of your equipment will appear. Select an item with the left analog stick or directional buttons,
then press the
S
button to confirm. You can also press the
D
button to automatically equip the
character with the optimal equipment available. You can cycle through characters by pressing the
Q
and
W
buttons.
STEP 3: Select the item to equip
Finally, choose the item to equip. Select one with the left analog stick or directional buttons, then press
the
S
button to confirm.
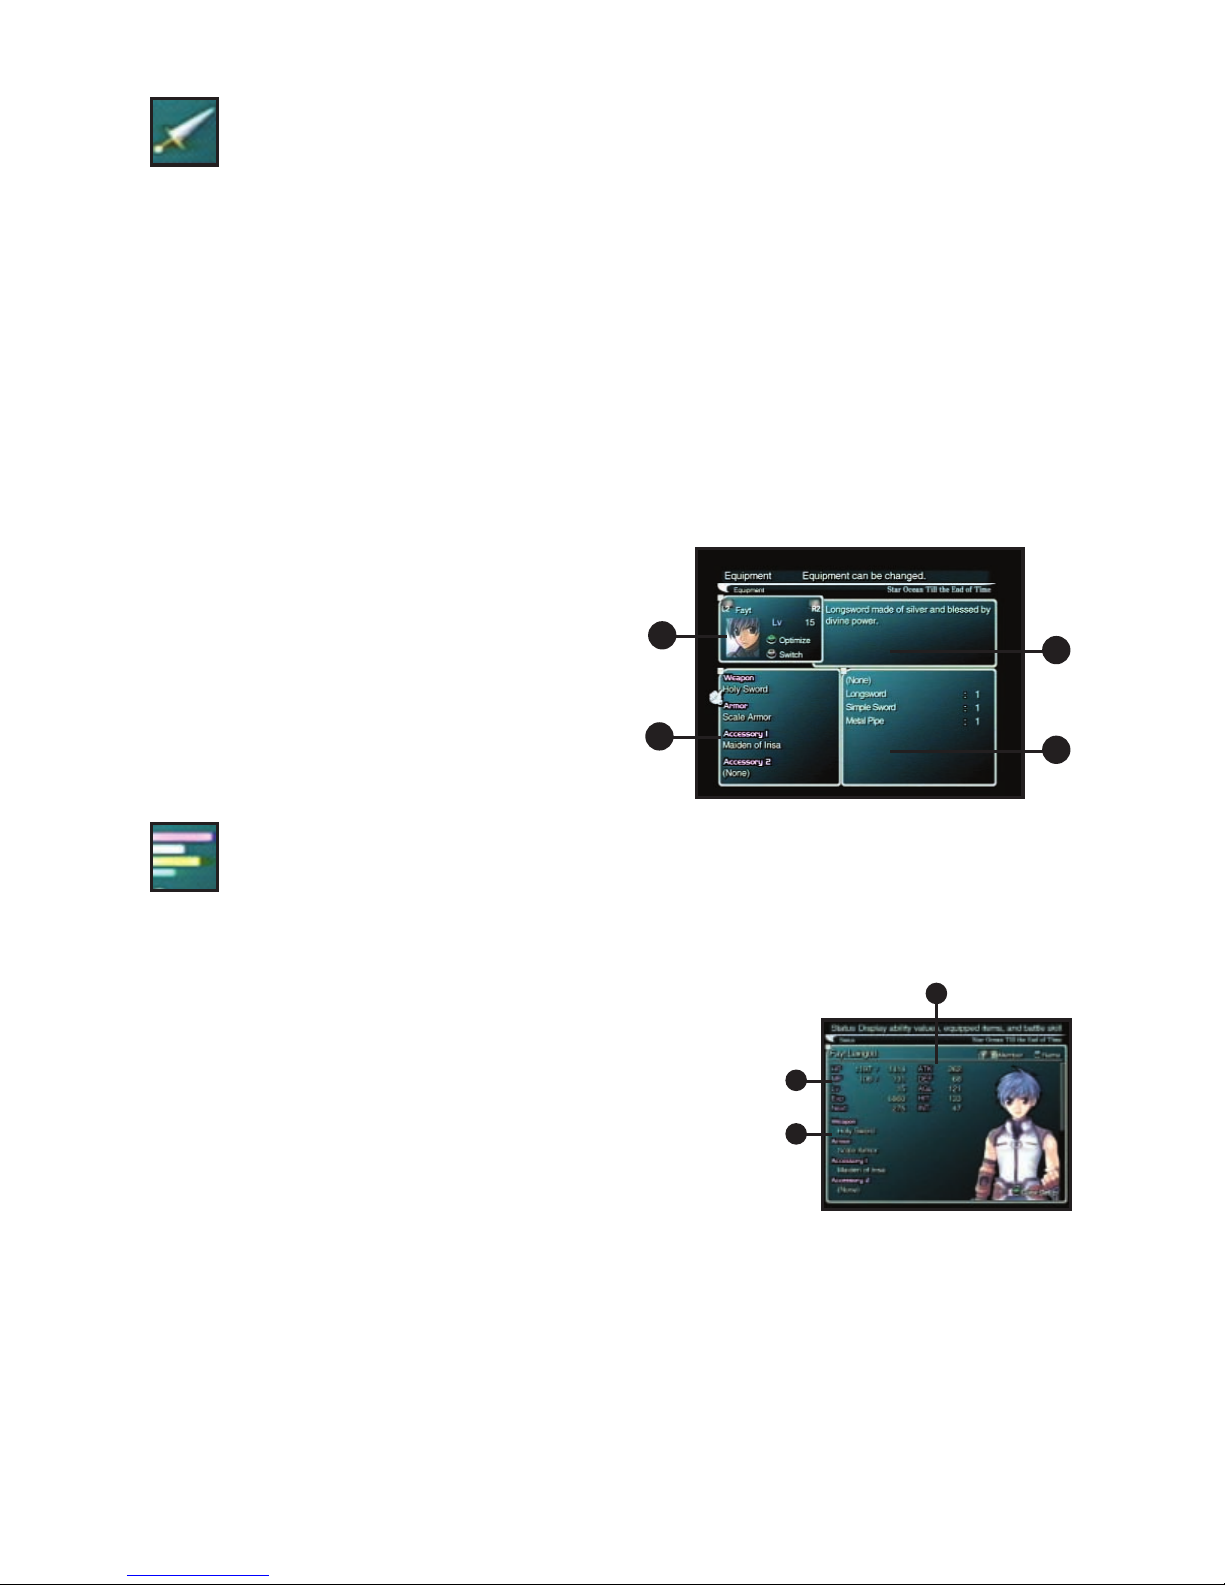
Viewing the Equipment Screen
1) Currently selected character. “LV” signifies the
character’s level.
2) Current equipment.
3) Description of the selected item.
4) List of available equipment.
STATUS
Here you can view each character’s status, equipment, and skills. You can also change the
character’s name and Color.
• For details on changing a character’s costume, please refer to "ALTERNATIVE PLAYER COLORS"
section later in this manual.
VIEWING THE STATUS SCREEN (1)
1) Basic character information.
HP – Current HP / Maximum HP.
MP – Current MP / Maximum MP.
LV – Character’s level.
EXP – Experience points accumulated.
NEXT – Experience points needed to reach the next level.
2) Character’s ability values.
ATK – Value indicating strength of character’s attack.
DEF – Value indicating strength of character’s defence.
AGL – Value indicating character’s agility.
HIT – Value indicating character’s accuracy.
INT – Value indicating character’s intelligence.
3) Weapon, armour and accessories currently equipped.
1
4
3
1
3
2
2

VIEWING THE STATUS SCREEN (2)
1) Skill status.
SP – Skill points currently available.
CP – Capacity points currently available for Battle Skills.
2) Battle Skills currently set up.
See BATTLE – SETTING UP BATTLE SKILLS section for details on
setting up Battle Skills.
Changing Character Names
Pressing the
S
button while in the status screen will take you to the
Changing Names screen. Select letters or numbers using the left analog stick
or directional buttons and press the
S
button to enter them. Once you’re
done, move the cursor to "Confirm" and press the
S
button.
CONFIG
You can configure game settings such as your controller’s vibration function and button
assignments. Press the left analog stick or directional buttons up or down to select an
option, then press left or right to change your settings.
VIEWING THE CONFIG SCREEN
1) Skip Events - Enable or disable skipping of events.
2) Voice - Select subtitle and voice settings for events.
3) Battle Targeting - Select automatic or manual targeting in battle.
4) Battle Camera - Select the type of camera movement used in battle.
5) Battle Camera Mode – Choose the height of the camera in battle.
6) Battle Voices - Turn voices in battle on or off.
7) Sidestepping - Select the controls for sidestepping.
8) Vibration - Turn the controller’s vibration
function on or off.
9) Audio - Select the audio environment.
10) Button Customization - Customise controller button settings.
11) Window Color - Customise window color. Select "Customize" and
press the Sbutton to display the window color customisation
screen.
12) Aspect Ratio - Select the screen size.
13) Battle Trophies - Select whether or not to collect Battle Trophies after battles.
TACTICS
Here you can switch members, change battle formation and select battle tactics. Select the
desired submenu with the left analog stick or directional buttons, then press the Sbutton to
open the settings screen.
TACTICS – SETTING A BATTLE PLAN
You can direct characters to follow certain courses of action in battle. Choose tactics according to the
type and abilities of each character.
STEP 1: Select a character
First, select a character with the left analog stick or directional
buttons, then press the
S
button to confirm.
1
3
5
2
4
7
6
8
9
11
10
13
12
1
2

STEP 2: Select tactics
A menu listing six tactics will appear. Select one with the left
analog stick or directional buttons, then press the Sbutton to
confirm.
REPLACE – REPLACE BATTLE PARTICIPANTS
You can switch out party members participating in battles. Up to three characters can be selected to
fight. Organise party members according to their condition and the type of enemy you face.
STEP 1: Select the character to be replaced
First, use the left analog stick or directional buttons to select
the character you want to replace, then press the Sbutton to
confirm. Battle participants are listed on the left, while reserve
members (those not actively participating) are on the right.
STEP 2: Replace the character
Next, select a character to replace the one you chose in step 1.
Choose and confirm the character the same way you did in step 1.
FORMATION – DETERMINE BATTLE FORMATION
AND LEADER
Here you can assign battle formation and leader. You should adjust your formation according to the
characters taking part.
STEP 1: Select a formation
There are ten formations available. Select one with the left
analog stick or directional buttons, then press the Sbutton to
confirm.
STEP 2: Select a leader
Press the Dbutton to display the leader selection window. Select the
character you want to designate as the leader with the left analog
stick or directional buttons, then press the Sbutton to confirm.
DICTIONARY
You can look up notes on the various terms that appear in the game. Select a category of
words, then select a word to see the notes. The number of words will increase as the game
progresses.
INVENTION INFO
Get information regarding inventions and file for patents.
Once you obtain the "Compact Communicator" in the game, a submenu called "Invention Info"
will be added to the Camp menu. You can use "Invention Info" to get information on items available all
over Elicoor II, file for patents and give orders to inventors.
LATEST INFO - GET INFORMATION ON INVENTIONS
Here you can check on the activity of inventors and get information on the latest
inventions. You can choose from the three menu options listed below. Move the
cursor to the desired option and press the
S
button to view detailed
information.
Options available in Latest Info:
1. Inventions 2. Items in store 3. Registered inventors
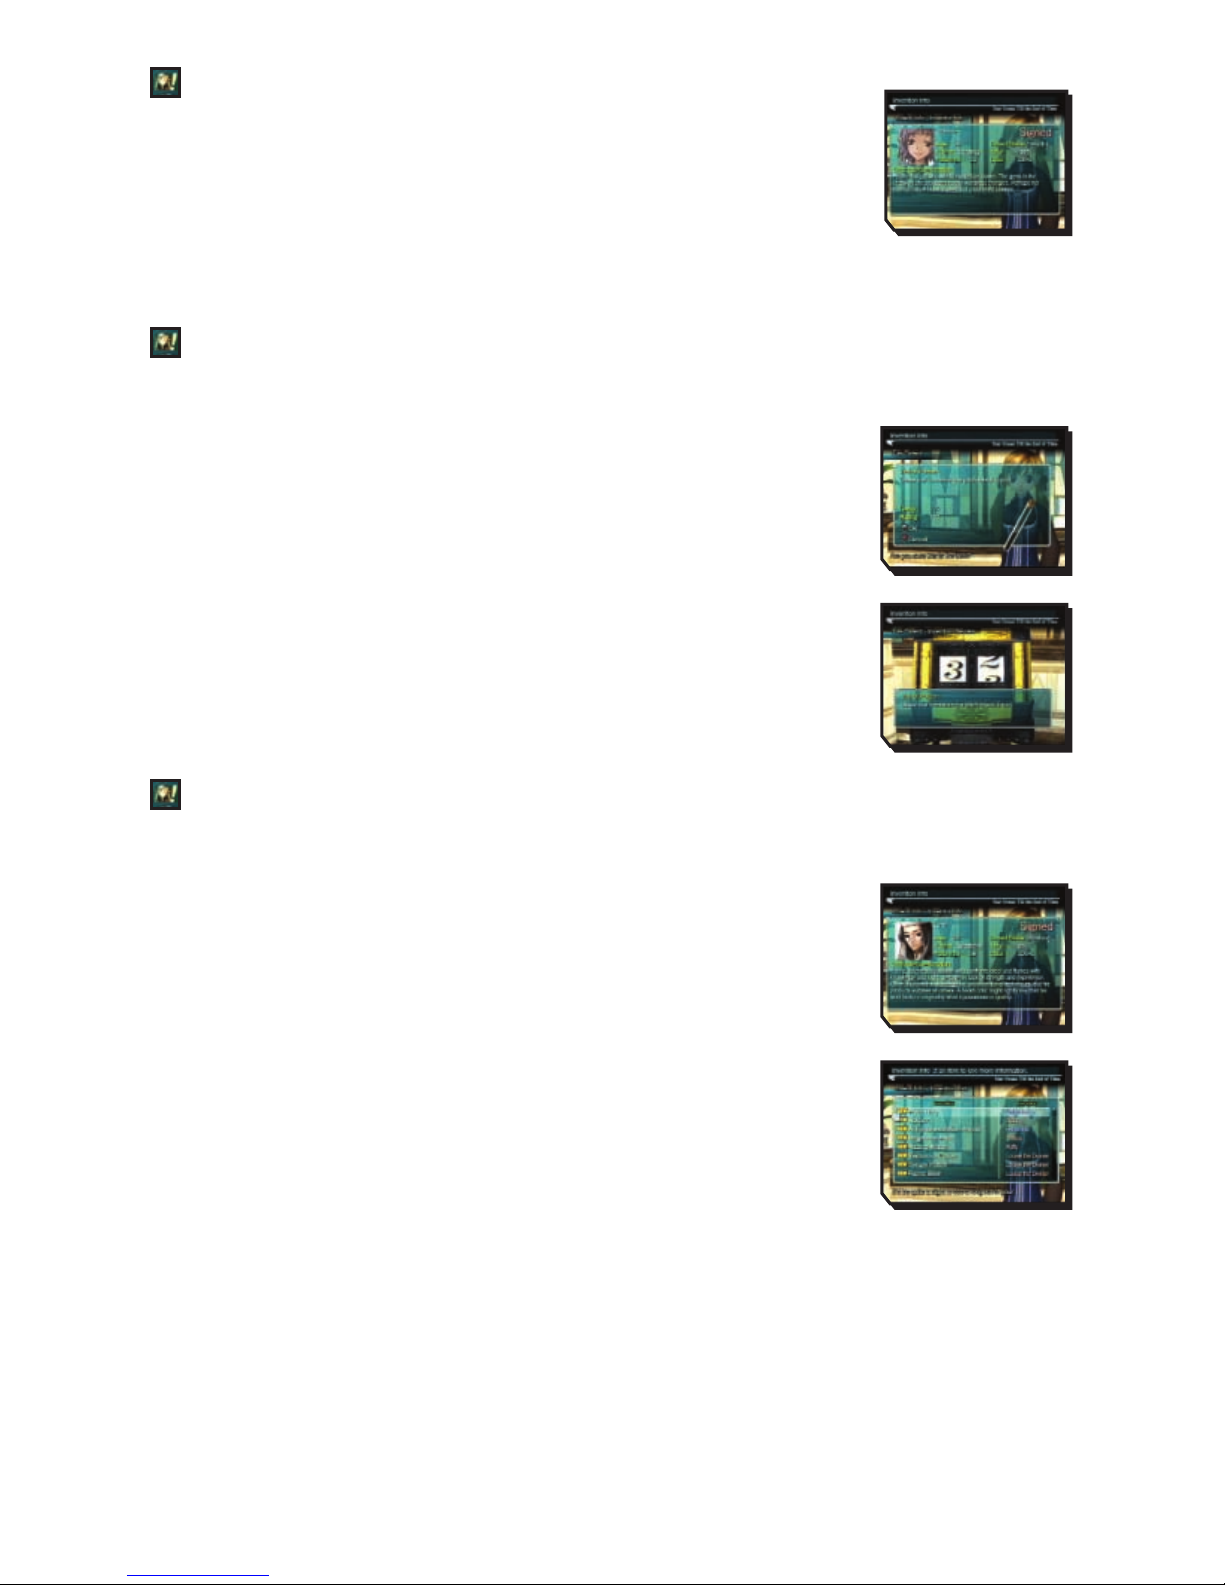
FILE PATENT – FILE A PATENT FOR YOUR INVENTIONS
When you invent a new item, you can file a patent for it.
STEP 1: Select the item you want to patent
When you select and confirm "File Patent", a list of eligible items will be
displayed. Select one with the left analog stick or directional buttons, then
press the
S
button to confirm.
STEP 2: Have your invention reviewed
Next, a description of the invention will appear. If you want to file a patent for
the item, confirm by pressing the
S
button. Your invention will then be
reviewed. After checking the evaluation results, press the
S
button to finalise
the filing process. The more points you accumulate from these reviews, the
higher your ranking as an inventor will be, and the more money you will make.
CHECK INFO – VIEW INFORMATION ON INVENTORS AND SHOPS
You can view information on inventors and shops all over Elicoor II. Select the desired menu option with
the left analog stick or directional buttons, then press the
S
button to confirm.
Inventor Info – Check information on inventors
You can check information on registered inventors. Choose an inventor from the
list with the left analog stick or directional buttons, then press the
S
button to
confirm.
Invention List – Check items that have been created
Select an item with the left analog stick or directional buttons, then press the
S
button to display details on that item. Press the
S
button again to display the
shops where the item is sold.
Shop Info – Check the items sold in each shop
You can check each shop to see what items it has for sale. Select a town from
the workshop map with the left analog stick or directional buttons, then press the
S
button to
confirm. Then select a shop to see the items available there.
Workshop Map – Check the locations of workshops and inventors
You can display the workshop map to check on the locations of workshops and inventors, and to see
the facilities available at each word shop. It can also come in handy for checking locations of towns and
dungeons in relation to each other.
Rankings – Check inventor rankings
You can check inventor rankings and view information on specific inventors.
CHANGE ORDERS – TELL YOUR INVENTORS WHAT TO DO
You can change orders given to the inventors working for you. Please see the INVENTING ITEMS
section for more details on the orders you can issue.
ALERTS – SET UP ALERTS
When you set up alerts, an icon will appear on the screen whenever the specified conditions are met.
Listed below are the four alerts you can set up. Select an alert with the left analog stick or directional
buttons, then press the
S
button to turn it on or off.
• Someone files a patent • New product hits the stores
• Contracted inventor patents an item • New inventor enters the development race
DATA
Here you can save or load data using a Memory Card. Select a MEMORY CARD slot and file
with the left analog stick or directional buttons, then press the
S
button to confirm.
SAVE – Save data
Save your progress in the game. You will need at least 175KB of free space to save game
data. You will need an additional 1,200KB of free space to collect Battle Trophies.
LOAD – Load data
Load data in order to resume the game from any of the saves on your Memory Card.
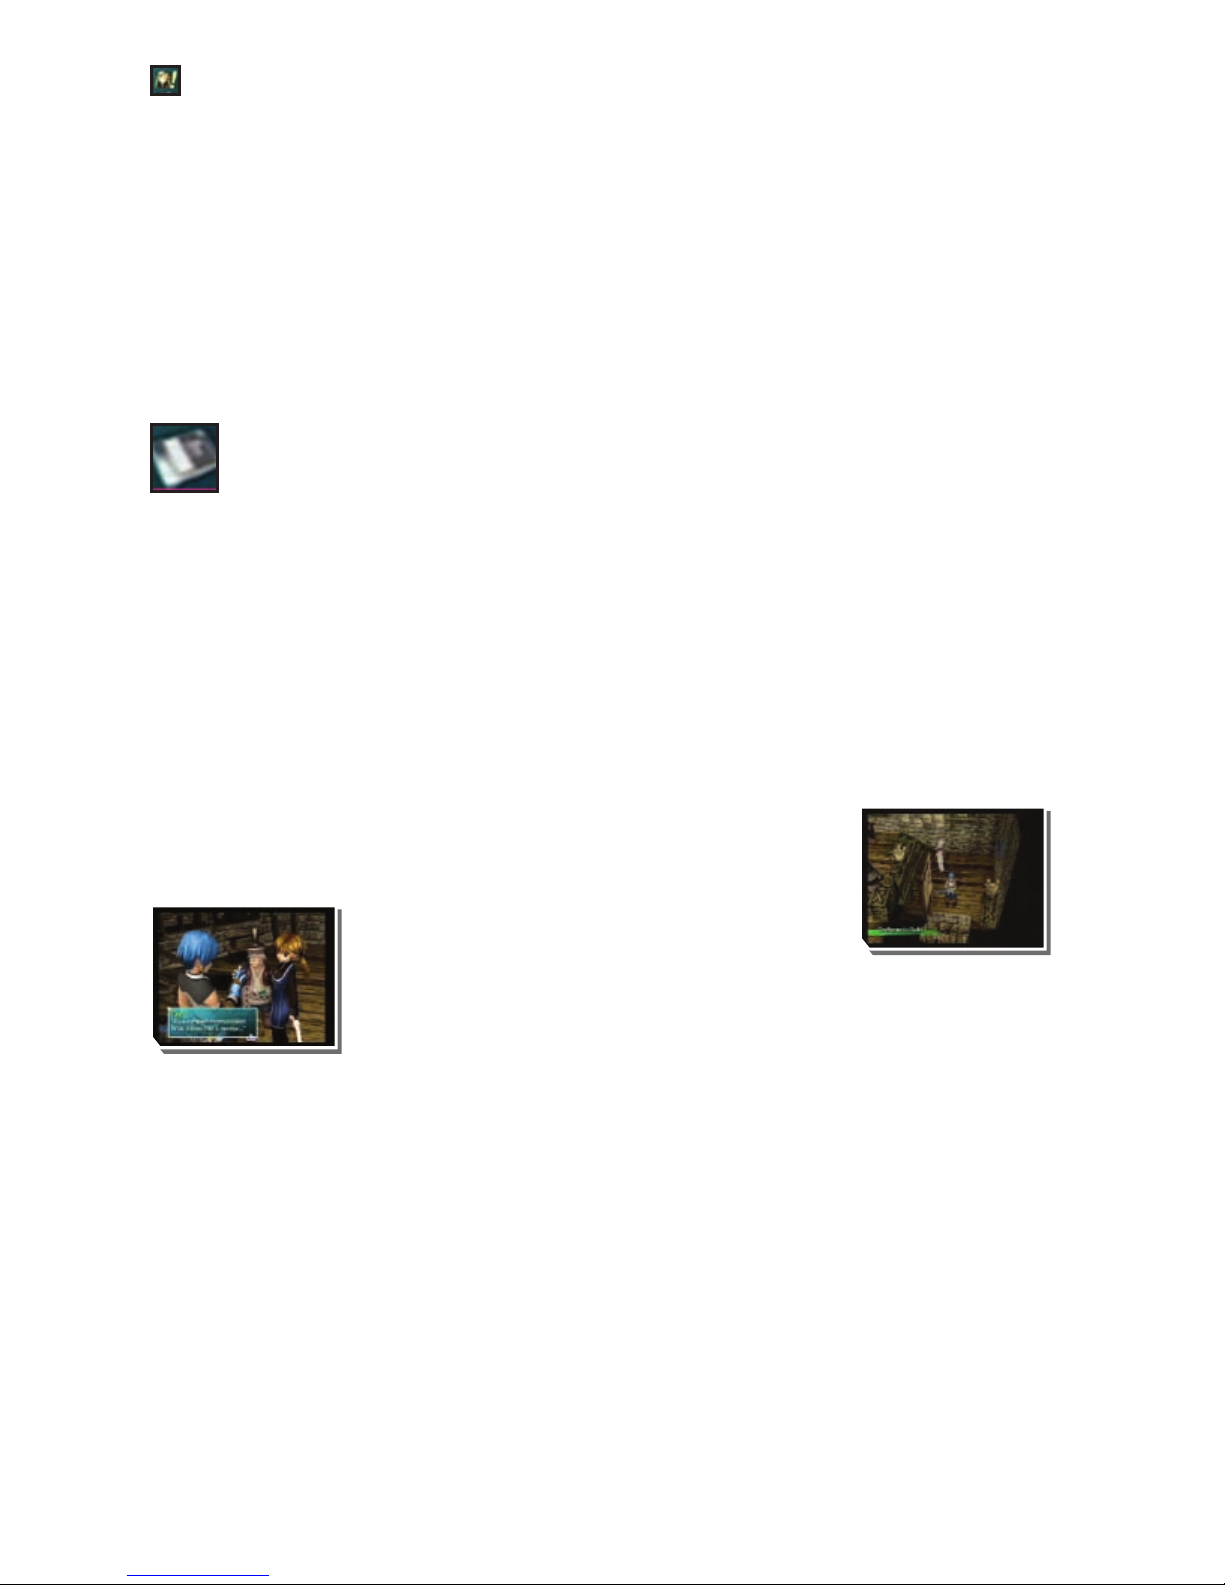
INVENTING ITEMS
“Inventing” is a system for modifying an existing item or creating a completely
new item. Besides weapons and armour, you can also invent such things as
food and accessories.
GETTING STARTED
In order to invent items, you must first register with
the Craftsmen’s Guild. There you will receive a Compact
Communicator, which you can use to send orders to inventors
you have contracted to work for you.
TWO WAYS OF INVENTING ITEMS:
1. Inventing items at workshops
At workshops, the player’s characters and inventors can form a team of one to three to invent items.
You can leave it up to the craftsmen’s inspiration through “Original Invention” or choose “Specify Plan”
to modify an item in your possession. Any item invented is immediately available for your use. If you
create a brand new item through Original Invention, you can file a patent for that invention.
2. Inventing items outside of workshops
You can send orders through the Compact Communicator to any inventor with whom you have signed a
contract. Instead of forming a team, you send orders to each individual inventor. You can have them
work on an “Original Invention” of their own or put them on “Standby” to await your orders. If a patent
is filed for an invention, the inventor may go up in the inventor rankings, resulting in bonus money for
you. Items invented in this way will not be immediately available, but will instead be distributed to the
shops.

INVENTING ITEMS
You can begin setting up for invention inside a workshop by approaching the paper-laden desk. Besides
inventing items, you can also expand workshop facilities and transfer inventors to other workshops.
INVENT – CREATE AN ITEM
This command is for inventing an item inside a workshop. The following is an overview of the
invention process.
[1] SET UP THE LINES
STEP 1: Forming the Development Team
First, you must set up a team to work on an invention in the workshop. A team
can consist of one to three inventors who possess the same talent. You can
view the inventors’ abilities by pressing the
ç
button.
Contracting Craftsmen
Craftsmen are scattered all over the continent. When you meet one, you
can contract him or her to work for you after negotiating and paying a
contract fee. You can even headhunt famous high-ranking craftsmen. You
should search every nook and cranny for inventors and sign them up. Some
may require certain items instead of money before they agree to a
contract.
VIEWING THE WORKSHOP SCREEN
1) Workshop Menu
2) Name of workshop and types of invention
possible there
3) Development lines set up
4) Craftsmen assigned
1
2
3
4
VIEWING THE DEVELOPMENT TEAM SCREEN
1) Inventors
These are the inventors and player’s characters who have
been assigned to the workshop.
2) Invention Menu
This displays the menu for invention and your current funds.
3) Lines
The more lines available, the more items you can invent
simultaneously.
12
3
This manual suits for next models
1
Table of contents
Popular Game manuals by other brands


Roberto Sport
Roberto Sport INGLESE Assembly instructions

Koala Technologies
Koala Technologies KoalaWare Spider Eater owner's manual

Tomy
Tomy The Magic Oven manual

Tiger Electronics
Tiger Electronics Last Out 7-584-0 instructions

Fisher-Price
Fisher-Price RollOverRover manual

Mattel
Mattel World Championship Football instructions


