Tri-Vision NC-250W HD 1080P Pro User manual
1
QUICK GUIDE
Camera Installation for iPhone, iPad, Android smart phone and tablet
For Technical questions, please email: info@trivisiontech.com

2
Contents
1.0 Introduction ----------------------------------------------------------------------3
2.0 Camera Installation
--------------------------------------------------------------Error! Bookmark not
defined.
3.0 Recorded Video Playback on Your Phone----------------------------------7
4.0 Viewing /Deleting/Disabling alerts on Your Phone----------------------8
5.0 Advanced Setting-----------------------------------------------------------------9
6.0 Wi-Fi Configuration ------------------------------------------------------------11
7.0 Warranty--------------------------------------------------------------------------12

3
1.0 Introduction
Thank you for purchasing a TriVision Internet video camera.
The camera can be accessed remotely from inside your network or the Internet; and can be controlled from iPhone,
iPad, Android, PC and Mac over an Intranet or the Internet via our mobile apps and software or a web browser. The
user friendly installation procedure and intuitive web-based interface allows easy integration with your home or
business wired network or Wi-Fi.
The camera also comes with motion detection software that can generate alarm triggers via e-mail and by uploading
images straight to a website. In our experience, we find that our customers get comfortable with advanced features
quickly and then start using the camera on a daily basis to stay in touch with their home, business or loved ones.
Using an iPhone, iPad, Android, Mac or PC you can view high quality live streaming video direct from the camera. It is
excellent for applications such as a baby monitor, nanny cam, pet cam, party cam, security & surveillance, remote
observation, elder and patient care as well as limited video conferencing or event broadcasting.
An exciting new feature is the ability to turn your iPhone, iPad iOS device and Android OS smartphone, tablet into a
baby monitor without a professional installer, extra wires, IP address setting, DDNS address setting or router settings.
Just plug and play

4
2.0 Camera Installation on iPhone, iPad, Android Phone/Tablet
1. Connect the included Ethernet cable to the network jack on the camera and connection the other end to one of the
LAN jacks of your router. Then connect the power supply to the camera and to a wall plug. If your camera has a
removable antenna, you may want to attach it now. IMPORTANT: Make sure camera is plugged into your router! Do
not connect the camera to the computer, even if your computer has an available Cat5 LAN jack.
IMPORTANT: For initial setup, you need to connect the camera directly to your router or switch with a network cable.
You cannot connect wirelessly to the camera without first setting it up via a network cable. The Anyscene app will
auto detect cameras that are on the same network as your phone/tablet for initial setup. Ensure the camera is
plugged in to the same router/network switch that your phone/tablet/computer are connected to.
2. Enable Wi-Fi on your Phone /Tablet and make sure to connect to the same router that your camera(s) are
connected to.
3. For iPhone, iPad, download and install “Anyscene” App from iPhone Apple Store on your iOS device. Elect to either
turn on or off notifications for live real-time updates. You can later turn these notifications features on or off under
your iOS SETTINGS for your Apple device.
4. For Android smartphone /Tablet, download and install “Anyscene” App from the Google Play Store. On your
first installation, the Anyscene app will prompt you to add a camera now and walk you through the process with
a simple tutorial. At the end of the tutorial, select SCAN LOCAL NETWORK
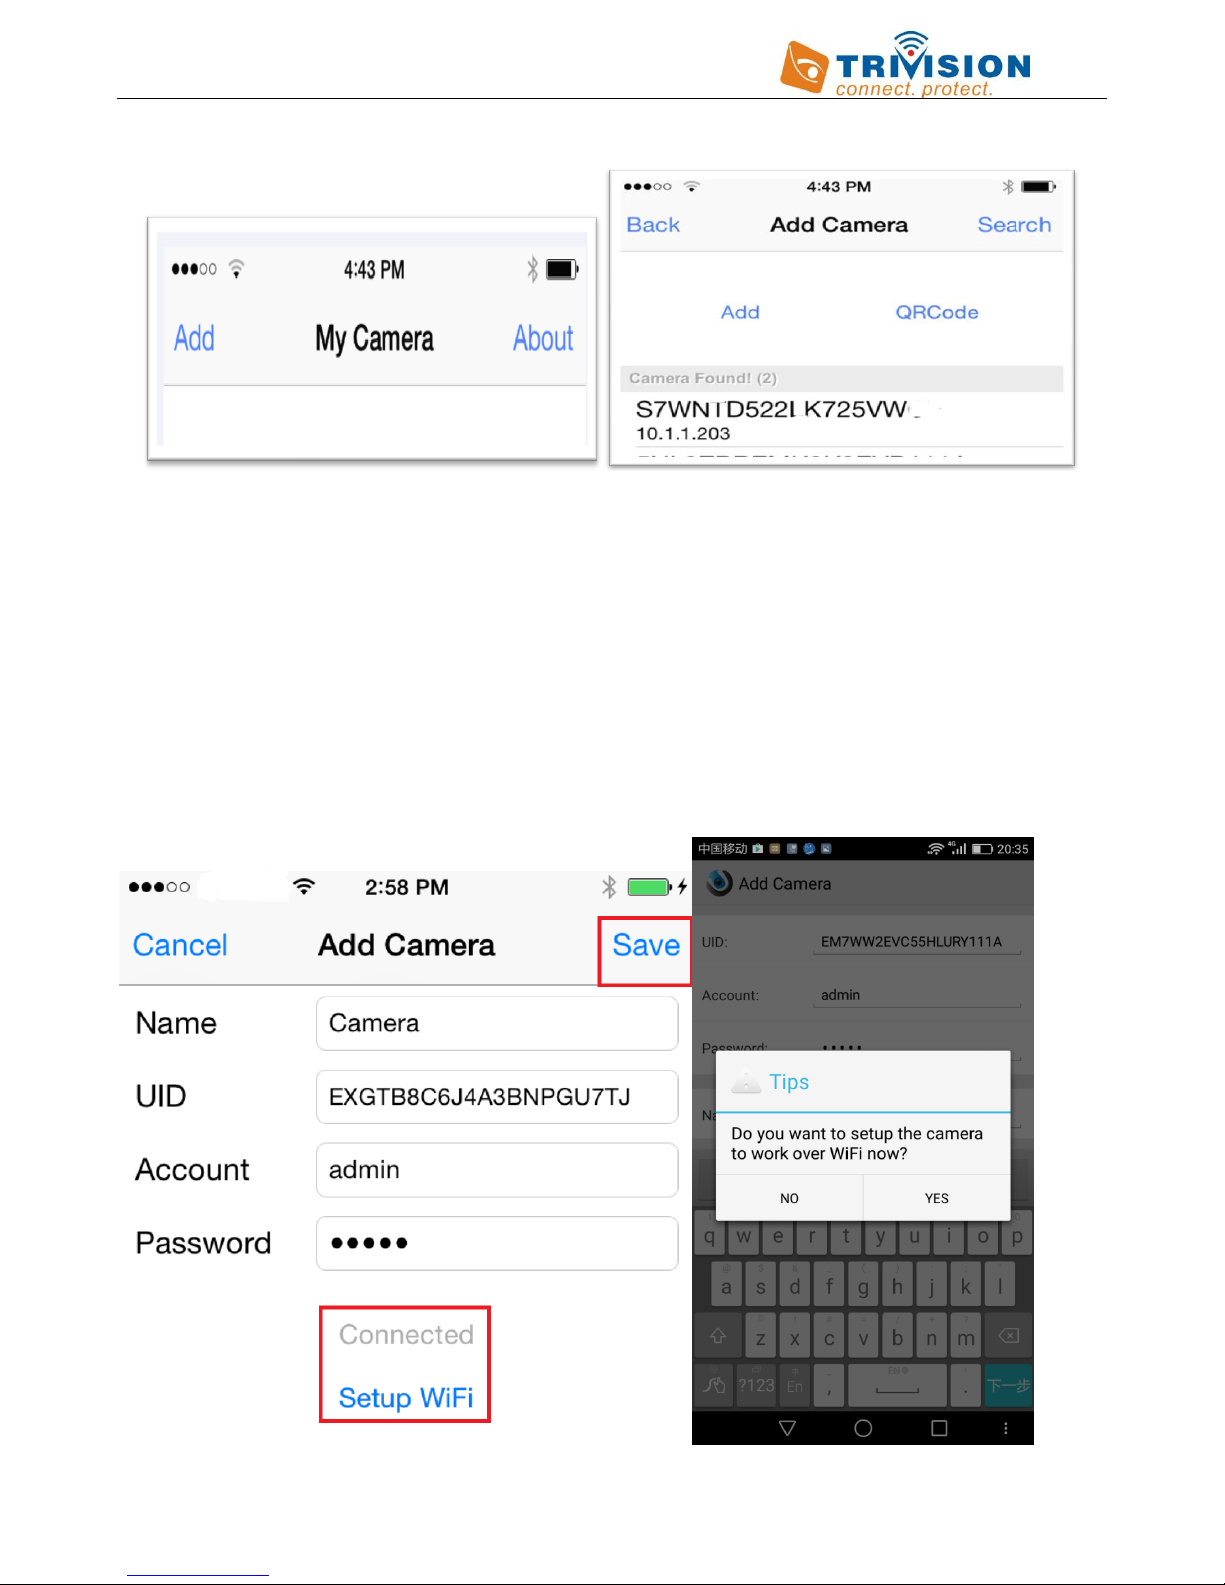
5. A) Click ADD and the app will attempt to detect cameras on your connected network
B) Select the camera’s UID
5
Note: Ensure the camera is plugged in to the same router/network switch that your iOS devices are connected to over
Wi-Fi.
6. A) Name: Assign a name to the camera to help identify this camera if more than one camera is in use.
B) UID (UPPER CASE, Keep the default setting, Don’t modify it)
C) Account: admin (lower case, Keep the default setting, Don’t modify it)
D) Password: admin (lower case, this field is case sensitive). The default password is: admin. Please note: if you
have changed the default login passwords on the camera web interface in browser, then you should enter the
same password when you add the camera to the app to specify the updated password or edit the password in
the app, otherwise the cameras will show as disconnected in app.
E) Tap CONNECT or OK to store your settings. If you enter the correct account and password credentials, you
will get connected and prompted to configure the Wi-Fi afterwards.
F) If you elect NO, tap the SAVE menu, then you will be presented with the camera online.
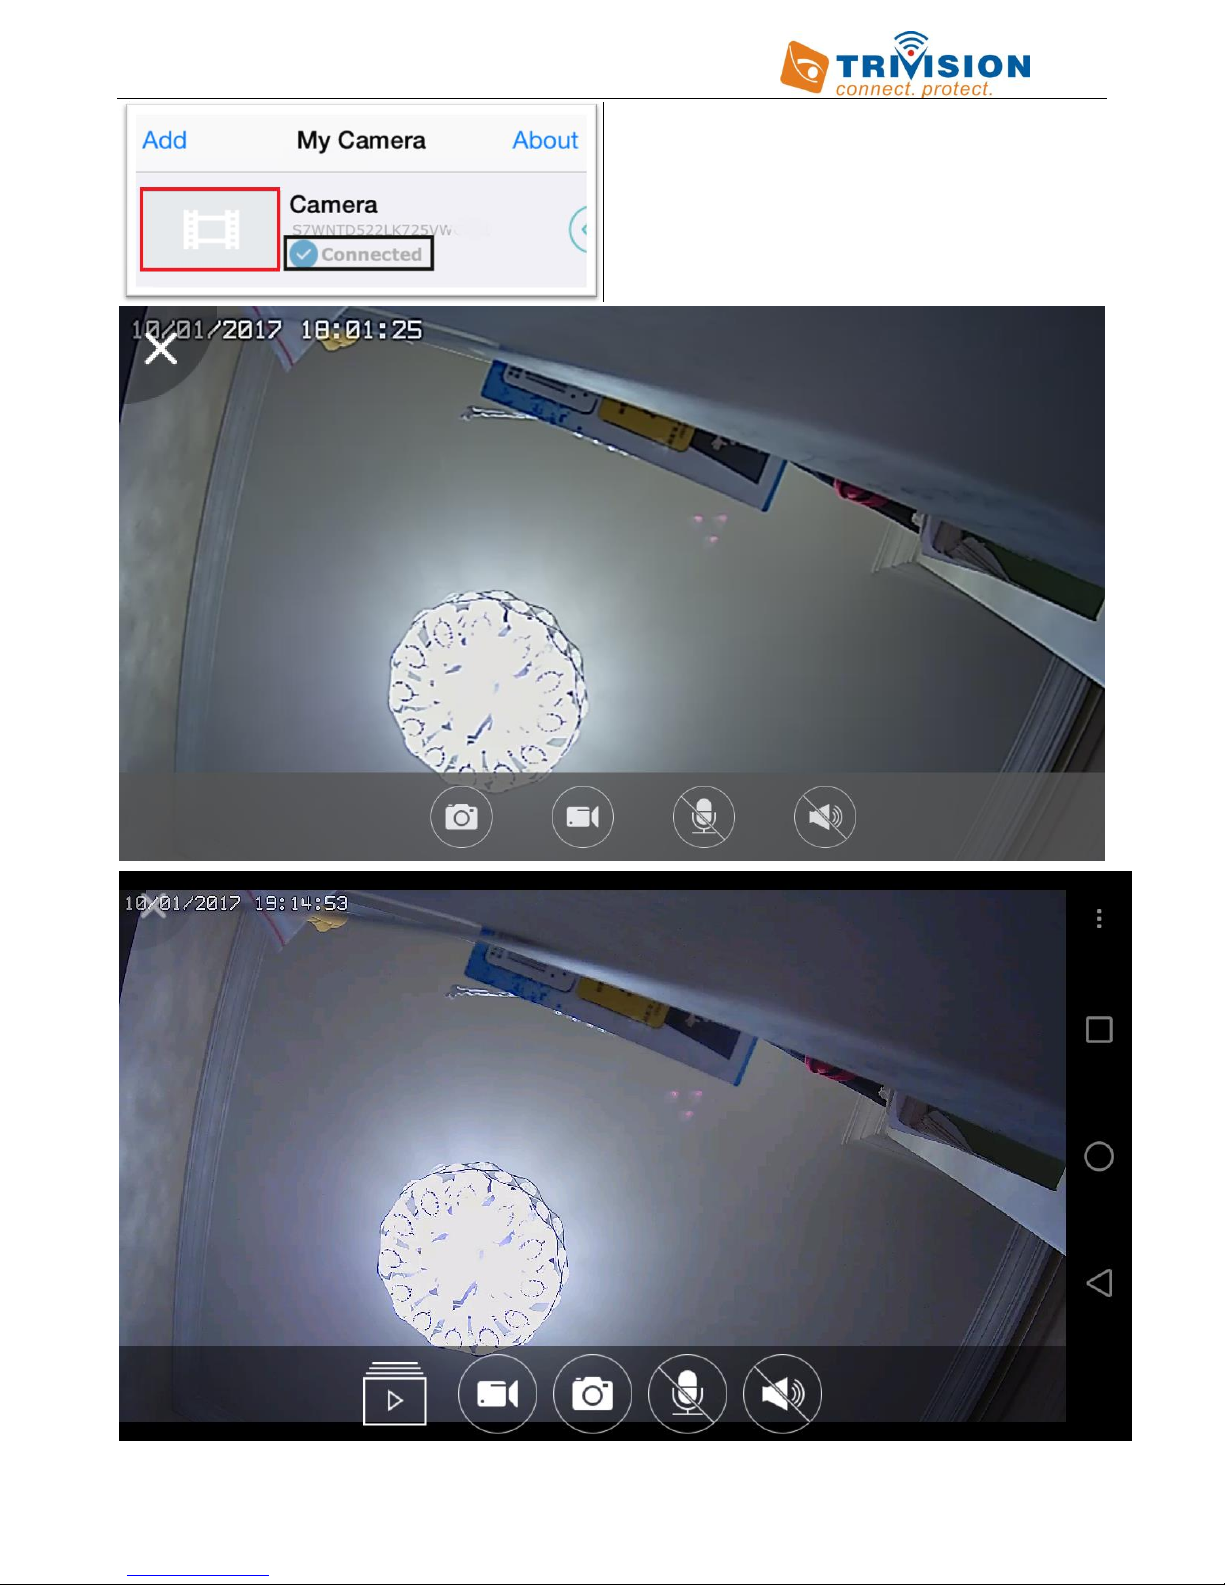
7. In the app, go to the My Camera page, tap the CAMERA (red circled below) to view the camera’s live under wired
connection. To go back , tap the screen, then tap the “X” in the top left of screen to return to My camera page.
6
7
3.0 Recorded Video Playback on Your Phone
Both Android and iOS devices can view captured videos and photos that are stored locally on the smart phone and
also Micro SD memory card. (Refer to the full manual for instructions on how to install the SD memory card and set
up motion detection recording.)
The process if similar for both devices.
1. Launch Anyscene
2. Make sure that you are connected to your camera
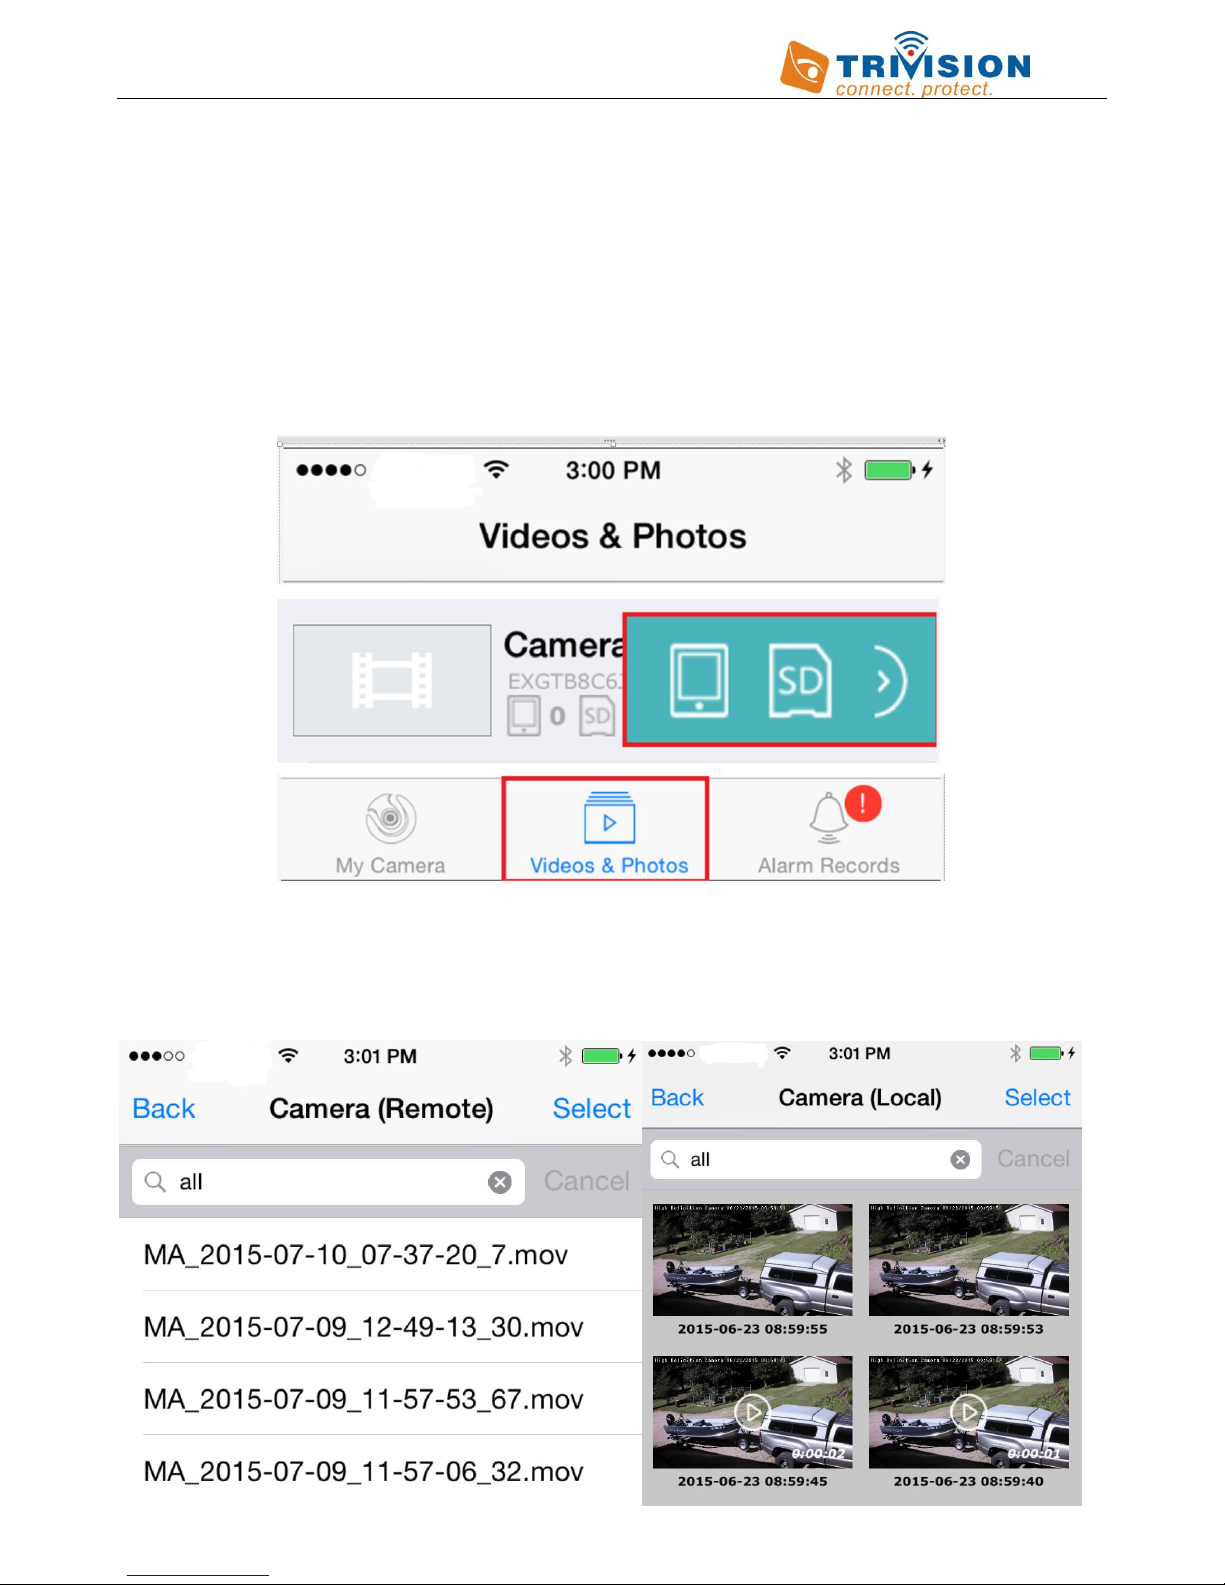
3. The next step is important: at the bottom of the screen, make sure you select VIDEOS & PHOTOS (not My Camera)
4. Touch the arrow to the right of the camera
5. Out will pop the choice to access the camera SD memory card or the mobile storage. Tap this symbol:
Elect Mobile to get a listing photos and videos stored on the mobile.
Elect SD card to get a listing photos and videos stored on the micro SD card. Then tap to view

8
4.0 Viewing /Deleting/Disabling alerts on Your Phone
Both Android and iOS devices can receive alert message when motion detector triggered alarms .
The process if similar for both devices.
1. Launch Anyscene
2. Make sure that you are connected to your camera
3. The next step is important: at the bottom of the screen, make sure you select Alarm Records, not VIDEOS &
PHOTOS and My Camera.
4. Touch the arrow to the right of the camera
5. Out will pop the choice to access the camera alerts (bell), alerts list, Tap this symbol:
Elect alerts (bell) to stop or start receiving notification from this camera.
Elect Alerts list to get a listing alerts message stored on the mobile.

9
5.0 Advanced Setting on iPhone, iPad, Android Smart Phone
You can perform many of the advance camera management configurations directly from your smart phone. With the
Anyscene app running, click the small arrow on the right side of the camera you wish to configure. (Below red arrow
points to the touch point.)
It is important that you have “My Camera” selected on the bottom of the Anyscene app. Also Note that if you click
anywhere but the right arrow icon, you will launch the camera live view.
Next, click the pencil EDIT symbol (circled below in red).
In the Edit page, you can:
Connect to the camera with the proper password (The default password is “admin” in lowercase without quotes).
Or change the admin password. Please note: if you have changed the default login passwords on the camera web
interface in browser, then you should enter the same password when you add the camera to the app to specify the
updated password or edit the password in the app, otherwise the cameras will show as disconnected in app.
Please note: Keep this password safe. The only way to recover from a lost password is to reset the camera back
to its default settings, and this will wipe all other settings

10
Or make network changes, refine Video Quality, Camera Setup, Alarm Setup, SD card recording or FTP Upload…...
To do so, touch ADVANCED SETTINGS
Tap About Device, you will get the camera information as below.
11
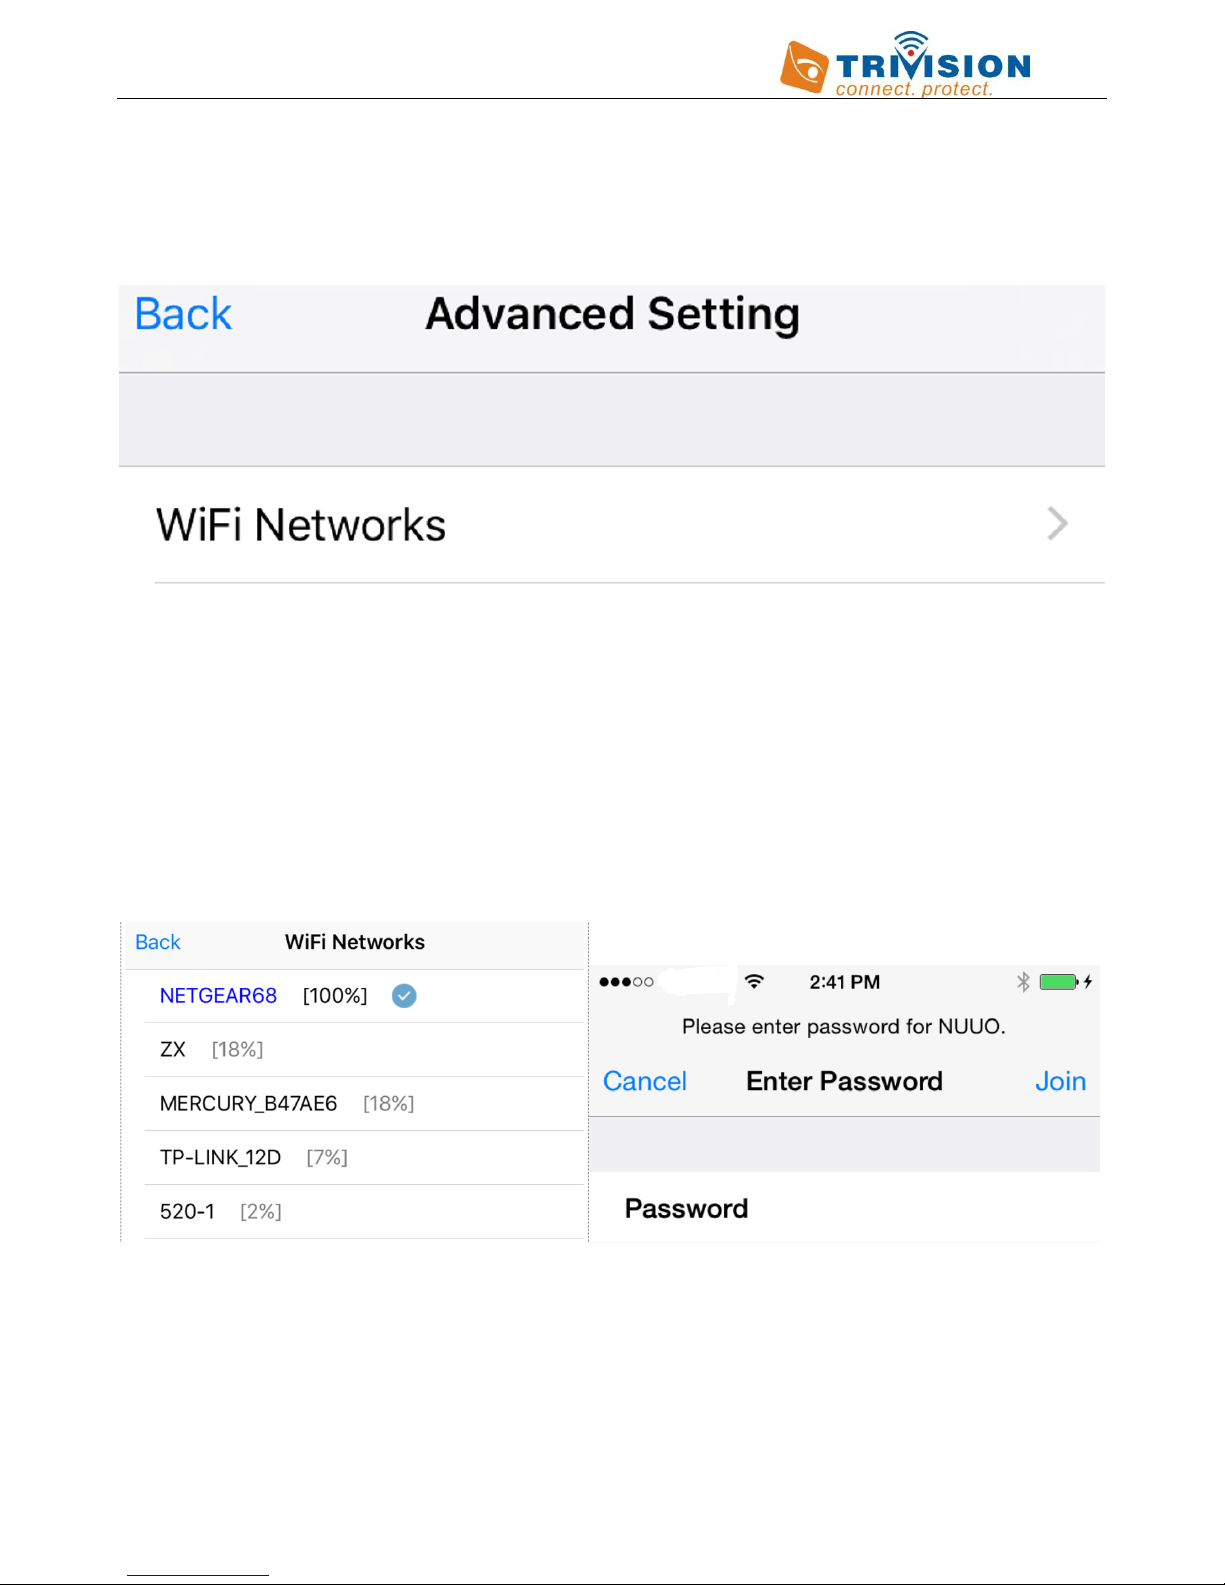
6.0 Wi-Fi Configuration on iPhone, iPad, Android Phone/Tablet
Of special interest for initial configuration is the ability to change the Wi-Fi network setup.
1. While in the Advanced Setting, select WiFi Networks or Wi-Fi setting
2. Tap the arrow, the App will then present you with a list of possible Wi-Fi networks that your camera can connect
to.
3. Select the Wi-Fi network that matches the network that you wish to connect. (Note that if you are already
connected, you will see a blue tick next to the wireless SSID.)
4. Once you select the network, you will then be presented with the request to enter Wi-Fi password:
5. And this will then connect the camera to the new Wi-Fi wireless network.
Please note: If you don’t remember the exact spelling of your Wi-Fi password, you can check the label on your router
or login your router and check your router’s wireless setup menu.

12
7.0 Warranty
TriVision offers a limited one year warranty for all hardware products made by the company. TriVision warrants the
original purchaser that the camera and related products enclosed with this limited hardware warranty will be free
from defects in workmanship and materials for a period of one year from the date of original purchase. This warranty
does not cover any damage attributable to erroneous installation, faulty maintenance, faulty repair or normal wear
and tear of the product.
The original purchaser shall without undue delay notify TriVision of any defect which appears, failure to which shall
mean that the purchaser loses their right to have the defect remedied.
During the warranty period, TriVision will repair or replace all defective products, provided that they are returned at
the customer’s expense to TriVision or an authorized TriVision repair facility and upon presentation of proof of
purchase.
TriVision has sole and unfettered discretion to determine whether a particular product will be replaced or repaired.
TriVision reserves the right to charge a “No Fault Found!” fee for products returned as defective where no fault could
be found by TriVision. The “No Fault Found” charge will be calculated as freight charge (if incurred) plus 10% of
invoice price for the units as handing charges.
TriVision assumes no liability as a consequence of following circumstances, under which will be automatically
excluded for warranty:
# The product is found to be defective after expiry of the warranty period
# The product has been subjected to misuse, abuse, or unauthorized repair, whether by accident or other cause as
determined by TriVision at it’s sole discretion.
# This warranty is void if the unit is tampered with or altered in any way. Certain models of TriVision products are
designed specifically for indoor use only. Use of these products outdoors will void this warranty.
# Product updates; reworks, and tests upon the request of customers in the absence of proper warranty coverage
from TriVision
# Products is damaged beyond repairs due to uncontrollable factors such as shipping, natural disasters, including but
not limited to lighting strike, flooding, earthquake.
# This warranty does not cover TriVision products purchased from unauthorized sources of supply including auction
houses. TriVision will not replace these units regardless of whether or not the product is in or out of warranty.
Contact us with any questions, no matter how simple or how
complicated. We pledge that we will not let you fail.
Table of contents
Other Tri-Vision Security Camera manuals


