Triangulum Astro TEPP User manual

User Manual
TEPP
Triangulum Equatorial Photographic Platform

TEPP User Manual
Triangulum Astro Kft.
2
Table of Content
1. Packing List.......................................................................................................................................2
2. Getting Started.................................................................................................................................3
2.1 Leveling and Polar Alignment..................................................................................................3
2.2 Mounting the Telescope onto the TEPP................................................................................3
2.3 Precision Polar Alignment........................................................................................................4
2.4 Finding the Target Object.........................................................................................................4
2.5 Electronic Control Interface......................................................................................................5
2.5.1 Connectors and Switches.................................................................................................5
2.5.2 Powering up........................................................................................................................6
2.5.4 Wireless Remote Controller..............................................................................................7
2.5.5 Reaching a Limit Switch....................................................................................................8
2.5.6 Beep Signals.......................................................................................................................8
3. Changing the Operation Latitude ..................................................................................................8
4. Transport...........................................................................................................................................9
5. Periodic Maintenance....................................................................................................................10
6. Troubleshooting .............................................................................................................................11
7. Specification ...................................................................................................................................12
1. Packing List
Your package contains the following items:
Item description
Quantity
[pcs]
TEPP Platform
1
Threaded mounting legs
5
Remote controller
1
M8 thread with a wing nut and washers
1
12V cigarette lighter adapter
1
USB cable (for remote controller charging)
1
Pole telescope adapter
1
ST4 autoguider cable
1

TEPP User Manual
Triangulum Astro Kft.
3
2. Getting Started
2.1 Leveling and Polar Alignment
Place the TEPP on a stable, and nearly
horizontal surface, facing the front of the
platform to the pole.
Set up the four outer bottom legs to get
the TEPP horizontal, and after
doublechecking the spirit level, set up the
5th leg in the middle as well, without
compromising the horizontal level, and
feeling the proper balance. This
alignment is recommended and good
enough for visual observation.
If you plan astrophotography, it’s strongly recommended to do further steps and to finetune
the polar alignment, either with a laserpointer (A), or with a polefinder telescope (B), or with
using the Schneiner method (C, see chapter 2.3).
A
B C
2.2 Mounting the Telescope onto the TEPP
Carefully position the Dobson’s base, and make sure that the pivot points of the base are
above the center axis of the TEPP, with further attention to keep the center of gravity at about
halfpoint of the DEC part.
If the central screw of the base makes it possible, use also the anchor point on the TEPP, and
get the provided M8 thread and the wing nut to fix the position.

TEPP User Manual
Triangulum Astro Kft.
4
IMPORTANT NOTE! Always make sure, that the base of your telescope is fixed to the
TEPP, and it cannot fall off! Manufacturer doesn’t take any responsibility if your
telescope is fall off of the TEPP because of a non appropriate mounting!
If you cannot use the center point of the base for
mounting, use cable ties right next to the rubber
legs of the upper part of the platform.This makes
your setup stable enough not to fall off, even in a
windy weather.
The last step is to place
your telescope and the
accessories onto the
base, and keep the
center of gravity as low
as possible! In order to
do that, you may use
extra weights at the main
mirror side of the
telescope. This way
you’ll be able to achieve
more accurate guiding.
2.3 Precision Polar Alignment
To get more precise polar aligment you canfollow the steps ofthe Scheiner method. A detailed
description can be found on the webpage below (note: for this method, you have to start the
platform first):
Scheiner method: http://www.grnbrg.org/polar_align/guidingsim.html
2.4 Finding the Target Object
Since TEPP is already operating in clock-machine mode (TEPP is turned on), as a first step,
manually set up the direction with the help of the finder scope, or with a lasepointer. Now you
can calibrate and finetune the position with the remote controller, untill the target is in the
middle of the frame. It is recommended to doublecheck the position through the ocular first,
then setting up the camera itself. After repeated recalibration of the frame (putting the target
into the very middle of the frame), you can start the calibration of tracking. With some practice,
this all setup takes less than 10 minutes, so you will have 100 minutes to take pictures before
TEPP stops.

TEPP User Manual
Triangulum Astro Kft.
5
2.5 Electronic Control Interface
The platform controller electronics is not waterproof! Do not use it in rain, and
always keep it away from any source of water or liquid! Always use a 12 V DC
power source! Using higher input voltage than 16 V will demage the circuit!
Do not disassemble the platform controller! In case of disassemble or water
demage the warranty is void.
2.5.1 Connectors and Switches
Front panel connectors and switches
1) Main power switch with power indicator LED
Use this switch to turn on or off the platform. The built in power indicator LED is
continously on if the input voltage is OK. Slow flashing light indicates low input voltage,
but it doesn’t effect the normal operation. Fast flashing light indicates a critically low
input voltage, if you’re using your car’s 12V battery, you should start charging as soon
as possible to prevent battery demage!
2) 12 V DC Power input
Connect 12 V DC power here. This connector has a
positive polarity, so connect the positive supply voltage
to the center point of the connector!
3) 12 V DC Outputs for accessories
These ports have 12 V output voltage and 3 A each ouput corrent capacity. Use this
connectors to power your accessories. Each port is protected against overcurrent
4) Autoguider port
ST4 compatible autoguider input port to connect your
autoguider. Pinout is shown on the drawing on the right.
5) Speed selection switches
You can select the desired autoguider and remote controller sensitivity with these
switches. 1: Fast 1/2: Medium 1/4: Slow
TEPP User Manual
Triangulum Astro Kft.
6
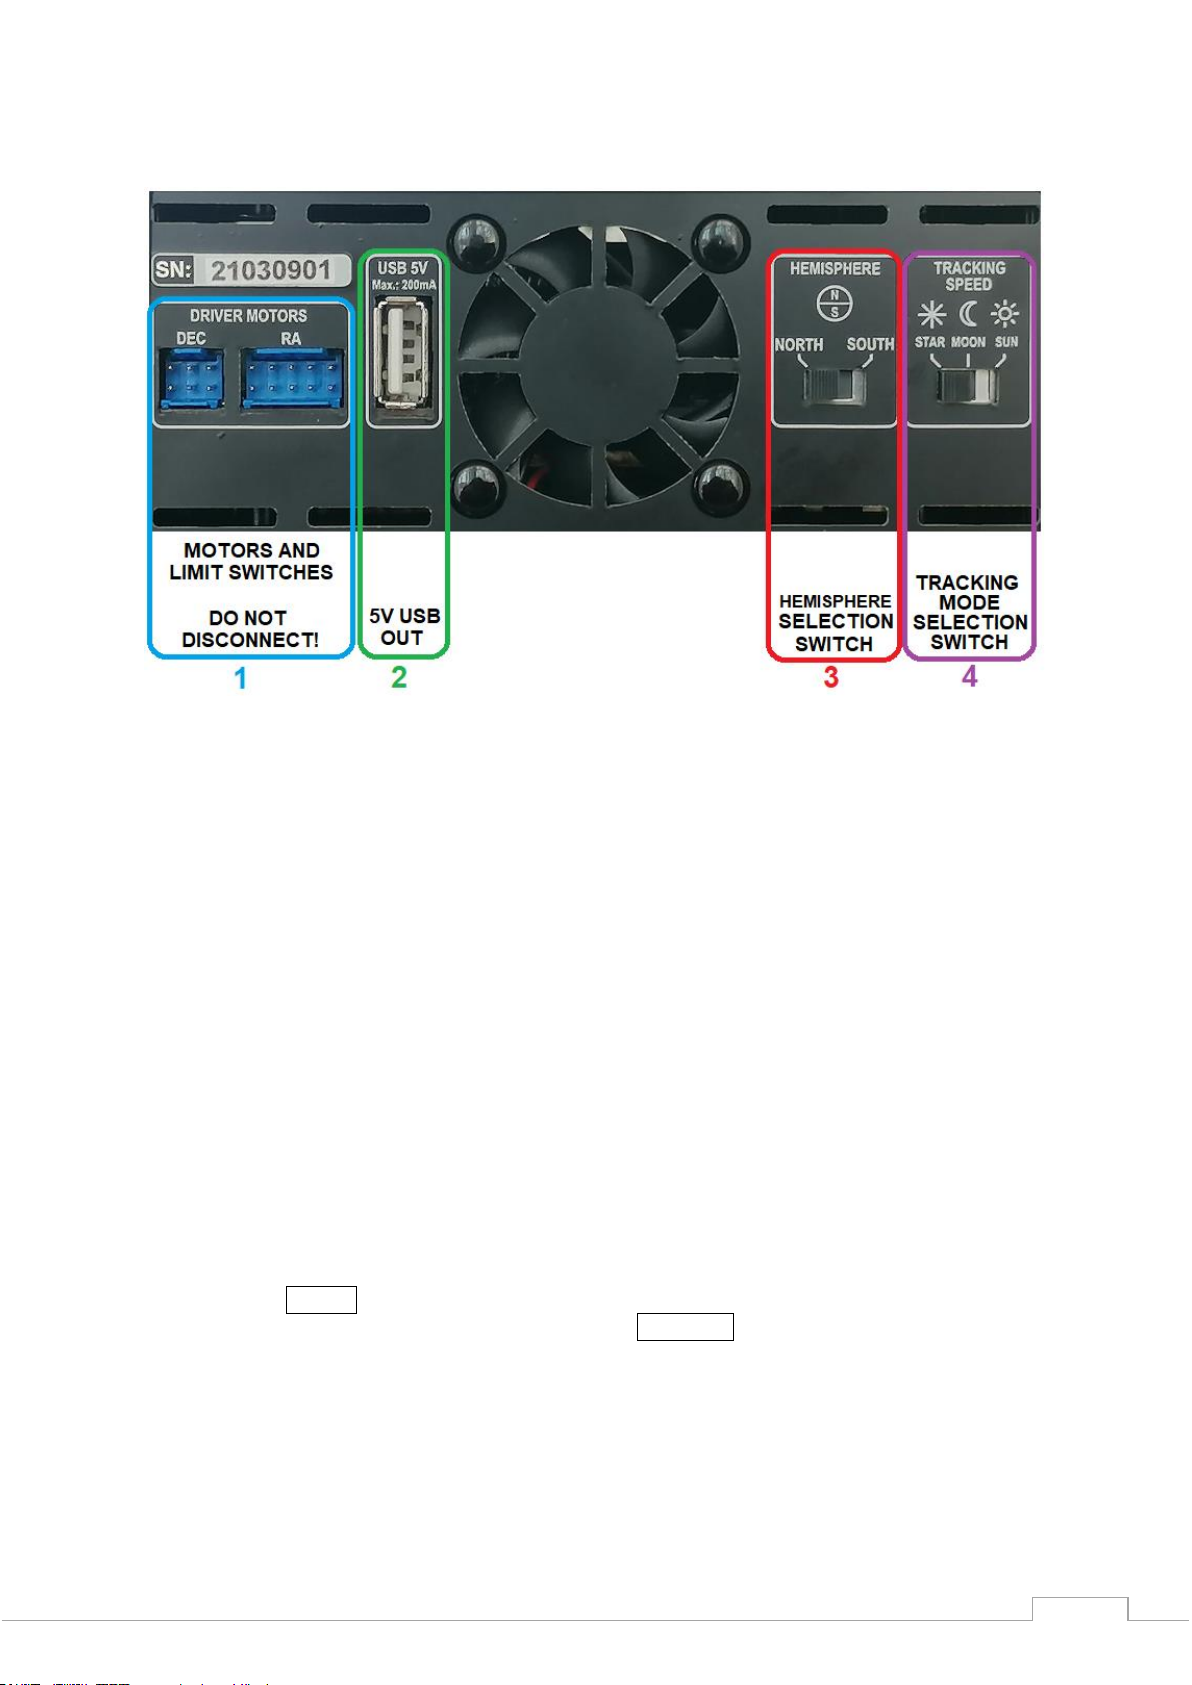
Rear panel connectors and switches
1) Motors and limit switches
Connection for the TEPP’s stepper motors and limit switches. Do not disconnect or
modify these connectors!
2) 5V USB out
Standard USB socket to charge your remote controller. Ouput current is limited to
200 mA. This port is only for charging, doesn’t support any communication, do not
connect to your PC or LapTop!
3) Hemisphere slection switch
Use this switch to select the hemisphere according to your location. This switch must
be set before power on! After you turned on the controller, it is not possible to change
hemisphere!
4) Tracking mode selection switch
TEPP can be used to track the Sun or the Moon too. Use this switch to select the
required tracking mode. For standard sky astrophotograpy always set to STAR
position. Change it only if you’re taking photos of the Sun or Moon!
Before start using the platform, always make sure that the HEMISPHERE swith is in the right
positon! There is no way to change the hemisphere slection during an active tracking. To do
that, you have to restart the controller after hemisphere is selected.
2.5.2 Powering up
To power up the controller, turn off the main switch, then connect a 12 V DC power source to
the connector 12V IN. Always use this dedicated power input connector for the 12 V power
supply! All of the other connectors –marked as 12V OUT- are outputs. You can use the
attached 12 V car cigarette lighter adapter, or any other power supply with 12 V regulated
output voltage and with a minimum 3 A output current rating. Always take care of the right
polarity, however the controller is protected against reverse polarity. After connecting the
power to the input, you will hear a short click. This is the sound of the output prtection relay,
and this is part of the normal operation. Now the 12 V auxiliary outputs are enabled, and you
can connect your own devices to them now (camera power, heating or cooling circuits,
autoguider, etc…). Each output has 4 A maximum output current, and they are shor-tcircuit

TEPP User Manual
Triangulum Astro Kft.
7
protected. The maximum current on the input connector is 10 A, so take care of that the
maximum power of all the attached peripherial devices is under 100 W! Always make sure,
that you are using a 12 V power supply that has the necessary output power rating to power
all of your connected devices!
Now you can turn on the controller with the main switch. The platform moves to the home
postion –it may take 1-2 minutes-, then the tracking starts automatically after a warning
beep.
ATTENTION! Right after you turn on the controller, you will hear a beep, then the
platform initializes, which means that axles start to move! Keep away your fingers off
the platform to avoid any injuries!
2.5.4 Wireless Remote Controller
During the active tracking you can use the remote controller to control it’s movement or to
search an object in the sky.
ATTENTION! Remote controller has a built in, rechargeable lithium polymer battery!
Battery is not replaceable at home! Do not disassemble it! Do not expose it to direct
heat or sunlight! Do not leave it in a car that can warm up on sunlight! Never leave it
unattended during charging! Do not use and do not attempt to charge it if the house is
broken! Do not use in rain, the remote controller is not waterproof!
The functions of each button is shown below:
The remote controller has a key lock function to prevent unwanted movements. To unlock the
remote controller, press and hold the ENABLE button. Once it’s enabled, the built-in LED
indicator shows the state of the charge of the battery:
-green: battery level is OK, it’s over 30%
-red: bettery level is low, it’s under 30%
-flashing red: battery is too low, connect it to a charger
If the red light is flashing, the remote controller doesn’s send any signal to the platform
controller, so connect it to a charger as soon as possible. Remote controller can be used
during charging.
To charge the remote controller you can use any standard 5V USB power source or phone
chargers with microUSB cable, or you can use the rear USB connector of the TEPP connector.
During charging the built in, blue LED lights. Charging time is around 6-8 hours. Once the
charging has ended, the blue light turns off.
To control the TEPP, push or pull the joystick to the desired direction, while the ENABLE
button is pressed. If the platform controller receives the signals it will sound very short beeps.
If you don’t hear this continous clicking sound, you’re probably out of the range, so go closer

TEPP User Manual
Triangulum Astro Kft.
8
to the platform or try to hold the remote controller in a different position. The nominal range is
around 3-5 meters / 10-15feet. Note: every remote controller has unique ID, so only it’s original
platform controller will receive it’s transmissions. This way more than one platform can be
used in the same time.
2.5.5 Reaching a Limit Switch
Before the platform reaches any of the limit switches, it will sound a short beep in every
seconds. This is a final countdown, and you have 10 seconds left to stop the photographing
before initialization starts. After 10 seconds the platform goes to the home position, then
restarts the tracking automatically. If the DEC axis reaches the limit switch, only this axis will
reset, the RAaxis continuesthe tracking. If RA limit switch is reached, then both axis will return
to home position.
The object of interest will be lost during homeing, so you have to find it again.
2.5.6 Beep Signals
Single, long beep, 1s
Start of initialization, platform goes to Home position
Long beep, followed by 3 short
beep
Home position reached, tracking has started
One short beep in every
seconds
Limit switch is reached, countdown is in progress
Countinous short beeps
Error! Swith off the controller, then restart it!
3. Changing the Operation Latitude
TEPP systems works between 33-62 latitudes on both hemispheres. You get the platform
preset according to your location. If you stay within ±2 degrees around the default latitude, it’s
not necessary to change the settings. In this case it’s perfectly enough to compansate the
difference by the setting the holding legs and tilt the whole platform. (Note: the spirit level is
cannot be used this time)
If you want to use the TEPP on a different latitude, you can change the platform settings, and
reassemble it to the desired latitude. To use the system on 33 or 62 degrees, just setup 35
and 60 degrees respectively.
Before start the assembly, always make sure that the platform is not loaded and not
powered!
Required tools:
3 mm and 4 mm Hex keys
7 mm and 8 mm Wrench
Loosen the screws on each side, and adjust the red arrows to the desired value, then tight
them very well! 1 degree accuracy during selection of the latitude is enough, since further
finetuning will be possible if you make precision pole finding (eg. adjust the lenght of the
legs, or use the Scheiner method).

TEPP User Manual
Triangulum Astro Kft.
9
Then you need to set up the two base plates too on the bottom side of the platform. To find
the right fixing holes, use the drawing below. Each hole represents 1 degree latitude from
35°to 60°.
4. Transport
In order to keep the hard metal surfaces unharmed during a transportation, it’s strongly
recommended to separate the bearings from the stainless steel arcs using cardboard pieces.
Use cable ties to fix these cardboard pieces, and to prevent the movement of the upper DEC
part.

TEPP User Manual
Triangulum Astro Kft.
10
Before using the platform, always make sure that the cardboards and cable ties are
removed!
5. Periodic Maintenance
TEPP has a pretty robust design, but it still needs some periodic maintenance to keep the key
components healthy.
Check the greasing of the DEC axis in every 6
months. If it’s too dry, apply some grease. You can
move the DEC part into the upper position with the
remote controller. This way you will have enough
space to get the grease anywhere ont he axis.
After doing so, switch off then on again the
electronics to get the DEC into the center position.
Check the RA belt tightness once in every 6 months. If it’s too loose, you can tighten it by
adjusting the gear wheel position on the side opposite to the RA motor. The tightness is just
perfect, if the loosest part of the belt can move around 3-4 mm.

TEPP User Manual
Triangulum Astro Kft.
11
6. Troubleshooting
Problem observed
Possible solution, root case
Remote controller doesn’t work
You’re out of the range, get closer
Battery is down, recharge it
Strong WiFi router can be found close to
the platform
Target object always leaves the
frame
Check the set latitude
Check the pole direction
Check the power supply of the controller
Guiding has a significant RA error
Check the tightness of the belt
Too windy weather
Guiding has a significant DC error
Check the position of the center of gravity
of the telescope, maybe it’s too close to the
DC axis
Too windy weather
Guider gives „Calibration error”
Doublecheck the stable balance of the Alt-
AZ axles
Try to select another autoguider speed on
the TEPP controller unit
Too windy weather
Blurry or striped pictures
Check the balance and proper fixing of Alt-
AZ axles
Try to set another integration time for
guiding
Too windy weather
Guider shows big deviation for the
RA-DEC perpendiculars
Try to take photos in another time, when
the target is closer to the meridian
One of the 12V outputs is not
working
Overloaded output: remove the load, and
wait 10-15 minutes to recover the internal
fuse
Try to connect your load to another output
connector
TEPP is not initialize (continous
short beeping)
Check the cables of the limit switches
Check the connectors and cables of the
TEPP controller unit
TEPP jumps or slides sometimes
Overweighted platform
RA belt is too loose
In peripheral positions the telescope
willing to fall off
Check the position of the center of gravity
of the telescope
Check the center mounting screw of your
telescope’s base
Fix the base to the TEPP using cable ties
DEC movement lags, or it has
clicking noise
Check the greasing of the DEC axis

TEPP User Manual
Triangulum Astro Kft.
12
7. Specification
Product Name
TEPP
Dimensions
74 cm x 82 cm x 23 cm
Weight
30 kg
Payload
100 kg
Operating latitude range
33-62°
Operating temperature range
-20 +40 °C
Tracking time
110 minutes
Power supply voltage
12 VDC (min.: 11V, max.: 16V)
Current consumption (without accessories)
maximum 1.2-1.4 A
Autoguider speed
1X 1/2X 1/4X
Manual speed (remote controller)
1X 1/2X 1/4X
Wireless remote controller range
3-5 meter
Wireless remote controller frequency
2.4 GHz
Note: The above specifications are subject to change, without advance notice
Table of contents


