TRIBUS Wheelchair accessible minibus User manual

Wheelchair accessible minibus
User manual

VEHICLE
LICENSE PLATE NUMBER
BRAND AND MODEL
VEHICLE IDENTIFICATION
NUMBER
COLOR
WHEELCHAIR LIFT NUMBER
PROJECT
VEHICLE FROM
DATE
MILEAGE
CHECKED BY
STAMP AND SIGNATURE APPROVAL
DELIVERY CHECK

AS-81-190807 2 of 271 of 27
Dear customer,
Congratulations on the purchase of your new wheelchair minibus!
The wheelchair accessible minibus is constructed with the utmost attention to safety, user-friendliness
and quality. All of our adjustments to this vehicle more than suciently comply with the statutory
requirements, in order to reassure you and your passengers.
Tribus can only guarantee the safety and the comfort of the conversion if its used correctly. We
therefore advise you to carefully read this manual before using your wheelchair accessible minibus for
the rst time and make sure that you have a good understanding of the instructions. The instructions in
this manual are also available on video, on our website: www.tribus-group.com/instructions.
If you have any questions concerning certain aspects of wheelchair transport, please don’t hesitate to
contact us. We will be happy to help you.
You can also count on us in case of any unexpected problems. Our service team is ready for you at all
times, to serve you without delay.
We wish you a safe and comfortable ride!!
Tribus
INDEX
IN CASE OF AN EMERGENCY CALL T +31 30 669 50 20
INTRODUCTION
6 PROTECTOR RESTRAINT SYSTEM
5 FLEXUSPRO SEAT & MOUNTING
3 TRIFLEXAIR FLOOR SYSTEM
4 TRIFLEXAIR SEAT & SIGNALING SYSTEM
2 GENERAL GUIDELINES
1 INTRODUCTION 2
5
3
14
11
7
7 WHEELCHAIR LIFT 16
ATTACHMENTS
FAQ 21
PARTS LIST
MAINTENANCE SCHEDULE
© Tribus 2019. No part of this publications may be reproduced and/or published
by means of print, photocopy, microlm or in any other way without prior written
consent of Tribus B.V. Tribus B.V. reserves the right to change or declare invalid
the text and data in this manual at any time.
22
25
3 DASHBOARD INSTRUMENTS
2 AUTOMATIC DOOR
1 RAMPS & STEPS 18
20
19
AS-81-190807 4 of 273 of 27
POLICY FOR MALFUNCTIONS, REPAIRS AND MISCELLANEOUS
Replace the wheelchair securement systems:
• in case of wear of the material of the belts
• in case of wear/defects of the mechanism
• if they have been used at the time of a crash accident, that resulted in the vehicle being towed
away
Prevent the wheelchair securement systems from being able to come into contact with sharp edges,
abrasive uid or oil.
Have adjustments, replacements or repairs on the wheelchair securement systems carried out only by,
or with permission of Tribus.
In case of adjustments, replacements and repairs only use parts approved by Tribus.
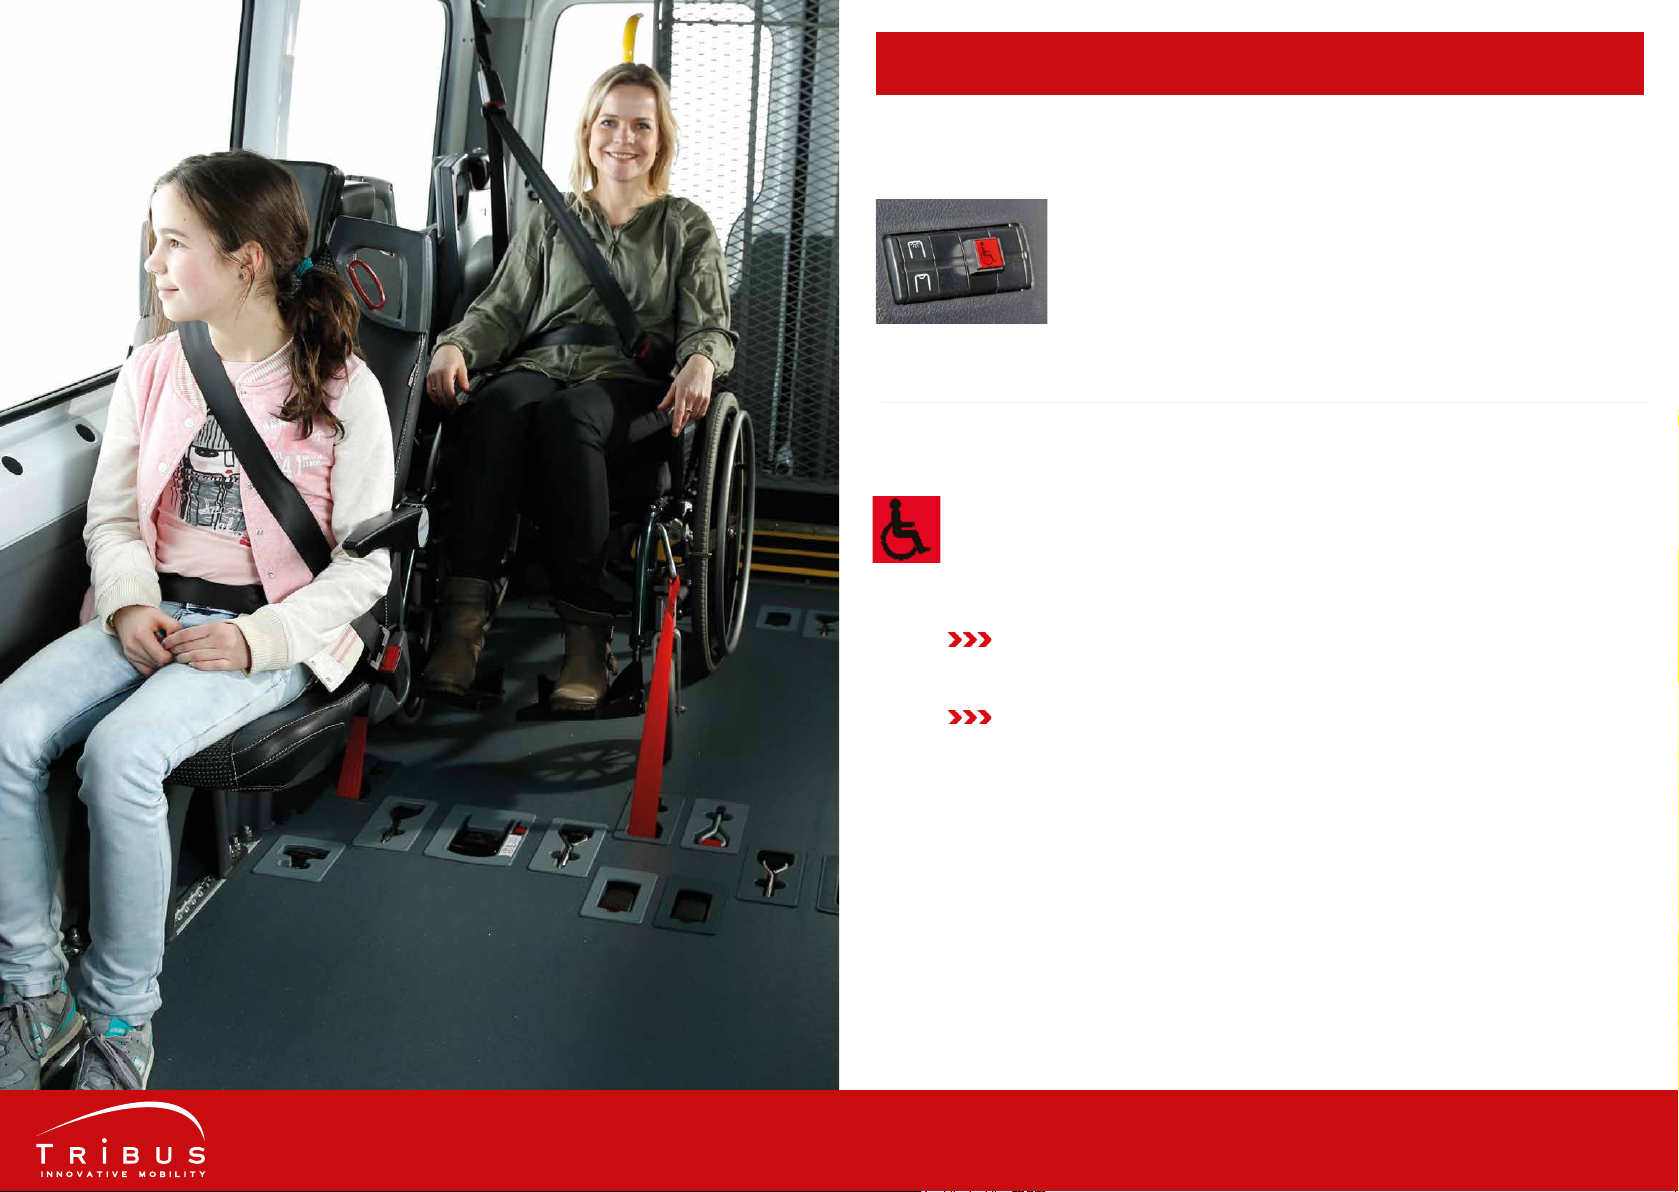
USE OF WHEELCHAIR RESTRAINT SYSTEM
• All wheelchair securement systems supplied by Tribus are exclusively intended to secure properly
lockable wheelchairs in travel direction.
• The safety belts of the wheelchair securement system, intended for the passenger, must always
be used, even if the wheelchair has its own safety belt.
• Additional accessories or parts of the wheelchair must be rmly secured. If they are not, then re-
move them from the wheelchair and store them elsewhere in the vehicle.
• If possible, remove any additional accessories or parts of the wheelchair that are situated in front
of the wheelchair passenger (except foot supports) and store them elsewhere in the vehicle.
• When using the belts, see to it that they are not twisted.
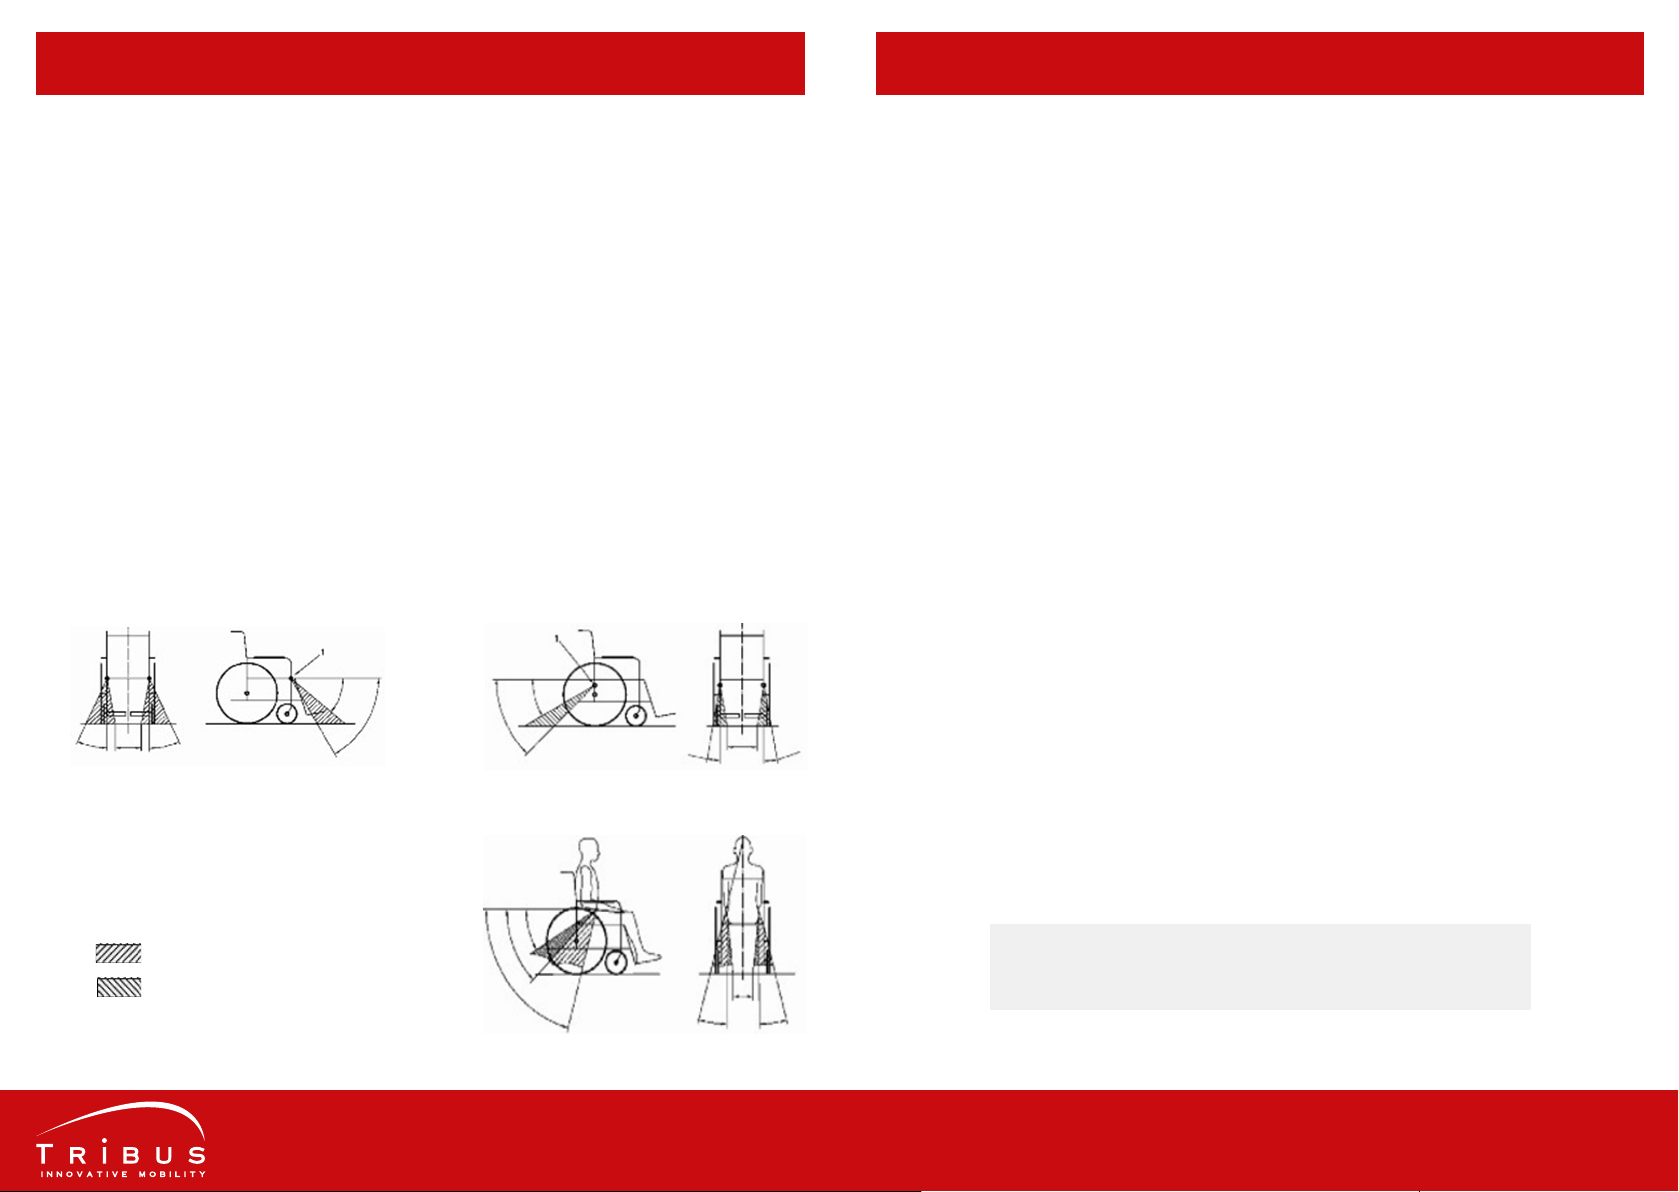
• Always observe the recommended angles and positions to secure wheelchairs. These are depicted
in pictures 1 and 2. Mount the hooks to a vertical point, so they cannot shift to the left or right.
Usually, the site of action is displayed for safely transportable wheelchairs (ISO 7176-19).
40°
60°
25°
25°
300
mm
1. Mounting front of wheelchair
10°
10°
300
mm
preferred angle
optional angle
Always observe the recommended angles of the passen-
ger’s hipbelt (picture 3).
2. Mounting back of wheelchair
3. Installing hip belts
10° 10°
300
mm
GENERAL GUIDELINESGENERAL GUIDELINES
IN CASE OF AN EMERGENCY CALL T +31 30 669 50 20

AS-81-190807 6 of 275 of 27
USE OF THE TRIFLEXAIR FLOOR SYSTEM
STEP 7
Now take the three-point belt
from the oor.
STEP 11
Use the height adjustable
belt to set the correct belt
height and belt angle. This
point should be above or at
the height of the shoulder.
STEP 10
Take the second belt latch
and attach it to the seat belt
buckle attached to the oor.
STEP 8
Attach the rst belt latch to
the seat belt buckle above
the window.
STEP 9
Fasten the passenger’s seat
belt. See to it that the belt
is not being separated from
the body by any parts of the
wheelchair.
HOW TO RELEASE
In order to release the
wheelchair passenger, you
rst release the seat belt.
Then unlock the hooks by
pulling the black lever and
remove them from the
wheelchair.
Place the hooks and belts
back into the oor before
moving the wheelchair.
USE OF THE TRIFLEXAIR FLOOR SYSTEM
To transport a wheelchair user you must follow the 11 steps below.
STEP 1
Drive the wheelchair inside
and position it on one of the
wheelchair positions between
the four hooks and in front of
the central lever.
STEP 5
Press the red button to lock
the four hooks.
STEP 4
Make sure that you attach
the hooks to the frame of the
wheelchair and not to other
parts.
STEP 2
Unlock all hooks of the
relevant wheelchair position
by pulling the central lever
backward.
STEP 3
Lever the four hooks at the
wheelchair location from
their position and attach
them to the wheelchair.
STEP 6
Gently move the wheelchair
forwards and backwards
until the straps are tight. The
wheelchair is now secured.
TRIFLEXAIR FLOORTRIFLEXAIR FLOOR
Mounting should be done by trained sta and after consultation of user
manual!

AS-81-190807 8 of 277 of 27
TRIFLEXAIR FOLDING SEATTRIFLEXAIR FOLDING SEAT
STEP 1
Unlock the folded seat by
pulling the red handle.
STEP 5
If necessary, adjust the
head support.
STEP 4
Bring the seat down.
STEP 2
Rotate the seat backward.
Release the handle, allowing
the seat to lock into the latch.
STEP 3
Position after it has been fully
rotated into travel direction.
To unfold the TriexAIR seat please follow the 5 steps below.
INSTRUCTION TO UNFOLD THE SEAT
STEP 1
Bring the seat up.
STEP 2
Unlock the folded seat by
pulling the red handle.
STEP 3
Rotate the seat forward.
Release the handle, allowing
the seat to lock into the latch.
To fold the TriexAIR seat please follow the 3 steps below.
INSTRUCTION TO FOLD THE SEAT
STEP 4
Position after it has been fully
rotated towards the window.
STEP 5
To unblock the view for the
wheelchair passenger please
push the headrest down.
AS-81-190807 10 of 279 of 27
SIGNALING SYSTEM
TriexAIR is optionally equipped with a signaling system. The system alerts
the driver if the wheelchair is not properly secured. This way it contributes to
the safety of the passengers.
This signaling system can be recognized by the red lamp to the right of the
steering wheel, see photo on the left.
• If this signal lights up one or more of the wheelchairs are not secured. Press the
red button next to the main release handle to secure the wheelchair.
Always visually identify that the wheelchair is properly secured by the
hooks and that the passenger is wearing the three-point belt.
Are there no other passengers in the bus? Then check if hooks are
properly positioned in their casing and if the central latch and the red
footswitch have been pressed.
DESCRIPTION OF SIGNALING SYSTEM
DESCRIPTION OF SIGNALING SYSTEM

AS-81-190807 12 of 2711 of 27
STEP 1
Unlock the folded seat by
pulling or pushing away the
red lever.
STEP 5
Bring the seat down until the
seat locks. The passenger can
now take place on the seat.
STEP 4
Pull the black button to
unlock the seat.
STEP 2
Rotate the folding seat
backwards until the seat
locks.
STEP 3
The folding seat is now
locked into seating position.
STEP 1
Position the seat onto the
rails such, that the ttings are
situated in the openings.
STEP 3
Tighten the tightening knobs
clockwise, hand-tight. The
seat is now secured in the
rails.
STEP 2
Turn the tightening knobs
a quarter turn and slide the
seat in such a way that the
T-pins fall into the plunger.
To unfold the TriexAIR seat please follow the 5 steps below.
UNFOLDING SEAT MOUNTING THE FLEXUSPRO SEAT
STEP 6
If desired, the passenger can
fold the armrest down for
more comfort.
The seats can be mounted in the vehicle in two dierent ways;
1. Fixed (picture 1)
2. By use of quick release levers (see mounting steps below)
MAINTENANCE
Check the lockables regularly
for damage and proper
functioning. In case of
problems please resolve this
immediately and replace
defect parts.
OPTIONAL
The lockables can optionally
be equipped with transport
rollers for easy moving of
the seat.
Picture 1
FLEXUSPRO MOUNTING SEATFLEXUSPRO SEAT
Mounting should be performed exclusively by trained personnel after
consultation of the user manual!

AS-81-190807 14 of 2713 of 27
USE OF THE PROTECTOR RESTRAINT SYSTEM
STEP 1
Retractors are removed from
the rail by pulling the ring
and sliding the retractor. As
the retractor is released, you
can lift it from the rail.
STEP 5
Use the red belt as a hip belt.
Attach the seat belt buckles
onto the belt latches of the
retractors.
STEP 4
Place the rear retractors (with
belt latch) for xation of rear
and position the hooks onto
the frame of the wheelchair.
STEP 2
You can position retractors
by sliding them over the rail,
applying light pressure. For
an optimal result you hold
them as shown in the picture.
STEP 3
First position the front
retractors and secure the
hooks to the frame of the
wheelchair. Pressing the red
button will unlock the hook.
STEP 6
Set the size of the hip belt
and fasten it.
RELEASE THE FLEXUSPRO SEAT FROM RAILS
STEP 1
Unscrew the two black
tightening knobs counter
clockwise.
STEP 4
Slide the seat a bit backward,
to make the ttings being
unrestricted in the rails. Tilt
the seat backwards and take
it from the rails.
STEP 2
Then slightly lift the
tightening knobs and rotate
them a quarter turn counter
clockwise.
STEP 3
The T-pins are now on the
plunger. The seat is now
unrestricted in the rails.
PROTECTOR RESTRAINT SYSTEM
Mounting should be performed exclusively by trained personnel after
consultation of the user manual!
Mounting should be performed exclusively by trained personnel after
consultation of the user manual!
FLEXUSPRO RELEASING SEAT
AS-81-190807 16 of 2715 of 27
HOW TO USE THE WHEELCHAIR LIFT AMF-BRUNS LINEAR AL1 SOLID
Before use, read the directions on the lift.
Always apply brakes on both sides of the wheelchair.
STEP 3
Push the wheelchair onto
the platform and apply the
brakes. The yellow grap
handles serve as support for
the wheelchair passenger.
The driver operates the lift
on the platform or next to
the platform.
STEP 2
Press the ‘unfold’ button.
The platform will descend to
a horizontal position. Then
push ‘down’ to lower the
lift to streetlevel. The grab
handles will open automati-
cally as soon as the platform
touches the ground.
STEP 1
Take the manual pressure
switch. Make sure there is no
one or nothing under the lift
so it can be lowered safely to
the ground.
STEP 4
Now push the button ‘up’ to
raise the platform. If the
platform is at the highest
horizontal position you can
push the wheelchair
passenger inside. After
securing the wheelchair
passenger press ‘fold’ to raise
the platform so you can close
the vehicle doors.
WHEELCHAIR LIFT
UP DOWN
FOLD UNFOLD
UP DOWN
FOLD UNFOLD
UP DOWN
FOLD UNFOLD
UP DOWN
FOLD UNFOLD
The pressure switch
has four buttons.
USE OF THE PROTECTOR RESTRAINT SYSTEM
STEP 7
Place the three-point belt
casing into the rail behind
the wheelchair on the side of
the window (left or right).
STEP 10
Then attach the seat belt
buckle of the black belt to the
belt latch of the red belt.
STEP 8
Click the adapter of the black
belt into the upper rail, in
“line” with the three-point
belt casing.
STEP 9
Take the black belt and apply
it around the wheelchair
user.
Mounting should be performed exclusively by trained personnel after
consultation of the user manual!
PROTECTOR WHEELCHAIR RESTRAINT

AS-81-190807 18 of 2717 of 27
HOW TO USE THE MECHANICAL FOLDING STEP
STEP 1
When the plate is unfolded, it serves as a step.
STEP 4
The ramp at the sliding side door is operated by
a switch at the entrance, or one on the
dashboard. Optionally the control can be swit-
ched automatically by a control-unit over the
sliding side door.
The electrical ramp is equipped, by default, with
a red signal light on the dashboard. This will
turn on if the ramp is still extended. The lamp is
in connection with the ignition.
STEP 2
As the step is folded, it will cover the entrance
section.
HOW TO USE THE AMF-BRUNS FOLDABLE WHEELCHAIR RAMP
STEP 1
Unlock the ramp on both
sides by pushing the press
button. Subsequently you
can carefully pull the ramp
towards you.
STEP 2
The gas spring will ensure
that the ramp can be ope-
rated lightly and easily. You
will need little eort to fold
and unfold the ramp. When
folding, check if the press
button is secured!
OPTIONAL
The ramp can be designed
with star knobs (see picture)
for easy disassemble of the
ramp. After unscrewing the
star knobs, the ramp can
easily be lifted from the
vehicle by two men.
HOW TO USE THE ELECTRICAL SLIDING STEP
MAINTENANCE
• Clean frequently by use of compressed air or water (garden hose or pressure jet)
• After cleaning, lubricate with silicone or cockpit spray
DO NOT USE GREASE OR OTHER LUBRICANTS!
FOLDING STEPSWHEELCHAIR RAMPS
AS-81-190807 20 of 2719 of 27
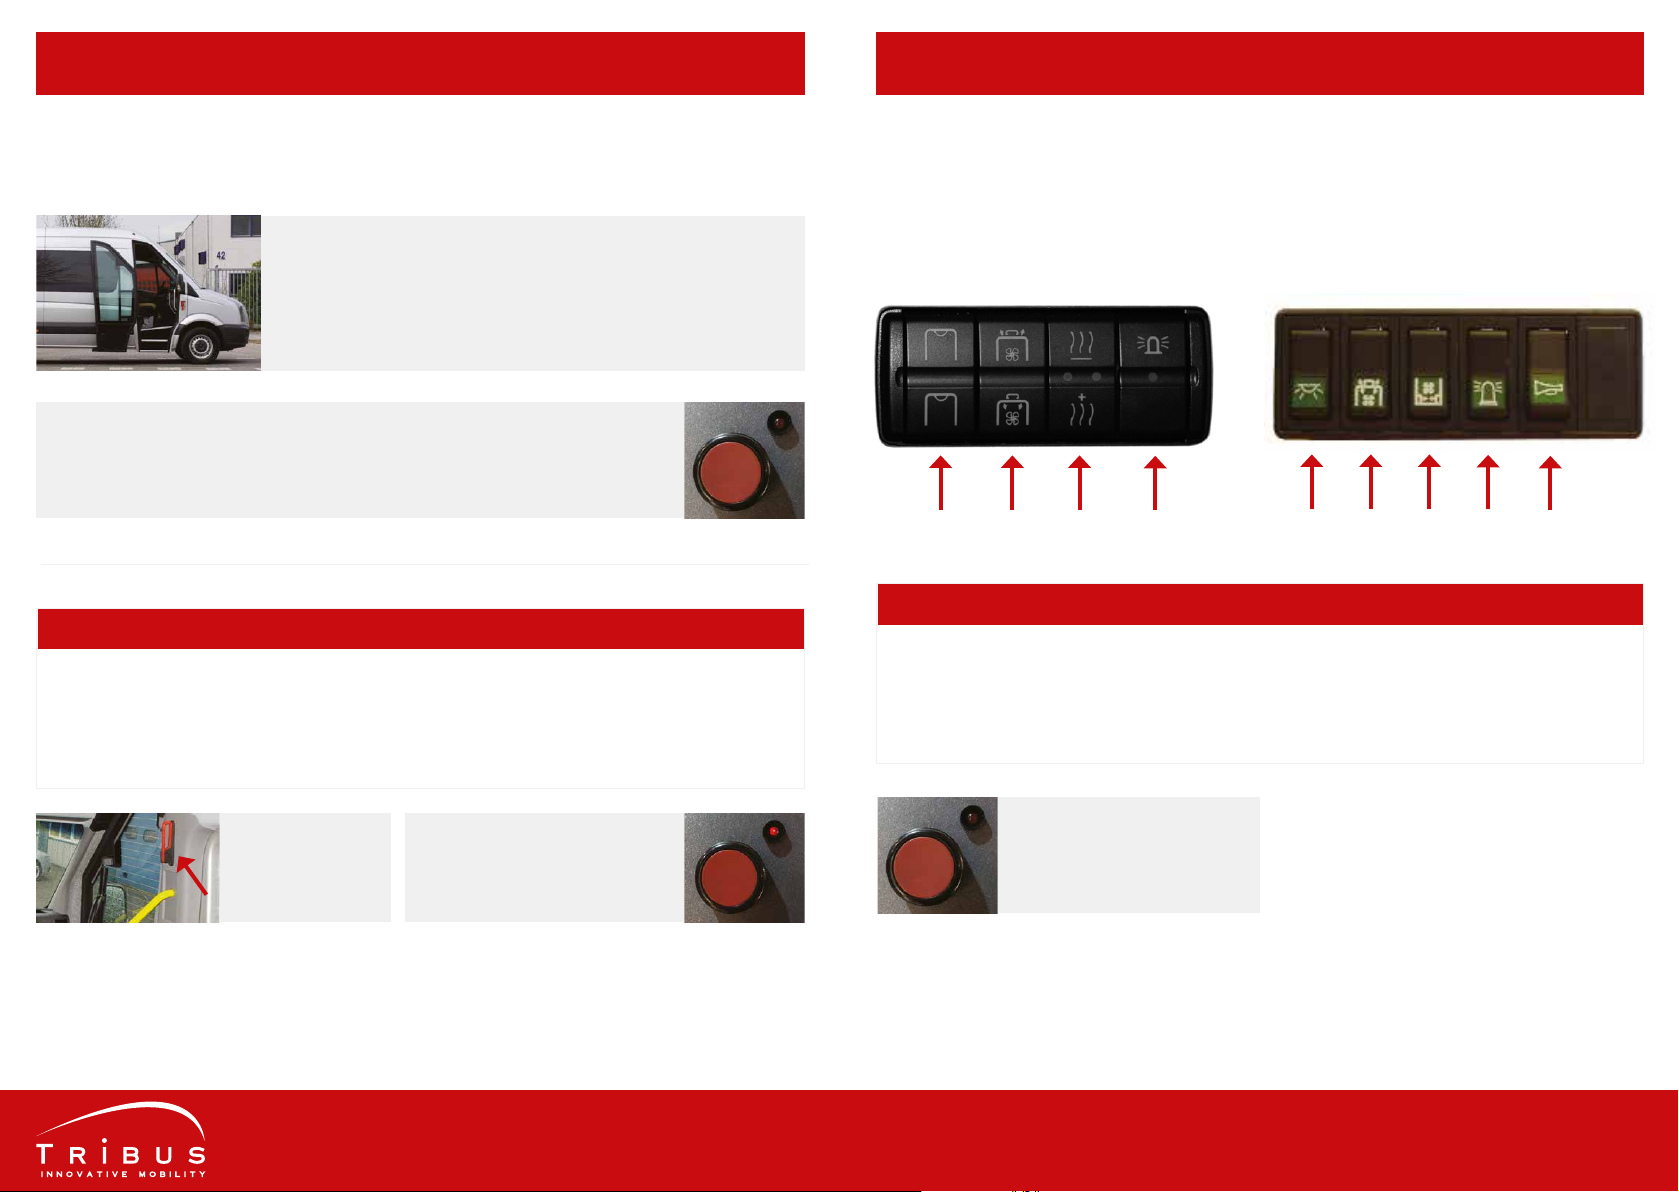
OPTIONAL: SWITCHES ON THE DASHBOARD
Switches below will be present only if the relevant option is available in the vehicle.
HOW TO USE THE AUTOMATIC DOOR
The vehicle is equipped with an automatic door. An original front
door will open to the front (A-pillar), a glass front door will open to the
back (B-pillar).
If the emergency release is active,
the small red light will be on. This
also applies if the emergency
release on the outside is jammed.
You can open and close the door by one push on the red button. This is located on
the dashboard, to the right of the steering wheel.
Optionally the door is connected to the handbrake. In that case the door can only
be operated when the vehicle’s handbrake is applied.
Inside, you pull this
lever. The door can
now be opened
manually.
EMERGENCY RELEASE
• During journeys, only the red button should be used to open and close the door. Opening the
door manually is only done in case of emergencies!
• Don’t start driving when the red lamp is still on! This means that although the door is locked, it
can still be opened from the outside.
• Never open the door while driving!
Mercedes-Benz & Volkswagen
DESCRIPTION TABLE
1. Interior lighting: Up means full lighting. Down means blue light for driving in the dark.
2. Roof Ventilator Up means blowing air out, down means sucking up air from the outside.
3. Warm water heater To switch the warm water heater in the passenger space on or o.
4. Optical Signaling: To switch the optical signaling, like ashing lights or roof lights, on or o.
5. Acoustic signaling To switch the acoustic signaling, like sirens and horns, on or o.
1 2 3 4 1 2 3 4 5
Ford, Renault & Opel
The red button is used to open
or close the automatic door.
See page 19.
DASHBOARD INSTRUMENTSAUTOMATIC DOOR

AS-81-190807 22 of 2721 of 27
REPLACEMENT PARTS OF TRIFLEXAIR FLOOR SYSTEM
Parts below can be ordered by email to [email protected].
THE WHEELCHAIR LIFT NO LONGER RESPONDS, WHAT SHOULD I DO?
It is possible that the main power switch of the lift was deactivated by accident or the standby
modus was activated. This red power switch can be found on the driver’s seat’s tray or on top of the
lift. If this doesn’t solve the problem, please consult the specic lift manual.
WHICH OIL SHOULD I USE FOR THE AMF-BRUNS “LINEARLIFT AL1”?
The AMF Linearlift requires ATF – D II D oil. It shouldn’t be necessary to replenish this, but if it
appears to be necessary frequently, contact Tribus via T +31 30 669 5027.
IS A LIFT PERIODIC INSPECTION (LPI)COMPULSORY?
Yes, the OHS Act requires the periodic inspection and maintenance of passenger lifts. In addition,
you can be held liable in case of accidents if no Periodic Inspection was carried out. Besides, it would
be reassuring for both you, your sta and clients to know that the lift works properly and safely.
A BELT IS FRAYED. CAN I STILL USE IT?
No, in order to guarantee the safety of the passengers, belts should always be in good condition.
This applies to seatbelts as well as belts of the wheelchair securement systems. When in doubt,
contact Tribus via T +31 30 669 5027.
THE SEATS ARE RATTLING. WHAT SHOULD I DO?
First check if the seats are mounted in the correct position (only for demountable seats). Then
check whether the quick release levers are properly secured and retighten them if necessary. If the
seat still rattles, then contact Tribus.
WHAT SHOULD I DO IF SOMEONE GETS STUCK BETWEEN AN AUTOMATICALLY CLOSING DOOR?
The automatic doors are equipped with a safety against getting squeezed. If, while closing, the door
detects counter-pressing, it will stop closing and open again. Do pay attention when closing the
doors though, prevention is better than cure!
WHERE CAN I FIND THE FUSES OF PARTS BUILT-IN BY TRIBUS?
The fuses of the parts that were installed by Tribus are located beneath the driver’s seat. If you
suspect a broken fuse regarding the lift, then rst check if the main power switch is in the right
position (see question one).
A-0000256005 Handle central locking system
0000703001 Three-point belt
0000703002 Belt buckle for three-point belt
0000256501 Inner and outer cable short
0000256500 Inner and outer cable long
0000256152 Back retractor
0000703005 Front retractor
PARTS LIST TRIFLEXAIR FLOORFAQ

AS-81-190807 24 of 2723 of 27
PARTS AMF-BRUNS LINEAR LIFT AL1 SOLID
Parts below can be ordered by email to [email protected].
0000752112 Aluminum bridge plate
0000752245 Protective cover aggregate (model after 2017)
0000752152 Protective cover aggregate (model before 2017)
0000752161 Torsional spring (right)
0000752163 Torsional spring (left)
0000752162 Knee joint
0000752164 Shaft
0000752165 Gas spring (130mm)
0000752166 Hand protective (right)
0000752167 Hand protective (left)
0000752168 Marker lights
0000752169 Handlebar
0000752170 Hand blocking lever (right)
0000752171 Hand blocking lever (left)
0000752155 Cilinder hydraulic
0000752112
0000752165
0000752165
0000752166
0000752166
0000752167
0000752167
0000752168
0000752168
0000752169
0000752169
0000752170
0000752171
0000752171
0000752171
0000752162
0000752163
0000752161
0000752164
DIAGRAM WHEELCHAIR LIFTPARTS LIST WHEELCHAIR LIFT

AS-81-190807 26 of 2725 of 27
DATE
MILEAGE
CHECKED BY
LPI YES NO REPAIR* YES NO
PROJECTNUMBER
STAMP AND SIGNATURE APPROVAL
DATE
MILEAGE
CHECKED BY
LPI YES NO REPAIR YES NO
PROJECTNUMBER
STAMP AND SIGNATURE APPROVAL
*See attached checklist for work carried out.
*See attached checklist for work carried out.
DATE
MILEAGE
CHECKED BY
LPI YES NO REPAIR* YES NO
PROJECTNUMBER
STAMP AND SIGNATURE APPROVAL
DATE
MILEAGE
CHECKED BY
LPI YES NO REPAIR YES NO
PROJECTNUMBER
STAMP AND SIGNATURE APPROVAL
*See attached checklist for work carried out.
*See attached checklist for work carried out.
TRIBUS CHECK
TRIBUS CHECKTRIBUS CHECK
TRIBUS CHECK

27 of 27
DATE
MILEAGE
CHECKED BY
LPI YES NO REPAIR* YES NO
PROJECTNUMBER
STAMP AND SIGNATURE APPROVAL
DATE
MILEAGE
CHECKED BY
LPI YES NO REPAIR YES NO
PROJECTNUMBER
STAMP AND SIGNATURE APPROVAL
*See attached checklist for work carried out.
*See attached checklist for work carried out.
TRIBUS CHECK
TRIBUS CHECK
AS-81-190501

Proostwetering 71
3543AC UTRECHT
The Netherlands
+31 30 669 50 20
www.tribus-group.com
All rights reserved. All information may be subject to changes and typographical errors.
Creators of innovative mobility
AS-70-190920 Gebruikshandleiding Rolstoelbus voorkant.indd 4 6-11-2019 11:35:28
Table of contents


