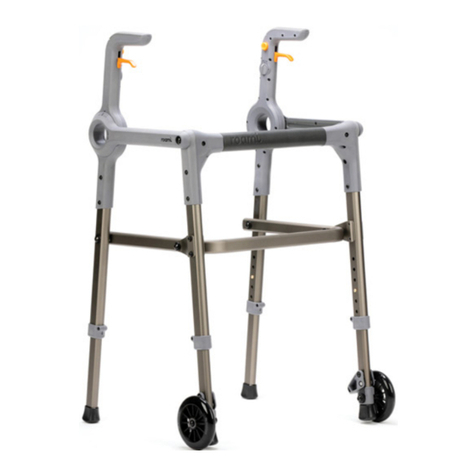
Mobilate Roami-Rose Gold User manual

USER MANUAL
IMPORTANT:
Save this manual for
future reference
Manufactured by:
Mobilate
2733 Kanasita Drive #121
Hixson, TN 37343 USA
REF
100.100 - Roami - Rose Gold
100.102 - Roami - Urban Blue
100.104 - Warrior - Camo
100.106 - Roami - Charcoal
100.108 - Roami - Red
100.101 - Roami - Rose Gold 2 Wheel
100.103 - Roami - Urban Blue 2 wheel
100.105 - Warrior - Camo 2 wheel
100.107 - Roami - Charcoal 2 wheel
100.109 - Roami - Red 2 wheel
Roami Progressive Mobility Aid
All manuals and user guides at all-guides.com

1. Introduction .......................................................... PG 3
2. Contents of Box....................................................... PG 4
3. Safety ................................................................... PG 6
4. Features ............................................................... PG 8
5. Assembly ..............................................................PG 10
5.1 Fitting the Rear Lower Legs .................................. PG 11
5.2 Unfolding the Roami PMA for Use ........................... PG 13
5.3 Adjusting the Height to Suit the User....................... PG 16
5.4 Folding Up the Roami PMA for Storage ..................... PG 18
6. Instructions for Use .................................................PG 20
6.1 Deploying and Retracting the Wheels ...................... PG 21
6.2 Using the Roami PMA like a Walker .........................PG 22
6.3 Using the Roami PMA like a Rollator ........................PG 23
6.4 Using the Roami PMA like a Stair Assist Up Stairs ......... PG 24
6.5 Using the Roami PMA like a Stair Assist Down Stairs......PG 29
6.6 Using your Roami PMA to Align Gait.........................PG 34
7. Maintenance ..........................................................PG 35
8. Warranty/Replacements ............................................PG 35
9. Technical Specifications ............................................PG 36
10. Support ...............................................................PG 36
11. Replacement Parts ..................................................PG 37
©Copyright 2020 Mobilate LLC All rights reserved
P/N: 400.160 Rev 3
PG 2 PG 3
©Copyright 2020 Mobilate LLC All rights reserved
P/N: 400.160 Rev 3
CONTENTS 1. INTRODUCTION
Congratulations on purchasing the Roami Progressive Mobility Aid (PMA).
Roami is a revolutionary articulating walking frame that adapts to your
needs as you walk over different surfaces and terrains. Roami functions as
a walker, rollator and stair climber in one. Roami also offers infinite angle
adjustment to assist with posture, gait, and stability. Mobilate hopes that
Roami will help increase your mobility and improve quality of life.
SAFETY NOTE: Like any mobility device, the physical and mental
capabilities of the user must match the capabilities of the product. Misuse
or misapplication of this product could result in significant injury or death.
Before using the Roami PMA:
• Talk to your health care professional and make sure the Roami PMA is the
right mobility aid for you.
• Review this User Manual carefully. Pay extra attention to the safety
information on pages 6 and 7.
• Important safety information is also found throughout the manual and
highlighted by this symbol:
• If you are happy and satisfied with Roami, please let us know. We would
love to hear from you. If you aren’t completely satisfied, or have any
questions, you can leave your comments with Mobilate at:
+1.423.651.0137
www.roamiwalkers.com
technicalsupport@mobilateus.com
All manuals and user guides at all-guides.com

©Copyright 2020 Mobilate LLC All rights reserved
P/N: 400.160 Rev 3
PG 4 PG 5
©Copyright 2020 Mobilate LLC All rights reserved
P/N: 400.160 Rev 3
1 x Roami Progressive Mobility Aid
2 x Legs with Grip Feet
1 x Instruction Booklet
1 x 2.5mm Allen Key
2.5mm Allen Key needed for assembly of the Roami PMA.
1 x Roami Progressive Mobility Aid
2 x Retractable wheels
2 x legs with Grip Feet
1 x Instruction Booklet
1 x 2.5mm Allen Key
OR
2. CONTENTS OF BOX
All manuals and user guides at all-guides.com

©Copyright 2020 Mobilate LLC All rights reserved
P/N: 400.160 Rev 3
PG 6 PG 7
©Copyright 2020 Mobilate LLC All rights reserved
P/N: 400.160 Rev 3
3. SAFETY
Above is the safety alert symbol. It is used to alert you to important
safety information. To avoid the risk of accidents, personal injury and
death, read and obey all safety messages that follow this symbol.
Before using the Roami PMA:
• Make sure the Roami PMA is the right product for you.
• Be sure to consult with a health care professional. This product may
not be suitable for use by persons having high risk conditions.
For example:
• If they are not mentally coherent (including from
medication),
• Do not have the cognitive ability to follow the instructions,
• Are physically unstable or do not have the strength to utilize
a walker or similar device,
• If they exceed the recommended weight limit
(300 lbs./ 130 kg),
• If they have any other condition that would impede their
ability to properly use Roami such as frequent dizziness or
disorientation.
• Make sure you read, understand and follow all instructions before assembly
and use. This includes instructions for optional equipment.
• Proper assembly, use and product maintenance are also required to help
assure your safety.
• The instructional videos are intended to demonstrate how the Roami PMA
can be used. View the videos after you read the User Manual.
• If you still have questions after reviewing the User Manual or demonstration
videos:
• Contact your health care professional to discuss medical issues.
• Contact Mobilate for any questions regarding assembly, set-up and
maintenance of the product.
Important safety rules when using the Roami PMA:
• Be aware of the surrounding surfaces when using the Roami PMA - such as
electrical cords, debris etc.
• ALWAYS use caution when using the Roami PMA, especially on wet, icy or
slippery surfaces.
• Do not use the Roami PMA on an escalator.
• Make sure that the accessories are properly installed and securely in place
before use.
• Make sure that the rubber tips and/or plastic Grip Feet are not ripped,
worn or missing.
• The legs must be adjusted to the same height when using as a walker or a
rollator.
• Do not hang anything on either side of the Roami PMA frame (this includes
the levers/handles on either side). This may cause the Roami PMA to tip or
be unstable.
• Do not sit on the front cross-member. Do not use the cross-member or
rigidizer as support.
• Do not leave or store the Roami PMA outside.
• Do not use with any other accessories unless specifically supplied or
recommended by manufacturer.
• Stop using the Roami PMA and seek medical attention immediately if you
feel weak, sick or suddenly dizzy.
• You should always feel comfortable using the Roami PMA. If you are
ever uncertain about how to use the Roami PMA, please contact the
manufacturer, Mobilate.
Special safety concerns for the stair climber/ descender options:
• The Stair climber / descender options are intended to be used on short
flights of stairs such as home entryways. Do not use on long flights of stairs
such as between floors of a home or building.
• Contact your health care professional to determine if this activity is right
for you.
• You must have the strength necessary for this activity.
• You must not have a medical condition that can involve dizziness or
disorientation.
• Do not use these options if you are uncertain about how to adjust
the walking frame with the safety button and levers. Contact the
manufacturer, Mobilate, to help learn how to use these options.
• When using on stairs, do NOT progress to the next step until the walking
frame is locked in place.
• Do not use in wet or slippery conditions.
• Carefully follow the steps outlined in Section 7 of this user manual.
All manuals and user guides at all-guides.com

©Copyright 2020 Mobilate LLC All rights reserved
P/N: 400.160 Rev 3
PG 8 PG 9
©Copyright 2020 Mobilate LLC All rights reserved
P/N: 400.160 Rev 3
4. FEATURES
1. Replaceable handle grips
2. Handle
3. Lever
4. Safety button
5. Fold lock
6. Cam-Lok
7. Side arm
8. Front pivot
9. Front cross-member (including padded wrap)
10. Front leg upper
11. Rear leg upper
12. Rigidizer
13. Leg cuff
14. Lower leg
a. Grip foot
b. Telescoping spring pin
15. Lower leg with wheel assembly
a. Foot pedal
b. Telescoping spring pin
c. Wheel
All manuals and user guides at all-guides.com

PG 11
©Copyright 2020 Mobilate LLC All rights reserved
P/N: 400.160 Rev 3
PG 10
©Copyright 2020 Mobilate LLC All rights reserved
P/N: 400.160 Rev 3
ASSEMBLY
5
For safety and stability, your Roami
PMA must be properly assembled
before any use. Do NOT use unless
it is properly assembled.
Your Roami PMA comes almost fully
assembled. You will need to simply
install (affix) the rear legs and adjust
the height on front and back legs
prior to first use.
If you are unable to properly
assemble Roami, please contact the
manufacturer, Mobilate at:
technicalsupport@mobilateus.com
+1.210.284.1312
5.1 FITTING THE REAR LOWER LEGS
5.1.1
Lay the folded Roami PMA on a flat surface.
5.1.2
Slide the Lower Leg (15) assembly inside the Rear Leg Upper (11) making sure
to keep the Spring Pin (14b) inside the leg facing to the inside of the Rear Leg
Upper (11) to align with the adjustment holes when fitted.
All manuals and user guides at all-guides.com

PG 12 PG 13
©Copyright 2020 Mobilate LLC All rights reserved
P/N: 400.160 Rev 3
©Copyright 2020 Mobilate LLC All rights reserved
P/N: 400.160 Rev 3
5.1.3
Once the Lower Leg (15) is slid inside the Rear Leg Upper (11) slide the Leg
Cuff (13) up onto the end of the Rear Leg Upper until it is all the way home
and well seated. Hold the Leg Cuff (13) in position on the Rear Leg Upper (11)
and tighten the locking screw to secure the Leg Cuff (13) in position.
5.1.4
Adjust height of rear Lower Legs by depressing the Spring Pin (14b) and
sliding the leg up or down. You should adjust so that Spring Pins are in the
same hole number on all 4 legs.
Don’t worry about adjusting the overall product height yet, that will be
addressed later in the manual.
5.2 .1
To start check that the Fold Lock (5)
is set to fold position (horizontal). If
it is, proceed to step 5.2.3
If not proceed to 5.2.2
5.2.2
If the Fold Lock (5) is in the vertical position, press the Safety Button (4),
squeeze the Lever (3) and while holding the Lever (3) turn the Fold Lock (5)
90° to the horizontal position. Repeat for the other handle. The Roami PMA
is now free to unfold.
At the bottom of a stairway (or sloping ground),
lift the front feet or wheels up onto the first step
Press both the Safety Locks (4) inwards until they click.
The Safety Locks (4) should stay depressed until the
Clutch Levers (3) are depressed and released.
Using your Roami PMA as a stair climber
Inclines
Grasping the Handles (2), squeeze both Clutch Levers (3) simultaneously.
The product will adjust to the height of the stairs under it’s own weight
Continue up the stairs or slope with
the Roami PMA locked in it’s adjusted position.
Squeeze both Clutch Levers (3) simultaneously an d the front legs of the device will automatically drop down to the surface.
Once at the top, place the rear feet on the top step,
press the Safety Locks (4),
Once the rear feet hit the lower ground,
release the Clutch Levers (3).
The Safety Locks (4) will spring out and re-engage and
the Roami PMA will be automatically locked into the
angle of the stairs or slope.
x2
5.2 UNFOLDING THE ROAMI PMA FOR USE
All manuals and user guides at all-guides.com

PG 14 PG 15
©Copyright 2020 Mobilate LLC All rights reserved
P/N: 400.160 Rev 3
©Copyright 2020 Mobilate LLC All rights reserved
P/N: 400.160 Rev 3
5.2.4
All 4 legs will be touching the
ground.
5.2.3
To unfold the Roami PMA, push
the Rigidizer (12) away from you as
shown.
5.2.6
Now turn the Fold Lock (5) 90º to
the locked (vertical) position shown.
The Lever (3) and Safety Button (4)
will move into their default position.
Listen for the “click” sound and feel
it engage the locking mechanism.
Roami is now ready for height
adjustment.
For safety and stability, you MUST
turn the Fold Lock (5) 90º back to
locked (vertical) position prior to
using the Roami PMA as a walking
aid.
5.2.5
Adjust the angle on the Cam-Lok (6) to your desired position. (See Section
7.6.1 for instructions on adjusting the Cam-Lok angle.)
All manuals and user guides at all-guides.com

PG 16 PG 17
©Copyright 2020 Mobilate LLC All rights reserved
P/N: 400.160 Rev 3
©Copyright 2020 Mobilate LLC All rights reserved
P/N: 400.160 Rev 3
5.3 ADJUSTING THE HEIGHT TO SUIT THE USER
5.3.1
Stand with your shoulders relaxed
and your arms hanging loosely at
your sides.
The Roami PMA handle height should
be at the crease of your wrist when
your arm is at its side.
5.3.2
Adjust the Lower Leg (15) heights by depressing the spring pins and sliding
the Leg up or down.
5.3.3
Make sure all legs are set to the same height.
The Roami PMA is now ready for use.
5.3.3
Ensure all 4 Lower Legs are adjusted to the same height position and the
Spring Pins (14b and 15b) are fully engaged in their holes after adjustment.
All manuals and user guides at all-guides.com

PG 19
©Copyright 2020 Mobilate LLC All rights reserved
P/N: 400.160 Rev 3
©Copyright 2020 Mobilate LLC All rights reserved
P/N: 400.160 Rev 3
PG 18
5.4 FOLDING UP THE ROAMI PMA FOR STORAGE
5.4.1
With the Fold Lock (5) is in the vertical position, press the Safety Button (4),
squeeze the Lever (3) and while holding the Lever (3) turn the Fold Dial (5)
90° to the horizontal position. Repeat for the other handle. The Roami PMA
is now free to fold.
At the bottom of a stairway (or sloping ground),
lift the front feet or wheels up onto the first step
Press both the Safety Locks (4) inwards until they click.
The Safety Locks (4) should stay depressed until the
Clutch Levers (3) are depressed and released.
Using your Roami PMA as a stair climber
Inclines
Grasping the Handles (2), squeeze both Clutch Levers (3) simultaneously.
The product will adjust to the height of the stairs under it’s own weight
Continue up the stairs or slope with
the Roami PMA locked in it’s adjusted position.
Squeeze both Clutch Levers (3) simultaneously an d the front legs of the device will automatically drop down to the surface.
Once at the top, place the rear feet on the top step,
press the Safety Locks (4),
Once the rear feet hit the lower ground,
release the Clutch Levers (3).
The Safety Locks (4) will spring out and re-engage and
the Roami PMA will be automatically locked into the
angle of the stairs or slope.
x2
5.4.3
Unit is now folded and ready to
transport. (Refer to 6.2 to unfold the
Roami PMA for use.)
5.4.2
To fold up the Roami PMA, pull the
Rigidizer (12) up toward you when
the product is standing up.
All manuals and user guides at all-guides.com

PG 21
©Copyright 2020 Mobilate LLC All rights reserved
P/N: 400.160 Rev 3
PG 20
©Copyright 2020 Mobilate LLC All rights reserved
P/N: 400.160 Rev 3
INSTRUCTIONS FOR USE
6
The Roami PMA can be used in a
number of different ways. The
abilities of the user must match
the capabilities of the Roami PMA.
Pay close attention to highlighted
safety information.
6.1 DEPLOYING AND RETRACTING THE WHEELS
6.1.1
Some models of the Roami PMA
come with retractable wheels on the
front legs.
To engage the Wheel (15c), simply
pushdown on the Foot Pedal (15a)
until you feel it lock down and the
wheel with the ground. Repeat with
the other leg.
6.1.2
To stow the Wheel (15c), place your
toes under the Foot Pedal (15a) and
lift up until the Foot Pedal (15a)
locks into the raised position. The
Wheels will be lifted and the Grip
Foot (14a) engaged with the ground.
The wheel option is intended for
flat surfaces only. Do not use with
the wheels down going up or down
on stairs.
Use the wheel option with care.
There are no brakes.
All manuals and user guides at all-guides.com

©Copyright 2020 Mobilate LLC All rights reserved
P/N: 400.160 Rev 3
PG 22 PG 23
©Copyright 2020 Mobilate LLC All rights reserved
P/N: 400.160 Rev 3
6.2 .1
When set up with no wheels (or
wheels up), the Roami PMA operates
like traditional walkers.
While gripping the Handles (2),
position yourself between the arms
within the boundaries of the Roami
frame.
Keep the body centered, in balance
and with both hands on the handles
as you step forward.
6.2 USING THE ROAMI PMA LIKE A WALKER
6.2.2
Step forward with your weaker leg first, putting weight on the palms. Keep
within the boundaries of the Roami frame. Lift Roami with each step, then
set back down.
6.3.1
When the retractable wheels are on
the front legs of Roami, it operates
as a rollator.
While gripping the Handles (2),
position yourself standing between
them with the Roami PMA slightly in
front of you.
6.3.2
Slide the Roami PMA forward to the
extent of your comfortable reach
and then, while supporting your
weight on the Handles (2), take a
step forward.
Once balanced and comfortable,
repeat the motion to complete
another step.
6.3 USING THE ROAMI PMA LIKE A ROLLATOR
This option is intended for use on
only flat surfaces!
Never us the rollator option on
stairs or sloping surfaces.
Always raise the wheels before
going up or down stairs and on
sloping surfaces.
All manuals and user guides at all-guides.com

PG 24 PG 25
©Copyright 2020 Mobilate LLC All rights reserved
P/N: 400.160 Rev 3
©Copyright 2020 Mobilate LLC All rights reserved
P/N: 400.160 Rev 3
6.4 USING THE ROAMI PMA LIKE A STAIR ASSIST UP STAIRS
Special precautions are required when using the stair climber function.
Read and follow these instructions.
• Consult with your medical provider to make sure that he or she feels this
task is appropriate for you.
• You must have adequate strength and endurance for this activity.
• Persons prone to dizziness or disorientation should not use this
function.
• The Stair climber / descender options are intended to be used on short
flights of stairs such as home entryways. Do not use on long flights of stairs
such as between floors of a home or building.
• Make sure the Roami PMA is working properly, and that parts are locked
into place.
• Have someone help you until you are completely familiar and comfortable
with this activity.
• Make sure the wheels are up and locked at all times.
• Before you begin, read and understand all the following instructions and
safety messages. Carefully follow steps 6.4.1 thru 6.4.9 as shown below.
At the bottom of a stairway (or sloping ground),
lift the front feet or wheels up onto the first step
Press both the Safety Locks (4) inwards until they click.
The Safety Locks (4) should stay depressed until the
Clutch Levers (3) are depressed and released.
Using your Roami PMA as a stair climber
Inclines
Grasping the Handles (2), squeeze both Clutch Levers (3) simultaneously.
The product will adjust to the height of the stairs under it’s own weight
Continue up the stairs or slope with
the Roami PMA locked in it’s adjusted position.
Squeeze both Clutch Levers (3) simultaneously an d the front legs of the device will automatically drop down to the surface.
Once at the top, place the rear feet on the top step,
press the Safety Locks (4),
Once the rear feet hit the lower ground,
release the Clutch Levers (3).
The Safety Locks (4) will spring out and re-engage and
the Roami PMA will be automatically locked into the
angle of the stairs or slope.
x2
6.4.3.
Grasping both Handles (2), squeeze both Levers (3) simultaneously. The
product will adjust to the height of the stairs under it’s own weight.
Note: The safety buttons should stay depressed until the levers are squeezed
and released.
At the bottom of a stairway (or sloping ground),
lift the front feet or wheels up onto the first step
Press both the Safety Locks (4) inwards until they click.
The Safety Locks (4) should stay depressed until the
Clutch Levers (3) are depressed and released.
Using your Roami PMA as a stair climber
Inclines
Grasping the Handles (2), squeeze both Clutch Levers (3) simultaneously.
The product will adjust to the height of the stairs under it’s own weight
Continue up the stairs or slope with
the Roami PMA locked in it’s adjusted position.
Squeeze both Clutch Levers (3) simultaneously an d the front legs of the device will automatically drop down to the surface.
Once at the top, place the rear feet on the top step,
press the Safety Locks (4),
Once the rear feet hit the lower ground,
release the Clutch Levers (3).
The Safety Locks (4) will spring out and re-engage and
the Roami PMA will be automatically locked into the
angle of the stairs or slope.
x2
6.4.2
At the bottom of a stairway (or
sloping ground), lift the front feet
or wheels up onto the first step.
6.4.1
Press both Safety Buttons (4) inwards
until they engage. Note: The Safety
Buttons (4) should stay depressed
until the Levers (3) are depressed
and released.
At the bottom of a stairway (or sloping ground),
lift the front feet or wheels up onto the first step
Press both the Safety Locks (4) inwards until they click.
The Safety Locks (4) should stay depressed until the
Clutch Levers (3) are depressed and released.
Using your Roami PMA as a stair climber
Inclines
Grasping the Handles (2), squeeze both Clutch Levers (3) simultaneously.
The product will adjust to the height of the stairs under it’s own weight
Continue up the stairs or slope with
the Roami PMA locked in it’s adjusted position.
Squeeze both Clutch Levers (3) simultaneously an d the front legs of the device will automatically drop down to the surface.
Once at the top, place the rear feet on the top step,
press the Safety Locks (4),
Once the rear feet hit the lower ground,
release the Clutch Levers (3).
The Safety Locks (4) will spring out and re-engage and
the Roami PMA will be automatically locked into the
angle of the stairs or slope.
x2
All manuals and user guides at all-guides.com

PG 26 PG 27
©Copyright 2020 Mobilate LLC All rights reserved
P/N: 400.160 Rev 3
©Copyright 2020 Mobilate LLC All rights reserved
P/N: 400.160 Rev 3
At the bottom of a stairway (or sloping ground),
lift the front feet or wheels up onto the first step
Press both the Safety Locks (4) inwards until they click.
The Safety Locks (4) should stay depressed until the
Clutch Levers (3) are depressed and released.
Using your Roami PMA as a stair climber
Inclines
Grasping the Handles (2), squeeze both Clutch Levers (3) simultaneously.
The product will adjust to the height of the stairs under it’s own weight
Continue up the stairs or slope with
the Roami PMA locked in it’s adjusted position.
Squeeze both Clutch Levers (3) simultaneously an d the front legs of the device will automatically drop down to the surface.
Once at the top, place the rear feet on the top step,
press the Safety Locks (4),
Once the rear feet hit the lower ground,
release the Clutch Levers (3).
The Safety Locks (4) will spring out and re-engage and
the Roami PMA will be automatically locked into the
angle of the stairs or slope.
x2
6.4.4
Once the rear feet hit the lower ground, release the Levers (3). The Safety
Buttons (4) will spring out and re-engage. Listen and feel for the “click”
sound of Roami automatically locking into place at the proper angle of the
stairs or slope.
Before progressing with a step, ensure with your hands on the handles that
Roami feels locked into place.
6.4.5.
Continue up the stairs or slope
with the Roami PMA locked in it’s
adjusted position. Move Roami up to
the next step before raising feet to
the next step.
Note:
When walking up or down stairs,
always lead with the stronger leg.
At the bottom of a stairway (or sloping ground),
lift the front feet or wheels up onto the first step
Press both the Safety Locks (4) inwards until they click.
The Safety Locks (4) should stay depressed until the
Clutch Levers (3) are depressed and released.
Using your Roami PMA as a stair climber
Inclines
Grasping the Handles (2), squeeze both Clutch Levers (3) simultaneously.
The product will adjust to the height of the stairs under it’s own weight
Continue up the stairs or slope with
the Roami PMA locked in it’s adjusted position.
Squeeze both Clutch Levers (3) simultaneously an d the front legs of the device will automatically drop down to the surface.
Once at the top, place the rear feet on the top step,
press the Safety Locks (4),
Once the rear feet hit the lower ground,
release the Clutch Levers (3).
The Safety Locks (4) will spring out and re-engage and
the Roami PMA will be automatically locked into the
angle of the stairs or slope.
x2
Do not go up stairs or slopes
without making sure the Roami
PMA is locked.
6.4.7
Squeeze both Levers (3) simultaneously and the front legs of the device will
automatically drop down to the surface. Before releasing the Levers, check
that the Cam-Lok (6) is set to center home position again.
At the bottom of a stairway (or sloping ground),
lift the front feet or wheels up onto the first step
Press both the Safety Locks (4) inwards until they click.
The Safety Locks (4) should stay depressed until the
Clutch Levers (3) are depressed and released.
Using your Roami PMA as a stair climber
Inclines
Grasping the Handles (2), squeeze both Clutch Levers (3) simultaneously.
The product will adjust to the height of the stairs under it’s own weight
Continue up the stairs or slope with
the Roami PMA locked in it’s adjusted position.
Squeeze both Clutch Levers (3) simultaneously an d the front legs of the device will automatically drop down to the surface.
Once at the top, place the rear feet on the top step,
press the Safety Locks (4),
Once the rear feet hit the lower ground,
release the Clutch Levers (3).
The Safety Locks (4) will spring out and re-engage and
the Roami PMA will be automatically locked into the
angle of the stairs or slope.
x2
6.4.6.
Once at the top, keep feet on step below. Position the Roami PMA on the top
step, press both Safety Buttons (4) inwards until they both engage.
At the bottom of a stairway (or sloping ground),
lift the front feet or wheels up onto the first step
Press both the Safety Locks (4) inwards until they click.
The Safety Locks (4) should stay depressed until the
Clutch Levers (3) are depressed and released.
Using your Roami PMA as a stair climber
Inclines
Grasping the Handles (2), squeeze both Clutch Levers (3) simultaneously.
The product will adjust to the height of the stairs under it’s own weight
Continue up the stairs or slope with
the Roami PMA locked in it’s adjusted position.
Squeeze both Clutch Levers (3) simultaneously an d the front legs of the device will automatically drop down to the surface.
Once at the top, place the rear feet on the top step,
press the Safety Locks (4),
Once the rear feet hit the lower ground,
release the Clutch Levers (3).
The Safety Locks (4) will spring out and re-engage and
the Roami PMA will be automatically locked into the
angle of the stairs or slope.
x2
All manuals and user guides at all-guides.com

PG 29
©Copyright 2020 Mobilate LLC All rights reserved
P/N: 400.160 Rev 3
PG 28
©Copyright 2020 Mobilate LLC All rights reserved
P/N: 400.160 Rev 3
6.4.8.
Note: The Roami PMA is designed to automatically adjust to terrain, however
users can cross-check the relative position of the Cam-Lok at any time using
the indicators shown.
6.4.9
Once the legs have dropped to the floor surface, release the Levers (3) and
listen and feel for the Roami to “click” into locked position.
At the bottom of a stairway (or sloping ground),
lift the front feet or wheels up onto the first step
Press both the Safety Locks (4) inwards until they click.
The Safety Locks (4) should stay depressed until the
Clutch Levers (3) are depressed and released.
Using your Roami PMA as a stair climber
Inclines
Grasping the Handles (2), squeeze both Clutch Levers (3) simultaneously.
The product will adjust to the height of the stairs under it’s own weight
Continue up the stairs or slope with
the Roami PMA locked in it’s adjusted position.
Squeeze both Clutch Levers (3) simultaneously an d the front legs of the device will automatically drop down to the surface.
Once at the top, place the rear feet on the top step,
press the Safety Locks (4),
Once the rear feet hit the lower ground,
release the Clutch Levers (3).
The Safety Locks (4) will spring out and re-engage and
the Roami PMA will be automatically locked into the
angle of the stairs or slope.
x2
Special precautions are required when using the stair descender function.
Read and follow these instructions.
6.5 USING ROAMI PMA LIKE A STAIR ASSIST DOWN STAIRS
6.5.1
Press both Safety Buttons (4) inwards
until they engage. Note: The Safety
Buttons (4) should stay depressed
until the Levers (3) are depressed
and released.
At the bottom of a stairway (or sloping ground),
lift the front feet or wheels up onto the first step
Press both the Safety Locks (4) inwards until they click.
The Safety Locks (4) should stay depressed until the
Clutch Levers (3) are depressed and released.
Using your Roami PMA as a stair climber
Inclines
Grasping the Handles (2), squeeze both Clutch Levers (3) simultaneously.
The product will adjust to the height of the stairs under it’s own weight
Continue up the stairs or slope with
the Roami PMA locked in it’s adjusted position.
Squeeze both Clutch Levers (3) simultaneously an d the front legs of the device will automatically drop down to the surface.
Once at the top, place the rear feet on the top step,
press the Safety Locks (4),
Once the rear feet hit the lower ground,
release the Clutch Levers (3).
The Safety Locks (4) will spring out and re-engage and
the Roami PMA will be automatically locked into the
angle of the stairs or slope.
x2
• Consult with your medical provider to make sure that he or she feels this
task is appropriate for you.
• You must have adequate strength and endurance for this activity.
• Persons prone to dizziness or disorientation should not use this
function.
• The Stair climber / descender options are intended to be used on short
flights of stairs such as home entryways. Do not use on long flights of stairs
such as between floors of a home or building.
• Make sure the Roami PMA is working properly, and that parts are locked
into place.
• Have someone help you until you are completely familiar and comfortable
with this activity.
• Make sure the wheels are up and locked at all times.
• Before you begin, read and understand all the following instructions and
safety messages. Carefully follow steps 6.5.1 thru 6.5.8 as shown below.
All manuals and user guides at all-guides.com

PG 30 PG 31
©Copyright 2020 Mobilate LLC All rights reserved
P/N: 400.160 Rev 3
©Copyright 2020 Mobilate LLC All rights reserved
P/N: 400.160 Rev 3
6.5.2
At the top of a stairway (or sloping
ground), lift the rear feet onto the
top step.
6.5.3
Grasping the Handles (2), squeeze both Levers (3) simultaneously. The
product will drop to the height of the stairs automatically when levers are
engaged.
6.5.4
Once the legs have dropped to the stair surface, release the Levers (3) listen
and feel for the “click” into locked position. With both hands on handles,
ensure that Roami is locked into place.
Note: When proceeding downstairs, start with your stronger leg first.
Do not proceed down stairs or slope without insuring Roami PMA is
locked.
At the bottom of a stairway (or sloping ground),
lift the front feet or wheels up onto the first step
Press both the Safety Locks (4) inwards until they click.
The Safety Locks (4) should stay depressed until the
Clutch Levers (3) are depressed and released.
Using your Roami PMA as a stair climber
Inclines
Grasping the Handles (2), squeeze both Clutch Levers (3) simultaneously.
The product will adjust to the height of the stairs under it’s own weight
Continue up the stairs or slope with
the Roami PMA locked in it’s adjusted position.
Squeeze both Clutch Levers (3) simultaneously an d the front legs of the device will automatically drop down to the surface.
Once at the top, place the rear feet on the top step,
press the Safety Locks (4),
Once the rear feet hit the lower ground,
release the Clutch Levers (3).
The Safety Locks (4) will spring out and re-engage and
the Roami PMA will be automatically locked into the
angle of the stairs or slope.
x2
6.5.5
Continue down the stairs or slope
with the Roami PMA locked in it’s
adjusted position.
All manuals and user guides at all-guides.com

PG 32 PG 33
©Copyright 2020 Mobilate LLC All rights reserved
P/N: 400.160 Rev 3
©Copyright 2020 Mobilate LLC All rights reserved
P/N: 400.160 Rev 3
6.5.7
Once at the bottom, place the front
feet on the lowest surface.
6.5.6
Press both Safety Buttons (4)
inwards and squeeze the levers
simultaneously.
At the bottom of a stairway (or sloping ground),
lift the front feet or wheels up onto the first step
Press both the Safety Locks (4) inwards until they click.
The Safety Locks (4) should stay depressed until the
Clutch Levers (3) are depressed and released.
Using your Roami PMA as a stair climber
Inclines
Grasping the Handles (2), squeeze both Clutch Levers (3) simultaneously.
The product will adjust to the height of the stairs under it’s own weight
Continue up the stairs or slope with
the Roami PMA locked in it’s adjusted position.
Squeeze both Clutch Levers (3) simultaneously an d the front legs of the device will automatically drop down to the surface.
Once at the top, place the rear feet on the top step,
press the Safety Locks (4),
Once the rear feet hit the lower ground,
release the Clutch Levers (3).
The Safety Locks (4) will spring out and re-engage and
the Roami PMA will be automatically locked into the
angle of the stairs or slope.
x2
6.5.8
Squeeze both Levers (3) simultaneously and the rear legs of the device will
automatically drop down to the surface.
Note: Continue walking forward with weaker leg first.
All manuals and user guides at all-guides.com

©Copyright 2020 Mobilate LLC All rights reserved
P/N: 400.160 Rev 3
PG 34 PG 35
©Copyright 2020 Mobilate LLC All rights reserved
P/N: 400.160 Rev 3
6.6.1
For users that need help with posture positioning, the Roami PMA can be set
to specific angles for improved gait and stability. Use the side indicators on
the Cam-Lok to confirm settings. Each marker represents a 6º shift in angle
forward or backward.
6.6 USING YOUR ROAMI PMA TO ALIGN GAIT
Monthly inspection and maintenance of Roami is necessary for safe and
proper use. Failure to do so could result in serious injury or death.
1. Always inspect the product for damage before use. If any damage is found,
DO NOT use the Roami PMA until it is repaired.
2. Weekly, wipe Roami surfaces with a damp cloth and mild detergent (the
use of bleach is not recommended). Allow to dry before use. Check all joints
and brackets for debris and clean if necessary.
3. Inspect all parts, particularly joints and brackets for loosening, corrosion,
deformation, wear, or compression. If seen, do not use the Roami PMA and
contact the manufacturer for service/repair at technicalsupport@mobilateus.
com
4. If Grip Feet (14A) are worn or cracked, replace with a new leg assembly
(See Section 11. Replacement Parts).
5. Roami PMA Handle Grips (2) should be removed for weekly cleaning. Wash
with a mild detergent or place in dishwasher. Allow to dry thoroughly before
inserting back on the Roami PMA handles.
7. MAINTENANCE
8. WARRANTY/REPLACEMENTS
Mobilate warrants that its products are free from defects in material or
workmanship. Under normal use and following all guidelines defined in this
manual, the Roami progressive mobility aid is warranted, from the time the
product is received, for a period of 1 year for the frame and 6 months for all
accessories and hardware.
Warranty is limited to original purchaser only. Alterations, abuse or failure to
provide suggested maintenance voids warranty.
All manuals and user guides at all-guides.com

©Copyright 2020 Mobilate LLC All rights reserved
P/N: 400.160 Rev 3
PG 36 PG 37
©Copyright 2020 Mobilate LLC All rights reserved
P/N: 400.160 Rev 3
For product questions, warranty repairs or replacement, contact:
Email: technicalsupport@mobilateus.com
Telephone: +1.423.651.0137
Additional resources (including instructional video)
Website: roamiwalkers.com
Youtube channel: UCc3gexkF69tGeqR1yulaEcw
10. SUPPORT
Front Leg with Retractable Wheels:
100.200 Roami 2 wheel assembly - Rose Gold
100.202 Roami 2 wheel assembly - Charcoal Gray
100.201 Roami 2 wheel assembly - Red
100.203 Roami 2 wheel assembly - Urban Blue
Back Leg Grip Feet:
100.300 Roami back grip foot assembly 2x - Rose Gold
100.301 Roami back grip foot assembly 2x - Charcoal Gray
100.302 Roami back grip foot assembly 2x - Red
100.303 Roami back grip foot assembly 2x - Urban Blue
Handle Grips:
Removable for cleaning and/or replacement.
100.400 Roami handle grips 2x - Charcoal Gray
100.401 Roami handle grips 2x - Urban Blue
11. REPLACEMENT PARTS9. TECHNICAL SPECIFICATIONS
Weight
Capacity
User Height Range Floor to Handle
Height
Dimensions Product
Weight
Shipping
Size
Shipping
Weight
Min Max Min Max Deployed Folded
300 lb 4’11” 6’4” 34” 39” 24 x 20 x 34” 24 x 11 x 36” 11.9 lb 23 x 10 x 31” 16.5 lb
Weight
Capacity
User Height Range Floor to Handle
Height
Dimensions Product
Weight
Shipping
Size
Shipping
Weight
Min Max Min Max Deployed Folded
136 kg 149.8 cm 193 cm 86.3 cm 99 cm 60 x 51 x
86 cm
60 x 29 x
92 cm
5.4 kg 59 x 26 x
78 cm
7.5 k g
Imperial units
Metric units
All manuals and user guides at all-guides.com

Manufactured by:
Mobilate
2733 Kanasita Drive #121
Hixson, TN 37343 USA
EU Authorized Representative:
Emergo Europe
Prinsessegracht 20, 2514
AP Den Haag, Netherlands
100.100
Roami - Rose Gold
100.101
Roami - Rose Gold
2 Wheel
100.102
Roami - Urban Blue
100.103
Roami - Urban Blue
2 wheel
100.104
Warrior - Camo
100.105
Warrior - Camo
2 wheel
100.106
Roami - Charcoal
100.107
Roami - Charcoal
2 wheel
100.108
Roami - Red
100.109
Roami - Red
2 wheel
All manuals and user guides at all-guides.com
This manual suits for next models
19
Table of contents
Other Mobilate Mobility Aid manuals
Popular Mobility Aid manuals by other brands

Invacare
Invacare RHL450-1 Assembly, installation and operating instructions

CHALLENGER SPORT
CHALLENGER SPORT J90FL user manual

Invacare
Invacare ESS-PTO parts catalog

aidapt
aidapt VY429 Fixing and maintenance instructions

Decon wheel
Decon wheel Helium Assembly instructions

Handicare
Handicare SystemRoMedic DisposableBelt manual